1
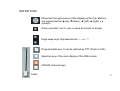
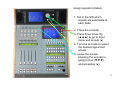
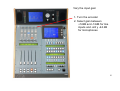
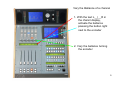
USER GUIDE TO THE ARENA
OPERATION
The mean of this guide is to help as a a
quick reference guide to the operation of
the most common functions of the ARENA
console. It is not a substitute of the
operation user manual. Software
configurations previous to the operation
are not included.
1
DEFINITIONS
Movement through menus of the displays at the top. Buttons
are represented as ▲(up),▼(down), ◄ (left), ►(right) y ●
(accept)
Rotary encoder: turn to vary a value and press to accept
Page swap keys. Represented as △ and ▽
Programmable key. It can be defined as PTT (Push to Talk)
Selection key of the main display of the DM module
ON/OFF channel keys
Fader
2
Assign signals to faders
1. Set in the SW which
signals are selectable at
each fader
2. Press the encoder
3. Press three times Up
(▲▲▲) to go to Input
menu and accept (●)
4. Turn the encoder to select
the desired signal and
accept
5. Leave the screen
pressing the encoder o
going to Exit (▼▼▼)
and accepting (●)
3
Vary the input gain
1. Turn the encoder
2. Select gain between
+12dB and -12dB for line
inputs and +24 y -24 dB
for microphones
4
Vary the Ballance of a channel
1. With the text L__|__R in
the channl display,
activate the ballance
pressing the botton right
next to the encoder
2. Vary the ballance turning
the encoder
5
Vary Mode and Phase
1. Press the Input Gain
encoder
2. Press twice Up (▲▲) to go
to Mode menu and accept (●)
3. Select the desired Mode:
Stereo, Mono L, Mono R, Mono
L+R (◄►) and accept (●)
4. Do the same way to select
the Phase: L+R+, L+R-, L-R+,
L-R-.
6
CUE Monitoring (inputs as PFL,
outputs as AFL)
1. Press the CUE button of
the channel/s
2. Select the listening level
with the CUE pot
3. Watch level and phase of
the CUE bus
4. Deactivate the sends to
PFL by pressing the PFL
buttons of the channels
sended to CUE or
pressing the CUE
RESET to deactivate all
the CUE sends at the
same time.
7
Control Room Monitors and
headphones
1. Select the default signals to
monitor in the SW. Choose if
they are exclusive or non
exclusive
2. Select the listening level
with the MONITOR or
HEADPHONES
encoders
3. Activate the signals
4. If I want to listen other
signal/s, press the
Monitor or Headphones
encoder, turn it until you
find the desired signal
and press the encoder to
select it. Go back to step
2.
8
Applying a Dynamic effect
1. Press the DYN button
2. Move over the effect to
apply (▲▼):
Compressor, Noise gate,
Delay or Rever
3. Select ON/OFF (◄►)
and accept (●)
9
Applying an EQ effect
1. Press the EQ button
2. Move over the effect to
apply (▲▼): Equalizer or
Filter
3. Select ON/OFF (◄►)
and accept (●)
10
Selecting another Preset for an
effect
1. Press the DYN ó EQ buttons
2. Move over the effect to
apply (▲▼)
3. Move over the preset
(►►►) and accept (●)
4. Select PRESET LIST
(►►►) and accept (●)
5. Select the desired preset
(▲▼) and load it (LOAD
●)
11
Varying the parameters of an effect
1. Press the DYN or EQ button
2. Move over the effect to apply
(▲▼) and accept (●)
3. Select the preset (◄►)
and accept (●)
4. Select CHANGE PARMs
(►►) and accept (●)
5. Select the parameter to
vary (▲▼) and modify it
with the encoder
12
Viewing and editing the routing I
Press the Up or Down buttons
(▲ ó ▼) to see the complete
routing of the 10 channels of
a page. It can be necessary
to do a scroll pressing Down
Menu (●)
A send is activated when the
symbol ▀ is shown and
deactivated when – is
shown.
2. Pressing the encoder and
turning we access to the
sends of the channels and
we are able to activate or
deactivate them with the
contiguous button. With the
light on the send is activated
and viceversa.
13
Viewing and editing the routing II
1. Press the ROUTING
button to see the
complete routing of the
channel. It can be
necessary to do a scroll
pressing Down Menu (●)
2. Activate and deactivate
the sends moving with
the scroll (▼▲) and
pressing the button (●).
A send is activated when
the symbol ▀ is shown
and deactivated when –
is shown.
14
Viewing and editing the routing III
1. It’s possible to modify the
routing parameters per
channel from its Routing
button: Pre/Post Fader,
Str/MonoL/MonoR/Mono
L+R
Active sends
Non-active sends
15
Page change
1. Press △ ó ▽.
Take into account that if
the Memory function is
activated, the first page
will appear as “A”
Activating channels
1. Activate ■ or deactivate ■
Take into account that
working in Bus Send Mode,
the ON button will work as
ON/OFF and the OFF button
will work as CUE
16
Control of external equipment
(AEQ codec and hybrids)
1. Previously we have defined
two/three keys per equipment
2. When a call is received the
RING/WAIT button starts
flashing. To get the call and
send the codec to WAIT
mode, pres the button. To put
the codec ON AIR, press the
other key: ON AIR
3. With a Cleanfeed function or
acting over the routing we can
decide the signals sent as a
feedback to the codec (Any
output can be MixMinus or Nx)
SEE CLEANFEEDS PAGE
17
Studio selection
1. Previously we’ll have defined
the studios and their
assignment of signals:
Remote PFL, Cough cut,
Monitors, Green and red light
relays
2. Select the studio (Máx. 3 with
red and green lights; Máx. 7
with red light only)
3. Set the signals sended and the
level
18
Execute a salvo or a GPO
1. Previosuly we’ll have defined,
in the SW, the salvos/gpo’s
and the keys assigned to
them.
2. Press the key to activate the
salvo or gpo. When you press the
key again, the inverse action is
executed
P.S.: it is possible to define the
behaviour of the keys: as a PTT,
where the action is active while
the key is press and the inverse
function is executed when you
release the key
19
Cleanfeeds
1. Previously, we’ll have defined,
in the sw, the keys assigned
to Cleanfeeds outputs
2. Keep the Cleanfeed key
pressed
3. The signals sent to the
cleanfeed are shown by its
routing button blinking. If it is
blinking the signal is being
sended and if not it is not
being sended an you can
send it pressing the routing
button
4. Once the desired channels are
sended to the cleanfeed,
release the key
20
Info & setup display operation
1. Press SELECT
2. In the DM display, all the
information of the channel is
shown:
- Processing
- Tone and noise generation
- I/O setup
3. To move through the
menus, we use the 3
encoders and the 5 keys
next to the display
21
Test signals generation
1. Press SELECT
2. Select TEST SIGNAL
GENERATION, using the
third encoder and
pressing it to select
3. Select Tone, Pink Noise
or White Noise
4. Select the level (in every
case) and frequency (for
the tone)
22
I/O Setup
1. Press SELECT
2. Select INPUT/OUTPUT
SETUP, using the third
encoder and pressing it
to select
3. Vary the Phase and
Mode. In case of a
microphone, adjust the
sensitivity and activate or
not the 48 v Phantom
power
23
Processing I
1. Press SELECT
2. Select PROCESSING,
using the third encoder
and pressing it to select
3. Select the desired effect:
Equalizer, Filter, Delay,
Compressor, Reverb,
Noise gate
24
Processing II
1. Vary the parameters with
the encoders and keys
2. Save or load the
presets.
3. Save or load the group
of effects stored for a
channel
25
Talkback
1. Select the output level of
the talkback mic
Select where to send the orders:
Studio monitors ■
Primary headphones group ■
Secondary headphones group ■
3. Or select to send orders
to all at the same time ■
26
User change
1. Select CHANGE USER
2. Move over the user with
the third encoder and
select it pressing the
encoder
3. Load the selection
27
Activating the clock manually
1. Select TIMER
FUNCTIONS
2. Start in manual mode
3. Reset the counter
28
Activating the timer manually
1. Select TIMER FUNCTIONS. If
it is not selected, press
TIMER
2. Select the initial
time
3. Start / Stop
4. Elapse
29
Save/Load a memory
1. Select WORKING
CONFIG
2. Select the memory with
the third encoder and
select it (●)
3. Save/Load/Delete the
selection
30
Save/Load a configuration
1. Select WORKING
CONFIG
2. Select WORKING
CONFIG
3. Select the
configuration
4. Save/Load/Delete the
selection
31
Load the Programmable keys config
1. Press MACRO CONFIG
2. Select the
configuration to
be applied
3. Load it
32
System Setup
1. Select SYSTEM SETUP
2. Write the password, if it
was defined in the sw,
with the programmable
keys 1 to 8
3. Choose an option
33
Change the frame and console IP’s
1. In the System Setup, select
Mixer address or Frame
address
2. Turn the encoder to vary
the value and press the
encoder to vary the field
34
See the DSP conssumption
1. In the main display, we
see the dsp
conssumption of the dsp
boards assigned to effect
2. In the System setup,
selecting Dsp % Cpu
used, the amount of dsp
process per dsp and its
function is shown
35
Disconnect all audio process (DSP)
1. From the System setup
select Disconnect all
audio Process
Check the Firmware versions
1. From the System setup
select Firmware version
information
36
Check signals –DSP assignment
1. From the System setup
select Dsp Output List
2. Check the signals
controlled by each DSP
board. To change the
shown DSP, press the
encoder
37
Changing date and time
1. From the System setup, press
Date or Time. Turn the
encoder to vary the value and
press it to change the field
38