1
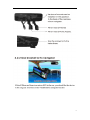
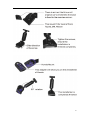
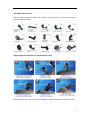
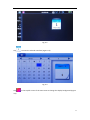
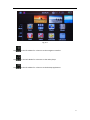
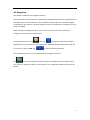
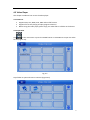
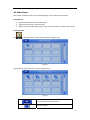
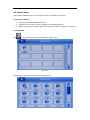
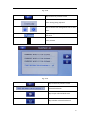
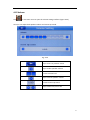
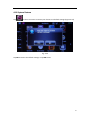
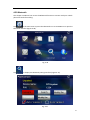
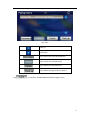
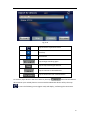
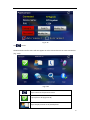
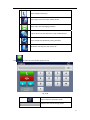
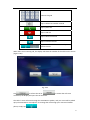
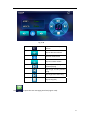
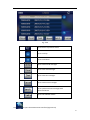
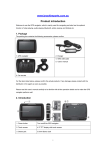
 Smart Mirror 2™ — User’s Manual — Register @ www.escortinc.com 1
TABLE OF CONTENTS 1. Chapter One: Product introduction 1.1 Introduction 1.2 What’s Included 2. Chapter Two: Features & Specifications 2.1 Main Features 2.2 Specifications 3. Chapter Three: Installation 3.1 Device Controls & Features 3.2.1 How to Install 3.2.2 Use Bracket to Fix Navigator 3.3 SD/MMC Card 4. Chapter Four: Features & Functions 4.1 Main Menu 4.2 Navigation 4.3 Video Player 4.3.1 Features 4.3.2 Operation 4.4 Audio Player 4.4.1 Features 4.4.2 Operation 4.5 Photo viewer 4.5.1 Features 4.5.2 Operation 4.6 E‐book Reader 4.6.1 Features 4.6.2 Operation 4.7 Games 4.8 Unit Conversion 4.9 Calculator 4.10 Volume 4.11 Backlight 4.12 Date & Time 4.13 Screen Calibration 4.14 FM Transmitter 4.15 System Information 4.16 Language 4.17 Navigation Path 4.18 System Restore 4.19 GPS Information 4.20 Bluetooth 4 4 4 5 5 6 7 7 8 9 12 13 13 16 17 17 17 20 20 20 23 23 23 26 26 26 30 31 32 33 34 35 36 38 39 40 41 42 43 44
2
Welcome to SmartMirror GPS. Please read this user’s manual carefully to become familiar with all the operation details and to ensure you use your device as it was designed. Before getting started, please note the following: • Specifications are subject to change without notice. •
Please make a copy of the important data. •
Please read the operating instruction carefully and use only accessories provided by the original manufacturer to avoid any unexpected damage. No warranty will be executed if you are not following the instructions or are connecting with incompatible accessories. We assume no responsibility for any loss or damage caused hereby. •
The electronic navigation data may be not in conformity with the actual road markings due to traffic construction development. Please be sure to comply with actual road conditions and follow the traffic rules. •
Operating and viewing the GPS while driving may cause a severe traffic accident. ESCORT is not responsible for any loss caused by an unexpected accident. •
Users can update and upgrade software by visiting www.escortinc.com. •
The screens shown in this guide may be different than the ones you see on your device, depending on the firmware version.
3
CHAPTER 1: PRODUCT INTRODUCTION 1.1 Introduction Congratulations on your SmartMirror GPS purchase. Designed for navigation, SmartMirror also offers functions like video and audio play, Bluetooth hands free, FM transmission, photo viewing, and E‐Book reading. • High performance, low‐power consumption MediaTek MT3351 CPU • Comfortable user interface is simple and easy to operate • Power management offers operating consistency you can rely on • Excellent receiving signal offers an exceptional navigation experience • Compatible with Bluetooth mobile for hands‐free calling • Audio and Video functions can help relieve fatigue • You can use it when driving, walking, riding or waiting for a meeting. The perfect “GPS + entertainment” device, SmartMirror can make your life and work more enjoyable. 1.2 What’s Included •
•
•
•
•
Rearview mirror GPS navigator Wire rode User’s manual Car bracket (option) Amplifier box (option) Please confirm the above items are included in your SmartMirror box. If anything is missing or any items are damaged, please contact ESCORT toll‐free at 800.543.1608.
4
CHAPTER 2: FEATURES & SPECIFICATIONS 2.1 Main Features •
•
•
•
•
•
•
•
•
•
Operating system: Microsoft Windows CE 5.0 4.3” TFT LCD display with resolution of 480x272 pixels Built‐in speaker, volume adjustable Button and touch‐screen operation Built‐in sensitive GPS antenna Navigation software runs directly from SD card Video formats supported: ASF, AVI, WMV, 3GP, MP4, FLV Audio formats supported: MP3, WAV Photo formats supported: BMP, JPG, PNG E‐book formats supported: TXT
5
2.2 Specifications CPU Flash Memory Operating System Navigation Software Video Player Audio Player Arm 11 484Mhz 4GB 128 MB 4.3” TFT LCD display Resolution: 480RGB(H)x272(V) High‐accuracy, endurable touch‐screen SD/MMC slot Supports SD cards up to 8GB A: Built‐in high fidelity speaker B: Built‐out high fidelity stereo amplifier box (option) Cold start: <42s Hot start: <3s (in open area) Warm start: <36s Microsoft Windows CE 5.0 SD card ASF, AVI, WMV, 3GP, MP4, FLV MP3 and WMA Photo Viewer E‐album; JPG, BMP, PNG E‐Book Reader TXT Flash, Games, Favorites, Calculator, Unit Conversion, FM Transmitter, Language, Volume, Backlight, Settings Restore, Calibration, Navi Path, GPS Info, Date/Time, System Info, USB Operating Temperature: 0°C to 60°C Storage Temperature: ‐20°C to 60°C LCD display Touch screen SD Audio GPS System Settings Temperature Working Humidity Range Storage Humidity range 45% to 80% RH 30% to 90% RH Atmospheric pressure 86KPa to 106KPa 6
CHAPTER 3: INSTALLATION 3.1 Device Controls & Features 7
Note: There is no need to connect the brake cable to enable switching the mirror into camera mode. 8
9
10
After‐Market Mount Install We have various mounts to choose from. If there is none to match your car, please contact us toll‐free at 800.543.1608. Original Equipment Manufacturer Market Mount Install The information is for reference only. This product is updated regularly without prior notice. 11
3.3 SD/MMC card The enclosed SD/MMC card contains the navigation software, map data and media file. Please insert the card correctly. If you insert the card improperly, you can damage the card. Do not take out the SD/MMC card when the system is navigating or playing. To remove, press the card inward slightly. The card will pop out enough for you to remove it from the slot. Please keep card away from children, so it is not swallowed. NOTE: 1. Don’t stress or bend the SD/MMC card. 2. Avoid high temperature or high humidity when using and storing the card. 3. Don’t expose card to direct sunlight. 4. Keep card far away from liquid and corrosive material. 12
CHAPTER 4: FEATURES & FUNCTIONS 4.1 Main Menu Tap to scroll down Tap to scroll up Fig. 4‐1 Tap in the top left corner of the main menu to display the date (Figure 4‐2). 13
Fig. 4‐2 Tap to enter the calendar interface (Figure 4‐3). Fig. 4‐3 Tap in the top left corner of the main menu to change the display background (Figure 4‐4). 14
Fig. 4‐4 Tap in the left sidebar for a shortcut to the navigation interface. Tap in the left sidebar for a shortcut to the audio player. Tap in the left sidebar for a shortcut to the desktop application. 15
4.2 Navigation This chapter introduces the navigation function. The system offers several options to customize the navigation experience to your preferences, including map with vivid animation, voice indication and text indication. The GPS navigator can determine your position, calculate the best route to your destination, and help you arrive safely and rapidly. Before using the navigation function, ensure you have inserted the SD card with the navigation software and set the Navi Path. To set the Navi Path, first tap , then tap . Navigate through the file folders, tapping each, until you find your GPS software file: SDMMC\COPILOT\COPILOT.EXE. Tap the file to select it, then tap OK. Tap to exit the Navi Path interface. Once the Navi Path is set, you can begin using the navigation software. Tap to open the navigation interface. Specific navigation functions depend upon your choice of navigation software. Please refer to your navigation software instructions for details. 16
4.3 Video Player This chapter introduces how to use the video player. 4.3.1 Features • Supports ASF, AVI, WMV, 3GP, MP4 and FLV file formats. • Supports full‐screen playing and play progress selection. • Before using the video player, please copy your video files to a folder on the device. 4.3.2 Operation Tap in the main menu or press the VIDEO button on SmartMirror to open the video file list (Figure 4‐5). Fig. 4‐5 Tap a folder to open and view its contents (Figure 4‐6). 17
Fig. 4‐6 Tap to return to previous screen Tap to scroll up Tap to scroll down Tap to open folder and view contents Tap to play video Tap a video file to open the video player interface. Fig. 4‐7 Tap to return to previous screen Tap to pause play; tap again to resume playing Tap to go to the next video Tap to display the video file list 18
Tap the circle on the volume bar and drag left or right to adjust volume Tap the circle on the play progress bar and drag left or right to go backward or forward within the video Tap the circle on the brightness bar and drag left or right to adjust brightness Tap the video screen to switch to full‐screen play; double‐tap in full‐screen mode to return to normal play Name of the video currently playing Time consumed / Total length of the video 19
4.4 Audio Player This chapter introduces how to use the audio player as your personal mp3 player. 4.4.1 Features • Supports both MP3 and WAV file formats. • Supports various play selection modes. • Before using the audio player, please copy your audio files to a folder on the device. 4.4.2 Operation Tap in the main menu to enter the music file list (Figure 4‐8). Fig. 4‐8 Tap a folder to open and view its contents (Figure 4‐9). Fig. 4‐9 Tap to return to previous screen Tap to scroll up 20
Tap to scroll down Tap to play song Tap a song name to open the audio player interface (Figure 4‐10). Fig. 4‐10 Tap to return to previous screen Title of the song or name of the audio file currently playing Tap to display the audio file list/playlist Tap to select the play mode: shuffle, repeat, loop Tap to return to the main menu Tap the circle on the play progress bar and drag left or right to move backward or forward within the song Tap to play the previous song Tap to pause play; tap again to resume playing 21
Tap to play the next song Tap to stop playing Tap the circle on the volume bar and drag left or right to adjust volume Time consumed/ Total length of the song 22
4.5 Photo Viewer This chapter introduces how to use the photo viewer to browse your pictures. 4.5.1 Function features • Supports JPG, BMP and PNG file formats. • Supports picture rotate, picture enlarge/shrink and slideshow play. • Before using the photo viewer, please copy your photo files to a folder on the device 4.5.2 Operation Tap in the main menu to open the photo list (Figure 4‐11). Fig. 4‐11 Tap a folder to open and view its contents (Figure 4‐12). 23
Fig. 4‐12 Tap to return to previous screen Tap to scroll up Tap to scroll down Tap to view photo Tap a photo file to open the photo viewer interface (Figure 4‐13). Fig. 4‐13 Tap to return to previous screen File name and format for the photo currently displayed Tap to display the photo list Tap to zoom in Tap to zoom out Tap to rotate the photo 90° 24
Tap to show the previous photo Tap to show the next photo Tap to view your photo in full‐screen mode; tap screen again to return to photo view mode Tap view photos as automatic slideshow in full‐screen mode; tap again to return to photo view mode 25
4.6 E‐book Reader This chapter introduces how to use the E‐book reader. 4.6.1 Features • Supports TXT file format. • Supports page turning and page browsing. • Before using the E‐book reader, copy your TXT files to a folder on the device. 4.6.2 Operation Tap in the main menu to open the E‐book list (Figure 4‐14). Fig. 4‐14 Tap a folder to open and view its contents (Figure 4‐15). 26
Fig. 4‐15 Tap to return to previous screen Tap to scroll up Tap to scroll down Tap to open book Tap a book file to open the E‐Book reader interface (Figure 4‐16). Fig. 4‐16 Tap to return to previous screen Tap to display the E‐book list Tap to adjust font (Figure 4‐17) Tap to adjust text color (Figure 4‐18) Tap to create a bookmark for selected text Tap to display bookmark list (Figure 4‐19) Tap to go to previous page 27
Tap to go to next page Fig. 4‐17 Tap to return to previous screen Tap to select/deselect bold text Tap to decrease font size Font size indicator Tap to increase font size 28
Fig. 4‐18 Tap to return to previous screen Color setting being adjusted Tap to choose from background color or text color Tap and drag circles on R, G, and B bars to set text color Color preview Fig. 4‐19 Tap to return to previous screen Selected bookmark Tap to open selected bookmark Tap to delete selected bookmark 29
4.7 Games Tap in the main menu to open the game interface and choose from a selection of games (Figure 4‐20). Fig. 4‐20 Tap to return to the previous screen. 30
4.8 Unit Conversion Tap in the main menu to open the unit conversion interface (Figure 4‐21). Fig. 4‐21 Tap to return to the previous screen. 31
4.9 Calculator Tap in the main menu to open the calculator interface (Figure 4‐22). Fig. 4‐22 Tap to return to the previous screen. 32
4.10 Volume Tap in the main menu to open the volume setting interface (Figure 4‐24). Here you can adjust both speaker volume and screen tap sound. Fig. 4‐24 Tap to return to previous screen Tap to reduce speaker volume Current volume level Tap to increase speaker volume Current screen tap sound Tap to select loud, soft or off 33
4.11 Backlight Tap in the main menu to open the backlight setting interface (Figure 4‐25). Fig. 4‐25 Tap to return to previous screen Tap to reduce brightness Current brightness level Tap to increase brightness Current backlight display time interval setting Tap to select how long you want the backlight to remain on following the last screen touch: always on, 3 minutes, 2 minutes, 1 minute, 30 seconds, or 10 seconds. 34
4.12 Date & Time Tap in the main menu to open the date/time setting interface (Figure 4‐26). The date/time setting interface allows you to set the system date, time and time zone. 4‐26 Tap and drag year, month and day columns to select date. Tap and drag hour and minute columns to select time. Tap or to select appropriate time zone. Tap to return to previous screen. 35
4.13 Screen Calibration Tap in the main menu to calibrate your device (Figure 4‐28). Fig. 4‐28 To calibrate: 1. Tap YES. A target will appear on the screen (Figure 4‐29). Fig. 4‐29 2. Carefully tap the center of the target. 3. Repeat as the target moves around the screen. 4. When calibration is complete, the target will disappear. The new calibration settings have been measured. 36
5. Tap the screen to save the new settings. OR, Wait 30 seconds to cancel and keep the current settings. 37
4.14 FM Transmitter Tap in the main menu to open the FM setting interface (Figure 4‐30). Fig. 4‐30 Tap to return to previous screen Tap to turn transmitter ON/OFF Current frequency Tap to select frequency When set to ON, the FM transmitter will send out a signal to your vehicle’s radio. Set your radio and your device to the same frequency (e.g., 76.0 MHz), and all the sounds of your device will come through your vehicle’s speakers. (Note: When FM transmitter is ON, the device speaker is disabled.) 38
4.15 System Information Tap in the main menu to open the system information interface (Figure 4‐31). Here, you can view your firmware version, APP version and system ID. Fig. 4‐31 Tap to return to the previous screen. 39
4.16 Language Tap in the main menu to open the language setting interface (Figure 4‐32). Fig. 4‐32 Tap a language to select it. Tap to return to the previous screen. 40
4.17 Navigation Path Tap in the main menu to open the navigation path setting interface (Figure 4‐33). Fig. 4‐33 Tap to return to previous screen. Tap to select/deselect auto run for GPS (i.e., whether you’d like the GPS software to run automatically upon device startup) Tap to set up the navigation path for your GPS software (i.e., direct the device’s navigation features to the software you have placed on the device) 41
4.18 System Restore Tap in the main menu to restore your device to its default settings (Figure 4‐34). Fig. 4‐34 Tap YES to restore the default settings or tap NO to exit. 42
4.19 GPS Information Tap in the main menu to enter the GPS information interface (Figure 4‐35). Fig. 4‐35 Tap to return to the previous screen. 43
4.20 Bluetooth This chapter introduces how to use the Bluetooth function to connect with your mobile phone for hands‐free calling. Tap in the main menu or press the Bluetooth icon on SmartMirror to open the Bluetooth interface (Figure 4‐36). Fig. 4‐36 Tap to display the Bluetooth pairing interface (Figure 4‐37). Fig. 4‐37 44
Tap to return to the previous screen Not currently connected to your mobile device The default name is GPSSystem The default password is 1234 Tap to display the pairing/connection history (Figure 4‐40) Tap to search for Bluetooth devices (Figure 4‐41) Tap to modify the device PIN (Figure 4‐38) Tap to connect/disconnect to the selected device Tap to modify the device name, as shown in Figure 4‐39 Tap to select/deselect auto‐connect, which allows an automatic connection with your mobile device when you start your vehicle Tap to select/deselect auto‐answer for incoming calls Tap modify the device PIN (Figure 4‐38). Fig. 4‐38 45
Enter your desired, tapping to switch between numbers and letters, then tap to save. Tap to modify the device name (Figure 4‐39). Fig. 4‐38 Enter the name, tapping to switch between letters and numbers, then tap to save. Tap to display the pairing/connection history (Figure 4‐40). 46
Fig. 4‐40 Scroll up Scroll down Tap to disconnect from selected device Tap to connect to selected device Tap to delete the selected device Tap to delete pairing/connection history Tap to search for available Bluetooth devices (Figure 4‐41). 47
Fig. 4‐41 Tap to return to previous screen Scroll up Scroll down Tap to begin searching again Tap to stop searching for devices Tap to connect to selected device Tap to disconnect from selected device To connect, tap a device in the list to select it, then tap . Enter the SmartMirror device PIN on your mobile phone to connect with the Bluetooth device safely. Then tap to exit. The following screen (Figure 4‐42) will display, confirming the connection. 48
Fig. 4‐42 Tap to exit. The Bluetooth interface icons will now appear in color to show there is an active connection (Fig. 4‐43). Fig. 4‐43 Tap to return to the previous screen Tap to place a call (Figure 4‐44) Tap to display contact list of paired phone 49
Tap to display call history Tap to play music from your mobile device Tap to open text messaging interface Tap to connect to the Internet via your mobile device Tap to display the Bluetooth pairing interface Bluetooth currently on; tap to turn off Tap to open the call interface (Figure 4‐44). Fig. 4‐44 Tap to return to previous screen Displays the number being dialed 50
Numeric keypad Tap to delete last number entered Tap to place call Tap to end call Tap to decrease volume Tap to increase volume Tap to switch call from GPS to cell phone and vice versa When there is an incoming call, the display will show the number of the caller on the screen (Figure 4‐45). Fig. 4‐45 Tap to refuse the call or to answer the call. Once connected, the display will open the call interface. The caller’s voice will come through the SmartMirror speaker, and your voice will be picked up by the SmartMirror microphone. To manage the call through your connected mobile phone, simply tap . 51
Tap to display the contact list of the connected device (Figure 4‐46). Fig. 4‐46 Tap to return to previous screen Tap to scroll up Tap to scroll down Tap to synchronize contact list with connected device Tap to dial selected contact Tap to display the call history (Figure 4‐47). 52
Fig. 4‐47 Tap to return to previous screen Tap to scroll up Tap to scroll down Tap Tap to view received calls Tap to view outgoing calls Tap to view missed calls Tap to call selected contact Tap to synchronize call history with connected device to open the A2DP music interface (Figure 4‐48). 53
Fig. 4‐48 Tap to return to previous screen Current volume level Tap to decrease volume Tap to increase volume Tap to pause; tap again to resume playing Tap to go to the previous song Tap to go to the next song Tap to stop play Tap to open the text messaging interface (Figure 4‐49). 54
Fig. 4‐49 Tap to return to previous screen Tap to scroll up Tap to scroll down Tap to view unread messages Tap to view read messages Tap to view sent messages Tap to view unsent messages Tap to synchronize text messages with connected device Tap to call selected contact Tap to open the DUN Internet interface (Figure 4‐50). 55
Fig. 4‐50 Tap to connect to the Internet. Once connected, SmartMirror will display the following screen (Figure 4‐51). (Note: Some mobile phones cannot support the DUN Internet function.) Fig. 4‐51 Tap to return to previous screen. Tap to open the browser. SmartMirror will automatically open an Internet Explorer browser (Figure 4‐52). 56
Fig. 4‐52 Tap to go back Tap to go forward Tap to refresh current page Tap to stop opening URL Tap to open the browser keyboard (Figure 4‐53) Tap to display address bar Tap to exit browser interface Fig. 4‐53 57
ESCORT Inc. 5440 West Chester Road West Chester, OH 45069 Sales/Service 800.543.1608 www.EscortRadar.com ©2012 ESCORT Inc. ESCORT® and SmartMirror™ are trademarks of ESCORT Inc. Features, specifications, and prices subject to change without notice. 58