1
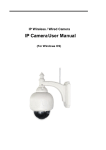
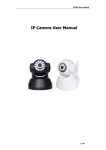
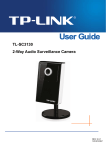
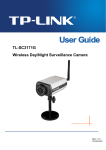
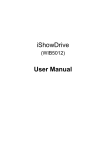
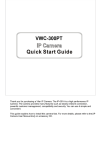
IP CAMERA
Quick Installation Manual
IP Cam Quick Installation Manual
1.Hardware Instruction
1>.Open the color box, and install the antenna.
2>.Plug the network cable into the camera and then into your Cable/DSL
router.
3>.Plug the power adapter into the camera and then into the power outlet.
4>. The ip cam will start to work after the camera is powered. Generally
speaking, The green indicator light will be always light , Yellow indicator
light will be flickering.
5>. You can use the following application after you install it correctly .
ADSL MODEM
IP Cam1
ADSL MODEM
Router
Wireless
Router
Remote Computer 2
WAN
IP Cam2
Remote Computer 2
LAN
Smartphone
Local Computer1
IP Cam 3
Network Switch
IP Camera
IP Cam 4
Local Computer 2
Local Computer 3
Used a diagram
2.Software installation
1>.The software installation is very easy, User can use it after you run the
ip cam program.
1
IP Cam Quick Installation Manual
Usually, the CD will be automatic run after user put it on the drive of your
computer. If not , Please open CD and double click“
”.
2>.Then you double click“search.exe” and install it step by step.After
that, you will find IP Camera Tool
on your desktop.
User Manual
Open Manual
Minimize
Exit
Search Tool
Tool Box
Quick install
guide
Open CD
3.Search device and access the ip cam .
1>.User can use the program“search tool” to find the ip camera on LAN.
And it will show ip address, Port No., and name as shown as below.
Attention: (“IP Camera Tool.exe” is a program which you can use on LAN.
You can ' t search the ip address and Port No. if you use it on WAN)
2>. Double-click the ip address shown on the search tool or you can type
the ip address on your browser on you device. (Such as http://192.168.1.1
11:8999) . After that, you can see the login in the ip cam. Please notice that
the default user name is admin,no password.
2
IP Cam Quick Installation Manual
Default User:admin
Default Password:
3>.Then you see the picture as shown below after you type the user name
and password.
Language option
Log on Mode option
4>.Please choose the log on Mode option according to your browser , For
example , you need to choose the ActiveX mode if you are using IE browser .
Otherwise , you can ' t see the video .Besides,there are 9 language for your
option.Besides,you can set the username and password as Administrator,
Operator or Visitor.
4.How to use WiFi
1>.Please make sure that your router have to support wifi function.
① Enter the wireless router setup page (you may see the wireless router
3
IP Cam Quick Installation Manual
user manual ). To Find out the SSID, Channel ( less than 10), Security Way
( NONE , WEP ), Authentication Type , encryption .
② Enter Wireless LAN Settings , and click“search” , Please search again if
there are no device shown on wireless network list .
Search again if there are no device
Double click
Type the password
if your router have
encryption
3>You can unplug the network cable after you click the “submit” , Please
notice the the system will show that “The device is rebooting Please do not
shutdown the power. Please waiting…30”
4 > Then you can research the ip cam via the search tool .
5.Access the IP Camera from the Internet
1>. User can access the IP Camera from the Internet, Enter WAN IP address
+ port number in the IE to access IP Camera. For example, Http:// 116.25.51.
115:8999
2>.You need to set DDNS if you use ADSL to surf the internet.
4
IP Cam Quick Installation Manual
DDNSFGBCHI
IPCam456DDNS789:;<=>?IP
@A/012BC)*(IPcam>?IP
IPCam
(
IP
"
2
+
,
!
-
"
.
#
/
$
0
,
1
&
$
'
3
!
#
ca
E
m
D
IP
DDNS789
C
)
am
*
IP
Internet
K,L+,
We already DDNS server. But you still can register a new DDNS at some
DDNS website.
Our DDNS Server
DDNS Address
IP Camera
User: admin
Password:
DDNS Hostname:
ipb0001.topipcam.org
User: ipb0001 Password: 971954
You just need to type the DDNS server on your browser . ( such as http://ipb
0001 . topipcam . org ) Then you will see log on interface . You can manage the
camera after you type the user name and password.
6.IP CAMERA AND ROUTER Setting
1>. The setting of ip camera
User can obain ip address automatic, the fault Port No. is 80, User name :
admin, no password.
①Router ' s DHCP server.You just need to choose the Port No. from 1 to 65535
5
IP Cam Quick Installation Manual
when the UPNP is on . Please notice that the Port No. can ' t be occupied by
other device.
a. User can change the Port No. via the search tool
choose one ip cam and right-click to
choose the network configuration
Port No.
b. User can change the Port No. when you access the ip camera and find the
" For Administrator " then click the " Basic Network Settings ”
②.User need to set the ip address and Port No. in other condition.Besides,
user need to use different ip address and Port No. if there are more than one
ip cam.
a . User can change the ip address and Port No. via search tool.
choose one ip cam and right-click to
choose the network configuration
IP Address
Port NO.
b. User can change the ip address and Port No. via the”Basic Network
Settings”
6
IP Cam Quick Installation Manual
}
IP Address
Port NO.
2>.The setting of router. (Please refer to the manual if you are using TPLINK
router)
a. User just need to make sure DHCP sever on when UPNP of your router is
already on.
b. User need to map the ip address and port by yourself via the Virtual server
of your router when there is no UPNP Setting in your router.
User have to map it one by one
C. Multi-router setting:
7
IP Cam Quick Installation Manual
To connect on double router 2
To connect on double router 1
ADSL MODEM
ADSL MODEM
Router I
Router I
192.168.1.1
192.168.1.1
Router II
Router II
192.168.1.1
192.168.1.1
①
②
③
④
⑤
⑥
④
⑤
⑥
⑦
①
②
③
① For the picture 1, the second router just be as concentrator. User just
need to use as usual.
② For the picture 2, user need to make some settings on your router, Then
you can access the ip cams ⑤⑥⑦, The routerⅡ just like a computer , so the
router is just as the computer ①②③, so user have to access the computer
and ip cams ④⑤⑥⑦ via the router Ⅱ. Because the WAN port of router
connect with ①②③, LAN port of router connect with④⑤⑥⑦ . So the
gateway of ④⑤⑥⑦ are match with LAN port of router Ⅱ.
Please refer to the setting of multi-router as shown below:
ADSL MODEM
WAN port
WAN port:Setting WAN IP Address
LAN port:192.168.1.1
255.255.255.0
Map router via Virtual server, WAN
port address;192.168.1.100 and device
port no:87、88、
A
192.168.0.1
LAN port
WAN port
WAN port :192.168.1.100
Subnet mask :255.255.255.0
Gateway :192.168.1.1
B
192.168.0.1
LAN port:192.168.0.1
Mask :255.255.255.0
DHCP Server is on
IP:192.168.1.110:86
IP:192.168.0.120:87
IP:192.168.0.110:88
Mask:255.255.255.0
Mask:255.255.255.0
Gateway:192.168.1.11
Gateway:192.168.0.1
Mask:255.255.255.0
DNS:202.96.134.133
DNS:202.96.134.133
Geteway:192.168.0.1
DNS:202.96.134.133
7. Aces sip camera via smartphone , IPAD and mobile
equipment .
1>. User just need to type ip address on the browser on your device , Then
you can access the camera .
8
IP Cam Quick Installation Manual
For example, click safari browser on your ipad.
2>.Type the ip address, for example:(http://ipa0008.topipcam.org)
3>.Choose the way to log in according to your browser.
Android system: open your browser on your device, and type the ip
address on it, such as http://ipa0008.topipcam.org, then you input the
user name and password.
Eu Environmental protection
The waste electronic products should not be disposed
of together with rubbish, Please recycle if there is
appropriate facilities, Please consult the the the
recycling proposal.
With relevant functional departments of the local
government or retailers.
9