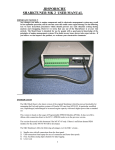
1
DataCheck
™
User Manual
v3.0
DataCheck
™
User Manual
©1996-2002 Committed Software. All Rights Reserved.
Published World-Wide by Committed Software
Committed Software
156 Lakeview Ave,
Hamden, CT 06514
DataCheck
Written by: Paul Carnine, Committed Software
Manual: Rich Gay, Paul Carnine and John Steele
DataCheck™ Software License Agreement
IMPORTANT: READ THIS BEFORE OPENING
By using the software, you accept the terms of this Software License Agreement. If you do
not agree to these terms, please return the Software disks, along with the rest of the package contents, immediately to Committed Software.
The Software, and the accompanying Documentation, are the property of Committed Software and are protected by United States and international copyright laws.
LICENSE GRANT For the purposes of this section, the following definitions apply:
Use means loading the Software into RAM, as well as installation on a hard disk or other
storage device. Product means the Software and Documentation.
This License determines your rights with respect to the Software.
You may:
u
Use one copy of the enclosed Software on a single computer, provided that the Software
is in use on only one computer at a time.
u
Make one copy of the Software for archival purposes, or copy the Software onto the hard
disk of your computer and retain the original for archival purposes.
u
Transfer the Software to another person, provided you inform Committed Software in
writing of the transfer, you retain no copies of the Software or Documentation, and the
other person agrees to this Software License Agreement.
LIMITED WARRANTY Committed Software represents and warrants that for a period of 30
days from the receipt of the Product (1) the disk on which the Software is distributed will be
free from defects in materials and workmanship; (2) the Software will perform substantially
in accordance with the Documentation.
If the Product fails to comply with the warranty set forth above, Committed Software’s entire
liability and your exclusive remedy will be replacement of the disk or, at Committed Software’s option, Committed Software’s reasonable effort to make the Product meet the
warranty set forth above. This limited warranty applies only if you return all copies of the
Product, along with a copy of your paid invoice, to an authorized Committed Software dealer
within 90 days of the date you received the Product. If Committed Software is unable to
make the Product conform to the above warranty, Committed Software, at its option, will
refund all or a fair portion of the price you paid for the Product. Any replacement Product will
be warranted for the remainder of the 90-day warranty period or for 30 days from the date
you received the replacement, whichever is longer.
COMMITTED SOFTWARE DISCLAIMS ANY AND ALL OTHER WARRANTIES,
iii
WHETHER EXPRESS OR IMPLIED, INCLUDING, WITHOUT LIMITATION, ANY IMPLIED
WARRANTIES OR MERCHANT ABILITY OR FITNESS FOR A PARTICULAR PURPOSE.
NO LIABILITY FOR CONSEQUENTIAL DAMAGES In no event shall Committed Software,
or its suppliers, be liable for any damages whatsoever, (including, without limitation, damages for loss or profits, business interruption loss of information, or other pecuniary loss)
arising out of the use of or inability to use the Product, even if Committed Software has been
advised of the possibility of such damages arising from any defect or error in this publication.
Some states or jurisdictions do not allow disclaimer of express or implied warranties in certain transactions; therefore this statement may not apply to you.
U.S. GOVERNMENT RESTRICTED RIGHTS This Product is provided with RESTRICTED
RIGHTS. Use, duplication, or disclosure by the U.S. Government is subject to restriction set
forth in subparagraphs (a)through (d) of the Commercial Computer-Restricted Rights clause
of FAR 52.227.19 when applicable, or in subparagraph (c)(1)(ii) of the Rights in Technical
Data and Computer Software clause at DFARS 252.227-7013, and in similar clauses in the
NASA FAR Supplement. The contractor/manufacturer is Committed Software, 156 Lakeview
Ave, Hamden, CT, 06514.
GENERAL This license constitutes the entire agreement between you and Committed Software concerning the Product. This License is governed in accordance with laws of the State
of Connecticut.
iv
Table of Contents
Table of Contents
DataCheck™ Software License Agreement..................... iii
Table of Contents................................................................ v
Introducing DataCheck™ ................................................... 7
Previewing the Manual.......................................................... 7
Understanding Terms Used in this Manual ........................... 8
Registering DataCheck ......................................................... 8
Meeting System Requirements ............................................. 9
Macintosh ............................................................................................................. 9
Windows ............................................................................................................... 9
Installing DataCheck ............................................................. 9
Installing the DataCheck Registration Number ................... 10
To Register DataCheck as a Developer Version ................................................ 10
Using DataCheck with 4th Dimension Files ........................ 11
To Open a 4th Dimension Data File ................................................................... 11
Author’s Notes..................................................................... 11
DataCheck Overview......................................................... 13
Understanding DataCheck Operation ................................. 13
Using DataCheck to Repair Problems ................................ 13
Getting a Quick Start ........................................................ 14
Launching DataCheck......................................................... 14
To Launch DataCheck ........................................................................................ 14
To Configure a Scan / Create a Run File............................................................ 14
Configuring DataCheck .................................................... 16
Registering DataCheck ....................................................... 16
To enter a registration number............................................................................ 16
Using the Configuration Dialog ........................................... 16
To set the structure, data file and TRIC resource. .............................................. 16
To set the Startup Options .................................................................................. 17
Setting Scan options ........................................................................................... 19
Understanding the Structure Area....................................... 27
The Special Menu ............................................................... 27
Disk Map ............................................................................................................ 27
Browser............................................................................................................... 29
Table Editor ........................................................................................................ 30
Preferences.......................................................................................................... 33
DataCheck Log File........................................................... 34
Understanding the Log File ................................................. 34
Using the Start/Pause/Resume Button ............................... 35
DataCheck Runtime .......................................................... 36
Installing the Serial Number into the Runtime Version........ 36
To Register DataCheck as a Runtime Version ................................................... 36
Using the Runtime Version ................................................. 37
Licensing the Runtime Version ........................................... 37
Advanced Topics .............................................................. 38
Multiple Indices per Field (item [48]) ................................................................ 38
Not all tables and fields scanned. Cannot process Bitmap ................................ 38
Temporary files................................................................................................... 38
v
Table of Contents
Recovery ............................................................................................................. 38
Force Drop All Indices ....................................................................................... 39
Sorting issues ...................................................................................................... 39
Configuring DataCheck Memory ....................................................................... 40
Using 4D to run DataCheck................................................................................ 40
Using a CRON utility ......................................................................................... 40
Recover by Tags ............................................................... 42
What is Recover by Tags? .................................................................................. 42
How do I use it?.................................................................................................. 42
Why is it different than 4D Tools ....................................................................... 42
Multiple Segments .............................................................................................. 43
What’s New in DataCheck™ v2........................................ 44
Recover By Tags ................................................................................................ 44
Carbonized.......................................................................................................... 44
Components Parsed ............................................................................................ 44
Two gremlin maps (one for Alpha, one for Text) .............................................. 44
Automated Launching of 4D after scan.............................................................. 44
Run Files are Cross Platform.............................................................................. 44
Example Code to bring down server and run DataCheck .................................. 44
Preferences.......................................................................................................... 45
Indices................................................................................................................. 45
Technical Support............................................................. 46
About Committed Software.............................................. 47
Glossary............................................................................. 48
Log Item Definitions.......................................................... 52
vi
Introducing DataCheck™
Introducing DataCheck™
DataCheck is the most comprehensive database diagnostic tool
available for the 4th Dimension environment. It is designed to
quickly find and report any situation out of the ordinary in your data
files. If any problems are found, DataCheck will offer a set of steps
that you may wish to take to attempt to fix the problems. In addition,
DataCheck reports a myriad of statistical information regarding your
data file, and allows you to perform some modifications to repair the
data file. More information is available in the specific chapters.
Previewing the Manual
This manual preview gives you a peak into the capabilities of
DataCheck. You’ll need to read the first few chapters thoroughly,
though, while you explore DataCheck, in order to understand all the
features that it offers.
“DataCheck Overview” provides a summary of DataCheck safety
features. You should read this short chapter prior to using
DataCheck.
“Getting a Quick Start” covers basic use of DataCheck.
“Configuring DataCheck” shows you how to customize a DataCheck
session, and save run files for future use.
“DataCheck Log File” explains the different sections of the log files
that DataCheck generates.
“DataCheck Runtime” shows you how to use the DataCheck Runtime, which is available as a separate application for you to provide
to your clients or end users.
“Advanced Topics” discusses technical details about 4th Dimension
data files and the operation of DataCheck.
“Glossary” contains a list of terms used throughout this manual.
“Log Item Definitions” is a complete list of each item reported by
DataCheck, along with detailed descriptions and actions. You should
refer to this chapter whenever a DataCheck log reports a problem.
7
Introducing DataCheck™
Understanding Terms Used in this Manual
The terminology used in this manual is intended to be consistant
with version 6 of 4th Dimension. This means that 4D “Files” are now
called “Tables”, “Layouts” are “Forms” and “Procedures” are “Methods”. Please bear with us as we all transition to the more standard
vernacular of database systems.
There is another set of words that may be new to you. Words such
as bitmap (or freemap), address tables, etc. The words chosen for
these objects are gleaned from ACI, and from what literature could
be found on the subjects. We believe that if ACI were to ever discuss these parts of the data file publicly, they would use similar
terminology. Please see “Glossary” on page 48.
Registering DataCheck
You should register your copy of DataCheck to stay informed about
new releases and about other important information, and be eligible
for upgrades. Registered users are entitled to free technical support.
You can contact Committed Software in any of these ways.
Phone. . . . . . . . . . . . (203) 281-4199
Fax . . . . . . . . . . . . . . (203) 281-4199
Email . . . . . . . . . . . . [email protected]
You can also contact us at (and should send the registration card to)
the address below.
Committed Software
156 Lakeview Ave
Hamden, CT 06514
The DataCheck web page always has the latest information about
updates, beta versions, and late breaking news. The URL is:
<http://www.committedsoftware.com/>
We also monitor the 4D iNUG Technical (iNUG) email list. This list is
the preferred method for asking and answering questions, as the
community nature of the list lets everyone benefit from the discussion. To subscribe to the list, follow the directions provided at this
URL:
<http://www.pdm-inc.com/iNUG/faq.htm>
8
Introducing DataCheck™
Meeting System Requirements
Macintosh
Your Macintosh needs the following software and hardware.
u
System 8.6 or above
DataCheck 3 is built on top of Carbon, which is only available for 8.6 or later.
u
20 Megabytes of RAM
We recommend allocating at least 20 Megabytes of RAM to DataCheck. Depending on your
datafile size, DataCheck may require more memory. DataCheck will inform you if it runs low
on memory.
Windows
Your Windows machine needs the following software and hardware.
u
Windows 98, 2000, XP, NT.
DataCheck uses MFC DLL's, not staticlly linked libraries, in order to reduce its file size. (This
is the reason DataCheck for Windows is so much smaller than DataCheck for Macintosh.
u
128 Megabytes of RAM
Your machine should have at least 128 Meg of memory, but for speed, you should get a very
fast disk, or disk subsystem. Those 7200 RPMs should be standard equipment for your data
crunching needs.
Installing DataCheck
To install DataCheck, simply download the .sit or .zip file from our
servers, then unzip or unstuff the file. That’s it. You can now run
DataCheck immediately. Here are some important files you’ll find:
u
READ ME FIRST!! file — important information that didn’t make
it into the manual
u
DataCheck application
u
DataCheck Manual.PDF , a PDF-formated file. This file requires
the Adobe Acrobat Reader, which is available from Adobe.
http://www.adobe.com/
u
Samples folder — this folder contains demo database files you
can use to experiment with DataCheck.
Congratulations! You’ve installed DataCheck and are now ready to
proceed to the next section.
9
Introducing DataCheck™
Installing the DataCheck Registration Number
You were provided with a registration number for DataCheck at the
time of purchase. This registration number must be entered into
DataCheck to achieve the full capability of the program. If you don’t
enter a valid registration number, then DataCheck will run in Demo
mode.
To Register DataCheck as a Developer Version
1 Select Register as Developer from the File menu.
The Register as Developer dialog is displayed.
2 Enter your name and company into the appropriate fields.
This information is saved with the serial number.
3 Enter the registration number provided to you.
This registration number (or serial number) is unique to you, and
contains encoded information that lets Committed Software
match your copy with you.
Note: Please don’t provide your registration number to others.
That would be illegal, and it is also not fair to the author of
DataCheck, who has spent several thousand hours developing
the product.
4 Click the OK button.
The information you entered is saved as part of the DataCheck
application on your hard disk.
10
Introducing DataCheck™
Using DataCheck with 4th Dimension Files
Now that you have installed DataCheck, you need to launch
DataCheck and select a database to scan.
To Open a 4th Dimension Data File
You can quickly open a 4th Dimension data file. You can use the
demo DataCheck datafile that has been installed.
1 Launch DataCheck by double-clicking on the DataCheck application icon.
2 Select the datafile you wish to use.
3 Click the Open button.
Alternatively, you can simply drag a 4D structure file onto the DataCheck application.
Author’s Notes
Many thanks go to:
Dennis Carnine, President of Committed Software. Among the
tough task of bringing together Committed Software in a very short
time, he also had probably the toughest task of all: bringing me into
this world.
John Steele who helped guide this software through various twists
and turns while at Foresight Technology, Inc, and until it landed back
in Committed Software’s own lap. John also updated and added
many parts to this manual. Although the content of this manual was
written by Committed Software, John Steele and Rich Gay created
the manual from it.
Rich Gay: who had the vision to create Foresight Technology, Inc.
Rich and I worked through some good times and bad times together,
and I will never forget how we were able to maintain a friendship as
well as a business relationship through all of it. It took patience,
honesty, trust, and business savvy. So, thanks, Rich. Rich also created the first revision of the DataCheck manual.
The Automation Group (David Beaver and Carrie Johnson) supported me through much of the writing of DataCheck. They provided
a comfortable atmosphere wherein I could live for a few years.
The Athenian School has offered me a wonderful environment to do
my work in since my departure from The Automation Group. Athenian is a 6-12 college preparatory boarding school nestled in the Mt.
Diablo foothills, in Danville, CA. While working there, I taught a light
11
Introducing DataCheck™
course load, ran the data systems, and coached cross-country
running.
My consulting work still continues, and thanks go out to those companies who give me the flexibility to work on their systems.
4D, Inc. should be thanked for opening their doors to third party
tools such as DataCheck and SanityCheck. They have answered
my questions, verified that my data structures exactly match the
actual structures used by 4D, and given me direct information about
specific bytes of the data file that have enabled me to have the confidence in my work to make modifications to the data file. Without
their openness, DataCheck would only work in read-only mode.
Julia, my sweet, has fed me, calmed me down when the details of
the indexing scheme alluded me, and brought me hot tea and a cat
to warm my lap when rain brought down the ISDN connection for the
umpteenth time and I couldn’t talk to you.
And you. None of this would be possible without you. There are
those of you who spent countless hours beta testing DataCheck —
taking the time and energy to try to figure out why DataCheck didn’t
like their perfectly fine data files. Beyond that, it takes trust to ship
me your data files, and for that I am ever grateful - it is the only way
I can diagnose and solve problems. Their work and trust has benefited us all.
And lastly, I want to thank all of you for your patience. As I have
lived in China for the past 4 years, there are periods of time when I
can't get mail for 2 or 3 days. There are hassles with FedEx-ing (it
takes 5 days!), and I ask you to do more work on your end to reduce
data file sizes when they are sent my way. I have been living somewhat of a dream of mine: to live afar and still work on the products I
love.
So, you can see, I just happen to write the code.
— Paul Carnine
12
DataCheck Overview
DataCheck Overview
This chapter discusses how DataCheck works, and the fundamental
issues involved with 4th Dimension datafiles.
Understanding DataCheck Operation
DataCheck opens your structure file, by default, in read-only mode.
The data file is always opened in read only mode when scanning for
problems. You can have complete confidence that the data file won’t
be modified in any way when doing a scan.
Using DataCheck to Repair Problems
DataCheck will only open your file with write privileges when it is
attempting to make a modification. It will only make a modification
after you have specifically instructed it to do so and have gone
through several dialogs describing the actions about to take place.
For example, the first action you must confirm is the opening of the
data file in write mode. DataCheck cannot open the data file in write
mode without your approval.
You should always make a backup of your data file before running
any part of DataCheck that will modify your file. We have tested
DataCheck in a myriad of situations and believe it to be rock solid.
However, there is always the chance that your datafile will present a
scenario that will cause DataCheck to fail. It is your responsibility to
make sure that this potential does not cause you problems.
Since DataCheck will verify your data file, it is highly recommended
after any modification that DataCheck makes on your data file, you
perform a full scan. This self-checking mechanism is an excellent
way to boost your confidence in the integrity of DataCheck and your
data file.
13
Getting a Quick Start
Getting a Quick Start
This chapter shows you how to get a quick start with DataCheck
once you have installed it.
Launching DataCheck
After you unzip the files you download, there will be a folder called
“DataCheck Folder” containing these items.
u
READ ME FIRST!! file — important information that didn’t make
it into the manual
u
DataCheck application
u
DataCheck Manual.PDF , a PDF-formated file. This file requires
the Adobe Acrobat Reader, which is available from Adobe.
http://www.adobe.com/
u
Samples folder — this folder contains demo database files you
can use to experiment with DataCheck.
To Launch DataCheck
1 Open the DataCheck folder.
2 Double-click the DataCheck icon to launch it.
3 Select the Sample file and click the Open button.
DataCheck displays the run file configuration window. For detailed information, see “Using the
Configuration Dialog” on page 16.
If DataCheck can find your data file, then that data file will be loaded into the configuration
screen.
If your structure file is password protected, then DataCheck will ask for your password. You
may enter either an Admin or Designer password. At no time does DataCheck unencrypt the
password from your structure file. It will encrypt the password you type in and compare that
encrypted value with the encrypted value on disk (prevents hacking into DataCheck memory
looking for plaintext passwords...).
4 Press the Scan button and interpret the results.
To Configure a Scan / Create a Run File
When you configure DataCheck, you are creating a “run” file that
can be saved and run at a later date. You might save a run file that
drops all your indices. You might configure a quick scan to be run
daily, or a longer scan to be run just after each backup. Those of
you with very large data files might configure seven run files, one to
run each night of the week, where each file scans different parts of a
data file.
14
Getting a Quick Start
You might also create a run file to send to a client of yours. If they
have DataCheck or DataCheck Runtime, they can also open the
RUN file and your configuration will be set for them to easily run.
Refer to “Configuring DataCheck” on page 16 for more information
about setting-up a DataCheck scan.
15
Configuring DataCheck
Configuring DataCheck
This chapter shows you how to configure DataCheck.
Registering DataCheck
DataCheck will run in Demo mode unless a valid registration number is entered. A registration number is provided at the time you
purchase DataCheck.
To enter a registration number
1 Launch DataCheck.
2 Choose Register as Runtime or Register as Developer from the
File menu.
3 Enter the registration number you received when purchasing
DataCheck.
4 Click the OK button.
Using the Configuration Dialog
DataCheck has only a few dialogs. The Configuration Dialog is used
to control all parameters for a particular “run” that is performed on a
data file. Once a configuration has been created, you can save it as
a run file for future use, or to provide to a client for use with DataCheck Runtime (see “DataCheck Runtime” on page 36 for
more information).
To set the structure, data file and TRIC resource.
Structure is a popup menu that shows you the path to your structure
file. If you’d like to change the structure file stored for this configuration, click the Set button.
Data File is a popup menu that shows you the path to your data file.
If you’d like to change the data file for this configuration, press the
Set button.
16
Configuring DataCheck
TRIC is a popup that shows the path to the file that the TRIC
resource was lifted from. When you set a TRIC resource, that TRIC
is pulled from the specified file and stored into the run file. That way,
if you send this run file to a client, the TRIC resource will work properly. See “TRIC resource” on page 48 for more information on this
subject.
DataCheck computes a checksum of the names of all tables and
fields in your strucure. This information is stored in the run file.
When the run file is sent to your client, they can change the Structure and Data File options, so long as the checksum of the names of
the fields and tables in their structure match with the checksum in
the run file.
To set the Startup Options
Most of these options are useful when integrating DataCheck with a
CRON utility. See “CRON utility” on page 48 for more information on
this subject.
These options affect what happens when you launch a run file, or
drag and drop a run file onto DataCheck.
Option
Description
Open without password
When this option is active, the run file is saved so that when
DataCheck is run, no password is required. The password is not
stored on disk. If any configuration change is attempted then the
password is requested. This option is useful when used in parallel
with a CRON utilty, as no dialog will ask for a password when the
scan begins.
Initiate scan on launch
When this option is active, DataCheck will immediately begin scanning after opening the document.
17
Configuring DataCheck
Option
Description
Pause before scan
When this option is active, DataCheck will wait for the given number
of seconds before beginning to process the file. This is to allow
DataCheck to work better with some CRON utilities that work better
when there is time between asking 4D to quit and having
DataCheck actually run (open) the files.
Auto number & save log
When this option is active, DataCheck will automatically number the
log file and automatically save it to disk. This option is only available
if the "Initiate scan on launch" option is active.
Quit after scan
When this option is active, DataCheck will quit itself after the scan is
completed. This option is only available if the "Auto number & save
log" option is active.
Launch after 4D Scan
DataCheck can relaunch 4D, with a given structure file after it is
done running it’s scan. When this option is active, you should select
a version of 4D to execute, and a structure file to launch 4D with.
18
Configuring DataCheck
Setting Scan options
The scan options offer you control over what occurs during a scan.
You might ask DataCheck to drop indices or scan the allocation bitmap. There are five different types of scan options you can set.
Index Scan Options
Option
Description
Scan Indices
When this option is selected, each index is loaded and scanned. The
scan consists of traversing all index nodes in the index tree. Each entry in
the index is compared against the preceeding entry. They should all be in
sorted order. See glossary for definition of terms.
Verify Record
Number
When this option is selected, each record number for each entry in each
node in the index is verified to be a valid record number. The record is not
read from disk, but it’s number is validated and found in the record
address table. This is a little more robust of a check, and doesn’t require
much more time and is therefore highly recommended.
Detail Statistics
When this option is selected various statistical items are generated for
the index. It can be useful in understanding where disk space is being
used in your data file.
Drop Selected
Indices
When this option is selected, the selected indices (those with a green dot
next to them) will be dropped during the scan. A dialog will prompt you
before the file is opened for write priviliges and again before the indices
are dropped. You should always run a scan after dropping indices to verify that no problems occured during the drop.
Force Drop All
Indices
This option drops all indices by simply setting two numbers to zero. The
two numbers are: the number of indices in the data file, and the offset to
the beginning of the index information table.
When these two numbers are cleared, however, the bitmap still has those
blocks as allocated (DataCheck does not try to deallocate them). Therefore, you should immediately run 4D Tool:Compact on the data file, and
then open the data file with 4D to re-index.
Force Drop All Indices should be used when you have serious index
damage that can’t be fixed any other way.
19
Configuring DataCheck
Option
Description
Drop Damaged
Indices
This option will drop indices that DataCheck notices are damaged. This
enables a one-step process for detecting and deleting troublesome indices.
Interactive (Drop
Damaged Indices)
When selected, the dropping of indices is interactive: you are asked
before deleting each index.
20
Configuring DataCheck
Record Scan Options
Scan Records
When this option is selected, each record is completely loaded from disk
and verified. The verification entails completely parsing the record from
top to bottom, including all subtables, text, and picture data. Various
integrity checks are done along the way to verify that the record is not
damaged.
Verify Index
(slow)
When this option is selected, each field that is indexed in each record is
searched for in the index. It guarantees that all data can be found in your
indices and stresses the index to the max. If any piece of data cannot be
found it is reported. This test can take a long time depending upon the
size of your indices. But there are some situations that can only be found
using this option, and it is suggested that if you can, you always use it,
and if it takes too long that you find a way to use it periodically.
Find “NANs”
NAN (Not-A-Number). This occurs in real data types and is due to a
divide by zero, or sqrt(-1), etc.
Find Alpha “Gemlins”
Finds Gremlin characters (as definied in the “Alpha Gremlin Map” dialog).
The default settings are for English language users of DataCheck, and
for “normal” use. The difference between Alpha and Text is that it is normal for Carriage Return and Line Feeds to appear in text, but not in
Alpha. There may be other differences you’d like to add.
Find Text “Gemlins”
Finds Gremlin characters (as definied in the “Text Gremlin Map” dialog).
The default settings are for English language users of DataCheck, and
for “normal” use. The difference between Alpha and Text is that it is normal for Carriage Return and Line Feeds to appear in text, but not in
Alpha. There may be other differences you’d like to add.
Export
If selected, then all scanned records are also exported to disk. The
records are exported in “Raw” format (PACKED). You can use the example “ImportRaw” database provided with DataCheck to import records
that have been exported using this option.
Interactive
(Export)
If interactive, then each record is presented to you before export occurs.
Allow Errors
(Export)
If Allow Errors is selected, then the record is exported even if errors were
detected in the record. By default, damaged records are skipped during
export.
21
Configuring DataCheck
Type Mismatch
Warnings
A type mismatch occurs when you change the data type of a field in the
structure. Any existing records have the old field type and are not
updated. 4D performs conversions between the old type and the new
type using the data in the record. For the paranoid amongst us, this data
type conversion is not desirable, although it causes no problems. This
feature allows us to detect this situation.
Detailed Statistics
When this option is selected various statistical items are generated for
the table. It can be useful in understanding where disk space is being
used in your data file.
Fix Alpha Gremlins
Converts all Gremlin characters (as definied in the Configure Gremlins
dialog), to spaces (ASCII 32).
Fix Text Gremlins
Converts all Gremlin characters (as definied in the Configure Gremlins
dialog), to spaces (ASCII 32).
Fix NANs
This will set every occurance of a NAN to zero.
Note: Zero is not the same as a NAN. NANs are used to represent infinity
or imaginary numbers or other non-real numbers that occur when you do
mathematics on numbers from the real number line.
Delete Bad
Records
Records which have damage will be deleted. This can be made interactive so that you see each record before it is deleted, and can choose
whether to delete it or not.
Interactive (Delete
Bad Records)
When selected, the record deletion will be interactive.
Force Delete
Selected Tables
This feature will completely wipe out the selected table’s data. This is a
drastic move that should only be used when there is serious damage in
a table that cannot be fixed in any other way.
Note: This feature does not clean up the bitmap, so you will need to run
4D Tools:Compact or check "Fix Bitmap Warnings" in the Bitmap features
after running this option.
22
Configuring DataCheck
Bitmap Scan Options
Scan Allocation
Bitmap
When this option is selected, the bitmap (or freemap) is tested against a
bitmap built by DataCheck during its scan. Briefly, the allocation bitmap
stores information about what parts of the file are free to be used. If the
bitmap is wrong, then one of two things will happen:
(a) if the bitmap claims that space is used, but it isn’t, then you will have a
larger data file than necessary, but it won’t cause any problems with
regard to the running of your data file. This is a common occurance in
data files, and should not concern you. Only if the size of the unused
space becomes large should you consider actions to remove these
items;
(b) if the bitmap doesn’t claim some space that is being used, then you
will have future problems as you use this data file. As 4D allocates space,
it will use space that is already in use, and you will have data corruption.
This type of scenario should never happen and if it does, you should
attend to it as if your data base had just crashed - it is very serious.
Zero all empty
space
This feature allows you to wipe out all unused space in your data file.
This protects against old data creeping into your data file when using
Recover by TAGS, and could also be used if a deleted record contained
sensitive data. This feature deletes all unused space -- it doesn't matter
what the space used to be used for -- it gets zeroed out if it's not
currently in use.
Fix bitmap warnings
This feature will change the bitmap to reflect what exists in the data file.
23
Configuring DataCheck
Deleted Scan Options
Scan for Deleted
Records
Records are undeleted and put back into the list. This operation only
works if the deleted records still exist (i.e., hasn't been zeroed). This
operation also only works if there is space in the secondary address table
to undelete the records. If sufficient space isn’t avaialable, DataCheck
will warn you of this. You can always export the delete records.
Interactive
When this is checked, all undeleting or exporting is interactive
Undelete
Deleted records are undeleted. This will only work if there is space in the
secondary address table to do the undeletion. This will always be the
case if you accidently delete records, and immediately run DataCheck to
un-delete. Note that because 4D re-uses space in your 4D file, the more
you use your data file after deleting a record, the less chance you have to
recover the deleted records.
Export
Deleted records are exported. They are exported in "SEND RECORD"
format. See the example database that ships with DataCheck for examples on importing these records into a 4D database.
24
Configuring DataCheck
Zero Deleted
Records
When a deleted record is found, the record is zeroed. If you check
"Export" as well as "Zero deleted records" the export is done first, and
then the records are zeroed. This can be very useful if you want to keep
historical data of deleted records and also wipe out all deleted records.
This option is useful if you have a “snapshot” of your data and you want
to zero out any old data that may be floating around. Why? A recover by
tags may recover old, deleted records. So doing this guarantees that old
records cannot be recovered.
This option is useful before compressing your data file for electronic
delivery. It guarantees that all old record space is zero, which compresses very well.
This option is very useful for those who really want to delete their data so
that prying eyes cannot easily look at old, deleted records in your data
file. We at committed software are not data security experts, but we do
know that zeroing this data is an excellent first-line defence. (geek talk: of
course there is always residual information even if you zero the data.
data experts always speak of writing several patterns over the data area
to remove any residual magnetic data. if you want this level of security,
please contact us, and we’ll put it in).
25
Configuring DataCheck
Setting the Target for a Scan
The little green dots indicate that the object is selected to be acted
upon during the scan. If the green dot is present and you press the
scan button, that object will be acted upon. Being acted upon may
mean scanning the records, or dropping the index, depending upon
the options you have chosen for the scan.
The green dot button will allow you to turn all green buttons on or
turn all green buttons off. The logic is as this: if you press the button
and all green dots are on, then they will all turn off. But if you press
the button and ANY of the green dots are off, then they will all turn
on.
When you press the green dot for a table, all fields and subtables
will be affected. This is for your convenience.
Please see “Multiple Indices per Field (item [48])” on page 38 for
additional information about using this feature.
26
Configuring DataCheck
Understanding the Structure Area
This area of the screen shows you the structure of your data file.
The items in bold are indices, the items in brackets are tables. By
pressing the green dots, you can select the given table or index to
be acted upon during the scan. These selections are saved in the
run file. For example, the [Incidents] table has the “ID Number” and
“Open date” fields selected. However, the "Client" field, and the
entire [Calls] table is not selected, and so they will not be acted upon
during the scan.
The Special Menu
DataCheck v2 introduces three new views of your data, a Disk Map,
a record and index Browser, and a Table Editor.
Disk Map
This view shows a layout of the disk, page by page. You can view
some of the data in this map by selecting it and pressing the "View"
27
Configuring DataCheck
button. This can be helpful for looking at the fragmentation of your
data. If you notice serious fragmentation of your data, you might get
better performance by performing Compact (using 4D Tools).
The three Speed settings:
1 Ludicrous (no idx/rec/bmap)
2 Fast (guess index/rec size)
3 Exact (* slow *)
These settings allow you to view the map in varying degrees of
28
Configuring DataCheck
granularity, depending upon how long you're prepared to wait for the
map to be generated.
The fastest setting skips the indices, records and bitmap to provide
an approximation of the disk map, while the second setting makes
an approximation of the index and record sizes.
Details on any selected part of the map will be displayed in the
Selected region, and if it is a record, further details may be seen by
selecting the View button. Please read the section “Browser” on
page 29 for more information.
Disk Map Color Key
u
Light Brown
Data segment header
u
Black
Reserved.
u
Grey
Bitmap address table
u
Yellow
Bitmap page
u
Dark Green
Data segment info
u
Light Green
File information table
u
Orange
Record primary address table
u
Pink
Record secondary address table
u
Red
Record
u
Dark Blue
Index primary address table
u
Purple
Index secondary address table
u
Light Blue
Node
Browser
The Browser allows you to browse your raw records and indices.
You can hop from an index directly to record data (or from index
node to index node). A historical list of your record surfing is kept for
ease of backtracking. For indices, the hierarchy for each index node
29
Configuring DataCheck
is easily accessible (easy to go to parent nodes).
From here, you can manually delete records if they are causing
problems.
Version 3 of DataCheck allows you to enter a record number in the
lower left of this screen. You can very quickly hop to that record and
view the underlying raw data.
Table Editor
This feature allows you to see (and change) general information for
the tables.
Although most data here should never be changed, this area does
contain the sequence number which many developers have
30
Configuring DataCheck
requested an ability to change.
Index Offset
Offset to the raw index data. Rarely should you change this, unless
you are trying to clear all indexes for this table, in which case you
might set this to 0x0000, and the Index Count to 0.
Index Count
The number of indexes for this table. Rarely would you change this.
Two instances when you might:
1 you are trying to "delete" the last index in the list of indexes
(reduce it by one).
2 you know the number is wrong, and so you try to set it to the correct number (usually decreasing).
Random Sig
Reserved and unused space by 4D.
TRIC Sig
The signature for the TRIC resource used to sort this table. This
31
Configuring DataCheck
may be ignored in current implementations of 4D.
Logfile Counter
Tracks the 4D Backup logfile checkpoints. Bumped when logfile is
changed. Rarely modified by developers.
Full Backup Sig
Signature of 4D Backup used to do last backup. Rarely modified by
developers.
PAT offset
Offset to the Primary Address Table for the records. Rarely
changed by developers. However, if you wanted to quickly delete all
records (and not clean up the bitmap), you could set this to zero,
and set the SAT count to zero.
SAT Count
Number of Secondary Address Tables in the Primary Address Table.
Rarely used by developers.
Last Del Rec
The address of last Deleted Record. Rarely used by developers
Last Seq. Num
This is the Last Sequence Number that 4D used for this table.
Pref. Seg. Num.
Ignored by 4D. Is the prefered segment number for data for this
table.
32
Configuring DataCheck
Preferences
This feature allows you to modify preferences for DataCheck.
Ask before closing modified Log file
If checked, DataCheck asks you before closing the log file.
Ask before closing modified Run file
If checked, DataCheck asks you before closing a run file that has
been modified.
Temporary files location
You can define where DataCheck puts it’s tempory files (they can be
large).
If “Use Data File Directory” is selected, then DataCheck puts the
temporary files in the same directory as the data file.
33
DataCheck Log File
DataCheck Log File
This chapter explains the log file generated by DataCheck when
processing a 4D data file.
Understanding the Log File
DataCheck generates a log file as a result of the scan. Here is an
example.
Reported item and
matching explanation
34
DataCheck Log File
Log Entry
Explanation
"invoices.Data - 10/27/96, 2:35
PM"
when the scan began / on what data file it
was run.
"Indices:"
shows the group that the items below
belong to.
"[Taxes]Code #7"
shows the index name, and its number (only
useful for reference within DataCheck).
"Error: Index 17 represents the
same field as this index."
the item number generated for the index.
"[48]"
the item number, which matches to the item
numbers at the bottom of the log.
For each item reported in the log, an explanation of that item type is
included at the bottom of the log. Additional information about all
reported items is included in “Log Item Definitions” on page 52.
Using the Start/Pause/Resume Button
One button allows you to start, pause and resume the processing of
a data file.
If your scan is currently running, then the button will say “Pause”. If
you have pressed the "Pause" button, then the button will say
“Resume”. If you press the “Resume” button, the scan will continue
where it left off. When the scan is complete, the scan button will
say “Start”, as it does above.
If you close the window or quit the application, the scan will be
stopped (you will be asked before terminating the scan).
35
DataCheck Runtime
DataCheck Runtime
This chapter explains the use and licensing of DataCheck Runtime.
Installing the Serial Number into the Runtime Version
You were provided with a registration number for DataCheck Runtime at the time of purchase. This registration number must be
entered into DataCheck to achieve the Runtime capability of the program. If you don’t enter a valid registration number, then DataCheck
will run in Demo mode.
To Register DataCheck as a Runtime Version
1 Select Register Product from the File menu.
The DataCheck Registration dialog is displayed.
2 Enter your name and company into the appropriate fields.
This information is saved with the registration number.
3 Enter the registration (or serial) number provided to you.
This regiatration number is unique to you, and contains encoded
information that lets us match your copy with you.
Note: Please don’t provide your registration number to others.
That would be illegal, and it is also not fair to the author of
DataCheck, who has spent several thousand hours developing
the product.
4 Click the OK button.
The information you entered is saved as part of the DataCheck
36
DataCheck Runtime
application on your hard disk.
Using the Runtime Version
The runtime version uses the same run file that the full version uses.
However, only three user interface options exist. Here is the runtime
screen:
This enables you to send preconfigured run files to your clients without worrying that they will click the wrong option and drop all indices
on their enormous data file. If you want them to drop a particular
index, create a run file that does this, and email it to them. They
just open, select the right structure and run files and press scan.
The log file looks exactly the same as the full version of DataCheck.
Licensing the Runtime Version
The DataCheck Runtime is licensed per machine. If you wish to distribute DataCheck with a commercial product, contact Committed
Software for special pricing information.
37
Advanced Topics
Advanced Topics
This chapter discusses advanced topics related to DataCheck.
Terms used in this chapter are defined in the “Glossary” on page 48.
Multiple Indices per Field (item [48])
Sometimes 4D creates more than one index for any given field.
Worse than that is that 4D Tools reads and validates the first such
index, and 4D uses the last index for any given field. This means
that in a multiple-index situation, 4D Tools cannot diagnose the
index, and 4D itself has problems dropping it. When these situations arise, your best bet is to select the index (and only that index),
by pressing the "green dot button" (the one above the Structure
area) until all indices are turned off. Then press the dash next to the
index you wish to delete (which selects that index). Press "Drop
selected indices" and run the scan. After the index is dropped, run a
normal scan (verifying records, indices, etc), to make sure the drop
went smoothly. This will rid you of multiple indices.
Not all tables and fields scanned. Cannot process Bitmap
The bitmap can only be scanned if all nodes of all indices and all
records in all tables were scanned. If there was a problem scanning
these areas, or if the areas weren’t fully scanned, then the bitmap
option cannot run. It would produce incorrect information if it were to
attempt to compare the DataCheck bitmap against the 4D bitmap.
Temporary files
DataCheck currently creates a temporary file (named tmpXXXX). It
guarantees that the file it’s trying to create temporarily doesn’t
already exist. It then creates the file, stores information in it, then
deletes the file upon conclusion. This file is DataCheck’s representation of the bitmap. Since this bitmap could be quite large,
DataCheck cannot keep it all in memory.
Recovery
Oftentimes, DataCheck suggests to recover by TAGS. Some people have noted that Recover by TAGS can be less efficient than
exporting all data and re-importing it. If you can export all data and
re-import it, then sometimes this can be faster.
38
Advanced Topics
When DataCheck asks you to recover by TAGS, in general you
should think: rebuild data file from scratch. Most people find it easiest to just recover by TAGS. Others will find it easiest to export/
import. Of course, if you can’t open the datafile, then you must
recover by TAGS.
Future versions of DataCheck will probably include options for
recovering a data file by TAGS.
Force Drop All Indices
This option drops all indices by simply setting two numbers to zero.
The two numbers are: the number of indices in the data file, and the
offset to the beginning of the index information table.
When these two numbers are cleared, however, the bitmap still
records those blocks as allocated (DataCheck does not try to deallocate them). Therefore, you should immediately run 4D
Tool:Compact on the data file, and then open the data file with 4D to
re-index.
Force Drop All Indices should be used when you have serious index
damage that can’t be fixed any other way.
Sorting issues
There are reproducable indexing problems with ASCII fields using
the universal “TRIC resource” (used for all U.S. versions of 4D).
The problem has to do with using characters that are outside of the
range of normal characters used by the english language. Specifically, the 0xBB, 0xBC, 0xC7, 0xC8, and 0xF5 characters all have
been shown to exhibit this problem. It has to do with how the TRIC
resource is put together. You should avoid using these characters at
any time in your ASCII fields when you intend to index the field.
Committed Software has not investigated other TRIC resources to
see if they exhibit the issue. However, here is a way to test your
database:
1 Create database with 1 file, 1 alpha field.
2 Index the field.
3 Add random ASCII data (build strings of random length with random characters).
4 Run DataCheck. If you add enough random data, you’ll eventually see a failure.
5 Search by index for data that DataCheck is describing as not
found.
39
Advanced Topics
6
7
8
9
Note that 4D cannot find the data either.
Drop index in 4D.
Rebuild index.
Search for data and note it is still not found.
Note: The index will never be correctly built.
Configuring DataCheck Memory
DataCheck should run most data files in it’s default fifteen megabytes of memory. DataCheck does not check to see how much
memory is available and allocate all of it (this is a bad practice as in
future OSes, virtual memory will do away with “partitions”, and this
type of code would not behave well). So, DataCheck allocates buffers for address tables, and index blocks, and record blocks using a
greedy algorithm based on the number of index nodes and records.
Using 4D to run DataCheck
Using the new “Automate” options within DataCheck, you can now
use 4D to trigger a run of DataCheck.
DataCheck still requires that the structure/data files are closed by
4D (ie, that 4D is not running). However, you can ask DataCheck to
launch from within 4D, and DataCheck will do it’s scan and relaunch 4D.
Using Macintosh, it’s best to use an AppleScript to bring down 4D
and Launch DataCheck. If you have configured the RUN file to do
so, then DataCheck will relaunch 4D when it is finished scanning the
file.
Using Windows, you can use the ACI Pack to launch DataCheck
with a run file, and then quit the server. If you have configured the
RUN file to do so, then DataCheck will relaunch 4D when it is finished scanning the file.
Please see the example code called “LaunchDataCheck” provided
with DataCheck for an example of how to perform this.
Using a CRON utility
A CRON utility is a utility that will perform specific actions on your
computer at a specific time.
The name comes from a Unix application called CRON.
You would use a CRON utility if you wanted to launch DataCheck at
40
Advanced Topics
a specific time of day and run a scan of DataCheck (say, every night
at midnight, you scan the data file)
[You might find that it’s more convenient to write 4D code to perform
the same task (assuming your 4D application is always running).
See the section above “Using 4D To run DataCheck” for more
information]
Information about CRON utilities for Macintosh computers is available at this URL:
http://www.macsos.com.au/macat/index.html
On Windows, you can use the scheduler that comes with the NT
Resource Kit, although if you need a 3rd party utility, here’s one that
is an implemenation of the original UNIX cron (there is no GUI).
http://kalab.com/freeware/cron/cron.htm
Committed Software does guarantee anything regarding these utilities. They are simply provided as examples of the type of utilities
that you might use with DataCheck to launch DataCheck.
41
Recover by Tags
Recover by Tags
This chapter discusses the Recover by Tags feature of DataCheck.
Terms used in this chapter are defined in the “Glossary” on page 48.
What is Recover by Tags?
Each record, on disk, contains special characters (tags) at the
header of the record which one can use to detect a record on disk.
Recover by Tags searches the data file for any data that has these
tags, and exports the found records
How do I use it?
Open up DataCheck as usual, point to your data file, and select
“Recover By Tags” from the Special menu.
DataCheck will scan the file and push all records found into a file.
The file will be the name of your file with an extension of “raw”. If
your file is “MyShell” then the file will be “MyShell.raw”. (The contents of this file are raw (or Packed) records. These records can be
read using the RECEIVE RECORD function within 4D).
You then create a new, empty, data file, and import the records in
the .raw file.
An example database, called ImportRaw ships with DataCheck
which shows an example of how to import raw records back into a
new data file.
Why is it different than 4D Tools
There are several reasons why DataCheck is different:
1. DataCheck uses a slightly different method for searching for the
records in a file. This method often finds more records than 4D Tools
finds.
2. DataCheck will recover only those tables that are selected in the
RUN file (the green dot). This allows you to only recover records
from a particular table, if you so choose.
3. DataCheck runs a scan over each record it recovers, thus ensuring that the records found are not damaged. This ensures that your
recovered file is not damaged.
42
Recover by Tags
Multiple Segments
DataCheck scans only one segment at a time during Recover By
Tags. This is because the data file contains information about multiple segments. If you’re performing recover by tags, then most likely
that file is damaged.
Simply select each segment, one at a time, and DataCheck will generate several .raw files. Import each raw file, one at a time, into 4D.
43
What’s New in DataCheck™ v3
What’s New in DataCheck™ v3
There are many new ways to check your datafiles in DataCheck
v2.0. The major new features in this version include:
Recover By Tags
DataCheck has it’s own implementation of Recover by Tags, which
is a little bit different than 4D Tools. In some instances, DataCheck
may recover more records than 4D Tools.
Carbonized
DataCheck has been carbonized for use under MacOS X. Our
MacOS 9 release also uses Carbon, for ease of development, and
convenience of download.
Components Parsed
DataCheck now parses Components in structure files.
Two gremlin maps (one for Alpha, one for Text)
Two gremlin maps are now available, one for Alpha and one for
Text. This allows you to have the Text gremlin map allow carriage
return and line feed, while the Alpha gremlin map flags those
characters as gremlins.
Automated Launching of 4D after scan
DataCheck can now optionally launch 4D with a structure file after it
has completed a scan. This is very useful for those who wish to
Automate the process of running DataCheck.
Skip Index or Table
You can skip an index or a table while DataCheck is processing it by
pressing the “Skip” button. This is useful when you are manually
running DataCheck and decide you don’t want to scan a particular
table that is very large. You don’t have to stop DataCheck, reconfigure it to skip the table or index, and restart it. Just press “Skip” and
continue.
44
What’s New in DataCheck™ v3
Run Files are Cross Platform
Run files are now crossplatform. This means you can create a RUN
file under Macintosh, and read it using DataCheck under Windows.
However, the paths to your structure / data files must be re-configured on the destination platform.
Example Code to bring down server and run
DataCheck
DataCheck ships with example code to bring down 4D server and
run DataCheck.
Preferences
Warn on Close
DataCheck now optionally warns you before closing “dirty” windows.
Temporary file locations
DataCheck will put temporary files where you want them. This
should speed up DataCheck under some scenarios (very large data
files), as you can put temporary files on a different disk than the 4D
data files.
Indices
“Drop Damaged Indices” added. When an index is detected as damaged, DataCheck will optionally delete the index.
45
Technical Support
Technical Support
Committed Software provides support for technical questions via
electronic mail.
Electronic Mail
Electronic Mail: . . . . . mailto:[email protected]
World Wide Web
World Wide Web: . . . http://www.committedsoftware.com/
ftp:. . . . . . . . . . . . . . . ftp://ftp.committedsoftware.com
FAX
(203) 281-4199
Telephone
(203) 281-4199
46
About Committed Software
About Committed Software
Committed Software specializes in writing tools for developers.
Our flagship products, SanityCheck and DataCheck, offer customers the best tools for managing their 4th Dimension structure and
data files. Our extensive consulting experience with 4th Dimension
allows us to understand the needs of the developers (both individual
and corporate) and provide solutions that fit those needs.
Committed Software is headquartered in Connecticut, USA with a
development office in Hangzhou, Zhejiang Province, Peoples
Republic of China.
Committed Software has resellers throughout the US and internationally in Australia, France, Germany, Japan, Norway, Spain and
Sweden.
Committed Software staff is available for disaster recovery of your
4th Dimension related files. Contact us for our rates.
Committed Software is privately held.
For more information, please visit our web site at:
http://www.committedsoftware.com
47
Glossary
Glossary
This chapter defines important terms used within this manual.
TRIC resource
A TRIC resource is a resource that contains the information about
how sorting should be performed in your data file. For example, a
different TRIC resource is used in Germany, due to the fact that certain sorting is different. Each TRIC has a unique identifying 4
character code. That code is stored in your data file so 4D (and
DataCheck) can use that code to find the right TRIC resource to use
when sorting an index. For 99% of the users of DataCheck, the
TRIC resource will automatically be found by DataCheck. However,
for those of you who are using a non-standard (i.e., home grown)
TRIC resource, you will need to install the TRIC resource into the
run file.
CRON utility
A CRON utility is a Macintosh or Windows program that will launch
an application at a specific time and/or date. This is useful for running automatic backups or a program like DataCheck.
Allocation bitmap
4D needs to keep track of where free space on disk exists. It does
this by deciding that disk space will be allocated in blocks. For
example, version 3.5 of 4D allocates disk space in 128 byte blocks.
Therefore, if 4D allocates only 1 byte of data, it must allocate 128
bytes on the disk. Now all 4D has to keep track of is each block in
the file. This is accomplished by one large bitmap. A bitmap is a set
of 1’s and 0’s, where 1 means that the block is allocated, and 0
means the block is not allocated. This bitmap is spread throughout
your data file. When DataCheck scans your data file, it builds its own
internal bitmap of which blocks are allocated and which are not.
When DataCheck has completed scanning the whole file, it can then
compare its bitmap against the existing 4D bitmap and report any
differences.
Index Node
An index is represented on disk as a tree of nodes. If you imagine a
geneology tree, there is a root. That root would be called the root
node. That root then points to several children. They would each
have a level of 1, and would be called nodes in the index tree.
Index Node Entry
Each node in an index tree has several entries. The number of
entries varies and depends upon the history of the particular tree
(4D decides to split and create more nodes as well as merge nodes
together as you create and delete records). An entry in the node
represents one pieces of data from a record. If the index was on an
alpha field for first names, then an index entry might have the data
“Julia” and a record number for the particular record that this entry in
48
Glossary
this index represents.
Record Address
Table
Records are stored all over the data file. To keep track of which
records belong to which tables, there is a table that keeps track of
where each record exists. This table is simply a set of offsets into
the data file.
Node Address
Table
Nodes are stored all over the data file. To keep track of which nodes
belong to which index, there is a table that keeps track of where
each node exists. This table is simply a set of offsets into the data
file
Data File Segment
4D now has the capability of creating multiple segments for a particular data file — the data can be spread across disks by creating
multiple segments.
NANs
NAN (Not-A-Number). This occurs in real data types and is due to a
divide by zero, or sqrt(-1), etc.
Note: Zero is not the same as a NAN. NANs are used to represent
infinity or imaginary numbers or other non-real numbers that occur
when you do mathematics on numbers from the real number line.
NANs are bad because they represent a non-number, meaning that
they represent a number that isn't a number. Math algorithms do not
know what to do with a non-number.
It is very easy for a NAN to be propagated throughout a datafile, as
math algorithms do not know what to do with a non-number, and so
create new instances of NAN’s as the result of an operation.
For example: NAN * 3 = NAN
NANs do not print correctly, some externals do not deal with them
well, and exporting them can end up creating garbage numbers,
which then become actual numbers when they are scanned back in.
Piles and piles of problems can start from one number being a NAN.
So it's best to catch them early.
Gemlins
Gremlins are characters found in strings or text that are outside of
the "normal" range of characters for your particular language. They
are considered "bad" because they are frequently “invisible” characters, and unless they are handled carefully, they can cause
unexpected behavior within an application.
For example, if a user entered “Car*nine” in a last name field, where
the * is an invisible gremlin character, they wouldn’t be able to see
the character (screen listings would show the name to be “Carnine”).
49
Glossary
Whenever the user searched for "Carnine" they wouldn’t get a hit,
however if they searched for "Car@" they would. This “weird”
behavior is why “gremlin characters” need to be handled carefully,
and why DataCheck gives you a way to catch and identify them.
Note that the definition of a gremlin character changes from human
language to language, and from data file to data file, as some people may use strings with odd characters to do something non-ascii,
such as control strings for serial devices.
50
Glossary
51
Log Item Definitions
Log Item Definitions
This chapter contains detailed definitions of all log items reported by
DataCheck. This information supplements the item descriptions
included in the logs generated by DataCheck.
The actions are suggestions. They are listed in the preferred order.
The <1> and <2> are placeholders that would be replaced with specific information for the particular item in question.
Error
Number
Description
Detail
Action
1
Out of memory (size:
<1>)
DataCheck could not allocate
the object of the given size. If the
size is reasonable, then
DataCheck is probably just out
of memory. If the size is really
large, then there may be damage in the data file.
If the size is reasonable, then
try increasing DataCheck’s
memory. Otherwise, look at the
object that was being manipulated and see if you can delete
that object and try again.
2
Error Freeing Memory
DataCheck recieved an invalid
memory block to free. Most
likely, this is an internal error.
Report this occurance to Technical Support.
3
Cannot open file ’<1>’
The given file could not be
opened by DataCheck.
Verify that the file exists. Verify
that the file is not open by
another application. Note that
DataCheck can run a scan on a
file opened by 4D, unless you
try to delete indices. In this
case, DataCheck will not be
able to open the file.
4
Cannot close file.
The file cannot be closed.
This is an internal error and
should be reported to Technical
support.
5
File Position Error
(<1>,<2>)
Whenever data is to be read
from disk, the file position must
be set to the particular place on
disk where the reading is to
commence. In this case, the file
position does not make sense.
Most likely, the file position is
beyond the end of the file
Examine other items to determine what object is causing this
particular item.
6
Cannot determine file
position.
Generated when the current file
position queried by DataCheck
is invalid. This item should
never occur.
Report to Technical Support.
52
Log Item Definitions
Error
Number
Description
Detail
Action
7
File Read Error (tried:
<1>, got: <2>)
Could not read data from disk.
DataCheck tried to read so many
bytes of data, but the operating
system only read the given
amount. Usually, this occurs
when there is a problem with the
file itself — at the file system
level.
Verify the integrity of the file by
using a disk utility (such as
Norton Utilities). If this still
reports problems, try moving to
another disk. If problems still
exist, try deleting the object in
question and reproducing it.
Your last resort is a recover by
TAGS. A backup would be nice,
too.
8
Unexpected End of file
(tried: <1>, got: <2>)
DataCheck ran off the end of the
file while trying to read an object
from disk. Your file has probably
been truncated or is damaged at
the file system level.
Run a disk utility (such as
Norton Utilities) to verify the
integrity of the file itself. Check
to see how long the file is compared to a recent backup. If it’s
comparable, then try deleting
the object in question and recreating it. If it’s much shorter,
then you’ve probalby lost most
of your data. You can try
rebuilding the file using a disk
utility, but at this point, you’re
looking at a backup.
9
File Write Error (tried:
<1>, wrote: <2>)
Could not write out the full object
to disk. This should only happen
if you run out of disk space while
DataCheck is trying to grow a
data file. This may occur if your
disk space is low and you are
trying to scan a large file. Be
aware that DataCheck creates a
temporary file that needs to be
grown periodically. This message may be generated as a
result of the temporary files
growth.
Report to Technical Support.
10
This item is not currently being used.
11
Unknown version of 4D
The given version of 4D is
unknown to DataCheck.
DataCheck can only run versions greater than 3.1.
Check your version and contact
us for an upgrade if you have a
version of 4D later than 3.1 and
receive this warning.
53
Log Item Definitions
Error
Number
Description
Detail
Action
12
Structure File Object
Map Damage.
The object map in your structure
file is damaged.
You should run SanityCheck for
more information, as
DataCheck simply stops processing when an error occurs.
Most likely, though, you’re
going to have to run 4D
Tools:Compact on the structure
file.
13
Too many subtables
DataCheck (and 4D) can only
handle up to 5 levels of sub files.
Anything more than that and 4D
will go down in flames.
DataCheck simply tells you that
you’ve got an invalid structure
definition.
Verify that you really do have
this situation. If you do, then
you’re going to have to create a
new structure file. Also, you
should look into a mirror and
say, “Why am I creating such a
bizarre structure definition, anyway?”
14
Bad Version (<1>)
This version is unrecognized by
this piece of code. Different
modules within DataCheck verify
that the correct version is being
used for that module. This message will most likely occur after
an upgrade has occured and not
all parts of DataCheck were
upgraded. Although unlikely, it is
possible.
Contact Technical Support.
15
Bad Table Number:
<1>
The table number cannot exist
as it is not in the range of valid
table numbers.
Determine what object stored
the bad table number and try to
delete and recreate it.
16
Table number mismatch: (structure: <1>,
data file: <2>)
The number of tables in the
structure does not match the
number of tables in the data file.
Usually this occurs when you try
to open the wrong data file.
Verify that you’re opening the
correct data file. If you are, verify you’ve got the right version
of your structure file. If that fails,
try opening the data file with
4D. If that fails, try recover by
TAGS, or recover via backup.
17
Version unsupported
by DataCheck
(requires v3.1.1 or
greater)
DataCheck requires version
3.1.1 or greater, and this data file
appears to be less than version
3.1.1.
Verify that the data file is
greater than 3.1.1. If it is, then
contact Technical Support.
18
This item is not currently being used.
19
This item is not currently being used.
54
Log Item Definitions
Error
Number
Description
Detail
Action
20
Table cannot be found
in structure file (Table:
<1>)
The given table number could
not be found in the structure file.
Either the structure file or the
data file is damaged, or they do
not match.
Verify that you’ve got the right
data file and structure file. Verify that the data file can be
opened with the structure file
from within 4D. If it can, contact
Technical Support. If it cannot,
then you should recover by
TAGS.
21
Internal Error: No free
blocks
DataCheck internally has lists of
blocks that it keeps in memory. If
it runs out of blocks it tries to
dump blocks that are not currently used by some part of
DataCheck. If that fails, it then
tries to write out blocks that are
dirty and reuse those blocks. If
that fails, it tries to allocate more
blocks. If that fails, you see this
message.
Increase DataCheck’s memory
partition.
22
Cannot read block (offset: <1>, length: <2>)
The given block could not be
read. Most likely this is due to a
file system error.
Check any other items that
might occur with this one to
deduce what may have caused
this to happen. If nothing is
obvious, then perhaps there is
a file system problem, so use a
disk utility (such as Norton Utilities) to diagnose this disk/file. If
the file appears to be OK, then
try Recover By TAGS.
23
Internal Error: Block
not found to lock (<1>)
DataCheck attempted to lock a
block for manipulation, but could
no longer find the block in memory to lock. This should never
happen.
Report situation to Tech Support. To immeidately solve the
symptom, increase
DataCheck’s memory partition,.
24
Internal Error: Block
not found to unlock
(<1>)
DataCheck attempted to unlock
a block and could not find the
block in memory to unlock it.
This should never happen and is
indicative of a bug in DataCheck.
Report situation to Technical
Support.
25
Cannot allocate disk
block memory
There is not enough memory to
allocate the desired block from
memory. DataCheck pre-flights
allocation of memory for speed,
and could not get the basic
amount necessary to store the
address table disk blocks.
Increase DataCheck memory
partition.
55
Log Item Definitions
Error
Number
Description
Detail
Action
26
Table header offset is
unreadable (Table
#<1>).
Could not find the offset to the
given table. Most likely, this is
either a version problem or a
problem with a bad table number.
Look at accompanying items as
they should tell you more about
this. If there are none, then you
are most likely going to have to
recover by TAGS.
27
Bad record number
(Num: <1>, Max: <2>)
The given record number is outside the valid range of record
numbers for the table.
Find the source of the problem
(most likely an index) and
delete and recreate the responsible object (i.e., drop and
rebuild the index).
28
Bad table number
(Table <1>, NTables:
<2>)
The given table number is outside the acceptable range of
tables for the database.
Deduce what object is causing
the problem and delete and recreate that object. Simple to do if
it is an index, more difficult if it
is the table header. If it is the
latter, then you’re probably
going to have to recover by
TAGS.
29
Structure has an index
on ’<1>’ that doesn’t
exist in data file
The structure has an index that
does not exist in the data file.
This can occur if the index has
been dropped, but the data file
has not been opened by 4D to
rebuild it. This can also happen if
the table has no data in it. Then
4D has no index to make, so it
doesn’t bother to make it.
Either re-index by opening with
4D, or ignore if there is no data
in the table.
30
Cannot allocate disk
block memory
There is not enough memory to
allocate the desired block from
memory. DataCheck pre-flights
allocation of memory for speed,
and could not get the basic
amount necessary to store the
address table disk blocks for the
indices.
Increase DataCheck’s memory
partition.
31
Cannot allocate index
information table
(nIndices: <1>)
There isn’t enough memory to
allocate space for the index
information table.
If the number of indices looks
right, then increase
DataCheck’s memory partition.
If you see something like
“213332342” for the number of
indices, then you’ve got a problem. You should probably force
drop all indices in the latter
case.
56
Log Item Definitions
Error
Number
Description
Detail
Action
32
Bad index number:
(Index #<1>, nIndices:
<2>)
The given index number is
greater than the number of indices in the database.
Verify the numbers generated
(does the maximum number
make sense?). If so, drop all
indices (Force Drop) and
rebuild them all.
33
Cannot read index
header table (nIndices: <1>)
The index header table contains
information about each index —
where the root node of the tree
on index is, what field the index
represents, etc. If this is unreadable, then the database is
unable to use any index.
You need to drop all indices.
Most likely, you will have to use
Force Drop All Indices, as nothing should be able to read the
index header table (4D Tools,
4D, DataCheck, etc).
34
Bad node ID (NodeID:
<1>, Max: <2>)
The index keeps track of a list of
nodes that represent the index.
Each node has a unique number
(just it’s position in the list). The
maximum number of nodes is
stored in the index header.
Therefore, if this error appears,
either the index header is incorrect, or the node ID is incorrectly
generated.
Try dropping the index. If that
doesn’t fix it, then the problem
is most likely in the index
header, and you should use
“Force Drop All Indices”.
35
Cannot find the field for
index <1>
Each index keeps track of the
field that it represents.
DataCheck verifies that this field
exists in the structure file. If it
doesn’t, then you get this error.
You should verify you’ve got the
right structure file for this data
file. If they match, then you
should drop all indices and
rebuild. Use “Force Drop All
Indices”.
36
Node begins beyond
EOF (offset: <1>, filesize: <2>)
When attempting to read a node,
the file position was out of file
bounds. Either the file has been
truncated or the index address
tables are damaged.
See what other errors pop up.
Try turning of index checking
and see if just the data is intact.
If the data is OK, try dropping
the index. If this fails, try dropping all indices via “Force Drop
All Indices”.
37
Cannot read node
blocks (offset: <1>,
size: <2>)
The data for the node cannot be
read from the file. Most likely
your index is damaged.
Check for other damage — run
a scan without Verify Index
being checked. If no other serious problems, then drop this
index.
57
Log Item Definitions
Error
Number
Description
Detail
Action
38
Node extends beyond
EOF (node end: <1>,
filesize: <2>)
The data for the node canot be
read from the file. This is indicative of damage to your index, but
could also be one symptom of a
greater problem.
Look for other problems in your
data file. If this is the only problem, then drop the index. If you
see this in a group of problems,
you probably have general file
damage that will probably only
be fixed via Recover by TAGS.
If your problems are on in indices, then you should “Force
Drop All Indices”.
39
Previous node damaged (ID: <1>)
Each entry in each node has a
“Previous” node and a “Next”
node. This is how the index tree
is built. A quick check is done on
the previous node ID, and if it
appears damaged, this item will
be generated.
You will most likely have to drop
the index and rebuild it.
40
Too many node entries
(num: <1> , max <2>)
There can only be 64 node
entries in version 3.5 of 4D. If
there are more than this in the
node, the node is assumed to be
damaged.
You should drop the index.
41
Record does not exist
(record number: <1>)
If “Verify Record Number” is
selected, the record offset is
pulled from the record address
tables. If the record number is
out of the range of record numbers, or if the record address
tables are damaged, this will
occur.
Turn off index checking and see
if the file scan is clean. If it is,
then you probably have index
damage. Otherwise, you should
fix the other problem and then
revisit this one.
42
Next node damaged
(ID: <1>)
Each entry in each node has a
“Previous” node and a “Next”
node. This is how the index tree
is built. A quick check is done on
the next node ID, and if it
appears damaged, this item will
be generated.
You will most likely have to drop
the index and rebuild it.
43
Bad field type (type:
<1>, entry: <2>)
Each entry in each node has a
“Previous” node and a “Next”
node. This is how the tree is
built. A quick check is done on
the node ID, and if it appears
damaged, it will be reported.
You will most likely have to drop
the index and rebuild it.
58
Log Item Definitions
Error
Number
Description
Detail
Action
44
Node entries extend
beyond end of node
(entry: <1>)
While scanning the node,
DataCheck constantly verifies
that it hasn’t fallen off the end of
memory allocated for this node.
This item is generated if
DataCheck runs off the end of
the node while reading node
entires. The entry number is
shown (rather useless to anybody but the author of
DataCheck).
Drop this index and rebuild it.
45
Index Damaged — too
many levels (nodeID:
<1>)
Only five levels are allows in any
index. A level is a level of the
tree of nodes. Since five levels is
the maximum, you can only have
five disk reads to find any given
data item. The number is
enforced by the maximum number of nodes to represent the
maximum number of elements
(or records).
If this is a new version of 4D,
contact Technical Support to
verify that this is still a limit of
4D. Otherwise, you’ve got some
damage in your index and
should delete and rebuild it.
46
Index Damage —
Entries are not sorted
(nodeID: <1>)
While DataCheck is scanning
the nodes, it verifies that each
entry is greater than (or equal to)
the entry before it. If this
becomes not true, then
DataCheck complains. This
problem has been seen with the
“Indexing Problem” described
above.
Drop the index and rebuild it. If
you still exhibit the problem,
then select “Verify Index (slow)”
and see if that fails. If it does
fail, then search from within 4D
for the data. If the data is found,
then report this to technical
support. Otherwise, you’ve got
a poorly built index that continues to be poorly built. If it is an
ASCII field, then you should try
to identify what “out of range”
characters you have an remove
them from your data.
47
Index Damaged — not
enough entries exist
(nodeID: <1>)
The entry in the node could not
be found. This node is severely
damaged, and therefore the
whole index is damaged.
Delete the index.
59
Log Item Definitions
Error
Number
48
Description
Index <1> represents
the same field as this
index.
Detail
This item occurs when more
than one index claims to represent a given field. Apparently, 4D
will sometimes create multiple
indices, which can cause problems with management of your
data file.
Action
Drop all indices for this field,
then rebuild them.
Please refer to “Multiple Indices
per Field (item [48])” on page 38
for more information.
49
Index does not exist in
structure file (approx
disk space: <1>)
The index is in the data file, but
is not in the structure file. Most
likely, you turned off the index
using a different data file, and
are now using DataCheck on
this data file (which has an
index) and the structure no
longer does. This will not cause
you any problems running 4D.
You don’t need to do anything.
However, you may wish to drop
this index to save disk space.
50
Deleted Index (approx
disk space: <1>)
The index has been deleted, but
4D only tags the index as
deleted and doesn’t actually
remove it.
This shouldn’t cause you any
problems. Creating a new index
should use this index slot. You
could drop this index with
DataCheck, which will clean it
up.
51
This empty index does
not exist in structure
file
The index is empty and doesn’t
exist in the structure file. This is
just a special case of item [49]
(above), and occurs when the
index has no nodes.
This shouldn’t cause any problems in your database. However, if you’d like to remove this
item, then drop the index with
DataCheck.
52
Cannot allocate
address table buffers
The address table buffer could
not be allocated. You can check
to see which address buffer this
is by look at other items generated after this one.
Most likely, you’ll simply need to
increase memory for
DataCheck.
53
Cannot load address
table block
The address table entry could
not be read from disk.
If the address table is associated with an index, then drop
the index and rebuild it. If the
address table is associated with
a table, then you’ll most likely
have to recover by TAGS.
60
Log Item Definitions
Error
Number
Description
Detail
Action
54
Tried to read beyond
address table
A DataCheck module requested
an address block that was out of
range.
Determine what caused this
problem by looking at items
generated after this item. For
example, if it is an index, just
drop the index and rebuild it. If
it’s a table, you’ll probably have
to rebuild the whole file using
recover by TAGS.
55
Invalid address in
address table.
The address in the address table
was not read from disk due to
the fact that it was bad.
Look at previous items to discover the block that could not
be read. Look at following items
to find out what module was
attempting to use this address
table, and deal accordingly. For
example, if it is an index, drop
the index.
56
Bad TAG (tag: <1>)
DataCheck recognizes three
types of TAGs. If any other TAG
is read in when the record is
pulled off of disk, then
DataCheck will complain.
If you have a new version of
4D, check with Technical Support to verify that a new TAG
has not been added to 4D that
this version of DataCheck
doesn’t recognize. Otherwise,
you’ve got a damaged record.
You should delete the record
and re-enter it. You know the
record from the record number
which is generated in a later
item.
57
Bad record number
(got <1>, expected
<2>)
There is a list of all records in
your database. This list is the
address table. The first entry in
that list is the first record (record
number 0), the next record in
that list is record number 1, and
so on. The record number is also
stored in the header of the
record on disk. If the two numbers mismatch, then this item is
generated.
You most likely have a damaged record and you should
recover by TAGs.
61
Log Item Definitions
Error
Number
Description
Detail
Action
58
Bad Table Number (got
<1>, expected <2>)
Each table has a list of records.
This record was found in the list
for a certain table, but when it
was read, it claimed to be from
another table. Not good.
Recovering by TAGS might
confuse 4D, if this record really
is for the file in question, and
simply has a bad table number
in it. If there’s only one of these,
then you should probably delete
the record and re-enter it. If
there is a rash of these, then
you probably have some general damage that Recover by
TAGS would clean up.
59
Record begins beyond
EOF (record: <1>, offset: <2>)
The record is off the end of the
file. 4D has been known to crash
trying to read these types of
records.
Try deleting the record. If that
fails, you’re only hope of ridding
yourself of this record is via
Recover by TAGS.
60
Cannot read record
data (record: <1>, offset: <2>)
The record could not be read
from disk. Check previous item
to discern why.
You will most likly have to
delete this record. If deleting
doesn’t work, then you’re going
to have to recover by TAGS.
61
Record extends
beyond EOF (record:
<1>, rec end: <2>)
The record goes beyond the end
of the file. Either the file has
been truncated or the record is
damaged and claims to be too
long.
If the record appears to be
damaged, then delete it. If the
file is truncated, go to backup.
62
Record field headers
extend beyond EOF
(record: <1>, nFields:
<2>)
Each record is broken into several parts. One part is the field
headers (which point to the data
itself). The field headers are of
constant size, so if this item is
generated, either the number of
fields (stored in the record
header) is damaged, or the file is
truncated.
If the nFields looks wrong (you
know, a bogus looking big number), then try deleting this
record. Otherwise, you’ve probably got a truncated file, and
you need to recover by TAGS.
63
Field data starts
beyond EOR (record:
<1>, field: <2>)
The data for the fields begin
beyond the end of this record.
This record is most likely damaged. Delete the record and reenter it.
64
Invalid field type
(record: <1>, type:
<2>)
DataCheck recognizes all field
types in version 3.5 of 4D. The
types are: Alpha (0), Real (1),
Text (2), Picture (3), Date (4),
Boolean (6), Subtable (7), Integer (8), Longint (9), Time (11).
If you’ve got a recent version of
4D, then verify with Technical
Support that there are no
issues with this item. If there
are no issues with DataCheck,
then you’ve probably got a
damaged record which you can
fix by deleting and re-entering.
62
Log Item Definitions
Error
Number
Description
Detail
Action
65
Field data overlaps
(record: <1>, field:
<2>)
While parsing each field,
DataCheck tracks the bounds. If
two fields overlap, DataCheck
detects it and warns you.
You should delete this record
and re-enter it.
66
Field data extends
beyond EOR (record:
<1>, field: <2>)
The data for a particular field
extends beyond the end of the
record. Most likely this occured
due to damage in this field. In
many cases, it’s a text field that
has a bad length (for the number
of characters). A date field, for
example, is always the same
length, so it’s hard for that to get
damaged.
Try deleting and re-entering the
record.
67
Record claims no text,
but field has text
(record: <1>, field:
<2>)
The record has a flag at the
beginning that descrbes whether
text is present in this particular
record. If the flag is cleared (not
set), but text exists, this item is
generated.
Delete the record and re-enter
it.
68
Record claims no picture, but field has picture (record: <1>, field:
<2>)
The record has a flag at the
beginning that descrbes whether
a picture is present in this particular record. If the flag is cleared
(not set), but a picture exists,
this item is generated.
Delete the record and re-enter
it.
69
Field data extends
beyond EOR (record:
<1>, nFields: <2>)
A quick compare is done
between the number of fields
and the field data offset and the
end of the record. If these do not
line up, then DataCheck generates this error.
Delete the record and re-enter
it.
70
Text data extends
beyond EOR (record:
<1>, field: <2>)
The text data extends beyond
the end of the record. This will
happen if the number of characters in the text is damaged.
Delete this record and re-enter
it
71
Picture data extends
beyond EOR (record:
<1>, field: <2>)
The picture extends beyond the
end of the record. This will happen if the picture header is damaged.
Delete this record and re-enter
it.
63
Log Item Definitions
Error
Number
Description
Detail
Action
72
Picture data is damaged (record: <1>,
field: <2>)
This picture is damaged.
DataCheck will not generate this
item in v3.5 due to the fact that
pictures may be BLOBs. Version
6 supports BLOBs, which will
enable DataCheck to begin
enforcing pictures in picture
fields.
Nothing until verison 6 of 4D.
73
Record claims no subtables, but field has
subtable info (offset:
<1>, field: <2>)
The record has a flag at the
beginning that descrbes whether
a subtable is present in this particular record. If the flag is
cleared (not set), but a subtable
exists, this item is generated.
Delete the record and re-enter
it.
74
Record has too many
subfields (record: <1>)
Only 5 subfields are allowed in a
database. If you have more 4D
will not be able to handle the
structure file. Verify that the
structure has less than 5 subtables.
Verify that the structure is valid.
If the structure really does have
more than 5 subtables, then
you have to solve that problem.
If the structure has less or equal
to 5 subtables, then your record
is probably damaged, and you
should delete and re-enter it.
Cannot find field data
in ’<2>’ index (record:
<1>, data: ’<3>’)
The given data could not be
found in the index. This may
mean index damage, and it may
mean a problem within
DataCheck.
Verify that you can find the data
within 4D, by doing a search.
Verify that when you search in
User Mode that you search
using the index, and verify that
you do get the record (in case
you get multple return results,
sift through for the right record).
If you can search with 4D and
get the right record, then
DataCheck is having problems
and you should contact Technical Support.
75
64
Log Item Definitions
Error
Number
76
Description
Cannot convert data
for index comparison
(record: <1>, field:
<2>)
Detail
DataCheck needs to convert
data from one format to another.
This occurs when you have a
field that is an integer field and
you have 5000 records and you
decide to change it to an ASCII
field. 4D does not convert each
record in your data file to have
an integer for that field. 4D will
convert the field on the fly to
build the index.
Action
Contact Technical Support.
Since DataCheck must check
that index, DataCheck must also
perform the same conversions.
This message is generated
when DataCheck cannot do the
proper conversion.
77
Bad disk address —
invalid file segment
(segment: <1>, max:
<2>)
Detailed Descriptions: disk
addresses contain the data file
segment number, if your data
has multiple files. This number
must be less than or equal to the
number of segments in your
data.
Check to see if the segment
number exists. The first segment is segment 0, the second
is segment 1, and so on. If it
does exist, then contact Technical Support. If it doesn’t exist,
then the address is incorrect
and you should track down
what module in DataCheck tried
to use this disk address by
examining items generated
after this item.
78
Disk position beyond
end of file (datafile:
<1>, position: <2>, file
len: <3>)
The disk position requested is
beyond the end of the file. This is
a generic item generated by low
level code that handles verifying
information about a disk request
to be made.
Deduce what DataCheck module has caused this to occur by
examining items that occur after
this item.
79
Internal error traversing index. (idxMid: <1>
nodeID: <2>
DataCheck experienced a problem walking the node tree. This
is an internal error and should
never happen.
Contact Technical Support.
80
Index node count
invalid (expected: <1>,
got: <2>)
This item is generated when the
number of nodes counted does
not match the number of nodes
in the index header.
Try dropping and rebuilding the
index.
65
Log Item Definitions
Error
Number
81
Description
Index unusable
Detail
Action
This item is generated when the
maximum number of items for an
object is reached.
Resolve other items that are
being generated by DataCheck.
Since DataCheck could report
problems occur once per record,
for 50,000 records, it was
deemed prudent to stop reporting problems after a reasonable
number.
82
Record unusable
This item is generated when the
maximum number of items for an
object is reached.
Resolve other items that are
being generated by DataCheck.
83
Record count not equal
to index entry count
(nRecs: <1>, nEntries:
<2>, idx: ’<3>’)
The number of records should
exactly match the number of
entries in all nodes in the index.
If they don’t match, then you
may have a problem. However,
when 4D cannot find data in an
index, it will often just re-add the
data into the index. At this point,
your nEntries will exceed the
nRecs.
Try deleting and rebuilding the
index.
84
Data file version number invalid
Different modules of DataCheck
verify versioning, so that as each
module is upgraded to match an
upgrade in 4D, code complains
gently instead of crashing.
Verify that your version is
greater than or equal to v3.1.1.
If it is, then contact Technical
Support.
85
4D interrupted while
saving bitmap
4D sets a bit in the header of the
file before it saves the bitmap.
When it’s done saving the bitmap, it clears this bit. Therefore,
if something happens between
starting the bitmap write and
ending the bitmap write, then
this bit will be set, indicating that
perhaps the bitmap table was
not completely updated on disk.
Perform a 4D Tools:Compact to
rebuild the bitmap tables.
86
4D interrupted while
saving index <1>
4D sets a bit in the header of the
file before it saves the index.
When it’s done saving the index,
it clears this bit. Therefore, if
something happens between
starting the index write and ending the index write, then this bit
will be set, indicating that perhaps the index was not completely updated on disk.
You should Force Drop All Indices and rebuild them.
66
Log Item Definitions
Error
Number
Description
Detail
Action
87
4D interrupted while
deleting index <1>
4D sets a bit in the header of the
file before it saves the index.
When it’s done saving the index,
it clears this bit. Therefore, if
something happens between
starting the index write and ending the index write, then this bit
will be set, indicating that perhaps the index was not completely updated on disk.
You should Force Drop All Indices and rebuild them.
88
Address tables damaged for table <1>
The address table is damaged.
The address table contains the
address (offsets) for each record
in the table.
Recover by TAGS.
89
4D interrupted while
flushing cache
4D sets a bit in the header of the
file before it flushes the cache.
When it’s done flushing the
cache, it clears this bit. Therefore, if something happens
between starting to flush the
cache and completing flushing
the cache, then this bit will be
set, indicating that perhaps the
data was not completely
updated on disk.
You should run recover by
TAGS.
90
Bad Data Segment
Information Table
count (range: 1..<2>,
val: <1>)
The number of data segments is
not correct. Either you have
exceeded the allowed amount,
or there is some damage in the
segment information table.
If there is damage, your only
recourse is recover by TAGS.
91
Bad Table Information
Table offset (offset:
<1>)
The table information table contains information about each
table — where the address table
for the table is, etc. So without
this offset, DataCheck cannot
find any of the records for this
file.
Most likely, you’re going to need
to run Recover by TAGS.
92
Bad Data Segment
Information Table offset (offset: <1>)
The data segment information
table contains information about
the segments that makes up
your data. The offset is stored in
the header of the first segment
(the main data file). If this offset
is incorrect, then there is no way
to obtain information about the
segments, such as how big a
block is for the segment, etc.
This is crucial information.
Most likely, you will have to
recover by TAGS.
67
Log Item Definitions
Error
Number
Description
Detail
Action
93
Error reading Data
Segment Information
Table (DSIT count:
<1>)
DataCheck could not read the
whole Data segment information table from disk. Most likely
there is a file position error, or
the DSIT runs off the end of the
file.
Most likely, you will have to
recover by TAGS.
94
Block size <1> invalid.
DataCheck only tested
with blockize of <2>
DataCheck is designed to work
with any size blocks. However, it
has only been tested with block
sizes of 64 and 128 bytes. Other
block sizes should work, but
DataCheck is warning that if
there are severe issues with the
data file, and this is a new version that creates a new blocksize, that DataCheck should be
suspect.
If you’ve run DataCheck on this
data file before and haven’t
upgraded to a new version of
4D and DataCheck has never
reported this, then you’ve probably got some damage that will
require you to recover by
TAGS. However, if you’ve just
upgraded to a new version of
4D and all of a sudden you start
to get this item, you should get
an upgrade of DataCheck.
95
Block ratio doesn’t
match blocksize (ratio:
<2> blocksize: <1>)
The block size has a corresponding ratio, which is basically
a number that is used to quickly
do math. The ratio allows a shift
operation to be performed
instead of a division (which is
slower). The ratio is derived from
the blocksize. If these two do not
correspond, then there is some
damage in your data file.
You should recover by TAGS.
96
Cannot open data segment ’<1>’
The data segment could not be
found on disk.
Verify that 4D can open this
data file. Verify that you have
permission to see the disk drive
and folder that this file exists in.
DataCheck needs to be able to
’see’ all segments for a file
when running. If the file simply
doesn’t exist any more, then
you’re going to have to go to a
backup. Otherwise, simply
opening the file with 4D (and
finding the subsequent data
segments) will allow DataCheck
to work properly.
68
Log Item Definitions
Error
Number
Description
Detail
Action
97
File system error
accessing EOF (file:
’<1>’)
DataCheck determines the size
of a file by jumping to the end of
the file and then asking the operating system what file position it
is at. If there was a problem in
either of these operations, then
DataCheck reports this error. It is
most likely a file system problem.
Use a file system tool such as
Norton Utilities to uncover the
problem.
98
Claimed file size
greater than actual file
size (file: ’<1>’, claim:
<2>)
The size of the data file is stored
within the data segment information table. If this claimed size is
greater than the actual file size,
then DataCheck complains. This
is indicative of a file truncation.
You should probably go to a
back up of this file. You might
be able to recover your data
using a disk utility, but your
backup is really your best bet.
99
Cannot read Table
Information Table
Header
The table information table
header contains information
such as the number of tables in
the database, what the offset to
the index header tables are, how
many indices there are, and the
like. If this cannot be read, then
there is most likely some severe
damage in your data file.
Recover by TAGS is probably
your only bet.
100
Too many tables (max:
<2>, claim: <1>)
Only 255 tables can be used by
4D. If the number of tables
stored in the table information
table header is greater than this,
then DataCheck complains.
Most likely, this is indicative of
damage.
You should recover by TAGs.
101
Cannot read Table
Information Table
The Table Information Table
stores information about each
table, such as how many records
there are, where the address
tables are stored on disk, and
the like. All table information
tables are read in one shot by
DataCheck. If it can’t read all of
them, then it bails, assuming that
there is severe damage. This
item is then generated.
Recover by TAGs.
102
Too many records
(table: <1>, claim: <2>)
A table can only have 16777215
records. If the number of records
is greater than this, then there is
some damage in your table information table for the given table.
You should recover by TAGs.
69
Log Item Definitions
Error
Number
Description
Detail
Action
103
Too many SAT entries
(table: <1>, claim: <2>,
max: 4096)
There can only be 4096 secondary address table entries in the
primary address table. There is
most likely some damage in the
table information table.
You should recover by TAGs.
104
Bad bitmap block number (got: <1>, max:
<2>)
There is a constant number of
bitmaps blocks in the database.
In version 3.5, that number is
4096. If DataCheck tries to
access a bitmap block that is
outside of this range, then this
item is generated.
Most likely there is damage in
the bitmap which should be
fixed via 4D Tools:Compact.
105
Can’t load bitmap
block (file position:
<1>)
The bitmap block could not be
loaded from disk. The block contains ones and zeros that
describe what parts of the file
are free for usage. If the bitmap
block can’t be found, then you
need to fix this problem as soon
as possible, otherwise 4D may
start overwriting places on disk.
The bitmap is damged and you
should try 4D Tools:Compact.
106
Couldn’t extend bitmap
table
The bitmap table is being
extended (grown), and it cannot
be done. Most likely, this is
caused by insufficientdisk space
to grow into.
You should free up more space
on this disk.
In version 1.0 of DataCheck, the
only time the bitmap table is
extended is when DataCheck is
extending it’s own version of the
bitmap table in the temporary
file. So you should take a look at
where the tmp file is being saved
on disk. It should be saved in the
same directory as the run file.
70
Log Item Definitions
Error
Number
Description
Detail
Action
107
Internal: bitmap table
cannot handle objects
this large (size: <1>,
max: <2>)
DataCheck has some internal
limits on how big of a block of
information that it can manipulate. The bitmap code cannot
save an object that is greater
than 4096*blocksize, or 500
Kilobytes. Since DataCheck only
needs to manipulate index
nodes and other small items, this
should never be a problem.
However, in future versions of
DataCheck, if a record is greater
than 500 KB, then DataCheck
might generate this item. This
item should be removed before
that occurs, and is only here as a
safety mechanism from within
DataCheck.
Call Technical Support and
report this item.
108
Cannot find space in
file to allocate object
(size: <1>)
The object is being allocated in
the bitmap table and not enough
space can be found.
DataCheck should try to extend
the bitmap table when this
occurs, and therefore, you
probably have other items
being generated. Follow the
instructions for those items.
109
File is too small to be a
4D data file (file: ’<1>’,
size: <2>)
For a proper 4D Data File, you
need to have at least 32 kilobytes of data on disk. Anything
less than this in size cannot be a
data file. DataCheck does this
brief check to protect itself
against attempting to read a
severely truncated data file.
Most likely, you’ve just selected
a file that is not a datafile and
tried to run DataCheck on it. If
this really is your data file, then
your file is severely truncated
and you will need to recover it,
or obtain a backup. Recovering
it means using a disk utiltity
(such as Norton Utilities) to perform the recovery.
110
Space occupied (offset: <1>, size: <2>)
When DataCheck is building its
own internal bitmap that
describes how space is used on
disk, it first checks to see if a bit
is already set before it sets the
bit. If the bit is already set, then
that means this block on disk is
already allocated to another part
of your data file. This is not a
good thing.
As usual, backup your data file.
Then you should perform a 4D
Tools:Compact, which should
clean up the bitmap. Then run
DataCheck to see if there’s any
damage now that the bitmap
table is cleaned up. If you continue to get this item, contact
Technical Support.
111
Cannot extend temporary storage file
The temporary storage file
(where DataChecks copy of the
bitmap is stored) could not be
extended.
Try increasing disk space on
this disk by removing other
files. The bitmap file shouldn’t
grow to be that large.
71
Log Item Definitions
Error
Number
Description
Detail
Action
112
TRIC resources used
to create these indexes
are unknown (<1>)
DataCheck knows about the
standard TRIC resources, but
cannot locate this TRIC. It may
be that the ID that describes the
TRIC is damaged, or it could be
that DataCheck simply doesn’t
know about your TRIC resource.
If you’ve run with DataCheck
before, and no problems were
encountered, then you’ve probably got some damage. Drop all
indices using Force Drop All
Indices and rebuild them with
4D. If you’re just encountering
this on a new datafile (and
especially if you know that
you’re using a different TRIC
resource), then you’re going to
have to install a TRIC resource
from your copy of 4D.
113
Table Information
Table address is damaged (addr: <1>)
The table information table
address is not correct.
DataCheck does a quick check
to verify that the table information table address is correct
before it tries to read the table.
This item is generated if the verification failed.
You should recover by TAGs.
114
Bitmap Error: Table
Information Table
There was a problem processing
the bitmap for the table information table. Most likely, this means
that the table information table
overlaps another object. Check
previous items to see the actual
situation.
Follow directions for the previous items. Most likely, you’ll be
doing a 4D Tools:Compact.
115
Bitmap Error: Primary
Address Table for
Table <1>
There was a problem processing
the bitmap for the primary
address table for the given table.
Most likely, this means that this
object overlaps another object.
Check previous items to see the
actual situation.
Follow directions for the previous items. Most likely, you’ll be
doing a 4D Tools:Compact.
116
Bitmap Error: Bitmap
blocks
There was a problem processing
the bitmap for the bitmap blocks.
Most likely, this means that this
object overlaps another object.
Check previous items to see the
actual situation.
Follow directions for the previous items. Most likely, you’ll be
doing a 4D Tools:Compact.
117
Cannot read Bitmap for
file <1>
The bitmap table for the data
segment (file) could not be read
into memory.
Verify that this is the right data
segment. Verify that 4D cannot
open the file. If both fail, then
you should do a 4D Tools:Compact.
72
Log Item Definitions
Error
Number
Description
Detail
Action
118
Bitmap Error: Data for
Record <1>
There was a problem processing
the bitmap for the the given
record. Most likely, this means
that this object overlaps another
object. Check previous items to
see the actual situation.
Follow directions for the previous items. Most likely, you’ll be
doing a 4D Tools:Compact.
119
Bitmap Error: Node for
Index — Node #<1>
There was a problem processing
the bitmap for a node in this
index. Most likely, this means
that this object overlaps another
object. Check previous items to
see the actual situation.
Follow directions for the previous items. Most likely, you’ll be
doing a 4D Tools:Compact.
120
Bitmap Error: Secondary Address Table
#<2> for Table <1>
There was a problem processing
the bitmap for the secondary
address table for this table. Most
likely, this means that this object
overlaps another object. Check
previous items to see the actual
situation.
Follow directions for the previous items. Most likely, you’ll be
doing a 4D Tools:Compact.
121
Cannot read Primary
Address Table for
Table <1>
There was a problem processing
the bitmap for the primary
address table for the given table.
Most likely, this means that the
object overlaps another object.
Check previous items to see the
actual situation.
Follow directions for the previous items. Most likely, you’ll be
doing a 4D Tools:Compact.
122
Bitmap Error: Primary
Address Table for
Index <1>
There was a problem processing
the bitmap for the primary
address table for the given
index. Most likely, this means
that the object overlaps another
object. Check previous items to
see the actual situation.
Follow directions for the previous items. Most likely, you’ll be
doing a 4D Tools:Compact.
123
Bitmap Error: Secondary Address Table
#<2> for Index <1>
There was a problem processing
the bitmap for the secondary
address table for the given
index. Most likely, this means
that the object overlaps another
object. Check previous items to
see the actual situation.
Follow directions for the previous items. Most likely, you’ll be
doing a 4D Tools:Compact.
73
Log Item Definitions
Error
Number
Description
Detail
Action
124
Cannot read Primary
Address Table for
Index <1>
The index has a list of nodes that
make up the index. This list is
comprised of one primary
address table and several secondary address tables. This item
is generated when the primary
address table cannot be read
from disk.
You most likely have severe
damage in this index and shoud
drop and rebuild it. You may
encounter problems trying to
drop it, so do make a backup. If
you encounter problems dropping, then use Force Drop All
Indices.
125
Bitmap Error: Index
Headers
There was a problem processing
the bitmap for the index headers.
Most likely, this means that this
object overlaps another object.
Check previous items to see the
actual situation.
Follow directions for the previous items. Most likely, you’ll be
doing a 4D Tools:Compact.
126
Space incorrectly
claimed (pos: <1>,
size: <2>)
DataCheck builds a bitmap while
it is processing your data file.
This bitmap represents all
spaces on disk that are used.
This bitmap is then compared
against the bitmap that 4D has
kept for your data file. If the two
do not correspond, then either
this item, or item [127] is generated. When this item is generated, it means that 4D has
claimed that a space on disk is
being used, however DataCheck
could find no object that claims
that disk space. This means that
the disk space is unused and will
never be used — it is dead
space in your file.
This will cause no problems.
However, if the sum of these
items becomes large, you may
wish to do a 4D Tools:Compact
to help save disk space. Note,
however, that doing a 4D
Tools:Compact will create extra,
unused, space unless you have
done a Force Drop All Indices
before hand. So, the proper
procedure would be: (1) Force
Drop All Indices (2) run 4D
Tools:Compact (3) open data
file with 4D to re-index.
127
Space should be
claimed (pos: <1>,
size: <2>)
DataCheck builds a bitmap while
it is processing your data file.
This bitmap represents all
spaces on disk that are used.
This bitmap is then compared
against the bitmap that 4D has
kept for your data file. If the two
do not correspond, then either
this item, or item [126] is generated. When this item is generated, it means that DataCheck
has found an object that usees a
piece of disk that 4D does not
have marked as being used.
This is a problem waiting to happen.
You should run 4D Tools:Compact to clean up the bitmap.
74
Log Item Definitions
Error
Number
Description
Detail
Action
128
Too many bitmap
errors for this data segment
This item is generated while processing the data segment so
that thousands of items are not
displayed in the log file. The first
25 are displayed, and then
DataCheck stops displaying (but
continues processing). You will
get summary information.
This is informational, no action
is required.
129
Total space incorrectly
claimed by bitmap: <1>
This item is generated to summarize the total amount of disk
space that the bitmap in the 4D
data file claims but aren’t really
being used. This is the sum of all
disk space from item [126].
N o action required — this is
informational. If this number
gets relatively large, then you
may wish to perform a compact
(see item [126] for details on
this).
130
Total space not properly claimed by bitmap:
<1>
This item is generated to summarize the total amount of disk
space that the bitmap in the 4D
data should be claiming but isn’t.
This is the sum of all disk space
from item [127].
See action items for item [127].
131
Cannot reliably run bitmap scan due to fatal
error
If the scan was not successfully
completed, then the bitmap cannot reliably be run. For example,
there was a fatal error and
DataCheck could not read all
nodes in an index, then
DataCheck cannot know
whether those nodes are allocated or not in the bitmap. So
there is no way to compare the
bitmaps reliably.
Solve the other items that have
been generated and re-run
DataCheck.
132
DATA FILE MODIFIED: All indices have
been dropped, but the
bitmap was not
updated.
This item will be generated after
a Force Drop All Indices has
been run. It is warning you that
although the indices have been
dropped, the space in the files
that that they were using have
not been cleaned up.
Run 4D Tools:Compact to clean
up the bitmap.
133
DATA FILE NOT MODIFIED: Could not drop
the indicies
This item is generated when
another error caused DataCheck
to not modify the file.
Check previous items to
deduce why this item was generated.
134
Index was dropped
The given index was dropped.
This is informational, no action
is required.
75
Log Item Definitions
Error
Number
Description
Detail
Action
135
Node #<1> cannot be
deleted
The given index could not be
deleted.
Run a DataCheck scan and see
what the results are. Most likely,
extra space will just exist — the
node couldn’t be dropped. If
this prevented the entire index
from being dropped, then the
way to fix it is with “Force Drop
All Indices”.
136
Cannot flush buffers
The buffers that hold changes
with regard to disk modifications
could not be flushed.
Run DataCheck on this file
again (doing a full scan, not
dropping indices). You may
have damage in the indices that
can be fixed via Force Drop All
Indices.
137
Node #<1> cannot be
found to be deleted
The node could not be found to
be deleted. Most likely, this indicates severe damage in the
index and is probably why you
were deleting it anyway.
Run DataCheck again on this
data file to determine it’s state.
Most likely, you will have to run
Force Drop All Indices.
138
Index Address Tables
severely damaged
Damage was detected while
attempting to drop an index.
Run DataCheck again to determine the shape of the file
(extent of damage). You may
have to run “Force Drop All Indices” at this point.
139
Bitmap node in different file segment (offset: <1>, expected
seg: <2>)
DataCheck assumes in several
places that the bitmap blocks are
going to be stored in the same
segment that they represent. If
this is not the case, then
DataCheck needs to be modified
to handle this case.
If this is a recent release of 4D
that you are running DataCheck
on, then perhaps you need an
upgrade of DataCheck. Otherwise, you might have damage
in your bitmap that would be
solved with 4D Tools:Compact.
140
Cannot modify Index
Header Table.
The index header table needs to
be modified to completely
remove the index in question.
However, while trying to modify
this table an error occured.
Run DataCheck to determine
the state of the indices. You
may need to run a Force Drop
All Indices to solve this situation.
141
Cannot find index in
Index Header Table
(index offset: <1>).
While attempting to remove the
index from the index header
table, the index itself could not
be found. This is indicative of
severe damage in the index
header table.
Perform a Force Drop All Indices.
76
Log Item Definitions
Error
Number
Description
Detail
Action
142
Field count mismatch.
(Record Num: <1>,
Num Fields: Rec: <2>,
Table: <3>).
The number of fields in a record
is compared against the number
of fields in the table (from the
structure file). If these two differ,
then DataCheck generates this
item.
Try deleting and re-entering the
data. If you still experience this,
call Technical Support.
143
Primary Address Table
for Table <1> is invalid
(PAT: <2>)
The primary address table for
the given table is damaged.
You most likely need to recover
by TAGs.
144
Primary Address Table
for Index <1> is invalid
(PAT: <2>)
The primary address table for
the given index is damaged.
Actions: Drop the index and
recreate it.
145
Index <1> is named
<2>
This item is generated when the
name for an index could not be
generated at the time the original
item was generated. DataCheck
will then find the name and
report it at a later date so that
you can track down the index
from within 4D.
Follow instructions for the other
item that was generated. This
item is purely informational.
146
Record <1>: field <2>
contains a NAN
This item is generated when
DataCheck finds a NAN (Not-ANumber) in your data. This
occurs in real data types and is
due to a divide by zero, or sqrt(1), etc. Note that although
DataCheck gives you a way to
set all NANs to zero, mathematically, a NAN is not the same
thing as zero. NANs are used to
represent infinity or imaginary
numbers or other non-real numbers that occur when you do
mathematics on numbers from
the real number line. Note also
that: NAN*3=NAN, etc. So
NANs tend to spread in data that
is manipulated mathematically,
so catch them early and catch
them often.
You have several choices for
actions: (1) Use DataCheck to
set all NANs to zero. This will
set all the NAN values found to
zero. (2) Find the record yourself and remove the NAN manually (by setting it to zero or
another number).
147
Unused
This item number is not currently
in use (but may be reused in a
later version of DataCheck).
N/A
77
Log Item Definitions
Error
Number
Description
Detail
Action
148
Record <1>: actual
size (<2>) does not
match stored size
(<3>)
In version 6 of 4D, the record
size is stored for faster retrieval.
This stored number does not
match the computed number
and is therefore suspect.
DataCheck is using the computed number. Note that in first
releases of 4D v6, this is a common problem. It is not clear at
the writing of this manual
whether there are ramifications
of this issue, but ACI has been
notified of it in great detail. It is
clear that this is a problem within
4D.
Try re-writing the record
(change a value in the record,
save it, resave the original
value). If that doesn't work, try
deleting the record and recreating it. If that doesn't work, contact Technical Support for more
information.
149
Node size does not
match stored node size
(actual: <1>, stored:
<2>)
In version 6 of 4D, the node size
is stored for faster retrieval. This
stored number does not match
the computed number and is
therefore suspect. DataCheck is
using the computed number.
Note that in first releases of 4D
v6, this is a common problem. It
is not clear at the writing of this
manual whether there are ramifications of this issue, but ACI has
been notified of it in great detail.
It is clear that this is a problem
within 4D.
Try dropping the index and letting 4D re-create it. You can
use DataCheck to drop the
index, or use 4D. Using
DataCheck verifies that it is
truely dropped, whereas sometimes 4D does not completely
delete the index.
150
Unused
This item number is not currently
in use (but may be reused in a
later version of DataCheck).
N/A
151
Unused
This item number is not currently
in use (but may be reused in a
later version of DataCheck).
N/A
152
Cannot write record
<1> to disk
While fixing records, DataCheck
could not write this record to
disk.
(1) verify the data file is not on a
locked volume (like a CD ROM
or a write protected volume).
(2) try deleting the record and
recreating it. If this item persists, contact Technical Support.
153
Bad checksum on
record <1>
Each record has a checksum to
protect against damage in the
file. This records checksum
does not match the record so the
record may be damaged.
Try deleting the record and recreating it. Note that future versions of DataCheck will be able
to fix this problem.
78
Log Item Definitions
Error
Number
Description
Detail
Action
154
Drop index '<2>' before
forcing NANs to zero
Cannot set NANs to zero without
dropping index first. Since modifying the field will change the
sort order of the index,
DataCheck requires that you
drop the index before modifying
the value of this field. This is
due to the fact that DataCheck
cannot rebuild indexes for you this task is best left for 4D to do.
If we make data changes in your
data file, we would then have to
update the index, which would
require manipulating the index.
Again, we leave major internal
index manipulations to 4D, for
compatibility issues.
Use DataCheck to drop the
index, then fix the NAN, then
open your data file with 4D and
the index will be rebuilt by 4D.
155
Loaded TRIC ID (<1>)
does not match stored
TRIC ID (<2>)
Each TRIC resource has an ID.
The manually loaded TRIC
resource's ID does not match
the TRIC ID stored in this data
file. Make sure you want to do
this - it is not standard.
Verify that you do want this to
happen (if you are manually
loading TRIC resources, you
should know what you are
doing). If you think you loaded
the right TRIC resource and got
this item, then verify that you
are truely opening the correct
version of 4D - you want the
one that you use when opening
this data file.
150
Unused
This item number is not currently
in use (but may be reused in a
later version of DataCheck).
N/A
151
Unused
This item number is not currently
in use (but may be reused in a
later version of DataCheck).
N/A
152
Cannot write record
<1> to disk
While fixing records, DataCheck
could not write this record to
disk.
(1) verify the data file is not on a
locked volume (like a CD ROM
or a write protected volume).
(2) try deleting the record and
recreating it. If this item persists, contact Technical Support.
153
Bad checksum on
record <1>
Each record has a checksum to
protect against damage in the
file. This record’s checksum
does not match the record so the
record may be damaged.
Try deleting the record and recreating it. Note that future versions of DataCheck will be able
to fix this problem.
79
Log Item Definitions
Error
Number
Description
Detail
Action
154
Drop index '<2>' before
forcing NANs to zero
Cannot set NANs to zero without
dropping index first. Since modifying the field will change the
sort order of the index,
DataCheck requires that you
drop the index before modifying
the value of this field. This is
due to the fact that DataCheck
cannot rebuild indexes for you this task is best left for 4D to do.
If we make data changes in your
data file, we would then have to
update the index, which would
require manipulating the index.
Again, we leave major internal
index manipulations to 4D, for
compatibility issues.
Use DataCheck to drop the
index, then fix the NAN, then
open your data file with 4D and
the index will be rebuilt by 4D.
155
Loaded TRIC ID (<1>)
does not match stored
TRIC ID (<2>)
Each TRIC resource has an ID.
The manually loaded TRIC
resource's ID does not match
the TRIC ID stored in this data
file. Make sure you want to do
this - it is not standard.
Verify that you do want this to
happen (if you are manually
loading TRIC resources, you
should know what you are
doing). If you think you loaded
the right TRIC resource and got
this item, then verify that you
are truely opening the correct
version of 4D - you want the
one that you use when opening
this data file.
156
Drop index '<2>' before
fixing gremlins
The data cannot be modified
while an index exists for this
table. The reason is that
DataCheck cannot resort the
index based on the change in
the data that will be made by fixing the gremlins.
Rescan with gremlin detection
157
Record <1>: field <2>
contains a gremlin:
'<3>'
The given field from the given
record contains a gremlin.
Gremlins can cause problems
with sorting your data, but more
than that, some characteres are
invisible to the eye, and may
cause problems when searching for this record again. See
gremlin section of manual for
more details.
Edit the record, remove the
gremlin. Alternatively, tell
DataCheck to accept this character by toggling it's state in the
Gremlin window. See “Record
Scan Options” on page 21.
80
Log Item Definitions
Error
Number
Description
Detail
Action
158
Record <1>: field <2>
contains a bad date:
'<3>'
The given field from the given
record contains a bad date. A
bad date is a date "outside" of
the normal range of dates. This
date may be computable by 4D,
but as it is stored on disk, it is not
normal. Example: 35/390/1903
Re-write the date field with a
valid date.
159
Remove 'unique' flag
on index '<2>' before
fixing gremlins.
This item is currently not
reported. Why? You must
always undo an index before fixing gremlins, so it is redundant
information.
You should never get this message.
160
This index is marked
deleted
This is purely information for you
stating that the given index is
marked as deleted, but still is
taking up some space in your
file.
No actions are necessary.
161
DataCheck will attempt
to continue reading this
file.
DataCheck has encountered a
problem and is not sure if it can
continue forward, but will continue anyway.
This is an informational message to warn you that
DataCheck is forging ahead,
even though all may not be in
order.
162
DataCheck has begun
writing an audit log in
file '<1>'.
DataCheck has begun writing an
audit log file. The audit log file
gives you very detailed information about certain aspects of
your data file, as well as details
of any modifications that
DataCheck has made. This file
is very easiliy parsable, and an
example program is provided to
help you parse this audit log for
further processing.
This is purely informational.
163
Table '<1>', record <2>
moved from <3> to
<4>.
This feature is not fully implemented. This notes when a
record is moved as part of the
compaction feature.
This is purely informational.
164
Index '<1>', node <2>
moved from <3> to
<4>.
This feature is not fully implemented. This notes when a
node is moved as part of the
compaction feature
This is purely informational.
81
Log Item Definitions
Error
Number
Description
Detail
Action
165
Record <1>, field <2>:
type differs from structure. struct: '<3>', rec:
'<4>'.
The given field from the given
record has a type difference
between what is in the record
and what is in the structure. This
is not a problem, and is not data
corruption. This is a normal situation within DataCheck that is an
exhibition of a very powerful feature of 4D. 4D allows you to
change the type of a field from,
say, long to ascii. When this
occurs, the data in the record
stays unaffected. It still stays as
type long. This is a great feature
of 4D, because when you
change the data type in the
structure, 4D does not have to
munge through all the records
and modify the data. This helps
you in the rapid development
phase of your projects. However, for us very paranoid developers, we like to know that when
we are in production, the data in
the record is the exact type that
is in the structure. This is for no
other reason. There is no problem with your data being in this
state.
None are required. This is a
feature of 4D. However, if you
choose, you can re-write this
record by modifying the field
(set it to itself) and the type will
be written correctly.
166
DataCheck has begun
to export records to
'<1>'.
DataCheck is informing you that
records have begun to be
exported to the named file.
This is purely informational.
167
DataCheck raw export
failed on record <1>
(offset <2>).
The record could not be
exported. This could be due to a
problem attempting to read the
record (ie, the offset is invalid) or
due to a full disk.
Make sure the disk is not full.
Delete the record – it is unreadable.
168
Set data block to
zeros: offset <1>, size
<2>
DataCheck is informing you that
it set the given block on disk to
all zeros. It does this when you
have asked it to zero unused
space on disk.
This is purely informational.
169
Record Exported: table
<1>, record <2>, offset
<3>, size <4>
This informational item lets you
know that the record was
exported to disk.
This is an informational item
only.
82
Log Item Definitions
Error
Number
Description
Detail
Action
170
Deleted record chain is
damaged. Record <1>
is in deletion chain and
should not be. Previous deleted record:
<2>
The given record was found to
be in the deletion chain. Since it
is an active record, it should not
be in the deletion chain.
Duplicate this record and then
delete the record that is causing
problems.
171
Deleted record #<1>.
(offset <2>, size <3>)
DataCheck has deleted the
given record.
This is informational.
172
Cannot delete records
in table <1> until all
indices have been
dropped from the table.
DataCheck cannot delete
records from a table until all
indexes for that table have been
dropped. This is due to the fact
that DataCheck cannot delete
records from the index (and reorder the index b-trees accordingly).
Drop the indexes for this table,
rerun DataCheck, rebuild the
indexes.
173
Loop in deleted record
chain.
DataCheck has found that the
deleted record chain loops on
itself. This situation will cause
crashing within 4D in many
cases.
Actions: (1) Export all data in
this table, then Force Delete the
table, then reimport the data,
then run Fix Bitmap warnings.
or (2) Export your data to disk,
create a new data file, import all
data. The first option is a little
more work, but means you only
dump the one table and start
over on that table. The second
option is less work on your side
(you dump everything and
reload everything), but may
take much longer to do in realtime.
174
Table was forcibly
dropped. You must fix
thebitmap (freemap)
now. Either run
4D Tools or use
DataCheck to fix the
bitmap
As you requested, DataCheck
forcibly dropped the whole table.
This is a very quick operation
because the bitmap is not
cleaned up by 4D. It simply
wipes out all the internal pointers
to the data for the table.
This is purely informational.
175
Bitmap fixed by allocating space in bitmap at
<1>, size <2>.
DataCheck fixed the bitmap by
allocating space in the bitmap
that was previousy incorrectly
unallocated. This change will
save you from potential future
problems with your data file.
This is purely informational.
83
Log Item Definitions
Error
Number
Description
Detail
Action
176
Bitmap fixed by deallocating space in bitmap
at <1>, size <2>.
DataCheck fixed the bitmap by
deallocating space in the bitmap
that was previously incorrectly
allocated. This change
"reclaims" space that had been
lost due to misallocations in the
bitmap.
This is purely informational.
177
Cannot undelete
records in table <1>
until all indices have
been dropped from the
table.
All indexes must be dropped
before DataCheck can undelete
records. This is because, as
part of undeletion, a new record
is created, which would modify
the index. DataCheck does not
currently modify the index (btrees).
Drop the index, re run this scan,
re-index.
178
Cannot undelete
records in table <1> –
no space in secondary
address table to do so.
Records can only be undeleted if
there is space in the secondary
address table to do so.
DataCheck cannot create a new
Secondary Address table -when it undeletes, it looks
through the Secondary Address
Table for space that is currently
unused, and uses that space.
Export the deleted records,
then use example code for
reading exported records to and
saving them in an existing data
file.
179
Undeleted record #<1>
into table <2>. (offset
<3>, size <4>).
The given record was undeleted.
FYI: the record number that
DataCheck chooses is the last
record number deleted.
This is purely informational.
180
Cannot allocate temporary buffer for
exporting or undeleting records (size: <1>).
DataCheck ran out of memory
trying to export/undelete
records.
Macintosh: Increase memory
partition for DataCheck.
Windows: Quit other applications.
181
Cannot read record to
undelete it. (offset: <1>
size: <2>).
The given record cannot be read
from disk. Either the offset is
bad, or the size is bad, or you
have run out of memory
(unlikely, because you should
have gotten an item 180 in this
case).
Try exporting this record to disk.
If that fails, then the record cannot be undeleted.
182
Computed SAT count
does not match existing SAT count. (table
#<1> existing: <2>,
computed: <3>).
DataCheck computes the Secondary Address Table (SAT)
count for each table, and then
compares it against what 4D has
stored as the proper SAT count.
If they are different, then there is
a serious problem with this table.
You can try setting the SAT in
the Table Information window to
the computed number, but it is
not guaranteed to fix this problem. Your best bet would be to
export all data, create a new
data file, and reimport.
84
Log Item Definitions
Error
Number
Description
Detail
Action
183
Record <1>: field <2>
contains a bad boolean: <3>.
The given field in the given
record contains a boolean
whose value is neither 1 nor 0.
This can cause problems as 4D
handles this case in an undefined manner. Some user interface elements (ie, boolean radio
buttons) will show the field as
"true" when an if statement will
compute it as "false", and visa
versa.
It is highly reccommended that
you fix these problems by
settng the boolean to the proper
value.
184
Cannot find entry in
node (node damaged): entry: <1>,
node: <2>, root: <3>.
The given node's list of entries is
damaged. The given entry cannot be found in the node.
You should drop the index and
rebuild it.
185
Node damaged:
reports number of
entry bytes as <1>, but
MUST be greater than
<2> (entry count).
This item occurs when the number of bytes reported for all
entries is less than or equal to
the entry count. In other words,
you must have at least 1 byte
per entry. If this is not the case,
then the entries don't really exist.
The node is very damaged.
You should drop the index and
rebuild it.
186
Index built with
decending IDs.
When 4D encounters two
records whose fields have the
same data, it still sorts them in
the index. It sorts them by
increasing record ID. This item is
generated when DataCheck
detects that the records are
sorted in decreasing order.
Although this is not a problem
initially, when an index looks this
way, it will eventually become
damaged.
You should drop the index and
rebuild it.
187
Record <1>: Modify
date is invalid: ‘<2>’.
4D stores a modification date
with each record in your database. This item is generated
when that date appears to be
invalid. The day should be in the
range of 1-31. Month 1-12.
Try re-writing the record. If you
have many records, write a
small routine that loads each
record, and does something like
add 0 (zero) to an integer in the
record, then save the record.
This should fix the problem.
85
Log Item Definitions
Error
Number
Description
Detail
Action
188
Deleted record chain
does not exist, yet
records have been
deleted.
When records are deleted, 4D
modifies the secondary address
table and builds a chain of
deleted records. If no records
have been deleted, then the
chain does not exist. This item
occurs when DataCheck detects
that records have been deleted,
but no chain exists to track those
deletions.
You should use 4D Tools Compact (or export all records and
import them into a new data
file).
189
Skipped scanning
some tables or
indexes, cannot perform bitmap checking
This item occurs bitmap checking is not performed because
some of the data file was not
scanned. Bitmap checking
requires that the complete file is
scanned by DataCheck.
Perform a full scan of all tables
and indices to do a bitmap
scan.
190
The skip button was
pressed and the object
was not fully processed
This item occurs when the user
pressed the “Skip” button while
processing an object (table,
index, etc). This is logged in the
log file so that you know what a
remote user may have done.
No action required. This is informational only.
86
Index
Numerics
L
4D NUG 8
4D Tools 38
Compact 19, 39
launching DataCheck 14
log file 34
auto number 18
log item definitions 52
A
Acrobat Reader 9, 14
Adobe Acrobat Reader 9, 14
allocation bitmap 23, 48
ASCII 39
auto number 18
M
memory 40
multiple indices per field 38
N
bitmap 19, 39
Networked User Group 8
node 48
node address table 49
C
P
checksum 17
children 48
compact 19, 39
Configuration Dialog 16
configuring a scan 14, 16
cron 17, 40, 48
password 17
Pause button 35
PDF 9, 14
picture 21
D
quit after scan 18
data file 16
data file segment 49
DataCheck
Installing 9
launching 14
memory 40
registering 8
repair 13
system requirements 9
DataCheck home page 8
DataCheck Runtime 16, 36
detail statistics 19
drop selected indices 19, 38
R
B
F
fields 26
force drop all indices 39
I
Index Header Table 76
index node 48
index tree 48
installing DataCheck 9
Q
RAM 9, 40
requirements 9
READ ME FIRST!! file 9, 14
record address table 49
recover by TAGS 38
recovery 38
registering DataCheck 8
repair 13
results of scan 34
Resume button 35
root 48
Runtime, DataCheck 16
S
scan allocation bitmap 23
scan configuration 14, 16
scan indices 19
scan on launch 17
scan options 19, 21, 23–24
scan record data 21
scan results 34
sequence number 30
serious index damage 19, 39
Start button 35
I-86
Index
subtables 21, 26
[email protected] 8
System 7.0 9
system requirements 9
T
table 26
TAGS 38
technical support 8
text 21
TRIC resource 16, 48
U
URL for DataCheck 8
V
verify index 21
verify record number 19
W
Web URL for DataCheck 8
I-87