1
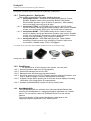
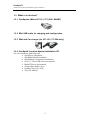
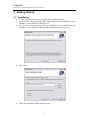
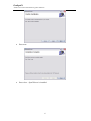
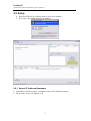
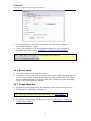
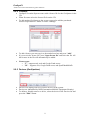
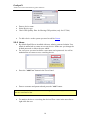
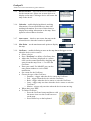
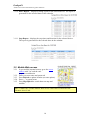
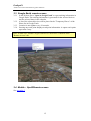
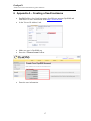
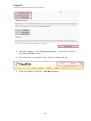
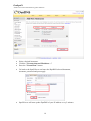
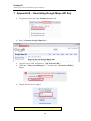
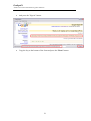
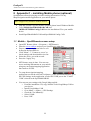
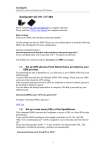
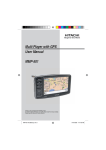
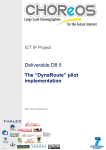
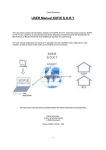
GeoSpotX Advanced Location and Monitoring GPS Solutions GeoSpotX Location System User Manual Version 1.52 Micro GC101 / CT-58A / MiniMT 1. GENERAL 1.1. APPLICATIONS 1.2. ARCHITECTURE 1.3. WHAT IS IN THE BOX? 1.3.1. GeoSpotter (Micro GC-101 / CT-58A / MiniMT) 1.3.2. Wall Charger (for GC-101 / CT-58A only) 1.3.3. Car charger (for GC-101 / CT-58A only). 1.3.4. GeoSpotX Location System Installation CD. 2. GETTING STARTED 2.1. INSTALLATION 2.2. SETUP 2.2.1. Server IP Address/Hostname 2.2.2. Router setup 2.2.3. Google Maps Key 2.2.4. Licenses 2.2.5. Devices (GeoSpotters) 2.2.6. Users 2.3. GEOSPOTTER SETUP 3. USAGE 3.1. WEB ACCESS 3.2. MOBILE WEB ACCESS 3.3. GOOGLE EARTH REMOTE ACCESS 3.4. MOBILE – SPOTXREMOTE ACCESS 4. PREREQUISITES 4.1.1. 4.1.2. 4.1.3. Desktop – SpotXServer: Phone - SPT Remote Driver: GeoSpotter: 5. SUPPORT 6. APPENDIX A – CREATING A FIXED HOSTNAME 7. APPENDIX B – GENERATING GOOGLE MAPS API KEY 8. APPENDIX C – INSTALLING MOBILE PHONE (OPTIONAL) 8.1. MOBILE – SPOTXREMOTE ACCESS SETUP 1 GeoSpotX Advanced Location and Monitoring GPS Solutions 1 General GeoSpotX Location System is an advanced location and monitoring system. The system enables tracking of assets, vehicles, people and pets all around the world in real-time. The system is based on advanced GPS and cellular technology. The tracking devices (GPS/GSM) are among the smallest and the most advanced devices in the market. The real-time location and the history track can be seeing remotely, using and web browser, over satellite images and maps (based on Google Maps). It also can be seeing in Google Earth, in any mobile phone with a web browser and in a Windows Mobile device over any navigation software (iGO, TomTom, Destinator, GoogleMaps mobile…). The system is totally autonomous. It includes server software that installed on the client computer. For maximum privacy, the system is password protected so only the client has immediate access to the tracking data. The system enables management of users and device access authorization. It possible to define an area on the map (GeoFence), that will trigger when a device exit or enter it. There is no limitation for devices number in one system. There is no monthly service fee. 1.1 Applications 1.1.1 1.1.2 1.1.3 1.1.4 Asset tracking. Vehicle Security and Recovery. Safeguard your families, children and pets and also protect seniors/patients. Fleet management. 1.2 Architecture 2 GeoSpotX Advanced Location and Monitoring GPS Solutions GeoSpotX Location system includes the following components: 1.2.1 Tracking device – GeoSpotter The system supports the following tracking devices: 1.2.1.1 GeoSpotter GC101 – Smallest GPS/GSM tracking device. Precise. Reliable. Enables remote voice monitoring. Build-in SOS button. Remote SMS operation. Up to 50 hours of operation*. With a battery case (not supply) can work up to 90 days*. 1.2.1.2 GeoSpotter CT58A - AGPS/GSM tracking device. Build-in motion sensor for battery saving and automatic operation upon motion. Enables remote voice monitoring. GPIO input. Up to 200 hours of operation* 1.2.1.3 GeoSpotter MiniMT – GPS/GSM tracking device. Build-in motion sensor for battery saving and automatic operation upon motion. Enables remote voice monitoring. Emergency number speed dial button. Enable 2-ways voice conversation. Up to 14 days of operation* 1.2.1.4 GeoSpotter MT-GL – GPS/GSM tracking device. Fixed vehicle mounting. Enables remote voice monitoring. Enable 2-ways voice conversation. Update every 5 Sec. I/O triggers. * One report per hour with motion sensor enabled. Operation time may vary according to usage. GeoSpotters: Micro GC101 CT58A MiniMT MT-GL 1.2.2 SpotXServer 1.2.2.1 1.2.2.2 1.2.2.3 1.2.2.4 1.2.2.5 1.2.2.6 1.2.3 The SpotXServer is the manager of the system. Its main roles: Receiving location data from the GeoSpotters. Stores and manages the device's DB. Manages users and device access authorization. Serves as a web server (HTTP). Displays real-time tracking information over map or satellite images (username and password protected). Supports Google Earth network link for real-time remote display of tracking information over Google Earth 3D maps/satellite. Handles SpotXMobileRAD request for device location data. SpotXMobileRAD The SpotXMobileRAD is a software driver (Windows Mobile Based) that connects the GeoSpotters to a mapping/navigation application on a mobile phone. The connection is done via GeoSpotX Server over the cellular network. The current location of the tracked GeoSpotter is displayed on the mapping/navigation application of the mobile phone. 3 GeoSpotX Advanced Location and Monitoring GPS Solutions 1.3 What is in the box? 1.3.1 GeoSpotter (Micro GC-101 / CT-58A / MiniMT) 1.3.2 Mini USB cable for charging and configuration. 1.3.3 Wall and Car charger (for GC-101 / CT-58A only). 1.3.4 GeoSpotX Location System Installation CD. The CD contains the following item: SpotXServer installation SpotXMobileRAD installation. SpotXMobile Configuration installation. GC101_CT58A USB drivers and manuals MiniMT Drivers and manuals Google Maps Mobile (free) FreeMap Israel (free S/W). This User Manual 4 GeoSpotX Advanced Location and Monitoring GPS Solutions 2 Getting Started 2.1 Installation In the GeoSpotX Location System CD, start the \PC\setup.exe. If you receive a message saying .NET Framework 2.0 is not installed on your computer, please install \PC\dotnetfx.exe. If you receive a message saying Windows Installer 3.0 is not installed on your computer, please install \PC\WindowsInstaller-KB884016-v2-x86.exe. Press Next. Select the installation folder and press next. 5 GeoSpotX Advanced Location and Monitoring GPS Solutions Press next. Press close – SpotXServer is installed. 6 GeoSpotX Advanced Location and Monitoring GPS Solutions 2.2 Setup Start SpotXServer by clicking on the icon on your desktop. If you get a firewall message press unblock. 2.2.1 Server IP Address/Hostname SpotXServer needs to run on a computer with a fix IP address/hostname. Press on the "Server IP Address" tab. 7 GeoSpotX Advanced Location and Monitoring GPS Solutions If you already have a fixed IP or a hostname, enter the "Server address" accordingly and press "Apply". If not, you can obtain a free fixed hostname address for your computer in DynDNS.org. Please refer to Appendix A – Creating a fixed hostname. Note: When done, server address is displayed in the status bar 2.2.2 Router setup If you do not have router, skip this section. If you have a router, you need to open the "Server port" in the router and map it to the IP of the computer running the SpotXServer (for both UDP and TCP). In the router configuration page it is usually called NAT/virtual server/port forwarding. Please refer to the router user manual. 2.2.3 Google Maps Key SpotXServer uses Google maps free mapping services for the website service. Each hostname should have a unique key. Note: This stage should be done only after settings the Server Address. To generate Google Maps API Key please refer to Appendix B – Generating Google Maps API Key. 8 GeoSpotX Advanced Location and Monitoring GPS Solutions 2.2.4 Licenses GeoSpotX Location System comes with a license file for the GeoSpotter in the CD. When first start select the license file from the CD. To add another GeoSpotter to the system you need to add the purchased license to SpotXServer: Menu->License->Manage. To add a license you can copy it to the marked text box and press "Add". If you received a license file, press "Open license file" and select the file. All the licenses in the file will automatically be added. License types: o "S" – supports only web and Google Earth access. o "SR" – supports web, Google Earth access and SpotXMobileRAD 2.2.5 Devices (GeoSpotters) Devices List displays the list of license devices in the system. Devices are indentified by IMEI (International Mobile Equipment Identity). To define a friendly name to a device, select the device in the Devices list and press the "Edit" button. 9 GeoSpotX Advanced Location and Monitoring GPS Solutions Enter a device name. Select Device type. Check GPS Quality filter for filtering GPS position (only for GC58A) To add a device to the system you need to add its license. 2.2.6 Users By default SpotXServer installed with user: admin, password: admin. User admin is authorized to remote access any device. Make sure you change the default password or delete the user admin. For every user you need to define a user name and a password. As well as authorization to remote access a tracking device. Press the "Add User" button in the Users Panel. Enter a username and password and press the "Add" button. Note: Each user is authorized to access tracking information only for the devices that are attached to him. To attach a device to a user drag the devices ID to a user in the users list or right-click the user. 10 GeoSpotX Advanced Location and Monitoring GPS Solutions 2.3 GeoSpotter setup Now you need to setup the GeoSpotter to communicate with the SpotXServer: For GC-101 or CT-58A For MiniMT Setup 11 GeoSpotX Advanced Location and Monitoring GPS Solutions 3 Usage 3.1 Web access 3.1.1 Press the "Open web site" in the General tab or go to the server address in your internet browser. 3.1.2 Enter a username and password of a user defined in SpotXServer and press "Log In". 3.1.3 Automatic location update is performing every 30 Press "Update Now" for immediate update. 3.1.4 Pressing any track point displays track point information. Zoom in to see all track points. A square track point represents a more then 5 min (can be configured). 12 sec. stop GeoSpotX Advanced Location and Monitoring GPS Solutions 3.1.5 Devices list box – list of all the devices authorized for the current user. Select one or more devices to display on the map. Clicking a device will center the map on the device. 3.1.6 Calendar – enable displaying historic tracking information. Green colored dates are date with tracking information. Press one of these dates to display the tracking information on the map. Press again on selected date to deselect. 3.1.7 Auto center – check to auto center the map on the selected device when the location is updated. 3.1.8 Max Point – set the maximum track points to display the map. on 3.1.9 GeoFence – enables defining an area on the map that will trigger an alert when the device exit or enter it. Select a device. Press "GeoFence" to define a GeoFence alert. Adjust the GeoFence (displayed as a yellow circle) to the wanted location by dragging and zoom in/out the map. Press +/- to resize the GeoFence. Enter your email. For MiniMT you can also enter phone number to receive SMS notification. Set a name for the GeoFence. Choose the type of the GeoFence: o Entrance – trigger when the device enters the GeoFence. o Exit – trigger when the device exits the GeoFence. o Both – trigger when the device enters or exits the GeoFence. o Once – trigger only one time when the device enters or exits the GeoFence. o Motion – trigger only one time when the device starts moving. When done press "Set". To Delete GeoFence: o Press the GeoFence button and hover with the mouse icon over the GeosFence area on the map. o Press Delete key on the keyboard. 13 GeoSpotX Advanced Location and Monitoring GPS Solutions 3.1.10 Drive Report – displays tracking report for the selected device. The report is generated for the selected dates in the calendar. 3.1.11 Stop Report – displays the stop times and location for the selected device. The report is generated for the selected dates in the calendar. 3.2 Mobile Web access 3.2.1 In you mobile internet browser go to the server address with "/m" and the end: http://serveraddress/m 3.2.2 Enter your user name and password. 3.2.3 Press Refresh to update location (no auto update). 3.2.4 Press +, - to zoom in/out 3.2.5 Press Map/Hybrid to switch between map and satellite. Note: A make sure "Enable Mobile Web access" check box is checked in the "Remote Access" tab. 14 GeoSpotX Advanced Location and Monitoring GPS Solutions 3.3 Google Earth remote access 3.3.1 In the Website Press "Open in Google Earth" to open tracking information in Google Earth. The tracking information is generated for the selected devices and the selected dates in the calendar. 3.3.2 A list of the selected devices will be placed in the "Temporary Places" of the Places list in Google Earth. 3.3.3 Location is auto update every 30 seconds. 3.3.4 Pressing any track point displays track point information. A square track point represents a stop. Note: A make sure "Enable Google Earth access" check box is checked in the "Remote Access" tab. 3.4 Mobile – SpotXRemote access See appendix C. 15 GeoSpotX Advanced Location and Monitoring GPS Solutions 4 Prerequisites 4.1 Desktop – SpotXServer: Windows 2000, XP, Vista. Internet connection. At least 1024x768 screen resolution. 4.2 Phone - SPT Remote Driver: Windows Mobile 5 and above. Cellular data connection (GPRS/3G/HSDPA) enabled. 4.3 GeoSpotter: SIM card with data connection (GPRS/3G/HSDPA) enabled. 5 Support If you have any problems, remarks, suggestions, please don't hesitate to contact us. [email protected] www.geospotx.com 16 GeoSpotX Advanced Location and Monitoring GPS Solutions 6 Appendix A – Creating a fixed hostname DynDNS offers a free fixed host name. SpotXServer supports DynDNS and ZoneEdit. For more information about http://ZoneEdit.com. In the "Server IP Address" tab: Make sure type is DynDNS.org Press the "Create account" button. Enter the user information. 17 GeoSpotX Advanced Location and Monitoring GPS Solutions Check the "I agree..." and "I will create only one..." check boxes, and press the "Create account" button. You will receive a confirmation email. Press the confirmation link. Login to DynDNS.org and press "Add Host Services". 18 GeoSpotX Advanced Location and Monitoring GPS Solutions Select a desired hostname. Click the "Use auto detected IP address…" Press the "Create Host" button. Go back to the SpotXServer and enter the DynDNS selected hostname, username, password and press apply. SpotXServer will now update DynDNS of your IP address every 5 minutes. 19 GeoSpotX Advanced Location and Monitoring GPS Solutions 7 Appendix B – Generating Google Maps API Key To generate a Key press the "Remote Access" tab. Press "Generate Google Maps Key". Copy the server URL and past it to "My web site URL". Check the "I have read and agree…" and press the "Generate API Key" button. Google will ask you to sign in. Note: open a new account if you don't have a Google account. 20 GeoSpotX Advanced Location and Monitoring GPS Solutions And press the "Sign in" button. Copy the key to the bottom of the form and press the "Done" button. 21 GeoSpotX Advanced Location and Monitoring GPS Solutions 8 Appendix C – installing Mobile phone (optional) SpotXRemote allows displaying real-time tracking information over any Map/Navigation mobile application in your mobile phone. Note: Support only windows mobile devices. Skip this section if you do not have a mobile phone based Windows Mobile. Copy \Mobile\SpotXMobileRAD.CAB and \Mobile\SPTMobileConfig.CAB from the installation CD to your mobile device. Install SpotXMobileRAD.CAB and SpotXMobileConfig.CAB. 1.1 Mobile – SpotXRemote access setup Open SPT Remote (Start -> Programs -> SPTRemote). Enter the server address and port (see SpotXServer status bar). Enter a username and password of a user defined in the SpotXServer. Click "Menu" -> "Connect to server" to check settings and download devices list. Select the device you wish to track. Press the "Apply" key. SPT Remote setup is done. You can now access tracking information on your mobile using any navigation/mapping application that connects to GPS. To setup the navigation/mapping application to track the selected GeoSpotter ( in the SpotXMobileRAD), go to the GPS Settings in the application, set the GPS COM port to the "Virtual COM" selected in the SpotXMobileRAD. You can test your settings with Google Maps mobile: o From the installation CD, copy \Mobile\Tools\GoogleMaps.CAB to your device. o Install GoogleMaps.CAB. o Go to Menu -> Option -> GPS Settings. o Check the "Set Manually". o Select COM6: o Press "OK". 22