1
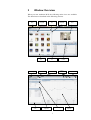
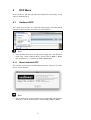
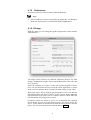
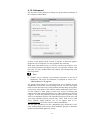
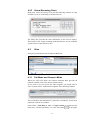
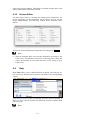
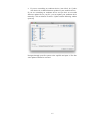
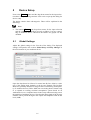
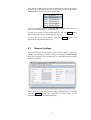
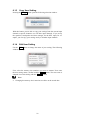
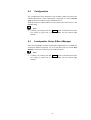
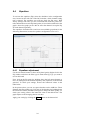
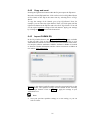
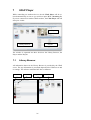
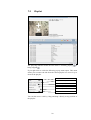
Remote Control Point
User's Manual
Contents
1
Software Audionet RCP .................................................... 5
2
Installation ......................................................................... 6
2.1
System requirements................................................................... 6
2.2
Installation on a Microsoft Windows PC .................................. 6
2.3
Installation on an Apple Mac ..................................................... 6
3
Window Overview ............................................................. 7
4
RCP Menu .......................................................................... 8
4.1
Audionet RCP .............................................................................. 8
4.1.1
About Audionet RCP .................................................................... 8
4.1.2
Preferences .................................................................................... 9
4.1.2.1 Design ........................................................................................... 9
4.1.2.2 Network ...................................................................................... 10
4.1.2.3 Advanced .................................................................................... 11
4.2
Tools ........................................................................................... 12
4.2.1
Rescan Network .......................................................................... 12
4.2.2
Select media renderer .................................................................. 12
4.2.3
Virtual Streaming Client ............................................................. 13
4.3
View ............................................................................................ 13
4.3.1
Full Mode and Compact Mode ................................................... 13
4.3.2
Column Editor ............................................................................. 14
4.4
Help ............................................................................................ 14
5
Device Setup .................................................................... 16
5.1
Global Settings........................................................................... 16
5.2
Network Settings ....................................................................... 17
5.3
Device Info ................................................................................. 19
6
Channel Settings ............................................................. 20
6.1
User Settings .............................................................................. 21
6.1.1
Load User Setting........................................................................ 21
6.1.2
Save User Settings ...................................................................... 21
6.1.3
Copy User Setting ....................................................................... 22
6.1.4
Edit User Setting ......................................................................... 22
6.2
Configuration ............................................................................ 23
6.3
Loudspeaker Setup & Bass Manager ...................................... 23
3
6.4
Equalizer .................................................................................... 24
6.4.1
Equalizer adjustment ................................................................... 24
6.4.2
Copy and reset ............................................................................. 25
6.4.3
Import CARMA EQ .................................................................... 25
7
UPnP Player .................................................................... 26
7.1
Library Browser ........................................................................ 26
7.2
Playlist ........................................................................................ 29
7.3
Player .......................................................................................... 31
8
Radio ................................................................................ 33
8.1
FM Radio ................................................................................... 33
8.2
Internet Radio............................................................................ 34
4
1
Software Audionet RCP
The software Audionet Remote Control Point (RCP) offers a great variety
of operation and setting options. Furthermore, the software is suitable to
stream audio data (e.g. music) from your UPnP server to your Audionet
device.
Audionet RCP is a user-friendly software providing a comfortable user
interface for streaming audio data. If you use an Audionet network device
(DNA, DNP, DNC), you are also able to control the entire device setup
from your PC.
The current version of RCP is available for download on our website
www.audionet.de for free and runs on all popular operating systems
(Windows, OS X, Linux).
Function:
·
Control playback on an UPnP renderer with audio data streamed from
an UPnP server
·
Manage (create, save and load) playlists
·
Set up all device parameters of your Audionet device
·
Input channel selection
·
Volume control and muting, as well as switching on and off of
Audionet devices
·
Easy adjustment of equalizer with graphical visualization
·
Loading and saving of user settings
·
Saving and running FM radio stations
5
2
Installation
2.1
System requirements
·
Java Runtime Environment Version SE 6.0 or later
·
Windows 98/2000/2003/XP/Vista/7/8
·
Mac OS X Version 10.7.3 or later
Audionet RCP is written in JAVA. Therefore it requires the JAVA
Runtime Environment (JRE). If JRE is not already installed on your PC,
please download the latest version free of charges from www.java.com.
Note
·
Audionet RCP requires JRE-Version SE 6.0 or later.
2.2
Installation on a Microsoft Windows PC
Before installing Audionet RCP, please verify that JRE Version SE 6.0 or
later is installed. If you use an older version, you can download the latest
version from www.java.com.
To install Audionet RCP, please unpack "Audionet_RCP.zip" to the desired location on your computer. Once you have unpacked the file, you
do not need further installation routines. Open the created folder
"Audionet-RCP" and start the program using the file "AudionetRCP.exe".
2.3
Installation on an Apple Mac
Before installing Audionet RCP, please verify that JRE Version SE 6.0 or
later is installed. If you use an older version, you can use the auto update
function or download the latest version from www.apple.com/support.
Unpack and store "Audionet_RCP.zip" on your local hard disc. Open the
directory "Audionet-RCP" and choose the file "Audionet-RCP.app" to
start the software Audionet RCP.
6
3
Window Overview
When you start Audionet RCP, the following main views are available.
The functions are described in the following sections.
Menu
List / Tile
View
Navigation
Folder
List
Power Toggle
Synchronize
Data
Bookmarks
Title
List
Input Channel
Device Setup
Channel and Bass
Adjustment
Control
Volume -/+
& Mute
User Settings
7
Player
Compact Mode
Equalizer
Adjustment
4
RCP Menu
In the menu bar you find all important information and settings of the
software Audionet RCP.
4.1
Audionet RCP
This menu item provides two important subcategories: the information
about the software and the preferences of Audionet RCP.
Note
·
All screenshots have been created using an Apple Mac. On Windows
menu entry "About Audionet RCP" can be found in Help > About,
item "Preferences" is contained in Tools > Preferences.
4.1.1
About Audionet RCP
This window provides general information about the software, for example the version number.
Note
·
The screenshots have been created using an Apple Mac. On Windows
menu entry "About Audionet RCP" can be found in Help > About.
8
4.1.2
Preferences
Set up the preferences of the software Audionet RCP here.
Note
·
The screenshots have been created using an Apple Mac. On Windows
menu item "Preferences" is contained in Tools > Preferences.
4.1.2.1 Design
With this dialog you can change the graphical appearance of the software
Audionet RCP.
You might choose between two different application designs. Try both
designs "Audionet RCP Light" and "Audionet RCP Dark", then select the
one you prefer.
Select the language you want to work with (german/english). Furthermore you can customize the font size for the whole application. A restart
of the software Audionet RCP is required for both settings to take effect..
Menu item Player Design changes the presentation of cover art and title
information within the player window. Compact Mode shows additional
title information next to the cover art, whereas Album Art Mode hides the
title information and enlarges the cover art.
Change the setting for Album art in list view to determine the condition
for the display of cover art in the library browser. Use the scroll bars below to set the album art dimension for both the library browser and the
player. You can leave the menu box with the button Close .
9
Note
·
In case the UPnP server provides no album art you will see a standard
image.
4.1.2.2 Network
Configure the network settings of the software Audionet RCP here. Usually the default settings will work well. If you experience problems when
trying to connect to your Audionet device or to other UPnP devices, the
settings for UPnP Search Time and Sync Timeout may be increased.
There is no need to alter these settings as long as there are no problems
when connecting to your Audionet device or to other UPnP devices. If a
problem occurs, the software Audionet RCP will notify you with an error
message.
You might try to decrease the search time settings for a quicker startup of
the software. If you choose the timeouts too short, setting up the connection to your Audionet device or to other UPnP devices might fail. If an
error message occurs, increase the settings for the search times again.
Note
·
If connecting to your Audionet device or to other UPnP devices fails,
confirm the error message with Rescan Network , or increase the
search timeouts and repeat the procedure by opening Tools > Rescan
Network or by pressing F5 on your keyboard.
10
4.1.2.3 Advanced
The last menu in the preferences dialog sets up the advanced settings of
the software Audionet RCP.
At first, set the playlist mode. Choose to activate or deactivate gapless
playback, to force next title or to stop playback after each title.
With menu item Media Library at startup activated, the software saves
your current position in the library browser as you quit the software. The
next time you start Audionet RCP the software will automatically open
this last position.
Note
·
Another way to simplify your browsing experience is the use of
Bookmarks. The usage of bookmarks is explained in section "7.1 Library Browser" on page 26.
The feature Debug Mode is a powerful tool for you to monitor and log
reproducible errors within your streaming network. You have the opportunity to track down the cause of the problems and thus help solving these
errors. In the main folder of the software another folder log will be created. The software is then going to track every activity concerning the
software itself and connected UPnP devices. This information is stored in
a log file. To solve the problems, please send the entire log folder (as zip
archive) or individual log files with a detailed description of the error and
your setup (operating system, network type, router, NAS servers, NAS
server software, media renderer, etc.) to our support team at [email protected]. We will work on a solution immediately.
The last three checkboxes on this configuration page determine if software Audionet RCP looks for news from Audionet, program or firmware
updates and bootloader updates at startup.
11
4.2
Tools
Execute functions to control the connection between the software
Audionet RCP and your Audionet device or other UPnP devices, or start
the virtual streaming client.
4.2.1
Rescan Network
Use this menu item if an error occurs when searching for UPnP devices.
If connecting to your Audionet device or to other UPnP devices fails,
confirm the error message with Rescan Network , choose Tools >
Rescan Network or press F5 on your keyboard.
In case all devices are connected (wired or wireless) correctly and the
error message occurs more frequently please try to increase the search
time settings as described in section "4.1.2.2 - Network" on page 10.
4.2.2
Select media renderer
If you run more than one UPnP renderer in your network, you can switch
between them. Use this menu item to select the device you want to control. Open path Tools > Select media renderer. You are able to control
several devices at the same time.
Open the drop-down menu and select the renderer you want to control.
Check the tick box Default media renderer to set the selected device as
default device. When you start the software Audionet RCP it will always
connect to this device if it is available. With the Apply button you apply and save your settings. Leave the dialog box with the Cancel button, thus the adjustment is not stored.
12
4.2.3
Virtual Streaming Client
Menu item Virtual Streaming Client and the following window are only
available if you are controlling an Audionet device.
The dialog box provides the same information as the device's display.
The buttons of the virtual streaming client match those of your Audionet
system remote control Harmony One.
4.3
View
Set up the presentation mode of Audionet RCP here.
4.3.1
Full Mode and Compact Mode
When you select Full Mode, the software Audionet RCP provides all
controls available. This is the factory default setting.
If you need to use your screen for other programs, you might want to
select Compact Mode. Audionet RCP appears in the following window.
The presentation and information is reduced to a minimum, yet the most
important controls are available.
Select View > Full Mode or View > Compact Mode to switch between
both views. Another possibility is to click the button
13
in the upper
right of the program window. This button is available in both views at the
same position and switches between both.
4.3.2
Column Editor
Use the Column Editor to configure the displayed title information. Set
up the appearance of the information for the library browser and the
playlist independently. The following window shows selectable information.
Set up your desired information and quit the user dialog with Close .
Note
·
Software Audionet RCP only presents information provided by the
UPnP server. If information is incorrect or missing, please check and
correct the metadata of your audio files and / or the setting of your
UPnP server.
4.4
Help
Menu Help offers access to different kinds of support. The first four entries open your default internet browser and lead to the corresponding
content.
Click item Check for Updates to manually check for software updates. If
there is a newer version available for download, software Audionet RCP
will notify you.
Note
14
·
If you are controlling an Audionet device, item Check for Updates
also checks for available firmware updates of your Audionet device.
If you are controlling an Audionet device and you have an accessible
firmware update file on your PC, you can update your Audionet device
manually. Click on Manual Firmware Update and the following window
opens up.
Navigate through your file system to the .upd-file and open it. The firmware update will then be executed.
15
5
Device Setup
Next to the Power button and the drop-down menu for the input selection there is a symbolized gearwheel. Click on it to open up the dialog for
device setup.
The dialog contains three subcategories. These will be explained in the
following.
Note
·
The buttons Power , the drop-down menu for the input selection
and the symbolized gearwheel are only available if you are controlling an Audionet device. Otherwise the buttons are grayed out and
disabled.
5.1
Global Settings
Adjust the global settings in the first tab of the dialog. The displayed
settings correspond to the sections Global Setup and Delay Manager in
the user's manual of your Audionet device.
Open the drop-down list Channel in menu item By-Pass Mode to select
one of the analog input channels as the by-pass channel. The By-Pass
Mode was primarily intended to integrate the overwhelming sound quality of Audionet devices (DNA, DNP) into an existing home cinema setup
or to expand an existing excellent stereophonic system based on an
Audionet device to a complete home cinema setup without missing out on
the qualities of Audionet devices. Note that the input signal of the by-pass
channel will be passed through to the outputs and amplifiers with its full
level (0 dB).
16
In the list for channel selection software Audionet RCP marks the by-pass
channel with a symbolized star. The following picture shows that An1 –
Balanced In is selected as by-pass channel here:
For more information refer to section By-Pass channel in the user's manual of your Audionet DNA or Audionet DNP.
To send your settings to your Audionet device, click the Sync button.
Now your adjustments are transmitted and applied.
To leave the device setup window, click the Close button. Nonsynchronized adjustments will be lost.
5.2
Network Settings
The second tab provides adjustment of the network settings. Compare the
settings in this dialog box with the settings from chapter Network Setup
in the user's manual of your Audionet device. The following dialog shows
the factory defaults.
When you have set up your network settings, transmit and save your data
with the Apply button. The adjustments are then stored in your
Audionet device and activated immediately.
17
Use the button Load factory defaults to return to the factory
defaults. Transmit the factory defaults to your Audionet device with
Apply .
The following illustration shows a configuration for a password-protected
WLAN connection. Note that DHCP is deactivated here.
Note
·
Everytime you change the settings and you want to save them, click
the Apply button. Otherwise all changes will be lost as soon as you
quit the user dialog with Close .
18
5.3
Device Info
Select the last tab to see further information on your Audionet device.
The window provides the following information.
Device Name:
exact label of the device
Firmware Version:
version number of the firmware
currently running on the device
Bootloader Version:
version number of the bootloader
currently running on the device
MAC Address:
MAC Address of the device
Current IP Address: currently assigned IP address
(static IP address assigned manually or
IP address assigned dynamically with DHCP)
Click on the Close button to quit the Device Setup dialog.
19
6
Channel Settings
Select the main tab Channel Settings to set up the adjustments for the
currently selected channel. Detailed information on every parameter can
be found in the corresponding section of the user's manual of your
Audionet device. The tab Channel Settings is only available if you are
controlling an Audionet device.
Note
·
Confirm your settings with the Sync button on the bottom left side.
·
If a setting is grayed out, it is not available for the selected input
channel.
·
All adjustments made in this tab always apply to the currently selected input channel.
20
6.1
User Settings
In the upper left of the RCP window, you see the settings buttons Load ,
Save , Copy and Edit . These refer to the section User Settings in
the user's manual of your Audionet device.
6.1.1
Load User Setting
Pressing the Load button opens the following selection window.
Select the user setting you want to load and click OK .
6.1.2
Save User Settings
The button Save opens the window shown below.
Select the user setting you want to store in and click OK .
Note
·
Saving will overwrite any settings in the memory slot. The old data is
lost and cannot be retrieved.
21
6.1.3
Copy User Setting
Pressing the Copy button opens the following selection window.
With this feature you are able to copy your settings from the current input
channel to specific channels or to all other input channels. If you set up
the equalizer, loudspeaker and bass manager for the NET input, for example, you can copy your settings easily to all other input channels.
6.1.4
Edit User Setting
Use the Edit button to change the name of your setting. The following
window opens up.
First, select the memory slot (number) you want to rename. Now enter
the new setting name. Confirm with the Sync button. The new name is
adopted. Leave this dialog with the Close button.
Note
·
Changing the memory slot's name has no effect on the stored data.
22
6.2
Configuration
The configuration field contained in the channel settings provides basic
channel adjustments. These adjustments correspond to section Channel
Setup in the user's manual of your Audionet device.
With the software Audionet RCP you have faster and easier access to the
channel setup.
Note
·
Confirm your settings with the Sync button on the bottom left side.
If a setting is grayed out it is not available for the selected input
channel.
6.3
Loudspeaker Setup & Bass Manager
Also, the loudspeaker and bass (subwoofer) adjustments are available for
each input channel separately. To set up all items look up section Bass
Manager in the user's manual of your Audionet device.
Note
·
Confirm your settings with the Sync button on the bottom left side.
If a setting is grayed out it is not available for the selected input
channel.
23
6.4
Equalizer
To activate the equalizer (EQ) select the checkbox in the configuration
area, located on the left side of the RCP window, while channel setting
tab is selected. The equalizer area will now show the EQ curve. With
factory settings still active you see a horizontal line with five points. Detailed information on each EQ band (point) is listed in the table below the
graph. Above the graph you are able to select the channel. Set up the EQ
for each channel separately.
The equalizers for Subwoofer 1 and 2 are not available (grayed out) in the
following illustration, because the speaker configuration is set to 2.0.
6.4.1
Equalizer adjustment
Use the left mouse button to select an EQ band (point). Right-click in the
EQ window and select the filter type in menu item EQ Type you want to
use for this band.
Now, pick up the EQ point (by holding down the left mouse button) to
move it (left/right) to the desired frequency and (up/down) to the desired
gain/loss. To check your settings, observe the numerical values in the
table below.
In the picture above you can see square brackets on the 0 dB line. These
illustrate the filter quality (Q). Pick one of the brackets (by holding down
the left mouse button) and slide (left/right) to change the filter quality. To
check your setting, observe the numerical value in the table below. The
graph adjusts to the changing data in real time.
Apply your setting by clicking the Sync button at the bottom left.
24
6.4.2
Copy and reset
Pressing the right mouse button within the EQ area opens the EQ menu.
Reset the selected EQ band here. Click on Reset Selected EQ-Band. Reset
all five bands of the EQ at the same time by selecting Reset All EQBands.
To copy the settings of all 5 bands, go to Copy EQ-Channel. Now, for
example, you can select the right channel. There you click again with the
right mouse button in the EQ area and select Paste EQ-Channel. You will
see the copied equalizer settings of the left channel. Apply your settings
by clicking the Sync button at the bottom left.
6.4.3
Import CARMA EQ
In the EQ window there is the Import CARMA EQ button available
on the top right. Click on this button to load equalizer settings to your
Audionet device which have been created and saved with the room acoustics analysis software Audionet CARMA. Audionet CARMA is licensed
as freeware. Further information and the current version are available on
our website www.audionet.de.
Navigate to the desired .amf-file within your file system and click on the
Open button. The equalizer settings will be loaded for the currently
selected input channel. Click on Sync to apply the settings to your
Audionet device.
Note
·
Save your previous equalizer settings to a user setting, so you can
refer to it later.
25
7
UPnP Player
While controlling an Audionet device, the tab UPnP Player will be selected automatically as soon as you switch to input NET – Streaming In.
If you are connected to another UPnP renderer, the UPnP Player tab will
always be visible.
Player
Library Browser
Playlist
The window is separated into three divisions: the Library Browser, the
Player and the Playlist.
7.1
Library Browser
All information shown in the Library Browser is provided by the UPnP
server. The way information is presented depends on the UPnP server and
its settings. The software Audionet RCP has no influence.
Level back
UPnP server
Navigation bar
26
Server items
you jump backwards through the tree
With the level back button
structure of the UPnP server. For example, if you click the level back
button in one of the example windows, the folder Album/Artist will be
displayed.
In the navigation bar you will see the current directory you are within the
server structure. By clicking on a directory you will switch there directly.
Navigate through the library browser until you find the desired artist,
song or album.
Double-clicking a title will attach it to the current playlist and it is played
back immediately. If you just want to add a title to the current playlist,
grab it with the mouse and place it into the playlist. This procedure is
called "drag and drop". The drag and drop procedure can also be used
with whole albums or artists.
Alternatively, you can click on the song, album or artist with the right
mouse button and the following pop-up menu opens.
Add selection to playlist
Add selection to playlist and play after the
currently playing title
Add selection to playlist and start playback
immediately
Furthermore, you have access to the bookmark function of the software
Audionet RCP. If you wish to navigate to your favorite artists or albums
faster, you can save these as bookmarks. Click on the symbolized star in
the library browser and the following window opens.
27
It is possible to save a bookmark for every desired position in the server
structure.
To save the current position, click on the symbolized star and enter an
appropriate name for your bookmark. Save your bookmark by clicking on
the Add Bookmark button.
To open an already saved bookmark, you also have to click on the symbolized star in the library browser. The same window opens up. Now,
however, you simply have to click on a saved bookmark and the previously saved directory will be opened in the library browser.
If you right click on a bookmark, you have two possibilities to choose
from. You are able to delete the bookmark, or you can save the bookmark
as the startup directory for the library browser. Selected as a startup directory, the bookmark will be opened immediately everytime the software
Audionet RCP starts up.
Note
·
Bookmarks save the current position in the library browser. That
means that you have to navigate to every bookmark directory at least
once to save that position.
·
If you switch your UPnP devices on and off regularly, the use of static IP addresses is recommended. Otherwise bookmarks might link to
a directory that does not exist anymore at the saved address. Then the
saved bookmarks are useless. With static IP addresses this problem
can be avoided.
28
7.2
Playlist
The play/stop indicator marks the title which is currently playing
being stopped .
or
If you right click on a title the following pop-up menu opens. This menu
allows you to remove the title from the current playlist or to move it up or
down in the playlist.
Start playback of the title
Remove the title from the playlist
Clear the whole playlist (same as the red cross)
Move the title one position upwards
Move the title one position downwards
Show detailed information
You can also move a title by "drag and drop" directly to any position of
the playlist.
29
Every playlist can be stored. Click on the disk icon
. In the next
dialog box, enter the desired playlist name. It will be displayed as the
name of the playlist in the upper right corner of the playlist area. Click on
the Save button to save your playlist to the selected directory.
If you wish to load a playlist, click on the folder icon
to open the
following dialog box. There you select the playlist you want to load. Apply your selection with Open .
Clicking the red cross icon
clears the current playlist. A playlist
that is not saved is lost and can not be restored.
30
Note
·
If you switch your UPnP devices on and off regularly, the use of static IP addresses is recommended. Otherwise playlists might link to titles that do not exist anymore at the saved addresses. Then the saved
playlists are useless. With static IP addresses this problem can be
avoided.
7.3
Player
The player area provides information on the title which is currently playing. In addition, all the control functions are available here.
Album art
Player buttons
Play time
Bit rate
Title
information
Repeat playlist
Shows selected
renderer
Shuffle play
Player button:
Plays or pauses the current title (icon switches)
Stops playback
Rewind or fast forward through the currently playing title
Jumps - within the playlist - to the next or previous track
31
Play modes:
Repeat: Repeats the entire playlist
Shuffle: Plays randomly all tracks in the playlist, each
track only once
Track information and album art:
This information is provided by the UPnP server. The shown information
is the meta tag data of the audio file which is read and distributed by the
UPnP server.
Selected Renderer:
See section "4.2.2 - Select media renderer" on page 12.
32
8
Radio
With the software Audionet RCP you are able to listen to FM radio as
well as to internet radio.
8.1
FM Radio
Software Audionet RCP has to be connected to an Audionet device in
order to listen to FM broadcasting services.
For this purpose, select input channel FM Radio. The following window
will be displayed:
RDS Radio Text display
The display provides information about the currently tuned frequency und
the station name (RDS Program Service). Beneath the frequency display
you will find the RDS Radio Text in case this feature is supported by the
FM station. With the two buttons on the right side of the window you are
able to tune up or down the frequency.
Use the drop-down menu Presets to open one of your saved presets. Open
the menu by clicking on it and select one of the 20 list items.
If you have selected a frequency manually and want to save it to your
presets, click on the button add . The following window opens:
33
Now choose one of the 20 memory slots and apply with OK . Your now
saved preset can be opened by using the previously described drop-down
menu Presets.
Note
·
In case the currently tuned FM station supports RDS Program Service
information, the name of the FM station is automatically used as
name for the preset you want to save. If no RDS Program Service
information is available the default name "PresetXY" is used, with
"XY" being the number of the preset.
·
Depending on the way the RDS information is individually
transmitted by the tuned FM station it could take several seconds
until RDS information like Program Service and/or Radio Text is
received, processed and displayed.
8.2
Internet Radio
Listen to the internet radio service vTuner with software Audionet RCP
connected to an Audionet device. With the internet radio service vTuner
it is possible to select your favourite radio stations from a steadily growing number of worldwide stations. You have to register with an account
at vTuner to save your favourite stations and to receive personalized recommendations.
To register an account, open the website http://audionet.vtuner.com. You
will be going to visit this address every time you wish to edit your
favourite radio stations. As long as you do not have registered an account
with your Audionet device, you have to click on Register Here right
below the login. Additionally you will be requested to enter your E-Mail
address, to choose a personal passphrase and to enter an access code.
Receive your access code as follows: With a stable connection
established to your Audionet device, select NET input and open path
Home > Internet Radio > Get Access Code within the library window in
the UPnP tab. The code consists of eight digits and can be found in the
third line.
As soon as you registered an account for your Audionet device, you are
able to log in to the website http://audionet.vtuner.com and edit your
favourite radio stations. Furthermore you are able to add radio stations to
your favourites by right-clicking on the station name within software
Audionet RCP. Search for all available radio stations using the library
browser of the software Audionet RCP. The operation and usage of radio
stations corresponds to the usage of audio files (see section "7 - UPnP
Player" on page 26).
Note
·
If you are not controlling an Audionet device, listen to radio services
supported by your UPnP server or NAS station. The RCP is only able
to show information which is delivered by the UPnP server.
34
Errors and omissions excepted. Specifications and design are subject to changes without prior notice.
audionet is a trademark of Idektron GmbH & Co KG
Engineered and produced by:
Idektron GmbH & Co. KG, Herner Str. 299, Gebäude 6, 44809 Bochum, Germany
www.audionet.de
[email protected]