1
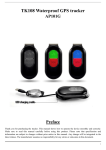
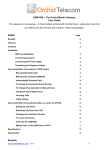
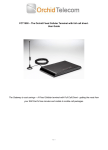
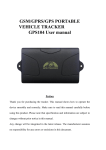
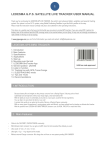
TK-STAR DETAILED USER MANUAL Preface Thank you for purchasing the tracker. This manual shows how to operate the device smoothly and correctly. Make sure to read this manual carefully before using this product. Please note that specification and information are subject to changes without prior notice in this manual. Any change will be integrated in the latest release. The manufacturer assumes no responsibility for any errors or omissions in this document. 1 Contents 1. Summary .......................................................................................................................................... 3 2. Applications ...................................................................................................................................... 3 3. Hardware Description ....................................................................... Error! Bookmark not defined. 4 Specs. ............................................................................................................................................... 5 5 Before first use .................................................................................................................................. 5 6 Commands and functions.................................................................. Error! Bookmark not defined. 7 GPRS / APN Settings ………………………………………………………………………………………16 8 Manufacturers advice ...................................................................................................................... 16 9 Troubleshooting ............................................................................................................................... 17 2 1. Summary The TK Star GPS Tracker works on existing GSM/GPRS network and GPS satellites. The tracker can locate and monitor any remote targets by SMS, GPS or internet. The most advanced GPS and AGPS technology is used giving dual positioning. The waterproof level of the unit is IP67. 2. Applications Vehicle - Rental or Fleet management etc. Personal vehicles – Cars, Campervans, Caravans, Motorcycles. Outdoor sports – Hiking, skiing and mountaineering. Person - Protect children, disabled or the elderly. Animals – Dogs, Horses, cattle. Provide peace-of-mind for businessmen Personnel Management Tracking Criminals 3. Hardware Descriptions 3.1 Front face 3 3.2 Side face Mini-USB for power supply and charging and software update / change. Indicator lights for SIM / GPS signal connection and battery charging. SOS Button ON /OFF Button 3.3 LED Description Green LED - GPRS working status Status of indicator Slow flash (Once every 2s) Continuously lit Green Led off Meaning GSM / GPRS connection No GPRS signal Device fault or dormant Blue LED - GPS working status Status of indicator Slow flash (Once every 2s) Continuously lit Blue led off Meaning GPS location successful Searching GPS signal Device fault or dormant Red LED - Power charging status Status of indicator Red led on all the time Red led flashing Red led off 4 Meaning Charging Low battery Full battery or charged full 4. Specifications Content Dimensions Weight Network Band GPS chip GPS sensitivity GPS accuracy Specs. 50mm x 50mm x 20mm 50g GSM/GPRS 850/900/1800/1900Mhz – Quad band UBLOX -159dBm 5m Time To First Fix Cold status - 35-80s Warm status - 35s Hot status - 1s Car charger 12—24V input 5V output Wall charger Battery Standby Storage Temp. Operation Temp. Humidity 110-220V input 5V output Chargeable 3.7V 1000mAh Li-ion battery 160-180 hours -40°C to +85°C -20°C to +55°C 5%-95% non-condensing 5. Before first use. Please charge the battery for 12 hours before first use. This conditions the battery for maximum performance. 5.1 SIM card installation Make sure your SIM has not got call divert switched on, is in credit, PIN code is off and call display is on (All standard SIM settings unless you have used the SIM in another device and changed these settings). The SMS text message must be in Text format and can’t respond to PDU format (again standard format unless you have changed it). 5 5.1.1 Open To open the cover remove the 4 screws with the supplied screwdriver. 5.1.2 Insert SIM Push forward and open the metal SIM cover. Put the SIM card into the card slot and press the metal piece to its original position, pushing it backward until it clicks – The SIM will only fit in one way. The SIM can only go in one way: 5.2 Battery and Charger Ensure the battery is charged for 8 -12 hours before first use. Please use the battery and charger provided by the manufacturer. This unit uses a built-in Li-ion battery, and full battery on standby can last up to 180 hours. After first use the battery usually should achieve a full charge in 3-5 hours. 6 5.3 Startup 1. Install the SIM card as above and reattach the cover in place. 2. Turn on the unit outdoors by pressing the “on/off” button until the indicator is on (these can be very faint, especially in sunlight). 3. For first use please initialize the unit and restore it to default setting. (Please refer to 6.1 for instruction.) 4. In 10 to 40 seconds the unit will begin to work and acquire the GSM and GPS signals. The LED indicators will keep flashing every 3 seconds when the unit is receiving these signals. 5. Once this unit receives a GPS signal you can use it and do any of the functions as described in this manual. 5.4 SMS Message contents description: 1. Google Maps link: This is the link to Google maps showing the position of the unit. When you click the link it will open maps on your smartphone showing the location of the unit. 2. V:A/V: Indicates GPS signal. V:A indicates there is a GPS signal; V:V indicates there is no GPS signal and has provided a SIM location via mobile phone towers. 3. 2013-10-17 10:48:18: The date and time stamp when the unit last received a GPS signal. 4. S: 000km/h: This indicates the last known speed of the unit. 5. B: The approximate amount of battery charge remaining. The value is between 1 and 6, with 6 being fully charged. 6. ID: 4102000759: The ID code of tracker device. This number is used for tracking website and the app and is on the back of the unit. 7. S25G03; p 46001 The GSM operator data from the cell towers. You can safely ignore this information. 8. L: 9531,c: 56662: Location based service data that indicates if the data came from a cell tower, GPS, or GPRS- again please ignore this data. 7 6. Commands and functions. The tracker unit works via SMS message sent to the SIM or through commands sent via the smartphone app or website platform. 6.1 Initialization Send “begin+password” as a SMS text message to the unit. It will reply “begin ok” and initialize the unit. (Default password: 123456) For example, send SMS: “begin123456” to the tracker via a cell phone. If successfully received the unit will send a reply SMS back to you saying: “begin ok”. 6.2 Change the password Send SMS: “password+old password+space+new password” to the unit to change the password. For Example: “password123456 000000”. It will reply: “password OK”. The new password will now be 000000 and should be used in place of 123456 in all the instructions in the manual. Note: Be sure to keep the new password safe. If you lose it you will have to upload the software to restore the original setting and won’t be able to use the Tracker. Make sure the new password is 6 digits or the tracker will not recognize the new password. 6.3 Authorised numbers Using an authorised number protects the unit from being accessed by anyone not authorised. If there is no authorised number any number that sends a message to the unit will receive a response and can change any of the settings. Once an authorised number is set the unit will only respond to messages sent from that number. 6.3.1. Set Authorised numbers To set an authorised number send SMS:”admin+password+space+cell phone number”. For example send SMS: “admin123456 13265790180”. If the command is successfully the unit will reply “admin ok!” 8 Any additional authorised numbers should be set by the first authorised number. 6.3.2 Delete Authorised numbers To delete an authorised number send SMS:“noadmin+password+space+authorized number”. For example: Send SMS “noadmin123456 13265790180”. If the command is successful the unit with reply “noadmin ok!” 6.4 Single Location 6.4.1 Location via call When an authorized number calls the device, it will hang up your call and reply via SMS message with a real-time location latitude and longitude information – shown below: Note: When GPS signal is lost or is weak you will receive two SMS messages, one with the GPS last location and one with the current GPRS location. Please note the time on the GPS signal as it will be the time the signal last was received. 6.4.2. Location via Text SMS To get a single real-time location through SMS send “G123456#” with 123456 being the password. If you have changed the password use that 6 digit code. For example send SMS: “G123456#”. If successful you will receive the following message: 9 Click on the Google maps link to open maps on your device and the location of the unit will be shown on the map. Note: If no authorised numbers are set any phone can call or text and receive the location message. If an authorised number is set and a non authorised number calls or texts the unit they will not receive a reply. 6.5 Monitor (Voice Surveillance) The commands to switch between Track and Monitor are “tracker” and “monitor”. The default mode is “tracker” (Track mode). To switch to monitor send SMS: “monitor+password”. If successful you will receive “monitor ok!”. The unit is now in monitor mode. When in monitor mode you can call the unit and it will silently accept your call and allow you to listen to the noise and conversations taking place around the unit. To switch to tracker mode send SMS: “tracker+password”. If successful you will receive “tracker ok!”. The unit is now in tracker mode. 6.6 Geo-fence A Geo-fence is a geographical area you define on a map. When the unit passes the boundary of this area it will send you a message telling you it is passing into or out of the area. 6.6.1. Set up via Text: (advanced) Once the unit has been immobile for 10 minutes you can send a SMS to set the geo-fence location. Send the following SMS: “stockade+password+space+latitude, longitude; latitude, longitude” to the unit to set the geo-fence. 10 If successful you will receive the following reply: “stockade ok”. Note: The first latitude & longitude is the coordinate of the top left corner of the Geo-fence, while the second latitude & longitude is the coordinate of the bottom right corner. If the unit passes out of the area it will send SMS to the authorised numbers every 3 minutes. To cancel the geo-fence send the following SMS: “nostockade+password”. If successful you will receive the following reply: “nostockade ok”. 6.6.2. Set up via Web or App (easy) Using the smartphone apps and online platform makes setting a geofence much easier as you can use the map to set the center and using the slide across the top make the area as large as you want. This Geo-fence is set around Gatwick Airport and will send you an SMS message if the unit moves outside of this area. This is perfect for vehicle security when you are on holiday, on a business trip, leaving your car in an insecure location or when you leave your car with a drop and collect company and you want to ensure you vehicle isn’t used without your authority while you are away. Of this can be used to inform you when whoever is carrying the tracker arrives at the airport – You family, your friends or your boss. 11 6.7 Movement alert The unit can be left in movement alert status and when it detects movement it will send you an alert message. To set up: When the unit stays immobile in a place for 3-10 minutes, the user can send SMS: “move+password” to the unit, then the unit will reply “move ok!”. When the unit moves 200m of more it will send SMS “Move ALARM+ Latitude and longitude” to the authorized numbers every 3 minutes. To cancel: Send SMS:” nomove+password” to deactivate the movement alert, tracker will reply “nomove ok”. 6.8. Over speed alert: The tracker can alert you when it goes over a certain speed. To set up send SMS: “speed+password+space+080” to the unit (suppose the speed is 80km/h), and it will reply “speed ok!”. When the target exceeds 80 km/h the unit will send SMS:”speed ALARM!+ Latitude and longitude” to the authorized numbers every 3 minutes. To Cancel send SMS “nospeed+password” to deactivate the over speed alarm, tracker will reply “nospeed ok”. Note: The recommended speed should be not less than 50km/h. 12 6.9. SOS button The SOS button sends a SMS to up to 3 numbers set by the authorised user. When pressed the unit will send a “help me” SMS with the location of the unit to those numbers. 6.9.1 Set up SOS SMS Mode: To Set SOS number, Send SMS: “sos+password+space+cell phone number” For example, please send:“sos123456 13265790180”to tracker to set 13265790180 as a SOS number. Press the SOS button for 3 seconds, it will send “help me!+ Latitude and longitude” to all the SOS numbers every 3 minutes. It will stop sending such a SMS when any authorized number reply SMS “help me!” to the tracker. 6.10 Low battery alert When GPS device battery is low it will send SMS: “bat:low” at 30 minutes interval. 6.10. Terminal (local) Time Setting The default time setting is based on China local time. Please change to local time in order to make best use of online tracking program and tracking location report’s Send SMS “time+space+zone+password+space+local time”. For example, Send SMS “time zone123456 8” (time zone of China). GMT is 0. 13 If the local time zone is negative as “-8”, then it should set as SMS: “time zone123456 -8”. 6.11. Sleeping/power-save mode On normal mode, when the unit doesn’t receive any commands and is still for 10 minutes it will automatically enter sleep mode. In sleep mode the power consumption is only 4mah/h. When it receives a command or is moved it will start GPS locating automatically. To force the unit to go into sleep mode (to save battery) send SMS “sleep+password”, the unit will reply “sleep ok”, and enter the forced sleeping power-save mode. To turn off the auto sleep function send SMS “sleep+password off”, The unit will reply “sleep off ok” and will continue in GPRS and GPS location modes until the battery runs out, the unit is powered off or you tell it to go back into sleep mode. This ‘sleep off’ setting will reset when the battery runs out. 6.12. Shock alert Shock alert lets you know when the unit is moving and must be set by the authorised user. Send SMS command “shock+password”, the unit will reply “shock ok.” Cancel: Send SMS command “noshock+password”, the unit will reply “noshock ok.” 6.13. Restore factory settings This must be sent by authorised user’s number. Send SMS command “format”, the unit will reply “The tracker will immediately restore the factory settings. All previous settings will be canceled.” 14 7 GPRS / APN setting User must send SMS via cell phone to set up IP, port and APN before starting GPRS. 7.1 APN Settings Each SIM card provider has their own APN settings. These are usually provided when you activate your SIM. 7.1.1. Set APN Name APN standards for Access Point Name and differs from country to country and SIM providers. For more information about the local APN, inquire with your local GPRS network operator. Text the tracker a SMS “apn+password + Space + your local APN” via a cell phone and if succeeded in setup, the tracker will return the message “apn ok”. e.g. “apn123456 giffgaff” 7.2.2 APN User name This is your user name to access your SIM providers network. Send SMS command “apn123456 cmnet”. If succeeded, “apn ok” is returned by the tracker in SMS. Notes: 123456 refer to password of tracker and CMNET is the APN of China Mobile (One of GSM Operator in china). 7.2.3. APN Password Send SMS command “apnpasswd abc123”. If successful you will receive “apnpasswd ok”. If you SIM doesn’t have a password you still need to send the “apnpasswd” message with a space after the word apnpasswd.. 8 Manufacturer’s advice. Please comply with the instructions to extend the unit life: 15 Keep the insides of the unit dry. Any liquid, i.e. rain, moisture, may destroy or damage the inside circuitry. Don’t use & store the unit in dusty places. Don’t put the unit in overheated or overcooled places. Handle carefully. Don’t vibrate or shake it violently. Clear the unit with a piece of dry cloth. Don’t clean in chemicals, detergent. Don’t paint the unit, this may cause some foreign materials left in between the parts. Don’t disassemble or refit the unit. Please use the battery and charger provided by manufacturer. Using other batteries and chargers will cause unwanted situation. 9. Troubleshooting Faults Startup Fail Hang up Fail Solution Check the battery and see if it is fully charged. Please initialize the unit and re-set up the authorized numbers – Once set the unit will only communicate with an authorised number. Monitoring failure Please check the authorization number is set to the correct time No GSM Signal Please make sure SIM Card is GSM Net and installed correctly; also call display should be on; but no call transfer and PIN code off. 16