Transcript
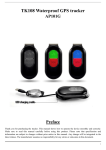
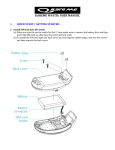
TK-STAR STICK GPS TRACKER USER MANUAL PREFACE Thank you for purchasing the GPS tracker. This manual shows how to operate the device: read this manual carefully before using the device. Please note that specication and information contained in this manual are subject to change without prior notice. Any change will be integrated into the latest release. The manufacturer does not accept liability for any errors or omissions that may be contained in this document. SOS BUTTON 1. SUMMARY FOR GPRS FOR POWER FOR GPS This device combines the latest GPS position and GSM GPRS (mobile communication network) technologies. The tracker can be operated either by a phone call, by SMS text message, or via the internet (web application, Android and iOS App). This product can be directly inserted into USB port in your computer, or directly inserted into another USB port; tablet, car, powerbank etc. The tracker can also be used during charging. TECHNICAL SPECI FI CATI ONS Dimensions 70mm x 25mm x 15mm (2.7"x0.98"x0.60 ") Weight 40 grams Network GSM/GPRS Band 850/900/1800/1900Mhz GPS sensitivity -159dBm GPS accuracy 5 meters Time To First Fix* Cold: 45 seconds | Warm: 35 seconds | Hot status: 1 second Car charger Input: 12—0224V | Output: 5V Wall charger Input: 11—20V | Output: 5V Battery Rechargeable 3.7V 420mAh Li-ion battery ON/OFF SWITCH LED INDICATOR STATUS M EANING Yellow-Solid No GPRS signal. Yellow-Flashing GPRS communication established. Center-RED-Not lit Fully charged. Center-RED-Solid red Charging. BLUE-Solid Searching for GPS signal. BLUE-Flashing GPS location successful. 80 hours Storage Temp. - 40°C to +85°C 2. INSTALLATION Operation Temp. - 20°C to +55°C 2. 1 SIM-CARD INSTALLATION Humidity 5% - 95% non-condensing .2. COMMAND REPLY Cancel SOS number nosos123456 nosos number ok Obtain current position *** G123456# Google link Set time zone (in relation to GMT) timezone123456+space+1 time ok timezone123456+space+ -1 Standby setup. Sets the number of minutes after which the tracker will go into standby mode. Default is 5 minutes sleep123456+space+time sleep time ok Wake up on movement **** sleep123456+space+shock sleep shock ok Turn off Standby mode sleep123456+space+off sleep off ok Exit/End Data mode nogprs123456 nogprs ok Set Data mode – the device will use data communication to send position information to our servers- ***** gprs123456 gprs ok Set monitor mode monitor123456 monitor ok Set tracking mode tracker123456 tracker ok Format the device ****** format * * The default password is 123456. If you change it, please replace 123456 in the commands above with the new password. * * * Always check the location received has been freshly calculated (GPS signal should be V:A). If the signal status is V:V, it could be that the device has entered Standby Mode. Call the number attached to the device to wake it out of Standby. * * * * Sends the device into Standby Mode until movement is detected by the motion sensors, at which point, the device activates and resumes normal functioning. * * * * * To use Data Mode, the device needs to be setup to use the internet. This is discussed in Section 5 below. * * * * * * This command can only be sent from an authorized number .5. Call the mobile number attached to the tracker and hang-up after it rings once. The tracker will respond by sending you an SMS as described in Section 3.1 below Click on the link to open google maps and see the location of the tracker. 4.1 EXPLANATION OF PARAMETERS/CODES IN SMS MESSAGE Google Maps link: This is the link to the Google map showing the position of the tracker unit. Clicking on the text will open Google maps to show the position of the unit. Picture II: Historical positioning information, without satellite signal (GPS) recovery but with GPRS (LBS) Now: lac:253B DD56: The real-time LBS position T:14/11/10 06:08:Timestamp of the time and date when the LBS position was calculated. Bat: 100% The approximate level of the battery. A value between 10% and 100%, with 100% being fully charged. Last: lat: 22.63955 lon: 114.17111: the last GPS position T:03:52 The time the last GPS position was calculated Google Maps link: The last GPS position 5. OPERATING THE TRACKER ONLINE. COMMAND INSTRUCTION TO SET THE ACCES POINT NAME (APN) INSTRUCTION Picture I Picture II Picture I:As a real-time positioning information of satellite signal recovery lat:22.63930 lon:114.17172:The real-time GPS position Speed: 000 This indicates the latest known speed of the unit in KM/H. T:14/12/11 05:23 Timestamp of the time and date when the GPS position was calculated. Bat:60% The approximate level of the battery. A value between 10% and 100%, with 100% being fully charged. 8737000001:The IMEI (International Mobile Station Equipment Identity) number of this device. . .6. COMMAND COMMAND REPLY Set new APN apn+123456+space+apn content apn ok (any existing will be replaced) Set APN username apnuser+123456+space+content apnuser ok Set APN password apnpasswd+123456+space+content apnpasswd ok Set data upload interval ( default:120 seconds) Upload+123456+space+30 begin123456 begin ok Change the password ** password123456+space+ newpassword password ok admin ok Remove authorized number noadmin123456 noadmin ok Set SOS number sos123456+space+ phone number sos number ok Also, after setting the APN, the tracker must be set to Data mode. Ask your mobile provider for the correct APN settings. This can also be generally found in the FAQ online. 5.1 Using the internet Platform : http://3.tkstargps.net/ IMEI: Printed on the back of the device as show in section 2.1 and in SMS message Password: 123456 5.2 Using the App for ANDROID/iOS Search TKSTAR in the Apple App Store/Google Play Store to install the applications on your device. Select “Log in by IMEI” Server: 3.tkstargps.net IMEI: Printed on the back of the device as show in section 2.1 and in SMS message Password: 123456 upload ok ! Turn on GPRS function by sending comand “gprs123456”and APN must be setup for the device to be able to upload data over the internet.There are two ways to nd APN out: check sim card carrier on internet or put sim card into own cell phone to nd out APN .7. REPLY Reboot the device .4. .3. 4. OPERATING THE TRACKER BY SMS TEXT MESSAGE 3. COMMANDS Note: ‘+space+’ means press the space key 1 time Authorize a number. Only this admin123456+space+ number will be allowed to phone number congure and query the tracker *Time To First Fix (TTFF) is a measure of the time required for a GPS receiver to acquire satellite signals and navigation data. As well as calculating a position solution (called a x). INSTRUCTION 2.2 TURNING ON THE DEVICE Turn on the unit by pressing the “on/off” button until the indicator is on. For rst use, please initialize the unit and restore it to default setting. (Please refer to Section 3 for instructions.) Wait for the device to acquire both Mobile network signal and GPS signal. This may take up to 40 seconds. GPS signal acquisition may take longer indoors. Once the signals are acquired, the Yellow and blue LEDs should be ashing as described above. You can then start setting up and operating your device as described in Section 3, 4 or 5. INSTRUCTION Note: SMS tracking works in Yellow-Solid mode and YellowFlashing mode, online tracking only works in YellowFlashing mode, turn on Yellow-Flashing mode by sending command "gprs123456" and set APN for the tracker Standby .1. Before starting make sure the SIM is a GSM card. Note: insert SIM card before boot, please reboot the device if the SIM card already is installed when the device is on. Insert the SIM card mobile phone card, pay attention to the direction, in accordance with the shell icon. .8.