1
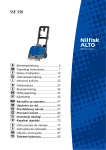
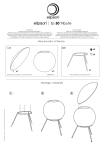
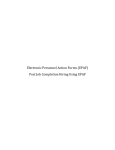
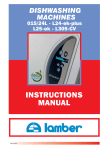
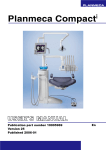
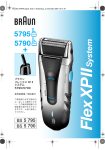
Micro
Mera
Aragon
Vinyl Care
Manual
Dear customer,
thank you for your decision of purchasing a record cleaning machine
from Hannl Vinyl Care.
Before initial use we strongly recommend you to read this instruction
manual carefully. This guide will help you using your record cleaner to
achieve best cleaning results possible whilst taking care of the record.
We hope you enjoy your new record cleaner,
your Hannl-Team
1. Delivery and packaging
The Hannl record cleaner comes in a special box to take care there will
be no damage on shipping. First of all please check if there is any
damage on the box. In case of any damage please report within 3 days
to your local dealer.
Please check the contents of the box.
We supply the following parts from factory:
0 Record cleaner
1 Instruction manual
2 Cleaning liquid X2000 (Micro Basic none!)
3 Power cord
4 replacement brushes (Micro:1 brush to apply the cleaning liquid )
5 replacement velvet sheets
6 bottle (Micro only)
Tip: Do not put the original packaging to the rubbish. In any case of
shipping you will have best protection for your cleaning machine only
from the original box.
In case of any question please feel free to contact us!
2. Installation
Please bear in mind this machine makes use of liquids that could harm
laquered or rubber surfaces. Always place on a non-sensitive
underground or put something protective under the record cleaner.
Also take care the outlet of the waste-tank is always closed!
Have fun with your new record cleaner!
Vinyl Care
description of appliance
8
1
1 suction cleaner
7
2 sense of rotation
9
4 pump
5 platter speed control
3
2
6 power switch
!
5
3 vacuum power
4
6
7 label protector
8 brush
9 tank for cleaning liquid
The mains switsch 10 is on the backside underneath the cleaner.
Readiness for operation is indicated by a light at the front of the device.
Switch 2 starts the platter. Depending on which button you press the
platter will spin clock- or counterclockwise.
Switch 4 starts the pump for the cleaning liquid. ( not available with Micro )
Push buttons 3 regulate the strength of suction. Noise of suction increases
with strength but will never be too loud. Lowest power is absolutely
sufficient for a proper removal of the liquid from the grooves.
Push buttons 5 alter the platter speed.
Tipp: Always brush with highest speed possible spinning repeatedly
clockwise and counter-clockwise.
Drying of the record should be made at lowest speed spinning one time
left hand and one time right hand that's it!
Removing the aluminium knob (9) opens the tank to fill in cleaning liquid.
on the backside
10 main switch (On/Off)
11 mains connector (230 V / US 115 V)
Vinyl Care
Cleaning of a record step by step:
Step 1)
Press on pushbutton 1 to start cleaning programme.
Platter starts spinning counterclockwise at highest
revs (LED on button 1 and 5 are illuminated).
5
1
Step 2)
Place the brush over the record and apply cleaning
liquid by pressing on button 7 (Ultra, Mera,
Flüsterbär and Aragon). Do not apply too much
liquid as this will not increase the effect of cleaning
but causing more waste. Let the the platter spin for
some revs depending on the degree of
contamination on record.
On the "Micro" please apply the cleaning liquid with
the bottle supplied with the record cleaner and use
the handbrush.
7
Step 3)
Pressing on button 2 will make the platter spin
clockwise. Let the platter spin for some revs in this
direction (LED on button 2 and 6 are illuminated).
2
5
Step 4)
6
2
3
4
Remove the brush from the record. Press button 3
to start suction motor. Revs on the platter go down
to minimum automatically. Place the suction arm
on the record. Let the record dry with one
revolution.( LED on button 2 / 4 / 6 on) Then press
on button 1 and the platter will spin the other
direction. Again let it spin for one revolution ( LED
on button 1 / 4 / 6 on).
Step 5)
4
Press button 4 . Suction motor stops and platter
keeps spinning (LED on button 4 off). Sway the
suction arm from the record when platter is still
spinning.
Step6)
Press button 6. The platter will stop and the record
cleaner goes into stand-by mode (all LEDs off).
Vinyl Care
6
3
5
4
6
Pushbutton 5 and 6 are increasing and decreasing the platter revs. Button + increases, button
decreases the speed in steps. LEDs beneath the buttons indicate maximum and minimum
settings. When LED on pushbutton 6 is on next push on button will stop the programm and
spin down the platter.
During aspiration process (LED on pushbutton 4 is on) you can increase suction power
incrementally by repeatedly pressing button 3. At maximum suction power LED on button 3 is
glowing permanently. Decreasing the suction power can be achieved by repeatedly pressing
button 4 (LED is flashing when lowest level is reached suction stops when pressing button 4
next time).
We strongly recommend you to use adaptive default values programmed on your record
cleaner!
Vinyl Care
4.2 New and normally soiled LPs
Put the record on the platter and fix it with the puck.
Several revs clock- and anti-clockwise are sufficient to dissolving dirt in
the grooves.
The record should show a homogenous wetting of the surface under the
brush. No cleaning solution should spill over the corner of the record. If
the latter is the case you've applied too much…
Take care there is enough liquid that while vacuuming it nothing dries in
advance…
The normal amount of liquid can easily be removed at lowest vacuum
level. The record surface must be completely dry before turning over to
clean the other side.
Bear in mind that there is a certain amount of dust and dirt inside the
record sleeves. Consider changing them after record cleaning you will
not be sorry.
4.3 Heavily soiled LPs
The dirt on heavily conatminated records easily be recognized as most
of the dirt is sitting in the grooves.
The cleaning procedure is exactly the same as already described under
4.1 but the following hints should be taken into account:
1
2
After some revs please remove the liquid in one step before applying
the next portion of cleaning solution. This will ensure to remove the
surface dust in a first step.
Reapply cleaning liquid and follow the procedure as nuder 4.2. This
will remove the dust from the
bottom of the grooves.
Most records even in difficult cases should be trackable after this
procedure.
4.4 What this machine cannot do
Removing scratches from the surface, no matter how small they are.
Removing alterations from chemicals
Removing oil, wax and residues of other so called cleaning products
You have purchased this cleaning device to clean records not to
repair them in any way...
Vinyl Care
4.5 Drainig waste from the tank
1. Take the tube from underneath
the record cleaner
2. Put the tube inside a glass
and let the used cleaning
solution rinse into the glass
by opening the outlet.
3. Make sure to close the
outlet after the waste tank
is void.
4. Put the tube back under
the machine where it
was before.
Dispose the waste and never reuse
it! Also make sure not to
incorporate this liquid.
Vinyl Care
5
Accesories
5.1.
Brush Sets
Your record cleaner comes with a brush-arm and a suction-arm für 12
inch LPs.
( Micro: handbrush) .
We additionally offer the following parts:
10-inch-version for 25 cm LPs
Single-version for Singles and Eps
The brush sets are exactly machined to match the size of the record.
Replacing for a different size can easily be done in a few minutes.
Vinyl Care
Ten usefull tips and tricks
!
Tip 1
Never use any cleaning solutions that can build foam. The foam will
destroy the vacuum unit.
Also corrosive liquids may not be used on this machine as they will
not only kill the machine but also your records!
Tip 2
To protect the labels on your records always use the puck. It will
prevent the moistening of the
label.
Tip 3
Never run the vacuum unit at the highest level when the suction arm
is not on the record. This
could possibly cause aspiration of waste liquid into the turbine which
will cause destruction.
Tip 4
The waste-tube must be closed while vacuum is applied. Otherwise
the airflow will be in
disorder.
Tip 5
While drying reduce plater-speed so that the record is dry directly
behind the suction-arm. This
will give best results and prevent from static electricity.
Tip 6
To prevent prints from the velvet of the suction-arm never stop the
platter before having
removed the suction-arm from the surface.
Tip 7
For a good and gentle drying it is essential that there is an even
contact between the suctionarm and the record surface. Please check the looks of the velvet and
readjust the suction-arm
if necessary.
Tip 8
When the gauze of the velvet is not going back into upright
position when being moistured it should be replaced.
Tip 9
To prevent from oxidation of the aluminium parts please dry them
after use.
Tip 10 In case the puck cannot be removed easily press gently with your
thumb against the lip
of the gasket.
Vinyl Care
Safety sheet for the record cleaning machine
Beware - strong rotational force -keep away from children
do not wear loose clothing when operating
Important: Please read the manual before using and operating the machine!
1
do not operate on an inflammable surface
2
place machine on a stable platform
3
only operate in well ventilated rooms
4
do not operate or store in humid enviranment
5
do not allow children to operate or play with the machine
6
pull main plug when not using the machine
7
do not drink and do not let your eyes get into contact with the cleaning liquid
8
keep cleaning liquid away from children
9
do not spill liquid onto sensitive surfaces
10 check main plug für damage before operating the machine
11 use original spare parts only
12 if smoke is detected - switch off and pull main plug immediately
13 the machine must be used for cleaning vinyl records only
14 always supervise the operation - do not leave unattended during the washing process
warranty and service
We have a limited warranty of 3 years.
The cleaning machine may only be serviced by an authorized dealer or the
manufacturer during the period of warranty. Any attempt of self-servicing voids
the warranty!
Warranty also is void in case of using foaming cleaning or corrosive liquids.
In case a service is necessary please send your record cleaner in the original
packaging to
Hannl Reinigungssysteme
Beyenburgerstrasse 21
42899 Remscheid
Subject to change without prior notice.
Vinyl Care