1
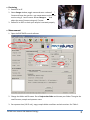
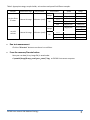
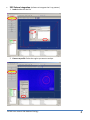
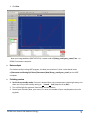
User guide for RIGAKU powder diffractometer September 2013 by Dr. Rie Fredrickson X-ray set 1. Open “XG Control” window and click “SET kV, mA” to set X-ray tube at operation (standby setting is 20kV, 2mA). kV and mA for the 2. Wait until the X-ray tube ramp up to 50kV, 50mA on the Rigaku x-ray diffractometer. Sample set on the machine 1. Open the RINT RAPID control software, and Goniometer control (Manual>Goniometer control). Select Phi position as Init. 2. Set your sample on the holder. Open the door (press the “door” button before opening machine). 3. Mount goniostad on the manual XYZ stage. RIGAKU user manual UW-Madison Geology 1 Centering 1. Rotate Phi to 0°. 2. Select Omega window, toggle move and enter a value of °. Center and focus the area for x-ray measurement on the cross section using X, Y and Z screws. Rotate Omega to °and adjust the area of interest using only Z screw. 3. Rotate Phi to 360° to check your sample is centered properly. Measurement 1. Open the RINT RAPID control software. 2. Change the folder and file name. Go to Project>data folder and choose your folder. Then give the new file name, sample and operator name. 3. Set exposure time (10-15 min), stage, sample holder conditions and axis motions. See Table 1. RIGAKU user manual UW-Madison Geology 2 Table1. Appropriate stage, sample holder, axis motions and speed for different samples. Samples Attachment stage Sample holder Axis motions Omega on glass fibers or tubes Manual-XY-stage Phi Manual-XY-stage Range Fixed Oscillation 1 degree/min 0<omega<40 Oscillation 3 degree/min -180<phi<0 Spin 3 degree/min -180<phi<0 Fixed 1 degree/min 35<omega<60 Oscillation 3 degree/min -180<phi<0 Spin 3 degree/min -180<phi<0 Fixed Reflection (small) Omega on solid surfaces Speed Reflection (small) Oscillation Fixed Phi Run test measurement Click the “Drive test” button to see there is no collision. Press the measure/Execute button Now your raw data (X-ray image file) is saved under c:\raxwish\image\Group_name\your_name\*.img on RIGAKU instrument computer. RIGAKU user manual UW-Madison Geology 3 2DP Pattern Integration (software to integrate the X-ray pattern ) 1. Load>double click the file 2. Convert to profile. Select the region you want to analyze. RIGAKU user manual UW-Madison Geology 4 3. Click Run. Now your integrated data (RINT ASCII file) is saved under z:\Group_name\your_name\*.asc on RIGAKU instrument computer. Data analysis For the data analysis using JADE program, the data you saved on z:\ drive is also shared under c:\Document and Settings\All Users\Documents\data\Group_name\your_name\ on the JADE computer. Finishing session 1. Set the X-ray standby mode: If no one is booked after your measurement is done right away, turn down the X-ray to the standby setting at kV and mA. (Keep the X-ray ON.) 2. Turn off the light for specimen illumination and the monitor. 3. Record your activities (data, your name, PI’s name, the number of your sample patterns) on the log book. RIGAKU user manual UW-Madison Geology 5