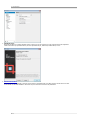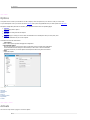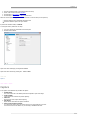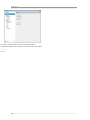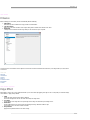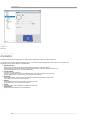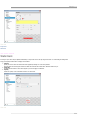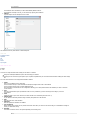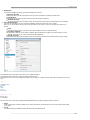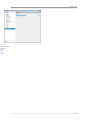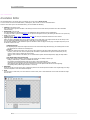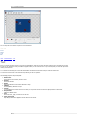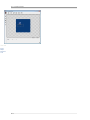
1
SPX Instant Screen Capture User Manual Copyright © Moodysoft Inc.. All Rights Reserved. SPX copyright © Moodysoft Inc.. All rights reserved. http://www.instantscreencapture.com The information contained in this document is subject to change without notice. This document contains proprietary information which is protected by copyright. All rights are reserved. No part of this document may be photocopied, reproduced, or translated to another language without the prior written consent of Moodysoft Inc.. Table of Contents Chapter 1: Welcome 1 Chapter 2: Introduction 2 2 3 5 6 6 7 9 9 10 11 13 13 14 15 15 16 17 18 Blur 20 21 22 23 24 25 Chapter 7: Registration 27 Chapter 8: Contact 28 Chapter 9: Index 29 Overview User Interface System Requirements Chapter 3: Options Activate Capture Chapter 4: Enhance Edge Effect Annotation Watermark Chapter 5: Send To Annotation Editor Clipboard File EMail FTP Printer My Program Chapter 6: Annotation Editor Arrow Shape Sequence Text Welcome . 1 Home > Welcome Welcome to SPX Instant Screen Capture SPX Instant Screen Capture has been the favorite screen capture program for millions of people since its first release in 2001. We hope you will join our community and enjoy the best tool in its category. Capture and send or annotate before sending. Capture an area of the screen or an entire window and instantly send the image to the clipboard for use in another application, to a file on your computer/network, to an email address as attachment, over the internet to your website, right to the printer or to a program for further editing. Show and Tell with the new, builtin Annotation Editor to better explain your work and ideas. Only simple and useful tools are available: arrow , shape , number sequence , text box and blur tool . View PDF Manual Download a fully functional version of SPX Instant Screen Capture free for a 15day trial period. Enjoy ! Moodysoft Inc. SPX 2 . Introduction Home > Introduction Introduction SPX Instant Screen Capture makes the perfect screenshots simply by dragging with the mouse to highlight an area on your screen or by pointing to an open window. For your convenience it also takes care of the traditional PRINTSCREEN and ALT + PRINT SCREEN keys for capturing the whole screen or the active window. Your work will look professional within minutes. Our work wouldn't be complete without this guide which explains in detail all the tools and functions. Your suggestions have helped us create this outstanding tool. Thank you ! See also Welcome Options Enhance Send To Annotation Editor Registration Contact Home > Introduction > Overview Overview SPX Instant Screen Capture was designed to "showandtell". And we made this very easy. How Does SPX Work ? SPX Instant Screen Capture works by capturing an image right from your screen, regardless what application is running or what is displayed. To trigger a capture press the hotkey. The cursor turns into a crosshair. With the crosshair you drag and highlight an area or click an open window, then release the mouse. For precise capture rotate the wheel button on your mouse to zoom in/out. If the Annotation Editor is selected, it will open with the screenshot on the canvas waiting for you to explain more using the available tools: arrow, shape, number sequence, text box and blur tool. When done, send the final masterpiece to any destination right from the Annotation Editor. If the Annotation Editor is not selected, the screenshot will be send instantly to the selected destination(s): clipboard, file, email, internet, printer, program. What is SPX good for ? With SPX screenshots you can show your work in many ways: Document with images the status of applications or systems Share images with others in your organization or family Print portions of images or documents Send support inquiries with a screen shot attached Reply to support tickets with an attached screen shot Send screen shots to your website and get back a full link(url) to that screen shot Prepare basic presentations Explain how things work Explain why things don't work Ask why things don't work ...and many more which you're welcome to discover. What are you using SPX for ? Let us know. SPX Introduction . 3 See also User Interface System Requirements Home > Introduction > User Interface User Interface When SPX is running and ready to take screen captures, you have access to five elements that will help you make the most out of SPX. 1. SPX Icon in the system tray(also called Notification area) SPX logo,the size of an icon is present in the system tray. Leftclick on this icon will open SPX Options screen. Rightclick on the icon will open SPX menu. 2. SPX Menu From SPX menu you can choose to: take screen shot open Options screen set SPX to launch at computer startup open this Help file open the About screen Exit SPX 3. SPX Options This is where you tell SPX what to capture and where to send the screen captures. SPX 4 . Introduction 4. SPX About screen Along with info about our company and SPX version, on this screen you can register your copy of SPX by entering the registration codes received when you purchased SPX. If you have't purchased SPX yet, click the Buy button and buy it now. 5. SPX Annotation Editor When SPX Options are configured to send the screen capture to Annotation Editor, the editor will open with the new screen shot on tha canvas. Use the tools available to "Show and Tell", then send the screen shot to any destination. SPX Introduction . 5 See also Overview System Requirements Home > Introduction > System Requirements System Requirements Minimum system configuration Windows XP/2003/Vista/7/8 512+ MB RAM (1GB Recommended) 800x600 minimum screen resolution See also Overview User Interface SPX 6 . Options Home > Options Options The Options screen is where you tell SPX how to start a capture, where to capture from, and where to send your screen shot. To open SPX Options screen you can leftclick on the SPX icon in the system tray(notification area) or select Options from SPX menu. SPX Options configuration panel has four sections, each explained in detail on their corresponding pages: 1. Activate How to trigger/start a capture. 2. Capture SPX behaviour during and after the capture. 3. Enhance Add nice edges, to stamp your screen shots with watermarks or to identify them with your name, date, time. 4. Send To Choose the destination for your screen captures. The bottomleft area has three buttons: Take capture Start a new capture right after changing SPX configuration. Resend last capture Bring the last capture, even if the area where it was taken from now contains ather information. If the destination has been changed in the meantime, it will be sent to the new destination. This button shows only if a screen capture has already been taken during the current session. Help Opens this help file. See also Welcome Introduction Enhance Send To Annotation Editor Registration Contact Home > Options > Activate Activate There are four ways to start / trigger a new screen capture: SPX Options . 7 1. 2. 3. 4. Press the activation Hotkey (recommended and most used) Select "Take Screen Shot" from SPX Menu Click SPX logo on SPX Options bottom area Click SPX logo on SPX Annotation Editor topleft corner When the screen capture is triggered the cursor turns into a crosshair and you can capture by: dragging with the mouse to highlight the desired area point to a Windows object or an open window By default the activation hotkey is CTRLF1 . To change the hotkey follow this two steps: 1. Type your favorite key combination in the Hotkey box 2. Click the Refresh button Capture the whole desktop by pressing PRINT SCREEN Capture the active window by pressing ALT PRINT SCREEN See also Capture Home > Options > Capture Capture A few options are available during and after the capture: 1. Include Cursor The cursor will be left on the desktop and will be captured as part of the image. 2. Large Crosshair Use a monitor wide cross hair for precise capturing. 3. Show size Show the size of the capture while capturing 4. Play Sound Play a camera sound when the capture is finished. 5. Zoom in/out for better precision Turn the mouse wheel to zoom the portion of the screen surrounding the cross hair. You don't need to turn this feature on / off. Zooming is available all the time. SPX 8 . Options To cancel a screen capture while the cross hair is active press ESC key. A confirmation message shows at the top of your screen after each screen capture. See also Activate SPX Enhance . 9 Home > Enhance Enhance Before sending your screenshot, SPX can automatically add the following: 1. Edge Effect Each side may have a different torn edge, border size and shadow. 2. Text Annotation Add a text or the date and time of the capture along with he station name and the user name. 3. Watermark "Stamp" each screenshots with an image that you can choose from your computer. The preview area on the bottom of the Options screen shows how these enhancements will look on your images before you even take a screen shot. See also Welcome Introduction Options Send To Annotation Editor Registration Contact Home > Enhance > Edge Effect Edge Effect Edge Effect is used to give a more professional look to your screen shots by applying torn edge on one or many sides, surround the image with a border or apply a drop shadow. 1. Sides Select the sides where the edge effect is applied. Choose the background color for the area removed by the edge effect. 2. Torn Edge Set the depth of the edge effect as a percentage of the image size. Maximum percentage is 50%. 3. Border Size Set the width and the color of the border surrounding the image. Maximum width is 10px. If the width is set to zero there will be no border. 4. Drop Shadow Apply the drop shadow effect to the whole image. SPX 10 . Enhance See also Annotation Watermark Home > Enhance > Annotation Annotation Annotations with text and predefined values are useful to better identify your images when shared with others. To "stamp" your screen shots with text annotation, type your text and/or add the predefined values in the yellow box. The position and the properties of the text annotation are explained below: 1. Position and color Specify the Corner where the annotation will be applied by clicking one of the four positions. Move the slider bar to change the offset from both the horizontal and vertical sides. Maximum offset is 20 px. Choose the background color for the text annotation box. 2. Text Annotation Type your text in the yellow box. Press the "+" button to choose from the predefined values: Time, Date, Computer name, User name. Click the "Font" button to define the font, style, size and color of the text. 3. Border size Set the width and the color of the border surrounding the annotation box. Maximum width is 10px. If the width is set to zero there will be no border. 4. Margins Set the width and the color of the margins. The maximum is 10 px. If the width is set to zero, there will be no margins. 5. Opacity Define the opacity of the annotation box between zero and 100%. 6. Drop shadow Apply the drop shadow effect to the annotation box. SPX Enhance . 11 See also Edge Effect Watermark Home > Enhance > Watermark Watermark An image of your choice may be placed automatically on top of each screen shot by using this function. To avoid hiding the background image, the Opacity function below is highly recommended. 1. Position Specify the Corner where the watermark will be applied by clicking one of the four positions. Move the slider bar to change the offset from both the horizontal and vertical sides. Maximum offset is 20 px. 2. Image file Click the Browse button to select the image file you want to apply as watermark. 3. Opacity Define the opacity of the watermark between zero and 100%. See also SPX 12 . Enhance Edge Effect Annotation SPX Send To . 13 Home > Send To Send To This section explains where your screen shots can be sent and how each destination is configured to maximize your productivity and simplify your work. The possible destinations are: Annotation Editor Clipboard File EMail FTP Printer My program A confirmation message will be shown at the top of your screen after each capture was sent to its destination. When Annotation Editor is selected, all other destinations are disabled. When Annotation Editor is nor selected, all other destinations are available and, for your convenience, you can choose to send to multiple destinations. For example, you may choose to send a screen capture to the printer but also sve it as file on your computer. See also Welcome Introduction Options Enhance Annotation Editor Registration Contact Home > Send To > Annotation Editor Annotation Editor If you wish to further annotate your screen shot before finally sending it, send it to the Annotation Editor first. Follow this link to learn everything about it: Annotation Editor Tools and Functions. To avoid confusion, when you select Annotation Editor as destination, all other destinations will be disabled. That's because right from the Annotation Editor you can send your screen shot to any destination once you're happy with your work. The builtin Annotation Editor will help you Show and Tell to better explain your ideas. Simple and useful tools are available: arrow , shape SPX 14 . Send To , number sequence , text box and blur tool . See also Clipboard File EMail FTP Printer My Program Home > Send To > Clipboard Clipboard To use the screen shot in another application, the easiest way is to first place it in the Clipboard, then paste it into the other application. See also Annotation Editor File EMail SPX Send To . 15 FTP Printer My Program Home > Send To > File File Store your screen shots or share them with others by sending them as files on your computer or network. The most popular graphic formats are available: bmp, jpg, gif, png. 1. Output folder Click the Browse button to find the location where you want to save the files. 2. File name Enter a prefix for your file names. Your screen shots will have this name or start with it depending on the naming rules below. 3. Naming rules Three ways are available for naming your files: Prompt for file name After each capture you will be prompted to enter a file name. By default, the prefix above will be shown. Fixed file name All following screen shots will be saved with the same name and in the same place without confirmation. Automatic file name generation Your files will be named using the prefix followed by numbers in ascending order, starting with 1. No confirmation will be required. See also Annotation Editor Clipboard EMail FTP Printer My Program Home > Send To > EMail EMail Many times you create a screen shot in order to send it by email immediately. By choosing EMail as destination, as soon as your capture is done, SPX will open your default email program, create a new message with the Recipient and the Subject already in place and the screen shot attached. With the new message open in front of you all you have to do is write your message in the email body and/or click the send button. 1. Recipient Type the email address of the recipient in the combobox. SPX 16 . Send To If the address wasn't used before, it will be automatically added to the list. If the address is already in the list, you can select it by opening the combobox. 2. Subject Type the subject for the subsequent new emails. This function works only with Outlook or Outlook Express. See also Annotation Editor Clipboard File FTP Printer My Program Home > Send To > FTP FTP There are two major benefits when sending screen shots to a website: Images are instantly available to anyone who's browsing your website. A link(url) to the screen shot gets copied in your computer's clipboard and you can send the link instead of sending the whole image file. Your FTP connection has to be configured and tested as follows: 1. Server Enter your FTP address in the combobox. If the connection exists, it will be selected and subsequent images will be sent to this website. If the connection doesn't exist, it will be added to the list. Each connection is stored with its own configuration allowing you to easily switch between the websites you want to send the screen shots to. 2. Port Enter the communication port. By default the value is 21 but, if different, you have to change it according to your work environment. 3. Path Define the path on your server where screen shots will be sent. The default path is the root "/". 4. Passive mode If your internet connection passes through a firewall, this option has to be selected. 5. User Enter the user name. Case sensitive ! 6. Password Enter the password. Characters are hidden ! 7. Test connection Before sending your images you may test the connection. SPX will try to connect to the server and give a confirmation message or advise you what went wrong. 8. File name This value is used as a name or as a prefix depending on the naming rules. SPX Send To . 17 9. Naming rules Three ways are available for naming your files when sending to a FTP server: Prompt for file name After each capture you will be prompted to enter a file name. By default, the prefix above will be shown. Fixed file name All subsequent screen shots will be sent with the same name without confirmation. Randomize file name The screen shots will be sent with random names. The random names will be made of prefix followed by a group of digits 10. After uploading the file... Once your file is uploaded to the server it becomes available to all those who have access to your website. Better yet, you can get back a link(url) to the screen shot which you can send by email or use for opening the image in your browser. Prefix Enter the URL to the location of the screen shot. (SPX will add the file name to complete the link.) Copy URL to clipboard If this option is checked, once the image is uploaded, SPX will send back the complete url of the filer and store it in the clipboard. From here, you can email or use the link in other applications. Open file in browser The screen shots will be sent with random names. The random names will be made of prefix followe by a group of digits. Using helpdesk systems for support is easier when you can explain with images. And sending the URL of the image is easier than sending the whole image. FTP option is the best way to work for support personnel: Store the image on a website once and send a link to that image every time you need. See also Annotation Editor Clipboard File EMail Printer My Program Home > Send To > Printer Printer SPX does what it says: it simulates the traditional PRINT SCREEN function by sending the captured image to a printer. 1. Printer Select a printer device from those available in your working environment. All subsequent screen shots sent to printer will be printed on this device. 2. Layout The standard options are available to further decide how the image will be printed: SPX 18 . Send To Proportional Prints the image at exact size. Fit to page Enlarge the image to the size of the page. Portrait Orients the print vertically. Landscape Orients the print horizontally. The PRINT SCREEN key, without SPX running, doesn't really print it just sends the whole screen image to the clipboard. SPX will really send your screen capture not the whole desktop to your printing device. See also Annotation Editor Clipboard File EMail FTP My Program Home > Send To > My Program My Program Use this function if you want to send the screen capture to a professional graphic editor or to another application. 1. Program Click the Browse button to locate a program available in your computer(by example C:\Windows\System32\mspaint.exe). To simplify your task SPX will show only the files with .exe extension. SPX Send To . 19 See also Annotation Editor Clipboard File EMail FTP Printer SPX 20 . Annotation Editor Home > Annotation Editor Annotation Editor The Annotation Editor is the canvas where you beautify your screen shot for Show and Tell. To send a screen shot to the Annotation Editor, in SPX Options, Send To has o be set as "Annotation Editor". Once the screen shot opens in the Annotation Editor, you have available the following: 1. SPX logo in the lefttop corner Start a new capture right from the Editor. The existing screen shot on the canvas and any annotation on it will be discarded without warning. 2. Destinations on the top side The same destinations as described in Send To are available and will work according to their configuration. To change the Send To specific configuration, you can open the SPX Options screen by leftclicking the SPX icon in the system tray. 3. Tools on the left side Available tools are : Arrow, Shape, Sequence, Text and Blur tool. They are described in detail in their own sections. 4. Object properties on the bottom side When you place an annotation object or you click on existing ones or simply click on the original screen shot on the canvas, in this area you will find the available properties specific to that object or to the original image. The properties available for each annotation object are described in their own pages. On this page, we'll explain only what you can do with the initial screen shot. Background color If by placing objects beyond the original size of the screen shot the final image becomes larger, the resulting extra area will be colored with the selected color as background. Cursor If SPX was configured to Include cursor, the cursor will be captured in its exact position and placed on the screen shot. However, even if the cursor was not captured, SPX remembers its position before the capture was taken and you may choose to place it now by clicking the cursor button. With the cursor selected on the canvas you can switch between pointer and hand shape and/or apply the drop shadow effect. Readjust capture area pixel by pixel Most times, instead of taking a new capture you can adjust the one already in front of you. Enlarge(+) and Shrink(<>) buttons are available for each side. One leftclick will enlarge/shrink the image by one pixel on the corresponding side. Holding the leftmouse button pressed will enlarge/shrink continuously until the mouse is released. When enlarging, SPX will add image to your screen shot as if it was captured with this size from the beginning. Readjusting is also possible using CTRLSHIFT + arrow keys. 5. Dimensions Shows the current size of the screen shot. If objects are placed on the canvas beyond the borders of the original image, the image size will be adjusted to a size which includes all objects. 6. Scale You may choose to scale down your screen shot from 100% to 80%, 50% or 30%.Doubleclick on the canvas will scale the image back to 100%. SPX Annotation Editor . 21 With the Editor only images captured by SPX can be annotated. When the Editor is selected all other destinations are disabled you can later send your final masterpiece to any destination right from the Editor. Objects on the canvas can be modified any time as long as the Editor was not closed. Just click the object and its properties will show allowing you to adjust them. Apply to all... is a powerful tool and very useful but you also need to pay attention when using it. For example, if you change one shape from ellipse to rectangle and press the Apply To All Shapes button, all shapes on the canvas will become rectangles and you won't be able to undo this. See also Welcome Introduction Options Enhance Send To Registration Contact Home > Annotation Editor > Arrow Arrow To add an arrow to your screen shot, click the arrow tool on the left panel and drag with the left mouse button between two points on the canvas. To resize the arrow later and/or to change its orientation, drag the start/end points with the left mouse button until you reach the desired size and position. To move the arrow click on the arrow body and drag to the new position. Once an arrow is placed or if an existing arrow is selected, the following properties may be adjusted: 1. Color Clicking the Color button will open the color panel where you can choose the color. Also available on this panel are the Windows system color picker and the standard color picker. 2. Size Adjust the thickness or the arrow body. 3. Arrow Set the length of the arrow head. 4. Opacity To avoid hiding the contents of the screen shot you may choose for the arrow the opacity between 0 and 100%. 5. Drop shadow Apply the shadow effect to the arrow. 6. Style Choose between the two arrow styles available. 7. Apply to all arrows Any change made will be applied to all arrows on the canvas. SPX 22 . Annotation Editor See also Shape Sequence Text Blur Home > Annotation Editor > Shape Shape To add a shape to your screen shot, click the shape tool on the left panel and drag with the left mouse button between the two opposite corners of the shape. To resize the shape later drag the corner and side handlers with the left mouse button until you reach the desired size. To move the shape click on the shape body and drag to the new position. The following properties may be adjusted: 1. Background color Choose the background color. 2. Fill color Choose the background color. 3. Border Adjust the thickness or the shape border. Maximum is 10px. 4. Corner Available only for rectangle shape.Allows the use of round corners and to set the radius. 5. Opacity To avoid hiding the contents of the screen shot you may choose for the shape the opacity between 0 and 100%. Opacity affects only the interior of the shape, not the border. 6. Drop shadow Apply the shadow effect to the shape. 7. Style Choose between the two shape styles available: ellipse and rectangle 8. Apply to all shapes Any change made will be applied to all shapes on the canvas. SPX Annotation Editor . 23 See also Arrow Sequence Text Blur Home > Annotation Editor > Sequence Sequence To add a number sequence click the sequence tool on the left panel, then click the position on the canvas. For every new number you have to click the sequence tool again. Per example, to add a 1234 sequence you have to click the sequence tool 4 times. To move a number, click and drag to the new position. You can not move the whole sequence at once. Each object has to be moved separately. To resize a number and/or to change its color and other properties, use the following : 1. Border color If the object has a border, choose its color. 2. Fill color Choose the fill color. 3. Border Adjust the thickness or the number border. Maximum is 10px. 4. Size Set the size of a square where the number will fit in. Maximim is 40px. 5. Opacity To avoid hiding the contents of the screen shot you may choose for the sequence the opacity between 0 and 100%. 6. Drop shadow Apply the shadow effect to the number. 7. Style Choose between the twostyles available: ellipse and rectangle 8. Font Choose the font, type, size and color of the numbers. 9. Apply to all numbers Any change made will be applied to all numbers on the canvas. SPX 24 . Annotation Editor You can only have one number sequence on each screenshot. See also Arrow Shape Text Blur Home > Annotation Editor > Text Text Even on a screen shot there may be a need for text explanations. Click the text tool, then drag with the mouse to define the text box. As soon as you release the mouse, the Edit Box appears where you can enter the text. Or you can enter/edit your text later by double clicking on the text box. To resize the text box drag the corner and side handlers with the left mouse button until you reach the desired size. To move the text box click on the text box body and drag to the new position. The following properties may be adjusted: 1. Border Color If the text box has a border, choose its color. 2. Fill color Choose the fill color. 3. Border Adjust the thickness or the border. Maximum is 10px. 4. Padding Set text padding. Maximum is 10px. 5. Opacity To avoid hiding the contents of the screen shot you may choose for the text box the opacity between 0 and 100%. 6. Drop shadow Apply the shadow effect. 7. Font Choose the font, type, size and color of the text. 8. Apply To All Texts Any change made will be applied to all text boxes on the canvas. SPX Annotation Editor . 25 See also Arrow Shape Sequence Blur Home > Annotation Editor > Blur Blur Use this tool to hide names, numbers or any other information that you don't want to share with others. Click the blur tool and drag a rectangle around the area that needs to be blurred. To resize the blurred area drag the corner and side handlers with the left mouse button until you reach the desired size. To move the blurred area click and drag it to the new position. The following properties may be adjusted: 1. Radius Adjust the blurring intensity. 2. Apply To All Blurs Any change made will be applied to all blurred areas on the canvas. SPX 26 . Annotation Editor See also Arrow Shape Sequence Text SPX Registration . 27 Home > Registration Registration If you evaluated SPX Instant Screen Capture, like it and think it fits your needs, then it's time to register it. To register SPX you have to buy a licence. A licence gives you the right to use SPX Instant Screen Capture for life. All purchases are processed securely online. Buy Now http://instantscreencapture.com/purchase.html Thank you ! See also Welcome Introduction Options Enhance Send To Annotation Editor Contact SPX 28 . Contact Home > Contact Contact Founded in 2000, Moodysoft Inc. is an Information Technology company, developing graphics software for home and office use. Moodysoft’s clients include thousands of corporate, government, academic organizations and many individual users worldwide. Home Page http://instantscreencapture.com EMail info@instantscreencapture.com SPX Index A activate 6 annotation , 10 13 arrow 21 B blur 25 C capture 7 clipboard 14 contact 28 E edge effect 9 editor 20 email 15 enhance 9 F file 15 ftp 16 M my program 18 O options 6 P printer 17 R register 27 S send to 13 sequence 23 shape 22 System Requirements 5 T text 24 W watermark 11