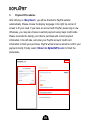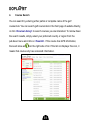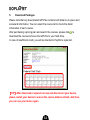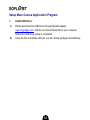
1
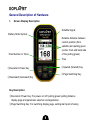
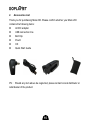
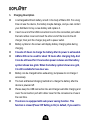
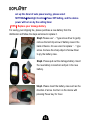
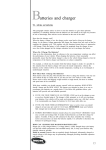
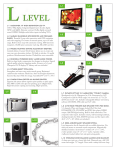
Content Special Announcement ................................................. 4 Attentions ...................................................................... 5 Attentions ...................................................................... 5 About GPS ..................................................................... 6 Thank You for Choosing Mars 200 ............................... 7 Using Conditions .......................................................... 7 General Description of Hardware ................................. 8 1. 2. 3. Screen Display Description .................................................. 8 Accessories List ................................................................. 10 Charging Description ......................................................... 11 Function Description .................................................. 13 1. 1) 2) 2. 1) 2) 3) 4) 5) 6) 7) 8) 3. 4. 5. 6. Start Menu ........................................................................... 13 Satellite Position............................................................ 14 Automatic Course Searching........................................ 14 Settings Menu ..................................................................... 15 Select Course ................................................................ 15 Delete Course ................................................................ 16 Unit –Metre/Yard ............................................................ 16 Clear Round Time .......................................................... 17 Backlight Control........................................................... 17 Language ....................................................................... 18 Set Time ......................................................................... 18 Model Info ...................................................................... 19 Electronic Course Card ...................................................... 19 Main Menu ........................................................................... 20 Shot Distance ...................................................................... 21 Green Location Correction................................................. 22 2 To Operate Mars 200: .................................................. 24 1. Product Registration .......................................................... 24 2. Lifetime Membership .......................................................... 26 3. Payment Procedures .......................................................... 30 4. Course Search .................................................................... 31 5. Download Packages ........................................................... 32 Setup Mars Course Application Program ............................................. 33 1. Install USB Driver................................................................ 33 2. Setup Mars Course Application Program .......................... 34 3. Start Mars Course Application Program ............................ 35 4. Connect Mars 200 to PC ..................................................... 35 5. Operate Mars Course Application Program ...................... 36 1) Add Course to Mars 200................................................ 37 2) Delete Course ................................................................ 39 3) Backup Course .............................................................. 40 4) Update Course ............................................................... 41 Questions & Answers ................................................. 42 3 Special Announcement Compass Systems Corporation E-mail:[email protected] The operation manual herein belongs to Compass Systems Corporation and anyone or any organization shall not duplicate, reprint, photocopy, scan or alter its whole or part content (including characters and pictures) for the purpose of use or sale in any kind of way privately unless acquiring a prior written consent of Compass Systems Corporation. Compass Systems Corporation is entitled to modify any information in the operation manual without notifying anyone or any organization (including persons who have or have not purchased the manual). 4 Attentions Global Position System (GPS) was developed and is managed by United States Department of Defense (DOD) that is responsible for its normal operation and position precision control; the U.S. is entitled to affect function or position precision of the whole system without prior notification or announcement based on its political considerations or safety of national defense. In order to use Mars 200 correctly and safely, you must be aware of some specific knowledge; please read the following attentions in the manual prior to operating the device: Mars 200 was only designed for the purpose of leisure and recreation and it isn’t applicable for industrial or special measurement. Mars 200 is only an auxiliary device, so we will not take any legal liability of accidents due to mistaken operation or wrong judgment by using Mars 200 for measurement. Please do not try to dissemble Mars 200 or repair any part of the device discreetly. Please do not place Mars 200 in a place exposing to direct sunlight or high temperature. Colors presenting by images in the manual are only for your reference and actual color combination of the device is decided by the actual manufacturing. 5 About GPS Global Position System (GPS) is a satellite system developed by Department of Defense of US. GPS consists of 32 satellites that encircle the earth and are 11,000 miles away from the ground. These satellites make two circles of the earth per day and emit signals of extremely low power which will be received and recorded by 5 ground stations. These ground stations will use precise time signals to confirm accurate position of each satellite. Your GPS receiver can “pick” signals sent out by the satellites. And an accurate latitude, longitude and height can be determined through calculation on positions and distances of at least 4 satellites. WAAS (Wide Area Augmentation System) can enhance the precision of GPS. It is designed by Federal Aviation Administration of US and mainly used to enhance precision of GPS on a plane. WAAS is combined with extra ground station groups which were set up in the places located precisely. These ground stations can work together with a master console so as to improve accuracy of satellite signals and reduce errors to about 3 meters. 6 Thank You for Choosing Mars 200 Compact design and friendly interface allow Mars 200 to be your best electronic caddie, which can help you to swing more strategically and manage the play route more easily. As long as you operate it in conformity to the guidance, you can be clear of the front, middle and back side of the putting green at a glance. Mars 200 is the easiest GPS special for golf in the world and the operation manual will explain characters and operation method of the product point by point to help you to achieve the most outstanding performance on the golf course. In order to ensure the best performance of the product and extend its service life, please read these instructions before using your Mars 200. Using Conditions As Mars 200 uses GPS, it is available only in the places that can receive satellite signals, excluding places indoor or in water. The device is applicable for golf distance measurement under the temperature from 0℃ to +60℃. 7 General Description of Hardware 1. Screen Display Description Satellite Signal Battery State Symbol Relative distance between current position (from satellite) and putting green (center, front and back side of the putting green) Hole Number or Timer Time ③Upward (forward) Key ①Execution/ Power Key ②Page Switching Key ④Downward (backward) Key Key Description: ①Execution/ Power Key: For power on/ off, putting green/ putting distance display page and parameter selection and application. ②Page Switching Key: For switching display page, setting start point of swing 8 distance and correcting course. ③Upward (Forward) Key. ④Downward (Backward) Key. 9 2. Accessories List Thank you for purchasing Mars 200. Please confirm whether your Mars 200 contains the following items: AC/DC adaptor USB connection line Belt Clip Pouch CD Quick Start Guide PS: Should any item above be neglected, please contact a local distributor or retail dealer of the product. 10 3. Charging Description A rechargeable lithium battery is built in the body of Mars 200. For a long time not use the device, the battery maybe damage, and you can contact your distributor to buy a new battery and replace it. Insert one end of the USB connection line into the connection port under the back rubber cover and insert the other end of the line into the AC charger; then joint the charger plug with a power outlet. Battery symbol on the screen will display battery charging state during charging. It needs 4-5 hours to charge the battery after its power is exhausted. A Mars 200 can be used for about 10 hours after charging fully. And it can be still used for 8 hours when power reduces and the battery symbol shows two grids. When the battery symbol shows one grid, it is still available for two-hour use. Battery can be charged before exhausting, but please do not charge it excessively. The best and fastest charging method is to charge the battery after the device is powered off. Please keep the USB connection line and charger well after charging and cover the connection port with rubber cover for the convenience of use in the next time. The device is equipped with auto power saving function. This function is closed (Power Off Setting is On) in default, if you want to 11 set up this timer of auto power saving, please select SETTINGSBacklight ControlPower Off Setting, and the device power will turn on by the setting timer. 【TIPS】Replace your damage battery For saving your shipping fee, please purchase a new battery from the distribution and follow the steps as below to replace it. Step1.Please use “+” type screw driver to gently remove the belt clip screw of battery case in the back of device. Or use a coin to replace “一” type screw. And use the sharp object of screw driver to pry the battery case. Step2. Please pull out the damage battery. Insert the new battery connection and put in the new battery. Step3. Please insert the battery case such as the direction of arrow. And turn on the device with pressing Power key for 3 sec. 12 Function Description Please confirm you are staying in an open area without shelter of buildings and woods so as to ensure the best reception of GPS satellite signals. 1. Start Menu Press Enter for 3 seconds until the power is on. Then three items will show on the start menu: <PLAY>, <SETTINGS> and <POWER OFF>. You can move the mark by pressing <Upward> and <Downward> and enter or execute the selected item after moving the mark to it and pressing Enter. If the satellite have not fixed before choosing <PLAY>, there will an information show on the screen. If the satellite have not fixed before choosing <PLAY>, there will a warning information show on the screen. And you can use the <PLAY> function until satellite fixed. 13 1) Satellite Position You can enter the main menu after choosing <PLAY> on the start menu; you will see a satellite icon on the top right corner keeps twinkling when you start your Mars 200 for the first time, which means the satellite is still searching for signals. The icon will stop twinkling after it locates and then you can use full functions of the device. Locating time of the satellite will reduce when you use the device in the next time as Mars 200 will remember your last location time. 2) Automatic Course Searching Mars 200 can provide an automatic course searching service; when you arrive at a course, please stay at the start menu for a moment after power is to wait for satellite location, then Mars 200 will ask you whether to choose the course after location. You can choose <Yes> to use the course information or choose <Play Previous> to maintain original course setting or choose <Select Course> to select the course you need in the 14 course list. Please note that you need to download course information in your Mars 200 before applying the auto course searching function. 2. Settings Menu Before using the product, you need to select a course and back tee at first. The menu also provides other settings. After you move the mark to item <SETTINGS> with <Downward> and press ENTER on the start menu, you will see the following items: 1) Select Course On the setting menu, move the mark to <Course List> and press ENTER, and then you will see a series of course information stored in the device. Use <Upward> and <Downward> to move the mark to the course name you want and press Enter, then the selected course name will turn to red and the menu will return to the settings menu automatically. If you want to back to the main settings page in any settings sub-item, please 15 press PAGE button; in the main settings page press PAGE button will return to the course information (green distance and scorecard) page. 2) Delete Course Move the mark to <Course Delete > and press ENTER on the settings menu; then move the mark to the course name you want to deleted and press ENTER, a menu will pop up to ask you whether you are going to delete the course, the course selected will be deleted after choosing <OK>. It is suggested not to delete the course unless the storage capacity is full as you need to pay for download the course information again after deleting it. If you want to back to the main settings page in any settings sub-item, please press Page button; in the main settings page press PAGE button will return to the course information (green distance and scorecard) page. 3) Unit –Metre/Yard Distance unit preset is yard. If you want to change it, you can choose < Metre/ Yard > on the setting menu and press ENTER, the unit will be changed into metre; if you press ENTER again, it will be switched into yard. 16 4) Clear Round Time Mars 200 provides you a simple timer to help you record the time spent in the play after locating satellite. You can return the timer to zero at any time only by selecting <Reset Round Time> and pressing ENTER; then the timer will return to zero. If you want to know present play time during a play, please go to the score card menu. 5) Backlight Control Mars200 provide auto backlight off function to save power; if you don’t touch any key for a specific time period, screen will turn to dark automatically. Using the <Upward> button set increasing or reducing the backlight duration; using the <Downward> button set increasing or reducing the power off duration. If you want to back to the main settings page in any settings sub-item, please press Page button. 17 6) Language You can choose <Language> and press ENTER to select the language you want with <Upward> and <Downward> key. 7) Set Time Mars 200 will set present time automatically according to relevant data of GPS satellites; also you can adjust the daylight saving time of your location. You can increase and reduce the time with <Upward> and <Downward> key after choosing <Time Set> and pressing ENTER on the setting menu. The setting menu will reappear after you adjust the time and press Enter. 18 8) Model Info You can check model, software/ hardware version and product serial number (S/N) of the product by pressing Enter after choosing <Model Info> on the setting menu; you can go back to the setting menu by pressing ENTER again. 3. Electronic Course Card Course card will provide information relevant to the fairway. You can go to the score card menu by pressing PAGE Key on the main menu. Information displayed by the score card menu is as following: Course Name Hole Number (will change according to the hole number selected on the main menu) Par 19 4. Main Menu The menu will be used most frequently when you use Mars 200. You can choose <Play> on the start menu and press ENTER; alternatively, you can press ENTER for 3 seconds to return to the start menu on any menu. 1) 2) The main menu will display the relative distances between you and the front, centre and back side of putting green clearly. You can press <Upward> and <Downward> key to switch the hole number. If current hole number is <1>, you can press <Upward> to switch to the second hole and you will see the hole number in the bottom left corner will change into <2>; then the main menu will display the relative distances between your present location and the front, centre and back side of putting green of the second hole. The menu can not only display the relative distances between your current location and the front, centre and back side of putting green, it also can allow you to check battery state, satellite reception state, current hole number and time. 20 5. Shot Distance Shot distance function can let you measure your play distance easily and precisely. You can press ENTER to go to the shot distance menu on the start menu. 1) 2) 3) Press PAGE Key for 3 seconds to reset the distance to 0 when you get to the playing position. When you go to the placement after playing, the menu will display the distance between your current position and playing position instantly. Please press ENTER when you get to the placement, thus your current swing distance will be saved. If you want to escape from the swing distance menu to return to the start menu, please press PAGE Key. Also you can use the pointer of shot distance function to make an easy measurement on the distance between any two points on the course. 21 6. Green Location Correction GPS green location information in the product is determined on the actual course situation when the information is collected; in case the green location has some changes, you can use the function to relocate it. 1) 2) 3) 4) For example, if you are going to correct the distance of the green center of the third hole on a course today, please press <Upward> and <Downward> to choose the third hole on the start menu after you get to the green center; then press Page for 3 seconds and you will see the figures are twinkling, which means the green correction function has been started. Press <Upward> and <Downward> to change the twinkling figures into the green center and press Enter again, and then Mars 200 will ask you whether to correct the green center? The distance will be reset as <0> after you press <OK>, which means the distance between you and the green center is 0. You can also use <Upward> and <Downward> to choose the front or back side of the putting green to make corrections continuously after finishing the correction on green center distance. The above method is available when you want to alter or correct the front, centre and back side of putting green of any course. However you need to 22 move to the front, centre and back side of putting green prior to corresponding corrections. 23 To Operate Mars 200: 1. Product Registration Please visit the GoPlanet official website www.mygolfgps.com/ to register new golf GPS product. Click the Create account link in the right top corner of website. Enter a valid E-mail address, preferred password, member info, select device name and enter the serial number of you device. (Please check the serial number via <Settings><Device Info> of menu in device.) If you would like to purchase some courses to golf, pleas choose a pricing plan in the bottom of website. If you would like to purchase courses next time, please choose No Thanks. You may purchase the pricing plan in the other day after you login your account. Please click <Create Account> to complete the registration. It is essential to make sure that the serial number is entered correctly; otherwise, course data cannot be uploaded to your device. 24 25 2. Lifetime Membership Users must first obtain a lifetime membership before downloading course data. You can connect your device to PC with internet access and select <Account Manage> to review membership status at any time. You may then click on <Map><Pricing Plans> to choose the suitable pricing plan for yourself and start enjoying full functions of the device. 26 There provide several pricing plan, please choose one you like. Before your payment, please read the detail of plan on the website. The pricing plan description as below: Professional Pricing Plan— Professional pricing plan is an annually unlimited download plan; you can download any courses which you are interested before your member ship expired. Only $24.99 per year, it is the best deal for both expert and amateur golfers. Gold Pricing Plan— Gold plan is just suit for you if you are visiting some regular courses; you need to pay $9.99 for the lifetime member ship and $16.99 for 10 courses download. All the courses you have downloaded will not be expired, you can own the courses. Silver Pricing Plan— Silver plan can satisfy your needs, for only small amount of golf courses, you can join this plan. Lifetime member ship for $9.99 and $8.99 for 5 courses download. All the courses you have downloaded will not be expired, you can own the courses. Bronze Pricing Plan— Bronze plan can fit your request, if you are always visiting the same golf club or specific golf clubs; it is good to join this bronze plan. For $9.99 lifetime member ship and $1.99 for 1 course. Save your money and your entire course may not 27 be expired. 28 【TIPS】Transfer your pricing plan. If you would like to transfer your pricing plan from Professional to Gold, Silver or Bronze, you need to wait for your one year member ship expired. If you would like to transfer your pricing plan from Gold, Silver or Bronze to Professional, there are several announcements: (a) You can immediately change your pricing plan, but the remaining in your account will lose. (b) Your life time member ship will be deleted. (c) You can own the course you already download, but if you download the same courses under Professional pricing plan, your course may be expired. 29 3. Payment Procedures After clicking on <Buy Now!>, you will be directed to PayPal website automatically. Please choose the display language in the right top corner of screen to fit your need. If you have an account with PayPal, please log in now. Otherwise, you may also choose to submit payment using major credit cards. Please reconcile the item(s) you’d like to purchase with correct payment information in the left side, and enter your PayPal account/ credit card information to finish your purchase. PayPal will send out an email to confirm your payment shortly. Finally, select <Return to MyGolfGPS.com> to finish the procedures. 30 4. Course Search You can search by entering either partial or complete name of the golf course/club. You can search golf course/club in the front page of website directly, or click <Course Library> to search courses you are interested. To narrow down the search results, simply select your preferred country or region from the pull-down menu and click on <Search>. If the course has GPS information, there will show an icon the right side of list. If the list not displays this icon, it means that course only has scorecard information. 31 5. Download Packages Please note that any downloaded GPS file contains both distance to green and scorecard information. You can select the course list to check the detail information of each course. After purchasing a pricing plan and search the courses, please click to download the course and save the GPS file to your hard drive. In case of insufficient credit, you will be directed to PayPal to replenish. 【TIP】After download or upload courses and disconnect your device, please restart your device to ensure the course data be refresh. And then, you can use your device again. 32 Setup Mars Course Application Program 1. 1) 2) Install USB Driver Please download the USB Driver through MyGolf website www.mygolfgps.com. And do not connect Mars 200 to your computer before the USB driver setup is completed. Unzip the file and double click the .exe file. Setup will begin automatically. 33 2. 1) 2) 3) Setup Mars Course Application Program Please download the Mars 200 application-Mars Course through MyGolf website www.mygolfgps.com. Please double click the setup file and follow the procedure to finish setup. If you have installed Mars Course before, please select whether you want to repair or remove the application program. If you use Windows Vista/ Windows 7, please restart your computer after installation is finished. 34 3. Start Mars Course Application Program Double-click Mars Course icon on your desktop to start the application program. 4. 1) 2) 3) 4) Connect Mars 200 to PC Plug in one end of the USB cable to the USB interface of your PC. Plug in another end of the USB cable to the connection port of Mars 200. Press and hold the Power key on Mars 200 for 3 sec till the power is on. Your PC will detect Mars 200 automatically, meaning that the USB Driver has been successfully installed. 35 5. Operate Mars Course Application Program Before operating the Mars Course application program, please confirm that: Both USB driver and Mars 200 application program have been installed; Mars 200 is connected to your PC and powered on. Next, click on <Connect> so that Mars Course will search for Mars 200 device and make a connection automatically. 36 1) Add Course to Mars 200 After you starting the Mars Course, <Add Course> function is the default page. The courses in your device will show on program screen, and you can click <OPEN> to select the courses list which you have download in your PC. And then, the courses you want to add will automatically upload to your device. A list of available golf courses in the device will appear on the program window. The series number of device will display on the top right corner, and if you update the expiration date of courses, which will show on the top right corner too. 【TIP】After download or upload courses and disconnect your device, 37 please restart your device to ensure the course data be refresh. And then, you can use your device again. 38 2) Delete Course If you would like to delete any golf course from the device, please select the course name(s) and click on <Delete>. Please not that once the golf course is deleted, it cannot be recovered. It is highly recommended to backup GPS files in your hard drive and then proceeds to delete. Otherwise, you have to download it again at www.mygolfgps.com. Please ensure to click <Disconnect> before you close Mars Course software. You can select each course name to delete it, or click <Select All> to delete all courses in your device. 39 3) Backup Course This software provide course backup function. Please select the courses you want to backup to your PC from the course list which show on the program window, and click Save button. There will display a Save to message, please creat a file to save your courses and click ok. The courses you choose will be backup to your PC. You can select each course name to backup it, or click <Select All> to backup all courses in your device. If you would like to re-upload those courses you had deleted, you can use <Add Course> function to add those courses from your PC again. 40 4) Update Course There will several pricing plan for you to purchase courses through MyGolf website www.mygolfgps.com. In the Professional pricing plan, your course will expire for a specific time period. If your couse expired, please purchase your member ship lifetime again through MyGolf website. After payment, you can use this function to check the expiration date. Expiration date of every course will display on the screen, please update the date after the internet connecting. And your course will work again. 【TIPS】Before updating the course, make sure device is connected to your desktop/laptop computer and the Internet connection is available. 41 Questions & Answers Situations The device cannot be started The device cannot detect satellites The device cannot connect with a computer Possible Problems 1. Battery voltage is too low. 2. You didn’t press and hold the Enter Key for 3 seconds. 1. Time for accessing satellite signal is not enough. 2. The device is suffering from the effect of shelters. Solutions 1. Charge the battery. 2. Press and hold the Enter Key until the power is on. 1. 1. 2. The device is not connected with an USB cable correctly. The driver is not installed. 1. 2. 2. Check whether the satellite icon keeps twinkling; if it stops twinkling, the satellite location has been fixed. Keep the device in an open space without building shelter. Check whether the USB cable has been connected correctly or change another USB cable. In addition, confirm the device has been started. Setup the driver correctly again. You can go to <Customer Support> on www.mygolfgps.com to download the latest version of user manual or acquire more relevant use information. 42