1
Degree project
Emulator for complex sensorbased IT system
Author: Ruslan Gederin and Viktor
Mazepa
Supervisor: Rüdiger Lincke
External Supervisor: Per-Olov
Thorén
Date: 2013-09-30
Course code: 5DV00E, 30 credits
Level: Master
Department of Computer Science
Acknowledgments
First of all we want to express gratitude to our supervisor, Dr. Rüdiger Lincke for an
interesting master thesis topic and for great work experience with him and his company
Softwerk.
We would also like to thank to:
•
•
•
•
Per-Olov Thorén and Ingela Stålberg for interesting meetings and for the
opportunity to work on a real commercial project.
Maksym Ponomarenko and Viktor Kostov for excellent management of our
work at our remote period.
Oryna Podoba and Illia Klimov for good collaborations during development.
Our families, relatives and friends for their support during our studying in
Sweden.
ii
Abstract
Developing and testing complex information technology (IT) systems is a difficult task.
This is even more difficult if parts of the system, no matter if hard- or software, are not
available when needed due to delays or other reasons. The architecture and design
cannot be evaluated and existing parts cannot be reliably tested. Thus the whole concept
of the system cannot be validated before all parts are in place.
To solve this problem in an industrial project, where the development of the serverside should be finished and tested (clear for production) while the hardware sensors
where designed but not implemented, we developed an emulator (software) for the
hardware sensors meeting the exact specification as well as parts of the server solution.
This allowed proceeding with the server-side development, testing, and system
validation without the hardware sensors in place. Following the exact specification
should allow replacing the emulator with the real sensors without complications, once
they are available. In the end, being able to develop hard- and software in parallel the
project can be in production much earlier than performing the development in sequence.
Disclaimer: this paper is written under a non-disclosure agreement. This is why certain
details are omitted in the thesis, but available to the project partner.
Keywords: emulation, sensor-based IT system, data acquisition, personal alert, Short
Message Service (SMS) gateway.
iii
Contents
1 Introduction ................................................................................................................... 1
1.1 Problem and Motivation ......................................................................................... 1
1.2 Goals, Criteria and Constrains................................................................................ 1
1.3 Outline .................................................................................................................... 2
2 Background Knowledge ................................................................................................ 3
2.1 Preliminary Research.............................................................................................. 3
2.2 Choice of Technologies .......................................................................................... 3
2.2.1 Main programming language........................................................................... 3
2.2.2 Technology for building Web User Interface.................................................. 4
2.2.3 RDBMS ........................................................................................................... 4
2.2.4 Application Server........................................................................................... 5
2.2.5 Tool for Automation Build .............................................................................. 5
2.2.6 Framework for Work With SMS ..................................................................... 5
2.2.7 High Level Design Pattern for the Web Application ...................................... 5
2.2.8 Development Methodology ............................................................................. 6
2.3 System Terminology .............................................................................................. 6
2.3.1 Sensor .............................................................................................................. 6
2.3.2 Alarms ............................................................................................................. 6
2.3.3 Responsible Persons and Messages................................................................. 7
2.3.4 SMS Gateway and 3G/GSM Modem .............................................................. 7
3 Features and Requirements............................................................................................ 8
3.1 Types of Users ........................................................................................................ 8
3.2 Messages................................................................................................................. 9
3.2.1 System Messages............................................................................................. 9
3.2.2 Notification Messages ..................................................................................... 9
3.3 Use Cases.............................................................................................................. 10
3.3.1 Data Acquisition ............................................................................................ 10
3.3.2 Emergency Situation Detected by Sensor ..................................................... 11
3.3.3 Emergency Situation Detected by Server...................................................... 11
3.3.4 Hardware Problems ....................................................................................... 12
3.4 Requirements for Emulator .................................................................................. 13
4 Architecture ................................................................................................................. 14
4.1 System Architecture and Behavior ....................................................................... 14
4.2 Emulator ............................................................................................................... 17
4.2.1 MVP Architecture ......................................................................................... 17
4.2.2 Emulator Behavior......................................................................................... 19
4.3 SMS Gateway....................................................................................................... 21
5 Implementation............................................................................................................ 24
5.1 Converting of Values............................................................................................ 24
5.2 E-mail Sending ..................................................................................................... 24
5.3 Enumeration of Sensor Commands ...................................................................... 25
5.4 Handling Client Request to the Server ................................................................. 26
5.5 Custom Widgets ................................................................................................... 27
5.6 UIBinder ............................................................................................................... 28
5.7 SMS Sending ........................................................................................................ 28
6 Testing ......................................................................................................................... 30
6.1 Testing Approach ................................................................................................. 30
6.2 Testing of Data Acquisition.................................................................................. 30
6.3 Testing of Emergency Situation Detected by Sensor ........................................... 30
iv
6.4 Testing of Emergency Situation Detected by Server............................................ 31
6.5 Testing of Hardware Problems ............................................................................. 32
7 Summarize................................................................................................................... 34
7.1 Conclusions .......................................................................................................... 34
7.2 Future works ......................................................................................................... 35
References ...................................................................................................................... 36
Appendix A. User Manual for Sensor Emulator .......................................................... A-1
Appendix B. Administrator Manual for Sensor Emulator............................................ B-1
v
List of Figures
4.1: General system architecture .................................................................................... 14
4.2: More detailed system architecture........................................................................... 15
4.3: Classic MVP............................................................................................................ 18
4.4: Simplified emulator client side architecture............................................................ 19
4.5: Sending Regular messages from emulator .............................................................. 19
4.6: Self-detected emergency situation emulation.......................................................... 20
4.7: Server-detected emergency situation emulation...................................................... 20
4.8: Hardware problem emulation .................................................................................. 21
4.9: Emulation of mobile network problems .................................................................. 21
4.10: SMS Gateway architecture .................................................................................... 22
4.11: Receiving incoming SMS messages...................................................................... 22
4.12: Sending SMS message .......................................................................................... 23
5.1: TimerButton widget ................................................................................................ 28
5.2: Output emulation console built using UIBinder...................................................... 28
6.1: Emulation of data acquisition.................................................................................. 30
6.2: Start emulation of emergency situation detected by sensor .................................... 30
6.3: End emulation of emergency situation detected by sensor ..................................... 31
6.4: Start emulation of emergency situation detected by server..................................... 31
6.5: Sensor sends value which is lower/higher than corresponding threshold ............... 31
6.6: Server sends message for turning on functional alarm............................................ 31
6.7: Sensor turns on functional alarm............................................................................. 32
6.8: Server sends message for turning off functional alarm ........................................... 32
6.9: Sensor turns off functional alarm ............................................................................ 32
6.10: Emulation of hardware problem............................................................................ 32
6.11: Sensor sends message about hardware problem.................................................... 33
A.1: Login page ............................................................................................................ А-1
A.2: Emulation page ..................................................................................................... А-1
A.3: Emulation process ................................................................................................ А-2
A.4: Output console...................................................................................................... А-2
vi
List of Tables
2.1: Comparison of programming languages ................................................................... 3
2.2: Comparison of Web user interface frameworks........................................................ 4
2.3: Comparison of RDBMS ............................................................................................ 4
3.1: System e-mail messages ............................................................................................ 9
3.2: System SMS messages .............................................................................................. 9
3.3: Notification messages.............................................................................................. 10
3.4: Data acquisition scenario......................................................................................... 10
3.5: Emergency situation detected by sensor scenario ................................................... 11
3.6: Emergency situation detected by server scenario.................................................... 11
3.7: Hardware problems scenario ................................................................................... 12
B.1: File mail.emulation.cfg.properties ........................................................................ B-2
vii
Abbreviations
3G – Third Generation of Mobile Telecommunications Technology
API – Application Programming Interface
GPL – General Public License
GSM – Global System for Mobile Communications
GUI – Graphic User Interface
GWT – Google Web Toolkit
HTTP – Hyper Text Transfer Protocol
IDE - Integrated Development Environment
IT - Information Technology
JSF – Java Server Faces
JSON - JavaScript Object Notation
JSP – Java Server Pages
MVA – Model View Adapter
MVC – Model View Controller
MVP – Model View Presenter
ORM – Object-Relational Mapping
RDBMS – Relational Database Management System
RPC – Remote Procedure Call
SIM – Subscriber Identification Module
SMS – Short Message Service
TCP – Transmission Control Protocol
URL – Uniform Resource Locator
USB – Universal Serial Bus
viii
1 Introduction
A company in south Sweden, which does not want to be mentioned at the time of the
thesis publication, wants to propose new solutions in the sensor-based IT systems for
data acquisition and monitoring.
Our work is performed in close collaboration with the customer, a second group of
students focusing on a different topic, as well as the experienced developers of
Softwerk, a consulting company managing our work.
Works on the project are distributed between students as following:
1. Ruslan Gederin and Viktor Mazepa – e-mail/SMS communication between
sensors and server, SMS gateway, emulator of sensors.
2. Oryna Podoba and Illia Klimov – Transmission Control Protocol (TCP)
communication between sensors and server, persistence layer and Android
applications.
All work was divided into three periods:
1. Requirements definition – meetings with the customer, use-case formulation and
conversations with the customer. This part of whole process we performed in
close collaboration with the second group.
2. Prototype development – the development of prototype for server-side and
emulator. This part was done separately. We were focused on the e-mail/SMS
architecture and communication.
3. Remote period – the development of web application and Android applications
for the system. We were focused on the emulator part.
In this thesis paper described research and development process for our part of this
system.
1.1 Problem and Motivation
The development of a complex sensor-based IT system for data acquisition and
monitoring is a complex task. This is even more difficult since parts of the system, the
sensors, are not available since they are developed in parallel to reduce time to market.
The architecture and design cannot be evaluated and existing parts cannot be reliably
tested. Thus the whole concept of the system cannot be validated before all parts are in
place.
Therefore the problem to be solved by this thesis is to permit the development and
validation of the server-side system without the actual sensors being in place to reduce
time to market and increase reliability of the production system in an early stage.
This is a challenging problem to solve, since the development of a complex sensorbased IT system for data acquisition and monitoring is in it self a challenge, in
particular since parts of the requirements for this system are not fully known, there are
complex protocols and dependencies, and it cannot be guaranteed that the sensors are
actually implemented according specification.
1.2 Goals, Criteria and Constrains
Reaching the following goals can solve the described problem:
1. The main goal is to develop a software emulator which emulates the real sensors
behavior. This goal is reached if the emulator fully implements the specification
1
of the hardware sensor. For the IT system controlling and monitoring the
sensors, there should be no difference.
2. The secondary goal is to develop parts of the server-side system to facilitate
testing of the emulator and the IT system. This goal is reached if the whole
system (server-side components and emulated sensors) are functional and can be
used for testing.
3. The final goal is to test the whole system implementation using the emulator.
This goal is reached if the implementation can be successfully validated against
the main use-cases with the help of the emulator. This should lead to minimal
integration problems when substituting the emulated sensors with real sensors.
Developing of system has several important constrains. We should use open-source
technology, because using commercial technology (proprietary software) is expensive
for our customer’s company. That is why we used Linux as server operation system,
Java as main programming language, Google Web Toolkit (GWT) as technology for
Web-based graphic user interface (GUI), MySQL as relational database management
system (RDBMS) and Hibernate as object-relational mapping (ORM) library for work
with database, Apache Tomcat as web server and servlet container, Apache Maven as
tool for automation build for Java projects.
1.3 Outline
The remainder of the thesis is structured as following: Chapter 2 provides a description
of all relevant background knowledge which is needed for a clear understanding of the
thesis. Chapter 3 defines all use-cases and requirements for the IT system and the
sensors. Chapter 4 includes description of general system architecture (with different
level of abstraction) and in particular the architecture of the emulator. Chapter 5
describes implementation of important and tricky parts of the system and emulator.
Chapter 6 defines process of system testing. Chapter 7 summarizes our work, presents
conclusions and discusses future work.
2
2 Background Knowledge
This chapter describes basic knowledge (our preliminary research) and terminology
which are crucial important for clear understanding of this thesis work.
2.1 Preliminary Research
Before starting the development we investigated some similar systems. We considered a
set of sensor-based IT system for data acquisition and monitoring: Siemens fire alarm
system [1], Notifier [2], Zeta fire alarm system [3]. They are all commercial and that is
why no documentation, source code, etc. is available. All systems used different sensors
for data acquisition, control panels and communication channels.
Also developed systems are hardware specific that is they depend on sensors and
their possibilities, that is why we could not take existing solutions.
As a part of research activities we tested behavior of real sensors. Sensor’s
manufacturer provides poor documentation for sensor’s platform. So for successful
system developing it was very important to understand and formalize all sensor actions
and its behavior. As result of our research we obtained some errors and defects of
sensor’s platform which were documented and sent to the manufacturer. At the current
moment manufacturer took into account all our comments and improved his sensor
platform.
Also we considered several fundamental books [4, 5] and papers [6] in the area of
sensor-based systems. Thus, on the several first meetings with customer (and during
development process) we came up with our ideas and propositions about system
architecture, communication channels, etc., but we were strongly restricted with existing
hardware (sensors and control devices) and customer’s requirements. That is why the
most important part of our research work was dedicated to investigation and testing
behavior of existing sensors. Anyway we also made research in the existing
technologies (programming languages, libraries, etc) for choosing the set of
technologies for the system implementation (see Section 2.2).
2.2 Choice of Technologies
This subsection describes our research in the different technologies which can be used
for system implementation. We used the next approach for comparison of technologies:
1. Define the most important criteria for assessment.
2. Choose the set of technologies for comparison.
3. Assess each technology and choice the best one.
For the most important technologies such as main programming language,
framework for building Web interface and RDMS we described our review below. For
other technologies we just show some key information.
2.2.1 Main programming language
We considered the next set of programming languages: Java, C#, PHP. We selected the
most important features (for our project) and compared these languages (see Table 2.1)
Table 2.1: Comparison of programming languages
Programming Open source
Fulfill all requirements
language
(free)
for this project
Java
Yes
Yes
C#
No
Yes
PHP
Yes
No
3
Cross
platform
Yes
No
Yes
Free
IDE
Yes
No
Yes
We compared these three languages and chose Java as main programming language
for our project. Paragraph below shows some key information about Java.
Java is a general-purpose, concurrent, class-based, object-oriented programming
language that is specifically designed to have as few implementation dependencies as
possible. It is intended to let application developers "write once, run anywhere",
meaning that code that runs on one platform does not need to be recompiled to run on
another [7].
2.2.2 Technology for building Web User Interface
Because we chose Java as main programming language, we reviewed only the Javabased frameworks for building Web user interface (see Table 2.2).
Table 2.2: Comparison of Web user interface frameworks
Technology
Open source Fulfill all requirements
(free)
for this project
GWT
Yes
Yes
JSF
Yes
Yes
JSP/Servlets
Yes
Yes
Full support in
IDE
Yes
Yes
Yes
We obtained the same results for each technology. We chose GWT because our
consulting company (Softwerk) is specialized in developing GWT applications.
Paragraph below shows some key information about GWT.
GWT is a development toolkit for building and optimizing complex browser-based
applications. GWT is used by many products at Google, including Google AdWords
and Google Wallet. It is open source, completely free, and used by thousands of
developers around the world [8]. GWT allows web developers to create and maintain
complex JavaScript front-end applications in Java. GWT emphasizes reusable, efficient
approaches to common web development tasks, namely asynchronous remote procedure
calls, history management, bookmarking, GUI abstraction, internationalization, and
cross-browser portability [9].
2.2.3 RDBMS
We considered the next set of RDBMS – MySQL, PostgreSQL, Oracle (see Table 2.3).
Criteria for complexity are subjective. In these cases we assessed our knowledge and
experience for each database.
Table 2.3: Comparison of RDBMS
RDBMS
Open source (free)
MySQL
PostgreSQL
Oracle
Complexity of
configuring
Simple
Middle
High
Yes
Yes
No
Complexity of
usage
Simple
Middle
High
We chose MySQL as RDBMS for our project. Paragraph below shows some key
information about MySQL.
MySQL the world's second most widely used open-source relational database
management system. The SQL phrase stands for Structured Query Language. MySQL is
a popular choice of database for use in web applications. Applications which use
MySQL databases include: TYPO3, MODx, Joomla, WordPress, phpBB, MyBB,
Drupal and other software. MySQL is also used in many high-profile, large-scale
4
websites, including Wikipedia, Google (though not for searches), Facebook, Twitter,
Flickr and YouTube [10].
2.2.4 Application Server
We used Apache Tomcat 7.0.33 as application server for our web-based part of the
system.
Also we reviewed similar applications servers such as: Jetty, Glassfish, JBoss. We
chose Apache Tomcat because:
•
•
•
It is open-source.
It supports all needful functionality.
It is easy in setup and in local use.
Tomcat is an application server from the Apache Software Foundation that executes
Java servlets and renders Web pages that include Java Server Page coding. Described as
a "reference implementation" of the Java Servlet and the Java Server Page
specifications, Tomcat is the result of an open collaboration of developers and is
available from the Apache Web site in both binary and source versions [11].
2.2.5 Tool for Automation Build
We used Apache Maven 3.0.5 for automation build of all parts of our system.
Also we reviewed similar tool called Apache Ant. We use Apache Maven because:
•
•
•
•
It open source.
Maven is easier than other tools.
It supports declarative build of the project.
It could dynamically download needful Java libraries from repositories.
Apache Maven is a software project management and comprehension tool. Based on
the concept of a project object model (POM), Maven can manage a project's build,
reporting and documentation from a central piece of information [12].
2.2.6 Framework for Work With SMS
We used SMSLib 3.5.2 for work with 3G/GSM modem.
Also we reviewed similar library called SMS library for the Java platform. We use
SMSLib because:
•
•
•
It open source.
It has complete and clear documentation.
All works with a 3G/GSM model are rather simple and intuitive.
SMSLib is an SMS messaging library. It provides a universal texting application
programming interface (API), which can be used for sending and receiving messages
via GSM modems and/or bulk SMS operators. This library is available for Java and
Microsoft .NET Framework environments [13].
2.2.7 High Level Design Pattern for the Web Application
We used MVP as a main pattern for web-based application.
Also we reviewed another similar pattern such as Model-view-controller (MVC) and
Model-view-adaptor (MVA). We chose MVP because:
5
•
•
GWT supports well defined implementation for this pattern – GWT MVP
Framework.
MVP much like other design patterns decouples development in a way that
allows multiple developers to work simultaneously.
Model-view-presenter (MVP) is a software pattern used for building user interfaces.
In MVP, all presentation logic is pushed to the presenter. Eventually, the model
becomes strictly a domain model.
2.2.8 Development Methodology
For our project we used Scrum as the development methodology.
Scrum is an iterative and incremental agile software development framework for
managing software projects and product or application development. Its focus is on "a
flexible, holistic product development strategy where a development team works as a
unit to reach a common goal" as opposed to a "traditional, sequential approach". Scrum
enables the creation of self-organizing teams by encouraging co-location of all team
members, and verbal communication between all team members and disciplines in the
project [14].
In our project we used all main activities from the Scrum methodology. Such as:
sprints, daily scrum, sprint planning meetings, sprint review meetings, etc. All
development process was divided into two week sprints. In the beginning of each sprint
we had sprint planning meeting. On this meeting we: selected what work is to be done,
prepared the sprint backlog, measured time for each added feature. In the end of the
each sprint we had sprint review meeting with the customer. This meetings is
summarized our work during the sprint. Also we had daily scrum meetings with the
other developers. Some times these meetings were organized remotely.
2.3 System Terminology
To the system terminology belongs: sensor, alarms existing in the system, responsible
persons, notification and system messages and SMS gateway.
2.3.1 Sensor
Sensor is a physical device which performed data acquisition in some area, sends data to
the server and has equipment for personal alert. Sensor communicates with server via email and SMS messages.
Sensor has set of attributes:
•
•
•
•
Two subscriber identification module (SIM) numbers for sending/receiving
SMS messages.
E-mail address for sending e-mail messages and related information.
Threshold – highest level of value above which alarm should turn on.
Regular message period – period for sending regular data about collected
information and self sensor’s state.
2.3.2 Alarms
There are two types of alarm existing in the system: emergency alarm and functional
alarm.
Emergency alarm occurs when the sensor detects value which are higher/lower then
corresponding threshold.
Functional alarm occurs when sensor platform detects some technical problem with
sensor’s equipment.
6
2.3.3 Responsible Persons and Messages
Each monitored area where sensors are installed has responsible persons. When
something happens in monitored area – responsible persons receive notification
message about occurred situation.
Notification message contains short text which clearly describes what happens in
monitored area. Notification message sends via e-mail and SMS protocol.
Server and sensors communicates via e-mail and SMS messages. Sensors send his
state to the server via messages. Server manages sensors work via messages. In terms of
thesis work these messages called system messages.
2.3.4 SMS Gateway and 3G/GSM Modem
For sending/receiving SMS messages server uses SMS gateway. It is organized on third
generation of mobile telecommunications technology/global system for mobile
communications (3G/GSM) modem (with SIM card) and with open source library for
work with such modems.
Another way to construct SMS gateway – using existing SMS services which
provide web-services for sending/receiving SMS. This variant of SMS gateway is
simpler but more expensive than building SMS gateway on own 3G/GSM modem.
7
3 Features and Requirements
During our development process we continuously communicated with the customers.
This allowed us to define complete requirements for the system and the emulator, such
as: types of users, type of messages, use-cases, requirements for emulator, etc.
We used Scrum methodology and that is why frequent changes in requirements did
not have negative influence on our developing process.
In this chapter we describe only use cases and requirements which are refer to our
part of thesis work.
3.1 Types of Users
All users in the system divided into three types: administrator, manager of a company
and technician.
Administrator is a user with highest possibilities into all system. This type of users
can: add/remove sensors to/from the system, add/remove new company to/from the
system, add/remove users to/from the system, attach/detach sensors to/from a manager
of a company/technician, see all information in the system (messages, sensors, user,
etc), change privileges for another types of users.
Manager of a company is a user with highest possibilities into single company. This
type of users can: add/remove technician to/from the system, attach/detach technicians
to/from his company’s sensors, see all information related to own company (messages,
alarms, sensors, etc). Also manager of a company could be a responsible person for
each sensor in own company. This means that this user will receive all notification
messages (via e-mail and SMS) related to his sensors from the system.
Technician is a user which work with sensors (manager of a company define these
sensors). Technician is responsible for sensor service and support. Technician receives
all notification messages related to his sensors from the system.
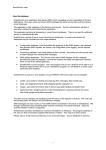
All information types of users summarized on Figure 3.1.
Administrator
Add/remove sensors
Add/remove company
Add/remove users
Attach/detach sensors to/from
manager/technician/company
See all information in the
system
Change privilege for another
types of users
Manager of a
company
Add/remove technician
Attach/detach technicians
See all information related to
own company
Could be a responsible person
for each sensors in company
Figure 3.1: Types of users
8
Technician
Responsible for sensor service
and support
See all information related to
sensors which is attach to him
Receives all notification
messages related to his sensors
3.2 Messages
All messages in the system divided into two groups: system messages and notification
messages. The differences between the groups are described in Section 2.2.
3.2.1 System Messages
As described in Section 2.2, sensors and server communicate via e-mail and SMS
messages, and these messages called system.
Table 3.1 shows some e-mail system messages. Table 3.2 shows some SMS system
messages. Using SMS system messages server can manage sensors work. SMS system
message contains sensors command.
These tables contain only messages description, condition of sending this messages
describes in the use cases (see Section 3.3).
Table 3.1: System e-mail messages
Name
Sender
Regular message
Sensor
Hardware fail
Sensor
message
Emergency situation
Sensor
detected message
Table 3.2: System SMS messages
Name
Sender
Emergency situation
Sensor
detected message
Hardware fail
Sensor
message
Confirmation
Sensor
message
Turn on emergency
Server
alarm message
Turn off emergency
Server
alarm
message
Turn on functional
Server
alarm message
Turn off functional
Server
alarm message
Set threshold
Server
message
Set regular period
Server
message
Regular request
message
Server
Recipient
Server
Server
Content
Measured values
Description of the problem
Server
Description of the emergency
situation
Recipient
Server
Server
Content
Description of the emergency
situation
Description of the problem
Server
Description of the confirmation
Sensor
Command for turning on
emergency alarm
Command for turning off
emergency alarm
Sensor
Sensor
Sensor
Sensor
Sensor
Sensor
Command for turning on
functional alarm
Command for turning off
functional alarm
Command for set threshold. With
threshold value.
Command for set period for
regular message. With period
value.
Request for sending regular
message
3.2.2 Notification Messages
As described in Section 2.2, notification messages sent from the server to the
responsible persons when something happens in monitored area.
Table 3.3 shows some of notification messages SMS.
9
Table 3.3: Notification messages
Name
Protocol
Emergency situation
SMS
detected notification
message
Hardware fail
SMS
notification message
Content
Description of the emergency
situation
Description of the hardware fail
3.3 Use Cases
Functional requirements to the system are formulated as set of use cases. Each use case
has actors, precondition, postcondition and successful scenario. Also each use case
could have numbers of alternative scenarios.
In this section shows use cases which are related to our field of work on this system.
It means that here we describes only features that emulator of sensors should support.
These use cases defines with high level of abstraction (only important steps without
detail). Also these use cases will be used as test cases for testing emulator and system
works.
3.3.1 Data Acquisition
This use case (see Table 3.4) describes requirements to the data acquisition and transfer
feature. This is the base use case in the system. It describes rules and scenarios for
periodical sending Regular messages from the sensor with measured values.
Table 3.4: Data acquisition scenario
Data acquisition.
Use case name
Sensor, server, responsible persons.
Actors
Server is running. The sensor is configured, operable and turned
Precondition
on; all information about it is stored in the database. The
communication flow between server, sensor and database works.
Obtained measured values are saved into the database.
Postcondition
1. Periodically sensor sends Regular message with measured
Successful
values.
scenario
2. Server receives new incoming message and recognizes it as
Regular message.
3. Server parses Regular message content and saves values
from message into the database.
1.1. Server does not received Regular message in time (in
Alternative
specified period).
scenario
#1
(First
regular 1.2. Regular message does not received after one minute.
1.3. Server sends Regular request message to the sensor.
message delay)
1.4. Regular message received.
1.5. Go to the item 3 in successful scenario.
1.1 Server does not received Regular message in time (in
Alternative
specified period).
scenario
#2
(Second regular 1.2 Regular message does not received after one minute.
1.3 Server sends Regular request message to the sensor.
message delay)
1.4 Regular message does not received after two minutes.
1.5 Server sends Turn on functional alarm to this sensor.
1.6 Server sends Hardware fail notification message to the
responsible persons.
1.7 Server saves information about alarm in the database.
10
3.3.2 Emergency Situation Detected by Sensor
This use case (see Table 3.5) specifies requirements for system work in case of
emergency situation in monitored area which was detected by sensor. Server provides
reaction on this situation.
Table 3.5: Emergency situation detected by sensor scenario
Emergency situation detected by sensor.
Use case name
Sensor, server, responsible person.
Actors
Server is running. Sensor is configured, operable and turned
Precondition
on; all information about it is stored in the database. The
communication flow between server, sensor and database
works.
Emergency situation is finished. All information about
Postcondition
emergency situation stored into the database. Responsible
persons are notified.
1. Sensor detects emergency situation in monitored area.
Successful scenario
2. Sensor turns on emergency alarm.
3. Sensor sends Emergency situation detected message via
e-mail.
4. Sensor sends Emergency situation detected message via
SMS.
5. Server receives new incoming e-mail message and
recognizes it as Emergency situation detected message.
6. Server sends Emergency situation detected notification
message to all responsible persons.
7. Server receives new incoming SMS message and
recognizes it as Emergency situation detected message.
8. Server saves information about emergency alarm into
the database.
9. Emergency situation is finished, all needful actions are
performed.
10. Server sends Turn off emergency alarm message to the
sensor.
11. Sensor receives this message and turn off emergency
alarm.
12. Sensor sends Confirmation message to the server.
3.3.3 Emergency Situation Detected by Server
This use case (see Table 3.6) specifies requirements for system work in case of
emergency situation in monitored which was detected by server.
In this kind of emergency situation main role belongs to the server (unlike in
previous use case). Sensor does not detect this kind of emergency situation – it is only
sends measured values to the server. And server checks if this value higher or lower
than corresponding threshold.
Table 3.6: Emergency situation detected by server scenario
Emergency situation detected by server.
Use case name
Sensor, server, responsible person.
Actors
Server is running. Sensor is configured, operable and turned
Precondition
11
Postcondition
Successful scenario
on; all information about it is stored in the database. The
communication flow between server, sensor and database
works. This sensor attached to the responsible person.
Emergency situation is finished. All information about
emergency situation stored into the database. Responsible
persons are notified.
1. Server receives new incoming message and recognized
it as Regular message.
2. Server parse Regular message and obtain measured
values.
3. Server compares obtained values with the corresponding
thresholds (both min and max value).
4. One or several values are out of limits.
5. Server saves information about emergency alarm into
the database.
6. Server sends Emergency situation detected notification
message to all responsible persons.
7. Server sends Turn on functional alarm message to the
sensor which sent Regular message with value which is
out of limits.
8. Sensor turns on functional alarm.
9. The sensor send Confirmation message to the server.
10. Server receives new incoming message and recognizes it
as Confirmation message.
11. Emergency situation is finished, all needful action are
performed.
12. Server sends Turn off functional alarm message to the
sensor.
13. Sensor receives this message and turn off functional
alarm.
14. Sensor sends Confirmation message to the server.
3.3.4 Hardware Problems
This use case (see Table 3.7) describes requirements for system work in case of
detection any hardware problems.
In this use case server receives message about hardware problems, stores information
into the database and notifies responsible persons about them.
Table 3.7: Hardware problems scenario
Hardware problems.
Use case name
Sensor, server, responsible person.
Actors
Server is running. Sensor is configured, operable and turned
Precondition
on; all information about it is stored in the database. The
communication flow between server, sensor and database
works. This sensor attached to the responsible person.
Functional alarm is finished. All information about it stored
Postcondition
into the database. Responsible persons are notified.
1. Sensor detects some hardware problem.
Successful scenario
2. Sensor turns on functional alarm.
3. Sensor sends Hardware fail message to the server.
4. Server receives new incoming message and recognized
12
5.
6.
7.
8.
it as Hardware fail message.
Server saves information about functional alarm into the
database.
Server sends Hardware fail notification message to the
responsible persons.
Hardware problem is solved, all needful actions are
performed.
Sensor turns off functional alarm.
3.4 Requirements for Emulator
Besides the above scenarios the following requirements are defined:
• The emulator should
o be a part of main web application (as a tab).
o provide possibility to chose sensors for emulation.
o provide possibility to input monitoring mail box.
o visualize each sensor.
• Each sensor should
o visualize as separate box and should include all equipments as real
sensor.
o emulate all behavior of real sensor.
o update his own state every 3 seconds.
o visualize measured values in readable form.
• The emulator should have output console for showing all information about
emulator work.
• The output console should have check box for filtering Regular messages.
• The output console should have buttons for managing scrolls and clear console.
Main requirement for emulator – it should fully copy behavior of the real devices.
13
4 Architecture
This chapter describes the architecture of the whole system, including emulator and
SMS gateway.
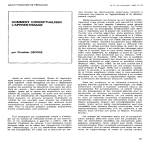
4.1 System Architecture and Behavior
Figure 4.1 shows the system architecture on the highest level of abstraction
Figure 4.1: General system architecture
Sensor (1) was described in Section 2.2.
Emulator of sensors (2) – software abstraction which copies the behavior of real
sensors. More detailed structure and behavior of emulator will be describes in Section
4.2.
For sending/receiving SMS messages uses SMS gateway (3). It is organized on
3G/GSM modem (with SIM card) and with open source library for work with modems.
More detailed structure and behavior of SMS gateway will be describes in Section 4.3.
Control server (5) – it is a set of Maven projects which are responsible for server part
of the system.
Database (6) is used for storing all information in the system.
GWT client (7) provides all needful mechanisms for different managing of the
system, visualization all information stored in the database, and provide user interface
for emulator.
Android tablet (8) – it is an Android application developed for managing sensors.
Main functions are: start/stop sensors, writing report about emergency situation, etc.
Notification application (9) – it is an Android application developed for showing
current information about monitored area on mobile devices.
14
In developing process we were fully responsible for emulator of sensors, SMS
gateway and also were partially involved in Control server, GWT server-side (emulator
logic). All Android and GWT client (except GUI for emulator) developing was not our
responsibility. So we do not describe this part in this thesis paper.
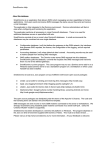
The general architecture of the developed system is shown in Figure 4.1. This figure
does not describe communication protocols, detailed structure of each architecture node.
That is why on the Figure 4.2 shows more detailed architecture. On this level of
abstraction includes structure of the Control server and ways for communication with it.
Emulator of sensors and SMS gateway will be shown in the next sections.
Figure 4.2: More detailed system architecture
In the system exist five different communication protocols – JavaScript Object
Notation (JSON), Hyper text transfer protocol (HTTP), SMS, e-mail, SMS via e-mail.
JSON is used for interaction between Android applications and Control server.
Interaction means that Android applications send JSON requests; REST Web service
(on the Control server) is processes their requests (i.e. read/write needful information
from/to the database) and sends JSON responses with data.
HTTP protocol is uses for accessing to the Web UI which is implementing using
GWT from the Web browser.
SMS protocol is uses for interaction between real sensors and SMS gateway which is
node of Control server. Sensors use this protocol for sending information about
emergency situation in monitored area, hardware problems with sensor’s platform and
for confirmation of commands execution. Control server uses this protocol for sending
15
manage commands to sensors. Each message sends via GSM mobile provider (in the
figure above it calls Mobile provider) and they cost money. This provider depends on
SIM cards plug-ins into the sensors platform and 3G/GSM modem on the SMS
gateway.
E-mail protocol is uses by sensors for sending current information about state of
monitored area (Regular messages). System has one reserved e-mail box for this
interaction (on the figure above it calls Main mail box). Sensors send e-mail messages
on this mail box and server continuously checks this mail box and receives new
incoming messages.
SMS via e-mail protocol is uses for interaction between emulator of sensors and
Control server. In this protocol information which sends/receives via SMS by real
sensors is sends/receives via e-mail with the specific markers in subject of the mail.
Emulator of sensors sends messages via this protocol on the Main mail box (due to
special markers in the mail subject, Control server distinguishes messages received via
e-mail or SMS via email). For receiving messages which was sent via this protocol
emulator of sensors uses special mail box (on the figure above it calls Emulator mail
box). This protocol was developed for cost saving. Because using SMS protocol for
system testing is very expensive (especially for stress testing).
Control server consists of several nodes:
1. SMS gateway:
a. SMS receiver.
b. SMS sender.
c. 3G/GSM modem.
2. E-mail gateway:
a. E-mail sender.
b. E-mail receiver.
3. Control layer:
a. Parser.
b. Control layer logic.
4. Persistence layer.
5. Database.
6. Main Web application:
a. Web UI.
b. Web UI logic.
c. Emulator logic.
d. REST Web service.
SMS gateway is uses for sending/receiving messages via SMS protocol. This node
works with connected 3G/GSM modem. Each sensor has property called receiver phone
number which contains number of SIM card in 3G/GSM modem and they send SMS
messages to this number. Control layer continuously calls SMS receiver which checks
modem for new incoming messages. If new message was found, SMS receiver returns it
to Control layer and then it parses in Parser. When Control layer need to sends SMS
message it calls SMS sender and then SMS sender constructs and sends message via
3G/GSM modem.
E-mail gateway is uses for sending/receiving messages via e-mail protocol. Each
sensor has property called e-mail recipient which contains e-mail address of Main mail
box and they send e-mail message on this mail box. Control layer continuously calls Email receiver which checks Main mail box for new incoming messages. If new message
was found, E-mail receiver returns it to Control layer and then it parses in Parser. When
16
control layer need to sends e-mail message (notification messages or SMS via e-mail) it
calls E-mail sender which constructs and sends message via e-mail protocol.
Control layer is a daemon process which running on the server and responsible for
sensor management, parsing of incoming messages, storing information from the
sensors into the database and responsible persons notification. Parser node performs
parsing of incoming messages (both SMS and e-mail). All other functions implements
by Control layer logic node.
Persistence layer provides simple and useful mechanisms for the database access.
All interaction between the database and other Control server nodes (storing/retrieving
information into/from database, etc) performed via Persistence layer.
Database is uses for storing all system information.
Main web application it is web-based part of the Control server. It includes:
1. Web UI which is implemented with GWT technology. It provides useful, simple
in use and user-friendly GUI for managing system, visualizing all system
information, etc. Also it provides GUI for emulator. Web UI accessible via
HTTP protocol (by link).
2. Web UI logic performs all backend operations for processing requests from Web
UI (i.e. obtain all messages from the database).
3. Emulator logic performs all backend operations for emulator of sensors (i.e.
sending/receiving messages, switching on/off alarms, etc).
4. REST Web Service is uses for processing requests from the Android applications
(i.e. obtain all sensors in specify kit from the database).
4.2 Emulator
Main goal of our thesis was design and implementation emulator of sensors. This
emulator needed because using real sensors for testing system is very expensive. Each
sensors costs rather big money, and now customer’s company does not have a lot of
sensors for developing and testing system.
As input knowledge for emulator behavior we had documentation from the sensors
manufacturer, and we made a lot of tests with available sensors (for clear understanding
of sensor behavior). Main requirement to the whole emulator is copying real sensors
behavior.
Important requirement for emulator architecture – it must have web user interface
and must be a part of main web application (Web UI and Emulator logic on Figure 4.2).
4.2.1 MVP Architecture
Main web application developed using GWT technology. Main challenge with we faced
was simultaneously developing this part of system, shared between different group of
developers.
As usual GWT project, Main web application separated into three parts – client side,
server side and shared code (which could be used both client and server side). For client
side architecture used GWT MVP framework, which gives well defined GWT based
implementation of MVP pattern (all benefits of it is described in Section 2.3).
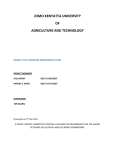
In classic MVP pattern there are 4 main parts – Model, View, Presenter (see Figure
4.3), and AppController which is wiring up all components together.
17
Figure 4.3: Classic MVP
Model is responsible for holding raw data. View is responsible for displaying data.
None of these parts include any business logic. Presenter is responsible for getting the
data, driving the view, listening for GUI events, implements business logic.
AppController is wiring up all components together.
Anyway for Main web application used GWT MVP Framework which is extends
classic MVP pattern for GWT needs. Main components are:
1. Model – the same as in classic MVP (holding row data and no business logic).
2. View – the same as in classic MVP, but it is structure allows to use UiBinder for
building user interface in XML-based format separately (this is important for
simultaneous developing).
3. Activity is a more advanced Presenter; it has lifecycle methods, responses to
events on the view, server calls, etc. All business logic goes here.
4. Place is responsible for navigation between different screens (tabs, menu items,
pages).
5. PlaceHistoryMapper is responsible for history handling mechanism.
6. ClientFactoy is holds on to instances of views and other reusable system
resources.
7. ActivityMapper – maps each Place to some Activity.
Main benefit of GWT MVP Framework is possibility for parallel work on different
parts of application.
Because emulator is a part of Main web application it also built on GWT MVP
Framework. On Figure 4.4 shows simplified architecture for client side of emulator. It
consists of:
1. EmulationView is the interface which has nested interface called Presenter and
all needful mechanism for receiving user interface elements. This is a part of
View.
2. Presenter is the interface which contains signature of all needful business logic
methods. This is a part if Activity.
3. EmulationViewImpl and SensorEmulatorBox – are user interfaces
implementation. They are use UiBinder for layout constructing. This is a part of
View.
4. EmulationActivity implements Presenter interface and perform all business logic
and update view. This is a part of Activity.
5. SensorDto is the data transfer object that is represent Sensor entity in the
database. EmulationActivity receives this object from the server side via remote
procedure call (RPC) requests/response. This is a part of Model.
6. EmulationPlace is associated with EmulationActivity and used by
AppPlaceHistoryMapper for handling navigation history.
7. AppActivityMapper is maps EmulationPlace to EmulationActivity.
18
Figure 4.4: Simplified emulator client side architecture
The same structure used in other part of Main web application. Control classes (i.e.
AppActivityMapper) are general and they work with all Activities and Places (which
are developed by different groups of students).
4.2.2 Emulator Behavior
For defining behavior of emulator and communication with server we used the set of
sequence diagrams. We shows sequence diagrams for the most important use cases.
Rest use cases have very similar behavior.
On the Figure 4.5 shows process of sending Regular messages with values which are
measured by sensor.
Figure 4.5: Sending Regular messages from emulator
On the Figure 4.6 shows behavior of emulator in case of emergency situation
detected by sensor.
19
Figure 4.6: Self-detected emergency situation emulation
On the Figure 4.7 shows behavior of emulator in case of emergency situation
detected by server.
Figure 4.7: Server-detected emergency situation emulation
On the Figure 4.8 shows behavior of emulator in case of hardware problem
emulation. Note that we showed only general description of behavior – there is a lot of
different hardware problems which could be emulate.
20
Figure 4.8: Hardware problem emulation
On the Figure 4.9 shows behavior of emulator in case of problem with mobile
network. In this case, if mobile network is turned off – sensor cannot send/receive any
messages.
Figure 4.9: Emulation of mobile network problems
On the previous diagrams were show only emulator actions. Behavior of server
which is not related to the sensor behavior – does not show on the diagrams.
4.3 SMS Gateway
SMS gateway is a part of Control server. It implements like separate Maven-library and
includes in the assembly of Control server. This library contains all necessary methods
21
for works with connected 3G/GSM modem (setup connection with modem,
send/receive SMS).
On the Figure 4.10 shows architecture of SMS gateway library.
Figure 4.10: SMS Gateway architecture
SMS Gateway consists of: 3G/GSM modem connected to the universal serial bus
(USB) port, virtual COM port, Serial Modem Driver and SMS Receiver/Sender.
3G/GSM modem was described above in previous sections. For building SMS
gateway we used Option modem with Comviq SIM card.
Operating System represents 3G/GSM modem as a device connected to the Virtual
COM port. So physically 3G/GSM modem connected to the USB port, but it
communicates with program part of SMS gateway via Virtual COM port.
Serial Modem Driver, SMS Receiver and SMS Sender it is a program part of the
SMS gateway which is implement use SMSLib library.
Serial Modem Driver is responsible for setup connection and communication with
modem. SMS Receiver and Sender are responsible for receiving/sending SMS
messages.
Control layer node calls SMS receiver and sender methods when it needs to obtain or
send SMS messages.
On the Figure 4.11 shows process of receiving incoming SMS messages form the
modem.
Figure 4.11: Receiving incoming SMS messages
On the Figure 4.12 shows process of sending SMS message form the modem.
22
Figure 4.12: Sending SMS message
23
5 Implementation
This chapter shows implementations of important and tricky parts of emulator and SMS
gateway. As described above we used next technologies: Java, GWT, SMSLib, Java
Mail API. We show only part of our source code without “whole picture”, because we
did our Master Thesis under non-disclosure agreement.
5.1 Converting of Values
Sensor measures different parameters of monitored area in platform-dependent values.
These values do not meaningful for humans. One of requirements for emulator consists
of showing current values in readable form. That is why we implemented method for
converting of platform-dependent values to traditional sensing system.
This implementation shows below.
Method for converting platform-depended value into traditional sensing system
private
private
private
private
private
static
static
static
static
static
final
final
final
final
final
Integer R_0 = 10000;
Integer V_IN = 3;
Double T_0 = 298.15;
Integer B = 4000;
double V_REF = 2.56d;
public static Float translateValue(Integer adc) {
if (adc != null) {
float value;
double vOut = 0;
double rntc = 0;
double ln = 0;
try {
vOut = adc * V_REF / 1024;
rntc = (vOut * 10000) / (V_IN - vOut);
ln = Math.log((rntc / R_0));
value = (float) ((1 / (ln / B + 1 / T_0)) - 273.15);
value = new BigDecimal(value)
.setScale(2, RoundingMode.UP)
.floatValue();
return (Float) value;
} catch (Exception e) {
e.printStackTrace();
}
}
return null;
}
5.2 E-mail Sending
As was described in previous chapters emulator of sensors should send e-mail messages
to the server. We used Java Mail API for sending/receiving e-mail messages.
Method for sending email message
public boolean sendEmail(String smtp, int port, String to,
String from, String password, String subject, String body) {
String type = "text/plain";
Properties props = System.getProperties();
props.put("mail.smtp.host", smtp);
24
props.put("mail.smtp.port", port);
props.put("mail.smtp.auth", "true");
Session session = Session.getDefaultInstance(props, null);
MimeMessage mimeMessage = new MimeMessage(session);
Multipart multiPart = new MimeMultipart();
try {
mimeMessage.setSubject(subject);
mimeMessage.addRecipient(RecipientType.TO,
new InternetAddress(to));
MimeBodyPart textBodyPart = new MimeBodyPart();
textBodyPart.setContent(body, type);
multiPart.addBodyPart(textBodyPart);
mimeMessage.setContent(multiPart);
mimeMessage.setFrom(new InternetAddress(from));
} catch (MessagingException e) {
return false;
}
Transport transport = null;
boolean sent = false;
try {
transport = session.getTransport("smtps");
transport.connect(smtp, from, password);
transport.sendMessage(mimeMessage,
mimeMessage.getAllRecipients());
sent = true;
} catch (Exception e) {
sent = false;
} finally {
try {
transport.close();
} catch (MessagingException e) {
sent = false;
}
}
return sent;
}
5.3 Enumeration of Sensor Commands
Emulator of sensors provides support of the set of sensor commands. When emulator
receives message with command it should identify this command. For this we used
enumeration which keeps all kind of commands and implements method for their
identifying. An enumeration type is a special data type that enables for a variable to be a
set of predefined constants. The variable must be equal to one of the values that have
been predefined for it [15].
Enumeration of sensor commands
public enum SensorInstructionType {
UNKNOWN_INSTRUCTION ("unknown"),
ATEST_INSTRUCTION ("ATEST"),
YELLOWON_INSTRUCTION ("YELLOWON"),
YELLOWOFF_INSTRUCTION ("YELLOWOFF"),
ATIME_INSTRUCTION ("ATIME"),
SENDA_INSTRUCTION ("SENDA"),
ACK_INSTRUCTION ("ACK"),
ACKAA_INSTRUCTION ("ACKAA"),
SEND_INSTRUCTION ("SEND"),
25
THRS_INSTRUCTION ("THRS");
private String token;
private SensorInstructionType(String token) {
this.token = token;
}
public String getToken() {
return token;
}
public static SensorInstructionType identify(String content) {
if(content != null) {
content = content.trim();
for(SensorInstructionType type :
SensorInstructionType.values()) {
if(type.getToken() == null ||
type.getToken().trim().length() == 0) {
continue;
}
if (type == ATIME_INSTRUCTION ||
type == THRS_INSTRUCTION){
if(content.contains(type.getToken())) {
return type;
}
}
if(content.equals(type.getToken())) {
return type;
}
}
}
return SensorInstructionType.UNKNOWN_INSTRUCTION;
}
}
5.4 Handling Client Request to the Server
As described above in previous chapters GWT application divides into three layers –
client, server, shared. Client layer communicates with server layer via RPC
requests/responses. For handling and processing requests from the client we defined
special classes like “xxxxRequestHandler” in which performing all necessary actions.
Below shows implementation for handling start/stop emulation request.
Handling client request to the server
public class EmulationLifeCycleRequestHandler extends
RequestHandler<EmulationLifeCycleRequest,
EmulationLifeCycleResponse> {
private EmulationLifeCycleRequestType requestType;
@Override
public EmulationLifeCycleResponse handle(HttpServletRequest
httprequest, EmulationLifeCycleRequest request)
throws XXXXException {
requestType = request.getRequestType();
switch (requestType) {
case START_EMULATION_REQUEST:
StateController.startAliveSending(request.getKitId());
break;
case STOP_EMULATION_REQUEST:
26
StateController.stopEmulation(request.getKitId());
break;
default:
break;
}
return new EmulationLifeCycleResponse();
}
}
5.5 Custom Widgets
GWT allows creating custom widgets by extending existing one and adding additional
functionality. Once widget creates it could be reuse in all part of the system. One of the
requirements to emulator was provide possibilities for manual update sensors state and
automatic update every 3 seconds. Also similar functionality was required in another
part of application. That is why custom widget which is extends Button widget was
created. This new widget provides opportunity for doing any specified operation by
click and every N seconds (where N – specified in source code).
Below shows source code of this widget and on Figure 5.1 shows his view.
TimerButton widget
public class TimerButton extends Button {
private static final int REPEAT_TIME_MS = 1 * 1000;
private static final int RESET_SECONDS_DEFAULT = 5;
private int currentRestSeconds = RESET_SECONDS_DEFAULT;
private int secondsRemaining = currentRestSeconds;
private Timer updateKitStatusTimer = new Timer() {
@Override
public void run() {
if (secondsRemaining == -1) {
secondsRemaining = currentRestSeconds;
click();
}
setText("Update (" + secondsRemaining + ")");
secondsRemaining--;
}
};
public TimerButton() {
this(RESET_SECONDS_DEFAULT);
}
public TimerButton(int resetTime) {
setResetTime(resetTime);
}
public void setResetTime(int seconds){
currentRestSeconds = seconds;
}
public void startTimer() {
this.updateKitStatusTimer.scheduleRepeating(REPEAT_TIME_MS);
}
public void stopTimer() {
this.updateKitStatusTimer.cancel();
secondsRemaining = currentRestSeconds;
setText("Update (" + secondsRemaining + ")");
}
public void resetTimer() {
secondsRemaining = currentRestSeconds; }
}
27
Figure 5.1: TimerButton widget
5.6 UIBinder
For building user interface we used UIBinder which is provides opportunities to build
user interface in separate XML-document which is connected to the Java code. A use of
UIBinder is a best practice for building View part of GWT MVP Framework.
Below shows part of UIBinder XML document which is describes output console of
emulation view and on Figure 5.2 shows result.
Part of UIBinder file
<g:CaptionPanel captionText="Output">
<g:VerticalPanel width="100%">
<g:HorizontalPanel styleName="btn-panel">
<g:HorizontalPanel styleName="{style.alive-panel}">
<g:CheckBox ui:field="alivePrintCheckBox"
styleName="{style.alive-check}"></g:CheckBox>
<g:Label styleName="alive-label">Regular</g:Label>
</g:HorizontalPanel>
<g:Button text="Clear console" styleName="btn btn-add console-btn"
ui:field="clearConsole"></g:Button>
<g:Button text="Scroll Lock: No" styleName="btn btn-add console-btn"
ui:field="scrollLock"></g:Button>
</g:HorizontalPanel>
<cw:EmulationTextArea styleName="emulation-action"
height="200px" readOnly="true" ui:field="emulationAction" />
</g:VerticalPanel>
</g:CaptionPanel>
Figure 5.2: Output emulation console built using UIBinder
5.7 SMS Sending
As described in SMS gateway architecture it is sends SMS messages via 3G/GSM
modem and for work with modem used SMSLib library.
Below shows implementation of sending SMS messages method.
SMS sending
public boolean sendSms(String recepient, String content) throws Exception {
SerialModemGateway gateway = null;
try {
gateway = new SerialModemGateway(Configuration.DEVICE_ID,
Configuration.COM_PORT, Configuration.BOUND_RATE,
Configuration.MANUFACTURER, "");
28
gateway.setInbound(true);
gateway.setOutbound(true);
gateway.setSmscNumber(Configuration.SMS_CENTER);
while
(!Service.getInstance().getServiceStatus().toString()
.equals("STOPPED")) {
Thread.sleep(3 * 1000);
}
Service.getInstance().addGateway(gateway);
Service.getInstance().startService();
OutboundMessage msg = new OutboundMessage(recepient,
content);
Service.getInstance().sendMessage(msg);
Service.getInstance().removeMessage(msg);
return true;
} catch (Exception ex) {
ex.printStackTrace();
return false;
} finally {
Service.getInstance().stopService();
Service.getInstance().removeGateway(gateway);
}
}
29
6 Testing
This chapter describes testing of whole system implementation using the emulator (our
final goal, which is described in Section 1.2). It includes functional testing [16] based
on the use cases defined in Section 3.3. As a result of work shows screenshots of
emulating sensor.
6.1 Testing Approach
Test data was created manually. We copied parts of real information from sensors and
changed others part. For each emulated sensor we prepared e-mail box, SIM number,
serial number, etc. All these settings were saved in the database. This information was
discussed and agreed with the group of experienced developers and the customer.
We checked server behavior using real sensors and emulator of real sensors. We did
next actions for check the server (with emulator):
1. Emulate repeating process of sending regular messages from many sensors with
information about monitored area (Section 6.2).
2. Emulate different types of emergency situations which are detected by sensor
(Section 6.3).
3. Emulate different types of emergency situations which are detected by server
(Section 6.4).
4. Emulate different types of hardware problems (Section 6.5).
Also we did the same things with using real sensors. We compared the results for
both variants. Test was passed if the results are similar.
6.2 Testing of Data Acquisition
For testing emulation of data acquisition could be used output console of emulator. This
console shows each message which is emulator sends and receives (Figure 6.1).
Figure 6.1: Emulation of data acquisition
As shows in output console each emulated sensor sends measured values in Regular
message to the server via e-mail.
6.3 Testing of Emergency Situation Detected by Sensor
For emulation of emergency situation detected by sensor need to check corresponding
checkbox. When it checked (see Figure 6.2) – sensor turns on emergency alarm and
sends corresponding message to the server.
Figure 6.2: Start emulation of emergency situation detected by sensor
30
When emergency situation is finished – server sends to the sensor corresponding
message and sensor turns of emergency alarm (see Figure 6.3).
Figure 6.3: End emulation of emergency situation detected by sensor
As showed on the pictures this use case working correctly.
6.4 Testing of Emergency Situation Detected by Server
For emulation of emergency situation detected by server need to check corresponding
checkbox (see Figure 6.4). When it checked – starts emulation of measuring high value
for checked parameter. And in next Regular message this parameter sends as usual to
the server (see Figure 6.5). Server parses this message, compares values with thresholds
and detects emergency situation if some parameters is out of bounds.
Figure 6.4: Start emulation of emergency situation detected by server
Figure 6.5: Sensor sends value which is lower/higher than corresponding threshold
After this, server sends message for turning on functional alarm on the sensor, which
sent incorrect value (see Figures 6.6, 6.7).
Figure 6.6: Server sends message for turning on functional alarm
31
Figure 6.7: Sensor turns on functional alarm
When emergency situation is finished – server sends to the sensor corresponding
message and sensor turns of functional alarm (see Figures 6.8, 6.9).
Figure 6.8: Server sends message for turning off functional alarm
Figure 6.9: Sensor turns off functional alarm
6.5 Testing of Hardware Problems
For emulation of hardware problems need to check/un-check one of the corresponding
check-boxes. Different check-boxes are responsible for different hardware problems.
Figure 6.10: Emulation of hardware problem
32
Figure 6.11: Sensor sends message about hardware problem
33
7 Summarize
In this chapter we show conclusions of our work and will explain possible future works
on this topic.
7.1 Conclusions
The problem addressed by this thesis is to permit the development and validation of the
server-side system without the actual sensors being in place to reduce time to market
and increase reliability of the production system in an early stage.
In order to solve this problem, we stated the following goals:
1. The main goal is to develop a software emulator which emulates the real sensors
behavior. This goal is reached if the emulator fully implements the specification
of the hardware sensor. For the IT system controlling and monitoring the
sensors, there should be no difference.
2. The secondary goal is to develop parts of the server-side system to facilitate
testing of the emulator and the IT system. This goal is reached if the whole
system (server-side components and emulated sensors) are functional and can be
used for testing.
3. The final goal is to test the whole system implementation using the emulator.
This goal is reached if the implementation can be successfully validated against
the main use-cases with the help of the emulator. This should lead to minimal
integration problems when substituting the emulated sensors with real sensors.
We reached the main goal by:
1. Analyzing the design and behavior of the real sensor (Section 2.1).
2. Investigating and choosing most suitable technology for implementation
(Section 2.3).
3. Defining all incoming and outgoing messages, i.e. the communication protocol
(Section 3.2).
4. Eliciting and documenting the requirements for the emulator with customers
(Section 3.4).
5. Developing an architecture and sequence of actions for the emulator (Section
4.2).
6. Implementing the emulator as a part of a web application (Sections 5.1, 5.2, 5.3,
5.4, 5.5, 5.6).
7. Testing the implemented emulator and validation of use-cases (Section 6.1, 6.2,
6.3, 6.4).
As a result we obtained the emulator which is fully implements the specification of
the hardware sensor. For the IT system controlling and monitoring the sensors, there is
no difference between real and emulated sensor because:
1. The emulator sends and receives all messages which are defined in the sensor’s
documentation.
2. The emulator uses the same protocols for sending/receiving message as a real
sensor.
3. The emulator performs all needful reaction for each type of incoming message.
4. The emulator has the same properties for each sensor as a real sensor.
5. The emulator could be replaced with the real sensors without any problems on
the server-side of the system.
34
We reached the secondary goal by:
1. Investigating and choosing most suitable technology for implementation
(Section 2.3).
2. Identifying and defining user types in collaboration with the customers (Section
3.1).
3. Eliciting and documenting requirements for whole system and specifying them
as use cases (Section 3.3).
4. Developing the system and server architecture (Section 4.1).
5. Developing the architecture of the SMS gateway (Section 4.3).
6. Implementing parts of server-side logic (Section 5.1).
7. Implementing SMS gateway (Section 5.7).
8. Testing implemented system with sensor emulator (Section 6.1, 6.2, 6.3, 6.4).
As a result we obtained whole system (server-side components and emulated
sensors) which are functional and can be used for testing.
We achieved the final goal by testing the whole system using the emulator instead of
the real sensors (Section 6.1, 6.2, 6.3, 6.4). This goal is reached because the
implementation can be successfully validated against the main use-cases with the help
of the emulator.
7.2 Future works
Despite our efforts, we recommend the following improvements as future work:
1. Stress testing of the system. All testing aimed at compliance with the
requirements from a functional perspective. Stress testing is important to assure
a stable system behavior in production settings.
2. Using well-defined and secure SMS gateway instead of existing one. Currently
we implemented our own SMS gateway using a USB modem on a local server.
This should be replaced by a 3rd party SMS gateway to assure stability,
performance, security and availability of the service.
3. Improve sensor platform to more modern communication protocols (i.e. use
TCP protocol instead of e-mail/SMS). Currently the communication protocol is
implemented using SMS and e-mail which brings a significant overhead, and
slow response time. This should be improved with another, more suitable
communication protocol.
35
References
[1]
Siemens, official site (2013, September). Fire alarm systems [online]. Available:
http://w3.usa.siemens.com/buildingtechnologies/us/en/fire-products-andsystems/fire-alarm-systems/pages/fire-alarm-systems.aspx
[2]
Notifier, official site (2013, September). Solutions [online]. Available:
http://www.notifier.com/Pages/default.aspx
[3]
Zeta, official site (2013, September). Fire alarm systems [online]. Available:
http://www.zetaalarmsystems.com/fire-alarm-systems.html
[4]
Handbook of Sensor Networks: Algorithms and Architectures, I. Stojmenovic,
John Wiley & Sons, September 2005.
[5]
Ad Hoc & Sensor Networks: Theory and Applications, C. De Morais
Condeiro and D. Agrawal, World Scientific Pub, April 2006.
[6]
A Remote Home Security System Based on Wireless Sensor Network and GSM
Technology, Huiping Huang, Shide Xiao, Xiangyin Meng, Ying Xiong, China,
2010 [online].
[7]
Wikipedia, the free encyclopedia (2013, August). Java (programming language)
[online]. Available: http://en.wikipedia.org/wiki/Java_(programming_language).
[8]
GWT official community (2013, August). Introduction to the GWT technology
[online]. Available: http://www.gwtproject.org/.
[9]
Wikipedia, the free encyclopedia (2013, August). Google Web Toolkit [online].
Available: http://en.wikipedia.org/wiki/Google_Web_Toolkit.
[10]
MySQL, Seyed M.M. Tahaghoghi, Hugh E. Williams, O'Reilly Media, 2010
[11]
SeacrhSOA
(2013,
September).
Tomcat
http://searchsoa.techtarget.com/definition/Tomcat.
[12]
Apache Maven Project (2013, September). Introduction [online]. Available:
http://maven.apache.org/.
[13]
SMSLib (2013, September). Welcome to SMSLib [online]; Available:
http://smslib.org/.
[14]
Wikipedia, the free encyclopedia (2013, August). Scrum (software development)
[online]. Available: http://en.wikipedia.org/wiki/Scrum(software_development).
[15]
The Java Tutorials (2013, September). Enum Types [online]. Available:
http://docs.oracle.com/javase/tutorial/java/javaOO/enum.html
[16]
Cem Kaner, Jack Falk, Hung Quoc Nguen. Testing computer software. An
international Thomson publishing company. 2001.
36
[online].
Available:
Appendix A. User Manual for Sensor Emulator
Sensor emulator is a part of web application, so it is available by link. Also, user should
be registered in the system and should have login and password.
For emulation real sensors is necessary to following next steps:
1. Open browser (i.e. Chrome, Opera, etc).
2. Go by link: http://xxxx.softwerk.se:8080/xxxx-web-client/ (Figure A.1).
Figure A.1: Login page
3. Put name and password which are registered in the system to the corresponding
text boxes and press Sign in button.
4. Chose Emulation tab (Figure A.2).
Figure A.2: Emulation page
5. Set all needful configuration properties which are required for emulation in
corresponding fields.
6. Press Start Button. Emulation will start (Figure A.3). Each sensor represents as
separate box with sections (they are marked with different colors on the figure).
А-1
1
Top section (marked with green) shows information about sensor (serial number,
e-mail address, etc) and it has two boxes for specifying sensor properties.
Middle section (marked with red) contains information about measured values.
These values automatically updates every 3 seconds or by pressed Update
button. Bottom section (marked blue) contains check boxes for managing
sensor's work. By checking or un-checking these check-boxes different
situations could be emulated. All actions (outgoing/incoming messages,
information about emulated situation, etc) prints into output console (Figure
A.4).
Figure A.3: Emulation process
Figure A.4: Output console
7. For different situations used special check-boxes (as described above). For
emulation of sensor’s turned off check-box called “Turned on” should be unchecked. The same procedure allows emulating another situation (both
emergency and hardware problem).
8. For stopping emulation press Stop button.
А-2
2
Appendix B. Administrator Manual for Sensor Emulator
This manual describes how to install distributive of web application (which is contains
sensor emulator) on the server. First of all, server should have: Linux/Windows/Mac OS
as operation system, Java (JRE), Apache Tomcat and MySQL. Also server should have
connection to the internet.
To install Java need:
1. Go to the Oracle web-site, chose JRE version, chose operation system and
download will start.
2. Run downloaded file and follow to the instructions.
3. After successful installation of JRE it exists in folder in C:\ProgramFiles\Java
(in Windows).
To install Apache Tomcat need:
1. Go to the link: http://tomcat.apache.org/download-70.cgi.
2. Choose operational system and save archive on your PC.
3. Unzip content of downloaded archive to the C:\Program Files (in Windows).
To install MySQL need:
1.
2.
3.
4.
Go to the link: http://www.mysql.com/downloads/installer/ and press Download.
Run downloaded file and choose Install MySQL Products.
Follow to the installation instructions.
Do not forget input password for the root user of the MySQL.
When all necessary environment was installed administrator should perform next
actions:
1.
2.
3.
4.
Import database dump into MySQL.
Upload distributive of web application on the Apache Tomcat.
Configure emulator using configuration files.
Stat Apache Tomcat.
Importing database dump procedure:
1. Open MySql WorkBench and choose Manage Import/Export.
2. Input your password.
3. Open Data import/restore, chose Import from Self-contained file, select path to
the dump file and press Start Import button.
For Uploading distributive of web application on the Apache Tomcat needs to put
distributive of web application into the webapp folder in Apache Tomcat.
Emulator has several configuration files which are response for set-upping mail
boxes and database connection properties. File mail.emulation.cfg.properties (Table
A.1) contains properties for e-mail box which is used for receiving incoming messages
from the control server. File mail.monitoring.cfg.properties contains properties for email box which is used by emulator for sending messages to the control server. All
configuration files for mail boxes have identical structure.
For setting-up connection with database used file hibernate.cfg.xml which is
available in xxxx-server-db maven project (in package src/main/resources). In this file
В-1
3
administrator could specify uniform resource locator (URL), user name and password
for connection with database. They are specifying in the next part of this file:
Fragment of hibernate.cfg.xml
<property name="connection.url">jdbc:mysql://localhost/xxxx_db_v2</property>
<property name="connection.username">xxxx_db</property>
<property name="connection.password">xxx_db</property>
Table B.1: File mail.emulation.cfg.properties
Property name
Description
LOGIN
E-mail address.
USER_NAME
User name of the mail box.
PASSWORD
Password for the mail box.
HOST
Host which is used.
PORT
Port which is used.
After that administrator should run Apache Tomcat by double click on startup.bat
file in bin directory of the Apache Tomcat.
В-2
4
1
Faculty of Technology
SE-391 82 Kalmar | SE-351 95 Växjö
Phone +46 (0)772-28 80 00
[email protected]
Lnu.se/faculty-of-technology?l=en