1
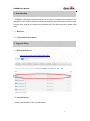
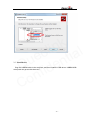
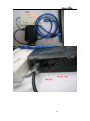
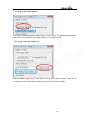
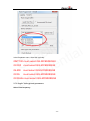
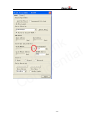
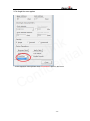
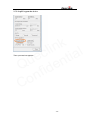
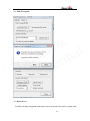
OSBDM User Manual
OSBDM
Upgrade
User Manual
TRACOSBDMUM001
Revision: 1.04
[email protected]
OSBDM User Manual
Document Title
OSBDM User Manual
Version
1.04
Date
2012-7-30
Status
Release
Document Control ID
TRACOSBDMUM001
k
n
i
l
l
c
a
i
e
t
u
n
Q fide
n
o
C
General Notes
Queclink offers this information as a service to its customers, to support application and
engineering efforts that use the products designed by Queclink. The information provided
is based upon requirements specifically provided to Queclink by the customers. Queclink
has not undertaken any independent search for additional relevant information, including
any information that may be in the customer’s possession. Furthermore, system validation
of this product designed by Queclink within a larger electronic system remains the
responsibility of the customer or the customer’s system integrator. All specifications
supplied herein are subject to change.
Copyright
This document contains proprietary technical information which is the property of Queclink
Limited., copying of this document and giving it to others and the using or communication
of the contents thereof, are forbidden without express authority. Offenders are liable to the
payment of damages. All rights reserved in the event of grant of a patent or the registration
of a utility model or design. All specification supplied herein are subject to change without
notice at any time.
Copyright © Shanghai Queclink Wireless Solutions Co., Ltd. 2011
-2-
OSBDM User Manual
Contents
1. Introduction ................................................................................................................................... 5
1.1. Reference............................................................................................................................. 5
1.2. Terms and Abbreviations ..................................................................................................... 5
2. Upgrade Flow................................................................................................................................ 5
2.1. Download Software ............................................................................................................. 5
2.2. Install Software ................................................................................................................... 5
2.3. Install driver ........................................................................................................................ 6
2.4. FLASH PROGRAMM(HCS08).......................................................................................... 8
2.5. Config USBDM................................................................................................................... 9
2.6. Connect PC and set ............................................................................................................. 9
2.7. Config the Target ............................................................................................................... 10
2.7.1.
Step 1: select the software ............................................................................... 12
2.7.2.
Step2: Select the Chip Type ............................................................................ 12
2.7.3.
Step3 Clock type and parameters .................................................................... 13
2.7.4.
Step4 Set erase option ..................................................................................... 15
2.7.5.
Setp5 Program the device ................................................................................ 16
2.8. End of Program ................................................................................................................. 17
2.9. Reset the set....................................................................................................................... 17
k
n
i
l
l
c
a
i
e
t
u
n
Q fide
n
o
C
-3-
OSBDM User Manual
Table Index
Revision History
Revision
Date
1.00
2012-01-31 Owen Feng
Initial
1.01
2012-02-07 Owen Feng
change some notes
1.02
2012-02-07 Owen Feng
Add picture
1.03
2012-07-05 Owen Feng
1- add user cable check
2- add clock selection
1.04
Author
Description of change
k
n
i
l
l
c
a
i
e
t
u
n
Q fide
n
o
C
2012-7-30
Owen feng
Add gv55/gv55lite mcu selection
-4-
OSBDM User Manual
1. Introduction
USBDM is a debugger hardware interface for a range of Freescale microcontrollers. It is
designed to work with Freescale's Codewarrior software under Windows and Linux. More
recently basic support for Coldfire with Codesourcery Tool chain has been added (WIN
only).
1.1. Reference
k
n
i
l
l
c
a
i
e
t
u
n
Q fide
n
o
C
1.2. Terms and Abbreviations
2. Upgrade Flow
2.1. Download Software
http://sourceforge.net/projects/usbdm/files/
2.2. Install Software
Please exclude MCU V10.X in install option.
-5-
k
n
i
l
l
c
a
i
e
t
u
n
Q fide
n
o
C
2.3. Install driver
Plug the USBDM cable in the computer, and then install the USB driver. USBDM USB
driver path can get as click the menu.
-6-
k
n
i
l
l
c
a
i
e
t
u
n
Q fide
n
o
C
Then in the computer set management, a new set “libusb”(winusb)devices will appear.
-7-
k
n
i
l
l
c
a
i
e
t
u
n
Q fide
n
o
C
2.4. FLASH PROGRAMM(HCS08)
Run HCS08 Programmer from menu.
-8-
2.5. Config USBDM
The first step is to config USBDM , that can let MCU enter BDM mode. Please config
USBDM following the picture.
k
n
i
l
l
c
a
i
e
t
u
n
Q fide
n
o
C
2.6. Connect PC and set
Connect PC and set by Queclink USB/BDM cable. For BDM supply power for MCU ,so the
-9-
set must be turned off firstly.
For GV300: turn off external power and switch the battery switcher to OFF position.
For GMT100: turn off external power and press reset button.
For GL500: remove the CR123 battery.
2.7. Config the Target
Check User cable connection:
k
n
i
l
l
c
a
i
e
t
u
n
Q fide
n
o
C
OSBDM user cable connection
Connect OSBDM with PC and Target(the example is GMT100).
- 10 -
k
n
i
l
l
c
a
i
e
t
u
n
Q fide
n
o
C
- 11 -
2.7.1. Step 1: select the software
k
n
i
l
l
c
a
i
e
t
u
n
Q fide
n
o
C
The selected software filename will be shown as in the figure. Sometimes it will appear file
open fail, this is a software compatible problem, move the file to root.
2.7.2. Step2: Select the Chip Type
Click the button “detect chip”, then chip id such as “6009” will be shown. If chip ID can
not be seen, there is connection problem. Please reconnect and try again.
- 12 -
k
n
i
l
l
c
a
i
e
t
u
n
Q fide
n
o
C
In the Dropdown menu, select the right chip.
GMT100 must select QG-MC9S08QG8
GV300
must select QG-MC9S08QG4
GL500
must select QG-MC9S08QG8
GV55
must select QG-MC9S08QG8
GV55Lite must select QG-MC9S08QG4
2.7.3. Step3 Clock type and parameters
Select Trim frequency:
- 13 -
k
n
i
l
l
c
a
i
e
t
u
n
Q fide
n
o
C
- 14 -
2.7.4. Step4 Set erase option
k
n
i
l
l
c
a
i
e
t
u
n
Q fide
n
o
C
In the dropdown menu,please check “EraseMass” option in this menu.
- 15 -
2.7.5. Setp5 Program the device
k
n
i
l
l
c
a
i
e
t
u
n
Q fide
n
o
C
Then a process bar appears.
- 16 -
2.8. End of Program
k
n
i
l
l
c
a
i
e
t
u
n
Q fide
n
o
C
2.9. Reset the set
For MCU will stay at upgrade mode when the set removed from the PC, please reset
- 17 -
the set according the set user manual.
k
n
i
l
l
c
a
i
e
t
u
n
Q fide
n
o
C
- 18 -