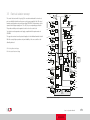
1
ServoOne Operation Manual Servo controller 4 A to 170 A ServoOne Operation Manual ServoOne Drives with Ambition The modular design of ServoOne ensures optimal integration into the machine process. Whether through a high speed field bus communication with the central multi-axes machine control, or through decentralized programmable Motion Control Intelligence in the drive controller, ServoOne will master both tasks brilliantly. ServoOne Operation Manual Subject to technical modifications. Id.-No.: 1100.00B.3-01 The contents of our documentation have been compiled with greatest care and in compliance with our present status of information. Status: 01/2009 Valid from firmware status: V1.1 Nevertheless we would like to point out that this document cannot always be updated parallel to the technical further development of our products. Information and specifications may be changed at any time. For information on the latest version please refer to www.lt-i.com. Guide through this document Dear user! We are happy that you have made a decision in favour of a product from LTi DRiVES. In order to be able to start operation of your new ServoOne quickly and without problems, we ask you kindly to read this operation manual thoroughly beforehand. Step 1. 2. Action This Operation Manual will enable you to install and commission ServoOne drive system very quickly and easily. Simply follow the step-by-step tables in the chapters. Comment Guide to quick-starting And away you go! Note: The transportation packaging has been designed and tested acc. to EN61800-2. 1 Safety 1 2 Mechanical installation 2 3 Installation 3 4 Commissioning 4 5 Diagnose 5 6 Safe Torque Off 6 A Appendix A Glossary ServoOne Operation Manual 3 ServoOne Operation Manual Ordering key Pictograms The order designation informs about the corresponding design variant of the servo controller delivered to you. Details concerning the ordering key can be found in the ServoOne ordering catalogue. SO84. 4 , Rated current , Pictograms as described in the following table are used in this operation manual for better orientation. The meaning of the corresponding is always correct, even if it is placed e.g. opposite a terminal diagram without any accompanying text. ! Attention! Operating errors may result in damage to or malfunction of the drive. Danger, high voltage! Improper behaviour may cause fatal accident. Power supply (AC/DC) Functional safety Danger from rotating parts! The drive may automatically start. Option 1 (communication) Option 2 (additional encoder) Note: Useful information Housing/cooling concept Software variant Optional design/protection Table of contents 3.6 1. 3.7 Connection of supply voltages.................................................................................18 3.6.1 Connection Control supply (24 V DC)...........................................................18 3.6.2 Connection of mains supply.........................................................................19 Safety....................................................................................... 7 1.1 Measures for your safety..........................................................................................7 Control connections.................................................................................................21 3.7.1 Specification of control connection..............................................................21 1.1.1 Read the Operation Manual first!.................................................................7 3.7.2 Standard terminal assignment......................................................................22 1.1.2 Pictograms used...........................................................................................7 3.7.3 Brake driver..................................................................................................23 1.2 Intended use............................................................................................................8 3.8 Specification of MMC-Slot ......................................................................................23 1.3 Responsibility...........................................................................................................8 3.9 Specification of USB 1.1 interface.............................................................................23 3.10 Specification Ethernet interface...............................................................................23 2. Mechanical installation.............................................................. 9 2.1 Notes for operation..................................................................................................9 3.12 Option 2..................................................................................................................24 2.2 Wall mounting.........................................................................................................9 3.13 Encoder connection.................................................................................................24 2.2.1 3. 3.11 Option 1..................................................................................................................24 Dimensions...................................................................................................10 Installation...............................................................................11 3.1 Overview of connections BG1 to BG4......................................................................11 3.1.1 3.2 Overview of connections BG5 to BG6a....................................................................13 3.2.1 3.3 Connection overview BG1 to BG4................................................................12 Connection overview BG5 to BG6a..............................................................14 EMC compliant installation......................................................................................15 3.3.1 Interference immunity of drive controllers....................................................15 3.3.2 Assignment of drive controller with internal line filter...................................15 3.3.3 Assignment of drive controller with external line filter..................................15 3.3.4 Notes for projecting and installation.............................................................16 3.4 PE-terminal..............................................................................................................16 3.5 Electrical isolation concept.......................................................................................17 3.13.1 Encoder connection for LSH/T-motors..........................................................24 3.13.2 Assignment motor/encoder cable for servo controller...................................24 3.13.3 Prefabricated encoder cables........................................................................25 3.13.4 Resolver connection.....................................................................................26 3.13.5 Connection for high resolution encoders......................................................26 3.14 Motor connection....................................................................................................27 3.14.1 Motor connection of LSH/LST-motors...........................................................28 3.14.2 Prefabricated motor cable.............................................................................28 3.14.3 Schalten in der Motorleitung........................................................................29 3.15 Braking resistor (RB).................................................................................................29 3.15.1 Protection in case of brake chopper fault......................................................29 3.15.2 Design with integrated braking resistor........................................................29 3.15.3 Connection of an external brake resistor......................................................31 ServoOne Operation Manual 5 ServoOne Operation Manual 6.2.2 Notes on safety............................................................................................54 3.16 7-segment display D1 and D2...................................................................................32 4. 3.16.1 Meaning of display.......................................................................................32 6.2.3 Overview of "STO" connections ..................................................................54 3.17 Function of buttons T1 and T2.................................................................................32 6.2.4 Wiring and commissioning ..........................................................................55 4.2 4.3 Stopping acc. to stop category 1 (SS1).....................................................................56 6.3.1 Notes on safety............................................................................................56 4.1.1 System prerequisites.....................................................................................33 4.1.2 Wiring of components..................................................................................34 4.1.3 Switching on control voltage........................................................................35 4.1.4 Communication with the DriveManager5......................................................35 A.1 4.1.5 Parameterization and setting........................................................................37 A.2 Technical data ServoOne..........................................................................................61 4.1.6 Save the setting............................................................................................40 A.2.1 SO84.004 to SO84.016................................................................................61 4.1.7 Drive under control (test run)........................................................................41 A.2.2 SO84.020 to SO84.072................................................................................62 The control window "Manual mode"......................................................................42 A.2.3 SO84.090 to SO84.170................................................................................62 6.3.2 Information on system design.......................................................................57 A. Appendix................................................................................ 59 Permissible current load of servo controllers............................................................59 Basic setting "Standard mode".....................................................................44 A.3 Ambient conditions..................................................................................................63 Diagnose..................................................................................................................45 A.4 Using a power choke...............................................................................................63 Faults and warnings in the DriveManager 5.x.................................................45 A.5 Line filter ................................................................................................................64 4.3.2 Status display of the device (Device status)...................................................46 A.6 UL-approval ............................................................................................................65 4.3.1 Diagnose................................................................................ 47 5.1 6.3 Initial commissioning (triggering via terminals).........................................................33 4.2.1 Device states indicated by D1 + D2 (7-segment display)................................47 5.1.1 6. 6.2.5 Checking the STO function...........................................................................56 Commissioning....................................................................... 33 4.1 5. 6 Example for flashing sequence:.....................................................................48 5.2 Excerpt from fault list...............................................................................................48 5.3 Helpline / Service.....................................................................................................49 Safe Torque Off (STO)............................................................. 51 6.1 Danger analysis and risk assessment........................................................................51 6.2 Definition of terms...................................................................................................51 6.2.1 Description of function.................................................................................53 A.6.1 Measures to comply with the UL-approbation (UL 508C) BG1 to BG4 .............................................................................................65 A.6.2 Measures to comply with the UL-approbation (UL 508C) for BG 5, 6 and 6a....................................................................................66 1. Safety Your qualification: • In order to prevent personal injury or damage to property, only personnel with electrical engineering qualifications may work on the device. • The qualified person must become familiar with the Operation Manual (refer to IEC364, DIN VDE0100). • Knowledge of the national accident prevention regulations (e.g. BGV A3, previously VBG 4 in Germany) 1.1 Measures for your safety In order to avoid physical injury and/or material damage the following information must be read before initial start-up. The safety regulations must be strictly observed at any time. 1.1.1 Read the Operation Manual first! 1. Read the Operation Manual first! • Follow the safety instructions! • Please observe the user information! Electric drives are generally potential danger sources: • Electric voltages of 230 V to 480 V Dangerously high voltages ≥ 50 V may still be present 10 minutes after the power is cut (capacitor charge). Therefore check for proper isolation from supply! • Rotating parts • Hot surfaces Protection against magnetic and/or electromagnetic fields during installation and operation. • For persons with pacemakers, metal containing implants and hearing aids etc. access to the following areas is prohibited: –– Areas in which drive systems are installed, repaired and operated. –– Areas in which motors are assembled, repaired and operated. Motors with permanent magnets are sources of special dangers. Danger: If there is a necessity to access such areas a decision from a physician is required. Table 1.1 Notes on safety U V N U V N L+ RB L- L+ RB L- L3 L2 L1 L3 L2 L1 During installation follow these instructions: • Always comply with the connection conditions and technical specifications. • Comply with the standards for electrical installations, such as wire cross-section, PE-conductor and ground connections. • Do not touch electronic components and contacts (electrostatic discharge may destroy components). Table 1.1 Notes on safety 1.1.2 Pictograms used. The notes on safety describe the following danger classes. The danger class describes the risk which may arise when not complying with the note on safety. Warning symbols ! General explanation Danger class acc. to ANSI Z 535 Attention! Operating errors may cause damage to or malfunction of the drive. This may result in physical injury or damage to material. Danger, high voltage! Improper behaviour may cause fatal accident. Danger to life or severe physical injury. Danger from rotating parts! The drive may automatically start to run. Danger to life or severe physical injury. Table 1.2 Explanation of warning symbols ServoOne Operation Manual 7 [ Safety ] ServoOne Operation Manual 8 1.2 Intended use 1.3 Responsibility ServoOne drive controllers are components for installation into stationary electric systems or machines. Electronic devices are never fail-safe. The company setting up and/or operating the machine or plant is itself responsible for ensuring that the drive is rendered safe if the device fails. When installed in machines the commissioning of the drive controller (i.e. start-up of intended operation) is prohibited, unless it has been ascertained that the machine fully complies with the regulations of the EC-directive 98/37/EC (Machine Directive); compliance with EN60204 is mandatory. EN 60204-1/DIN VDE 0113 "Safety of machines", in the section on "Electrical equipment of machines", stipulates safety requirements for electrical controls. They are intended to protect personnel and machinery, and to maintain the functional capability of the machine or plant concerned, and must be observed. Commissioning (i.e. starting intended operation) is only permitted when strictly complying with EMC-directive (2004/108/EEC). The function of an emergency stop system does not necessarily cut the power supply to the drive. To protect against danger, it may be more beneficial to keep individual drives running or to initiate specific safety sequences. Execution of the emergency stop measure is assessed by means of a risk analysis of the machine or plant, including the electrical equipment in accordance with EN ISO 14121 (previously DIN EN 1050), and is determined by selecting the circuit category in accordance with EN ISO 13849-1 (previously DIN EN 954-1) "Safety of machines - Safety-related parts of controls". ServoOne complies with the low voltage directive 2006/95/EEC The drive controller fulfils the demands of the harmonized product standard EN 61800-5-1:2003. If the drive controller is used for special applications, e.g. in explosion endangered environments, the required standards and regulations (e.g. for explosion endangered environments EN 50014, "General provisions" and EN 50018 "Pressure proof housing") must always be observed. Repairs may only be carried out by authorised repair workshops. Unauthorised opening and incorrect intervention could lead to physical injury or material damage. The warranty granted by LTi DRiVES will become void. NOTE: The use of drive controllers in mobile equipment is assumed an exceptional environmental condition and is only permitted after a special agreement. 2. Mechanical installation 2.2 Wall mounting Step 2.1 Notes for operation Please strictly avoid that ... • any moisture enters into the device, • aggressive or conductive substances are in the immediate vicinity, • drill chippings, screws or foreign bodies drop into the device, • the ventilation openings are covered, as otherwise the device may be damaged. ! Please note: •• Cooling air must be able to flow through the device without restriction. •• For mounting in switch cabinets with convection (= heat loss is discharged to the outside via the cabinet walls), always fit an internal air circulation fan. •• The backing plate must be well earthed. •• The device is solely intended for installation in a control cabinet. 1. Action Comment Mark the position of the tapped holes on the backing plate. Cut a tap for each fixing screw in the backing plate. Dimensioned drawings/hole distances see Fig. 2.1 The tapping area will provide you with good, full-area contact. 2. Mount the servo controller vertically on the backing plate. Observe the mounting clearances! The contact area must be metallic bright. 3. Mount the additional components, such as the line filter, power choke, etc., on the backing plate. The cable between line filter and servo controller must not be longer than max. 30 cm. 4. Continue with the electrical installation in section 3. Table 2.3 Mechanical installation •• The control cabinet must at least meet the requirements of degree of protection IP4x. ! At tention: According to EN ISO 13849-2 the control cabinet must have degree of protection IP54 or higher when using the safety function STO (Safe Torque OFF). •• To attain the best result for effective EMC installation use a chromatized or galvanised backing plate. If backing plates are varnished, remove the coating from the contact area. The devices themselves have an aluminium back panel (BG1 to BG4) or a back panel made of aluminized and galvanized sheet steel (BG5, BG6, BG6a). •• Max. pollution severity 2. Further information on environmental conditions can be found in the appendix. ServoOne Operation Manual [ Mech. instal. ] 9 ServoOne Operation Manual 2.2.1 Dimensions ServoOne BG1 BG2 BG3 BG4 BG5 BG6 BG6a SO82.004 SO84.004 SO84.006 SO84.008 SO84.012 SO84.016 SO84.020 SO84.024 SO84.032 SO84.045 SO84.060 SO84.072 SO84.090 SO84.110 SO84.143 SO84.170 Weight [kg] 3.4 4.9 6.5 7.5 13 28 32 B (Width) 58.5 90 130 175 190 H (Height) 295 345 D (Depth)1) 224 240 A 29.25 50 C 80 120 344.5 150 200 365 581 5 6 10 5.6 9.5 for direct butt mounting (see note) 20 40 100 G 150 Screws 4 x M4 B T > 300 C1 A Fig. 2.1 all mounting (dimensions in mm) > 500 4 x M5 4 x M8 H1 355 387.5 600 H2 38.5 15 20 2 x M4 H2 180 > 270 C 322 4.8 F C 540 242 DØ 2) H1 H 280 C1 E BG2 ... BG6 BG1 G F all measurements in mm 1) without terminals/plugs 2) The bending radius of the connecting leads must be accounted for E Table 2.4 ServoOne dimensions - see Fig. 2.1 Note: The minimum distance specified in the table for sizes 1-4 applies for devices of the same power. When butt mounting devices with different drive power you should arrange the devices according to their power (e.g. viewed from the left BG4-BG3-BG2-BG1). This minimizes the thermal influence among each other. When butt mounting ServoOne controllers together with other devices, you must make sure that these device do not affect one another thermally. F F Fig. 2.2 Assembly spacing D C1 D A D 10 3. Installation AC-Mains connection ! Attention: Installation must only be carried out by qualified electricians who have undergone instruction in the necessary accident prevention measures 24 V-Supply for control electronics X11 9 X8 Option 2 - additional encoder interface 10 X ,X X7 Port for high resolution encoder 6 X Resolver port Dual 7-segment display 3.1 Overview of connections BG1 to BG4 The following shows the position plan with the corresponding positions of plugs and terminals. For better orientation we have identified the designations of plugs and terminals with an abbreviation (XINDEX). Buttons Slot MMC-Memory card X1 USB-port Ethernet-port X2 X3 Control terminals X4 Note: The overview for connections (BG5, BG6 and BG6a) starts on page 13. X5 Connection motor-PTC Option 1 - Communication (for field bus modules) Connection Motor Braking resistor D.C. link Connection Motor brake X12 X13 Fig. 3.1 Position plan BG1 to BG4 ServoOne Operation Manual [ Installation ] 11 ServoOne Operation Manual 3.1.1 Connection overview BG1 to BG4 No. X11 Single-phase network N Cover K1 FN L1 2 D ,D T 1, T 2 MMC-Slot X1 Service interface USB 1.1 X2 Service interface Ethernet 1 2 1 2 X10 X9 K1 + 24V DC supply for control electronics (UV) - + 15 16 17 18 ISD00 ISD01 ISD02 ISD03 19 ISD04 20 ISD05 21 ISD06 7-segment display Equipment status display see p.32 T1, T2 Button Changes to the bootstrap mode. see p.32 X1 Slot for MMC exchangeable data carrier Enables e. g. firmware download without PC see p.23 X2 USB 1.1 interface Service interface, Plug & Play connection to PC see p.23 X3 Ethernet interface Service interface, fast TCP/IP port (RJ45) see p.23 X4 Control terminals Relay output diagnose STO, 8 digital inputs, 2 analog inputs, 3 digital outputs, 1 additional relay output see p.21 Option 1 Communication Factory installed module for field busses, e.g. SERCOS, PROFIBUS, EtherCAT or CANopen see p.24 AC mains connection Mains supply see p.19 PE-terminal Connection diagram see chapter 3.4 see p.16 X10, X9 Control supply connection U V 24 V supply voltage for control electronics of servo controller see p.18 X8 Option 2 additional encoder interface e. g. for second Sin/Cos encoder or EnDat 2.1© see p.24 X7 high definition encoder interface Sin/Cos encoder, EnDat 2.1© encoder, Hiperface© encoder see p.26 X6 Resolver connection Motor temperature monitoring can be routed through the resolver lead (X6/5 and 9) see p.26 X5 Connection of motor temperature monitoring PTC, following DIN 44082 Linear temperature sensor KTY84-130 Automatic cutout Klixon see p.26 X13 Connection of motor brake Power output with open-circuit/overload detection to the relay. Attention: Observe the freewheeling suppressor circuit see p.23 X12 Power terminal Motor, brake resistance and connection of the d.c.-link see p.27 11 12 2 1 6 7 3 13 8 4 14 9 5 15 6 2 6 1 10 Encoder X11 + 5 - 9 7 X6 8 3 Analog setpoint 2 X7 Option 2 8 3 ISA00+ 4 ISA005 ISA01+ 6 ISA01- X8 4 X4 Control Analog setpoint 1 +24V against I/O-GND X3 Resolver + Front X5 - 10 ENPO (STO) Diagnose STO Relay 22 ISDSH (STO) 12 RSH 11 23 24 Digital2 OSD03 GND 2 Control of motor brake X12 U V W Motor 3 ~ 1 DGND I/O-GND L- 2,14 +24V (UH) 13 Communication field busses 1 Relais OSD04 7 OSD00 8 OSD01 9 OSD02 Digital0 Digital1 X13 L+ DGND D.C.link Braking resistor RB Option 1 (+) Brake (-) Bottom Fig. 3.2 Connection overview BG1 to BG4 Page D1, D2 add. encoder 9 INSERT MMC L3 L2 L1 L3 L2 MultiMediaCard Function Three-phase network X11 1 N L1 FN L1 Designation 12 Brake (+) Table 3.1 Legend to terminal diagram BG1 - BG4 3.2 Overview of connections BG5 to BG6a The following shows the position plan with the corresponding positions of plugs and terminals. For better orientation we have identified the designations of plugs and terminals with an abbreviation (XINDEX). 24 V-Supply for control electronics AC-Mains connection X9, X10 X20 Connection motor brake X8 Option 2 - additional X11 encoder port X7 Port for high resolution encoder 7-segment display Buttons 6 X Resolver port Slot MMC-Memory card X1 USB-port Ethernet-port X2 X3 Control terminals X4 24 V-Supply for X9, X10 control electronics X20 Connection motor brake X8 Option 2 - additional 11 AC-Mains X connection encoder interface X7 Port for high resolution encoder 7-segment display Buttons Slot 1 MMC-Memory card X X6 Resolver port 2 USB-port X 3 Ethernet-port X Control terminals X4 X5 Connection motor PTC X5 Connection Motor-PTC Option 1 - Communication (for field bus modules) Option 1 - Communication (for field bus modules) Connection Motor Braking resistor D.C. link 12 X Connection Motor Braking resistor 12 D.C. link X Fig. 3.3 Position plan BG5 Fig. 3.4 Position plan BG6/6a ServoOne Operation Manual [ Installation ] 13 ServoOne Operation Manual 14 3.2.1 Connection overview BG5 to BG6a No. Cover Three-phase network D1, INSERT MMC MultiMediaCard X11 D2 L3 L2 MMC-Slot Service interface USB 1.1 Service interface Ethernet X1 X2 1 2 1 2 X10 X9 X3 X20 19 ISD04 20 ISD05 X8 Relay Digital0 Digital1 Digital2 I/O-GND 23 24 Relay OSD04 2 2 see p.32 T1, T2 Button Changes to the bootstrap mode. see p.32 X1 Slot for MMC exchangeable data carrier Enables e. g. firmware download without PC see p.23 X2 USB 1.1 interface Service interface, Plug & Play connection to PC see p.23 X3 Ethernet interface Service interface, fast TCP/IP port (RJ45) see p.23 X4 Control terminals Relay output diagnose STO, 8 digital inputs, 2 analog inputs, 3 digital outputs, 1 additional relay output see p.21 Option 1 Communication Factory installed module for field busses, e.g. SERCOS, PROFIBUS-DP, EtherCAT or CANopen see p.24 AC mains connection Mains supply see p.19 PE-conductor connection Connection diagram see chapter 3.4 see p.16 Supply voltage for control electronics of servo controller see p.18 Control of motor brake 3 1 11 6 2 Encoder 12 7 3 8 13 8 4 X11 14 9 10 5 X6 Front X5 7 OSD00 8 OSD01 9 OSD02 1 DGND 1 X12 6 + - 5 9 X10, X9 Control supply connection U V X8 Option 2 additional encoder interface e. g. for second Sin/Cos encoder or EnDat 2.1© see p.24 X7 high definition encoder interface Sin/Cos encoder, EnDat 2.1© encoder, Hiperface© encoder see p.26 X6 Resolver connection Motor temperature monitoring can be routed through the resolver lead (X6/5 and 9) see p.26 X5 Connection of motor temperature monitoring PTC, following DIN 44082 Linear temperature sensor KTY84-130 Automatic cutout Klixon see p.26 X20 Motor brake connection (only BG5, BG6, BG6a) Power output with open-circuit/overload detection to the relay. Attention: Observe the freewheeling suppressor circuit see p.23 X12 Power terminal Motor, brake resistance and connection of the d.c.-link see p.27 Resolver + - U V W Motor 3 ~ +24V(UH) 14 ZK+ ZK- 13 DGND D.C. link RB+ Communication field busses Braking resistor Option 1 RB- (+) Brake (-) Bottom Fig. 3.5 Terminal diagram BG5 to BG6a Page Equipment status display 15 X7 9 Diagnose STO 24V DC supply for brake (IIN = 2,0 A) Option 2 10 ENPO(STO) 22 ISDSH(STO) 12 RSH 11 24V DC supply for control electronics (UV ) Function 7-segment display add. encoder 4 21 ISD06 - + 1 18 ISD03 + 6 15 ISD00 16 ISD01 17 ISD02 GND K1 2 +24V against DGND ISA00+ ISA00ISA01+ ISA01- 7 Analog setpoint 2 3 4 5 6 X4 3 Analog setpoint 1 +24 V OSD03 8 Control FN L1 T 1, T 2 L3 L2 L1 Designation D1, D2 Brake (+) Table 3.2 Legend to terminal diagram BG5 to BG6a 3.3 EMC compliant installation Servo controllers are components intended for installation into industrially and commercially used equipment and machines. They must only be installed into IP4x compliant control cabinets or higher. ! At tention: According to EN ISO 13849-2 the control cabinet must have degree of protection IP54 or higher when using the safety function STO (Safe Torque OFF). Commissioning (i.e. starting intended operation) is only permitted when strictly complying with EMC product standard EN 61800/-3. Note: The new EMC product standard for electrical drives with variable speed is EN61800-3:2004. The transition period for the old EN61800-3:1996 ends on 1st of October 2007. The installer/operator of a machine and/or equipment must provide evidence of the compliance with the protection targets stipulated in the EMC-standard. ! At tention: Compliance with the required EMC-protection targets is normally achieved by observing the installation instructions in this manual and using the appropriate radio interference suppression filters. Please note: •• The earthing lead must be laid out in star configuration to conform to the EMC standards. •• The backing plate must be well earthed. •• The motor cable, mains lead and control cable must be laid out separately from each other. •• Avoid loops, and lay cable over short distances. 3.3.1 Interference immunity of drive controllers In order to improve the interference immunity as specified in EN61800-3 the drive controllers of BG1 to BG 4 have an aluminium housing, driver controllers of BG5 to BG6a are equipped with a aluminized, galvanized sheet steel housing. 3.3.2 Assignment of drive controller with internal line filter Drive controllers BG1 to BG5 are equipped with integrated line filters. With the measuring method specified in the standard the drive controllers comply with the EMC protection targets acc. to EN61800-3 for "Environment 1" (living area C2) and "Environment 2" (industrial area C3).* ! Attention: This is a restricted availability product in accordance with IEC 61800-3. This product may cause radio interference in domestic environments; in such cases the operator may need to take appropriate countermeasures. *for exact data see chapter A.5 Line filter, page 64 3.3.3 Assignment of drive controller with external line filter External radio interference suppression filters (EMCxxx) are available for the drive controllers for BG6 and BG6a. With the prescribed measuring method and the external line filter these drive controllers also comply with the EMC product standard IEC61800-3 for "Environment 1" (living area C2) and "Environment 2" (industrial area C3). In order to reach the use of longer motor cables and compliance with the EMC product standard IEC61800-3 for the "general availability" (living area C1), additional external line filters are available for the devices with internal line filters (BG1 to BG5). *for more detailed information see chapter A.5 Line filter, page 64 •• The operational leakage current is > 3.5 mA. •• Control leads, data lines, motor cables and encoder lines must be shielded. ServoOne Operation Manual [ Installation ] 15 ServoOne Operation Manual 3.3.4 Notes for projecting and installation Subject Cable routing Cable type Further hints for the control cabinet design Supplementary information 3.4 PE-terminal Projecting and installation regulations PE-terminal Use a bright backing plate. Use cables and/or ground straps with cross Equipotential bonding sections as large as possible. Route PE-conductors of components in a star shaped pattern. To create a low-resistance HF-connection both grounding (PE) and shield connection must have large-area contact to the PE-bar on the backing plate. PE-mains connection in accordance with DIN VDE 0100 part 540 • Mains connection < 10 mm². PE-conductor cross-section min. 10 mm² copper or 2 conductors with the cross-section of the mains supply lines. • Mains connection > 10 mm² copper. Use a PE-conductor cross section complying with the mains lead cross-section. • Route the motor cable separated from signal and mains supply lines. The minimum distance between motor cable and signal line/mains line must be 20 cm, if necessary us a separator. • Always route the motor cable without interruptions and the shortest way out of the control cabinet. • When using a motor contactor or a reactance coil, the respective component should be directly mounted to the drive controller. Do not bare the core ends of the motor cable too soon. • Avoid unnecessary cable lengths. Step 1. 2. PE-mains connection Action acc. to DIN VDE 0100 part 540 Erden Sie jeden Servoregler! Connect terminal in star configuration with the PE-bar (main earth) in the control cabinet Also connect the protective conductor terminals of all other components, such as power choke, filter, etc. in a star configuration to the PE-bar (main earth) in the control cabinet. PE PE PE The drive controllers must always be wired with screened motor cables and signal lines. A cable type with double copper braiding with 6070 % coverage must be used for all screened connections. • Contactors, relays, solenoid valves (switched inductivities) must be wired with fuses. The wiring must be directly connected to the respective coil. • Switched inductivities should be at least 20 cm away from the process controlled assemblies. • Place larger consumers near the supply. • If possible enter signal lines only from one side. • Lines of the same electric circuit must be twisted. Connect residual strands at both ends with the control cabinet ground (earth). Supplementary information can be found in the corresponding connection description 16 U 1 U 2 V 1 V 2 W 1W 2 U 1 U 2 V 1 V 2 W 1W 2 U 1 U 2 V 1 V 2 W 1W 2 PE Fig. 3.6 Star configuration layout of the PE-conductor Mains connection < 10 mm² copper: PE-conductor cross-section min. 10 mm² or use 2 conductors with a cross-section of the mains supply lines. Mains connection > 10 mm² copper. Use a PE-conductor cross section complying with the mains lead cross-section. 3.5 Electrical isolation concept You therefore need a separate control supply, compliant with the requirements of a SELV/PELV. The opposite overview shows the potential supplies for the individual terminals in detail. Ethernet X3 GNDµP ILIM VµP PE 4 9 ENPO 2 7 3 GNDµP X5/ + Motor-PTC X5/ − GNDµP ILIM X4/3 DGND ISDSH X4/22 ILIM SELV = Safety Extra Low Voltage X4/14 UH X4/2 F1 13 8 4 DGND X4/10 Encoder/SSI X7 14 9 VµP ILIM 10 5 X4/21 ISD06 12 6 1 11 VµP 15 GNDµP DGND With this concept higher operation safety and reliability of the servo controller is additionally achieved. PELV = Protective Extra Low Voltage Resolver X6 8 3 7 2 6 1 X4/15 ISD00 ISD01 ISD02 ISD03 ISD04 ISD05 5 The control electronics with its logics (µP), the encoder terminals and the in- and outputs is metallically isolated from the power section (power supply/d.c.-link). All control terminals are designed as safety extra-low voltage (SELV/PELV) circuit and must only be operated with voltages ranging from 5 V to 50 V, as per corresponding specification. This provides reliable protection against electric shock on the control side. VµP USB1.1 X2 DGND A/D X4/4 GNDµP X4/5 A/D X4/6 ISA00+ ISA00- ISA01+ ISA01- X9/+ GNDµP UV F2 X9/- VµP X4/13 DGND X4/1 F3 µP F4 DGND OSD00 X10/+ Control supply 24 V DC UV GNDµP X10/- X4/7 X13/1 OSD03 Motor brake DGND OSD01 X13/2 GND X4/8 X4/12 X4/11 DGND OSD02 GNDµP X4/9 F3 DGND PE GNDµP DGND complex non-linear impedance RC-link RSH X4/23 X4/24 OSD04 GNDµP Polyswitch Fig. 3.7 Electrical isolation concept ServoOne Operation Manual [ Installation ] 17 ServoOne Operation Manual 3.6 Connection of supply voltages Note A: (applies only for BG1 to BG5) Apart from the control section, the external voltage source also supplies the output for the motor holding brake (IBR = 2 A max.). When this output is active, the current for the motor holding brake IV + IBR = 4 A flows through terminal X9, plus the required current for the digital inputs and outputs. The starting current for the supply voltage of BG1 to BG5 can be 2-3 times the operating current The power supply for the ServoOne is separated into the supplies for control and power sections. The supply for the control must always be connected first, so that triggering of the ServoOne can first be checked or the device can be parameterized for the intended application. 3.6.1 Connection Control supply (24 V DC) Device 1 Cover D1 D2 X11 Three-phase network D1 D2 L3 L2 X11 X9 Three-phase network L1 1 2 + - 1 2 + - max. 10 A gG 24 V DC ± 20 % ext. voltage source Loop-through only possible with BG1 to BG4 X10 X9 1 2 1 2 + + - next servo controller Fig. 3.8 Connection of control supply Control supply (specification) Control supply X9/+ = 1 X9/- = 2 • UV = 24 V DC ±20 %, stabilized and filtered. • IV = 2.0 A (BG1 to BG4)1) IV = 2.5 A (BG5)1) IV = 5.0 A (BG6, BG6a)2) • Internal polarity reversal protection • the power supply unit used must have a safe and reliable isolation towards the mains network, as per EN50178 or EN618005-1 X10/+ = 1 X10/- = 2 • Permissible current load (terminals) IB = 10 A max. 1) see note A, 2) see note B Table 3.3 Specification of control supply At tention: Suitable measures must generally be applied to provide adequate line protection. At tention: Dangerous voltage may be applied to the device, even if the device does not emit any visual or audible signals/indications (e.g. with mains voltage applied to terminal X11) and missing control voltage (+24 V on X9, X10)! L3 L2 L1 X10 ! Device 2 Cover 18 ! Note B: BG6 and BG6a represent a special case: Due to an internally available high-threshold switched-mode power supply an external 24 V power supply is not permanently required. The starting current for a 24 V supply is approx. 12 A over a period of 200 ms and then drops to 5 A. Once the highthreshold switched-mode power supply has started there will be no further external current consumption. 3.6.2 Connection of mains supply L3 L2 L1 BG1 to BG4 Three-phase network Cover X11 Filter L3 Choke K1 FN L2 Please proceed as follows: L3 L2 L1 BG5 to BG6a Three-phase network Cover X11 Choke L3 K1 FN L2 L1 Filter L1 X10 1 2 + - X10 1 2 + - X9 1 2 + - X9 1 2 + - Fig. 3.9 Connection of mains supply 3 x 230/400/460/480 V N L1 BG1 Cover Single-phase network X11 Filter N Choke K1 1. 2. 3. 4. 5. FN L1 X10 1 2 + - X9 1 2 + - Fig. 3.10 Anschluss Netzversorgung 1x 230 V ! Step At tention: (applies only for Bg5, BG6 and BG6a) Due to the different precharging technology in these devices you must make sure that the power choke is installed between servo controller and line filter (see Fig. 3.9 ). Note: Before commissioning the value of the connected mains voltage must be set in the servo controller (factory setting = 3 x 400 V AC). More detailed information see chapter 4 "Commissioning". Action Comment Determine the wire cross-section, depending on maximum current and ambient temperature. Line cross-section acc. to local regulations and conditions. Wire the drive controller with the line filter, max. cable length 0.3 m (with non-shielded cable)! This step does not apply for BG1 to BG5, this series has an integrated line filter. Wire the power choke, see appendix A.5 Reduces the voltage distortions (THD) in the net and prolongs the lifetime of the servo controller. Install a K1 circuit breaker (power circuit breaker, contactor, etc.). Do not switch on the power! Use mains fuses (duty class gG), which will For compliance with the equipment isolate all poles of the drive controller from the safety act acc. to EN61800-5-1 mains supply. Attention: Risk of fatal injury! Never wire or disconnect electrical connections while these are live. Always disconnect the power before working on the device. Dangerously high voltages ≥50 V may still be present 10 minutes after the power is cut (capacitor charge). You should therefore always check that the system has been deenergized. ! ATTENTION: Should local regulations require the installation of a residual current operated protective device, the following applies: In case of a fault the drive controller is able to generate d.c. leak currents without zero crossing. Drive controllers therefore must only be operated with residual current operated protective devices (RCDs)1) type B for a.c. fault currents, pulsating or smooth d.c. fault currents, which are suitable for servo controller operation, see IEC 60755. Residual current monitoring devices (RCMs)2) can additionally be used for monitoring purposes. 1) residual current protective device 2) residual current monitor ServoOne Operation Manual [ Installation ] 19 ServoOne Operation Manual Device connected load1) [kVA] Please note: Drive controller •• Switching the mains power: –– In case of too frequent switching the unit protects itself by high-resistance isolation from the system. After a rest phase of a few minutes the device is ready to start once again.. •• TN network and TT network: permitted without restriction.. •• IT network (insulated centre point): not permitted! –– In case of an ground fault the electrical stress is approx. twice as high. Clearances and leakage paths acc. to EN 61800-5-1 are no longer maintained. –– for compliance with EN61800-3 or IEC 1800-3, see appendix. Max. line crosssection2) of term. [mm²] Specified mains fuse, duty class gG [A] With power choke (4 % uK) Without power choke SO84.008 SO84.012 5.9 8.8 8.3 12.5 4 3 x max. 20 3 x max. 25 SO84.016 SO84.020 11.1 13.9 15 18.7 16 3 x max. 32 3 x max. 40 SO84.024 SO84.032 16.6 22.2 22.5 30 16 3 x max. 50 3 x max. 63 Max. line crosssection2) of term. [mm²] Specified mains fuse, duty class gG [A] •• Connection of the servo controller via a power choke is mandatory: –– where the servo controller is used in applications with disturbance variables corresponding to environment class 3, as per EN 61000-2-4 and higher (hostile industrial environment). 20 Drive controller Device connected load1) [kVA] With power choke (2 % uK) Without power choke3) SO84.045 31 41.2 25 3 x max. 63 •• For further information on permissible current loads, technical data and environmental conditions please refer to the appendix. SO84.060 42 54.3 25 3 x max. 80 Note: Please note that the ServoOne has not been designed for environment class 3. Further measures are mandatory in order to achieve this environment class! SO84.072 50 65.5 25 3 x max. 100 SO84.090 62 82.3 50 3 x max. 125 SO84.110 76 101.0 50 3 x max. 160 SO84.143 99 131.0 95 3 x max. 200 SO84.170 118 157.2 95 3 x max. 224 ! For further information please consult your project engineer. Device connected load1) [kVA] Drive controller Max. line crosssection2) of term. [mm²] Specified mains fuse, duty class gG [A] With power choke (4 % uK) Without power choke SO82.004 1.6 2.2 4.0 1 x max. 10 SO84.004 2.8 4 4.0 3 x max. 10 SO84.006 4.2 6 4.0 3 x max. 16 Table 3.4 Connected load and mains fuse 1) With 3 x 400 V mains voltage 2) The minimum cross-section of the power supply cable depends on the local regulations and conditions, as well as on the rated current of the servo controller. 3) Power choke mandatory Table 3.4 Connected load and mains fuse 3.7 Control connections Step 1. 2. 3. 4. 5. 6. 3.7.1 Specification of control connection Action Comment Check whether a complete device setting is already available, i.e. whether the drive has already been projected. ISA0+ ISA0ISA1+ ISA1- If this is the case, a special control terminal assignment applies. Please contact your project engineer to obtain the terminal assignment. Choose a terminal assignment. Wire the control terminals with shielded cables. The following is strictly required: STO request X4/22, ENPO X4/10 and a start signal (on control via terminal). Des. Terminal X4/3 X4/4 X4/5 X4/6 P.-isolation • UIN = ±10 V DC • Definition 12 bit; RIN approx.101 kΩ • Terminal scan cycle in "IP mode" = 125 µs, otherwise = 1 ms • Tolerance: U ±1 % of the measuring range end value. no Digital inputs Initial commissioning Earth the cable shields over a wide area at both ends. Conductor sizes fixed: 0.2 to 1.5 mm² Conductor sizes flexible with ferrule: 0.2 to 1.5 mm² ISD00 ISD01 ISD02 ISD03 ISD04 ISD05 ISD06 X4/15 X4/16 X4/17 X4/18 X4/19 X4/20 X4/21 Keep all contacts open (inputs inactive). ENPO (STO) Check all connections once again! Specification Analogue inputs X4/10 Continue with commissioning in section 4. Please note: •• Always wire the control terminals with shielded cables. •• Lay the control cables separately from the mains lead and motor cable. •• A cable type with double copper braiding with 60 - 70% coverage must be used for all shielded connections. • Frequency range < 500 Hz • Terminal scanning cycle = 1 ms • Switching level low/high: ≤ 4.8 V / ≥ 18 V • for 24 V typically 3 mA • Frequency range ≤ 500 kHz • Switching level low/high: ≤ 4.8 V / ≥ 18 V • Imax at 24 V = 10 mA, RIN approx. 3 kΩ • internal signal delay time < 2 μs suitable as trigger input for quick saving of actual position yes yes • Request input STO • Deactivation of the restarting lock (STO) and release of power stage = high-level • Frequency range < 500 Hz • Reaction time approx. 10ms • Switching level low/high: ≤ 4.8 V / ≥ 18 V • for 24 V typ. 3 mA yes • short-circuit proof • Imax = 50 mA, PLC compatible • Terminal scan cycle = 1ms • High-side driver yes X4 REL 24 12 REL 23 11 RSH RSH ISDSH 22 10 ENPO ISD06 21 9 OSD02 ISD05 20 8 OSD01 ISD04 19 7 OSD00 ISD03 18 6 ISA1- ISD02 17 5 ISA1+ ISD01 16 4 ISA0- ISD00 15 3 ISA0+ +24V 14 2 +24V DGND 13 1 DGND Digital outputs OSD00 OSD01 OSD02 X4/7 X4/8 X4/9 Table 3.5 Specification of control connections X4 ServoOne Operation Manual [ Installation ] 21 ServoOne Operation Manual Des. Terminal Specification 22 3.7.2 Standard terminal assignment P.-isolation STO "Safe Torque Off" ISDSH (STO) RSH RSH X4/22 X4/11 X4/12 • Request input STO • Frequency range < 500 Hz • Switching level low/high: <4.8 V / >18 V • for 24 V typ. 3 mA Diagnose STO, both tripping channels active, one normally open contact with automatically resetting circuit breaker (polyswitch) • 25 V / 200 mA AC, cos φ = 1 • 30 V / 200 mA DC, cos φ = 1 X4/12 X4/11 X4 yes Request STO yes Relay outputs REL X4/23 X4/24 Relay, 1 normally open • 25V / 1.0 A AC, cos φ = 1 • 30V / 1.0 A DC, cos φ = 1 • Switching delay approx. 10 ms • Cycle time 1 ms Auxiliary supply + 24 V X4/2 X4/14 • Auxiliary supply to feed the digital control inputs • UH = UV-∆U (∆U typically approx. 1.2 V), no destruction in case of short circuit (+24 V -> GND), however, device may switch off for a short time. • Imax = 80 mA (per pin) with self-resetting circuit breaker (polyswitch) X4 RSH X4/1 X4/13 Reference ground for 24 V, with automatically resetting circuit breaker (polyswitch) Desig. 24 REL 12 RSH 23 REL 11 RSH 22 ISDSH 10 ENPO 21 ISD06 9 OSD02 20 ISD05 8 OSD01 19 ISD04 7 OSD00 18 ISD03 6 ISA1- 17 ISD02 5 ISA1+ 16 ISD01 4 ISA0- 15 ISD00 3 ISA0+ 24 12 REL 23 11 RSH ISDSH 22 10 ENPO ISD06 21 9 OSD02 ISD05 20 8 OSD01 ISD04 19 7 OSD00 14 +24 V 2 +24 V ISD03 18 6 ISA1- 13 DGND 1 DGND ISD02 17 5 ISA1+ ISD01 16 4 ISA0- ISD00 15 3 ISA0+ +24V 14 2 +24V DGND 13 1 DGND yes yes Table 3.5 Specification of control connections X4 ! X4 REL Digital ground DGND Desig. Note: With high currents flowing through the ground terminals a high resistance isolation from the device ground is required. This may cause misconduct of the drive (avoid ring currents in the wiring). START Diagnose STO Request STO ISA0- ISA0- or ISA0+ +10 V ISA0+ CNC or SPS Fig. 3.11 Control terminals, standard assignment (initial commissioning) Note: When using the safety function "Safe Torque Off (STO)" via terminals ENPO and ISDSH, the explanations in chapter 6 must be strictly followed. 3.8 Specification of MMC-Slot 3.7.3 Brake driver Plug X13 (BG1 to BG4) is intended for the connection of a motor brake. Des. Term. OSD03 X13/1 GND X13/2 Brake driver X13 • Short-circuit proof • Voltage supply through control supply UV to X9/X10 • UBR = UV-∆U` (∆U` typically approx. 1.4 V) • To trigger a motor holding brake of up to IBR = 2.0 A max., for brakes with higher current requirements a relay must be connected in series. • Overcurrent causes shut down • Can also be used as configurable digital output • interruptible cable breakage monitoring < 200 mA typically in condition "1" (up to relay). For a MMCplus-Card with 128 MB memory capacity and 3.3 V supply voltage Connection 3.9 Specification of USB 1.1 interface X13 OSD03 1 GND 2 M •• For USB 1.1 Standard with Full speed device •• Intended for communication with a PC •• USB-cable required (see ServoOne ordering catalogue chapter 4 "Accessories") •• Only designed as service interface! + 24 V DC Brake (-) Brake (+) 3.10 Specification Ethernet interface •• Transfer rate 10/100 MBits/s BASE-T Table 3.6 Specification of terminal connections X13 •• Line protocol IEEE802.3 compliant Plug X20 (BG5 to BG6a) is intended for the connection of a motor brake. •• Crosslink cable required (see ServoOne ordering catalogue chapter 4 "Accessories") Des. +24 V OSD03 GND Term. X20/1 X20/2 X20/3 Brake driver X20 • Short-circuit proof • External voltage supply required 24 V (IIN= 2.1 A) required • To trigger a motor holding brake of up to IBR = 2.0 A max., for brakes with higher current requirements a relay must be connected in series. • Overcurrent causes shut down • interruptible cable breakage monitoring < 200 mA typically in condition "1" (up to relay). Connection X20 +24 V 1 OSD03 2 GND 3 24V DC supply for brake (IIN = 2,1 A) M + 24 V DC Brake (-) Brake (+) Table 3.7 Specification of terminal connections X20 ServoOne Operation Manual [ Installation ] 23 ServoOne Operation Manual 3.11 Option 1 3.13 Encoder connection Depending on the ServoOne design variant, option 1 can be designed as follows: All encoder connections are located on the cover of the unit. •• for field bus SERCOSII 24 •• For field bus PROFIBUS 3.13.1 Encoder connection for LSH/T-motors •• for field bus EtherCAT Please use the prefabricated motor and encoder line from LTi DRiVES GmbH to connect the LSH/T synchronous motors. •• for field bus CANopen Note: More detailed information can be found in the ServoOne ordering catalogue / chapter 3 and in the user manual for the corresponding field bus. 3.12 Option 2 3.13.2Assignment motor/encoder cable for servo controller Compare the type plates on the components. Make absolutely sure to use the correct components according to a variant A, B or C! KGH3-KS xxx Option 2 is an additional encoder interface. Example: •• Evaluation of optical sine/cosine encoders with zero pulse evaluation •• EnDat 2.1, connection via X8 (15-pin D-SUB plug) Variant C X7 X6 KGS2-KS xxx Variant B high resolution encoder KRY2-KS xxx Variant A e.g. Note:More detailed information can be found in the ServoOne ordering catalogue / chapter 3. Hiperface-Multiturn: LSH074-2-30-320/T1, G6M Hiperface-Singleturn: LSH074-2-30-320/T1, G6 high resolution encoder e.g. KM3-KS-xxx Sin/Cos-Multiturn: LSH074-2-30-320/T1, G13 Sin/Cos-Singleturn: LSH074-2-30-320/T1, G12 Resolver e.g. LSH074-2-30-320/T1 without further options Fig. 3.12 Assignment motor/encoder cable Note: Do not split the encoder cable, for example to route the signals via terminals in the control cabinet. The knurled screws on the D-Sub plug housing are tightly locked! 3.13.3Prefabricated encoder cables The specifications can only be assured when using the LTi system cables. K Encoder cable Connection of servo controller with resolver e.g. LSH/LST H074-2-30-320/T1 without further options KRY2-KSxxx X6 G13: = Sin/Cos multiturn encoder with SSI/EnDat interface e.g. LSH/LST H074-2-30-320/T1, G13 KGS2-KSxxx Motor (with encoder installed) Variant A Variant B Variant C KGS2-KSxxx G6: = Sin/Cos single turn encoder with Hiperface© interface e.g. LSH/LST H074-2-30-320/T1, G6 KGH3-KSxxx X7 G6M: = Sin/Cos multiturn encoder with Hiperface© interface e.g. LSH/LST H074-2-30-320/T1, G6M KGH3-KSxxx X7 RY2 - X7 Encoder line KRY2-KS-005 KS 005 RY2 GS2 GH3 Encoder system Chain trailing ability Design Length 2 m Length 3 m Length 5 m Length 8 m Length 10 m Length 15 m Length 20 m Cable length X7 G12: = Sin/Cos single turn encoder with SSI/EnDat interface e.g. LSH/LST H074-2-30-320/T1, G12 Table 3.8 Variants of motors, encoder type and encoder line Encoder cable Prefabricated cable Resolver cable Encoder cable SSI, EnDat Encoder cable Hiperface© KS 002 003 005 008 010 015 020 Ordering key Technical data: KRY2-KSxxx / KGS2-KSxxx/ KGH3-KSxxx Chain trailing capability Minimum bending radius:: Temperature range: yes for stationary routing - for flexible applications 90 mm for stationary routing -40 ... +85 °C for flexible applications -40 ... +85 °C Cable diameter approx. 8.8 mm Material of oversheath PUR against oil, hydrolysis and microbial activity (VDE0472) Resistance UL-Style 20233, 80 °C - 300 V, CSA-C22.2N.210 -M90, 75 °C - 300 V FT1 Certifications Table 3.9 Technical data encoder cable ServoOne Operation Manual [ Installation ] 25 ServoOne Operation Manual 3.13.4Resolver connection 3.13.5Connection for high resolution encoders A resolver is connected to board slot X6 (9-pin D.Sub socket). Encoder interface X7 enables the evaluation of the following encoder types. 9 ϑ - (PTC, KTY, Klixon)1) 8 9 5 1) At tention: The motor PTC (also KTY and Klixon) must be designed with reinforced insulation acc. to EN61800-5-1 against the motor winding. 11 Refcos / (S3) analog differential input track B 12 8 13 Ref- analog excitation (ground reference point to pin 6) 14 7 15 Ref+ analog excitation at 16 kHz and 8 to 11 V AC 1 6 6 ϑ + (PTC, KTY, Klixon)1) 2 5 Sine/Cosine encoder with zero pulse: • e.g. Heidenhain ERN1381, ROD486 • UV = 5 V ± 5 %, Imax = 150 mA 7 Supply voltage, internally already connected with X7/3 3 4 Function X7 8 Cos+ / (S1) analog differential input track B 4 3 9 Refsin / (S4) analog differential input track A 5 2 7 Sin+ / (S2) analog differential input track A 10 6 1 2 1 Table 3.10 Pin assignment X6 ! Fig.: Function 3 4 Resolver X6 X6/Pin Encoder/ SSI Fig.: 26 Heidenhain Sine/Cosine encoder with EnDat2.1 interface: • e.g. 13 bit singleturn encoder (ECN1313.EnDat01) and 25 bit multiturn encoder (EQN1325-EnDat01) • UV = 5 V ± 5 %, Imax = 150 mA Sine/Cosine encoder with SSI interface: • e.g. 13 bit singleturn and 25 bit multiturn encoders (ECN413-SSI, EQN425SSI) • UV = 5 V ± 5 %, Imax = 150 mA Sick-Stegmann Sine/Cosine encoder with HIPERFACE© interface: • Singleturn and multiturn encoders, e.g. SRS50, SRM50 • UV = 7 to 12 V (typ. 11 V) ± 5 %, Imax = 100 mA Table 3.11 Suitable encoder types on X7 Note: Encoders with a power supply of 5 V ± 5 % must have a separate encoder line connection. The encoder line serves the detection of the actual supply voltage on the encoder, whereby a compensation of the voltage drop on the line is achieved. Only the use of the encoder line assures that the encoder is supplied with the correct voltage. The encoder line must always be connected. Electrical specification of the interface X7: Select the cable type specified by the motor or encoder manufacturer. Thereby please observe the following boundary conditions: •• Always used shielded cables. The shielding must be placed on both sides of the cable. •• Connect the differential track signals A, B, R or CLK, DATA to each other via twisted wires. •• Do not separate the encoder cable, for example to route the signals via terminals in the switch cabinet. Fig.: X7/Pin Function Sine/Cosine Absolute encoder SSI/ EnDat 2.1 Absolute encoder HIPERFACE© 1 A- A- REFCOS 2 A+ A+ +COS 3 11 12 13 14 15 2 1 6 7 3 8 4 9 5 10 Encoder/ SSI X7 4 Data + 5 Data - 6 B- B- REFSIN 7 - - US - Switch 8 GND GND GND 9 R- - 10 R+ - 11 B+ B+ Step 7 to 12 V / (typically 11.8 V) 100 mA + 5 V, ± 5 % at 150 mA controlled, monitoring via sensor line 3.14 Motor connection 12 Sense + US - Switch Sense - - 14 - CLK+ - 15 - CLK - - Comment 1. Determine the cable cross-section, depending on maximum current and ambient temperature. Cable cross-section acc. to local and country specific regulations and conditions 2. Connect the shielded motor cable to the terminals X12/ U, V, W and connect the motor to ground . Shielding and suppression of noise radiation, apply shielding on both ends. Wire the PTC temperature sensor (if present) to X5 using a separate shielded cable and activate the temperature evaluation via the DriveManager. Shielding and suppression of noise radiation, apply shielding on both ends. 3. Note: The temperature sensor connection can also be routed through the resolver line to X6/5 and 9. However, this requires a reinforced insulation acc. to EN 61800-5-1 in the motor (e.g. LSH/LST-motor). +SIN 13 Action After connecting pin 7 and pin 12 a voltage of 11.8 V will be applied to X3/7! ! Attention: For the connection X5 it must be assured that the temperature watchdog used is equipped with a basic isolation against the motor winding. Table 3.12 Pin assignment of plug connection X7 Note: The encoder supply on X7/3 is short-circuit proof in both 5 V and 11.8 V operation. The controller remains in operation enabling the generation of a corresponding error message when evaluating the encoder signals. Note: In the event of a short-circuit or earth fault in the motor cable, the power stage is disabled and an error message is emitted. ServoOne Operation Manual [ Installation ] 27 ServoOne Operation Manual 3.14.1Motor connection of LSH/LST-motors 3.14.2Prefabricated motor cable Note: Please use the prefabricated motor cable KM3-KS-005 to connect servo motors of series LSH xxx and LST xxx. Servo controllers size BG1 to BG4 can be used for these motors. Front Ordering key KM3 OSD03 GND X12 1 2 Control of motor brake Motor cable KM3-KS-005 U V W L+ ~ Minimum bending radius: 24 V DC + Brake (+) Boden Fig. 3.13 Connection of motor 005 008 010 015 020 KM3.KS xxx DC-Anschluss RB 002 003 Technical data Motor 3 Bremswiderstand 005 Ordering key For motors with pluggable power connection L- KS Chain trailing ability Design Length 2 m Length 3 m Length 5 m Length 8 m Length 10 m Length 15 m Length 20 m Cable length - X13 - Prefabricated motor cable + X5 28 Temperature range: Brake (-) up to 16 A IN for stationary routing 60 mm for flexible applications 120 mm for stationary routing -50 ... +90 °C for flexible applications -50 ... +90 °C Cable diameter approx. Ø 12 mm Material of oversheath PUR Table 3.13 Technical data motor cable Note: Strands 5 and 6 (PTC) are only required for motors with optical sensors (G12, G13, G6, G6M). On the LSH/LST xxx motors with resolver PTC-monitoring is accomplished through the resolver line. 3.14.3Schalten in der Motorleitung ! Attention: Switching in the motor line must generally take place in de-energized state and with deactivated power stage, as otherwise problems, such as burned off contactor contacts, will occur. In order to assure de-energized switching on you must make sure that the contacts of the motor contactor are closed before the servo controller power stage is released. In the moment the contactor switches off the contacts must remain closed, until the servo controller power stage has been switched off and the motor current has dropped to 0. This can be achieved by providing the control sequence of your machine with appropriate safety periods for the switching of the motor contactor. However, despite these measures it cannot be ruled out, that the servo controller will malfunction when switching in the motor line. 3.15 Braking resistor (RB) In regenerative operation, e.g. when braking the drive, the motor feeds energy back to the drive controller. This increases the voltage in the DC-link. If the voltage exceeds a threshold value, the internal braking transistor is activated and the regenerated power is converted into heat by means of a braking resistor. 3.15.1Protection in case of brake chopper fault ! Attention: If the internal brake chopper transistor is permanently switched on, because it is alloyed through by overload (= 0 Ω), there is a protective function to protect the device against overheating. You activate this function by assigning 56_BC_FAIL(56) to any digital output (expert field "I/O configuration" -> digital output -> OSD00 to OSD02). In case of a fault the selected output will switch from 24 V to 0 V. This signal ensures that the servo controller is safely disconnected from the mains supply. Detailed information on parameterization can be found in the ServoOne user manual. 3.15.2Design with integrated braking resistor The catalogue only specifies the peak braking power for the servo controller with integrated braking resistor (design SO8x.xxx.xxxx.1xxx). The permissible permanent braking power must be calculated. It depends on the effective loading of the controller in the corresponding application. In general the servo controller is thermally designed in such a way, that no energy input by the internal braking resistor is permitted during continuous operation with rated current and under max. ambient temperature. Thus the controller design with integrated braking resistor only makes sense, if the effective drive controller load is ≤ 80 %, or the braking resistor has been planned for onetime emergency stopping In case of an emergency stop the heat capacity of the braking resistance can only be utilized for a single braking operation. The permissible energy WIBr can be taken from the following table. ServoOne Operation Manual [ Installation ] 29 ServoOne Operation Manual Technology Rated resist- Peak braking power PPBr ance RBR 1690 W1) SO82.004 SO84.004 SO84.006 PTC SO84.024 SO84.032 K1 95 W 600 Ws 95 W 1690 W2) SO84.008 SO84.012 SO84.016 SO84.020 Pulse energy WIBr 90 Ω Drahtwiderstand 230 W 4700 W3) 6170 W4) 6500 W 6000 Ws 360 W 5) 480 W 1) Data referred to 1 x 230 V mains voltage (BR switch-on threshold 390 VDC) 2) Data referred to 3 x 230 V mains voltage (BR switch-on threshold 390 VDC) 3) Data referred to 3 x 400 V mains voltage (BR switch-on threshold 650 VDC) 4) Data referred to 3 x 460 V mains voltage (BR switch-on threshold 745 VDC) 5) Data referred to 3 x 480 V mains voltage (BR switch-on threshold 765 VDC) Table 3.14 Data of the integrated braking resistor (design SO8x.xxx.xxxx.1xxx) If the drive is not permanently operated at its power limit, the reduced power dissipation of the drive can be used as braking power. Note: Further calculation assumes that the drive controller is used at max. permissible ambient temperature. This means that any additional energy input from the internal braking resistor caused by low ambient temperature will be neglected. To calculate the continuous braking power please proceed as follows: ∫ ∫ ∫ ∫∫ Device 30 T 1 TT 2 I eff = 1 i dt •• Calculation of the effective drive controller I eff = T1 i 22 dt utilization during a cycle T: I eff = T 0 i dt T T0 0 1 2 T i dt I eff = •• Determination of the permissible continu T1 I eff 2 I DBr = 1 − I0effi dt × K1 P ous braking power on basis of unutilized eff = PDBr = 1T− IIeffN × K1 drive power: PDBr = 1 − I0 N × K1 IN I eff Boundary conditions PDBr = 1 − T × K1 1 IIeffNT 2 1 −1 × T P×2 Kdt = 1 PPDBr ≥ •• A single braking process must not exceed DBr x2 TBrdt Br PDBr ≥ WT1IBr ×I≥NP∫∫PBrPPBr PBr the maximum pulse energy of the braking 0 PDBr ≥ T × ∫0 PPBr dt Br Br T T0 resistor. 1 2 PDBr ≥ × T PPBr dt Br •• The continuous braking power calculated T1 ∫0 22 2 T for the device must be greater than the efTdt PDBr ≥ P × ∫P PPBr 2 PBr T = T × T∫ dtBrBr PBr fective braking power of a device cycle. 0 P T = PDBr PBr × ∫ dt Br × ∫00 dt Br T = PDBr P DBr 2 T0 This results in the minimum permissible P T = PBr 2 × T∫ dt Br cycle time T with calculated continuous PPBr 0 braking power: × dt Br T = DBr PPDBr 22 ∫0 The maximum total switch-on time of the 2 × T TBrSum = PPBr × T PPBr TBrSum = P braking resistor over a specified cycle time PBr ×T TBrSum = PDBr DBr T with calculated continuous braking power PDBr 2 results from: P TBrSum = PBr 2 × T PDBr connected to PBr be At tention: No additional external braking resistor × T TBrSum = must the drive controller SO84.008 to SO84.032 with integrated PDBr braking resistor. ! 3.15.3Connection of an external brake resistor ! ! Attention: •• Strictly follow the assembly instructions for the braking resistor. •• The temperature sensor (bimetal switch) on the braking resistor must be wired in such a way, that the power stage is deactivated and the connected servo controller is disconnected from the mains supply if the braking resistor overheats. •• The minimum permissible connection resistance of the servo controller must not be fallen short of, technical data see chapter A Appendix. •• The braking resistor must be connected with a shielded cable. Size BG1 to BG4 U V W X 12 LL+ RB Size BG5 to BG6a X 12 Motor 3 ~ ZK+ DC-connection Braking resistor ZK- RB+ Brake (-) Motor 3 ~ DC-connection Braking resistor 24 V DC + Brake (+) Bottom Brake (-) Fig. 3.14 Connection of braking resistor ! Available braking resistors (excerpt) Ordering designation Degree ContinuResist- Peak braking of proous braking 1) 2) power ance tection power BR-090.01.54,UR 35 W 6250 W IP54 BR-090.02.54,UR 150 W 6250 W IP54 BR-090.03.54,UR 300 W 6250 W IP54 BR-090.10.650,UR 1000 W 6250 W IP65 BR-026.01,54,UR 35 W 21600 W IP54 BR-026.02,54,UR 150 W 21600 W IP54 BR-026.03,54,UR 300 W 21600 W IP54 BR-026.10,650,UR 1000 W 21600 W IP65 90 Ω 26 Ω RB+ 24 V DC Brake (+) Bottom U V W Attention: The external brake resistor must be monitored by the control. The temperature of the braking resistor is monitored by a temperature watchdog (Klixon). In case of excessive temperatures the servo controller must be disconnected from the mains supply. At tention: No additional external braking resistor must be connected to the drive controller SO84.008 to SO84.032 with integrated braking resistor. Attention: Risk of fatal injury! Terminal L+ (BG1 to BG4) or BR+ (BG5 to BG6a) is fixed connected to d.c. link (> 300 V DC). The connection is not fuse protected inside the device. Never wire or disconnect electrical connections while these are live! Always disconnect the power before working on the device. Dangerously high voltages ≥50 V may still be present 10 minutes after the power is cut (capacitor charge). You should therefore always check that the system has been deenergized. Illustration Example: BR-090.01,540,UR 1) Tolerance ± 10 % 2) the maximum possible braking power in dependence on ON-time and cycle time Fig. 3.15 Technical data - braking resistors ! Note: Exact specifications, especially with respect to surface temperature, the required cable cross-sections, the max. connection voltage and high voltage strength can be found in the ServoOne ordering catalogue. Please consult your projecting engineer for more detailed information on the design of braking resistors ServoOne Operation Manual [ Installation ] 31 ServoOne Operation Manual 3.16 7-segment display D1 and D2 3.16.1Meaning of display D1 and D2 serve the display of SO8000 system states. The display also provides information on equipment faults with error number and location of fault. Further information can be found in chapter 5. 3.17 Function of buttons T1 and T2 The buttons T1 and T2 are used to set the device to bootstrap mode. This mode is used to transfer equipment firmware from a PC to the servo controller´, or to transmit a firmware update. For this process the program "Bootloader" must be additionally installed on the PC. The "ServoOne User Manual" contains a detailed description of the firmware transfer D1, D2 T1, T2 Fig. 3.16 7-segment display 32 Fig. 3.17 Position of buttons T1 and T2 4. Commissioning 4.1.1 System prerequisites •• a connected servo controller (see chapter 3). Details on initial commissioning can be found in the following chapter 4.1.2, "Wiring of components". •• a PC with installed operating software DriveManager 5.x 4.1 Initial commissioning (triggering via terminals) Initial commissioning is subdivided into the following five steps. Speed controlled operation by use of a resolver was chosen for parameterization. Triggering is to be executed via terminals X4. Step 1. 2. 3. 4. 5. Action Wiring or components Switching on control voltage External 24 V supply voltage DriveManager 5 Operating software Communication, installation •• an USB interface cable (e.g. USB-cable A to B type CC-USB 03, see ServoOne ordering catalogue) •• a servo motor type LSH or LST with resolver (see ordering catalogue LSH/LST servo motors), connected to the servo controller as described in chapter 3 (LSH and LST motor datasets can be downloaded from the product CD-ROM). Comment see chapter 3 "Installation" see chapter 3 "Installation" Information concerning installation can be found in the Operation Manual DriveManager 5.x Parameter setting more details see description of parameters ServoOne. Drive under control (test run) Mains voltage on, STO function deactivated, start contact, specify setpoint ! At tention: During commissioning strictly comply with the safety regulations specified in chapter 1. At tention: Never wire or disconnect electrical connections while they are live. Disconnect the unit from the mains supply (230/400/460/480 V) before working on it. Work on the device must only be carried out, after the d.c.-link voltage has dropped below a residual voltage of 50 V (on BG1-BG4 to be measured on terminals X12/L- and L+ or on BG5-BG6a on terminals X12/ZKand X12/ZK+). Note: Details concerning STO (Safe Torque Off) are not taken into consideration for initial commissioning, see chapter 6. ServoOne Operation Manual [ Commissioning ] 33 ServoOne Operation Manual 4.1.2 Wiring of components 1. Connection For complete wiring all power supply, encoder, communication and service connections must be connected to the appropriate terminals, using the cables and leads provided for this purpose. Sufficient shielding must be assured, see chapter 3 "EMC compatible installation". Terminal Designation Cable type X13 Brake driver Standard shielded Socket Designation Cable type USB X2 USB A • CC-USB 03 TCP / IP (Ethernet) X3 RJ45 • CC_ECL 03 Connection of motor brake Tabelle 4.4 Motor brake (optional) Connection = chosen setting/component Connections Terminals Terminal designation Cable type Control supply X10 +24 V DC, X10/1 = (+), X10/2 = (-) Standard Motor connection X12 Motor phases: U / V / W Braking resistor: L+ / RB ( RB+ / RB-) D.C.-link: L+ / L- (ZK+ / ZK-) KM3-KSxxx X11 3-phase L1/L2/L3/PE (230/400/460/480 V AC) Single phase L1/N/PE (230V AC) Mains supply Standard see chapter 3.1 Overview of connections Tabelle 4.1 Voltage supply Encoder type Designation Cable type TTL, SSI-Encoder X7 D-Sub 15pole (female) KGS2-KSxxx KGH2-KSxxx Resolver, motor-PTC on X6/5+9 X6 D-Sub 9pole (female) KRY2-KSxxx Tabelle 4.2 Encoder Connection Connection of motor monitoring (if no resolver is used) Tabelle 4.3 Motor-PTC CoDeSys Gateway Terminal X5 Designation ϑ+ and ϑ- Cable type Standard shielded not yet available. Tabelle 4.5 Communication with PC with installed operating software DriveManager 5.x Connection Terminals Designation Cable type Request STO X4/22 ISDSH (STO) Standard shielded Request STO, Deactivation of restart inhibit X4/10 ENPO (STO) Standard shielded Start input digital X4/15 ISD00 Standard shielded X4/3 and 4 ISA00 Standard shielded Setpoint assignment input analog Socket 34 Tabelle 4.6 Communication via terminals (see chapter 3.7.2) Field bus (selection) Module Device design SERCOSII Option 1 SO84.xxx,xx1x,xxxx PROFIBUS Option 1 SO84.xxx,xx2x,xxxx EtherCAT Option 1 SO84.xxx,xx3x,xxxx CANopen Option 1 SO84.xxx,xx4x,xxxx Tabelle 4.7 Bus communication to master control (optional) 4.1.3 Switching on control voltage 2. 4.1.4 Communication with the DriveManager5 In order to initialize and parameterize the SO8000 only the 24V DC control voltage supply must first be connected to X10. Ensure correct polarity. 3. The operating software DriveManager must be installed on a PC. The PC can be linked with the servo controller via USB 1.1 or Ethernet (TCP/ IP). Use DriveManager to create a "Project". In a project you can set and save the data sets of several connected servo controllers. A parameter editor is available for the display and setting of parameters. A DigitalScope with plot file is additionally included. After successful switching on you will be able to read two conditions in the 7-segment display. The meaning of other messages is described in the chapter "Diagnose". D1 D2 Action Reaction Explanation Switching on the external 24 V control voltage Initialization OK Not ready for starting UZK OFF Device is initialized Starting lockout (power stage not ready) UZK ON - control OFF takes place in step 5 Tabelle 4.8 Switch-on status of the ServoOne (after connection of the 24 V control supply) A detailed description of the DriveManager 5.x can be found in the DriveManager 5.x manual. ! At tention: The connection must only be made after the SO8000 has completed its initialization (connection via USB 1.1). Note: The firmware of a SO8000 must be compatible with the version of the DriveManager 5.x. Should the communication setup fail, you must check the compatibility. Prerequisite: •• DriveManager 5.x is installed •• Electrical connection via USB (cable type in the example CC-USB 003) on terminal X2 or via TCP/IP (Ethernet, cable type CC-ECL 003) on terminal X3 to PC available ServoOne Operation Manual [ Commissioning ] 35 ServoOne Operation Manual 36 Create a project with the DriveManager. 1. 3. Start DriveManager (DM) Open new project Menu bar: "File" > "new Project" > "scan Network" In case of successful communication the directory tree is displayed down the left hand side of the screen. n online mode the writing appears in black. Fig. 4.3 Online mode 4. Fig. 4.1 New program 2. The directory tree now shows the USB (COM4) interface used and a node for the corresponding subscriber is displayed. For initial communication the parameters must first be read in. This request must be confirmed with "yes". This process may take a few seconds. Opening "Drive settings" gives you access to the relevant subject areas. The individual subject areas can be opened by double-clicking with the left mouse button. E.g. open the subject area "Power stage" and set it to the existing mains voltage. Fig. 4.4 Subject area "Power Stage" 5. If you have made any changes, these must first be saved. Saving a project in the device: Menu bar: "File" > "save new Project" Fig. 4.5 Saving the new project Fig. 4.2 USB interface Note: It is possible to open several subject areas at the same time. Online mode = black writing in tree structure. Offline mode = blue writing in tree structure. 4.1.5 Parameterization and setting 4. The following settings must be made to be able to check the general function of the drive system. Setting the power stage Open the subject area "Power stage" and set the existing mains voltage and the desired cycle frequency of the power stage (factory setting 400 V and 8 kHz). For parameterization it is recommended to open the required subject areas. The directory "Drive Settings" contains all required subject areas. For commissioning the following subject areas are required: "Power stage", "Motor", "Encoder", "Control", "I/O configuration", "Motion profile". Fig. 4.7 ! Setting the mains frequency and the power stage switching frequency At tention: If the clock frequency needs to be higher than the default setting ex factory, the technical data will change. Fig. 4.6 Overview of subject areas ServoOne Operation Manual [ Commissioning ] 37 ServoOne Operation Manual 38 Setting the motor Loading/saving a motor dataset: Settings in this subject area become necessary if you have no motor dataset available for the connected motor. Details on how to create a motor dataset can be found in the ServoOne User Manual. If you intend to use a LSH- or LST-motor, the following motor datasets are available. Click on menu button "From file" to load a dataset. With "File" > "Save New Project" you can save a dataset in the servo controller. Fig. 4.9 Loading/saving a motor dataset Encoder setting This subject area enables the parameterization of the connected encoder system. In this example we have chosen a resolver (encoder lead for resolver = KRY2-KS-xxx, see ServoOne ordering catalogue). Fig. 4.8 Motor setting Selection of the PTC-connection: ►► Set parameter 732 MON_Motorptc to "X6" (PTC via resolver lead) or "X5" (PTC via terminal X5). Fig. 4.10 Selecting and setting the encoder system ►► Set parameter 506 ENC_CH2_Sel from "off" to "res" Control In the subject area "Control" you choose the control mode. In this example we have chosen the "Speed control mode". The "Speed controller" can be adjusted in detail via an active block diagram. More detailed information can be found in the "ServoOne User Manual". Fig. 4.12 Fig. 4.11 Choosing the control Setting the digital inputs For initial commissioning please select the following settings in the sub-subject area "digital inputs": ►► ISD00 to "START (1)" = "Start of control" Parameterizing inputs/outputs "I/O configuration" The subject area "I/O configuration" is sub-divided into "digital inputs", "digital outputs", "analog inputs", "analog outputs" and "motor" (for motor brake). Certain functions can be assigned to each input/output by means of programming. Fig. 4.13 Setting the analog inputs In addition select the following setting in the sub-subject area "analog inputs": ►► ISA00 to "REFV" = "Specify setpoint as voltage" (parameter 109) ServoOne Operation Manual [ Commissioning ] 39 ServoOne Operation Manual 40 Motion profile 4.1.6 Save the setting In this subject area you will find the sub-subject areas "Basic settings", "Stop ramps", "Setpoint table", "Analog channel ISA00" etc. For initial commissioning the following parameter settings must be made in the subject area "basic settings": Click on the "Safe" button to save the parameter settings in the device. There is also the possibility to save the parameter dataset in form of a data file to the connected PC. For this purpose click on button "to File", select the desired directory and confirm the saving process with "OK". ►► Set parameter 159 MPRO_CTRL_SEL to TERM = "Control via terminals" ►► Set parameter 165 MPRO_REF_SEL to ANAO = "Analog setpoint specification" Fig. 4.15 saving in the device Fig. 4.14 Setting the motion profile Fig. 4.16 Save as dataset 4.1.7 Drive under control (test run) 5. ! The drive is tested without the coupled mechanics. A test run is still possible under certain conditions, even if the motor has already been coupled to the system. Please check all connections once again before starting the test run. Attention! Test run with motor installed: In this case it must be assured that the test will not cause any damage to the system! Pay particular attention to the limitations of the travel range. Please note that you yourself are responsible for safe operation. LTi DRiVES GmbH will not assume liability for any occurring damage. Danger to life from uncontrolled rotation! Before starting motors with feather keys in the shaft end these must be reliably secured against being ejected, as far as this is not already prevented by drive elements such as belt pulleys, couplings or similar. ! Attention! Destruction of motor: • • The motors are intended for operation on the servo controller. Direct connection to the mains supply can destroy the motor. The motor surfaces may become extremely hot. No temperature sensitive parts may touch or be mounted to these areas, appropriate measures to prevent contact must be applied wherever necessary. • In order to avoid overheating of the motor, the temperature sensor installed in the winding must be connected to the terminals of the temperature monitoring system for the servo controller (X5 or X6). • The motor brake (if installed) should be checked for fault-free functioning before commissioning of the motor. The standstill holding brake (installation optional) is only designed for a limited number of emergency braking operations. Use as working brake is strictly prohibited. Procedure: Switch on the 24 V control supply and the 400 V mains supply D1 D2 Action Reaction Switching on the external 24 V control voltage Initialization OK Not ready for starting UZK OFF Starting lockout (power stage not ready) UZK ON - control OFF Explanation Device is initialized Tabelle 4.9 Display D1/D2 during the switching-on sequence The drive is started with the following switch-on sequence: 1. Deactivate safety function "STO" (see chapter 6) ISDSH (STO) 1 0 2. Digital input ISD00 "START OF CONTROL" 1 0 3. Specify the analog speed setpoint ISA00 1 0 4. Check the drive behaviour 1 0 ENPO (STO) ≥ 2 ms START ≤ 4 ms Fig. 4.17 D1 Control active t Switching on sequence D2 Action Reaction Explanation Enable "STO" and power stage "ENPO" Ready for switching on Power stage ready "Start" enabled Switched on Drive energized Tabelle 4.10 Display D1/D2 during the switching-on sequence If the drive reacts correctly to a setpoint change, disable the start contact again. The motor will rotate until it comes to a halt. This concludes the test run. Drive optimization, see ServoOne application manual. ServoOne Operation Manual [ Commissioning ] 41 ServoOne Operation Manual 4.2 The control window "Manual mode" In "Manual mode" (control window) the controller can be controlled "manually" in various control modes. This type of control is totally independent from the existence of any master control. The hardware must be released before the control is operated (STO, ENPO). It is recommended to record the motion process of the drive with the oscilloscope in parallel. This enables a meaningful assessment of the controlling performance. At tention: Controlling the system in "Manual mode" triggers movements of the axis. The connected control is not activated and has no influence on the controller. In events of emergency the controller can be stopped via the hardware release (ENPO, Safe Torque Off). With lifting applications one must make sure that a mechanical brake is available. If a drive cannot be moved via the control window, you should check the following: ! At tention: The controller must first be started as specified in the operating instructions, before the function is started. When the control window is opened, the parameter settings in the connected device are automatically changed according to the settings in the control window. The previous settings are restored accordingly when the window is closed !! However, you should avoid interrupting the communication (e.g. voltage drop, disconnection of the power supply cable) while the control window is open. However, should this occur, you must reset the parameters P 0159 MPRO_CTRL_SEL and P 0165 MPRO_RCF_SEL manually to the old values during a new communication. 42 ►► The system status of the controller must be as follows ►► Parameter of the motor dataset ►► Wiring of the motor phases ►► Hardware switch (ENPO, SDSH) The control window mask 1 1 Selection of control mode: The normal control modes are available. 2 Basic setting: The mask for basic settings changes with the selected control type. 3 Starting and stopping the control 4 Activating the function "Quick Stop" 5 Activating the function "Stop" 6 Activating and deactivating the control window 2 3 5 4 6 Fig. 4.18 The control window mask The control window is invoked with the button "Activate manual". The subsequently displayed warning must be accepted by tagging the corresponding field. ! Note: The control window will only be activated after this confirmation: You thereby agree with the necessary safety notes. • When opening the control window, various parameters of the drive will be changed. When exiting the window the original parameter setting will be restored. • Software limit switches are not active. • Parameters cannot be saved as long as the control window remains open. • The motor is energized. • The motor generates its rotating field and is able to perform movements. • A connected and parameterized motor brake may be activated (checking the brake status). • Before the activation make sure that there are no dangers for persons and the mechanical system of the plant. Fig. 4.19 Notes on safety ServoOne Operation Manual [ Commissioning ] 43 ServoOne Operation Manual 44 4.2.1 Basic setting "Standard mode" Referencing "Homing mode" Here you compile the basic settings to use the control in "Manual mode". The usual referencing types are available for positioning in manual mode. All of these types can be chosen from the catalogue field. ATTENTION: When choosing "Motion profile IP(1)" as profile type, the setpoint is directly passed on to the controller. No ramps are active. The drive tries to reach its end position with maximum dynamics. There is a risk of causing damage to the mechanical system! Standard setting "Standard mode" –– Selection of control mode –– Selecting the profile type –– Acceleration ramp –– Brake ramp –– Positioning speed Fig. 4.21 Choosing the referencing travel "Jog mode" –– Positioning mode –– Setpoint specification Jog mode" enables endless positioning. You can choose from two speeds and both directions of rotation. Jog mode is started with the buttons Jog(+) or Jog(-). When releasing the control button, the drive will stop along a parameterized braking ramp. Fig. 4.20 Window "Standard mode" Fig. 4.22 Jog mode Reversing the sense of rotation "Reverse mode" In "Reverse mode" you can change the sense of rotation, once a defined position or speed is reached. At a position of e.g. 360° the drive rotates 360° in positive and subsequently 360° in negative direction. 4.3 Diagnose ►► Double 7-segment display, see chapter 5. 4.3.1 Faults and warnings in the DriveManager 5.x Parameters 31 ErrorStack and 33 ActualError contain additional information on an actual error or a warning. This information can be retrieved through the "Device state monitor" in DriveManager 5.x Note: More detailed information can be found in the "ServoOne User Manual". –– Position / Speed: Choosing the value to trigger the reversal of the sense of rotation. –– Hold after target reached: Deceleration time to reverse the sense of rotation Fig. 4.23 Reverse mode NOTE: Manual mode is particularly suitable for the optimization of the control. The Scope function enables the recording of step responses. The procedure for optimizing the controller is described in the user manual. ServoOne Operation Manual [ Commissioning ] 45 ServoOne Operation Manual 4.3.2 Status display of the device (Device status) Double-clicking on the button <Drive status> in the header opens the status window. If an error occurs a "Pop-up" window with further information about the error is automatically opened. Fig. 4.24 <Drive status> Open window Fig. 4.26 Fig. 4.25 <<Drive status> Window 46 Device error 5. Diagnose Display 5.1 Device states indicated by D1 + D2 (7-segment display) Display Meaning Parameter System states *) *) Not ready to switch on (no ZK-voltage)1) Parameter Fault (see below) (Fault) In case of a fault the following information will alternately be displayed Display for faults or faults that cannot be reset ↓ See example on next page (table 5.2) Display changes after approx. 1 s Error number (decimal) Example: 05 = Overcurrent Device in reset state Automatic initializing during start-up of device Meaning (Start) (NotReadyToSwitchOn) Starting lockout (ZK OK, power stage not ready)1) (SwitchOnDisabled) Ready to switch on (power stage ready) (ReadyToSwitchOn) Switched on (drive energized)2) (SwitchedOn) Drive ready (drive energized and ready for setpoint specification) 2) (OperationEnabled) Quick stop 2) (QuickStop) Fault reaction active 2) (FaultReactionActiv) ↓ Display changes after approx. 1 s Error location (decimal) Example: 01 = Software monitoring ↑ After approx. 1 s the display jumps to ER 1) S. flashes when the function STO (Safe Torque Off) is active, display goes out when the function is inactive. *) it is not a "safe indication" as specified in EN 61800-5-2. 2) This point flashes when the power stage is active. Table 5.1 Device states Table 5.1 Device states ServoOne Operation Manual [ Diagnose ] 47 ServoOne Operation Manual 5.1.1 Example for flashing sequence: ER > 02 > 05 * ER > 02 > 05 ... Display 5.2 Excerpt from fault list Display Meaning Explanation Error ER = "Fault" Fault name: 02 = "Fault in parameter list" Fault description: 05 = "Function to check the current parameter list" ER > > XX no fault Runtime error Error in parameter list Undervoltage Table 5.2 Error example Overvoltage Note: The faults can be acknowledged in accordance with their programmed reaction (ER) or reset via a 24 V-reset (X9 / 10) (ER.). ! Overcurrent Attention: Faults marked with a dot can only be reset, after the cause of the fault has been eliminated. Motor overtemperature Servo drive heat sink overtemperature Servo drive interior overtemperature Motor protection (I^2t) Power stage protection (I^2t) external fault request Table 5.3 Error list Note: More detailed information on fault management can be found in the "ServoOne User Manual". 48 5.3 Helpline / Service If you have any technical questions concerning project planning or commissioning of the drive unit, please feel free to contact our helpline. •• Helpline - Please contact us: Mo.-Thu.: 8.00 - 16.30 h Phone +49 (0)64 41 / 966 - 180 Fr.: 8.00 - 16.30 h Phone +49 (0)64 41 / 966 - 180 E-Mail: [email protected] Fax: +49 (0)64 41 / 966 - 137 If you need further assistance, our specialists at the LTi Service Center will be happy to help. •• Service - Please contact us: Mo.-Thu.: 8.00 - 16.30 h Phone +49 (0)64 41 / 966 - 171 Fr.: 8.00 - 16.30 h Phone +49 (0)64 41 / 966 - 171 E-Mail: [email protected] Fax: +49 (0)64 41 / 966 - 211 ServoOne Operation Manual [ Diagnose ] 49 ServoOne Operation Manual 50 6. Safe Torque Off (STO) 6.2 Definition of terms STO: Safe Torque OFF 6.1 Danger analysis and risk assessment Users of the safety functions (STO/SS1) must strictly comply with the machine directive 98 / 37 / EEC, or the currently valid edition respectively. With the safety function STO the power supply to the drive is reliably interrupted (no metallic isolation). The drive should not be able to generate a torque and thus no endangering motion. The rest position is not monitored. The "STO" function corresponds with stop category 0 acc. to EN 60204-1. SS1: Safe Stop 1 (stopping acc. to stop category 1) The manufacturer or his representative is obliged to perform a danger analysis (acc. to machine directive 98 / 37 / EEC), before the market launch of the machine. He must perform an analysis of dangers arising from the machine and introduce appropriate measures to reduce/eliminate such dangers. With the danger analysis all prerequisites for establishing the required safety functions are fulfilled. In case of controlled stopping with reliably monitored delay time the drive is braked by the drive controller. Once the delay time, which is monitored by an external safety circuit, has expired, the power supply for the drive is interrupted (no metallic isolation). The safety function STO is active. The ServoOne safety function "Safe Torque Off (STO)" has been approved by the accredited certification body "TÜV-Rheinland". Parts of the standard EN954-1 category 3, EN ISO 13849-1, EN 62061, EN 61800-5-1 and EN 61508 were accounted for. Stop category according to EN 60204-1 The acceptance applies for servo controller types acc. to the tables in chapters A1.1 and A1.2. as well as for sizes BG1-BG4 from serial number 0729 0001. For size BG5+6 from serial no.: on request ! Qualification: The operator of the safety related system is trained in accordance with his state of knowledge, as is appropriate for the complexity and safety integrity level of the safety related system. This training includes the study of essential features of the production process and knowledge of the relation between the safety related system and the equipment under control (EUC). The "SS1" function corresponds with stop category 1 acc. to EN60204-1. Stop category System behaviour/ requirement 0 Uncontrolled stopping: By direct interruption of power supply to the machine drive elements. 1 Controlled stopping: Power supply to machine drive elements is maintained to achieve stopping. The power supply will only be interrupted when standstill is reached. 2 Controlled stopping: By which the power supply to the machine drive elements is maintained also at standstill. Table 6.1 Stop category ServoOne Operation Manual [ STO ] 51 ServoOne Operation Manual 52 IEC 62061 : 2006 Stop category acc. to EN 60204 Part 1 Standard on safety sectors for the field of machines, emerged from IEC 61508 IEC 61508 : 1998 - 2000 Stop category Stop category Stop category 0 1 2 Quick Stop Quick Stop Position related Stop SBH Position regulation at standstill Only in case of fault STO acc. to category 3 (Drive free of torque) fig. 6.1 Structure of stop categories Emergency stop In compliance with the national and European foreword to EN 60204-1 electrical operating means may also be used for emergency stop facilities, if these e. g. fulfil the standards EN 954-1 and/or IEC 61508. The "STO" function can therefore be used for emergency stop functions. Note: The term "Emergency Stop Facility" was replaced by the new term "Action in Case of Emergency". The term "Emergency Stop" was replaced by "Stopping in Case of Emergency (Emergency Stop)", see paragraph 9.2.5.4.2 in EN60204-1. EN 954-1 : 1996 / EN ISO 13849-1 : 1999 Safety of machines, safety related parts of controls. The standard EN ISO 13849 emerged from EN954-1, supplemented by the aspects of quality management and reliability. Note: EN954-1 : 1996 is still valid until the end of october 2009, or will then be replaced by EN ISO 13849-1 : 1999. International basic safety standard describing the status of safety technology in all its aspects. EN 61800-5-1 : 2003 Electrical drives with variable speed. Part 5-1: Requirements concerning electrical, thermal and function safety. EUC (equipment-under-control) EUC - Operating equipment: A system, that responds to the input signals from the process and/or a user and generates output signals, which enable the EUC to work as desired. EUC - Equipment: Equipment, machine, apparatus or plant used for the manufacture, production and processing, transportation, medical or other activities. EUC - risk: Risk resulting from the EUC or its interaction with the EUC operating equipment. Safety function Function performed by an E / E / PE safety related system, a safety related system of other technology or external facilities for risk minimization, with the goal of reaching and maintaining a safe state for the EUC, under due consideration of a particularly undesired result. Validation Confirmation that the special requirements for a certain purpose of use are fulfilled by examination and the issuing of objective evidence. Validation describes the activity to proof that the examined safety related system meets the specified safety requirements of the safety related system in every respect, before or after the installation. Positive opening operation of a contact element 6.2.1 Description of function Symbol for positive opening operation acc. to EN 60947-5-1 appendix K The servo controller SO8000 supports the safety function "STO" (Safe Torque Off), acc. to the requirements of EN 954-1 "Category 3", EN ISO 13849-1 "PL d" and EN 61508 / EN 62061 "SIL2". In case of a positive opening operation of a contact element, the contact separation is achieved as a direct result of a certain movement of the actuating element caused by non-elastic links (no spring). Safety circuit A safety circuit is designed with two channels and has been approved by accredited testing bodies on the basis of the standards. There is a large number of manufacturers offering a vast variety of safety circuits for various applications. Interlocked separating protective devices An interlocked separating protective device (EN 1088, paragraph 3.2) is a separating protective device working in connection with an interlocking mechanism. The interlocked separating protective device with tumbler is described in EN 1088, paragraph 3.3. Tumbler lock A tumbler lock (EN 1088, paragraph 3.4) is a device with the function of holding a separating protective device closed, until the risk of injuring has been eliminated. The safety function "STO" acc. to EN954-1 describes a safety measure in form of an interlocking and control function. Category 3 means that this safety function will remain in place in case a single fault occurs. The safety relevant parts must be designed in a way that: •• an isolated fault in any of these parts does not result in the loss of the safety function, and •• the isolated fault will be detected, whenever reasonably possible. For the "STO" function the servo controllers are equipped with additional logic circuits and a feedback contact. The logic interrupts the power supply to the pulse amplifiers used to trigger the power output stage. In combination with the controller release "ENPO" the system uses two channels to prevent the motor creating a torque. In comparison with the solution with a motor contactor this variant offers the following advantages: •• Abandonment of the external motor contactor •• Resulting in less wiring work •• Space saving •• Better EMC-compatibility due to the continuous shielding of the motor lead. •• Shorter reaction time ServoOne Operation Manual [ STO ] 53 ServoOne Operation Manual 54 6.2.2 Notes on safety 6.2.3 Overview of "STO" connections Always formulate a validation plan. The plan specifies which tests and analyses were used by you to determine compliance of the solution with the requirements of the application. ServoOne offers a separate input for the "STO" request, a facility to deactivate the restart inhibit and a separate relay contact for feedback. Danger: •• If the servo controller is in "STO" state all motor and mains lines, brake resistors and d.c.-circuit voltage lines conduct dangerous voltages against PE-conductors. •• With the function "STO" no "shut-down of voltage in case of emergency" is possible without additional measures. There is no metallic isolation between motor and servo controller! There is therefore a risk of electric shock or other risks of electric origin. Danger: •• If an external effect of forces can be expected in safety function "STO", e.g. with suspended load, this motion must be reliably prevented by additional measures, e.g. by a mechanical brakes, safety bolts or clamping device with brake. •• By two short circuits each in two offset branches of the power circuit a short-term movement of the axis can be triggered, dependent on the number of poles of the motor. Example synchronous motor: With a 6-pole synchronous motor the movement may be max. 30°. With a direct driven ball screw, e.g. 20 mm per revolution, this corresponds with a single linear movement of 1.67 mm. Example asynchronous motor: Since the exciting field collapses when reverse biasing the inverter and has fully decayed after approx. 1 second, the short circuits in two offset branches of the power section have almost no effect. Note: The safety circuitry connected to the ServoOne should be designed in such a way, that in case of a loss of electric supply the safe state of the machine can be reached or maintained. Des. Term. Specification P.-isolation Digital inputs ENPO (STO) X4/10 • Request input STO = low level • Deactivation of the restart inhibit and release of power stage = high-level • Frequency range < 500 Hz • Reaction time approx. 10 ms • Switching level low/high: <4.8 V / >18 V • for 24 V typ. 3 mA Yes STO "Safe Torque Off" ISDSH (STO) RSH RSH X4/22 X4/11 X4/12 • Request input STO = low level • Frequency range < 500 Hz • Switching level low/high: <4.8 V / >18 V • for 24 V typically 3 mA Diagnose STO, both tripping channels active, one normally open contact with automatically resetting circuit breaker (polyswitch) • 25 V / 200 mA AC, cos φ = 1 • 30 V / 200 mA DC, cos φ = 1 X4/12 X4/11 X4 Yes Yes Auxiliary supply + 24 V X4/2 X4/14 • Auxiliary supply to feed the digital control inputs • UV = 24 V DC, no delay in case of short circuit (+24 V -> GND), however, short-term shut-down of device possible. • Imax = 50 mA (per pin) with automatically resetting circuit breaker (polyswitch) - Digital ground DGND X4/1 X4/13 Reference ground for 24 V, with automatically resetting circuit breaker (polyswitch) Table 6.2 Terminal assignment X4 - REL 24 12 REL 23 11 RSH RSH ISDSH 22 10 ENPO ISD06 21 9 OSD02 ISD05 20 8 OSD01 ISD04 19 7 OSD00 ISD03 18 6 ISA1- ISD02 17 5 ISA1+ ISD01 16 4 ISA0- ISD00 15 3 ISA0+ +24V 14 2 +24V DGND 13 1 DGND Digital ground and auxiliary voltage are outputs. The feed for the 24 V auxiliary voltage is accomplished through terminal X9 and X10. Note: In case of a spatially isolated installation of switch and drive controller one must make sure that the leads from closed contact 1 to ENPO (STO) and from normally closed contact 2 to ISDSH (STO) are wired separately, or that possible faults are ruled out by using e.g. a protective tube. 6.2.4 Wiring and commissioning For the "STO" function the servo controllers are equipped with additional logic circuits and a feedback contact. The logic interrupts the power supply to the pulse amplifiers used to trigger the power output stage. In combination with the controller release "ENPO" the system uses two channels to prevent the motor creating a torque. In order to remove the STO safety function and to deactivate the restart inhibit, the signal ISDSH must be set to High before the signal ENPO or simultaneously with the signal ENPO. ENPO ISDSH STO Restart inhibit Network 3 X4 ENPO 10 Channel 1 L L H3) H3) (L) H 12 RSH 2) (L) H 2) 22 ON Output stage locked via two channels High OFF OFF Power stage at standby. Low OFF OFF Power stage at standby. Low H (H) L ON ON Output stage locked via two channels High (H) L H OFF ON Output stage locked via one channel Low (L) H H OFF OFF Power stage at standby. Low Channel 2 2 (24 V+) 3 M 3~ RSH1) ON 11 ISDSH Controller state ( ) previous status 1) 3x10 6 switching cycle at 200mA (rest position: normally open) 2) In order to deactivate the restart inhibit the control signals must be simultaneously (ENPO max. 5 ms before ISDSH) set to High (H), or ISDSH must be reliably set to High (H) before ENPO. 3) This only applies when STO has been disabled by the process described in "2)". Table 6.3 Switching behaviour of the safety function fig. 6.2 "STO" selection of function via switch with two normally closed contacts (positively driven) Note: There is no protection against unexpected restarting after re-establishing the electric power supply in the illustrated exemplary circuitry, unless an external circuitry is used. If ENPO and ISDSH are High when reconnecting the electric power supply (see truth table), the axle may start when Autostart has been programmed. The safety feature on the machine must assure that the ServoOne (the SRP / CS) can reach and maintain the safe state of the machine. Note: The plausibility between input signals (ENPO, ISDSH) and feedback (RSH) must always be monitored. ServoOne Operation Manual [ STO ] 55 ServoOne Operation Manual 56 6.2.5 Checking the STO function 6.3.1 Notes on safety The applied control signals "ISDSH" and "ENPO" must always be checked by the operator or a superimposed control for plausibility to the feedback (RSH). Always formulate a validation plan. The plan specifies which tests and analyses were used by you to determine compliance of the solution (e.g. suggested circuitry) with the requirements of the application. The occurrence of an implausible status is a sign for a system fault (installation or servo controller). In this case the drive must be switched off and the fault rectified. ! Attention: The function "STO" (Safe Torque Off) must generally be checked for correct functionality after: You should in any case check whether •• all safety related output signals are correctly and logically generated by the input signals •• Initial commissioning •• the behaviour in case of a fault corresponds with the specified circuit categories. •• After any intervention in to the wiring of the system •• control and operating means are sufficiently dimensioned for all types of operation and environmental conditions. •• After replacing one or several appliances in the system. 6.3 Stopping acc. to stop category 1 (SS1) The following example of a circuit represents one of many possibilities which can be realized with ServoOne and an external protective circuit. For the realization of "interlocked separated Protective features" with/without tumbler there are many manufacturers, who offer a vast variety of protective circuits for various applications. The following example of a circuit is intended to demonstrate, how servo controllers are wired with a typical protective circuit. Here it is the intention to realize controlled stopping acc. to stop category 1 (SS1). After completion of analyses and tests create a validation report. This report should at least contain: •• all objects to be tested •• the reliable personnel for testing •• testing facilities (including details on calibration) and simulation instruments •• performed tests •• problems found and solutions for these problems •• results Keep the documented results in an understandable form. ! Danger: Strictly comply with the safety notes in chapters 6.2.2 and 6.2.4. 6.3.2 Information on system design Configuration Inform the user about the correct use, the capacity and the limits of safety related parts. Instruct the user about how he should maintain the capacity of safety related parts, especially if fault exclusions specified by you require special maintenance work. Note: For the determination of safety categories (STO, SS1) we have considered the following following fault exclusion. EN954-1 EN61508 EN13849-1 Sensor Category 3 SIL2 PL d - Logic Category 3 SIL2 PL d - Actor* Category 3 (STO) SIL2 PL d Stop category 0 Entire system Category 3 SIL2 PL d Stop category 1 •• Fault exclusion: Bridging within the interconnection in the control cabinet. With this system solution one achieves a solution SS1 "Safe Stop, Stop Category 1 (with monitored time)". * SO8000 •• Reason: Protected installation in control cabinet, proven technology A Table 6.4 Comparison of safety standards B S11 S12 S21 S22 X1 X2 X3 13 23 37 24 V+ RSH RSH AC DC Network 24 V DC KA A1 EN60204-1 F1 K1 K3 K2 K4 SO8000 1) ENPO Channel 1 ISDSH Channel 2 RSH ISD00 2) A2 Y1 13 23 37 START M 3~ 1) In rest position the contact (RSH) is a normally open contact. In relation to the signals in the switching diagram the contact is closed! 2) The exemplary circuitry the input ISD00 is set to "START(1)" (see page 39). fig. 6.3 Exemplary circuitry "Stopping acc. to stop category 1 (SS1)" ServoOne Operation Manual [ STO ] 57 ServoOne Operation Manual 58 A.1 Permissible current load of servo controllers 4 kHz / 45 °C Maximum permissible servo controller output current and peak current depend on the mains voltage, the motor cable length, the power stage switching frequency and the ambient temperature. With changing application related conditions, the maximum permissible ampacity of the servo controllers will also change. 8 kHz / 40 °C f T / TU Mains voltage SO82.004 4 kHz / 45 °C 230 V 4.0 A 8 kHz / 40 °C 230 V 4.0 A 12 kHz / 40 °C 230 V 3.7 A 16 kHz / 40 °C 230 V 2.7 A f T = power stage switching frequency, TU = max. ambient temperature double overload capability for 10 s Data apply for a motor cable length of ≤ 10 m. table A.1 Rated current BG1 (1 x 230 V) 12 kHz / 40 °C 16 kHz / 40 °C 8.0 A 12.0 A 16.0 A 20.0 A 24.0 A 32.0 A SO84.012 460 V 4.0 A 6.0 A 8.0 A 12.0 A 16.0 A 20.0 A 24.0 A 32.0 A 480 V 4.0 A 6.0 A 8.0 A 12.0 A 16.0 A 20.0 A 24.0 A 32.0 A 400 V 4.0 A 6.0 A 8.0 A 12.0 A 16.0 A 20.0 A 24.0 A 32.0 A 460 V 4.0 A 6.0 A 7.2 A 10.8 A 13.9 A 17.4 A 21.0 A 28.0 A 480 V 4.0 A 6.0 A 6.9 A 10.4 A 13.3 A 16.6 A 20.0 A 26.7 A 400 V 3.7 A 5.5 A 6.7 A 10.0 A 11.0 A 13.8 A 15.8 A 21.0 A 460 V 2.9 A 4.4 A 5.3 A 8.0 A 8.8 A 11.0 A 12.4 A 16.5 A 480 V 2.7 A 4.0 A 4.9 A 7.4 A 8.0 A 10.0 A 11.3 A 15.0 A 400 V 2.7 A 4.0 A 5.0 A 7.6 A 8.0 A 10.0 A 11.3 A 15.0 A 460 V 1.6 A 2.4 A 3.7 A 5.6 A 5.9 A 7.4 A 9.2 A 12.2 A 480 V 1.3 A 1.9 A 3.3 A 5.0 A 5.2 A 6.5 A 8.4 A 11.2 A f T = power stage switching frequency, TU = max. ambient temperature Double overload capability for 10 s Data apply for a motor cable length of ≤ 10 m. table A.2 Rated current BG1 to BG4 (3 x 230/400/460/480 V) ServoOne Operation Manual [ Appendix ] SO84.032 6.0 A SO84.024 4.0 A SO84.020 SO84.008 400 V Mains voltage SO84.016 SO84.006 f T / TU SO84.004 A. Appendix 59 60 A 120 A 120 A 72 A 144 A 144 A 90 A 170 A 180 A 110 A 170 A 220 A 143 A 190 A 286 A 170 A 190 A 315 A IN IMAX (at 0 Hz) IMAX (> 5 Hz) 460 V 42 A 83 A 83 A 56 A 111 A 111 A 67 A 133 A 133 A 83 A 157 A 167 A 102 A 157 A 204 A 132 A 176 A 265 A 157 A 176 A 291 A IN IMAX (at 0 Hz) IMAX (> 5 Hz) 480 V 41 A 81 A 81 A 54 A 108 A 108 A 65 A 130 A 130 A 81 A 153 A 162 A 99 A 153 A 198 A 129 A 171 A 257 A 153 A 171 A 284 A IN IMAX (at 0 Hz) IMAX (> 5 Hz) 400 V 45 A 90 A 90 A 60 A 120 A 120 A 72 A 144 A 144 A 90 A 134 A 180 A 110 A 134 A 165 A 143 A 151 A 215 A -- 1) IN IMAX (at 0 Hz) IMAX (> 5 Hz) 460 V 42 A 83 A 83 A 56 A 111 A 111 A 67 A 133 A 133 A 83 A 124 A 167 A 102 A 124 A 153 A 132 A 140 A 199 A -- 1) IN IMAX (at 0 Hz) IMAX (> 5 Hz) 41 A 81 A 81 A 54 A 108 A 108 A 65 A 130 A 130 A 81 A 121 A 162 A 99 A 121 A 149 A 129 A 136 A 194 A -- 1) 480 V IN IMAX (at 0 Hz) IMAX (> 5 Hz) f T = power stage switching frequency, TU = max. ambient temperature 1) not permitted 2) The peak current IMax is permissible for 3 s at a preload of 70 % and for 10 s at a heat sink temperature of ≤ 45 °C/ 4 kHz and ≤ 40 °C/ 8 kHz. 3) The peak current IMax is permissible for 30 s (10 s for SO84.170) at a preload of 70 %. All currents are specified as effective values. In the frequency range from 0 Hz to 5 Hz the maximum current is linearly rising. All data apply for a motor cable length of ≤ 10 m. table A.3 Rated current BG5, BG6 and BG6a 12 kHz / 40 °C 16 kHz / 40 °C 58 A 116 A 116 A 90 A 107 A 144 A 90 A 107 A 144 A 115 A 121 A 172 A -- 1) IN IMAX (at 0 Hz) IMAX (> 5 Hz) 460 V 42 A 83 A 83 A 54 A 107 A 107 A 54 A 107 A 107 A 83 A 99 A 133 A 83 A 99 A 133 A 106 A 112 A 159 A -- 1) IN IMAX (at 0 Hz) IMAX (> 5 Hz) 480 V 41 A 81 A 81 A 52 A 104 A 104 A 52 A 104 A 104 A 81 A 96 A 130 A 81 A 96 A 130 A 104 A 109 A 155 A -- 1) IN IMAX (at 0 Hz) IMAX (> 5 Hz) 400 V 42 A 84 A 84 A 42 A 84 A 84 A 42 A 84 A 84 A 72 A 86 A 115 A 72 A 86 A 115 A 92 A 97 A 138 A -- 1) IN IMAX (at 0 Hz) IMAX (> 5 Hz) 460 V 39 A 78 A 78 A 39 A 78 A 78 A 39 A 78 A 78 A 67 A 80 A 106 A 67 A 80 A 106 A 85 A 90 A 128 A -- 1) IN IMAX (at 0 Hz) IMAX (> 5 Hz) 480 V 38 A 76 A 76 A 38 A 76 A 76 A 38 A 76 A 76 A 65 A 77 A 104 A 65 A 77 A 104 A 83 A 87 A 124 A -- 1) IN IMAX (at 0 Hz) IMAX (> 5 Hz) SO84.170 3) 58 A 116 A 116 A SO84.143 3) 45 A 90 A 90 A SO84.110 3) 400 V SO84.090 3) SO84.072 2) 45 A 90 A 90 A Mains voltage SO84.170 3) SO84.143 3) SO84.110 3) SO84.090 3) SO84.072 2) SO84.060 2) 400 V SO84.060 2) 8 kHz / 40 °C f T / TU 60 SO84.045 2) 4 kHz / 45 °C SO84.045 2) f T / TU Mains voltage ServoOne Operation Manual f T = power stage switching frequency, TU = max. ambient temperature 1) not permitted 2) The peak current IMax is permissible for 3 s at a preload of 70 % and for 10 s at a heat sink temperature of ≤ 45 °C/ 4 kHz and ≤ 40 °C/ 8 kHz. 3) The peak current IMax is permissible for 30 s (10 s for SO84.170) at a preload of 70 %. All currents are specified as effective values. In the frequency range from 0 Hz to 5 Hz the maximum current is linearly rising. All data apply for a motor cable length of ≤ 10 m. table A.3 Rated current BG5, BG6 and BG6a SO84.016 SO84.012 SO84.008 SO84.006 SO84.004 Technical data SO82.004 Designation Voltage 3 x Umains Rated current, effective (IN) 4A 4A Peak current 6A 8A 12 A 16 A see table A.1.1 Rotating field frequency 0 ... 400 Hz Power stage switching frequency 1 x 230V -15 +10 % 4.7 kW at 90 Ω (PTC) 72 Ω3) 72 Ω3) 72 Ω3) SO84.016 SO84.012 SO84.008 4.7 kW at 90 Ω 39 Ω3) 39 Ω3) 20 Ω3) 1) All data related to 400 V output voltage and a switching frequency of 8 kHz, 2) Data related to 400 V mains voltage 3) Connection of an external braking resistor not permitted for devices with internal braking resistor (version SO8x.xxx.xxxx.1xxx)! 4) without power choke 5) Data referred to 3 x 480 V mains voltage (BR switch-on threshold 765 V DC) table A.4 Technical data SO82.004 to SO84.016 (3 x 230 V/ 3 x 400 V/ 3 x 460 V/ 3 x 480 V) ± 10 % Device connected load2) (with power choke) 1.6 kVA 2.8 kVA 4.2 kVA 5.9 kVA 8.8 kVA 11.1 kVA Current2) (with power choke) 9.5 A4) 4.2 A 6.4 A 8.7 A 13.1 A 17.3 A 240 W 330 W Asymmetry of the mains voltage Peak braking power with internal braking resistor (version SO84. xxx.xxxx.1xxx) 4, 8, 12, 16 kHz Input mains supply side Mains voltage Brake chopper power electronics Minimum ohmic resistance of an externally installed braking resistor5) Output motor side1) SO84.006 Technical data A.2.1 SO84.004 to SO84.016 SO84.004 Designation SO82.004 A.2 Technical data ServoOne ! Note: For further information on brake chopper switch-on threshold pleas refer to chapter 3.15.2. ± 3 % max. - 50/60 Hz ± 10 % Frequency Power dissipation at IN and 8 kHz/ 400 V 85 W 96 W 122 W 175 W 1) All data related to 400 V output voltage and a switching frequency of 8 kHz, 2) Data related to 400 V mains voltage 3) Connection of an external braking resistor not permitted for devices with internal braking resistor (version SO8x.xxx.xxxx.1xxx)! 4) without power choke 5) Data referred to 3 x 480 V mains voltage (BR switch-on threshold 765 V DC) table A.4 Technical data SO82.004 to SO84.016 ServoOne Operation Manual [ Appendix ] 61 ServoOne Operation Manual Output motor side1) Voltage 3 x Umains 20 A 24 A Peak current 32 A 45 A 60 A 72 A Current2) (with power choke) (3 x 400 V/ 3 x 460 V/ 3 x 480 V) ± 10 % 13.9 kVA 16.6 kVA 22.2 kVA 31 kVA 42 kVA 50 kVA 21.6 A 26.2 A 34.9 A 45 A 61 A 72 A 50/60 Hz ± 10 % SO84.170 SO84.143 SO84.110 4. 8 kHz (factory setting 4 kHz) 400 W 475 W 515 W 610 W Mains voltage 170 A 2) 4 kHz Device connected load (with power choke) (3 x 400 V/ 3 x 460 V/ 3 x 480 V) ± 10 % 3) Current3) (with power choke) 62 kVA 76 kVA 99 kVA 118 kVA 90 A 110 A 143 A 170 A ± 3 % max. 50/60 Hz ± 10 % Frequency 830 W 1010 W Power dissipation3) at IN 1300 W 1600 W 2100 W 2500 W 12 Ω5)) 10 Ω5)) 8.5 Ω5)) 6.5 Ω5)) Brake chopper power electronics Brake chopper power electronics Peak braking power with internal braking resistor (version SO84.xxx.xxxx.1xxx) 1) 3) 4) 5) 143 A1) 0 ... 400 Hz Asymmetry of the mains voltage ± 3 % max. Frequency Minimum ohmic resistance of an externally installed braking resistor 110 A1) Input mains supply side (3 x 230 V/ 3 x 400 V/ 3 x 460 V/ 3 x 480 V) ± 10 % Asymmetry of the mains voltage Power dissipation2) at IN 90 A1) see table A1.2 Power stage switching frequency 4, 8, 12, 16 kHz Input mains supply side Device connected load2) (with power choke) Rated current, effective (IN) Rotating field frequency 0 ... 400 Hz Power stage switching frequency 3 x Umains Peak current see tables A1.1 and A1.2 Rotating field frequency Mains voltage Technical data Output motor side1) Voltage Rated current, effective (IN) Designation SO84.090 SO84.072 SO84.060 SO84.045 SO84.032 Technical data SO84.024 Designation A.2.3 SO84.090 to SO84.170 SO84.020 A.2.2 SO84.020 to SO84.072 62 6 kW at 90 Ω - - - 12 Ω3)5) 18 Ω4) 18 Ω4) 13 Ω4) 20 Ω3)5) 12 Ω3)5) All data related to 400 V output voltage and a switching frequency of 8 kHz, 2) Data related to 400 V mains voltage Connection of an external braking resistor not permitted for devices with internal braking resistor (version SO8x.xxx.xxxx.1xxx)! BR switch-on threshold for all mains voltages = 745 V DC Data referred to 3 x 480 V mains voltage (corresponds with BR switch-on threshold 765 V DC) table A.5 Technical data SO82.020 to SO84.072 Minimum ohmic resistance of an externally installed braking resistor 1) All data related to an output voltage of 400 V and a switching frequency of 8 kHz 2) All data related to an output voltage of 400 V and a switching frequency of 4 kHz 4) Data related to 400 V mains voltage 5) Data referred to 3 x 480 V mains voltage (corresponds with BR switch-on threshold 745 V DC) table A.6 Technical data SO82.090 to SO84.170 ! Note: For further information on brake chopper switch-on threshold pleas refer to chapter 3.15.2. A.3 Ambient conditions Ambient conditions Temperature range during operation 1) -10 ... 40 °C at 8/16 kHz -10 ... 45 °C at 4 kHz to 55 °C with with reduced power in storage 1) -25 ... +55 °C during transport 1) -25 ... +70 °C Relative humidity during operation 1) Degree of protection ServoOne A.4 Using a power choke The use of power chokes is necessary: •• where the servo controller is used in applications with disturbance variables corresponding with environment class 3, as per EN 61000-2-4 and above (hostile industrial environment). •• with a d.c. link between multiple servo controllers. 15 ... 85 %, dewing not permitted Device IP202) except the terminals Cooling concept Wall mounting IP20 Accident prevention instructions according to local regulations (in Germany e.g. BGV A3) Mounting height up to 1000 m above seal level, higher than 1000 m above sea level with reduced power 1% per 100 m, max. 2000 m above sea level Pollution severity 2 Type of installation Built-in device, only for installation in control cabinet with degree of protection min. IP4x 1) Further information, see "ServoOne Project Planning Guide" 2) The terminals meet the requirements of degree of protection IP00. table A.7 Ambient conditions ServoOne ! ! Attention: According to EN ISO 13849-2 the control cabinet must have degree of protection IP54 or higher when using the safety function STO (Safe Torque OFF). Attention: The drive controllers must not be installed in areas where they would be permanently exposed to vibrations. ServoOne Operation Manual [ Appendix ] 63 ServoOne Operation Manual A.5 Line filter Details concerning the subject "Electromagnetic Compatibility" can be found in chapter "3.3 EMC-compatible installation". The following table shows the permissible motor cable lengths in accordance with the standard EN 61800-3. The list contains only devices with internal radio interference suppression filter. Drive controller 4 kHz Power stage cycle frequency 8 kHz Power stage cycle frequency 12 kHz Power stage cycle frequency 16 kHz Power stage cycle frequency Category Drive controller 4 kHz Power stage cycle frequency C3 C2 C3 C2 C3 C2 C3 C2 25 m 10 m 25 m 10 m 25 m 10 m 25 m 10 m 2)3) 25 m 10 m 25 m 10 m 25 m 10 m 25 m 10 m SO84.110 2)3) 25 m 10 m 25 m 10 m 25 m 10 m 25 m 10 m SO84.143 2)3) 25 m 10 m 25 m 10 m 25 m 10 m 25 m 10 m SO84.170 2)3) 25 m 10 m 25 m 10 m 25 m 10 m 25 m 10 m SO84.072 SO84.090 C3 = "Second environment" (industrial area) C2 = "First environment" (living area) 1) Please note that the motor shield connection is not on the shield plate, but directly at the device terminals. 2) For compliance with the standard power chokes (uK = 4 % to 32 A / uK = 2 % at 45 to 170 A) must be used 3) Compliance with the standard is only possible when using an external filter (no internal filter present) C3 C2 C3 C2 C3 C2 SO84.0041) 40 m 20 m 40 m 15 m 40 m 10 m 40 m 8m SO84.006 40 m 20 m 40 m 15 m 40 m 10 m 40 m 8m 1) SO84.008 40 m 20 m 40 m 15 m 40 m 10 m 40 m 10 m SO84.0121) 40 m 20 m 40 m 15 m 40 m 10 m 40 m 10 m SO84.0161) 40 m 10 m 40 m 10 m 40 m 10 m 40 m 10 m SO84.0201) 40 m 10 m 40 m 10 m 40 m 10 m 40 m 10 m Explanation to the table 1) SO84.024 40 m 10 m 40 m 10 m 40 m 10 m 40 m 10 m Living area: SO84.0321) 40 m 10 m 40 m 10 m 40 m 10 m 40 m 10 m SO84.045 2) 25 m 10 m 25 m 10 m 25 m 10 m 25 m 10 m SO84.060 2) 25 m 10 m 25 m 10 m 25 m 10 m 25 m 10 m table A.8 Permissible motor cable lengths in [m] 16 kHz Power stage cycle frequency 2) C2 C3 = "Second environment" (industrial area) C2 = "First environment" (living area) 1) Please note that the motor shield connection is not on the shield plate, but directly at the device terminals. 2) For compliance with the standard power chokes (uK = 4 % to 32 A / uK = 2 % at 45 to 170 A) must be used 3) Compliance with the standard is only possible when using an external filter (no internal filter present) 12 kHz Power stage cycle frequency Category C3 1) 8 kHz Power stage cycle frequency 64 table A.8 Permissible motor cable lengths in [m] Limit values acc. to EN61800-3 (first environment C2), limited availability. Maximum permissible motor cable length at which the emitted interference (≥ 9 kHz) is below the permitted limit values. Industrial area: Limit values acc. to EN 61800-3 (second environment C3), limited availability. Maximum permissible motor cable length at which the emitted interference (≥ 9 kHz) is below the permitted limit values. A.6 UL-approval A.6.1 Measures to comply with the UL-approbation (UL 508C) BG1 to BG4 Size 1. The devices must only be operated on networks of overvoltage category III. 2. The devices can be used in networks with a maximum possible current of 5 kA with phase symmetric current and a max. voltage of 480 V with network fusing acc. to table A.9. 3. The devices are designed for installation in environments with pollution severity 2. 4. The integrated back-up fuse does not serve as protective device for branch lines. The protective device for branch lines must be designed according to the instructions of the manufacturer, the NEC regulations (National Electrical Code) and other locally valid standards. 5. Only UL-qualified device connecting cables (mains, motor and control cables) must be used: –– Use copper cables with a temperature resistance of min.75 °C. –– The specified tightening torques for terminals. see table A.9. BG1 BG2 BG3 BG4 Tightening torTightening torque ques for control for mains and motor terminals X5, X9, terminals X11 X12 X10, X13 Mains fuse / Class SO82.004 0.56 - 0.79 Nm 0.56 - 0.79 Nm 1 x 20 A / K5 SO84.004 0.56 - 0.79 Nm 0.56 - 0.79 Nm 3 x 10 A / K5 SO84.006 0.56 - 0.79 Nm 0.56 - 0.79 Nm 3 x 15 A / K5 SO84.008 0.56 - 0.79 Nm 0.56 - 0.79 Nm 3 x 20 A / RK5 SO84.012 0.56 - 0.79 Nm 0.56 - 0.79 Nm 3 x 25 A / RK5 SO84.016 1.7 Nm 0.56 - 0.79 Nm 3 x 30 A / RK5 SO84.020 1.7 Nm 0.56 - 0.79 Nm 3 x 40 A / RK5 SO84.024 1.7 Nm 0.56 - 0.79 Nm 3 x 50 A / K5 SO84.032 1.7 Nm 0.56 - 0.79 Nm 3 x 60 A / K5 Device table A.9 Tightening torques and mains fuse BG1 to BG4 6. Maximum temperature of ambient air (surrounding temperature): see tables A.7. ServoOne Operation Manual [ Appendix ] 65 ServoOne Operation Manual A.6.2 Measures to comply with the UL-approbation (UL 508C) for BG 5, 6 and 6a 1. The devices must only be operated on networks of overvoltage category III. 66 Tightening torques, cable cross-sections and mains fuses Size Device Tightening torque for Cable cross section Mains fuse / PE-conductors and mains for motor and mains Class RK 1 terminals terminals 2. The devices can be used in networks with a maximum possible current of 10 kA with phase symmetric current and a max. voltage of 480 V. SO84.024 2.5 Nm / 22 lb-in AWG 10 3 x 50 A 3. The devices are designed for installation in environments with pollution severity 2. SO84.032 2.5 Nm / 22 lb-in AWG 8 3 x 50 A SO84.045 2.5 Nm / 22 lb-in AWG 6 3 x 50 A SO84.060 2.5 Nm / 22 lb-in AWG 6 3 x 80 A 2.5 Nm / 22 lb-in AWG 4 3 x 80 A 4. The integrated back-up fuse does not serve as protective device for branch lines. The protective device for branch lines must be designed according to the instructions of the manufacturer, the NEC regulations (National Electrical Code) and other locally valid standards. 5. Only UL-approved circuit breakers and fuses of class RK1 may be used. For details on the fuse rating see table A.10. BG5 SO84.072 BG6 6. The overload protection inside the device must permit twice the rated device current for min. 3 seconds. 7. Only UL-qualified device connecting cables (mains, motor and control cables) must be used: –– Use copper cables with a temperature resistance of 60 to 75 °C. –– Table A.10 shows the suitable tightening torques for the terminals 8. If the device is to be operated with an enclosed external braking resistor, this resistor must be separately protected against excessive temperatures. 9. Maximum temperature of ambient air (surrounding temperature): see tables A.7. BG6a SO84.090 6 ... 8 Nm / 53 ... 71 lb-in AWG 2 3 x 125 A 1) 6 ... 8 Nm / 53 ... 71 lb-in AWG 1 3 x 160 A SO84.143 1) 6 ... 8 Nm / 53 ... 71 lb-in AWG 1/0 3 x 200 A SO84.170 1) 15 ... 20 Nm / 133 ... 177 lb-in AWG 2/0 3 x 224 A SO84.110 1) 1) Under preparation table A.10 Tightening torques, cable cross-sections and mains fuse BG5, BG6, BG6a Glossary Symbole 7-segment display D1 / D2......................................................................32 A Ambient conditions.................................................................................63 Assembly spacing....................................................................................10 Assignment motor/encoder cable............................................................24 B Basic setting............................................................................................44 Braking resistor, integrated......................................................................29 C Calculation of continuous braking power................................................30 CANopen................................................................................................24 Communication with the DriveManager 5...............................................35 Connected load and mains fuse..............................................................20 Connection BG1 to BG4.........................................................................11 Connection BG5 to BG6a........................................................................13 Connection for high resolution encoders.................................................26 Connection of control supply..................................................................18 Connection of mains supply....................................................................19 Connection overview BG1 to BG4...........................................................12 Connections on control terminal X4 STO.................................................54 Control connections................................................................................21 Control terminals, standard assignment..................................................43 Control window mask.............................................................................36 D Danger analysis and risk assessment........................................................51 Device connected load............................................................................61, 62 Device states...........................................................................................47 Diagnose................................................................................................47 Diagnose DriveManager 5.......................................................................45 Dimensions.............................................................................................10 DriveManager 5, creating a project.........................................................36 E Electrical isolation concept......................................................................17 Electrical specification of the interface X7...............................................26 EMC compatible installation....................................................................15 Emergency stop......................................................................................52 Encoder cables, prefabricated.................................................................24 Encoder connection................................................................................38 Encoder setting.......................................................................................24 EnDat 2.1...............................................................................................48 Error list, excerpt.....................................................................................24 EtherCAT................................................................................................23 EUC (equipment-under-control)..............................................................52 F Feather key.............................................................................................41 H Helpline /Service......................................................................................49 Homing mode.........................................................................................44 How to use this manual..........................................................................3 ServoOne Operation Manual [ Index ] 67 ServoOne Operation Manual I P Id.-No.:1100.00B.1-00............................................................................2 Illustration of dimensions........................................................................10 Initial commissioning...............................................................................33 Intended use...........................................................................................20 Interlocked separating protective devices................................................53 Parameterization and setting...................................................................37 Permissible current load of servo regulators.............................................59 PE-terminal.............................................................................................16 Pictograms..............................................................................................4 Pollution severity.....................................................................................63 Position plan BG1 to BG4........................................................................11 Position plan BG5...................................................................................13 Position plan BG6...................................................................................13 Positive opening operation of a contact element.....................................53 PROFIBUS................................................................................................24 Project planning and installation.............................................................16 Protective Extra Low Voltage (PELV).........................................................17 J Jog mode................................................................................................44 K Keys T1 and T2.......................................................................................32 L Line filter................................................................................................64 Loading/saving a motor dataset..............................................................38 M Mains supply (230 V/400 V/460 V/480 V)................................................19 Measures for your safety.........................................................................7 MMC-Slot, Spezification.........................................................................23 Motor cables, prefabricated....................................................................28 Motor connection...................................................................................27 O Operation Manual...................................................................................2 Option 1 (communication)......................................................................24 Option 2 (additional encoder).................................................................24 Ordering key...........................................................................................37 Overview of “STO” connections..............................................................54 Q Quick start..............................................................................................3 R Rated current BG1 to BG4......................................................................59 Rated current BG5, BG6 and BG6a.........................................................60 Referencing............................................................................................44 Resolver connection................................................................................8 Responsibility..........................................................................................45 “Reverse mode”.....................................................................................45 S Safe Torque Off (STO).............................................................................51 Safety. 7 Safety circuit...........................................................................................53 Safety Extra Low Voltage (SELV)..............................................................17 Safety notes in DriveManager.................................................................43 Save the setting......................................................................................40 68 ServoOne Operation Manual SERCOS II................................................................................................24 Setting the motor...................................................................................38 Setting the power stage..........................................................................37 Shaft end................................................................................................41 Specification of control connections........................................................21 SS1:Safe Stop 1......................................................................................51 Standard mode.......................................................................................44 Standard terminal assignment.................................................................55 Status display on the device....................................................................46 STO, description of function....................................................................53 Stop categories acc. to EN60204-1.........................................................51 Stop categories, structure.......................................................................52 Stopping acc. to stop category 1 (SS1)....................................................56 STO wiring and commissioning...............................................................55 Subject to technical modifications...........................................................33 System design SS1..................................................................................57 T Technical data.........................................................................................61 Temperature range..................................................................................63 Terminal diagram BG5 to BG6a...............................................................14 Test run...................................................................................................41 TN-network............................................................................................20 U USB 1.1 specification..............................................................................23 V Variants of motors, encoder type and encoder line..................................25 W Wall mounting........................................................................................9 Wiring or components............................................................................34 69 ServoOne Operation Manual 70 LTi DRiVES GmbH Technical alterations reserved. Gewerbestraße 5-9 35633 Lahnau Germany Fon +49 (0) 6441/ 96 6-0 FAX +49 (0) 6441/ 96 6-137 The contents of our documentation have been compiled with greatest care and in compliance with our present status of information. Heinrich-Hertz-Straße 18 59423 Unna Germany Fon +49 (0) 2303/ 77 9-0 FAX +49 (0) 2303/ 77 9-397 www.lt-i.com [email protected] Nevertheless we would like to point out that this document cannot always be updated parallel to the technical further development of our products. Information and specifications may be changed at any time. For information on the latest version please refer to www.lt-i.com. Id. No.: 1100.00B.3-01 • 01/2009