Transcript
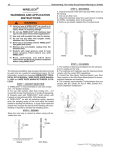
CROSBY® SPELTER BUTTON SB-427B
APPLICATION INSTRUCTIONS
Reuse Of Crosby® Spelter Buttons
The following are general guidelines for the reuse of a
Crosby® SB-427B Button. The use and inspection of used
buttons are the responsibility of the user.
Procedure For Removing Spelter Cone
• Cut the rope close (½”) to the nose end of the button
and press the cone out of the button.
Scope
This procedure is provided to give instructions for installation
of wire rope into the Crosby® SB-427B Spelter Button using
WIRELOCK® socketing material, or zinc socketing material.
Additionally, instructions regarding the reuse of spelter
buttons are included. The spelter button is part of a socket
assembly that includes a socket basket, pin, cotter pin and
button. If there are any questions regarding these instructions,
please contact The Crosby Group LLC at (918) 834-4611 and
request technical assistance.
NOTE: Many high performance ropes require special
attention to prevent rope damage during cutting, seizing and
brooming in preparation for the speltering operation. Attention
to the special instructions is required to ensure proper
termination efficiency. Consult rope manufacturer for
specific details.
Installation
Install button on the rope so that the live end of the rope
extends out of small inside diameter of the button. Broomed
end of rope should be pulled into button and placed
completely to the “MAX FILL” line marked on the button to
ensure correct length of engagement with socketing material.
Socketing using WIRELOCK® Resin Material
Seizing, cleaning, brooming and preparation of wire rope and
pouring of WIRELOCK® is to be carried out per instructions
provided in the Wire Rope End Terminations User’s Manual,
and WIRELOCK® Warnings and Application Instructions
located on the WIRELOCK® Product or in the Crosby General
Catalog.
Socketing Using Zinc Spelter Material
Seizing, cleaning, brooming and preparation of the wire
rope, and pouring of zinc is to be carried out in accordance
with recommendations of the Wire Rope User’s Manual, 4th
Edition, or other approved procedures.
Note: Before operation of the wire rope assembly, it is
recommended that all poured sockets, whether with zinc or
resin, be proof loaded to seat the cone.
• For metallurgical, medical and environmental reasons,
we do not recommend the use of heat to remove the
spelter cone.
• However, if this is the only means available for removing the zinc cone, care should be taken not to exceed 850˚F (450˚C) surface temperature. The preferred method would be a slow heat in a temperature controlled oven. If a torch (rosebud) is used, the heated area shall be monitored with a Tempil stick or a temperature indicator to prevent localized heating from exceeding the 850˚F (450˚C) limit.
• To remove a WIRELOCK® cone, heat the surface of the button to 350˚F (177˚C) (do not exceed the 850
˚F (450˚C) limit for any localized hot spot). Leave for 5-10 minutes, then drive the cone out with a hammer and drift.
Selection Of Buttons For Reuse
• Use only buttons that:
• Do not show discoloration from excessive heating.
• Do not show any signs of welding.
• Select only buttons that have been cleaned and have passed a Magnetic Particle Inspection by a qualified technician (level II ASNT-SNT-TC-1A-88) per ASTM E709. Acceptance criteria shall be per ASTM E125, Types II-VIII, Degree 1. No cracks are acceptable.
• Select only buttons that do not show any signs of overloading or wear.
•
Select buttons that are free from nicks, gouges an abrasions. Indications may be repaired by lightly grinding until surfaces are smooth, provided they do not reduce the dimensions by more then 10% of the nominal catalog dimension.
• Select buttons that are not distorted, bent or deformed.
NOTE: Buttons having any of the indications as outlined
above shall not be reused.
Copyright © 2013 The Crosby Group LLC
All Rights Reserved
55