1
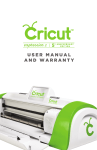
Meijer.com
™
User Manual
Manuel d’Utilisateur
Meijer.com
Meijer.com
™
Welcome to Cricut Expression™ !
The Cricut Expression™ is the latest addition to the revolutionary Cricut™ cutting
system. This cartridge-based system does not require a personal computer and
allows you to cut thousands of intricate and detailed characters as small as 0.25” (0.62
cm) and as large as 23.5” (59.69 cm) with just the touch of a button. Cricut Expression
works with paper sizes up to 12” x 12” (30.48 cm x 30.48 cm) and 12” x 24” (30.48 cm x
60.96 cm), significantly expanding your creative capabilities. This impressive machine
is also compatible with all of the existing Cricut cartridges. Creative Features built into
every Cricut™ cartridge allow you to add special effects to characters. There are literally thousands of custom combinations you can use to make each project uniquely
your own.
Trademarks: Any trademarks, indicated or otherwise, are used only in an editorial
fashion and to the benefit of the trademark owner, with no intention of infringement
of the trademark.
Before activating your 30 days of free customer service, we recommend that you
spend at least an hour getting acquainted with your Cricut Expression™ cutting
system. The Cricut Expression™ User Manual has been prepared to help you become
familiar with the Cricut Expression™ machine and answer most questions you may
have. For the most up-to-date information, FAQs, and tips, visit www.cricut.com.
ENGLISH Contents
License Agreement............................................................................................................... 5
Unpack Your Box.................................................................................................................... 7
The Cricut Expression™ 24” Personal Electronic Cutter™............................................... 8
Installing the Cutting Blade Assembly............................................................. 9
Positioning Your Cricut Expression™ Machine............................................... 9
What Your Cricut Expression™ Machine Can Cut........................................ 10
Basic Operations.................................................................................................................. 10
Setup.................................................................................................................... 10
Loading Paper.....................................................................................................11
Place Paper on Cutting Mat............................................................................11
Load Cutting Mat into Machine..................................................................... 12
Choosing Your Characters............................................................................... 12
Basic Keys and Buttons You Should Know..................................................... 12
STOP..................................................................................................................... 12
CUT....................................................................................................................... 12
Blade Navigation Buttons................................................................................ 12
Shift...................................................................................................................... 12
Shift Lock............................................................................................................. 12
Space.................................................................................................................. 13
Back Space........................................................................................................ 13
Clear Display...................................................................................................... 13
Reset All............................................................................................................... 13
Repeat Last........................................................................................................ 13
Sound On/Off..................................................................................................... 13
Load Paper......................................................................................................... 13
Unload Paper..................................................................................................... 13
Set Paper Size..................................................................................................... 13
Load Last............................................................................................................. 13
Paper Saver........................................................................................................ 13
Cutting Characters............................................................................................ 14
Size Dial............................................................................................................... 14
Cutting Your Selections.................................................................................... 14
Removing Your Characters from the Cutting Mat....................................... 14
Advanced Operations........................................................................................................ 15
Creative Feature Keys....................................................................................... 15
Shadow Feature................................................................................................ 15
Advanced Keys and Buttons............................................................................ 15
Blade Navigation Buttons................................................................................ 15
Left and Right Arrow Buttons........................................................................... 15
OK Button............................................................................................................ 15
Modes on the Cricut Expression™ Machine................................................... 16
Portrait................................................................................................................. 16
Mix ’n Match....................................................................................................... 16
Quantity.............................................................................................................. 17
Fit to Page........................................................................................................... 17
Fit to Length........................................................................................................ 17
Auto Fill................................................................................................................ 18
Functions on the Cricut Expression™ Machine.............................................. 18
Multi Cut.............................................................................................................. 18
Center Point........................................................................................................ 18
Line Return.......................................................................................................... 19
Flip........................................................................................................................ 19
Settings................................................................................................................ 19
Mat Size............................................................................................................... 20
Xtra Buttons......................................................................................................... 20
Sizing.................................................................................................................... 20
Real Dial Size...................................................................................................... 20
Cutting on Lightweight or Heavyweight Materials...................................... 20
Adjusting Blade Depth..................................................................................... 20
Speed Dial.......................................................................................................... 21
Pressure Dial....................................................................................................... 21
Basic Care............................................................................................................................. 21
Blade Life............................................................................................................. 21
Replacing the Cutting Blade........................................................................... 21
Caring for the Cutting Mat............................................................................... 22
Cleaning Your Cricut Expression™ Machine................................................ 22
Frequently Asked Questions.............................................................................................. 23
Troubleshooting.................................................................................................................... 24
Meijer.com
Cricut Expression™ 24” Personal Electronic Cutter™
End User License Agreement
Meijer.com
PROVO CRAFT AND NOVELTY, INC. (“PROVO CRAFT”) IS WILLING TO LICENSE THE
HARDWARE, CARTRIDGES, FIRMWARE, AND SOFTWARE OF THE CRICUT EXPRESSION™
24” PERSONAL ELECTRONIC CUTTER™ (“CRICUT EXPRESSION”) TO YOU ONLY UPON
THE CONDITION THAT YOU ACCEPT ALL OF THE TERMS CONTAINED IN THIS END USER
LICENSE AGREEMENT (“AGREEMENT”). PLEASE READ THE AGREEMENT CAREFULLY. BY
USING CRICUT EXPRESSION™ OR ANY OF ITS ASSOCIATED COMPONENTS, YOU ACCEPT THE TERMS OF THE AGREEMENT. IF YOU ARE NOT WILLING TO BE BOUND BY ALL
THE TERMS OF THIS AGREEMENT, YOU MAY NOT USE CRICUT EXPRESSION™ AND YOU
SHOULD PROMPTLY CONTACT PROVO CRAFT FOR INSTRUCTIONS ON RETURN OF THE
UNUSED PRODUCT(S).
1. DEFINITIONS. “Software” means any machine readable materials (including, but not
limited to, source code, compiled code, algorithms, libraries, source files, header files,
and data files), any updates or error corrections provided by PROVO CRAFT, and any
user or owner manuals, programming guides, and other documentation provided to
you by PROVO CRAFT under this AGREEMENT. “Firmware” means any encoded information provided on any chip or microprocessor of CRICUT EXPRESSION including, but
not limited to, source code, compiled code, algorithms, libraries, source files, header
files, and data files, and any updates or error corrections provided by PROVO CRAFT.
“Hardware” means any physical component that is part of or sold with CRICUT EXPRESSION, including but not limited to Cricut™ cartridges used with CRICUT EXPRESSION
that contain images or fonts. “Documentation” means any documents provided with
CRICUT EXPRESSION when purchased, including but not limited to the User Manual.
2. LICENSE TO USE. Subject to the terms and conditions of this AGREEMENT, PROVO
CRAFT grants you a non-exclusive, non-transferable, limited license without license fees
to use CRICUT EXPRESSION and any associated software, firmware, and hardware.
3. RESTRICTIONS. Software and firmware are confidential and copyrighted. Title to
software, firmware, and hardware and all associated intellectual property rights is
retained by PROVO CRAFT. Unless enforcement is prohibited by applicable law, you
may not modify, decompile, disassemble, reverse engineer, distribute, or copy software, firmware, or hardware. You may not, whether for your own use or benefit or for
the use or benefit of another, except as expressly provided herein, reproduce, copy, or
publish, or permit the reproduction, copying, or publication of, any physical, mechanical, electrical, or electronic medium that is associated with the CRICUT EXPRESSION,
including any firmware, software, and documentation, except as expressly provided
herein. No right, title, or interest in or to any trademark, service mark, logo, or trade
name of PROVO CRAFT or its licensors is granted under this AGREEMENT.
4. TRANSFER. You may permanently transfer all of your rights under this AGREEMENT only
as part of a sale or transfer of the CRICUT EXPRESSION, provided you retain no copies
of any part or component of the CRICUT EXPRESSION, you transfer all of the CRICUT
EXPRESSION (including all component parts, hardware, software and upgrades thereof,
and documentation), and the recipient agrees to the terms of this AGREEMENT.
ENGLISH 5
Meijer.com
5. LIMITED WARRANTIES. This AGREEMENT is subject to and hereby incorporates the CRICUT EXPRESSION™ 24” Personal Electronic Cutter Statement of Limited Warranty and
Cricut™ Font and/or Shape Cartridge Statement of Limited Warranty.
6. TERMINATION. This AGREEMENT is effective until terminated. This AGREEMENT will terminate immediately without notice from PROVO CRAFT if you fail to comply with any provision of this AGREEMENT. Either party may terminate this AGREEMENT immediately should
any of the software, firmware, or hardware become, or in either party’s opinion be likely
to become, the subject of a claim of infringement of any intellectual property right.
7. EXPORT REGULATIONS. All software, firmware, and technical data delivered under
this AGREEMENT are subject to U.S. export control laws and may be subject to export
or import regulations in other countries. You agree to comply strictly with all such laws
and regulations and acknowledge that you have the responsibility to obtain such
licenses to export, re-export, or import as may be required after delivery to you.
8. TRADEMARKS AND LOGOS. You acknowledge and agree as between you and
PROVO CRAFT that PROVO CRAFT owns the CRICUT EXPRESSION and PROVO CRAFT
trademarks and all CRICUT EXPRESSION and PROVO CRAFT-related trademarks, service marks, logos, and other brand designations (“PROVO CRAFT marks”). You shall not
use the PROVO CRAFT marks for any purpose without the express written consent of
PROVO CRAFT. Any such authorized use of the PROVO CRAFT marks inures to PROVO
CRAFT’s benefit.
9. U.S. GOVERNMENT RESTRICTED RIGHTS. If software is being acquired by or on behalf
of the U.S. government or by a U.S. government prime contractor or subcontractor (at
any tier), then the government’s rights in software and accompanying documentation
will be only as set forth in this AGREEMENT; this is in accordance with 48 CFR 227.7201
through 227.7202-4 (for Department of Defense [DOD] acquisitions) and with 48 CFR
2.101 and 12.212 (for non-DOD acquisitions).
10. GOVERNING LAW. Any action related to this AGREEMENT will be governed by Utah
law and controlling U.S. federal law. No choice of law rules of any jurisdiction will apply.
11. SEVERABILITY. If any provision of this AGREEMENT is held to be unenforceable, this
AGREEMENT will remain in effect with the provision omitted, unless omission would
frustrate the intent of the parties, in which case this AGREEMENT will immediately
terminate.
12. INTEGRATION. This AGREEMENT is the entire AGREEMENT between you and PROVO
CRAFT relating to its subject matter. It supersedes all prior or contemporaneous oral or
written communications, proposals, representations, and warranties, and prevails over
any conflicting or additional terms of any quote, order, acknowledgment, or other
communication between the parties relating to its subject matter during the term of
this AGREEMENT. No modification of this AGREEMENT will be binding, unless in writing
and signed by an authorized representative of each party.
ENGLISH
Unpack Your Box
Meijer.com
Your box should contain the following:
1. Cricut Expression™ machine
2. User Manual
3. Plantin SchoolBook™ font cartridge, cartridge binder, keypad overlay,
and handbook
4. Blade assembly
5. 12” x 12” (30.48 cm x 30.48 cm) cutting mat
6. Quick Start Guide
7. Power adapter
1
2
3
4
6
5
7
ENGLISH The Cricut Expression™ 24” Personal Electronic Cutter™
Meijer.com
The illustration below will help you become familiar with your Cricut Expression™
machine. All the buttons, keys, and components shown will be described in more
detail later on.
CUT Button
Blade Navigation
Buttons
On Button
Keypad
STOP Button
Display Screen
Speed Dial
Pressure Dial
Roller Bar
Size Dial
Door
Cartridge
WARNING! Disconnect electrical power before servicing or cleaning. DO NOT place
your fingers or other objects in the Cricut Expression™ machine while connected to
electrical power, powered on, or during cutting operations. Rapid movements of the
cutting carriage during operation may cause bodily injury and/or damage to the
Cricut Expression machine.
ENGLISH
Installing the Cutting Blade Assembly
Meijer.com
Please note that the Cricut Expression™ machine’s cutting blade assembly is
located in the bottom of your box, separate from the machine. Before you turn the
machine on, you will need to insert the blade assembly. To do this, follow these
simple instructions:
1. Open the doors on the Cricut Expression
machine and remove the cardboard inserts
from either side of the carriage.
2. Remove the green cutting blade assembly
from its bag. Make sure the black arrow on the
blade assembly points to the number 4 on the
adjustment knob, and ensure that the cutting
blade has been inserted into the assembly with
the sharp end pointing down.
3. The blade assembly fits into the black cradle
to the left of the carriage. Locate the silver
screw and turn it counter-clockwise until it
loosens enough that you can swing the screw to
the right. Be careful not to loosen the screw too
much, or it will fall out.
4. Open the left arm of the black cradle and
position the cutting blade assembly inside, as
shown with the black arrow facing you. Close
the cradle, swing the screw back to the left,
and tighten it by turning it clockwise. Plug the
machine in and press the On button to place
the blade assembly in cutting position.
Positioning Your Cricut Expression™ Machine
Place your Cricut Expression™ machine at least 12” (30.48 cm) from the edge of your
table to prevent it from tipping and causing possible injury.
Depending on the cutting mat used,
allow 12” (30.48 cm) or 24” (60.96 cm) in the
back of the Cricut Expression machine for
mat movement.
24” (60.96 cm)
12” (30.48 cm)
ENGLISH When positioning your Cricut Expression machine, choose a location that isMeijer.com
• inaccessible to children. The Cricut Expression machine is not a toy and contains
components, including a sharp blade, that could be hazardous to children.
• stable, flat, and hard-surfaced, within 6 feet (1.83 meters) of a grounded electrical
outlet, and that has a minimum clearance of 2 feet (60.96 cm) behind the Cricut
Expression machine for paper movement.
• indoors or in a dry location where the Cricut™ cartridges are not directly exposed to
the effects of the weather.
• away from direct exposure to sunlight or extreme temperatures such as in parked
cars, storage sheds, sunrooms, etc.
WARNING! Your Cricut Expression™ machine should never be left or stored outside, in
unheated or un-air conditioned locations, or in environments where the machine or
cartridges can come in contact with water.
What Your Cricut Expression™ Machine Can Cut
The Cricut Expression™ cutting system can cut a wide range of materials, from vellum
and cardstock to poster board and vinyl. The Cricut Expression machine can even cut
thin chipboard with the use of the Multi Cut function. Learn more about the exciting
possibilities with this function on page 18.
TIP: The repeated cutting of heavy materials may reduce the life of your Cricut
Expression™ machine’s cutting blade and mat.
Basic Operations
Setup
Plug your Cricut Expression™ machine into a grounded electrical outlet.
Lift the display panel.
Place the keypad overlay on top of the
machine’s keypad.
10
ENGLISH
Meijer.com
Insert a Cricut™ cartridge into the cartridge slot
located in the front of your Cricut
Expression machine.
Turn it on by pressing the On button near the
CUT button.
TIP: Make sure the title on the keypad is the same as the title on the cartridge.
Loading Paper
TIP: The Cricut Expression machine can cut materials as large as 12” x 24” (30.48 cm x
60.96 cm). The machine cannot cut materials smaller than 3” x 3” (7.62 cm x 7.62 cm).
Cardstock is recommended for best results. We suggest that you practice on less
expensive materials while becoming familiar with the features described in this
User Manual.
Place Paper on Cutting Mat
A 12” x 12” (30.48 cm x 30.48 cm) paper size is recommended for the first try.
1. Remove clear protective cover from
cutting mat.
2. Align a corner of the paper with the “Align
paper corner here” icon in the lower left corner
of the cutting mat.
3. Press and smooth from the center of the
paper to the edges of the cutting mat to
adhere it well. Your paper is ready to be cut. To
use other paper sizes, see “Basic Keys and
Buttons You Should Know” on page 12.
TIP: The surface of the cutting mat has been treated to make it slightly tacky to hold
the paper in place during cutting. Remove paper slowly when using lightweight
materials such as vellum.
ENGLISH 11
Meijer.com
Load Cutting Mat into Machine
1. Once the paper has been placed on the mat,
insert the mat into the machine with the arrow
pointing toward the machine.
2. Hold the cutting mat firmly between the roller
bar and the deck and gently push the leading
edge of the mat into the rollers. Then press the
Load Paper key on the keypad overlay. The
Cricut Expression machine will then load the
mat and paper. If the mat does not load, press
the Unload Paper key and try again.
TIP: Depending on the cutting mat used, allow 12” (30.48 cm) or 24” (60.96 cm) in the
back of the Cricut Expression machine for mat movement.
Choosing Your Characters
Select the character(s) you want to cut from the keypad overlay. Your selection will be
displayed in the display screen.
TIP: Letters will be cut as single characters.
Basic Keys and Buttons You Should Know
STOP
If you want to stop the Cricut Expression™ machine from cutting
before it is finished, simply press the STOP button located adjacent
to the CUT button. This will suspend any operation in progress.
Press the CUT button to begin cutting the character selections on
the display screen. The Blade Navigation Buttons (discussed in
detail on page 15) offer eight-way directional blade movement,
moving the cutting blade to any location on the paper.
The Shift key allows you to select the character in the upper right
corner of a key. The Shift key will be backlit in green when active.
TIP: To select a character from the upper right corner of a key, press
the Shift key once (you do not need to hold it down) and make
your selection.
The Shift Lock key allows repeated selections of characters in the
upper right corners of keys. The Shift Lock key will be backlit in
green when active.
12
ENGLISH
Meijer.com
The Space key functions just like the space bar on a computer or
typewriter. It inserts one space after the last character entered
every time the Space key is pressed.
TIP: You probably won’t need the Space key if you are cutting one word at a time. Use
it when you specifically want negative space in your cuts.
The Back Space key functions just like the backspace key on a
computer or typewriter. It deletes character(s), starting from the last
one entered, every time it is pressed.
The Clear Display key clears the contents of the Cricut Expression
machine’s display when pressed.
The Reset All key clears the contents of the Cricut Expression
machine’s display and returns all settings to their defaults. No key
should be backlit in green after you press Reset All.
The Repeat Last key inserts the last selections that were cut onto
the display. Once the character(s) appears on the screen, you can
press CUT again or you can change any settings (features, dial size,
speed, pressure, etc.) and then press CUT.
The Sound On/Off key turns the chirp on or off. This key will not turn
off any system warning beeps.
TIP: If you turn the sound key off, that will become your default setting. The next time
you turn the Cricut Expression machine on, the sound will still be off.
The Load Paper key pulls the cutting mat and paper into
the machine.
The Unload Paper key ejects the cutting mat and paper from
the machine. Only press when the Cricut Expression machine is
finished cutting.
The Set Paper Size key is used when you are using a paper size
smaller than 12” x 12” (30.48 cm x 30.48 cm) or 12” x 24” (30.48 cm x
60.96 cm), depending on the mat size selected. Place the paper
on the cutting mat, aligning it in the lower left corner of the mat as
indicated (even if cutting in the Portrait mode). Once the paper has
been placed on the mat, insert the mat arrow first into the
machine, holding it firmly between the roller bar and the deck.
Then press Load Paper. Move the cutting blade to the upper right
corner of the paper using the Blade Navigation Buttons, and then
push the Set Paper Size key. The size of your paper will appear on
the display. You can now begin entering your project information.
Use the Load Last key instead of the Load Paper key when you’ve
temporarily unloaded the mat and you want the blade to start cutting at the point on the paper where the previous cut ended.
The Paper Saver key automatically rearranges your selections to
take up the least amount of space possible on your paper. If
you turn the Paper Saver function on, that will become your
default setting. The Paper Saver key will be backlit in green
when active.
ENGLISH 13
Meijer.com
Cutting Characters
Size Dial
Using the Size Dial, choose one of the size
settings ranging from 0.25” (0.64 cm) to 23.5”
(59.69 cm). This will determine the height of your
finished cut. The selected size will be displayed
on the display screen next to the keypad
overlay. Although the full size range is available
no matter the size of the cutting mat, be sure
to select a size that will fit on the material you
are using (a warning message will display on
the display if your size is too large). The Cricut
Expression machine includes four units of measurement: Inches—1/4ths, Inches—1/10ths, cm,
and mm. Select the desired unit of measurement from the Settings menu (learn more on
page 19).
TIP: All letters in a font set are cut in proportion to the Key Height Character. This is
usually the tallest character in a set. Refer to the handbook of each font cartridge
to determine the Key Height Character. For other character sizing, see “Advanced
Operations” on page 15.
Cutting Your Selections
Press the CUT button.
The STOP button, located adjacent to the CUT
button, will stop any operation in progress.
When the Cricut Expression machine is finished
cutting, press the Unload Paper key on the
keypad to eject the cutting mat and paper
from the machine.
Removing Your Characters from the Cutting Mat
Gently remove images from the cutting mat. If it
is difficult to remove the characters, use a craft
knife or the Cricut Tools™ (sold separately) to
carefully lift the images. Once all characters are
removed, clean off any small scraps of paper
remaining on the cutting mat. This will improve
cutting mat performance in the future.
TIP: To extend the life of your cutting mat, always cover it with the protective cover
and never leave paper on it for an extended period of time.
14
ENGLISH
Advanced Operations
Meijer.com
Your Cricut Expression machine has a variety of advanced operations designed to
enhance your creativity. We recommend you become familiar with basic operations
before moving onto the advanced operations described in this section.
Creative Feature Keys
Creative Features are found within the six gray keys in the upper
left corner of the keypad. Creative Features vary from cartridge
to cartridge and provide a multitude of creative options. Refer
to a Cricut cartridge’s handbook for a full review of the Creative
Features that are available on that particular cartridge.
When a feature key is selected, it will be backlit in green. A
feature can be selected before or after a character(s) has been
selected, but before the CUT button is pressed (unless using the
Mix ’n Match mode). Once pressed, a feature key will remain lit
until it is turned off in one of the following ways: the feature key is
pressed a second time or the Reset All key is pressed. The Mix ’n
Match mode offers multiple Creative Features to be applied to
different characters in the same cut (learn more on page 16).
TIP: Due to the sizes and shapes of characters, a feature may not work with all
characters. Please refer to the handbook included with each cartridge for Creative
Feature details.
Shadow Feature
The Shadow feature is the most common Creative Feature offered on Cricut™ font
and shape cartridges. When selected, this feature creates a proportionately larger
shadow image of every character that is selected. When the Shadow feature is active,
the Shadow key will be backlit in green.
TIP: Using just the Shadow feature by itself creates a chunky version of the original font.
TIP: When sizing a shadow to fit a character, use the same dial size that was selected
on the base image or original character. Example: If you’ve cut a 2” (5.08 cm) letter A
and you now want a shadow of it, keep the Size Dial set at 2”.
Advanced Keys and Buttons
The Blade Navigation Buttons are the eight directional buttons
marked with arrows and arranged around the CUT button. They
allow you to move the cutting blade so you can easily position
it exactly where you want to start a cut. When repositioning, the
display tells you the cutting blade’s location on the cutting mat.
The Left and Right Arrow Buttons (the plus and minus arrows)
below the display allow you to move between different
selections on the display.
The OK button next to the Left and Right Arrow Buttons confirms
selections made on the display. It also will display any calculations pertaining to the Auto Fill, Quantity, Fit to Page, or Fit to
Length modes.
ENGLISH 15
Modes on the Cricut Expression™ machine
Portrait
Landscape
Meijer.com
The Portrait mode changes the cutting
direction from Landscape mode, the default
setting, to Portrait mode. Landscape cuts
characters from top to bottom on the cutting
mat (the right side of the cut comes out of the
machine first). Portrait cuts characters from left
to right on the cutting mat (the bottom side of
the cut comes out of the machine first).
The Portrait mode will start with the cutting
blade in the top left corner instead of the top
right corner in the Landscape mode. To cut in
Portrait mode, you will need to press the
Portrait button so that the display reads
“Portrait mode” and the button is backlit in
green. Press Load Paper to load the paper and
cutting mat, wait for the blade to move to the
top left corner, and make your cutting selection. Press the Portrait button again to return
to Landscape mode. You will need to load the
paper and cutting mat again.
The Mix ’n Match mode allows multiple
Creative Features or the Flip function to be
applied to only certain characters selected on
the display. For example, you can cut a base
letter A and a Roly Poly letter B in the same cut.
To use the Mix ’n Match mode, press the Mix ’n
Match button so that the display reads “Mix ’n
Match on” and the button is backlit in green.
Make your cutting selection, selecting different Creative Features from the keypad overlay
for each character if desired. Be sure to select
the character first and then select the desired
Creative Feature. Use the Left and Right Arrow
Buttons below the display to select the different
characters and alter features as needed.
TIP: If you are using both the Mix ’n Match mode and the Quantity mode, the Left and
Right Arrow Buttons will control the quantity of cuts. You will not be able to use the
arrow buttons to select the different characters and alter the features.
16
ENGLISH
The Quantity mode allows you to
choose the
Meijer.com
number of cuts you want of those selected on
the display. To use the Quantity mode, press
the Quantity button until the button is backlit
in green and the display reads “Quantity on”
and offers instructions. Then use the plus and
minus arrows (the Left and Right Arrow Buttons)
to indicate the quantity of cuts desired. Then
make your cutting selection and press CUT. The
display will show a running total of how many
cuts from the selected quantity have been cut.
If the quantity selected exceeds the amount of
available paper, you can unload the mat and
load more paper. The machine will keep track
of the number of cuts made.
Pressing the OK button once the quantity count has started will reset the cut tally back to
zero, whether or not you’ve adjusted the quantity using the Left and Right Arrow Buttons.
The Fit to Page mode maximizes the size of the
character on the page, overriding the size set
with the Size Dial. To use the Fit to Page mode,
press the Fit to Page button any time before
pressing the CUT button. The mode will be on
when the button is backlit in green. After
pressing CUT, the display will preview the cut
height and length before the machine begins
to cut.
TIP: To cut two proportionate characters (such as a base character and its shadow)
using the Fit to Page mode, select the Fit to Page mode with the larger character
(shadow) selected first. Press the OK button to see the calculated size of the character
and press CUT. Note this size. Unload and remove that cut and load in your next
cutting mat and paper. Then turn off the Fit to Page mode and select the noted
calculated size for the smaller (base) character. These two cuts (the shadow and the
base) will now be in perfect proportion to each other.
TIP: After making your cutting selection, press the OK button to see the calculated size
of the cut.
The Fit to Length mode allows you to set the size
of the length of a designated cut. This mode
is only available in the Landscape mode. This
mode takes out the guesswork of setting the
height of each cut with the Size Dial and
hoping to make a cut a certain length. To use
the Fit to Length mode, press the Fit to Length
button so that the button is backlit in green.
Then make your cut selection and determine
the length using the Size Dial on the right side
of the front of the machine. Press CUT and the
display will preview the height before the machine begins to cut. The Fit to Length mode will
apply to all cuts on the display screen.
TIP: The length in this mode is dependent upon the currently selected unit of measurement
(Inches—1/4ths, Inches—1/10ths, cm, or mm). The Fit to Length measurement will adjust to
the nearest increment, so it will not create proportions between characters that are perfect to the dial size. If you want to be more exact, use mm as your unit of measurement.
ENGLISH 17
TIP: After making your cutting selection, press the OK button to see the calculated
Meijer.com
number of cuts that will fit on the page.
The Auto Fill mode fills the page with as many
of the characters selected on the display as will
fit on the page at the size selected. To use the
Auto Fill mode, press the Auto Fill button so that
the button is backlit in green. Then make your
character(s) selection, set the Size Dial, and
press CUT.
TIP: After making your cutting selection, press the OK button to see the calculated
height of the cut.
TIP: The Auto Fill mode will only allow up to 300 duplicates of the selected character(s).
If you would like to cut more than 300, you can select two (or more) of the same
character(s) and then press the Auto Fill button. This would increase the duplicates to
600 (or more).
TIP: Certain modes can be combined, such as Portrait, Mix ’n Match, and Quantity.
However, the size modes (Fit to Page, Fit to Length, and Auto Fill) cannot be combined.
For example, if you select Fit to Page and then select Auto Fill, the Cricut Expression
will automatically deselect Fit to Page and select Auto Fill.
Functions on the Cricut Expression™ machine
Multi
Cut
Center
Point
Flip
Line
Return
The Multi Cut function allows you to cut the cut
lines of a selected character(s) two, three, or
four times on top of the original cut lines. This
allows the machine to cut thicker materials,
such as thin chipboard. To use the Multi Cut
function, you must first determine the number
of multi cuts in the Settings screen. Press the
Settings button and advance through the settings options until you reach the Multi Cut menu.
Use the plus and minus arrows to select 2, 3, or
4 and then press OK to select. Exit the Settings
screen and then press the Multi Cut button until
it is backlit in green. Then make your character
selection(s), press CUT, and the machine will use
your Multi Cut setting to cut the character(s).
The Center Point function cuts a character(s)
centered on a designated point. It is only available
in the Landscape mode. This function is useful for
cutting shapes around images on photographs or
patterned paper. To use the Center Point function,
move the cutting blade using the Blade Navigation Buttons until the blade is over the center of
the cut. Press the Center Point button until it is
backlit in green. Then make your character
selection(s), press CUT, and the machine will cut
the character with the blade position you set as
the center of the cut.
18
ENGLISH
TIP: Even with the Center Point function activated, a character will stillMeijer.com
cut proportionate to the Key Height Character unless Real Dial Size is selected. For example, a lowercase letter may not cut exactly centered over the center point because it is being cut
proportionate to the Key Height Character. Press Real Dial Size for a centered cut.
The Line Return function allows you to create
line breaks between cuts as if you were using
the return or enter key on a computer keyboard. Select the first line of characters, press
CUT, select more characters, press the Line
Return button, and then press CUT again.
The Flip function creates a flipped (or mirrored)
image cut of characters. To use the Flip
function, press the Flip button until it is backlit
in green. Then make your character selection,
press CUT, and the machine will cut a flipped
version of the selection on the display. The
Flip function can also be used with the Mix ’n
Match mode.
TIP: To turn off modes and functions, simply press the specific mode or function button
again until the button is no longer backlit in green.
Settings
Settings
Mat
Size
Xtra1
Xtra2
The Settings screen allows you to change the language, units of measurement, Multi
Cut settings, mat size, and character image display. The Settings screen determines
the machine’s settings that will be the default each time the machine is used. To access the Settings screen, press the Settings button until it is backlit in green and the
display shows the first Settings menu. There are five Settings menus:
1. The language menu allows you to choose one of four languages (English, French,
Spanish, or German) to be used for the instructions and information on the display screen.
2. The units menu allows you to choose one of four units of measurement (Inches—
1/4ths, Inches—1/10ths, cm, or mm).
3. The Multi Cut menu allows you to choose the numbers of cuts (2, 3, or 4) to be used
for the Multi Cut mode.
4. The default mat size menu allows you to choose the mat size (12” x 12” or 12” x 24” )
you will be cutting with.
5. The character images menu allows you to choose to show previewed cuts on the
display (Display) or to not show previewed cuts on the display (Don’t Display).
The Left and Right Arrow Buttons can be used to move through the different selections,
and the OK button is used to make selections. Press the OK button to advance to the
next menu and press the SETTINGS button to exit.
ENGLISH 19
Mat Size
Meijer.com
The Mat Size button is a quick way to set the mat size that you will be using with
the Cricut Expression machine. Load the mat and then press the button to change
to 12” by 12” or 12” by 24”. The default mat size can also be changed on the
Settings screen.
Xtra Buttons
The Xtra1 and Xtra2 buttons are placeholders for future functions for the Cricut
Expression™ machine. See all the Cricut Expression updates at www.cricut.com.
Sizing
Characters in the Cricut cutting system are measured from the lowest possible point
to the highest possible point. In font sets, and some shape sets, the character shown
in red is the Key Height Character. This is usually the tallest character in any one set. All
other characters will be sized in proportion to the Key Height Character, unless Real
Dial Size is selected. In shape sets, some images are also cut in proportion to other
shapes. See the cartridge handbook to get the details on specific cuts.
Real Dial Size
If Real Dial Size is selected, all characters will be sized according to the selected dial
size, rather than cutting proportionate to the Key Height Character or the base shape.
TIP: Only one dial size can be selected for each cut, and that dial size will be applied
to all characters on the display (even in the Mix ’n Match mode). For example, you
cannot select an A at 1” (2.54 cm) and then immediately select a B at 2” (5.08 cm) in
the same cut. We recommend you check the size appearing in the display prior to
pressing the CUT button.
Cutting on Lightweight or Heavyweight Materials
Your Cricut Expression machine can cut a variety of materials. For an optimal cut on
lightweight materials such as vellum or heavyweight materials such as thick cardstock,
you may need to adjust the blade depth, the speed of the cut, and/or the cut pressure discussed in the following sections.
Adjusting Blade Depth
Remove the cutting blade assembly from the Cricut Expression machine to change
the setting on the adjustment knob. However, if the arrow is facing forward you can
leave the cutting blade assembly attached and simply spin the top of the adjustment
knob to change the setting.
WARNING! Always unplug your Cricut Expression machine before removing the
cutting blade assembly!
To remove the cutting blade assembly (Figure 1), locate the screw and turn it counterclockwise until it loosens enough that you can swing the screw to the right (Figure
2). Be careful not to loosen the screw too much, or it will fall out. Remove the cutting
blade assembly from the machine. Next, locate the adjustment knob (Figure 3) on the
top of the cutting blade assembly, and turn it to your desired setting.
Figure 1
20
ENGLISH
Figure 2
Figure 3
The smaller the number on the adjustment knob, theMeijer.com
shorter the blade depth. Shorter blade depths are recommended for light-
weight materials, longer blade lengths for heavier materials.
Reinstall the cutting blade assembly into the Cricut Expression
machine by reversing the procedure to remove the cutting blade assembly. Test the setting on a scrap piece of paper and make adjustments as necessary.
TIP: Cutting on cardstock and other heavy materials will reduce the life of your blade,
but it will produce the best cuts.
TIP: If the Cricut Expression produces poor cutting results, always insert a new blade
first before trying other options.
Speed Dial
The Speed Dial allows you to control the cutting speed for an optimal cut on a variety
of papers. If you regularly cut on heavyweight materials, you may want to turn the
dial up to increase the cutting speed. For lightweight materials or for smaller, more
detailed cuts, you may want to turn the dial down to decrease the cutting speed.
After each adjustment, we recommend that you test the setting with a scrap piece of
paper, readjusting as necessary until you achieve the desired results.
The display will indicate the speed level, ranging from one bar (“Min”) to five bars
(“Max”). As a general rule, decrease the cutting speed if your cuts are being torn. If
this doesn’t work, change the blade or adjust the blade depth (see page 20).
Pressure Dial
The Pressure Dial allows you to control how hard the cutting mechanism presses
against the paper. For heavyweight materials, you may want to move the dial up to
increase the cut pressure. For lightweight materials, you may want to turn the dial
down to decrease the pressure. After each adjustment, we recommend that you test
the setting with a scrap piece of paper, readjusting as necessary until you achieve the
desired results.
The display will indicate the pressure level, ranging from one bar (“Min”) to five bars
(“Max”). As a general rule, increase the pressure if your selections are not being cut
completely through the paper. If this doesn’t work, the blade depth may need to be
adjusted (see page 20).
Basic Care
Blade Life
You can expect anywhere from 500 to 1500 single cuts from your cutting blade before
it requires replacement. Your actual cutting blade life will vary, depending on the
settings you use and the materials you cut. When the quality of your cuts decreases,
it is probably time to replace your cutting blade. For best results, use only genuine
Cricut™ Replacement Cutting Blades, available at participating Cricut retailers (part
#29-0002).
Replacing the Cutting Blade
WARNING! Always unplug your Cricut Expression machine before replacing the
cutting blade.
To change the cutting blade, you must first remove the cutting blade assembly. Refer
to page 20 in this manual for instructions.
ENGLISH 21
After removing the cutting blade assembly, locate the blade release at the
top of
Meijer.com
the cutting blade assembly and push it in (Figure 1). The blade will emerge from the
cutting blade assembly. You will need to gently pull the blade away from the magnet
holding it in place (Figure 2).
To install the new blade, let go of the blade release and carefully insert the shaft of the
blade into the hole in the bottom of the cutting blade assembly. The blade should be
“sucked” up inside the shaft if properly installed (Figure 3). The replacement cutting
blade is now installed. Reinstall the cutting blade assembly into the Cricut Expression
machine by reversing the procedure to remove the cutting blade assembly.
Figure 1
Figure 2
Figure 3
WARNING! Cutting blades are extremely sharp and should be handled with the
utmost care. They are also potential choking hazards; they should be kept away
from children.
Caring for the Cutting Mat
You can expect anywhere from 25–40 full mat cuts (expect even more when a cut
is smaller than the full mat) from your Cricut™ cutting mat before it requires replacement. Your actual cutting mat life will vary, depending on the settings you use and
the papers you cut. When your paper no longer sticks to the cutting mat, it’s time to
replace the mat. Use only genuine Cricut™ replacement cutting mats, available at
retailers everywhere (part #29-0003).
TIP: To extend the overall life of each mat, use several mats, rotating them often, and
keep the original protective cover on your mat when not in use.
Cleaning Your Cricut Expression™ Machine
WARNING! Always unplug your Cricut Expression™ machine before cleaning!
To clean the Cricut Expression machine, gently wipe exterior panels with a damp
cloth. Immediately dry any excess moisture with a chamois or other soft cloth. Do
not use chemicals or alcohol-based cleaners (including, but not limited to, acetone,
benzene, and carbon tetrachloride) on the machine. Abrasive cleansers and cleaning tools should also be avoided. Do not immerse the machine or any component of it
in water.
Additional Basic Care Tips:
• Keep away from food and liquids
• Keep in dry, dust-free location
• Avoid excessive heat or cold
• Do not leave in car, where excessive heat may melt or damage plastic components
• Do not expose to direct sunlight for any extended period of time
22
ENGLISH
Frequently Asked Questions
Meijer.com
TIP: For our complete list of frequently asked questions, plus the latest updates to the
User Manual, visit www.cricut.com.
Q: Do I have to hold down the Shift key to use it?
A: No. Just press it once and it will be backlit in green, indicating it is in use.
Q: Are the Creative Feature keys the same for each cartridge?
A: Only the Shadow feature is found on most sets. The other five Creative Features are
handpicked by the artist and will vary.
Q: How long will the blade last?
A: Anywhere from 500 to 1500 single cuts, depending on what kind of materials you
are cutting. Replacement blades are inexpensive and easy to change. Refer to the
“Replacing the Cutting Blade” section on page 21 in this manual.
Q: How long will a cutting mat last?
A: Each mat will last anywhere from 25–40 full mat cuts, depending on the size of cuts
and what kind of materials you are cutting. We recommend that you use several mats,
rotating them often. This will extend the overall life of each mat.
Q: Can I use a smaller paper size than the size of the cutting mat?
A: Absolutely! Just align a corner of the smaller paper with the bottom left corner of
the mat, even in the Portrait mode. Once the mat is loaded, use the Blade Navigation
Buttons to move the cutting blade down to the upper right corner of the new paper.
Then press the Set Paper Size key on the keypad overlay to let the machine know
where to start cutting on the new size of paper.
Q: Do I have to finish cutting a full page before unloading the cutting mat?
A: No. You can unload the paper and remove just the pieces you need. You can then
reload the paper at a later time and navigate the cutting blade to any open area to
resume cutting. If you immediately use the same paper for a new cut, press the Load
Last key instead of the Load Paper key. The Load Last key will automatically return the
cutting blade to the place where it stopped cutting.
Q: How does the Paper Saver mode work?
A: The Paper Saver mode will “pack in” any selected cuts to optimize the space
needed. See page 13 of this manual.
Q: What does Real Dial Size do?
A: By default, your Cricut Expression™ machine will cut characters in proportion to
each other. However, if you want to “break” this proportion and get any character to
cut at the literal dial size, press the Real Dial Size key. For instance, with the Size Dial set
at 2”, a lowercase a will actually cut out approximately 1” (2.54 cm) to fit proportionately with any other cut letter. With Real Dial Size selected, that same a would cut at a
full 2” (5.08 cm).
Q: How is the cut of a character measured?
A: Each character cut is measured from the lowest possible point to the highest possible point.
ENGLISH 23
Troubleshooting
Meijer.com
TIP: For our complete list of frequently asked questions, plus the latest updates to the
User Manual, visit www.cricut.com.
Problem: The cutting mat won’t load when I push the Load Paper key.
Solution: Try pushing the cutting mat slightly into the roller bar as you press the Load
Paper key.
Problem: The cutting mat didn’t load when I pushed the Load Paper key. And now,
when I try to push it again, it doesn’t do anything.
Solution: You need to press Unload Paper first. Your Cricut Expression™ machine
“thought” that it loaded the mat, even if it didn’t pull it in. The machine needs to be
given the command to unload before another paper load attempt is made. Pressing
the Unload Paper key will reset the roller bar, allowing for another paper load attempt.
Problem: The blade is not cutting all the way through the paper.
Possible Solution 1: Use the Multi Cut function to allow for multiple cuts along the same
cutting lines.
Possible Solution 2: Increase the cut pressure. Do this with the Pressure Dial found on
the left side of the front of the Cricut Expression machine. See page 21.
Possible Solution 3: The blade depth may need to be adjusted, particularly if you are
trying to cut through thicker materials. See page 20.
Possible Solution 4: The cutting blade may dulled by use and need replacement. Refer
to the “Replacing the Cutting Blade” section on page 21.
Problem: The paper lifts off the mat as the Cricut Expression machine is cutting.
Possible Solution 1: Make sure you press the paper firmly onto the cutting mat when
setting up the cut.
Possible Solution 2: Try using a new mat. Each mat will last anywhere from 25–40 full
page cuts, depending on the size of cuts and the kind of material you are cutting.
Problem: I can’t get characters to cut out with the Creative Feature selected.
Solution: Some characters don’t work with all of the Creative Features available on
a font or shape cartridge. Refer to the Icon Gallery in the cartridge handbook to see
which features work with which characters.
Problem: I’ve placed a smaller sized paper on the mat and navigated to the upper
right corner of the cutting mat, but when I cut characters, the blade returns and starts
cutting back at the top of the cutting mat.
Solution: After you’ve navigated to the upper right corner using the Blade Navigation
Buttons, and prior to pressing CUT, you need to press the Set Paper Size key. This will tell
the Cricut Expression™ machine that you have selected a smaller paper size. Otherwise, the machine “thinks” that a full sheet of paper (either 12” x 12” [30.48 cm x 30.48
cm] or 12” x 24” [30.48 cm x 60.96 cm], depending on the cutting mat) is loaded.
Problem: The cutting mat is too sticky. It’s ripping my paper when I try to remove it.
Solution: Use a craft knife or the Cricut Tools™ (sold separately) to successfully life the
material from the cutting mat. The Cricut Tools are custom designed for lifting, pulling,
or cleaning up cut characters.
24
ENGLISH
Meijer.com
ENGLISH 25
Meijer.com
29-2268 User Manual
© 2007 Provo Craft and Novelty, Inc.
All rights reserved/Tous droits réservés
Spanish Fork, UT 84660
Made in China/Fabriqué en Chine
www.provocraft.com • 024107