1
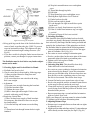
Figure 99 Leveling the Firefinder
d. Keep guide lugs on the base of the firefinder below the
center of track to prefent side play. WHY: To prevent
errors in horizontal readings. The slightest side play
will make horizontal angle readings incorrect. (See
Fig.99.)
e. If you have trouble leveling the finder in more than one
position, contact your Ranger for proper instructions.
The firefinder must be level before any further adjustments can be made.
2. Checking Sights and Vertical Hair for Plumb
a. Firefinder has been leveled.
b. Check vertical hair in front sight by following steps:
(1) Hang weighted thread or string from nail
inside window frame.
(2) If vertical hair does not coincide with string,
hair is not straight.
c. Adjustment
(1) Loosen screw on sight fastening the horsehair.
(2) Pull the horsehair tight.
(3) Tighten the screw again.
(4) Hair is then tight and straight. If it does not
coincide with string, notify Ranger.
d. Replacing Vertical Hair
(1) Have on hand extra supply of dark horsehair.
(In emergency black thread or fine wire may be
used temporarily.)
(2) Loosen both top and bottom screws holding
hair.
(3) Thread new hair through bottom holes in sight
standard.
2
(4) Wrap hair around bottom screw and tighten
screw.
(5) Thread hair through top hole.
(6) Pull tight.
(7) Wrap around top screw and tighten screw.
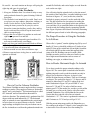
c. Checking Rear Sight Slot to See If Vertical
(1) Finder has been leveled.
(2) Hair on front sight is plumb.
(3) Look through rear sight at small dot or point
on the wall.
(4) Raise eye slowly from bottom to top of slot.
(5) If dot is visible from bottom to top, rear sight
is vertical.
(6) Report to Ranger if slot is not vertical.
3. Orienting Firefinder
This should be done daily.Firefinder has been leveled,
cross hairs arc plumb.A designated orientation point has
been selected by the Ranger and the bearing recorded and
posted in the lookout house. If this point does not check,
the firefinder Must be oriented in the following manner:
a. Loosen orientation adjustment screws below the upper
plate of firefinder. (See N, Fig. 98.)
b. Set vernier at correct reading of orientation point.
c. Revolve, not the sights, but the entire plate of the instrument until sights arc trained on orientation point.
d. Tighten screws below plate of finder.
c. Finder is then oriented.
4. Orienting Map Disk. This should be done daily.
Finder has been leveled and oriented.
a. Set vernier at correct reading/or designated orientation
point selected by the Ranger. Locate this orientation
point on your firefinder map. If the steel tape does not
pass directly over the orientation point on your map,
the disk is not oriented. Then follow these steps:
b. Loosen flat head screws around outer edge of map.
c. Revolve the map disk until the orientation point shown
on the map lies directly under the steel tape,
d. Clamp disk in place by gently tightening the fiat head
screws being careful that the position of the disk is not
disturbed in the process.
c. Repeat operation using a second and third orientation
point to recheck Your work.
Notify your Ranger if your map cannot be oriented within
15' (minutes) on at least three orientation points.
5. Adjusting Distance Tape
a. Distance tape is suspended between front and rear sights
by adjusting screws.
b. Adjust screws at either end of tape so that “0” point on the tape
will bc directly over the center pin. (See Tape G, Fig. 98.)