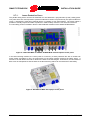
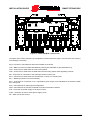
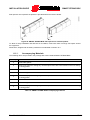
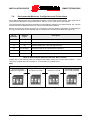
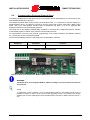
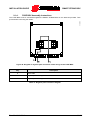
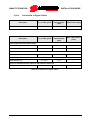
1
15P00EPB120 SMART STRING BOX STRING BOXES FOR PV SYSTEMS USER MANUAL - INSTALLATION GUIDE - Updated: 29/04/2013 English Rev. 02 • This manual is integrant and essential to the product. Carefully read the instructions contained herein as they provide important hints for use and maintenance safety. • This product is to be used only for the purposes it has been designed to. Other uses should be considered improper and dangerous. The manufacturer is not responsible for possible damages caused by improper, erroneous and irrational uses. • Elettronica Santerno is responsible for the product in its original setting. • Any changes to the structure or operating cycle of the product must be performed or authorized by Elettronica Santerno. • Elettronica Santerno assumes no responsibility for the consequences resulting by the use of nonoriginal spare-parts. • Elettronica Santerno reserves the right to make any technical changes to this manual and to the product without prior notice. If printing errors or similar are detected, the corrections will be included in the new releases of the manual. • The information contained herein is the property of Elettronica Santerno and cannot be reproduced. Elettronica Santerno enforces its rights on the drawings and catalogues according to the law. Elettronica Santerno S.p.A. Strada Statale Selice, 47 - 40026 Imola (BO) Italy Tel. +39 0542 489711 - Fax +39 0542 489722 santerno.com [email protected] SMART STRING BOX INSTALLATION GUIDE Table of Contents TABLE OF CONTENTS ................................................................................................ 2 INDEX OF FIGURES .................................................................................................... 5 INDEX OF TABLES ...................................................................................................... 7 1. GENERAL INFORMATION ON THE PRODUCT...................................................... 9 1.1. 1.2. 1.3. 1.4. 1.5. 1.6. Operating Principles .......................................................................................... 10 Main Integrated Standard Functions .................................................................. 11 Optional Functions ............................................................................................. 12 Scope of this Manual ......................................................................................... 12 For Whom this Manual is Intended .................................................................... 13 Attached Documentation ................................................................................... 13 1.6.1. 1.7. 1.8. 1.9. Preservation of the Documentation ........................................................................... 13 References for the Electronic Board ID Codes................................................... 14 Symbols used .................................................................................................... 14 Definitions.......................................................................................................... 15 2. CAUTION STATEMENTS ....................................................................................... 16 2.1. 2.2. 2.3. 2.4. 2.5. 2.6. 2.7. Precautions for Use and Prohibitions ................................................................. 17 Intended Use ..................................................................................................... 17 Qualified Technical Personnel ........................................................................... 18 Specific Dangers Linked to Photovoltaic (PV) Systems ..................................... 18 Execution of Work ............................................................................................. 19 Personal Protective Equipment .......................................................................... 20 Electrical Connections: Safety Procedure .......................................................... 21 2.7.1. Lexan Protective Cover ............................................................................................. 22 3. PRODUCT IDENTIFICATION ................................................................................. 23 3.1. 3.2. 3.3. 3.4. Checking the Product on Delivery ...................................................................... 23 Product Part Number ......................................................................................... 24 Product Revision Index ...................................................................................... 24 Serial Number.................................................................................................... 24 4. PRODUCT CONFIGURATION ............................................................................... 25 4.1. Composition of a SMART STRING BOX............................................................ 25 4.1.1. 4.1.2. 4.1.3. 4.2. 4.3. 4.4. 4.5. 4.6. Output Section - DC-SWITCH BOX .......................................................................... 26 String Connection Section – JUNCTION BOX .......................................................... 28 SMART STRING BOX Connection Diagram ............................................................. 32 Measuring the Current and Performance of the Individual Strings ..................... 33 24-hours-a-day Anti-theft Function..................................................................... 33 Environmental Measures ................................................................................... 33 Monitoring the State of the SPD Disconnection Switch. ..................................... 33 Emergency Disconnecting Switch Opening ....................................................... 33 5. STORAGE AND TRANSPORT ............................................................................... 34 5.1. 5.2. Conditions for Transport .................................................................................... 34 Environmental Requirements for Storage and Transport ................................... 34 6. HANDLING AND ASSEMBLY ................................................................................ 35 6.1. Assembly of the Product on the Installation Site ................................................ 36 6.1.1. Accompanying Materials ............................................................................................ 37 7. COMMISSIONING .................................................................................................. 39 7.1. Connection with String Conductors .................................................................... 40 7.1.1. 7.1.2. 7.2. Connection to the Inverter ................................................................................. 43 7.2.1. 7.3. 2/106 Version with Cable Gland and Terminals .................................................................. 41 Version with Quick-fit Connectors.............................................................................. 41 Protection Devices against Short-Circuit ................................................................... 44 Power Supply Configuration and Connections ................................................... 46 Rev. 02 - 29/04/2013 INSTALLATION GUIDE 7.4. 7.5. SMART STRING BOX Environmental Measures Configuration and Connections .................................. 47 Anti-theft System Connections........................................................................... 49 7.5.1. 7.5.2. 7.6. 7.7. 7.8. Large-scale Systems ................................................................................................. 49 Small-scale Systems ................................................................................................. 50 Bus Communication Configuration and Connections ......................................... 51 Disconnecting Switch and SPD Status Connections .......................................... 52 Disconnect Switch Release Coil Connections .................................................... 53 8. COMMUNICATIONS AND REMOTE MONITORING ............................................. 54 8.1. 8.2. 8.3. 8.4. General Information ........................................................................................... 54 Communication Ports and Protocol Used .......................................................... 55 Connection Topologies ...................................................................................... 56 Connection ........................................................................................................ 59 8.4.1. 8.4.2. 8.4.3. 8.4.4. RS485 Bus – Main Principles .................................................................................... 59 RS485 Port ................................................................................................................ 60 Internal Bus RS485 Cables ....................................................................................... 62 Bus Communication Installation Procedure ............................................................... 63 9. OPTIONALS ........................................................................................................... 64 9.1. Fuse Box ........................................................................................................... 64 9.1.1. 9.1.2. 9.1.3. 9.1.4. 9.1.5. 9.1.6. Product ID Code ........................................................................................................ 64 Checking the Product on Delivery ............................................................................. 65 Internal View, Electrical and Connections Diagram................................................... 67 FUSE BOX Assembly Instructions............................................................................. 69 Mechanical Dimensions Specifications ..................................................................... 70 Product Installation .................................................................................................... 71 9.2. 9.3. Configuration Option without Anti-Inversion Diodes ........................................... 71 Configuration Option with Terminal Connections ............................................... 71 10.1. Maintenance Sheet ............................................................................................ 72 10. MAINTENANCE ....................................................................................... 72 10.1.1. 10.1.2. 10.1.3. 10.1.4. 10.1.5. 10.1.6. 11. Box Visual Inspection and Cleaning .......................................................................... 73 Checking the Connector Status ................................................................................. 73 Checking the Cable Glands Status ............................................................................ 73 Checking Fuses ......................................................................................................... 73 Checking the SPDs .................................................................................................... 74 Checking Tightening .................................................................................................. 75 TROUBLESHOOTING ............................................................................. 76 11.1. 11.2. Self-Diagnostics................................................................................................. 76 Current Measurement Malfunction ..................................................................... 77 11.2.1. 11.2.2. 11.3. Anti-theft System Malfunction ............................................................................ 77 11.3.1. 11.3.2. 11.4. Serial Communication Problems ............................................................................... 78 Safety Devices Tripped...................................................................................... 78 11.5.1. 11.5.2. 11.5.3. 11.6. String Opening is not Indicated.................................................................................. 77 False String Opening is Indicated .............................................................................. 77 Malfunction of Communication Ports ................................................................. 78 11.4.1. 11.5. No Current is Measured ............................................................................................. 77 The Expected Current is not Measured ..................................................................... 77 Output Disconnecting Switch Tripped ....................................................................... 78 SPDS Tripped or Fuses Blown .................................................................................. 78 String Fuse Blown ...................................................................................................... 79 General Principles in the Event of Failure .......................................................... 81 11.6.1. 11.6.2. Fault Containment ..................................................................................................... 81 Fault Analysis............................................................................................................. 82 11.7. 11.8. Revision of String with Inverted Polarity ............................................................. 83 How to Contact the CUSTOMER SERVICE ...................................................... 84 12.1. Dataplate ........................................................................................................... 85 12. TECHNICAL DATA .................................................................................. 85 12.1.1. 12.2. 12.3. Product Revision Label .............................................................................................. 86 Installation Specifications .................................................................................. 86 Electrical Specifications ..................................................................................... 87 Rev. 02 - 29/04/2013 3/106 SMART STRING BOX 12.3.1. 12.3.2. 12.4. Mechanical Dimensions ............................................................................................. 92 Clearance Values ...................................................................................................... 96 Fastening the Cover .......................................................................................... 96 Connection of Power and Signal Cables ............................................................ 96 12.6.1. 12.6.2. 12.6.3. 12.6.4. 12.6.5. 12.7. 12.8. 12.9. 12.10. Maximum Voltage Derating ....................................................................................... 89 Rated Current Derating .............................................................................................. 90 Dimensions and Weights ................................................................................... 92 12.4.1. 12.4.2. 12.5. 12.6. INSTALLATION GUIDE DC Connection - String Cables.................................................................................. 96 DC Connection – Output Cables ............................................................................... 97 Connection of Earth Cables ....................................................................................... 97 Connection of Signal Cables ..................................................................................... 98 Connection of Internal Components .......................................................................... 99 Output Disconnect Switch Release Coil ............................................................. 99 SPD ................................................................................................................. 100 Environmental Sensors Acquisition.................................................................. 101 Fuse Box ......................................................................................................... 104 12.10.1. FUSE BOX Electrical Specifications ........................................................................ 104 12.10.2. Dimensions and Weights ......................................................................................... 105 12.10.3. Cable Connection .................................................................................................... 106 4/106 Rev. 02 - 29/04/2013 INSTALLATION GUIDE SMART STRING BOX Index of Figures Figure 1: SMART STRING BOX Line ............................................................................................................ 9 Figure 2: SMART STRING BOX one-line diagram..................................................................................... 10 Figure 3: Block diagram of the first and second parallel levels ................................................................... 11 Figure 4: 16-input SMART STRING BOX ................................................................................................... 12 Figure 5: JUNCTION BOX for SMART STRING BOX with transparent lexan panel .................................. 22 Figure 6: DC-SWITCH BOX with opaque Lexan panel ............................................................................... 22 Figure 7: Packaging of SMART STRING BOX ............................................................................................ 23 Figure 8: SMART STRING BOX serial number ........................................................................................... 24 Figure 9: Composition of a SMART STRING BOX ..................................................................................... 25 Figure 10: DC-SWITCH BOX: internal view ................................................................................................ 26 Figure 11: DC-SWITCH BOX electrical diagram ......................................................................................... 27 Figure 12: DC-SWITCH BOX: bottom view ................................................................................................. 28 Figure 13: JUNCTION BOX: internal view .................................................................................................. 29 Figure 14: JUNCTION BOX: bottom view ................................................................................................... 30 Figure 15: JUNCTION BOX electrical diagram ........................................................................................... 31 Figure 16: SMART STRING BOX positioning and connection diagram...................................................... 32 Figure 17: Unpackaging of SMART STRING BOX ..................................................................................... 34 Figure 18: SMART STRING BOX................................................................................................................ 36 Figure 19: Incorrect SMART STRING BOX installation ............................................................................. 36 Figure 20: SMART STRING BOX with spacers for heat dissipation ........................................................... 37 Figure 21: Cabling recommended for the parallel string modules ............................................................... 40 Figure 22: Installation of cables with ferrule on terminal ............................................................................. 41 Figure 23: Fitting the string connection connector ...................................................................................... 42 Figure 24: String disconnection ................................................................................................................... 43 Figure 25: DC-SWITCH BOX position of cable glands ............................................................................... 44 Figure 26: Short circuit located downstream from the SMART STRING BOX ............................................ 45 Figure 27: Connection of the 3-wire PT100 thermistor................................................................................ 48 Figure 28: Anti-theft connection with separate anti-tampering and theft signalling ..................................... 50 Figure 29: Anti-theft connection with cumulative signalling for more than one SMART STRING BOX ...... 50 Figure 30: SPD status signalling connection diagram ................................................................................. 52 Figure 31: SPD and disconnecting switch status signalling connection diagram ....................................... 53 Figure 32: ELV zone dedicated to Modbus RS485 and environmental sensors communication ............... 55 Figure 33: Recommended multidrop connection diagram .......................................................................... 56 Figure 34: 8-string SMART STRING BOX connection diagram .................................................................. 57 Figure 35: Details of 8-string SMART STRING BOX connection terminals ................................................ 57 Figure 36: 16-string SMART STRING BOX connection diagram ................................................................ 57 Figure 37: Details of 16-string SMART STRING BOX connection terminals .............................................. 58 Figure 38: 24-string SMART STRING BOX connection diagram ................................................................ 58 Figure 39: Details of 24-string SMART STRING BOX connection terminals .............................................. 58 Figure 40: Communication line terminator DIP-switch ................................................................................ 61 Figure 41: 16-input SMART STRING BOX cablet ....................................................................................... 62 Figure 42: 24-input SMART STRING BOX cablet ....................................................................................... 63 Figure 43: FUSE BOX ................................................................................................................................. 64 Figure 44: B-F-8 FUSE BOX cover ............................................................................................................. 65 Figure 45: B-F-8 module: internal view........................................................................................................ 67 Figure 46: FUSE BOX module: bottom view ............................................................................................... 67 Figure 47: FUSE BOX electrical diagram .................................................................................................... 68 Figure 48: Diagram of negative pole connection of the strings to the FUSE BOX ...................................... 69 Figure 49: STRING BOX connection with optional fuse expansion box ..................................................... 70 Figure 50: FUSE BOX dimensions .............................................................................................................. 70 Figure 51: FUSE BOX wall mounting .......................................................................................................... 71 Figure 52: Surge Protective Device ............................................................................................................. 74 Figure 53: Fuse extraction using the fuse extractor .................................................................................... 80 Figure 54: Fuse installation using the fuse extractor ................................................................................... 80 Figure 55: SMART STRING BOX dataplate ................................................................................................ 85 Rev. 02 - 29/04/2013 5/106 SMART STRING BOX INSTALLATION GUIDE Figure 56: Product revision label ................................................................................................................. 86 Figure 57: Coefficient Kt for temperature derating (at sea level) ................................................................ 90 Figure 58: Coefficient Ka for altitude derating ............................................................................................. 91 Figure 59: 8-string SMART STRING BOX .................................................................................................. 92 Figure 60: 16-string SMART STRING BOX ................................................................................................ 93 Figure 61: 24-string SMART STRING BOX ................................................................................................ 93 Figure 62: JUNCTION BOX ......................................................................................................................... 94 Figure 63: DC-SWITCH BOX ...................................................................................................................... 95 Figure 64: SMART STRING BOX view ....................................................................................................... 99 Figure 65: FUSE BOX CS-BF-8 dimensions ............................................................................................. 105 6/106 Rev. 02 - 29/04/2013 INSTALLATION GUIDE SMART STRING BOX Index of Tables Table 1: Documentation supplied with the product ..................................................................................... 13 Table 2: Electronic board references........................................................................................................... 14 Table 3: SMART STRING BOX models and relative composition .............................................................. 25 Table 4: DC-SWITCH BOX by current and voltage size ............................................................................. 26 Table 5: DC-SWITCH BOX connections: Key ............................................................................................. 26 Table 6: Terminals for auxiliary contacts ..................................................................................................... 27 Table 7: DC-SWITCH BOX connectors/cable glands ................................................................................. 28 Table 8: JUNCTION BOX string connection modules ................................................................................. 28 Table 9: JUNCTION BOX cables ................................................................................................................ 30 Table 10: JUNCTION BOX internal connections ......................................................................................... 32 Table 11: Environmental requirements for storage and transport ............................................................... 34 Table 12: SMART STRING BOX accompanying materials ......................................................................... 37 Table 13: SMART STRING BOX accompanying materials per model ........................................................ 38 Table 14: Power supply input/output terminals, M13 connector ................................................................. 46 Table 15: 230 Vac power supply connections, connector M12 ................................................................... 46 Table 16: Environmental measures terminals, M10 connector ................................................................... 47 Table 17: DIP-switch configuration of analogue input ACH0 ...................................................................... 47 Table 18: DIP-switch configuration of analogue input ACH1 ...................................................................... 48 Table 19: Environmental measures factory settings ................................................................................... 48 Table 20: Anti-theft function terminals, connector M9 ................................................................................. 51 Table 21: Terminals for DC-SWITCH BOX auxiliary contacts .................................................................... 52 Table 22: Communication port .................................................................................................................... 55 Table 23: Connection cable ......................................................................................................................... 59 Table 24: Serial port connection .................................................................................................................. 60 Table 25: CN3 connector terminals ............................................................................................................. 60 Table 26: M11 connector terminals ............................................................................................................. 60 Table 27: DIP-switch for RS485 line terminator .......................................................................................... 61 Table 28: FUSE BOX configurations ........................................................................................................... 64 Table 29: Accompanying Materials ............................................................................................................. 66 Table 30: Key to FUSE BOX connectors/cable glands ............................................................................... 67 Table 31: Negative pole connection diagram .............................................................................................. 69 Table 32: Maintenance Sheet...................................................................................................................... 72 Table 33: Installation specifications for SMART STRING BOX .................................................................. 86 Table 34: SMART STRING BOX electrical specifications with anti-inversion diodes ................................. 87 Table 35: SMART STRING BOX electrical specifications with anti-inversion diodes ................................. 87 Table 36: SMART STRING BOX power supply ratings............................................................................... 87 Table 37: SMART STRING BOX technical data ......................................................................................... 88 Table 38: Nominal power supply specifications .......................................................................................... 89 Table 39: Maximum DC voltage based on altitude...................................................................................... 89 Table 40: Calculation of the rated current reduction coefficient .................................................................. 91 Table 41: SMART STRING BOX dimensions and weights ......................................................................... 92 Table 42: Clearance Values ........................................................................................................................ 96 Table 43: Fastening the Cover .................................................................................................................... 96 Table 44: String cable connection with cable gland and terminal ............................................................... 96 Table 45: String cable connection with quick-fit PV connector ................................................................... 96 Table 46: Power cables connection............................................................................................................. 97 Table 47: Power cables connection - ferrule ............................................................................................... 97 Table 48: DC-SWITCH BOX: earth cable ................................................................................................... 97 Table 49: Auxiliary terminals cable section ................................................................................................. 98 Table 50: Connection of signal cables ........................................................................................................ 98 Table 51: Tightening torques ....................................................................................................................... 99 Table 52: Output disconnect switch release coil ......................................................................................... 99 Table 53: SPD technical specifications ..................................................................................................... 100 Table 54: Analogue inputs configured in 0-10 V mode ............................................................................. 101 Table 55: Analogue inputs configured in 0-20 mA mode .......................................................................... 102 Rev. 02 - 29/04/2013 7/106 SMART STRING BOX INSTALLATION GUIDE Table 56: Analogue inputs configured in 0-100 mV mode ........................................................................ 102 Table 57: Analogue inputs configured as temperature measurement with PT100 ................................... 103 Table 58: FUSE BOX Electrical Specifications ......................................................................................... 104 Table 59: FUSE BOX technical data ......................................................................................................... 104 Table 60: FUSE BOX dimensions and weights ......................................................................................... 105 Table 61: Number of FUSE BOX cables ................................................................................................... 106 Table 62: FUSE BOX cable connection .................................................................................................... 106 8/106 Rev. 02 - 29/04/2013 INSTALLATION GUIDE SMART STRING BOX 1. GENERAL INFORMATION ON THE PRODUCT SMART STRING BOX, designed for maximum reliability and life expectancy, based on numerous years of experience working with large ground and roof installations, comply with the most stringent national and European safety directives. Our modular design philosophy and the wide range of products available make it is possible to adapt equipment quickly and successfully to the individual needs of the customer. Careful and precise design down to the very last detail and strict quality control guaranteed by standard ISO 9001 are the strong points of a reliable product which is able to maintain its features unaltered over time. Designed to last in even the most arduous environmental conditions, Elettronica Santerno string boxes guarantee wide safety margins during daily use. These and other design features are what position SMART STRING BOX at the highest level of reliability and performance for photovoltaic field energy production. NOTE The images and photos in this manual may be modified at the manufacturer's discretion both from a technical point of view and in appearance, hence the illustrations provided herein are not binding. Figure 1: SMART STRING BOX Line Rev. 02 - 29/04/2013 9/106 SMART STRING BOX INSTALLATION GUIDE Medium- and high-power PV generator systems are made up of a high number of strings. To optimize the connection topology and enhance the protection and monitoring systems, parallel connection of the strings is carried out on string boxes distributed over the field. The SMART STRING BOX line includes string boxes with between 8 and 24 inputs. The range offers the following versions: • 600V version, for field voltages up to 750 Vdc maximum • 800V version, for field voltages up to 880 Vdc maximum • 900V version, for field voltages up to 900 Vdc maximum • 1000V version, for field voltages up to 1000 Vdc maximum 1.1. Operating Principles S000114-00EPS Figure 2: SMART STRING BOX one-line diagram The SMART STRING BOX is made up of the following function blocks: String Connection Section – JUNCTION BOX This section is for the parallel connection of the PV generator strings and includes safety fuses and antiinversion diodes. There are also current sensors and the control board for detecting mismatch loss and executing the algorithms of the anti-theft system. Serial communication ports are also available. Output disconnecting switch section - DC-SWITCH BOX This section includes a suitable disconnect under load device and a surge protective device. 10/106 Rev. 02 - 29/04/2013 INSTALLATION GUIDE SMART STRING BOX Medium- and high-power PV generator systems are made up of a high number of strings. To optimize the connection topology and enhance the protection and monitoring systems, the parallel connection of the strings is carried out on more than one level, usually a first parallel level and a second parallel level. Elettronica Santerno offers a complete range of products for string parallel connections, STRING BOX and SMART STRING BOXES for creating the first parallel level and the Sunway DC-Parallel for creating the second parallel level. Figure 3: Block diagram of the first and second parallel levels 1.2. Main Integrated Standard Functions The main integrated standard functions of SMART STRING BOX are listed below: • Possibility to connect 8 – 24 strings. • Measurement of each individual string current. • Mismatch detection. • String opening alarm and detection of poor performance. • Two environmental measurements (radiation and temperature). • Fuses on the positive pole. • DC disconnect under load device. • Surge Protection Device. • Signalling contact for DC disconnecting switch status. • Signalling contact for SPD status. • Quick-fit PV connectors. • Release coil at charge release for roof installations in compliance with fire prevention prescriptions. • Polycarbonate flameproof and UV ray-resistant box. • Degree of protection IP65. • Serial communication system completely integrated with the Elettronica Santerno remote control system with alarm indication in the event of communication loss. • Advanced self-diagnostics. • Complete integration with the Sunway Station. Rev. 02 - 29/04/2013 11/106 SMART STRING BOX 1.3. INSTALLATION GUIDE Optional Functions The main optional functions of SMART STRING BOX are listed below: • Fuses installed on the negative pole by using the FUSE BOX fuse expansion box. • Version without anti-inversion diodes and 10A string rated current. The rated current and the maximum output current is left unchanged. Version available for the configuration without anti-theft system only. • Version with clamp connectors (no quick-fit connectors). • 24-hour-a-day anti-theft with measurement of impedance string. Figure 4: 16-input SMART STRING BOX 1.4. Scope of this Manual This manual covers: • all SMART STRING BOX for PV applications ο JUNCTION BOX Revision 1 and lower (version with quick-fit PV connector) ο DC-SWITCH BOX Revision 1 and lower. • all fuse expansion boxes ο FUSE BOX Revision 1 and lower. To identify the product version, please refer to section 12.1.1. 12/106 Rev. 02 - 29/04/2013 INSTALLATION GUIDE 1.5. SMART STRING BOX For Whom this Manual is Intended This manual must be read by: • Installers • Operators • Plant manager Please refer to section 1.9. 1.6. Attached Documentation SMART STRING BOX and any FUSE BOXES are supplied with the following documents: Name of the document Scope Installation Guide Contains all the information necessary for the assembly, installation and maintenance of the product Programming Guide Contains the product operating measurements and programming parameters Table 1: Documentation supplied with the product 1.6.1. Preservation of the Documentation All documents must be kept for the entire life span of the equipment together with the system documentation. They must be kept in a place where they are readily available. Rev. 02 - 29/04/2013 13/106 SMART STRING BOX 1.7. INSTALLATION GUIDE References for the Electronic Board ID Codes The table below indicates the electronic board ID codes used in the electrical and mechanical diagram. ID code Description ES889 CONTROL BOARD ES851 DATA LOGGER BOARD Table 2: Electronic board references 1.8. Symbols used KEY: DANGER Indicates an operating procedure which, if not carried out correctly, may lead to injuries or even death caused by electric shock. WARNING Indicates an operating procedure which, if not carried out correctly, may cause serious damage to equipment. NOTE Indicates important information concerning use of the equipment. PROHIBITION Strictly forbids the execution of operating procedures. 14/106 Rev. 02 - 29/04/2013 INSTALLATION GUIDE 1.9. SMART STRING BOX Definitions Installer Technician responsible for setting up, positioning and installing the equipment in compliance with the system diagram and in accordance with first-class, professional criteria. Operator Worker who has been suitably trained and informed on the risks and relative safety procedures to be adopted. The operator can carry out routine maintenance on the equipment. Plant manager Person who co-ordinates or manages system management activities and is responsible for ensuring health and safety standards are adhered to. Technical room Place used for housing the technological systems such as the wiring, plumbing, heating, air-conditioning, lifting and telecommunications systems. It is equipped with suitable forced-air ventilation and/or air conditioning and is also fitted with appropriate safety devices governing access, maintenance and fire-prevention. Person in charge of running the electrical system (System Manager) Person with the highest level of responsibility concerning operation of the electrical system. If required some of his/her tasks may be delegated to others. Person in charge of working activities (Works Supervisor) Person with the highest level of responsibility concerning the execution of work. If required some of his/her tasks may be delegated to others. The Works Supervisor must give all persons involved in the execution of work activities the relative instructions concerning reasonably foreseeable dangers which may not be immediately apparent. Skilled electrician Someone who has been trained and has enough technical knowledge or experience to enable him/her to avoid the dangers which may be generated by electricity. Instructed person Someone who has been adequately advised or supervised by a skilled person to enable him/her to avoid the dangers which may be generated by electricity. Rev. 02 - 29/04/2013 15/106 SMART STRING BOX INSTALLATION GUIDE 2. CAUTION STATEMENTS This section covers safety statements. The non-observance of the safety instructions below may cause serious injury or death and equipment failure. Carefully read the instructions below before installing, starting and operating the equipment. Only competent personnel must carry out the equipment installation. SAFETY RECOMMENDATIONS TO FOLLOW DURING USE AND INSTALLATION OF THE EQUIPMENT: NOTE Always read this instruction manual thoroughly before starting the equipment. DANGER ALWAYS EARTH THE EQUIPMENT. OBSERVE THE PRESCRIPTIONS CONCERNING CONDUCTOR SECTION INDICATED IN SECTION 12.6.3. WARNING Do not connect supply voltages which exceed the rated voltage. If voltage exceeding the rated value is applied, the internal circuits may be damaged. In the event of an alarm, please consult section 11 TROUBLESHOOTING. Only restart the equipment once the problem has been rectified. Do not carry out isolation tests between the power terminals or between the control terminals. Make sure that the screws on the connection terminal board have been tightened correctly. Observe the ambient conditions for installation. The electronic boards contain components which are sensitive to electrostatic charges. Do not touch the boards unless absolutely necessary. Should this be the case, take all the necessary precautions to prevent damages caused by electrostatic charges. 16/106 Rev. 02 - 29/04/2013 INSTALLATION GUIDE 2.1. SMART STRING BOX Precautions for Use and Prohibitions DANGER RISK OF ELECTRIC SHOCK NEVER carry out operations on the equipment when it is powered. EXPLOSION AND FIRE RISKS The risk of explosion or fire may exist if the equipment is installed in a room containing flammable vapours. Do not install the equipment where there is a risk of explosion or fire. PROHIBITION The product described in this manual has not been designed to operate in potentially explosive atmospheres. Consequently, installation in such an environment is strictly prohibited. PROHIBITION It is forbidden to make any technical or mechanical modifications to the cabinet even when out of warranty. Elettronica Santerno is not responsible for any risks that may arise due to unauthorised alterations, modifications or tampering. PROHIBITION It is strictly prohibited to operate inside the SMART STRING BOX to carry out short circuit tests concerning the strings. Any system testing must be carried out on the individual strings only once that have been disconnected from the SMART STRING BOX. 2.2. Intended Use The SMART STRING BOX constitute a modular system for creating parallel strings for PV modules. The product envisages a DC-SWITCH BOX in output which is capable of excluding connection of the PV field subsection. Observe the maximum operating voltage indicated in the product technical characteristics found in section 11 TROUBLESHOOTING. The product must only be used as prescribed in this manual. The DC power supply must come from the PV field only. Any use other than that described in this manual is to be considered inappropriate and therefore improper. Rev. 02 - 29/04/2013 17/106 SMART STRING BOX 2.3. INSTALLATION GUIDE Qualified Technical Personnel All work on SMART STRING BOX products must be carried out by skilled technical personnel only. By skilled personnel it is intended persons who have been suitably trained to carry out the work in question. To commission and use the SMART STRING BOX, personnel must know and understand the instructions for installation and use. In particular all safety warnings must be strictly observed. 2.4. Specific Dangers Linked to Photovoltaic (PV) Systems PV systems have certain characteristics which are the source of additional hazards and are described below: • A live current source is connected. Depending on the operating conditions, there may be live voltage from the PV generator or from the electrical grid. This must be taken into consideration, particularly when disconnecting parts from the system. • Very high DC voltages are involved (with no periodic zero crossings) hence failure or the incorrect use of fuses or plugs may cause electric arcs. • The short-circuit current of the PV generator is only slightly higher than the maximum operating current and furthermore is linked to radiation. This means that fuses may not always blow in the event of a short-circuit. • The PV generator grid is usually an IT type, i.e. it is only earthed in the event of a fault or energy leakage. For connection to PV fields with earthing pole, connection is of the TN type, but the earth connection is protected by a fuse which may trip in the event of a single fault. • In the event of a fault (for example a short-circuit), cutting off a generator with a high number of branches may prove to be somewhat difficult. Take great care to ensure each sub-field disconnecting switch has been opened before going near the devices installed in the technical room. 18/106 Rev. 02 - 29/04/2013 INSTALLATION GUIDE 2.5. SMART STRING BOX Execution of Work Maintenance, configuration modifications and management operations require the involvement of all production and maintenance personnel. These activities must be carried out in observance of health and safety regulations. The Standards and Laws governing this aspect vary depending on the personnel involved, methods of access and/or the tasks which may be carried out on the product and envisage constructive measures aimed at guaranteeing adequate levels of safety. Standard EN 50110-1, second edition, identifies the people who are granted access to the product: • Person in charge of running the electrical system (System Manager). • Person in charge of work activities (Works Supervisor). • Skilled electrician. • Instructed person. Please refer to section 1.9. Standard EN50110-1 governs the way work in a plant is carried out and the relationship between the aforementioned persons who may work on the plant to maintain the electrical safety conditions stipulated by European Directives. This standard and its national equivalents must therefore be adhered to whenever it is necessary to access a PV system. Rev. 02 - 29/04/2013 19/106 SMART STRING BOX 2.6. INSTALLATION GUIDE Personal Protective Equipment Maintenance technicians must be provided with the following personal protective equipment as envisaged by European Directives and relative implementation of the same on national territory. SYMBOL DESCRIPTION Safety glasses/face shield Throughout operations. 1000 V high-voltage insulated gloves Throughout operations. Dielectric helmet Throughout operations. Safety footwear/dielectric boots Throughout operations. Insulated tools Throughout operations. Operators must also be provided with a suitable means of communication for contacting the emergency services if necessary. NOTE It is always advisable to work on the electrical cabinets with THE POWER SUPPLY SWITCHED OFF and the equipment in safety conditions (please refer to section 2.7). 20/106 Rev. 02 - 29/04/2013 INSTALLATION GUIDE 2.7. SMART STRING BOX Electrical Connections: Safety Procedure Before carrying out any kind of operation inside the box, always place the equipment in safety conditions. To do this follow the instructions provided below: • Make sure that the inverter connected to the SMART STRING BOX is not running, i.e. that it is STOPPED. • Open the switch on the DC side of the converter • Remove the cover from the DC-SWITCH BOX and open the disconnecting switch (there is NO need to remove the Lexan safety panel). • Disconnect all the strings from the JUNCTION BOXES which make up the SMART STRING BOX without removing the cover (see section 11 TROUBLESHOOTING). • If there are other auxiliary power supply sources at network voltage, proceed to open the relative switches and check that the terminals in question are in fact disconnected. • Proceed to open the JUNCTION BOX modules, remove the Lexan safety panel and use a multimeter to check that there is no voltage between + and – on the copper bars. • Proceed with the operation in question. DANGER The RS485 serial and the environmental sensors input circuit found in the JUNCTION BOXES of the SMART STRING BOX, which is not protected by the Lexan safety panel, must be considered an ELV (Extra-Low Voltage) circuit, galvanically isolated from the PV field circuits but with insulation which has no reinforced insulation or double insulation properties. Therefore it cannot be treated as a SELV circuit. The RS485 serial communication line and any environmental sensors must be wired in accordance with all the prescriptions for NON-SELV circuits. Rev. 02 - 29/04/2013 21/106 SMART STRING BOX 2.7.1. INSTALLATION GUIDE Lexan Protective Cover The parallel string boxes and the DC-SWITCH box are fitted with a polycarbonate (Lexan) safety panel. Live parts which are most exposed to possible inadvertent contact are protected by this panel made from Lexan, a transparent, break-proof material which is resistant to high temperatures. The panel makes it possible to visually inspect the inside of products in relative safety once the cover has been removed. A Lexan safety panel is installed in all the JUNCTION BOX modules of the SMART STRING BOX. Figure 5: JUNCTION BOX for SMART STRING BOX with transparent Lexan panel In the disconnecting modules, the Lexan panel is covered by a white protective film with a central hole which makes it possible to carry out manoeuvers on the switch without removing the safety panel. A window in the film allows the user to observe the state of the dischargers. Furthermore, the DC-SWITCH BOX cover is transparent so that the state of the disconnecting switch can be observed in total safety. Figure 6: DC-SWITCH BOX with opaque Lexan panel 22/106 Rev. 02 - 29/04/2013 INSTALLATION GUIDE SMART STRING BOX 3. PRODUCT IDENTIFICATION 3.1. Checking the Product on Delivery On receiving delivery of the equipment make sure that the packaging shows no signs of damage. Check that it complies with your order by referring to the dataplates described below. In the event of any damage, please contact the relative insurance company or the supplier. If the delivery does not match your order, contact the supplier immediately. Figure 7: Packaging of SMART STRING BOX NOTE The labels indicating the codes and product description and any optionals selected, may differ in colour to the ones shown in the figure. If the equipment is to be stored before installation, make sure that the ambient conditions in the warehouse meet the necessary specifications (please refer to section 5.2). The warranty covers manufacturing defects. The manufacturer shall not be held liable for any damage which may have occurred during transport and unpacking. Under no circumstances shall the manufacturer be held liable for damage or faults caused by incorrect use, misuse, incorrect installation or inadequate temperature or humidity conditions or exposure to corrosives nor for faults caused by operation outside the rated values. Nor shall the manufacturer be held liable for consequential or accidental damage. NOTE For the terms of warranty please refer to the warranty certificate supplied with the product. Rev. 02 - 29/04/2013 23/106 SMART STRING BOX INSTALLATION GUIDE NOTE Check that all relative accompanying materials are present. Please refer to section 6.1.1. 3.2. Product Part Number The product Part Number identifies the parallel string box and is indicated on the relevant dataplate. The dataplate also holds all the necessary technical data (please refer to section 12.1). The product Part Number is made up of the following elements: CS XX X Y ZZZ V XX Model SP: for SMART STRING BOX X Anti-theft A: Anti-theft Y No. of strings No. of strings ZZZ Field Voltage 600V: Class 600V 800V: Class 800V 900V: Class 900V 1000V : Class 1000V Examples: CS-SP-8-800V CS-SPA-8-800V 3.3. Product Revision Index The product revision index is indicated on the dataplate Please refer to section 12.1. 3.4. Serial Number The serial number of each individual module can be found on the lower section of the module itself (near the connectors and on the inside). Figure 8: SMART STRING BOX serial number 24/106 Rev. 02 - 29/04/2013 INSTALLATION GUIDE SMART STRING BOX 4. PRODUCT CONFIGURATION 4.1. Composition of a SMART STRING BOX The parallel string boxes are made up of one or more string connection sections (JUNCTION BOX) and an output section with relative disconnect under load device (DC-SWITCH BOX). Number of inputs JUNCTION BOX DC-SWITCH BOX 8 1 1 16 2 1 24 3 1 Table 3: SMART STRING BOX models and relative composition Figure 9: Composition of a SMART STRING BOX Rev. 02 - 29/04/2013 25/106 SMART STRING BOX 4.1.1. INSTALLATION GUIDE Output Section - DC-SWITCH BOX DC-SWITCH BOXES are distinguished by current capacity and PV field voltage class. All DC-SWITCH BOXES are fitted with a Surge Protective Device (SPD). DC-SWITCH BOX Description B-SEZ - P-100A-600V DC-SWITCH BOX 100 A – Class 600V B-SEZ - P-160A-600V DC-SWITCH BOX 160 A – Class 600V B-SEZ - P-250A-600V DC-SWITCH BOX 250 A – Class 600V B-AUT- P-100A-800V DC-SWITCH BOX 100 A – Class 800V / 900V / 1000 V B-AUT - P-160A-800V DC-SWITCH BOX 160 A – Class 800V / 900V / 1000 V B-AUT - P-250A-800V DC-SWITCH BOX 250 A – Class 800V / 900V / 1000 V Table 4: DC-SWITCH BOX by current and voltage size S000150 Figure 10: DC-SWITCH BOX: internal view Connections Function A Terminals for auxiliary contacts B Connection bars for power cables to the Inverter PE Earth cable connection screws Table 5: DC-SWITCH BOX connections: Key 26/106 Rev. 02 - 29/04/2013 INSTALLATION GUIDE SMART STRING BOX Terminal Function 1-2 Disconnecting switch status N.O. contact (contact closed when disconnecting switch is closed) 3-4 SPD status N.C. contact (contact open if SPD is broken) 5-6 Disconnecting switch release winding Table 6: Terminals for auxiliary contacts Up to 2 conductors per pole are envisaged for the DC output power cables. If connection is carried out using just one cable per pole, only 2 of the 4 cable glands present on the connections side will be used. For power cable connections, please refer to section 12.6. P000962-B Figure 11: DC-SWITCH BOX electrical diagram Rev. 02 - 29/04/2013 27/106 SMART STRING BOX INSTALLATION GUIDE S000163 3 2 GND 1 4 Figure 12: DC-SWITCH BOX: bottom view Recommended destination of cable glands: Key Function 1 Disconnecting switch status and release winding contact output 2 SPD status contact output 3 DC cables output 4 Connection of earth (GND) cable Table 7: DC-SWITCH BOX connectors/cable glands 4.1.2. String Connection Section – JUNCTION BOX 8-string JUNCTION BOXES are available for the SMART STRING BOX, with or without anti-theft option. String box type String Connection Section Description Sensors Anti-theft SMART STRING BOX B-SA-8 8-string JUNCTION BOX Yes Yes SMART STRING BOX B-S-8 8-string JUNCTION BOX Yes No Table 8: JUNCTION BOX string connection modules 28/106 Rev. 02 - 29/04/2013 INSTALLATION GUIDE SMART STRING BOX FUSES Figure 13: JUNCTION BOX: internal view The figure above shows a drawing of the appliance's interior when the upper cover has been removed (by unscrewing the 6 screws). Key to connectors, DIP-switches and fuses installed on the board. CN3 – DB9 connector for RS485 with Modbus protocol (also repeated on terminal board M11). CN4 – Connector for cablet from the cover's microswitch. CN5 – Connector for cablet from the SPD and/or disconnecting switch status signalling contacts. M9 – Connector for connection to the (external) anti-theft control unit. M10 – Connector for external sensors (solarimeter, PT100); Two 3-pole inputs. M11 – RS485 (connection on terminal board). M13 – Connector for connection of 10 V input/output power supply. Also indicated on the bracket outside the Lexan panel. SW1 – DIP-switches for analog inputs configuration. SW2 – DIP-switches for insertion of RS485 connection termination resistors. FU9 – Protection for power supply circuit from PV field. FU22 – Protection for 230 V mains power supply circuit. PE – Earth connection screws. Rev. 02 - 29/04/2013 29/106 SMART STRING BOX INSTALLATION GUIDE S000154 5 6 1 2 3 4 Figure 14: JUNCTION BOX: bottom view Key Description No. of cables 1 RS485 input/output 2 shielded two-twisted pair cables 2 External sensors input 2 three-pole cables 3 Strings inputs Up to 16 (8 positive & 8 negative) 4 Single-phase 230 Vac power supply input/output 2 three-pole cables 5 Output for signals to anti-theft control unit 1 four/six-pole cable 6 Earth connection (EP) 1 single-pole cable Table 9: JUNCTION BOX cables 30/106 Rev. 02 - 29/04/2013 INSTALLATION GUIDE SMART STRING BOX The figure below shows the equipment's internal electrical diagram. Figure 15: JUNCTION BOX electrical diagram Rev. 02 - 29/04/2013 31/106 SMART STRING BOX 4.1.3. INSTALLATION GUIDE SMART STRING BOX Connection Diagram S000117-00EPS Figure 16: SMART STRING BOX positioning and connection diagram Cables Function 1 Cablet for signalling SPD status 2 RS485 internal bus connection cablet 3 Cablet for signalling disconnecting switch status Table 10: JUNCTION BOX internal connections For the position of the connectors inside the JUNCTION BOX, please refer to Figure 13. The figure also highlights the bus communication daisy chain connection which is created using pre-wired connectors. See section 7. 32/106 Rev. 02 - 29/04/2013 INSTALLATION GUIDE 4.2. SMART STRING BOX Measuring the Current and Performance of the Individual Strings The SMART STRING BOX makes it possible to accurately read the current of each individual connected string. The measurements are processed by the internal control board in order to obtain: • Mean measurements of the currents for each JUNCTION BOX, for the purpose of integration with the Santerno remote control service. • Detection of string opening. • Detection of performance loss. For further information, please refer to the “Programming Guide”. 4.3. 24-hours-a-day Anti-theft Function The anti-theft function is designed to detect removal of modules from the system. When a theft is detected, the event is transmitted to the supervision system which immediately sends an alarm message to the user. To ensure security, the supervision system, also known as LDR strategy, is designed to check communication signals continuously. If communication fails for a time exceeding the set threshold, an alarm message is sent to the user. The anti-theft function also envisages an anti-tampering switch. The anti-tampering switch is normally closed and opens if someone tries to open the box cover. This signal is usually wired to an immediate alarm input of the anti-theft system coupled to the system. The relay signals the theft of one or more panels in the range of a string. It usually remains excited and goes into a standby status in the event of an alarm. It is normally wired to a delayed input of the anti-theft system. 4.4. Environmental Measures It is possible to connect up to two auxiliary sensors to the board for measuring the ambient temperature, module surface radiation, horizontal radiation, wind speed. The use of these sensors makes it possible to carry out environmental measures distributed over large scale PV plants. Each JUNCTION BOX for SMART STRING BOX has two environmental measure inputs. Each input can be connected to solarimeters, thermometers with 0-100 mV, 0-10 V, 4-20 mA, PT100 outputs. For all the details, please refer to section 7.4. 4.5. Monitoring the State of the SPD Disconnection Switch. The control board can monitor the intervention of the Surge Protection Devices and opening of the disconnecting switch. For further information, please refer to the “Programming Guide”. 4.6. Emergency Disconnecting Switch Opening Opening of the SMART STRING BOX disconnecting switch may occur in remote mode by means of the shunt opening release. If necessary use a minimum voltage winding; contact Elettronica Santerno S.p.A. For all the details, please refer to section 12.7. Rev. 02 - 29/04/2013 33/106 SMART STRING BOX INSTALLATION GUIDE 5. STORAGE AND TRANSPORT 5.1. Conditions for Transport The parallel string boxes are delivered packed to extremely high standards. To avoid damaging the product, move the package using a pallet jack or a forklift with a lifting capacity no lower than 100 kg. Remove the product from the packaging through the sides, keeping it horizontal to the ground. Figure 17: Unpacking the SMART STRING BOX 5.2. Environmental Requirements for Storage and Transport Required conditions Ambient temperature for storage and transport -25 °C ÷ +70 °C Ambient humidity for storage From 5% – 95%, from 1 g/m – 25 g/m , with no condensation or ice formation (category 3K3 in compliance with EN50178). Ambient humidity during transport Maximum 95% up to 60 g/m . Slight condensation may occur when the equipment is not running (category 2k3 in compliance with EN50178). Atmospheric pressure for storage 86 – 106 kPa (categories 3k3 and 1k4 in compliance with EN50178). Atmospheric pressure during transport 70 – 106 kPa (category 2k3 in compliance with EN50178). 3 3 3 Table 11: Environmental requirements for storage and transport 34/106 Rev. 02 - 29/04/2013 INSTALLATION GUIDE SMART STRING BOX 6. HANDLING AND ASSEMBLY PROHIBITION It is strictly forbidden to proceed with product handling and assembly operations in adverse weather conditions, in snow, rain or persistent fog. Always check that there is no water or condensate inside the product. It is strictly prohibited to leave the product outside without its cover, in any kind of weather conditions, except for the time strictly necessary to perform the assembly and commissioning operations. WARNING The SMART STRING BOX must be installed with the cable input/output side pointing downwards. Avoid installing the product where it may be exposed to direct sunlight. Do not install the SMART STRING BOX upside down or horizontally. Make sure that air can circulate freely around the box. WARNING Every time the SMART STRING BOX is opened and reclosed, it must be done to the highest working standards, ensuring that the product remains intact and that no damage is caused to the sealing and fixing elements. Before reclosing the cover always check that the inside of the SMART STRING BOX is free from condensate or water residues; if this is not the case the product must be placed in safety conditions (please refer to section 2.7) and thoroughly dried out. Correctly tighten the screws on the closure cover (please refer to section 12.5) making sure that the correct degree of watertightness is restored. Rev. 02 - 29/04/2013 35/106 SMART STRING BOX 6.1. INSTALLATION GUIDE Assembly of the Product on the Installation Site WARNING Being as the ambient conditions significantly affect the life-expectancy of the product, do not install it where water build-up may be created due to dips in the installation surface or where it may be exposed to constant dripping. All the parallel string boxes must be installed in an upright position. To facilitate installation, the parallel string boxes come supplied with a special bracket. S000145 Z X Y Figure 18: SMART STRING BOX S000130 Z Z X X Y Y Figure 19: Incorrect SMART STRING BOX installation 36/106 Rev. 02 - 29/04/2013 INSTALLATION GUIDE SMART STRING BOX Rear spacers are required if the product is provided with anti-inversion diodes. Figure 20: SMART STRING BOX with spacers for heat dissipation To allow for easy installation and effective air circulation, make sure there is enough free space around the equipment. Dimensions, weights and necessary clearances are indicated in section 12.4. 6.1.1. Accompanying Materials The following items are provided in the package with each individual SMART STRING BOX: Quantity Description 4 PG29 cable glands 2 PG29 screw plugs for closing any unused inputs These are to be inserted on the box during the wiring phase. 4 Reducer rubbers for PG29 1 PG16 cable gland 1 PG16 screw plugs for closing any unused inputs These are to be inserted on the box during the wiring phase. 1 Set of 4 screws for the cover 4 PG11 cable glands 4 PG11 screw plugs for closing any unused inputs These are to be inserted on the box during the wiring phase. Table 12: SMART STRING BOX accompanying materials Rev. 02 - 29/04/2013 37/106 SMART STRING BOX INSTALLATION GUIDE Furthermore, depending on the SMART STRING BOX model, the following items are supplied: Quantity 8 inputs 16 inputs Description 24 inputs Version with cable gland and terminals 16 + 8 32 + 16 48 + 24 PG11 cable glands 16 32 48 PG11 screw plugs for closing any unused inputs These are to be inserted on the box during the wiring phase. 8 16 24 Fuses Version with quick-fit connectors 8 16 24 PG11 cable glands 8 16 24 PG11 screw plugs for closing any unused inputs These are to be inserted on the box during the wiring phase. 8 16 24 Fuses Table 13: SMART STRING BOX accompanying materials per model Crimpers The quick-fit flying connectors must be crimped onto the string cables on site. Make sure that suitable crimpers are available. 38/106 Rev. 02 - 29/04/2013 INSTALLATION GUIDE SMART STRING BOX 7. COMMISSIONING WARNING To carry out the following operations, check that the parallel string box is in safety conditions. Please refer to section 2.7. DANGER The heat sink at the back may reach very high temperatures during operation. DO NOT touch with unprotected hands. Burning hazard. The following paragraphs provide information on power and signal cable connection and commissioning. Each string must be made up of the same number of panels. All panels must have the same nominal characteristics. Failure to observe these specifications will lead to a plant with low yields and possible malfunctions. Do not install devices and/or components (dischargers, return or switch terminals, joins on the cables) on the wiring between the JUNCTION BOXES and the modules. As well as lowering the level of plant safety and performance, malfunctions may occur or false signals may be generated by the anti-theft system. Only a single string is to be connected to each input. Connecting more than one string in parallel to an input may lead to the maximum allowable current being exceeded and consequent failure. If more inputs are needed, use a box with a higher number of connections or split the field into subfields, each one being served by a connection box. Rev. 02 - 29/04/2013 39/106 SMART STRING BOX 7.1. INSTALLATION GUIDE Connection with String Conductors The connection of the cables to the panels must be carried out along the shortest possible route in order to minimize loss in resistance in the cables and hence system losses. In the following figure A, the correct method of cabling is shown in a diagram. Figure 21: Cabling recommended for the parallel string modules 40/106 Rev. 02 - 29/04/2013 INSTALLATION GUIDE 7.1.1. SMART STRING BOX Version with Cable Gland and Terminals The JUNCTION BOX for the SMART STRING BOX does not come assembled with cable glands. The cable glands are supplied with the product. The procedure for installing the cable gland and connection to the board is described below. • Screw the cable gland onto the box without tightening it. • Pass the cable with ferrule through the cable gland. • Wire the cable to the terminal board. From M1 to M4 connect the positive pole of the strings, from M5 to M8 connect the negative pole of the strings (please refer Figure 15). • Tighten the terminals (please refer to section 12.6.1). • Correctly tighten the cable gland. • All the cable glands which are not used must be closed with the special plugs. WARNING Always use cables with ferrules. Please refer to section 12.6. Check the correct position of the ferrule so as to avoid tightening onto the plastic section, as shown in the figure. To carry out the following operations, check that the switch on the DC-SWITCH BOX of the parallel string box in question is open. Always wear the PPE required by law for working in the presence of live voltage (dielectric gloves with at least 1000V high-voltage insulation). Figure 22: Installation of cables with ferrule on terminal 7.1.2. Version with Quick-fit Connectors The JUNCTION BOX for the SMART STRING BOX does not envisage PV quick-fit connectors as a standard (type MC4): • female connector on the positive pole • male connector on the positive pole. Rev. 02 - 29/04/2013 41/106 SMART STRING BOX INSTALLATION GUIDE WARNING Always use flying connectors of the same brand as the connectors installed on the string box. The use of other connectors may damage the product. To carry out the following operations, check that the disconnecting switch on the DCSWITCH BOX of the parallel string box in question is open. Always wear the PPE required by law for working in the presence of live voltage (dielectric gloves with at least 1000 high-voltage insulation). STRING CONNECTION Join the contacts to fit them together. Check that they are correctly joined by pulling on the connectors. Figure 23: Fitting the string connection connector Once all the strings have been connected to the parallel string box, the switch on the DC-SWITCH BOX and the DC side of the Inverter can be closed. For all details on power cable connections, please refer to section 12.6. 42/106 Rev. 02 - 29/04/2013 INSTALLATION GUIDE SMART STRING BOX STRING DISCONNECTION Squeeze the two spring tabs together. Separate the contacts. Figure 24: String disconnection 7.2. Connection to the Inverter Proceed as follows: • Connect the power cables between the SMART STRING BOX and the inverter onto the bars in the DC-SWITCH BOX. Use the special cable glands. • Connect the cables with suitable cable lugs to the + and - bars in accordance with the prescriptions in Table 48. • Tighten the cable glands. • Leave the DC-SWITCH BOX disconnecting switch open until the string conductors have been connected. Rev. 02 - 29/04/2013 43/106 SMART STRING BOX INSTALLATION GUIDE Figure 25: DC-SWITCH BOX position of cable glands The conductors in output towards the inverter or the Sunway DC-Parallel cabinet for the subfields parallel may be single or double conductors (two parallel single-pole conductors). For the convenience of cabling, the DC-SWITCH BOXES are provided with 4 separate cable glands for single- or double-cable outputs for each polarity. For information relative to the section and diameter of cables, please refer to section 12. WARNING The cable glands must be correctly replaced and tightened once the cable has been inserted. Cable glands which are not used must be plugged. The gable glands and covers must be accurately tightened to prevent water, insects or small animals from getting inside and causing plant malfunctions as well as fire risks. 7.2.1. Protection Devices against Short-Circuit The SMART STRING BOX are equipped with a suitable under load disconnect device in output but are not fitted with protection against short circuits, such as fuses, in output. The connection cables between the SMART STRING BOX (normally located near the PV modules) and the inverter (located in the technical room) usually carry all the current from the group of strings which belong to an individual SMART STRING BOX. Being as the PV field is a current-limited generator, even in the event of a short circuit the current delivered by this kind of generator cannot exceed the maximum sizing value. If the PV plant is made up of more than one SMART STRING BOX, this concept is not valid for the current flowing through the cables. Take as an example a short circuit which occurs downstream from a SMART STRING BOX but upstream from the connection to the Sunway DC-Parallel cabinet (see figure below). When this happens, the current from all the strings bar one is localized in the section of cable between the point where the short circuit has occurred and the connection to the Sunway DC-Parallel. 44/106 Rev. 02 - 29/04/2013 INSTALLATION GUIDE SMART STRING BOX DC PARALLEL I1 I1 I2...+In I2...+In S0001 93 STRING BOX n°1 F F STRING BOX n°2 I2 F I2 F In F In F STRING BOX n°N Figure 26: Short circuit located downstream from the SMART STRING BOX Fault caused by a short circuit on the output cables must be envisaged during the design phase and appropriate protective measures adopted. • If the PV plant is made up of more than one SMART STRING BOX, the Sunway DC-Parallel effectively solves this problem. • If the PV plant is made up of a very small number of SMART STRING BOX, a connection directly to the inverter can be envisaged, without inserting fuses, as long as the cables are sized for the maximum fault current. • If the PV plant is made up of just one SMART STRING BOX, the problem does not exist. Rev. 02 - 29/04/2013 45/106 SMART STRING BOX 7.3. INSTALLATION GUIDE Power Supply Configuration and Connections Each JUNCTION BOX holds a measurement and supervisory circuit which needs a power supply. The power supply source of the circuit is based on the product model. SMART STRING BOX without anti-theft system, versions 600V, 800V and 900V: • PV field with a voltage exceeding 200 Vdc. SMART STRING BOX without anti-theft system, version 1000V: • 230 Vac ±10% grid also with UPS backup. • DC power supply unit via the dedicated terminal (M13) equipped with an 8 - 15 Vdc input. This terminal can also be found on the bracket outside the Lexan safety panel. SMART STRING BOX with anti-theft system: • 230 Vac ±10% grid also with UPS backup • 12 Vdc ± 20% anti-theft central battery • DC power supply unit via the dedicated terminal (M13) equipped with an 8 - 15 Vdc input. This terminal can also be found on the bracket outside the Lexan safety panel. WARNING Before accessing the terminal boards, check that the box is in safety conditions. Please refer to section 2.7). The table below list the types of signal connections and details on the relative connector/terminal board. No. of terminals Name of signal 7 10V I/O 8 0V Description Power supply input/output* Common power supply - zero volt signal circuits Table 14: Power supply input/output terminals, M13 connector WARNING For safety reasons, terminal M13 can also be found on the bracket outside the Lexan safety panel. No. of terminals Name of signal 1 LINE 2 NEUTRAL 3 EARTH-EP Description 230 Vac -50/60 Hz power supply input Safety conductor - EARTH Table 15: 230 Vac power supply connections, connector M12 For the rated power supply technical characteristics, please refer to heading 12.2. 46/106 Rev. 02 - 29/04/2013 INSTALLATION GUIDE 7.4. SMART STRING BOX Environmental Measures Configuration and Connections Each JUNCTION BOX has two configurable analogue environmental measure inputs. Each input can be connected to solarimeters, thermometers with 0-100 mV, 0-10 V, 4-20 mA, PT100 outputs. The M10 terminal board has three terminals for each analogue measure: the signal terminal, the common terminal and the excitation terminal for a 3-wire PT100 thermistor measure. Before connecting the signal conductors it is necessary to set the relative configuration corresponding to the type of input signal on the SW1 dip-switch, located next to terminal board M10 (see Figure 13). No. of terminals Name of signal 15 PT100 EXC 0 16 ACH0 17 0V 18 PT100 EXC1 19 ACH1 20 0V Description Excitation output for PT100 thermistor channel 0 Configurable measure input channel 0 Common measure 0 - Zero volt signal circuits Excitation output for PT100 thermistor channel 1 Configurable measure input channel 1 Common measure 0 - Zero volt signal circuits Table 16: Environmental measures terminals, M10 connector Please refer to the following table for setting the DIP-switch, taking into account that contacts 1 - 3 are relevant to channel ACH0 and contacts 4 - 6 are relevant to channel ACH1. SW1 Configuration of analogue input ACH0 0-10 V f.s. mode (Default configuration) 0-100 mV f.s. mode 0-20 mA f.s. mode Temperature reading with PT100 thermistor Table 17: DIP-switch configuration of analogue input ACH0 Rev. 02 - 29/04/2013 47/106 SMART STRING BOX INSTALLATION GUIDE SW1 Configuration of analogue input ACH1 0-10 V f.s. mode (Default configuration) 0-100 mV f.s. mode Temperature reading with PT100 thermistor 0-20 mA f.s. mode Table 18: DIP-switch configuration of analogue input ACH1 Configuration of the channel and the measurement unit must be set to correspond by programming the relative board parameters. To carry out correct configuration, please refer to the “Programming Guide”. Type of acquisition set in the parameters Mode set on SW1 Full-scale and notes Voltage 0 -10 V 0-10 V f.s. mode 0 -10 V Voltage 0 -100 mV 0-100 mV f.s. mode 0 -100 mV Current 0 - 20 mA 0-20 mA f.s. mode 0 mA - 20 mA Current 4÷20 mA 0-20 mA f.s. mode 4 mA - 20 mA Temperature Temperature reading with PT100 thermistor -50 °C - 120 °C. Table 19: Environmental measures factory settings It is preferable to carry out connection of the environmental sensors with a shielded cable, connecting the shield to the GND - 0V terminal and leaving it free on the opposite side. It is preferable to connect the 3-wire PT100 thermistor to eliminate the residual resistance of the wire carrying the excitation current. Correct connection is illustrated in the figure below. Figure 27: Connection of the 3-wire PT100 thermistor 48/106 Rev. 02 - 29/04/2013 INSTALLATION GUIDE SMART STRING BOX If 3-wire PT100 sensors are not used, it is still preferable to connect the excitation terminal near the sensor. NOTE It is necessary to set the software parameters to match the dip-switch settings. Hardware configuration settings which do not correspond with the type of acquisition set in the parameters produce results which do not reflect the values actually acquired A voltage or current value which exceeds the upper full-scale value or is less than the lower full-scale value produces a saturated acquired value of the maximum and minimum measures respectively. WARNING The inputs configured for voltage have a high input impedance and must never be left open if active. Isolating a conductor relative to an analogue input configured as a voltage input does not guarantee that the channel reading will be zero. Zero is only correctly detected if the input is wired to a low-impedance or short-circuited signal source. Therefore, do not put relay contacts in series on the inputs to reset the reading. For the technical characteristics, please refer to section 12.9. 7.5. Anti-theft System Connections CAUTION Power supply must be ensured by an external power supply source, either the 230 Vac mains or the auxiliary power supply. 7.5.1. Large-scale Systems The anti-theft function in the SMART STRING BOX is perfectly integrated with the Elettronica Santerno remote control system. • Regular access to instant overall and specific system data. • Data Logging with analysis of the performance of each individual plant section. • Management of fault and malfunction situations by means of alarm messages sent via e-mail or SMS. The anti-theft function is designed to detect removal of modules from the system. When a theft is detected, it is recorded in the control board status (JUNCTION BOX), then the event is transmitted to the supervision system which immediately sends an alarm message to the user. To ensure security, the supervision system is designed to check communication signals continuously. If communication fails for a time exceeding the set threshold, an alarm message is sent to the user. For the configuration of this function, please refer to the “Programming Guide”. Rev. 02 - 29/04/2013 49/106 SMART STRING BOX 7.5.2. INSTALLATION GUIDE Small-scale Systems For small-scale systems, designed to use up to a maximum of four JUNCTION BOX modules, it is possible to use an internal relay. This can be connected to an anti-theft system with a commercial siren and can be monitored in remote mode. This relay opens in co-ordination with the anti-tampering switch, the contacts of which are available on terminal board M9. The anti-tampering switch is normally closed and opens if someone tries to open the box cover. This signal is usually wired to an immediate alarm input of the anti-theft system coupled to the system. The relay signals the theft of one or more panels in the range of a string. It envisages a combination of both NC and NO contacts. It usually remains excited (NC contact closed) and goes into a standby status in the event of an alarm. It is normally wired to a delayed input of the anti-theft system. To obtain a single cumulative signalling of both alarm conditions it is possible to use terminals 3 and 6 of connector M9, thus obtaining a connection of the two alarm contacts in series. The figure below indicates the wiring details of three common cases: • separate anti-tampering and theft signalling • common anti-tampering and theft signalling • cumulative anti-tampering and theft signalling for multiple SMART STRING BOX, up to a maximum of 4 JUNCTION BOX modules. S000166 Figure 28: Anti-theft connection with separate anti-tampering and theft signalling S000156 Figure 29: Anti-theft connection with cumulative signalling for more than one SMART STRING BOX 50/106 Rev. 02 - 29/04/2013 INSTALLATION GUIDE SMART STRING BOX The table below list the types of signal connections and details on the relative connector/terminal board. No. of terminals Name of signal 1 POWER SUPPLY 2 0V 3 ALR-TAMPER 4 ALR-COM 5 ALR-NC Alarm relay NC contact - closes following a theft alarm 6 ALR-NO Alarm relay NO contact - open following a theft alarm Description 12 Vdc power supply input from central alarm battery Common power supply - zero volt signal circuits Anti-tampering contact - opens in relation to ALR-COM for box opening or forcing Common alarm signalling Table 20: Anti-theft function terminals, connector M9 7.6. Bus Communication Configuration and Connections Please refer to section 8.4. Rev. 02 - 29/04/2013 51/106 SMART STRING BOX 7.7. INSTALLATION GUIDE Disconnecting Switch and SPD Status Connections The SMART STRING BOX makes it possible to acquire disconnecting switch status or SPD status via the terminal present inside the DC-SWITCH BOX. Terminal Description 1-2 Disconnecting switch status contact (NO) 3-4 SPD status contact (NC) 5-6 Disconnecting switch release winding Table 21: Terminals for DC-SWITCH BOX auxiliary contacts The CN5 connector on the SMART STRING BOX control board connected to the DC-SWITCH BOX terminal, signals an alarm condition if the two poles are opened. The contacts on terminals 1 and 2, if open, identify the open disconnecting switch (only valid for the 16and 24-string configuration). The contacts on terminals 3 and 4, if open, identify SPD tripping. The diagram for the SMART STRING BOX disconnecting switch status signalling connections is illustrated in the figures below. 8-string configuration: Figure 30: SPD status signalling connection diagram Key to the cablet shown in the figure: • Cablet (1) connects the NC contact, terminal 3 and 4 of the DC-SWITCH BOX surge protection device to the CN5 connector on the control board. 52/106 Rev. 02 - 29/04/2013 INSTALLATION GUIDE SMART STRING BOX 16- and 24-string configuration: Figure 31: SPD and disconnecting switch status signalling connection diagram Key to the cablets shown and numbered in the figure: • Cablet (1) connects the NC contact, terminal 3 and 4 of the DC-SWITCH BOX surge protection device to the CN5 connector on the control board. • Cablet (2) connects the NO contact, terminal 1 and 2 of the DC-SWITCH BOX disconnecting switch to the CN5 connector on the control board. 7.8. Disconnect Switch Release Coil Connections Connection to the release winding is made via terminal 5 and 6 and the relative cable gland in the DCSWITCH BOX. Please refer to Table 7. Rev. 02 - 29/04/2013 53/106 SMART STRING BOX INSTALLATION GUIDE 8. COMMUNICATIONS AND REMOTE MONITORING WARNING To carry out the following operations, check that the parallel string box is in safety conditions. Please refer to section 2.7. 8.1. General Information The SMART STRING BOX is equipped with a communication port which allows for local and remote connection to a remote monitoring system. This provides the following advantages: • Full integration with the Santerno remote monitoring system for checking production performance and detecting alarms. • Complete remote monitoring accessibility in both local and remote mode from PC and SunwayPortal web portal. By using a PC as a Master device, it is possible to adopt Elettronica Santerno’s Remote Sunway software package. This software offers tools such as image capture, keyboard emulation, oscilloscope and multifunction tester functions, operating data history tables compiler, parameter setup and receptiontransmission-saving of data to and from PC and scan functions for automatic recognition of connected devices. Consult the specific Remote Sunway manual for use of the software package with Elettronica Santerno products. 54/106 Rev. 02 - 29/04/2013 INSTALLATION GUIDE 8.2. SMART STRING BOX Communication Ports and Protocol Used The SMART STRING BOX serial ports use the 2-wire RS485 electric standard plus a 0 volt reference wire and standard Modbus/RTU protocol. The SMART STRING BOX usually behaves as a Modbus slave, i.e. it responds to requests made by a Modbus Master device. The Master is usually a Sunway series solar inverter, fitted with a Data Logger board, and a PLC with Modbus interface which accompanies the plant, or by a PC equipped with Elettronica Santerno’s Remote Sunway software. The serial port on the SMART STRING BOX, available on connector M11, implements galvanic isolation of the RS485 signals in relation to the external communication devices. For specifications concerning the protocol, programming of the serial parameters, the Modbus address etc., please refer to the “Programming Guide”. Protocol and availability relevant to the serial ports are indicated in Table 25. Serial port Connector Protocol RS485 CN3, M11 Modbus Slave Table 22: Communication port Figure 32: ELV zone dedicated to Modbus RS485 and environmental sensors communication WARNING The board does not recognize Modbus address settings carried out when the board is not powered. NOTE To guarantee correct operation of the communication network, the RS485 circuit driver is isolated in relation to the 0V of the control board signalling circuits. The isolation test voltage between the common CMD signal of the RS485 interface and the 0V GND is 500 Vac 50 Hz 1 min. Rev. 02 - 29/04/2013 55/106 SMART STRING BOX 8.3. INSTALLATION GUIDE Connection Topologies The SMART STRING BOX is usually multidrop connected. The multidrop connection entails the chain connection of multiple devices. In this case each device is a JUNCTION BOX. The RS485 multidrop line to multiple devices must be wired using a linear and not a star topography: each device connected to the line must be connected by an incoming cable from the previous device and have an outgoing cable to connect the next device. The exceptions are obviously the first and last devices in the chain which, will have only an outgoing line and an incoming line respectively. The reference diagram recommended by the MODBUS-IDA association for the connection of 2-wire devices is illustrated in the figure below. Figure 33: Recommended multidrop connection diagram The network is made up of the termination resistor and the polarization resistors incorporated for convenience in each JUNCTION BOX and which can be turned on by DIP-switch SW2 located next to connector CN3. The figure shows the termination network only for the devices at the ends of the chain. In fact, these are the only ones which need a terminator. Being as one end of the chain is constituted of the Master device, only both contacts of dip-switch SW2 must be set to ON (see Figure 32) in the JUNCTION BOX located the furthest away (in electrical terms) from the Master, i.e. the one at the end of the multidrop chain. All the dip-switches in the other JUNCTION BOX modules must remain on OFF. If multiple SMART STRING BOX are multidrop connected, it is necessary to enter and leave with a RS485 cable, which is why there are two input and output cables glands on the box. In 8-string SMART STRING BOX, made up of a single junction module, it is necessary to enter leave with the RS485 cable in the same JUNCTION BOX. 56/106 Rev. 02 - 29/04/2013 INSTALLATION GUIDE SMART STRING BOX S000167 Figure 34: 8-string SMART STRING BOX connection diagram S000188 CN3 ES889 GND B A 12 10 M11 9 GND B A 14 Figure 35: Details of 8-string SMART STRING BOX connection terminals In 16- and 24-string SMART STRING BOX, made up of two or three junction modules, it is necessary to enter with the RS485 cable in one of the end boxes, leaving the internal route to the internal RS485 bus cable, and leave the box from the other end. S000168 Figure 36: 16-string SMART STRING BOX connection diagram Rev. 02 - 29/04/2013 57/106 SMART STRING BOX INSTALLATION GUIDE CN3 CN3 ES889 ES889 12 10 M11 9 GND B A 14 12 10 M11 9 GND B A 14 Figure 37: Details of 16-string SMART STRING BOX connection terminals S000169 Figure 38: 24-string SMART STRING BOX connection diagram CN3 CN3 CN3 ES889 ES889 ES889 12 10 M11 9 GND B A 14 12 10 M11 9 14 12 10 M11 9 GND B A 14 Figure 39: Details of 24-string SMART STRING BOX connection terminals 58/106 Rev. 02 - 29/04/2013 INSTALLATION GUIDE 8.4. SMART STRING BOX Connection 8.4.1. RS485 Bus – Main Principles The MODBUS-IDA organization (http://www.modbus.org) defines the connection for Modbus communication on RS485 serial link (used by the inverter) as 2-wire cable type. For this type of cable, the following specifications are recommended: Connection cable Shielded cable made up of a balanced pair known as D1/D0 + common conductor. Recommended cable: Belden 3106A Paired EIA Industrial RS485 PLTC/CM. Type of cable Minimum section conductors for 2 AWG23 corresponding to 0.258 mm . For long lengths it is advisable to use 2 a larger section, up to 0.75 mm . Maximum length 500 metres with reference to the maximum distance measured between the two stations furthest apart. Impedance specifications Recommended over 100 Ω, usually 120 Ω. Table 23: Connection cable It is advisable to connect all the equipment connected to the multidrop connection network to the earth by means of a common conductor. In this way, any differences in earth potential between different equipment which may interfere with communications is reduced to a minimum. The common terminal 0V connection is necessary. An 0V connection which is common to all equipment in the multidrop communication network minimizes possible differences of reference potential between the equipment which could interfere with communication. The common reference of control board power supply is isolated in relation to earth. By connecting one or more inverters to a communication device with a common earth (for example a PC) a low-impedance path between the control board and earth is obtained. It is possible that disturbances conducted at high frequency from the power parts of the inverter may transit along this path and this can cause malfunctions to the communication apparatus. It is always advisable to equip the communication equipment with a galvanically isolated RS485 communication interface or a galvanically isolated RS485/USB convertor. WARNING Cat. 5 2-, 3- or 4-pair data transmission cables cannot be used for the serial connection, not even over short sections. Wiring operations of the module must be carried out when the inverter is NOT powered. Remember to take all the necessary precautions before accessing the connectors and before handling the board. Rev. 02 - 29/04/2013 59/106 SMART STRING BOX 8.4.2. INSTALLATION GUIDE RS485 Port SERIAL PORT CONNECTION Serial port Optoisolated port RS485 YES Connectors CN3: SMART STRING BOX internal connections M11: RS485 field bus connection Table 24: Serial port connection No. of terminals Name of signal 1-3 A (D1) RS485 Signal D1 (*) 2-4 B (D0) RS485 Signal D0 (*) 5-7-8 0VM RS485 “Common” signal 0V (*) 6 N.C. Not connected 9 5 VM OUT +5 V Isolated, max 50 mA for powering external optional devices Shell EP - Shield Cable braid / shield connected to earth (EP) Description Table 25: CN3 connector terminals (*) in accordance with the MODBUS-IDA association nomenclature No. of terminals Name of signal 9 A (D1) RS485 Signal D1 (*) 10 B (D0) RS485 Signal D0 (*) 11 5 VM OUT +5 V Isolated, max 50 mA for powering external optional devices 12 0 VM OUT RS485 “Common” signal 0V (*) 13 N.C. 14 EP - Shield Description Not connected Cable braid / shield connected to earth (EP) Table 26: M11 connector terminals (*) in accordance with the MODBUS-IDA association nomenclature To connect up to the serial line use the M11 terminal board as described in section 8.2. 60/106 Rev. 02 - 29/04/2013 INSTALLATION GUIDE SMART STRING BOX DIP-SWITCH FOR RS485 LINE TERMINATOR DIP-switch SW2-1, SW2-2 Function RS485 terminator Factory setting Notes Both ON: terminators enabled ON: 120 Ω resistor between A (D1) and B (D0), 1500 Ω resistor between A (D1) and +5 VE, 1500 Ω resistor between B (D0) and Common. OFF: no termination polarization resistor and Table 27: DIP-switch for RS485 line terminator The factory settings of the DIP-switches are indicated in the following figure. Figure 40: Communication line terminator DIP-switch NOTE Incorrect setting of the terminators in a multidrop line may inhibit communication and lead to communication difficulties particularly at high baud rates. If more than the two prescribed terminators have been installed on a line some drivers may enter protection mode for thermal overload thus blocking the communication of some devices. Elements participating in a RS485 section are called nodes. The maximum number of nodes which can be connected on a section is limited to the following aspects: • Logic limit of the bus, equal to 247 • Length of the connection • Transmission speed • Electronic drivers used The limit set by the line drivers used in Sunway TG models is 30 devices. It is not advisable to use section lengths exceeding 500m. Should it be necessary to connect more than 30 devices on the same line or over a length exceeding 500 m, it is advisable to break the connection up into more than one section using RS485 repeaters. NOTE The RS485 bus default rate is 38400 baud. It is not advisable to exceed this value. In the event of communication disturbances, it is possible to set the rate at a lower value 19200 or 9600 baud. For correct communication within the range of the multidrop chain it is necessary to allocate a univocal address to each JUNCTION BOX. Rev. 02 - 29/04/2013 61/106 SMART STRING BOX INSTALLATION GUIDE By default, each JUNCTION BOX has a Modbus address composed of the last two digits of the serial number. Should it be necessary to change it, follow the bus communication INSTALLATION PROCEDURE. NOTE The voltage values for the bus in standby are: 2.6 V between line A (D1) and Common 2.4 V between line B (D0) and Common 8.4.3. Internal Bus RS485 Cables In the case of 16- and 24-string SMART STRING BOX, a RS485 cable is used to ensure continuity of the multidrop chain. This cable, fitted with DB9F connectors, multidrop connects the RS485 interfaces of each control board (CN3 connector). SMART STRING BOX with 16 inputs: cablet code PC1604160 SMART STRING BOX with 24 inputs: cablet code PC1604240 Both cablets are included as part of the supply with each SMART STRING BOX. S000175 Figure 41: 16-input SMART STRING BOX cablet 62/106 Rev. 02 - 29/04/2013 INSTALLATION GUIDE SMART STRING BOX S000176 Figure 42: 24-input SMART STRING BOX cablet 8.4.4. Bus Communication Installation Procedure • Before accessing the area of the JUNCTION BOX which contains the bus communication devices, put the box in safety conditions. Please refer to section 2.7. • Power the board at 12 Vdc using terminal M13, also located on the bracket outside the Lexan safety panel. In this way the functions of the SMART STRING BOX card are active (the board can communicate) but does not constitute a hazard for the user. • Connect the multidrop cable to DB9 CN3 connector or the M11 terminal board alongside. • Set the SW2 DIP-switch in accordance with the prescriptions provided above for the communication bus terminators. • MODIFYING THE ADDRESS: if necessary, act on the Rotary Switches CE1 and CE2, setting the required address between 1 and 99. Figure 32 illustrates the position of the rotary switches which are outside the Lexan safety panel near the CN3 connector and identified with the code “MODBUS ADDRESS”. The left-hand rotary switch CE1 is for the tens and the right-hand switch CE2 is for the units. It is also possible to set addresses above 99. For further information, please refer to the “Programming Guide”. • Wait for 15 seconds before interrogating the board at the new address. In the event of serial communication problems, please section 11. Rev. 02 - 29/04/2013 63/106 SMART STRING BOX INSTALLATION GUIDE 9. OPTIONALS 9.1. Fuse Box Figure 43: FUSE BOX 9.1.1. Product ID Code SMART STRING BOX do not have safety fuses installed on the negative pole of the strings. If fuses are also required on the negative pole a supplementary FUSE BOX can be connected. The FUSE BOX is available in three configurations for 8, 16 and 24 strings. These configurations are obtained by putting together 8-string FUSE BOX modules. Product ID Code Product composition CS - BF - 8 1 x B-F-8 CS - BF - 16 2 x B-F-8 CS - BF - 24 3 x B-F-8 Table 28: FUSE BOX configurations Product ID codes are as follows: CS - BF Y 64/106 Y No. of strings No. of strings Rev. 02 - 29/04/2013 INSTALLATION GUIDE 9.1.2. SMART STRING BOX Checking the Product on Delivery The equipment’s technical specifications are indicated on the box cover. Figure 44: B-F-8 FUSE BOX cover Rev. 02 - 29/04/2013 65/106 SMART STRING BOX INSTALLATION GUIDE The following items are provided in the package with each individual FUSE BOX: No. Description 8 PG11 screw plugs for closing any unused cable glands These are to be inserted on the box during the wiring phase. 17 PG11 cable glands 8 Fuses 1 Set of 2 screws for the cover 1 Box installation kit (made up of 4 stainless steel 6x20 screws, 4 stainless steel M6 cage nuts, 4 stainless steel M6 flat washers, 4 stainless steel M6 split washers plus support bar). Table 29: Accompanying Materials 66/106 Rev. 02 - 29/04/2013 INSTALLATION GUIDE 9.1.3. SMART STRING BOX Internal View, Electrical and Connections Diagram The figure below shows a drawing of the appliance's interior when the upper cover has been removed (by unscrewing the 4 screws). Figure 45: B-F-8 module: internal view Key Function A Negative pole inputs of strings from the PV field B Negative pole outputs of strings to SMART STRING BOX C Safety fuses D Earth terminal E Earth cable input Table 30: Key to FUSE BOX connectors/cable glands Figure 46: FUSE BOX module: bottom view Rev. 02 - 29/04/2013 67/106 SMART STRING BOX INSTALLATION GUIDE S000171 Figure 47: FUSE BOX electrical diagram WARNING Before accessing the terminal boards, check that the box is in safety conditions. Please refer to section 2.7). 68/106 Rev. 02 - 29/04/2013 INSTALLATION GUIDE 9.1.4. SMART STRING BOX FUSE BOX Assembly Instructions The FUSE BOX must be mounted alongside the SMART STRING BOX on the brackets provided. Then proceed with connecting the cables. S000155 Figure 48: Diagram of negative pole connection of the strings to the FUSE BOX Key Description A Earth cable B Negative pole of string from the PV field C Negative pole of string to JUNCTION BOX Table 31: Negative pole connection diagram Rev. 02 - 29/04/2013 69/106 SMART STRING BOX INSTALLATION GUIDE Figure 49: STRING BOX connection with optional fuse expansion box 9.1.5. Mechanical Dimensions Specifications 164 S000172 30 6.5 25 6.5 395 373 18.5x6.5 mm 300 Figure 50: FUSE BOX dimensions 70/106 Rev. 02 - 29/04/2013 INSTALLATION GUIDE 9.1.6. SMART STRING BOX Product Installation The fuse expansion boxes must be installed in accordance with the prescriptions provided in section 6.1. S000146-00EPS FUSE BOX JUNCTION BOX SMART STRING BOX DC SWITCH Figure 51: FUSE BOX wall mounting For details on the ambient conditions for installation, storage and transport, please refer to section 5.2. 9.2. Configuration Option without Anti-Inversion Diodes NOTE Please contact Elettronica Santerno SpA. A configuration without anti-inversion diodes and 10A string rated current is also available. 9.3. Configuration Option with Terminal Connections A version without quick-fit connectors is available which entails connecting the string cables using cable glands and terminals. All the necessary information can be found in section 7 and section 12. Rev. 02 - 29/04/2013 71/106 SMART STRING BOX INSTALLATION GUIDE 10. MAINTENANCE DANGER Before carrying out any kind of operation, please refer to section 2.7. NOTE In the event of any fault, please contact the Elettronica Santerno SpA CUSTOMER SERVICE for instructions on the necessary corrective action to be taken. Adequate maintenance ensures conversion performance and inverter reliability is maintained over time. This heading describes all the activities required to keep machine parts which are subject to wear and deterioration and/or components which are essential for guaranteeing safety and optimum performance in good condition. Access to products for the purpose of maintenance, modifications and management involves all persons responsible for production and maintenance. It must be carried out in observance of the health and safety regulations described in section 2.5. The minimum maintenance interval is indicated in Table 32. Equipment installed in an environment where there is a high concentration of dust requires more frequent maintenance than generally indicated. The activities described may involve stopping the inverter. Once the maintenance procedure has been completed restart the inverter by pressing the START button. 10.1. Maintenance Sheet Maintenance tasks Frequency (recommended) Box visual Inspection and Cleaning Every 6 months Check the state of connectors Every 12 months Check the state of cable glands Every 12 months Check the state of fuses Every 12 months Check the state of the disconnecting switch Every 12 months Check SPDs Every 12 months Check that cables and bars are securely tightened Every 12 months Check the condition of dataplate and warning signs Every 24 months The frequency of scheduled maintenance may need to be increased depending on the location in which the equipment is installed and the relevant ambient conditions. Table 32: Maintenance Sheet 72/106 Rev. 02 - 29/04/2013 INSTALLATION GUIDE 10.1.1. SMART STRING BOX Box Visual Inspection and Cleaning • Visually inspect the state of cables. Check that cables show no signs of damage caused by rodents and remove any insects. • Check to see if any condensation has formed inside the equipment. Should this be the case, clean with a cloth, find out where water is getting in and rectify the problem. • General box cleaning. • Check the watertightness of the casing and for any signs of damage. • Check that the cover is correctly positioned and consequently that IP65 protection is guaranteed. • Check that no wires, clamps or anything else has inadvertently been left under the cover. • Check that the screws used for securing the cover in place are in good condition. If necessary, replace with screws supplied with the product or request spares from the Elettronica Santerno SpA CUSTOMER SERVICE. 10.1.2. Checking the Connector Status • Check the state of the quick-fit PV connectors in the JUNCTION BOXES. • Check that connectors are firmly inserted. • Check that the cable is correctly crimped on each connector. • Close off all the unused connectors. 10.1.3. Checking the Cable Glands Status • Check the state of the cable glands in the JUNCTION BOXES. • Check that cable glands are securely tightened around the cable. • Close off all the unused cable glands. 10.1.4. Checking Fuses • Routine maintenance entails checking the continuity of the fuses installed in the JUNCTION BOXES of the SMART STING BOXES and STRING BOXES. • Visually inspect the installed fuses and the fixing springs on the fuse holders inside the JUNCTION BOXES. Rev. 02 - 29/04/2013 73/106 SMART STRING BOX 10.1.5. INSTALLATION GUIDE Checking the SPDs DANGER Electric shock and burns hazard: coming into contact with live PV field or grid components can lead to serious injury and even death! NEVER work on the equipment unless it is switched off and disconnected from the power supply. Inspect the state of the SPDs (Surge Protective Devices) by checking the status of the button/slot on the discharger. The exact position of the SPDs can be seen on the Electrical and Mechanical Diagram. Figure 52: Surge Protective Device Button/slot status SPD Status Button/slot with green indicator visible SPD ready for use Button/slot with red indicator visible SPD faulty Please refer to Table 54. 74/106 Rev. 02 - 29/04/2013 INSTALLATION GUIDE 10.1.6. SMART STRING BOX Checking Tightening In order to guarantee correct tightness of the electrical contacts, periodical checking of the tightening torques is to be carried out over the equipment’s life cycle. • Pay particular attention to any colour variations or anomalies affecting the terminals and copper bars. Replace any damaged connections or corroded contact elements. • Check the tightness of all the terminal clamps for connecting the power wiring and tighten if necessary. • The tightening torques can be found in section 12.6. Rev. 02 - 29/04/2013 75/106 SMART STRING BOX INSTALLATION GUIDE 11. TROUBLESHOOTING SMART STRING BOX products are completely protected against short-circuits and overvoltage caused by system failure or temporary phenomena. Furthermore, the control system performs complete selfdiagnosis operations to help personnel solve any problems which may occasionally arise. The modular design of Elettronica Santerno inverters makes repair and/or reset operations quick and easy to perform. This chapter indicates the most likely causes of the most common problems. The steps to be taken to remove these causes are also described. WARNING To carry out the following operations, check that the parallel string box is in safety conditions. Please refer to section 2.7. NOTE If necessary, please contact the Elettronica Santerno SpA CUSTOMER SERVICE. 11.1. Self-Diagnostics The SMART STRING BOX’s self-diagnostics system detects and records most malfunctions and provides technical support elements which are useful for problem solving. The elements providing support for diagnostic functions which are accessible in remote and/or local remote control are as follows (please refer to the “Programming Guide”): • Measure and control electronic board power supply indicator LED. • Output disconnecting switch status. • SPD status. • String current verification. • Alarms history for the SMART STRING BOX accessible in remote and/or local remote control. When an alarm occurs, the SMART STRING BOX records it in the Alarms history list together with the time of occurrence (Supply Time and Operation Time), the status of the SMART STRING BOX and the value of certain sampling measurements taken at the time of alarm tripping. The stored data is very useful in helping to determine the cause which triggered the alarm and consequent removal of the alarm condition. 76/106 Rev. 02 - 29/04/2013 INSTALLATION GUIDE 11.2. SMART STRING BOX Current Measurement Malfunction 11.2.1. No Current is Measured • Check if the disconnecting switch is closed. • Check that string polarity has not been inverted. • Check that the strings show no signs of interruption in continuity of the cable. NOTE If the problem persists, please contact the Elettronica Santerno SpA CUSTOMER SERVICE. 11.2.2. The Expected Current is not Measured • If the SMART STRING BOX is equipped with quick-fit connectors, check that said connectors have been connected in the right position. • If the SMART STRING BOX is equipped with cable glands, check that string cables have been tightened in the right position. 11.3. Anti-theft System Malfunction 11.3.1. • Check that the minimum number of strings selected in the SMART STRING BOX parameters are disconnected. 11.3.2. • String Opening is not Indicated False String Opening is Indicated Check that string polarity has not been inverted. Rev. 02 - 29/04/2013 77/106 SMART STRING BOX 11.4. INSTALLATION GUIDE Malfunction of Communication Ports 11.4.1. Serial Communication Problems • Check that all the programming parameters are correct. • Check the voltage values for the bus in standby: please refer to section 8.4.2. 11.5. Safety Devices Tripped 11.5.1. Output Disconnecting Switch Tripped • Check for short circuits. • Check the polarity of the PV field poles. • Check that the release winding is not excited. 11.5.2. • SPDS Tripped or Fuses Blown If the SPD has tripped and/or relative fuse have blows, replace them. Please refer to section 12.8. 78/106 Rev. 02 - 29/04/2013 INSTALLATION GUIDE 11.5.3. SMART STRING BOX String Fuse Blown This section describes faults relevant to one or more SMART STRING BOX fuses blowing. If a fuse blow, procedures cannot be limited to simply replacing the fuse. Suitable analysis of the fault which caused the problem must be also carried out. NOTE Should the fuse blow again, please contact the Elettronica Santerno SpA CUSTOMER SERVICE. Before replacing a blown fuse, all the tasks described in section 11.6.1 and 11.6.2 must be performed. PROCEDURE FOR REPLACING STRING FUSES To replace a fuse, proceed as follows: • • To extract the blown fuse: ο Use the special insulated fuse extractor. See Figure 53. ο Stand in front of the fuse holder. ο Take hold of the fuse with the extractor perpendicular to the electronic card. ο Give a sharp pull to remove. To insert a new fuse: ο Use the special insulated fuse extractor. Please refer to Figure 54. ο Stand in front of the fuse holder. ο Take hold of the new fuse with the extractor. ο Position the fuse in the fuse holder, keeping the extractor perpendicular to the electronic card. ο Firmly push the fuse into place. Rev. 02 - 29/04/2013 79/106 SMART STRING BOX INSTALLATION GUIDE Figure 53: Fuse extraction using the fuse extractor Figure 54: Fuse installation using the fuse extractor 80/106 Rev. 02 - 29/04/2013 INSTALLATION GUIDE SMART STRING BOX Once the fuse has been replaced, restore all the conditions for plant operation. • Replace the Lexan safety panel. • Replace the cover. • Restore the auxiliary power supply, if present (for SMART STRING BOX only). • Connect the strings. • Close the disconnecting switch on the DC-SWITCH BOX. • Close the switch on the DC side of the inverter. 11.6. General Principles in the Event of Failure Access to the PV system components for the purpose of maintenance, modifications and management involves all persons responsible for production and maintenance. It must be carried out in observance of the health and safety regulations described in section 2.5. 11.6.1. Fault Containment The following prescriptions are of a general nature. • Place the equipment affected by the fault in safety conditions. This operation may involve stopping and disconnecting all the up- and downstream devices. Please refer to section 2.4. • If the fault has occurred inside an inverter, press an emergency stop button to cut the inverter off up- and downstream. Open the disconnecting switches of all the string boxes so that the entire DC input section is safe, including the DC-Parallel (if installed). • In multi-inverter systems it is usually sufficient to cut off the inverter affected by the fault both upand downstream so that the other inverters can remain in operation. • If the fault has occurred in one of the components downstream from the inverter (AC parallel cabinet, external transformer, metering cabinet etc.) STOP all the machines and then press the emergency stop button to cut off the inverter both up- and downstream. • If the fault has occurred in one of the components upstream from the inverter (DC-parallel, String Box, etc.) STOP all the machines and then press the emergency stop button to cut off the inverter both up- and downstream. Open the disconnecting switches of all the String Boxes so that the entire DC input section is safe, including the DC-Parallel (if installed). • If the fault has occurred in one of the String Boxes, open all the strings connected in input and open the disconnecting switches of all the String Boxes in order to place all the equipment in safety conditions, including the cable output section. • Proceed with analysis of the causes and consequences of the fault. NOTE If necessary, please contact the Elettronica Santerno SpA CUSTOMER SERVICE. Rev. 02 - 29/04/2013 81/106 SMART STRING BOX 11.6.2. INSTALLATION GUIDE Fault Analysis This section covers the main principles to be observed when analysing the causes and consequences of faults. A PV inverter usually operates as part of an overall system. All the components adopt various protective measures therefore, in general, the consequences of a generic fault affecting an upstream component or element does not extend to other components downstream. However, the causes and the consequences of any faults which may arise need investigating on the plant as a whole. Fault investigation and analysis activities represent one of the most hazardous tasks assigned to maintenance technicians. This manual only provides indications of an extremely generic nature concerning the precautions which must be adopted when fault investigation and analysis activities need to be carried out on live components. In the event of a fault, before proceeding to resolve the problem, the following tasks must be performed to evaluate: • • The state of components and the system as a whole: ο Check the state of the contacts. ο Check the state of cables. ο Check the status of any interface protection installed in the system. ο Check the state of all protective elements installed in the system. ο Check the state of any auxiliary power supplies. ο Check the level of humidity present on system components. If faults have occurred on each box, inverter and/or the system: ο Check for any earth faults on the DC side and the AC side. ο Make sure all prescriptions have been observed relative to the neutral connection or those relative to field configuration (floating, Positive Earthed, Negative Earthed). ο Check the state of the SPDs and relative fuses. Once all the aforementioned steps have been performed, proceed with evaluating: • The causes of faults. • The consequences of faults on the electrical, electromechanical and electronic components. • The steps to be taken to remove the cause of the fault. Once all the aforementioned steps have been performed, proceed with rectifying the causes of the fault. NOTE If necessary, please contact the Elettronica Santerno SpA CUSTOMER SERVICE. 82/106 Rev. 02 - 29/04/2013 INSTALLATION GUIDE 11.7. SMART STRING BOX Revision of String with Inverted Polarity Correct connection of the strings to the JUNCTION BOX must be checked in the presence of live voltage, hence in the daytime. DANGER Correct connection of the strings to the JUNCTION BOX must be checked by expert personnel only using all the necessary safety devices and precautions. • Make sure that the inverter connected to the SMART STRING BOX is NOT running, i.e. that it is STOPPED. • Open the switch on the DC side of the converter. • Make sure that the disconnecting switch on the DC-SWITCH BOX is open. • Remove the cover from the JUNCTION BOX. The Lexan safety panel must be left in its seat. • With the aid of a multimeter check the polarity of the strings (between the positive pole input terminal of each individual string and a negative pole input terminal). If a string connection error is found: • Disconnect the inverted string from the JUNCTION BOX connector. • Correct the wiring of the inverted string (invert the connectors of the positive and negative poles from the panels). Once the strings have been correctly wired restore all the conditions for plant operation. • Replace the cover on the JUNCTION BOX. • Connect the strings to the quick-fit connectors. • Close the disconnecting switch on the DC-SWITCH BOX. • Close the switch on the DC side of the inverter. Rev. 02 - 29/04/2013 83/106 SMART STRING BOX 11.8. INSTALLATION GUIDE How to Contact the CUSTOMER SERVICE Should it be necessary to contact the Elettronica Santerno SpA CUSTOMER SERVICE, please provide the following data: • Equipment model • Serial Number • Date of commissioning • Order confirmation reference, if available It is advisable to recover the following information from the memory: • Number of operating hours (please refer to the “Programming Guide”) • Alarms history (please refer to the “Programming Guide”) This operation can be carried out using the Remote Sunway program with local or remote connection. NOTE Should it be necessary to send the equipment in for repair or to return the equipment, contact the Elettronica Santerno SpA CUSTOMER SERVICE, to agree upon the terms. 84/106 Rev. 02 - 29/04/2013 INSTALLATION GUIDE SMART STRING BOX 12. TECHNICAL DATA CAUTION Power supply must be ensured by an external power supply source, either the 230 Vac mains or the auxiliary power supply. 12.1. Dataplate Each dataplate indicates the product’s technical data and identification details. • Name of the product. • Part number assigned to the product by Elettronica Santerno. • Technical data (rated input/output voltage and current, rated power, etc.) • CE marking and indications of the relative reference Standards applied in the construction of the equipment (CE is a registered collective trademark). • Product revision index. • Serial Number: identifies the product serial number The dataplate measures 100 x 70 mm and is silver in colour. Figure 55: SMART STRING BOX dataplate Rev. 02 - 29/04/2013 85/106 SMART STRING BOX 12.1.1. INSTALLATION GUIDE Product Revision Label To identify the version of the product supplied, simply refer to the revision label on the cover and inside the box. Figure 56: Product revision label 12.2. Installation Specifications Installation specifications for SMART STRING BOX Operating ambient temperature -25 °C ÷ +50 °C Operating ambient humidity From 5% – 95%, from 1 g/m – 25 g/m , with no condensation or ice formation (category 3k3 in compliance with EN50178) 3 3 Up to 2000 m ASL Altitude For higher altitudes please refer to section 12.3.1 and 12.3.2. Do not install the equipment where it is exposed to direct sunlight. Installation site or where it is exposed to conductive dust, corrosive gases, vibrations, water spray or dripping. Do not install in salty environments. Degree of protection IP 65 Degree of pollution Class 3S2 or higher, according to IEC 60721-3-3 Table 33: Installation specifications for SMART STRING BOX 86/106 Rev. 02 - 29/04/2013 INSTALLATION GUIDE 12.3. SMART STRING BOX Electrical Specifications SMART STRING BOX U.M. 600V 800V 900V 1000V Maximum DC input voltage V 740 Vdc 880 Vdc 900 Vdc 1000 Vdc DC string fuses (positive pole) A Additional fuse sizes available, to be defined when ordering the equipment Input current Impp (Impp) A 8 Max input current (Isc) A 10 Uc Pulse withstanding voltage kV 12 A - PV rated (10x38) 4 kV: Strings inputs 4 kV: DC output Table 34: SMART STRING BOX electrical specifications with anti-inversion diodes SMART without diodes STRING BOX anti-inversion Maximum DC input voltage U.M. 600V 800V 900V 1000V V 740 Vdc 880 Vdc 900 Vdc 1000Vdc 12 A - PV rated (10x38) DC string fuses (positive pole) A Additional fuse sizes available, to be defined when ordering the equipment Input current Impp (Impp) A 10 Max input current (Isc) A 11 Uc Pulse withstanding voltage kV 4 kV: string input 4 kV: DC output Table 35: SMART STRING BOX electrical specifications with anti-inversion diodes WITHOUT ANTI-THEFT SYSTEM SMART STRING BOX Versions 600V, 800V, 900V Power supply From PV field V > 200 Vdc Version 1000V From 230 Vac grid From DC 8-15 Vdc power supply unit WITH 24h/24h ANTI-THEFT SYSTEM From 230 Vac From 12 Vdc battery From DC 8-15 Vdc power supply unit Table 36: SMART STRING BOX power supply ratings Rev. 02 - 29/04/2013 87/106 CS-SP(A)-8-XXXV CS-SP(A)-16-XXXV CS-SP(A)-24-XXXV INSTALLATION GUIDE UNIT OF MEASURE SMART STRING BOX N. 8 16 24 Nominal output current @ 45°C ambient temperature A 72 144 192 Output disconnect switch rating A 160 200 250 INPUT Max. number of strings OUTPUT Table 37: SMART STRING BOX technical data CAUTION The maximum number of strings connected to the product shall be calculated based on the allowable output rated power, as well as on the ambient temperature and the product configuration. 88/106 Rev. 02 - 29/04/2013 INSTALLATION GUIDE Features SMART STRING BOX Min. Typ Max. Power supply from PV field Operating voltage range 200 Vdc Udc max Power absorbed from PV field Protection (FU9) 6.5 W 2 A-1000 Vac fuse, dimensions 6.3x32 mm Power supply from grid Applicable voltage interval Frequency 200 Vac 230 Vac 250 Vac 45 Hz 50 Hz 65 Hz Power absorbed from the grid 6.5 W Peak inrush current (1ms) 7A 1 A-250 V fat fuse, dimensions 5x20 mm and 250 Vac varistor Protection (FU22) Power supply from DC or battery source Applicable voltage interval 8 Vdc 12 Vdc Power absorbed from the battery 14.5 Vdc 7.5 W Absorbed current 300 mA 625 mA 1.6 A-60 V resettable fuse and 15 Vdc Zener diode Protection Table 38: Nominal power supply specifications 12.3.1. Maximum Voltage Derating When equipment is installed at a high altitude, the maximum DC voltage, i.e. the maximum Voc value applicable to the product in accordance with section 12.3 must be derated as indicated in the table: Altitude [m] Maximum DC voltage/max. Voc 0-2000 Unchanged 2001-3000 Do not exceed 846 V Table 39: Maximum DC voltage based on altitude If the equipment is to be installed at over 3000 m, please contact Elettronica Santerno SpA. Rev. 02 - 29/04/2013 89/106 SMART STRING BOX 12.3.2. INSTALLATION GUIDE Rated Current Derating To calculate the nominal current, coefficient ‘Kt’ is assigned to temperature while coefficient ‘Ka’ is assigned to altitude. Figure 57: Coefficient Kt for temperature derating (at sea level) 90/106 Rev. 02 - 29/04/2013 INSTALLATION GUIDE SMART STRING BOX Figure 58: Coefficient Ka for altitude derating To calculate nominal current derating the following method of calculation is used: Calculation of coefficients Condition Calculation of the nominal output current Ktot = Kt x Ka If Ktot ≥ 1 Unchanged Ktot = Kt x Ka If Ktot < 1 Rated output current reduced by a Ktot factor Table 40: Calculation of the rated current reduction coefficient Rev. 02 - 29/04/2013 91/106 SMART STRING BOX 12.4. INSTALLATION GUIDE Dimensions and Weights Product name Dimensions WxHxD [mm] Weight [Kg] CS-SP(A)-8-600V 1000x300x185 22.5 CS-SP(A)-16-600V 1600x300x185 32 CS-SP(A)-24-600V 2200x300x185 41.5 CS-SP(A)-8-800V 1000x300x185 22.5 CS-SP(A)-16-800V 1600x300x185 32 CS-SP(A)24-800V 2200x300x185 41.5 CS-SP(A)-8-900V 1000x300x185 22.5 CS-SP(A)-16-900V 1600x300x185 32 CS-SP(A)24-900V 2200x300x185 41.5 CS-SP(A)-8-1000V 1000x300x185 22.5 CS-SP(A)-16-1000V 1600x300x185 32 CS-SP(A)-24-1000V 2200x300x185 41.5 Table 41: SMART STRING BOX dimensions and weights 12.4.1. Mechanical Dimensions 1018 (MAX) 400 165 218 600 CS-SP(A)-8 86 300 392 6,5 P001016-A 370 1000 Asole mm, distanti Slots6,5x18,5 6.5x18.5 mm. fraIn-between loro 6,5 mm distance 18,5 6,5 30 6.5 mm Figure 59: 8-string SMART STRING BOX 92/106 Rev. 02 - 29/04/2013 INSTALLATION GUIDE SMART STRING BOX 1618 (MAX) 400 600 165 218 600 CS-SP(A)-16 6,5 P001015-A 300 86 392 370 1600 Asole 6,5x18,5 mm, Slotsfra6.5x18.5 distanti loro 6,5 mm 18,5 6,5 mm. In-between distance 6.5 mm 30 Figure 60: 16-string SMART STRING BOX 2218 (MAX) 400 600 600 165 218 600 CS-SP(A)-24 300 86 6,5 P001014-A 370 392 2200 Asole 6,5x18,5 mm, 18,5 6,5 30 distanti6.5x18.5 fra loro 6,5 mm Slots mm. In-between distance 6.5 mm Figure 61: 24-string SMART STRING BOX Rev. 02 - 29/04/2013 93/106 SMART STRING BOX INSTALLATION GUIDE 161,5 600 341 300 135 Figure 62: JUNCTION BOX 94/106 Rev. 02 - 29/04/2013 INSTALLATION GUIDE SMART STRING BOX 300 188 188 400 341 P000889-0 Figure 63: DC-SWITCH BOX Rev. 02 - 29/04/2013 95/106 SMART STRING BOX 12.4.2. INSTALLATION GUIDE Clearance Values It is necessary to observe the following minimum distances from walls, other equipment and objects in order to ensure safety of access and adequate heat dispersion. SMART STRING BOX Front [mm] RH/LH side [mm] Back [mm] Bottom [mm] With anti-inversion diodes 800 120 50 250 Without anti-inversion diodes 800 120 -- 250 Table 42: Clearance Values See section 6. 12.5. Fastening the Cover Description Tightening torque of screws [Nm] JUNCTION BOX 2 - 2.5 DC-SWITCH BOX 2 - 2.5 Table 43: Fastening the Cover 12.6. Connection of Power and Signal Cables 12.6.1. DC Connection - String Cables VERSION WITH CABLE GLAND AND TERMINALS String cable header Tightening torque of terminals [Nm] Min./Max. conductor section [mm²] Min./Max. external cable diameter [mm] 1.2 - 2.5 4/6 5/10 Pipe ferrule (manufacturer's reference: Cembre) 4 mm2 cables PKD 412 6 mm2 cables PKD 612 Table 44: String cable connection with cable gland and terminal VERSION WITH QUICK-FIT PV CONNECTORS String cable header Quick-fit PV connectors Min./Max. conductor section [mm²] Min./Max. external cable diameter [mm] 4/6 5/10 Table 45: String cable connection with quick-fit PV connector 96/106 Rev. 02 - 29/04/2013 INSTALLATION GUIDE 12.6.2. SMART STRING BOX DC Connection – Output Cables No. of cables per pole Tightening torque [Nm] Max. cable section [mm²] Min./Max. external cable diameter [mm] 2 18 2x150 12/24 Output cables to inverter (from DC-SWITCH BOX) Table 46: Power cables connection Section 2 [mm ] Cable gland Cable ferrule (manufacturer's reference: Cembre) 2 (1 x positive, 1 x negative) 35 PG29 + adapter A7-M10 2 (1 x positive, 1 x negative) 50 PG29 + adapter A10-M10 2 (1 x positive, 1 x negative) 70 PG29 A14-M10 2 (1 x positive, 1 x negative) 95 PG29 A19-M10 2 (1 x positive, 1 x negative) 150 PG29 A24-M10 4 (2 x positive, 2 x negative) 35 PG29 + adapter A7-M10 4 (2 x positive, 2 x negative) 50 PG29 + adapter A10-M10 4 (2 x positive, 2 x negative) 70 PG29 A14-M10 4 (2 x positive, 2 x negative) 95 PG29 A19B-M10/15.5 4 (2 x positive, 2 x negative) 150 PG29 A24B-M10/19 No. of cables Table 47: Power cables connection - ferrule 12.6.3. Connection of Earth Cables Description DC-SWITCH BOX: earth cable Cable lug/pipe ferrule No. of cable glands Tightening torque Yes 1 x PG16 10 [Nm] Max. cable section [mm²] Min./Max. external cable diameter [mm] 35 9/14 Table 48: DC-SWITCH BOX: earth cable Rev. 02 - 29/04/2013 97/106 SMART STRING BOX 12.6.4. INSTALLATION GUIDE Connection of Signal Cables Description No. of cable glands DC-SWITCH BOX auxiliary terminals Min./Max. external cable diameter Cable section [mm] [mm] 1 x PG11 5/10 1.5 Table 49: Auxiliary terminals cable section Description No. of cable glands Min./Max. external Max. cable section cable diameter [mm²] [mm] Power supply terminals cable section M13 power supply input/output 1 x PG11 5/10 1 Power supply from grid 230 V M12 3 x PG11 5/10 1.5 2 x PG11 5/10 1 2 x PG11 5/10 1 5/10 1 Environmental measures cable section Environmental Measures M10 Communication cable section RS485 Modbus M11 Section of anti-theft function cables to the external control unit Anti-theft function M9 1 x PG11 Table 50: Connection of signal cables 98/106 Rev. 02 - 29/04/2013 INSTALLATION GUIDE 12.6.5. SMART STRING BOX Connection of Internal Components Figure 64: SMART STRING BOX view Key A Description Torque [Nm] Copper bars for internal power connections 10 Table 51: Tightening torques 12.7. Output Disconnect Switch Release Coil Release coil Voltage Inrush Power 1SDA 051342 R1 ABB SACE 220…240V AC 220…250V DC AC: 100 VA DC: 120 W Type Shunt opening Table 52: Output disconnect switch release coil Rev. 02 - 29/04/2013 99/106 SMART STRING BOX 12.8. INSTALLATION GUIDE SPD Technical specifications for SPDs are provided in the table below. Technical Specifications Rated voltage of system 1000 V Maximum voltage of system 1120 V Back-up power supply 4A Rated discharge current 20 kA Response time 25 ns Residual current < 1 mA Configuration Y connection of three SPDs to varistor UP level of protection ( L-L / L-PE ) 3.8 kV L tightening torque 2.8 Nm Remote Signal Contact Type 1 NO/NC Minimum range 12Vdc - 10 mA Maximum range 250 Vac - 1 A 2 Cable section 1.5 [mm ] Ambient Conditions Operating temperature -40 ... +80 Maximum altitude 2000 General Specifications Removable cartridges Yes UL94 Fire resistance V0 Table 53: SPD technical specifications 100/106 Rev. 02 - 29/04/2013 INSTALLATION GUIDE 12.9. SMART STRING BOX Environmental Sensors Acquisition The nominal specifications for the environmental measures analogue inputs are indicated in the table below. WARNING If the maximum/minimum input or output voltage ratings are exceeded, irreparable damage to the equipment may occur. NOTE The isolated power supply output and the analogue auxiliary output are protected by a resettable fuse capable of protecting the power supply unit inside the inverter against faults following a short circuit, but it cannot be guaranteed that the inverter will temporarily cease operation in the event of a short circuit. ANALOGUE INPUTS Rating Analogue inputs configured in 0-10 V mode Min Typ Max Unit Input impedance 40 kΩ Cumulative offset and gain error in relation to full scale value 0.5 % Temperature coefficient of the offset and gain error 200 ppm/°C Digital resolution 12 bits Voltage LSB value 2.44 Permanent overload on the inputs without causing damage Input filter cut-off frequency (low-pass first order filter) -30 mV/LSB +30 1 V Hz Table 54: Analogue inputs configured in 0-10 V mode Rev. 02 - 29/04/2013 101/106 SMART STRING BOX INSTALLATION GUIDE Rating Analogue inputs configured in 0-20 mA mode Min Typ Max Unit Input impedance 40 kΩ Cumulative offset and gain error in relation to full scale value 0.5 % Temperature coefficient of the offset and gain error 200 ppm/°C Digital resolution 12 bits Voltage LSB value 2.44 Permanent overload on the inputs without causing damage -3.7 Input filter cut-off frequency (low-pass first order filter) mV/LSB +30 1 V Hz Table 55: Analogue inputs configured in 0-20 mA mode Rating Analogue inputs configured in 0-100 mV mode Min Input impedance Typ Max 1 Cumulative offset and gain error in relation to full scale value Unit MΩ 0.2 % Temperature coefficient of the offset and gain error 50 ppm/°C Digital resolution 12 bits Voltage LSB value 24.7 Permanent overload on the inputs without causing damage Input filter cut-off frequency (low-pass first order filter) -30 µV/LSB +30 1 V Hz Table 56: Analogue inputs configured in 0-100 mV mode 102/106 Rev. 02 - 29/04/2013 INSTALLATION GUIDE SMART STRING BOX Rating Analogue inputs configured as temperature measurement with PT100 Min Type of probe 2-wire connection PT100 thermistor Measurement range -50 PT100 element polarization current Typ Max 125 0.67 Unit °C mA Temperature measurement coefficient 50 ppm/°C Digital resolution 12 bits 1.5 °C Maximum cumulative measurement error over -40 °C ÷ +50 °C temperature range 0.5 Mean value of temperature LSB (SW linearization function) Permanent overload on the inputs without causing damage Input filter cut-off frequency (low-pass first order filter) 0.098 -10 °C/LSB +10 1 V Hz Table 57: Analogue inputs configured as temperature measurement with PT100 Rev. 02 - 29/04/2013 103/106 SMART STRING BOX INSTALLATION GUIDE 12.10. Fuse Box For the installation specifications, please refer to section 12.2 for the SMART STRING BOX. 12.10.1. FUSE BOX Electrical Specifications U.M. CS-BF-8 CS-BF-16 CS-BF-24 INPUT Maximum DC input voltage V 1000 Vdc 12 A - PV rated (10x38) DC string fuses (positive pole) A Additional fuse sizes available, to be defined when ordering the equipment Input current Impp (Impp) A 8 Max input current (Isc) A 10 String cable section Uc Pulse withstanding voltage 4-6 mm 2 4 kV: Strings inputs kV 4 kV: DC output Table 58: FUSE BOX Electrical Specifications U.M. CS-BF-8 CS-BF-16 CS-BF-24 No. 8 16 24 A 80 160 240 INPUT Max number of strings OUTPUT Maximum output power Table 59: FUSE BOX technical data 104/106 Rev. 02 - 29/04/2013 INSTALLATION GUIDE 12.10.2. SMART STRING BOX Dimensions and Weights Product name Dimensions WxHxD [mm] Weight [Kg] CS-BF-8 300x341x134 3 CS-BF-16 600x341x134 6 CS-BF-24 900x341x134 9 Table 60: FUSE BOX dimensions and weights 300 134 300 341 P0009 16-0 Figure 65: FUSE BOX CS-BF-8 dimensions For the clearances to be observed, see section 12.4.2 for the SMART STRING BOX. Rev. 02 - 29/04/2013 105/106 SMART STRING BOX 12.10.3. INSTALLATION GUIDE Cable Connection Cable No. of cables String cables Max 16 (8 in input, 8 in output) Earth cable 1 Table 61: Number of FUSE BOX cables String cable header Pipe ferrule (manufacturer's reference: Cembre) 4 mm2 cables PDK 412 6 mm2 cables PDK 612 Tightening torque of terminals [Nm] Min./Max. conductor section [mm²] Min./Max. external cable diameter [mm] 2.5 4/6 5/10 Table 62: FUSE BOX cable connection 106/106 Rev. 02 - 29/04/2013