1
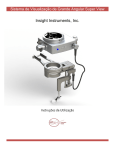
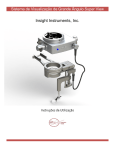
The
Leica CFM 2
Instruction Manual
Features of the
Leica CFM 2:
Trinocular Ergobody - provides a range of 0-35o angle ergonomically
adjusts to eye level of persons with varied height and seating
requirements. Accepts 10x eyepieces for binocular viewing, and has
an extra port for video and photo applications.
Explanation of Warning Symbols
(1.2)
CAUTION: Special safety information is marked at the edge by
the left-hand symbol and highlighted by a gray background.
Comparison Bridge - optically combines the images of two separate
specimens. A centralized control allows you to adjust the split image
dividing line from 0-100% of specimen viewing on each side.
Reverse Nosepiece - holds up to 5 objectives. Open holes are plugged
with a threaded cap.
(1.2) Numbers in brackets, e.g. (1.2) refer to illustrations. In this
example Fig. 1 pos 2.
CAUTION: This symbol means that incorrect operation can
damage the microscope or its accessories.
CAUTION: Danger of electrical shock.
*
Explanatory note. Item is not included in all variants of the
microscope.
Stage(s) - a 360o circular rotatable stage and a square (mechanical)
stage with Vernier scales.
Mechanical Stage Fingers - provide incremental manipulation of
specimens. Easily adjusted controls allow N/S/E/W stage movement
on the stages.
Abbe Condenser - a circular dovetail centerable condenser mount is
easy to change and adapt optional filters and light ring slides for phase
contrast. This has an auxiliary lens included with it for use with the
Leica DM LS objectives.
Infinity Optics - three Leica DM LS N Plan objectives are included as
standard: 10x, 20x, and 40x. These objectives are optically matched
for parfocality magnification and parcentration. Any additional DM
LS objectives can be matched for use with this system.
Focusable Eyepieces - Two focusable 10x eyepieces with 20mm field
of view allows the user to parfocalize the optical system to their
individual preferences.
Field Diaphragm - the leaf-type aperture allows an adjustable light
field ranging from pinhole-sized to the entire light well opening.
Fine/Coarse Focus - easily accessible control knobs on the sides of
the units allow for at least 20mm of overall vertical travel of the stages.
In addition, 3µm increments of movement can be achieved by using
the fine focus knob.
Illumination System - external cold light source provides balanced,
even illumination through a bifurcated fiber optic bundle.
EN
1
Leica CFM 2
Instruction Manual
1.0 Introduction................................................................................................2
1.1 Microscope Features ......................2
1.2 About This Manual...........................3
1.3 Unpacking ..........................................3
1.4 Equipment Installation.....................3
2.0 Unpacking ..................................................................................................2
3.0 Preparation For Use
3.1 Illumination Source..........................4
3.2 Trinocular Ergobody & Eyepieces4
3.3 Condensers........................................5
3.4 Field Diaphram ..................................5
3.5 Aperture Diaphram ..........................5
3.6 Final Adjustments .............................5
4.0 Operation
4.1 Illumination.........................................5
4.1.1 Objectives...........................................5
4.1.2 Objectives Lettering.........................5
4.1.3 Filed Performance of Objectives ..6
4.1.4 Colour Code Rings on Objectives .6
4.2 Photomicrography............................6
4.3 Video Applications Microscopy....6
4.4 Optical Performance Parameters.....6
4.4.1 Total Magnification..................................6
4.4.2 Useful Magnification..............................6
4.4.3 Object Field Diameter.............................6
5.0 Care of Microscope
5.1 Polarizer Application Kit..................7
5.3 Dual Viewer........................................7
5.4 Phase Contrast Objectives.............7
5.5 Binocular Ergobody .........................7
5.6 Fixed 10x Eyepieces.........................7
5.7 Stages..................................................7
5.8 Motorized Tables ..............................7
5.9 Light Source Filters ..........................7
5.10 CL/PH 0.90/1.25 Oil Condenser.......7
5.11 Brightfield Objectives ......................7
5.12 Reticles................................................7
6.0 Fuse Placements ......................................................................................7
6.1 Dust Protection .................................7
6.2 Solvents...............................................7
6.3 Acids, Alkaline Solutions ................7
6.4 Dust/Optics.........................................7
6.5 Oil..........................................................8
2
1.0 Introduction
The Leica CFM 2 is the premier instrument for high magnification
comparison microscopy such as hair and fiber analysis, featuring
world-renowned optics.
Intricate specimens such as hair and fiber can only be compared with
sufficient accuracy if they are observed simultaneously, with an even,
color-balanced illumination. The Leica CFM 2’s comparison bridge
and adjustable split image dividing line allows from 0-100% line division
for precise acuity when comparing specimens. The base of the unit
accommodates the ultimate illumination system for comparison.
Attaching a bifurcated fiber optic cable applies 100 watts of singlelamp color balancing for both specimens.
The CFM 2 is based on the Leica DM LS microscope. Accessories for
the DM LS should only be used after contacting your local Leica
Microsystems representative.
NOTE: Leica CFM 2 optical components are matched for color balance.
Use only balanced, paired optics from Leica for accurate comparisons.
A Leica DM LS Microscope Instruction Manual is included for
reference only.
1.1 Microscope Features
Designed exclusively for the demanding requirements of precise hair
and fiber analysis, the Leica CFM 2 features:
Leica high quality optics have set global standards in optics
engineering.
Lighting - a key feature for any comparison microscope, one light
source creates equal intensity and color correctness from side to side
by using bifiburcated fiber optic bundles.
Trinocular Ergobody assembly - ergonomics combined with precision
optical viewing allow the trinocular ergobody to comfortably fit your
work station design. The trinocular ergobody allows the adaption of
both video and photo capabilities.
Comparison bridge - is the center of the Leica CFM 2. The bridge
supports two precisely matched sets of objectives on quintuple ball
bearing nosepieces. A prism with dividing line moves laterally to
provide a split field of image. By rotating the conveniently located
prism knob, the field is continuously adjustable from 100% of the left
object to 100% of the right object, or any position in between.
EN
The high quality optical system provides a large 20mm field of
view with erect, unreversed images. The image moves in the
same direction as the object for quick and easy manipulation
of the specimen.
Stages - one rotatable circular and one square stage allow
precise alignment of specimens for comparison viewing.
Compact instrumentation - minimal height, width and depth
measurements allows for an easy fit at any workstation.
Controls on either side are ergonomically accessible.
Infinity optics - matched quality optics provide parfocal,
parcentered alignment and allows you to add both video and
photography without deviating from the original optical path.
The Leica CFM 2 can be fully customized for your various
applications with compatible accessories offered by Leica.
1.2 About This Manual
For your convenience, this manual follows the Leica CFM 2
setup from top to bottom — unpacking to assembly, to
operation and preventative maintenance.
This Leica CFM 2 user manual is presented in four sections:
I
II
III
IV
Assembly
Operation
Accessories
Reference Information
1.3 Unpacking
Please compare the delivery carefully with the packing list,
documents delivery note or invoice. We strongly recommend
that you keep a copy of these documents with the manual, so
that you have the delivery information available. This can be
used later when ordering more equipment or when the
microscope is serviced.
Make sure that no small parts are left in the packing material.
IMPORTANT NOTE! When taking the microscope out
of its packing and putting it onto the desk, take care not
to damage the sensitive vibration-damping feet on the bottom
of the microscope.
Do not assemble the microscope and accessories at this time.
1.4 Equipment Installation
Workstation Requirements
The Leica CFM 2 must be used on a hard, stable and level
surface such as a laboratory table or work bench.
Installation
Make sure that the workplace is free from oil and chemical
fumes. Site vibrations, direct sunlight and major temperature
deviations have a negative effect on measurements and
photomicrography. It is important to have a stable desk of the
right height (0-80 cm), a proper work station and an
ergonomically designed chair, shown in the Accessories
Section of this manual, which can be adjusted in several
positions, are the basic prerequisites for fatigue-free
microscopy.
2.0 Unpacking
Your standard Leica CFM 2 will be packaged in one box.
Additional accessories will be packaged in separate boxes.
The box that contains the standard Leica CFM 2 contains the
following:
• Microscope stand with attached comparison bridge,
square stage and objectives.
• Trinocular Ergobody
• Leica CLS cold light source with power cord
• Circular stage with stage fingers attached
• Two Abbe condensers
• Bifurcated fiber optic bundle
• Two 10x eyepieces
• Dust cover
• CFM 2 Instruction Manual
• DM LS Instruction Manual
• Warranty Card
Remove these from the packaging accordingly.
1. Removing the foam cover. This exposes the top of the
comparison bridge.
2. Next, carefully remove the foam insert from around the
comparison bridge.
3. Next, remove the foam insert that surrounds the
microscope stands.
EN
3
NOTE: use extreme caution before removing CFM2 from the
packaging due to awkwardness and weight of the unit.
4. Position yourself to the rear of the microscope
assembly. Then remove the microscope assembly
from the box. By carefully grabbing hold of each
microscope stand behind the nosepieces and slowly
removing the assembly. Place this assembly onto a
stable surface.
5. Remove foam block from under both stages.
6. Remove the trinocular ergobody from the foam insert.
Align the male dovetail on the bottom of the ergobody
with the female dovetail on the top of the comparison
bridge and insert into place. Secure it in place by
tightening the thumbscrew. Remove plastic cases
with eyepiece inside. Open and place eyepieces in
trinocular ergobody.
7. Next, remove the circular stage. Attach this to the
right hand mounting bracket on the microscope
assembly. Align the slot on the bottom circular
portion of the stage top with the pin in the mounting
bracket and snap into place. Use the centering
thumbscrews to roughly center the stage opening
with an objective.
8. Next, remove the two Abbe condensers from the
foam insert. Assemble the condensors to the
microscope in the following manner:
Turn the centering screws counterclockwise until
the condenser can be inserted at an angle from
above. Make sure the guide pin clicks into the slot!
The adjustment range of the aperture diaphragm
should face the front.
Tighten the centering screws by turning a few
revolutions in clockwise direction, so that the
condenser cannot be removed.
Raise the condenser until the top of it is the opening
on the illumination source until fully seated. Now
place the bifurcated ends with the metal inserts into
the opening in the back of each stand. Insert these
fully and lock into place with the thumbscrews.
9. Next, remove the illumination source from the foam
insert. Place this near the microscope assembly.
10. Now, remove the bifurcated fiber optic bundles from
the foam insert. Insert the single end of the bundle
into the opening on the illumination source until fully
seated. Now place the bifurcated ends with the
4
metal inserts into the opening in the back of each
stand. Insert these fully and lock into place with the
thumbscrews.
The Leica CFM 2 is now fully assembled. Please check the
packaging for any unused parts.
Place all foam inserts back into box and store for any future
requirements.
3.0 Setting Up
Now position the instrument at its permanent workstation
location. This location should be free from oil and chemical
fumes. In addition, the workstation location needs to be free
from vibrations, direct sunlight and major temperature
deviations. These conditions will lead to poor performance
of the system.
It is also important that the workstation be ergonomically
correct. The height of the instrument and chair you use should
be such that it promotes ergonomic comfort for the user.
3.1 Illumination Source
Plug the power cord into an electric outlet. The source is
now ready for use. Ensure that the illumination intensity level
control knob is positioned at its lowest setting. Now, switch
the power controller to the on position.
3.2 Trinocular Ergobody and Eyepieces
Position the eyetubes such that looking through them at the
workstation is ergonomically comfortable. Set your
interpupillary distance by pulling the eyepiece tubes apart
or pushing them closer together until you see one
superimposed image, not a double image, when looking with
both eyes. At this time, we will not adjust the focus of the
eyepieces.
3.3 Condensers
Place a specimen on each stage. Ensure that the 10x
objective is positioned in the optical path. Focus each side
of the instrument [This can be done by adjusting the dividing
line to fully view one side at a time. This method should be
used for the following as well.] Adjust the field diaphragm to
its smallest opening and focus the iris leafs. Once focused,
center this image in the field of view of the 10x objective. This
is accomplished by adjusting the condenser until the edge
EN
of the field diaphragm appears sharply focused. Center the image of
the field diaphragm with both centering screws of the condensor until
it is in the center of the field of view.
Ensure that the circular stage opening is centered about the top of
the condenser. This is accomplished by using both centering screws
for the circular stage.
3.4 Field Diaphragm
Open the field diaphragm until it just disappears from the field of view.
When changing an objective the condenser centration may have to
be slightly adjusted.
The field diaphragm protects the specimen from unnecessary warming
and keeps all light not required for image formation away from the
object to enable greater contrast. It is therefore only opened just wide
enough to illuminate the viewed or photographed object field. A change
in magnification therefore always necessitates matching of the field
diaphragm.
3.5 Aperture Diaphragm
The aperture diaphragm determines the resolution, depth of field and
contrast of the microscope image. The best resolution is obtained
when the apertures of the objective and the condenser are roughly
the same.
When the aperture diaphragm is stopped down to be smaller than the
objective aperture, resolving power is reduced, but the contrast is
enhanced. A noticeable reduction in the resolving power is observed
when the aperture diaphragm is stopped down to less than two thirds
of the objective aperture and should be avoided where possible.
The aperture diaphragm is set according to the viewer’s subjective
impression of the image, the scale on the dial is just to allow
reproducible settings and does not represent absolute aperture values.
In principle you can do a calibration yourself by comparison with the
apertures of various objectives. Visual comparison of the apertures
of the objective and the condenser can be made as follows: Remove
the eyepiece from the eyepiece tube or engage an auxiliary telescope
and focus. Close or open the aperture diaphragm until its image is
just visible in the objective pupil (brighter circle). This is considered
the standard setting, i.e. condenser aperture = objective aperture.
For objectives with low contrast the aperture diaphragm can be
stopped down further to highlight faint specimen details. In polarized
light microscopy narrowing the aperture diaphragm usually results in
brighter colours.
NOTE: The aperture diaphragm in the illumination light path is
not for setting the image brightness. Only the illumination
intensity level control knob on the illumination source or the neutral
density filters should be used for this.
An aperture diaphragm in the objective is normally fully opened. The
reduction in image brightness caused by stopping down results in:
• Greater depth of field
• Change in contrast
3.6 Final Adjustments
If necessary, when the specimens are not parfocalized from the left
to the right eyepieces, set the dividing line in its center position and
then view the specimen and focus the right eyepiece by adjusting the
microscope F/C control. Next, adjust the focus of the left eyepiece
by adjusting the position of the upper part of the eyepiece until the
viewed specimen is sharply focused.
Adjust the light level of the instrument to your personal preference
by adjusting the illumination intensity level control knob of the
illumination source.
4.0 References
4.1.1 Objectives
When additional objectives are to be used, use only Leica objectives
of tube length ( (infinity) with M 25 thread that have been matched for
magnification and parfocality. It is customary, although not essential,
to arrange the objectives so that the magnification increases when
the objective nosepiece is rotated counterclockwise. Lower the
specimen stage as far as possible before assembling the objectives.
4.1.2 Objective Lettering
°/—
C Plan 10 x/0.22
°/ 0.17
C Plan 40 x/0.65
°/0 Oil
N Plan 50 x/0.75
° Objective for infinite tube length (°).
—The objective can be used with and without a coverglass.
0.17
The objective may only be used with a coverglass of
the standard 0.17 mm thickness. Use without a
coverglass or with a coverglass of a very different
thickness will result in a distinct drop in performance,
especially for objectives with high apertures.
0
Use without a coverglass, e.g. for cell smear specimens.
EN
5
Objective type (performance class):
4.2 Photomicrography
C, C PLAN
N PLAN
PL FLUOTAR®
PL APO
10x/0.22
The trinocular ergobody supports photomicrography applications. A
photo eyepiece tube adapter and photo eyepieces must be inserted
into the third port before photomicrograpic equipment can be attached.
In addition, photo reticles will need to be used in the focusable
eyepieces in the binocular port, unless the photomicrographic
equipment is fitted with a special viewing port. Contact your Leica
Microsystems Representative for more information regarding these
applications and refer to the manual supplied with the photographic
equipment for further details.
Achromat
Planachromat (standard for CFM 2)
Semiapochromat
Planapochromat
Magnification and aperture. The aperture (pickup angle) influences resolution, field depth,
contrast and brightness. Objectives with a builtin iris diaphragm are engraved with their maximum
and minimum aperture, e.g. 0.85-0.55.
Immersion objectives for: oil, water, universal(oil,
water, glycerine, etc.)OIL: only use optical
immersion oil of DIN / ISO standard. W: Water
immersion, used distilled water if possible. IMM:
Universal objective for water, glycerine or oil.
PH = phase contrast objective, the corresponding
light ring in the condenser is also indicated, e.g.
PH 2.
Strain-free objective for quantitative polarized light
microscopy.
OIL, W, IMM
PH
P, POL
4.3 Video Applications Microscopy
The trinocular ergobody supports video microscopy applications. A
C-mount adapter must be inserted into the third port before a video
camera can be attached. Contact your Leica Microsystems
Representative for more information regarding these applications.
4.4 Optical Performance Parameters
4.4.1 Total Magnification
Total magnification = objective magnification x eyepiece magnification.
4.1.3 Field Performance of Objectives
4.4.2 Useful Magnification
The engraving on the objectives does not include their field
performance. It can vary slightly within a class of objective, e.g. the
lower objective magnifications may well have higher values than the
approximate values given below:
The total magnification of a light microscope is subject to physical
limits known as the useful magnification. This is roughly a thousand
times the aperture of the objective.
If the Useful Magnification is exceeded, blurred images may result.
4.4.3 Object Field Diameter
Objective series
If you divide the eyepiece field of view number by the objective
magnification, you obtain the true diameter of the observed object
field. The eyepiece magnification is not taken into account in the
calculation. With the 10x/20 eyepiece and a 50x objective, for example,
an object field of 20:50 = 0.4 mm can be surveyed.
max. recommended eyepiece FOV
15
20
25
Achromate
C PLAN Achromats
N PLAN Plan achromats
PL FLUOTAR®
PL APO Plan achromats
4.1.4 Colour Code Rings on Objectives
In accordance with DIN / ISO standards, the magnification of each
objective is indicated by a colour ring:
6
White
Dark Blue
Light Blue
Dark Green
Light Green
Yellow Green
Orange
Red
Brown
Grey
100x
125x
150x
160x
63x
40x
50x
25x
32x
16x
20x
10x
6.3x
4x
2.5x
1.6x
EN
5.0 Accessories
The following items are available for use with the Leica CFM 2.
5.1 Polarizer Application Kit
Matched polarizer/analyzer sets for polarization applications. The
analyzer is attached between the top of the microscope stand and
the comparison bridge. The Polarizer with first order red compensator
for polarization applications. The Polarizar attaches to the top of the
field diaphragm housing.
5.3 Dual Viewer
Dual-viewing accessory for teaching applications. Included with the
dual Viewer is a standard DM LS binocular Body. This attaches
between the top of the of the bridge and the trinocular ergobody.
5.4 Phase contrast objectives
Five N-Plan objectives are available as standard accessories, 5x, 10x,
20x, 40x, 100x. Any DM LS phase contrast objective can be matched
for this usage.
5.5 Binocular Ergobody
Provides a range of 0-35o eyetube angle, ergonomically adjusts to eye
level of persons with varied height and seating requirements. Accepts
10x eyepieces for binocular viewing.
5.6 Fixed 10x Eyepieces
10x eyepieces, with 20mm view and fixed focus planes.
5.7 Stages
If the standard left hand square stage and circular rotatable stage
mounted on the right side is unacceptable, right hand square stages
and circular rotatable stages are available for your specific needs.
5.8 Motorized Tables
Sculptured worktable for easy, smooth motorized foot control for height
adjustment includes 2 swivel arm accessory trays.
5.9 Light Source Filters
5.11 Brightfield Objectives
In addition to the three standard N Plan objectives, two additional
N-plan objectives 5x and 100x are available as standard accessories.
Any DM LS objective can be matched for this usage.
5.12 Reticles
Various DM LS reticles are available for use.
6.0 Preventative
Maintenance
6.1 Dust Protection
Protect the microscope from dust by putting on the flexible dust cover
after each work session. Dust and loose particles of dirt can be
removed with a soft brush, lint-free cotton cloth, or compressed air.
6.2 Solvents
Obstinate dirt can be removed with a clean cotton cloth
moistened with any ordinary hydrous solution, benzine or
alcohol. Do not use acetone, xylol or nitro dilutions. Cleaning agents
of unknown composition should be tested on an inconspicuous part
of the microscope. Painted or plastic surfaces must not be tarnished
or etched.
6.3 Acids, Alkaline Solutions
Particular care should be taken when working with acids or
other aggressive chemicals. Always avoid direct contact
between such chemicals and the optics or stands. Thorough cleaning
after use is strongly recommended. Keep the microscope optics
absolutely clean.
6.4 Dust / Optics
Remove any dust from glass surfaces with a fine, dry, grease-free
artists’ hair brush, or by blowing with compressed air or by vacuum
suction. Any remaining dirt can be removed with a clean cloth
moistened with distilled water. If distilled water is not sufficient, use
pure alochol, chloroform or benzine.
Various color filters are available for use.
5.10 CL / PH 0.90 / 1.25 Oil Condenser
For use with 100x objectives in both brightfield and darkfield
applications.
EN
7
6.5 Oil
First wipe off immersion oil with a clean cotton cloth, then wipe over
several times with ethyl alcohol.
NOTE: Objectives must not be opened for cleaning. Only the front lens
can be cleaned in the ways described above and the upper lens by
blowing dust off with compressed air.
All Leica instruments are manufactured and tested with extreme care.
If you do have cause for complaint, however, please do not try to repair
the instruments and their accessories yourself. Contact your Leica
dealer.
8
EN
©1998 Leica Microsystems Inc., Buffalo NY USA ISO 9001 Printed in USA 10600-100 Rev. D 1/98
Leica Microsystems Inc.
Tel 716 686 3000
Educational and Analytical Division
Fax 716 686 3085
PO Box 123
www.leica.com
Buffalo, New York USA 14240 0123
ISO-9001 Certified