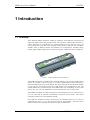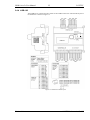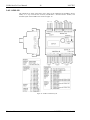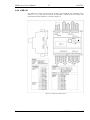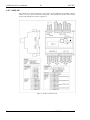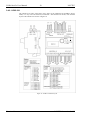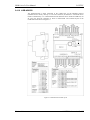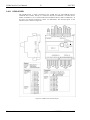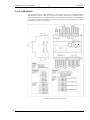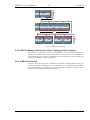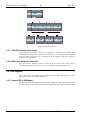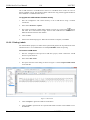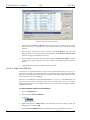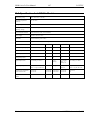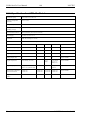
1
LIOB-10x / x5x L-IOB™ I/O Module User Manual LOYTEC electronics GmbH Contact LOYTEC electronics GmbH Blumengasse 35 1170 Vienna AUSTRIA/EUROPE [email protected] http://www.loytec.com Version 4.8 Document № 88078508 LOYTEC MAKES AND YOU RECEIVE NO WARRANTIES OR CONDITIONS, EXPRESS, IMPLIED, STATUTORY OR IN ANY COMMUNICATION WITH YOU, AND LOYTEC SPECIFICALLY DISCLAIMS ANY IMPLIED WARRANTY OF MERCHANTABILITY OR FITNESS FOR A PARTICULAR PURPOSE. THIS PRODUCT IS NOT DESIGNED OR INTENDED FOR USE IN EQUIPMENT INTENDED FOR SURGICAL IMPLANT INTO THE BODY OR OTHER APPLICATIONS INTENDED TO SUPPORT OR SUSTAIN LIFE, FOR USE IN FLIGHT CONTROL OR ENGINE CONTROL EQUIPMENT WITHIN AN AIRCRAFT, OR FOR ANY OTHER APPLICATION IN WHICH IN THE FAILURE OF SUCH PRODUCT COULD CREATE A SITUATION IN WHICH PERSONAL INJURY OR DEATH MAY OCCUR. LOYTEC MAKES NO REPRESENTATION AND OFFERS NO WARRANTY OF ANY KIND REGARDING OF ANY THIRDPARTY COMPONENTS MENTIONED IN THIS MANUAL. No part of this publication may be reproduced, stored in a retrieval system, or transmitted, in any form or by any means, electronic, mechanical, photocopying, recording, or otherwise, without the prior written permission of LOYTEC. LC3020, L-Chip, L-Core, L-DALI, L-GATE, L-INX, L-IOB, LIOB-Connect, LIOB-FT, L-IP, LPA, L-Proxy, L-Switch, L-Term, L-VIS, L-WEB, L-ZIBI and ORION™ stack are trademarks of LOYTEC electronics GmbH. LonTalk®, LONWORKS®, Neuron®, LONMARK®, LonMaker®, i.LON®, and LNS® are trademarks of Echelon Corporation registered in the United States and other countries. LIOB-10x/x5x User Manual 3 LOYTEC Contents 1 Introduction ................................................................................................ 13 1.1 Overview ............................................................................................................ 13 1.2 Scope................................................................................................................... 14 2 Quick-Start Guide ...................................................................................... 15 2.1 Quick-Start Guide (L-INX Mode) ................................................................... 15 2.1.1 Hardware Installation ............................................................................... 15 2.1.2 Configuration ........................................................................................... 15 2.2 Quick-Start Guide (LONMARK® Mode) ......................................................... 17 2.2.1 Hardware Installation ............................................................................... 17 2.2.2 Commissioning ........................................................................................ 17 2.2.3 Configuration ........................................................................................... 17 2.3 Quick-Start Guide (BACnet Mode) ................................................................. 18 2.3.1 Hardware Installation ............................................................................... 18 2.3.2 BACnet/IP Setup ...................................................................................... 19 2.3.3 Configuration ........................................................................................... 19 3 Hardware Installation ................................................................................ 20 3.1 Enclosure............................................................................................................ 20 3.2 Product Label .................................................................................................... 20 3.3 Mounting ............................................................................................................ 21 3.4 Terminal Layout ................................................................................................ 21 3.4.1 LIOB-100 ................................................................................................. 22 3.4.2 LIOB-101 ................................................................................................. 23 3.4.3 LIOB-102 ................................................................................................. 24 3.4.4 LIOB-103 ................................................................................................. 25 3.4.5 LIOB-150 ................................................................................................. 26 3.4.6 LIOB-151 ................................................................................................. 27 3.4.7 LIOB-152 ................................................................................................. 28 3.4.8 LIOB-153 ................................................................................................. 29 3.4.9 LIOB-154 ................................................................................................. 30 3.4.10 LIOB-450/550 .......................................................................................... 31 3.4.11 LIOB-451/551 .......................................................................................... 32 3.4.12 LIOB-452/552 .......................................................................................... 33 3.4.13 LIOB-453/553 .......................................................................................... 34 3.4.14 LIOB-A2 .................................................................................................. 35 3.5 Power Supply and Wiring ................................................................................ 35 3.5.1 LIOB-Connect without Extension ............................................................ 36 Version 4.8 LOYTEC electronics GmbH LIOB-10x/x5x User Manual 4 LOYTEC 3.5.2 LIOB-Connect with Extension ................................................................ 37 3.5.3 LIOB-FT in Free Topology ..................................................................... 37 3.5.4 LIOB-FT in Bus Topology ...................................................................... 38 3.5.5 CEA-709 Network Connection in Free Topology or Bus Topology ....... 39 3.5.6 LIOB-IP Connection ............................................................................... 39 3.5.7 CEA-852 Network Connection................................................................ 40 3.5.8 BACnet/IP Network Connection ............................................................. 40 3.6 LED signals ....................................................................................................... 40 3.6.1 Status LED (L-INX Mode) ...................................................................... 40 3.6.2 Status LED (LONMARK® Mode) ............................................................ 41 3.6.3 Status LED (BACnet Mode).................................................................... 41 3.7 Status Button ..................................................................................................... 42 4 Device Modes and Installation .................................................................. 43 4.1 Device Modes .................................................................................................... 43 4.1.1 LIOB-Connect Device Mode (LIOB-10x) .............................................. 43 4.1.2 LIOB-FT Device Mode (LIOB-15x) ....................................................... 43 4.1.3 LIOB-IP Device Mode (LIOB-45x/55x) ................................................. 43 4.1.4 LONMARK® Device Mode (LIOB-15x/45x) ........................................... 43 4.1.5 Non-ECS Device Mode (LIOB-15x/45x) ................................................ 43 4.1.6 BACnet Device Mode (LIOB-55x) ......................................................... 44 4.2 Device Installation ............................................................................................ 44 4.2.1 Device Installation (LIOB-Connect device mode) .................................. 44 4.2.2 Device Installation (LIOB-FT/IP device mode) ...................................... 44 4.2.3 Device Installation (LONMARK® / Non-ECS device mode) ................... 45 4.2.4 Device Installation (BACnet Mode) ........................................................ 45 4.3 Device Monitoring and Replacement .............................................................. 45 4.3.1 Device Monitoring and Replacement (L-INX Mode).............................. 45 4.3.2 Device Monitoring and Replacement (LONMARK® Mode) .................... 45 4.3.3 Device Replacement (BACnet Mode) ..................................................... 45 5 L-IOB LCD Display ................................................................................... 46 5.1 Main Page of LIOB-55x in BACnet Mode ..................................................... 46 5.2 Main Page of LIOB-10x/15x/45x (I/O Overview Page) ................................. 47 5.3 Manual / Quick Edit Mode .............................................................................. 48 5.4 Device Information and Configuration (LIOB-10x/15x/45x) ........................ 48 5.5 I/O Configuration ............................................................................................. 50 6 L-IOB Web Interface (LIOB-45x/55x) ..................................................... 52 6.1 Device Information and Account Management ............................................. 52 6.2 Device Configuration ........................................................................................ 54 6.2.1 System Configuration .............................................................................. 54 Version 4.8 LOYTEC electronics GmbH LIOB-10x/x5x User Manual 5 LOYTEC 6.2.2 Backup and Restore ................................................................................. 55 6.2.3 Port Configuration ................................................................................... 56 6.2.4 IP Configuration....................................................................................... 57 6.2.5 VNC Configuration .................................................................................. 57 6.2.6 LIOB-IP Configuration (LIOB-IP Device Mode) .................................... 58 6.2.7 CEA-852 Device Configuration (LONMARK® Mode) ............................. 58 6.2.8 BACnet Configuration (BACnet Mode) .................................................. 60 6.2.9 BACnet/IP Configuration (BACnet Mode) .............................................. 60 6.2.10 Data Points and AST (BACnet Mode) ..................................................... 61 6.3 Device Statistics ................................................................................................. 61 6.3.1 System Log .............................................................................................. 61 6.3.2 IP Statistics .............................................................................................. 62 6.3.3 CEA-852 Statistics (LIOB-IP or LONMARK® Mode) ............................. 62 6.3.4 Enhanced Communications Test (LIOB-IP or LONMARK® Mode)......... 63 6.3.5 CEA-709 Statistics (LIOB-IP or LONMARK® Mode) ............................. 64 6.3.6 BACnet Bindings Statistics (BACnet Mode) ........................................... 64 6.3.7 Scheduler and Alarm Log Statistics (BACnet Mode) .............................. 65 6.4 Reset, Contact, Logout ...................................................................................... 65 7 L-IOB Host LCD Display (L-INX Mode)................................................. 66 7.1 L-IOB Scan and Configuration Run ............................................................... 66 7.2 L-IOB Remote Access ....................................................................................... 66 7.3 L-IOB Data Points............................................................................................. 67 8 L-IOB Host Web Interface (L-INX Mode) .............................................. 68 8.1 LIOB-IP Bus (for LIOB-45x/55x) .................................................................... 68 8.2 L-IOB Installation Page (LIOB-Connect Bus) ............................................... 69 8.2.1 L-IOB Scan and Configuration Run ......................................................... 69 8.3 L-IOB Installation Page (LIOB-FT/IP Bus) ................................................... 71 8.4 L-IOB Device Information and Statistics ........................................................ 72 8.5 L-IOB Overview Page ....................................................................................... 72 8.6 L-IOB I/O Test Page ......................................................................................... 74 8.7 L-IOB Data Points............................................................................................. 75 9 Concepts ...................................................................................................... 76 9.1 Technology-Independent Data Points (BACnet Mode) ................................. 76 9.2 Bus and Device Configuration ......................................................................... 76 9.2.1 Index of first Device not in Daisy Chain (LIOB-Connect device mode) . 76 9.2.2 Station ID (L-INX Mode) ........................................................................ 76 9.2.3 Minimum Firmware Version (L-INX Mode) ........................................... 76 9.2.4 Enabled (L-INX Mode)............................................................................ 77 9.2.5 Allow Upgrade (L-INX Mode) ................................................................ 77 Version 4.8 LOYTEC electronics GmbH LIOB-10x/x5x User Manual 6 LOYTEC 9.2.6 Product Code ........................................................................................... 77 9.2.7 Device Name ........................................................................................... 77 9.2.8 PIN .......................................................................................................... 77 9.2.9 Alternative Unit ....................................................................................... 77 9.2.10 Language ................................................................................................. 77 9.2.11 Group I/O Min/Max Send Times (LONMARK® Mode)........................... 77 9.2.12 NID .......................................................................................................... 77 9.2.13 Translation Tables ................................................................................... 77 9.3 I/O Configuration ............................................................................................. 77 9.3.1 Name ....................................................................................................... 78 9.3.2 HardwareType ......................................................................................... 78 9.3.3 SignalType............................................................................................... 78 9.3.4 Interpretation ........................................................................................... 78 9.3.5 DataType ................................................................................................. 80 9.3.6 SNVT ...................................................................................................... 81 9.3.7 DeadTime for Fading and Ramping ........................................................ 81 9.3.8 IOFunc, GroupNumber, and DeadTime for Interlocked Mode ............... 81 9.3.9 IOFunc, GroupNumber, and SubGroupNumber for Switch Mode .......... 81 9.3.10 IOFunc, GroupNumber, and SubGroupNumber for Card Reader Mode . 81 9.3.11 OperatingMode, OverrideValue, and DefaultValue ................................ 81 9.3.12 Persistent Flag ......................................................................................... 82 9.3.13 Invert Flag ............................................................................................... 82 9.3.14 PulseTime Flag ........................................................................................ 82 9.3.15 SIUnit_OnText and USUnit_OffText ...................................................... 82 9.3.16 Resolution................................................................................................ 83 9.3.17 MultUS and OffsUS ................................................................................ 83 9.3.18 DisplayOnSymbol and DisplayOffSymbol .............................................. 83 9.3.19 Offset ....................................................................................................... 83 9.3.20 MinValue and MaxValue ........................................................................ 83 9.3.21 COV and MaxSendTime ......................................................................... 83 9.3.22 MinSendTime .......................................................................................... 84 9.3.23 TransTable............................................................................................... 84 9.3.24 NTC_Rn, NTC_Tn, and NTC_B ............................................................ 84 9.3.25 HoldTime and DebounceTime ................................................................ 84 9.3.26 EventGroup Modes and Values ............................................................... 85 9.3.27 OffValue and OnValue ............................................................................ 85 9.3.28 PWMPeriod ............................................................................................. 85 9.3.29 NominalPower ......................................................................................... 85 9.4 Version 4.8 Switch Mode (LONMARK® Mode) .................................................................. 85 LOYTEC electronics GmbH LIOB-10x/x5x User Manual 7 LOYTEC 9.4.1 General Function ...................................................................................... 85 9.4.2 Two-Input Mode ...................................................................................... 88 9.4.3 Examples .................................................................................................. 88 9.5 STId Card Reader Mode .................................................................................. 93 9.5.1 Code Signal .............................................................................................. 93 9.5.2 Data Signal ............................................................................................... 93 9.5.3 Clock Signal ............................................................................................. 94 9.6 Data Points (L-INX Mode) ............................................................................... 94 9.6.1 Bus specific Data Points .......................................................................... 94 9.6.2 Device specific Data Points ..................................................................... 94 9.6.3 I/O specific Data Points for Inputs ........................................................... 95 9.6.4 I/O specific Data Points for Outputs ........................................................ 96 9.6.5 Parameters ................................................................................................ 97 9.7 Data Points (LONMARK® Mode) ..................................................................... 97 9.7.1 Device Global Configuration Properties .................................................. 97 9.7.2 Node Object (UFPTnodeObject, FPT Key #0) ........................................ 98 9.7.3 Common Terminal Object (UFPTcomTerm, FPT Key #20013) ............. 99 9.7.4 Input / Output / Group Mapping .............................................................. 99 9.7.5 Input Object (UFPTopenLoopSensor, FPT Key #1) .............................. 102 9.7.6 Output Object (UFPTclosedLoopActuator, FPT Key #4) ..................... 105 9.8 Data Points (BACnet Mode) ........................................................................... 108 9.8.1 BACnet Technology .............................................................................. 108 9.8.2 Native BACnet Objects for I/Os ............................................................ 108 9.9 Default Configuration ..................................................................................... 110 10 The Configurator ...................................................................................... 112 10.1 Software Installation ....................................................................................... 112 10.2 Configuring L-IOB Modules (L-INX Mode) ................................................ 112 10.2.1 Add L-IOB Modules .............................................................................. 112 10.2.2 Configure I/Os ....................................................................................... 113 10.2.3 Manage L-IOB Configurations .............................................................. 114 10.2.4 Using L-IOB Data Points ....................................................................... 116 10.2.5 Upgrade Firmware ................................................................................. 117 10.2.6 Printing Labels ....................................................................................... 118 10.3 Configuring L-IOB Modules (LONMARK® / Non-ECS device mode) ........ 119 10.3.1 Connecting to a L-IOB Module ............................................................. 119 10.3.2 L-IOB Device Settings ........................................................................... 121 10.3.3 Configure I/Os ....................................................................................... 121 10.3.4 Manage L-IOB Configurations .............................................................. 122 10.3.5 Up- and Download of Configurations .................................................... 123 Version 4.8 LOYTEC electronics GmbH LIOB-10x/x5x User Manual 8 LOYTEC 10.3.6 Using L-IOB Data Points ...................................................................... 123 10.3.7 Upgrade Firmware ................................................................................. 123 10.3.8 Backup and Restore ............................................................................... 123 10.3.9 Printing Labels ...................................................................................... 124 10.4 Configuring L-IOB Modules (BACnet Mode) ............................................. 124 10.4.1 Connecting to a L-IOB Module ............................................................. 124 10.4.2 Configure I/Os ....................................................................................... 125 10.4.3 Manage L-IOB Configurations .............................................................. 126 10.4.4 Up- and Download of Configurations.................................................... 126 10.4.5 Using L-IOB Data Points ...................................................................... 127 10.4.6 Upgrade Firmware ................................................................................. 129 10.4.7 Backup and Restore ............................................................................... 129 10.4.8 Printing Labels ...................................................................................... 129 11 L-IOB Firmware Update ......................................................................... 130 11.1 Firmware Update using the Configurator .................................................... 130 11.2 Firmware Update using the LWEB-822/900 Master Device Manager ...... 130 12 L-IOB Device Replacement ..................................................................... 131 12.1 L-IOB Device Replacement (L-INX Mode) .................................................. 131 12.1.1 LIOB-Connect Device Replacement with L-INX Power-Cycle ............ 131 12.1.2 LIOB-Connect Device Replacement without L-INX Power-Cycle ....... 131 12.1.3 LIOB-FT/IP Device Replacement ......................................................... 132 12.2 L-IOB Device Replacement (LONMARK® Mode) ........................................ 132 12.3 L-IOB Device Replacement (BACnet Mode)................................................ 132 13 Troubleshooting ........................................................................................ 133 13.1 Technical Support ........................................................................................... 133 14 Application Notes ..................................................................................... 134 14.1 External Power Supply (not using LPOW-2415A) ...................................... 134 14.2 Physical Connection of Inputs ....................................................................... 134 14.2.1 Connection of Switches ......................................................................... 134 14.2.2 Connection of S0 Pulse Devices (Meters) ............................................. 135 14.2.3 Connection of Voltage Sources to Universal Inputs .............................. 136 14.2.4 Connection of Voltage Sources to Digital Inputs .................................. 136 14.2.5 Connection of 4-20mA Transmitters to Universal Inputs ...................... 137 14.2.6 Connection of Resistive Sensors............................................................ 137 14.2.7 Connection of STId Card Readers ......................................................... 138 14.3 Physical Connection of Outputs .................................................................... 138 14.3.1 6A Relays on LIOB-100 (Built-in Fuse) ............................................... 138 14.3.2 6A Relays with One External Fuse ........................................................ 139 14.3.3 6A Relays on LIOB-xx2 using Separate Fuses ...................................... 139 Version 4.8 LOYTEC electronics GmbH LIOB-10x/x5x User Manual 9 LOYTEC 14.3.4 16A and 6A Relays on LIOB-xx3 .......................................................... 139 14.3.5 External Relays and Inductive Loads ..................................................... 140 14.3.6 1A Triacs ............................................................................................... 140 14.3.7 12V Analog Outputs .............................................................................. 141 15 Security Hardening Guide ....................................................................... 142 15.1 Installation Instructions .................................................................................. 142 15.2 Firmware .......................................................................................................... 142 15.3 Ports ................................................................................................................. 142 15.4 Services ............................................................................................................. 143 15.5 Logging and Auditing ..................................................................................... 143 16 Specifications ............................................................................................ 144 16.1 I/O Specification .............................................................................................. 144 16.1.1 UI - Universal Input ............................................................................... 144 16.1.2 DI - Digital Input, Counter Input (S0-Pulse) .......................................... 144 16.1.3 AO - Analog Output ............................................................................... 144 16.1.4 DO - Digital Output ............................................................................... 145 16.1.5 PRESS - Pressure Sensor ....................................................................... 145 16.2 Internal Translation Tables ............................................................................ 145 16.3 Maximum Number of L-IOB Devices per L-IOB Host ................................ 145 16.4 Specification for LIOB-10x Models ............................................................... 146 16.5 Specification for LIOB-15x Models ............................................................... 147 16.6 Specification for LIOB-45x Models ............................................................... 148 16.7 Specification for LIOB-55x Models ............................................................... 149 17 References ................................................................................................. 150 18 Revision History........................................................................................ 151 Version 4.8 LOYTEC electronics GmbH LIOB-10x/x5x User Manual 11 LOYTEC Abbreviations AST ..................................... Alarming, Scheduling, Trending BACnet ............................... Building Automation and Control Network CEA-709 ............................. Protocol standard for LONWORKS networks CEA-852 ............................. Protocol standard for CEA-709 over IP networks COV .................................... Change-Of-Value CP........................................ Configuration Property CS........................................ Configuration Server that manages CEA-852 IP devices DHCP .................................. Dynamic Host Configuration Protocol, RFC 2131, RFC 2132 I/O ....................................... Input/Output LIOB ................................... LOYTEC I/O bus MAC ................................... Media Access Control NAT .................................... Network Address Translation, see Internet RFC 1631 NTC .................................... Negative Temperature Coefficient (Temperature Sensor) NV ....................................... Network Variable OPC ..................................... Open Process Control PTC ..................................... Positive Temperature Coefficient (Temperature Sensor) SCPT ................................... Standard Configuration Property Type SNVT .................................. Standard Network Variable Type UCPT .................................. User-Defined Configuration Property Type UI ........................................ User Interface Additionally, the following abbreviations are used for the L-IOB device modes: L-INX Mode ...................... Refers to the LIOB-Connect device mode (LIOB-10x models), the LIOB-FT device mode (LIOB-15x models), and the LIOB-IP device mode (LIOB-45x/55x models). A L-IOB host is needed (e.g. L-INX device). LONMARK® Mode ............ Refers to the LONMARK® and non-ECS device modes (LIOB-15x/45x models). In these modes, the LIOB-15x/45x devices act as independent nodes on a CEA-709 network. A L-IOB host is not needed. BACnet Mode .................... Refers to the BACnet device mode of the LIOB-55x models. In this mode, the LIOB-55x devices act as independent nodes on a BACnet/IP network. A L-IOB host is not needed. Version 4.8 LOYTEC electronics GmbH LIOB-10x/x5x User Manual 13 LOYTEC 1 Introduction 1.1 Overview The L-IOB I/O modules LIOB-10x, LIOB-15x, LIOB-45x, and LIOB-55x provide physical inputs and outputs (I/Os) either through a CEA-709 connection, a BACnet/IP connection, or a direct connection to a L-IOB host (e.g. L-INX automation server). The I/Os can e.g. be used as data points in the IEC 61131 program running on the L-IOB host. The L-IOB I/O modules come in different models with different I/O configurations, including analog outputs, digital outputs, digital inputs, and universal inputs, which can be freely configured. Figure 1: L-IOB installation with L-INX device The LIOB-10x modules are added to the L-INX automation server using the LIOB-Connect system. An example is shown in Figure 1. To add a L-IOB module to the L-INX device, slide the module from the top to the bottom. The plastic fitting on the side holds the module in place and the gold contacts attach the L-IOB module to the LIOB-Connect bus. The L-IOB modules are powered through the LIOB-Connect bus. Depending on the L-INX device, up to 8 or even 24 L-IOB devices can be stacked up this way in a daisy chain. The LIOB-15x modules are either connected over the LIOB-FT port of a L-INX device or over any CEA-709 FT network (LONMARK® / Non-ECS device modes). This allows connecting remote I/Os over standard FT cabling. The LIOB-45x modules are either connected via the LIOB-IP protocol of a L-INX or LIOB-48x/58x device, or over any CEA-852 network (LONMARK® / Non-ECS device modes). In both cases, the physical connection is done via Ethernet/IP. Version 4.8 LOYTEC electronics GmbH LIOB-10x/x5x User Manual 14 LOYTEC The LIOB-55x modules are either connected via the LIOB-IP protocol of a L-INX or LIOB-48x/58x device, or over any BACnet/IP network (BACnet device mode). In both cases, the physical connection is done via Ethernet/IP. Whenever a L-INX (or LIOB-48x/58x) device is needed as a L-IOB host, the L-IOB device mode is abbreviated as ‘L-INX Mode’. This covers the LIOB-Connect device mode (LIOB-10x models), the LIOB-FT device mode (LIOB-15x models), and the LIOB-IP device mode (LIOB-45x/55x models). Whenever the L-IOB devices act as independent nodes on a CEA-709 network without the need for a L-IOB host, the L-IOB device mode is abbreviated as ‘LONMARK® Mode’. This covers the LONMARK® and non-ECS device modes (LIOB-15x/45x models). Whenever the L-IOB devices act as independent nodes on a BACnet network without the need for a L-IOB host, the L-IOB device mode is abbreviated as ‘BACnet Mode’. These three abbreviations (‘L-INX Mode’, ‘LONMARK® Mode’, and ‘BACnet Mode’) will be used throughout this entire document, especially in headings, to point out that the following section only applies to this mode. Refer to Section 4.1 for more information about the different L-IOB device modes and Section 5.4 for information on how to setup the device mode in LIOB-15x/45x/55x models. Initial configuration of the L-IOB modules is accomplished through the L-INX Configurator software. The parameterization of I/Os, self-test, manual modes, override values, etc. can also be operated on the L-IOB’s LCD display, the Web UI of a connected L-IOB host, or the LWEB-821/900 Master Parameter Editor tool. 1.2 Scope This document covers LIOB-10x, LIOB-15x, LIOB-45x, and LIOB-55x modules with firmware version 4.8 (or higher), the L-INX automation server firmware version 4.8 (or higher) and the L-INX Configurator version 4.8 (or higher). Version 4.8 LOYTEC electronics GmbH LIOB-10x/x5x User Manual 15 LOYTEC 2 Quick-Start Guide This chapter shows step-by-step instructions on how to configure the L-IOB I/O module for a simple application. 2.1 Quick-Start Guide (L-INX Mode) Observe that this quick-start guide only covers the LIOB-Connect (LIOB-10x), LIOB-FT (LIOB-15x), and LIOB-IP (LIOB-45x/55x) device modes, see Section 4.1. For this guide, it is assumed that the L-IOB host is a L-INX automation server. 2.1.1 Hardware Installation Depending on the L-IOB model, the L-IOB I/O modules can either be attached directly to the LIOB-Connect bus, the LIOB-FT bus of the L-INX device, or Ethernet/IP. For LIOB-10x devices (LIOB-Connect), connect the first L-IOB device to the L-INX by sliding it from top to bottom at the right side of the L-INX (see Figure 1). The plastic fitting on the side holds the module in place and the gold contacts attach the L-IOB module to the LIOB-Connect bus. Connect further L-IOB devices the same way to the last L-IOB device already connected. 2.1.2 Configuration Configuration of the L-IOB devices is achieved using the L-INX Configurator software, see the corresponding user manual [1]. The L-INX Configurator uses a separate tab to configure the L-IOB devices. The L-IOB device configuration can be done offline and is shown in the following steps. To Configure L-IOB I/Os 1. Add L-IOB devices on the L-IOB tab from the supplied L-IOB templates using the Add Device(s) button as shown in Figure 2. Figure 2: Add L-IOB devices to the LIOB-Connect bus Version 4.8 LOYTEC electronics GmbH LIOB-10x/x5x User Manual 2. 16 LOYTEC Select a L-IOB device in the tree on the left-hand side and enter names for the I/Os by double-clicking into the Name column as shown in Figure 3. Figure 3: Change I/O names 3. Select an I/O and change the object parameters to configure this I/O. You can multiselect I/Os and change the parameters for all selected I/Os, see Figure 4. Figure 4: Change L-IOB parameters for the selected I/O(s) Version 4.8 4. On the Datapoints tab, the L-IOB data points have been created. These data points can be used, e.g., in the logiCAD IEC61131 program. For physical inputs, the data point Lx_y_zzz_Input_Read will be used to read the input value and for physical outputs, the data point Lx_y_zzz_Output_Write will be used to set the output value. 5. After downloading the configuration into the L-INX device, the L-IOB inputs and outputs can be checked with the L-INX Web UI. An example is shown in Figure 5. LOYTEC electronics GmbH LIOB-10x/x5x User Manual 17 LOYTEC Figure 5: Checking L-IOB inputs and outputs on the Web UI 2.2 Quick-Start Guide (LONMARK® Mode) Observe that this quick-start guide only covers the LONMARK® device mode of LIOB15x/45x models, see Section 4.1. 2.2.1 Hardware Installation A LIOB-15x I/O module in LONMARK® device mode is connected to a CEA-709 network using the FT port of the L-IOB device. A LIOB-45x I/O module in LONMARK® device mode is connected to a CEA-852 network using the Ethernet/IP port of the L-IOB device, see Chapter 4. In both cases, the device must be powered e.g. using an LPOW-2415A power supply. 2.2.2 Commissioning Use the appropriate L-IOB template of your LNSTM based network management tool (e.g. NL-220TM or LonMakerTM) to create and commission a L-IOB device in the database. Once the device is created, the ‘Configure’ function of the network management tool can be used to invoke the Configurator Software. 2.2.3 Configuration Configuration of the L-IOB devices is achieved using the L-INX Configurator software, see the corresponding user manual [1]. After startup, the Configurator will show the LIOB Device tab as depicted in Figure 6. Version 4.8 LOYTEC electronics GmbH LIOB-10x/x5x User Manual 18 LOYTEC Figure 6: LIOB Device Tab In the Device Parameters table, the device specific configuration properties can be set. To Configure L-IOB I/Os 1. Select the LIOB I/Os tab. 2. The LIOB I/Os tab displays the I/Os available on that L-IOB device in the Inputs / Outputs list. 3. To adapt the I/O name, double-click the name in the Name column and edit it, e.g., ‘RoomTemp’. 4. Select (or multi-select) an I/O in the Inputs/Outputs list and observe the Object parameters list below. These parameters can be used to configure the I/O. 5. Once the L-IOB configuration is finished, it can be downloaded into the connected L-IOB device using Tools / Download Configuration. 6. The data points of the L-IOB device are represented as network variables (NVs) and configuration properties (CPs). The NVs can now be polled or bound in the network management tool. 2.3 Quick-Start Guide (BACnet Mode) Observe that this quick-start guide only covers the BACnet device mode of LIOB-55x models, see Section 4.1. 2.3.1 Hardware Installation A LIOB-55x I/O module in BACnet device mode is connected to a BACnet/IP network using the Ethernet/IP port of the L-IOB device, see Chapter 4. The device must be powered e.g. using an LPOW-2415A power supply. Version 4.8 LOYTEC electronics GmbH LIOB-10x/x5x User Manual 19 LOYTEC 2.3.2 BACnet/IP Setup Before the device can be used in the BACnet/IP network, the initial IP and BACnet setup must be done in the LCD UI (see Section 5.1) or Web UI (see Section 6.2). 2.3.3 Configuration Configuration of the L-IOB devices is achieved using the L-INX Configurator software, see the corresponding user manual [1]. After startup of the Configurator, select the L-IOB tab as depicted in Figure 6. Figure 7: L-IOB Tab To Configure L-IOB I/Os Version 4.8 1. Select ‘LIOB-LOCAL’ at the left side of the L-IOB tab. 2. The I/Os available on that L-IOB device are displayed in the Inputs / Outputs list. 3. To adapt the I/O name, double-click the name in the Name column and edit it, e.g., ‘RoomTemp’. 4. Select (or multi-select) an I/O in the Inputs/Outputs list and observe the Object parameters list below. These parameters can be used to configure the I/O. 5. Once the L-IOB configuration is finished, it can be downloaded into the connected L-IOB device using Tools / Download Configuration. 6. The data points of the L-IOB device are represented as BACnet input or output server objects of the appropriate type according to the I/O configuration. LOYTEC electronics GmbH LIOB-10x/x5x User Manual 20 LOYTEC 3 Hardware Installation 3.1 Enclosure The L-IOB enclosures are 107 mm wide for DIN rail mounting, following DIN 43 880. Figure 8 shows the LIOB-100 enclosure as an example. Figure 8: LIOB-100 Enclosure (dimensions in mm) 3.2 Product Label The product label on the side of the L-IOB I/O module contains the following information (see Figure 9): Version 4.8 L-IOB order number (e.g.: LIOB-100, LIOB-150, etc.), LOYTEC electronics GmbH LIOB-10x/x5x User Manual 21 LOYTEC Date Code, which defines the production week and year, Serial number with bar-code (SER#), Node ID of the device. Models with an Ethernet/IP interface additionally contain the MAC address on the label. Figure 9: L-IOB product label Unless stated otherwise, all bar codes are encoded using “Code 128”. An additional label is also supplied with the L-IOB for documentation purposes. 3.3 Mounting All L-IOB devices come prepared for mounting on DIN rails following DIN EN 50 022. The devices can be mounted in any position. However, an installation place with proper airflow must be selected to ensure that the L-IOB’s temperature does not exceed the specified range (see Section 16.4). 3.4 Terminal Layout The L-IOB device provides pluggable screw terminals to connect to sensor and actuator hardware. The screw terminals can be used for wires of a maximum thickness of 2.5 mm2 / AWG13. Refer to Section 16.1 for the specification of all I/O hardware types. The next sections show the terminal layouts for the different L-IOB models. Version 4.8 LOYTEC electronics GmbH LIOB-10x/x5x User Manual 22 LOYTEC 3.4.1 LIOB-100 The LIOB-100 is connected to the L-INX via the LIOB-Connect bus. The terminal layout of the LIOB-100 is shown in Figure 10. Figure 10: LIOB-100 terminal layout Version 4.8 LOYTEC electronics GmbH LIOB-10x/x5x User Manual 23 LOYTEC 3.4.2 LIOB-101 The LIOB-101 is connected to the L-INX via the LIOB-Connect bus. The terminal layout of the LIOB-101 is shown in Figure 11. Figure 11: LIOB-101 terminal layout Version 4.8 LOYTEC electronics GmbH LIOB-10x/x5x User Manual 24 LOYTEC 3.4.3 LIOB-102 The LIOB-102 is connected to the L-INX via the LIOB-Connect bus. The terminal layout of the LIOB-102 is shown in Figure 12. Figure 12: LIOB-102 terminal layout Version 4.8 LOYTEC electronics GmbH LIOB-10x/x5x User Manual 25 LOYTEC 3.4.4 LIOB-103 The LIOB-103 is connected to the L-INX via the LIOB-Connect bus. The terminal layout of the LIOB-103 is shown in Figure 13. Figure 13: LIOB-103 terminal layout Version 4.8 LOYTEC electronics GmbH LIOB-10x/x5x User Manual 26 LOYTEC 3.4.5 LIOB-150 The LIOB-150 is either connected to the L-INX via the LIOB-FT bus (LIOB-FT device mode) or to any CEA-709 FT network (LONMARK® / Non-ECS device modes). The terminal layout of the LIOB-150 is shown in Figure 14. Figure 14: LIOB-150 terminal layout Version 4.8 LOYTEC electronics GmbH LIOB-10x/x5x User Manual 27 LOYTEC 3.4.6 LIOB-151 The LIOB-151 is either connected to the L-INX via the LIOB-FT bus (LIOB-FT device mode) or to any CEA-709 FT network (LONMARK® / Non-ECS device modes). The terminal layout of the LIOB-151 is shown in Figure 15. Figure 15: LIOB-151 terminal layout Version 4.8 LOYTEC electronics GmbH LIOB-10x/x5x User Manual 28 LOYTEC 3.4.7 LIOB-152 The LIOB-152 is either connected to the L-INX via the LIOB-FT bus (LIOB-FT device mode) or to any CEA-709 network (LONMARK® / Non-ECS device modes). The terminal layout of the LIOB-152 is shown in Figure 16. Figure 16: LIOB-152 terminal layout Version 4.8 LOYTEC electronics GmbH LIOB-10x/x5x User Manual 29 LOYTEC 3.4.8 LIOB-153 The LIOB-153 is either connected to the L-INX via the LIOB-FT bus (LIOB-FT device mode) or to any CEA-709 network (LONMARK® / Non-ECS device modes). The terminal layout of the LIOB-153 is shown in Figure 17. Figure 17: LIOB-153 terminal layout Version 4.8 LOYTEC electronics GmbH LIOB-10x/x5x User Manual 30 LOYTEC 3.4.9 LIOB-154 The LIOB-154 is either connected to the L-INX via the LIOB-FT bus (LIOB-FT device mode) or to any CEA-709 network (LONMARK® / Non-ECS device modes). The terminal layout of the LIOB-154 is shown in Figure 18. Figure 18: LIOB-154 terminal layout Version 4.8 LOYTEC electronics GmbH LIOB-10x/x5x User Manual 31 LOYTEC 3.4.10 LIOB-450/550 The LIOB-450/550 is either connected to the L-IOB host via the LIOB-IP protocol (LIOB-IP device mode), directly to a CEA-852 network (LONMARK® / Non-ECS device modes of LIOB-450), or to a BACnet/IP network (BACnet device mode of LIOB-550). In all cases, the physical connection is done via Ethernet/IP. The terminal layout of the LIOB-450/550 is shown in Figure 19. Figure 19: LIOB-450/550 terminal layout Version 4.8 LOYTEC electronics GmbH LIOB-10x/x5x User Manual 32 LOYTEC 3.4.11 LIOB-451/551 The LIOB-451/551 is either connected to the L-IOB host via the LIOB-IP protocol (LIOB-IP device mode), directly to a CEA-852 network (LONMARK® / Non-ECS device modes of LIOB-451), or to a BACnet/IP network (BACnet device mode of LIOB-551). In all cases, the physical connection is done via Ethernet/IP. The terminal layout of the LIOB-451/551 is shown in Figure 20. Figure 20: LIOB-451/551 terminal layout Version 4.8 LOYTEC electronics GmbH LIOB-10x/x5x User Manual 33 LOYTEC 3.4.12 LIOB-452/552 The LIOB-452/552 is either connected to the L-IOB host via the LIOB-IP protocol (LIOB-IP device mode), directly to a CEA-852 network (LONMARK® / Non-ECS device modes of LIOB-452), or to a BACnet/IP network (BACnet device mode of LIOB-552). In all cases, the physical connection is done via Ethernet/IP. The terminal layout of the LIOB-452/552 is shown in Figure 21. Figure 21: LIOB-452/552 terminal layout Version 4.8 LOYTEC electronics GmbH LIOB-10x/x5x User Manual 34 LOYTEC 3.4.13 LIOB-453/553 The LIOB-453/553 is either connected to the L-IOB host via the LIOB-IP protocol (LIOB-IP device mode), directly to a CEA-852 network (LONMARK® / Non-ECS device modes of LIOB-453), or to a BACnet/IP network (BACnet device mode of LIOB-553). In all cases, the physical connection is done via Ethernet/IP. The terminal layout of the LIOB-453/553 is shown in Figure 22. Figure 22: LIOB-453/553 terminal layout Version 4.8 LOYTEC electronics GmbH LIOB-10x/x5x User Manual 35 LOYTEC 3.4.14 LIOB-A2 The LIOB-A2 adapter can be used to extend the LIOB-Connect bus and to connect an external power supply. Figure 23 shows the front view of the LIOB-A2. Figure 23: LIOB-A2 front view On the “24 VDC INPUT” terminal, a 24 VDC power supply can optionally be connected to supply L-IOB devices with power when not using an L-POW power supply. 3rd party devices (up to 200 mA in total), which also need a 24 VDC power supply, can be connected to the “24 VDC / 200mA OUTPUT”. At the bottom of the LIOB-A2, a 4-wire cable (“SEL”, “GND”, “A”, “B”) can be connected to extend the LIOB-Connect bus as shown in Figure 24. When the cable is longer than 1 m, it is necessary to terminate the LIOB-Connect bus at the end. This is achieved by using another LIOB-A2 and connecting the “B” with the “TERM” terminal, as shown at the bottom right of Figure 24. Figure 24: Using the LIOB-A2 adapter to extend the LIOB-Connect bus More information about LIOB-Connect wiring can be found in Section 3.5. 3.5 Power Supply and Wiring Please refer to Section 16.3 on how many L-IOB devices can be connected to a L-IOB host. There are six ways of connecting L-IOB devices: Version 4.8 to the LIOB-Connect port of a L-IOB host (LIOB-10x), LOYTEC electronics GmbH LIOB-10x/x5x User Manual 36 LOYTEC to the LIOB-FT port of a L-IOB host (LIOB-15x in LIOB-FT device mode), to a CEA-709 network (LIOB-15x in LONMARK® or Non-ECS device mode), to the LIOB-IP bus of a L-IOB host (LIOB-45x/55x in LIOB-IP device mode), to a CEA-852 network (LIOB-45x in LONMARK® or Non-ECS device mode), to a BACnet/IP network (LIOB-55x in BACnet device mode). The LIOB-Connect port of a L-IOB host provides a means for connecting LIOB-10x modules, including power supply and communication, without further cabling needs. The gold contacts at the side of the enclosure attach the modules in a daisy chain. Up to 24 L-IOB devices can be connected to the LIOB-Connect port. The LIOB devices are physically and logically organized in a daisy chain. This means that the L-IOB host is able to automatically enumerate the connected I/O modules to match the order defined in the Configurator. The LIOB-FT port of a L-IOB host is used to overcome longer distances between the L-IOB host and the L-IOB I/O modules (LIOB-15x models in LIOB-FT device mode). Depending on the L-IOB host, up to 8 or 24 L-IOB devices can be attached over LIOB-FT. The cable type, topology, and length are in accordance with the TP/FT-10 specification. The LIOB-FT modules need additional setup (Station ID), as explained in Chapter 4. The CEA-709 Network Connection is available for the LIOB-15x models in LONMARK® or Non-ECS device mode. The number of connectable devices, cable type, topology and length follow the TP/FT-10 specification. All rules of CEA-709 / LONMARK® devices regarding network installation, management, and maintenance apply. A L-IOB host is not required. The LIOB-IP port of a L-IOB host is used to connect L-IOB devices over Ethernet/IP (LIOB-45x/55x models in LIOB-IP device mode). Depending on the L-IOB host, up to 8 or 24 L-IOB devices can be attached over LIOB-IP. The LIOB-IP modules need additional setup (e.g. IP address, Station ID), as explained in Chapter 4. The CEA-852 Network Connection is available for the LIOB-45x models in LONMARK® or Non-ECS device mode. All rules of CEA-852 / LONMARK® devices regarding network installation, management, and maintenance apply. A L-IOB host is not required. The BACnet/IP Network Connection is available for the LIOB-55x models in BACnet device mode. All rules of BACnet devices regarding network installation, management, and maintenance apply. A L-IOB host is not required. Please refer to Section 5.4 for setting up the correct device mode in LIOB-15x/45x/55x models. For using external (non-LOYTEC) power supplies, please refer to Section 14.1. For connecting sensors and actuators to the L-IOB I/Os, please refer to Sections 14.2 and 14.3. The next Sections describe the different power supply and cabling variants in detail, depending on the connection method. 3.5.1 LIOB-Connect without Extension Up to 4 L-IOB devices can be directly connected to the L-INX device in a physical daisy chain as depicted in Figure 25. Version 4.8 LOYTEC electronics GmbH LIOB-10x/x5x User Manual 37 LOYTEC Max. 4 1 3 2 4 Figure 25: LIOB-Connect Daisy Chain The LPOW-2415A power supply to the left is equipped with a LIOB-Connect port and can be attached to the L-INX for powering both the L-INX and the L-IOB I/O modules. 3.5.2 LIOB-Connect with Extension For space considerations or if the power supply is not sufficient for all connected L-IOB devices (more than 4), the LIOB-Connect chain can be split into two (or more) segments of modules using LIOB-A2 adapters and a 4-wire cable (“SEL”, “GND”, “A”, “B”) as depicted in Figure 26. Max. 4 1 4 ... Length < 50 m 4 Optional if Length > 1 m Max. 4 5 8 ... Figure 26: LIOB-Connect Extension The total length of the extension cable must be smaller than 50 meters. If the length exceeds 1 meter, a LIOB-A2 adapter must be used at the end of the last segment as a termination, with terminals “B” and “TERM” connected, as depicted in the bottom right of Figure 26. Observe that the extension must be done exactly as depicted in Figure 26, even if it is just used for providing sufficient power supply and not to overcome space issues. 3.5.3 LIOB-FT in Free Topology Figure 27 shows the connection of LIOB-15x modules (LIOB-FT device mode) to the LIOB-FT port of a L-INX device in free topology, which can be used for cable lengths of up to 500 m between any two devices. Version 4.8 LOYTEC electronics GmbH LIOB-10x/x5x User Manual 38 LOYTEC LT-33 free topology 2 1 3 2 4 Max. 4 24V 24V 24V 5 6 24V 7 8 Figure 27: LIOB-FT Free Topology The L-IOB devices can either be powered by L-POWs (middle part of Figure 27) or other 24 V power supplies (bottom part of Figure 27). The LIOB-FT port of the L-INX (terminals “A” and “B”) must be connected to all LIOB-15x devices. One LT-33 terminator (free topology terminals) must be placed somewhere in the network. 3.5.4 LIOB-FT in Bus Topology Figure 28 shows the connection of LIOB-15x modules (LIOB-FT device mode) to the LIOB-FT port of a L-INX device in bus topology, which must be used for a cable length of above 500 m. The L-IOB devices can either be powered by L-POWs (middle part of Figure 28) or other 24 V power supplies (bottom part of Figure 28). The LIOB-FT port of the LINX (terminals “A” and “B”) must be connected to all LIOB-15x devices, forming a physical bus. An LT-33 terminator (bus topology terminals) must be placed at both ends of the bus. Version 4.8 LOYTEC electronics GmbH LIOB-10x/x5x User Manual 39 LOYTEC LT-33 bus topology 2 1 3 2 4 Max. 4 24V 24V 24V 24V LT-33 bus topology 5 6 7 8 Figure 28: LIOB-FT Bus Topology 3.5.5 CEA-709 Network Connection in Free Topology or Bus Topology The connection of LIOB-15x devices in LONMARK® or Non-ECS device mode works exactly like in LIOB-FT device mode, refer to Sections 3.5.3 and 3.5.4. The only difference is that instead of the connection to the LIOB-FT port of a L-INX device, the L-IOB devices are directly connected to a CEA-709 network. 3.5.6 LIOB-IP Connection Figure 29 shows the connection of LIOB-45x/55x modules (LIOB-IP device mode) to a L-INX. Observe that communication over NAT routers is not supported for the LIOB-IP bus. The L-IOB devices can either be powered by L-POWs (middle part of Figure 29) or other 24 V power supplies (bottom part of Figure 29). Version 4.8 LOYTEC electronics GmbH LIOB-10x/x5x User Manual 40 LOYTEC Ethernet Ethernet Ethernet Ethernet 1 Ethernet 3 2 4 Max. 4 Ethernet Ethernet Ethernet 24V 5 Ethernet 24V 24V 24V 6 7 8 Figure 29: LIOB-IP Connection 3.5.7 CEA-852 Network Connection The connection of LIOB-45x devices in LONMARK® or Non-ECS device mode works exactly like in LIOB-IP device mode, refer to Section 3.5.6. A L-IOB host is not needed in this case. There could still be e.g. a L-INX device in the network acting as the CEA-852 configuration server though. 3.5.8 BACnet/IP Network Connection The connection of LIOB-55x devices in BACnet device mode works exactly like in LIOB-IP device mode, refer to Section 3.5.6. A L-IOB host is not needed in this case. 3.6 LED signals The L-IOB device is equipped with a three-color status LED (see Figure 10) which indicates the current state of the L-IOB device. 3.6.1 Status LED (L-INX Mode) The meaning of the LED signals for the LIOB-10x models, the LIOB-15x models in LIOBFT device mode, and the LIOB-45x/55x models in LIOB-IP device mode is listed in Table 1. Version 4.8 LOYTEC electronics GmbH LIOB-10x/x5x User Manual 41 LOYTEC Behavior Description Comment OFF Unconfigured / Offline The L-IOB device is either not connected to a L-IOB host or not yet set online. GREEN Normal Operation The L-IOB device is connected to a L-IOB host and online. No I/O is in manual mode. ORANGE Manual Mode At least one I/O is in manual mode. RED Error An error has occurred (e.g. a sensor is disconnected or signals an error). Flickering Traffic Indicates traffic between the L-IOB host and the L-IOB device. RED flashing at 0.5 Hz Fallback Override The primary firmware image is corrupt and the L-IOB has booted the fallback image. In this case, the firmware must be upgraded again. Table 1: Status LED Patterns in LIOB-Connect / LIOB-FT / LIOB-IP device mode 3.6.2 Status LED (LONMARK® Mode) The meaning of the LED signals for the LIOB-15x/45x models in LONMARK® or Non-ECS device mode is listed in Table 2. Behavior Description Comment OFF Online The L-IOB device is configured online. Flickering Traffic The L-IOB device receives or transmits NV or CP values. ORANGE Manual Mode At least one I/O is in manual mode. RED Error An error has occurred (e.g. a sensor is disconnected or signals an error). GREEN flashing at 0.5 Hz Offline The L-IOB device is offline. RED flashing at 0.5 Hz Fallback Override The primary firmware image is corrupt and the L-IOB has booted the fallback image. In this case, the firmware must be upgraded again. Table 2: Status LED Patterns in LONMARK® / Non-ECS device mode 3.6.3 Status LED (BACnet Mode) The meaning of the LED signals for the LIOB-55x models in BACnet device mode is listed in Table 3. Behavior Description Comment OFF No Traffic No packets are received or transmitted. Flickering GREEN Traffic The L-IOB device receives or transmits packets. ORANGE Manual Mode At least one I/O is in manual mode. RED Error An error has occurred (e.g. a sensor is disconnected). RED flashing at 0.5 Hz and “LIOB Fallback” shown in LCD UI Fallback Override The primary firmware image is corrupt and the L-IOB has booted the fallback image. In this case, the firmware must be upgraded again. Table 3: Status LED Patterns in BACnet device mode Version 4.8 LOYTEC electronics GmbH LIOB-10x/x5x User Manual 42 LOYTEC 3.7 Status Button The L-IOB device is equipped with a status button (see Figure 10). When pressing the status button shortly during normal operation of the device, a service pin message (LIOB15x/45x) or I-Am message (LIOB-55x) is sent out, the LCD is reset, and the LCD backlight is switched on. The status button can also be used to switch the device back to factory default state. Press the button and power-cycle the device. Keep the button pressed until the Status LED illuminates orange permanently. Release the button within five seconds from that time on to reset the device to factory defaults. Version 4.8 LOYTEC electronics GmbH LIOB-10x/x5x User Manual 43 LOYTEC 4 Device Modes and Installation After physically installing and connecting the L-IOB devices, they must be configured to be able to communicate with each other resp. with the L-IOB host. The necessary steps depend on the used device mode. The available device modes and resulting installation steps as well as some remarks about device monitoring and replacement are documented in the next sections. 4.1 Device Modes There are six different device modes available for L-IOB devices which are explained in the following sections. For LIOB-15x/45x/55x models, the device mode can be changed on the LCD Display, see Section 5.4. Observe that the LIOB-Connect / LIOB-FT / LIOB-IP device modes are abbreviated as ‘L-INX Mode’, the LONMARK® / Non-ECS device modes are abbreviated as ‘LONMARK® Mode’, and the BACnet device mode is abbreviated as ‘BACnet Mode’. 4.1.1 LIOB-Connect Device Mode (LIOB-10x) This is the only available device mode for LIOB-10x devices. It requires a L-IOB host. The L-IOB devices are directly connected to the host as described in Section 3.5. 4.1.2 LIOB-FT Device Mode (LIOB-15x) This mode is similar to the LIOB-Connect device mode of LIOB-10x devices. It also requires a L-IOB host. The difference is that the connection between the LIOB host and the L-IOB devices is done over the LIOB-FT port instead of the LIOB-Connect port as explained in Section 3.5. 4.1.3 LIOB-IP Device Mode (LIOB-45x/55x) This mode is similar to the LIOB-FT device mode of LIOB-15x devices. The only difference is that the connection between the L-IOB host and the L-IOB devices is done over the LIOB-IP bus instead of the LIOB-FT port. 4.1.4 LONMARK® Device Mode (LIOB-15x/45x) This is the standard device mode for LIOB-15x/45x devices. The L-IOB devices behave as independent nodes on a CEA-709 network. They are LONMARK® certified and support all current CEA-709 technologies such as the Enhanced Command Set (ECS) and a large number of network address table entries (512). A L-IOB host is not needed. 4.1.5 Non-ECS Device Mode (LIOB-15x/45x) This mode is similar to the LONMARK® Device Mode with the exception that the Enhanced Command Set (ECS) is not supported and thus the L-IOB device only supports 15 address Version 4.8 LOYTEC electronics GmbH LIOB-10x/x5x User Manual 44 LOYTEC table entries. This mode must be set when using network management tools which do not support ECS. 4.1.6 BACnet Device Mode (LIOB-55x) This is the standard device mode for LIOB-55x devices. The L-IOB devices behave as independent nodes on a BACnet/IP network. A L-IOB host is not needed. 4.2 Device Installation Depending on the device mode, device installation works as explained in the following sections. 4.2.1 Device Installation (LIOB-Connect device mode) Whenever a new configuration is downloaded into a L-INX device (with connected LIOB10x devices), as well as whenever the user manually scans for devices or starts a configuration run in the L-INX UI, the L-IOB devices are detected, commissioned, and configured. This is done in the following steps: 1. All L-IOB devices directly connected over the LIOB-Connect bus or over a LIOB-A2 adapter using a 4-wire cable (see Section 3.5) are detected. The devices are automatically enumerated according to their position in the physical daisy chain. 2. All devices are configured and set online. At this point, the L-IOB data points are available in the L-INX application. 4.2.2 Device Installation (LIOB-FT/IP device mode) The first step after hardware installation is to setup the LIOB-FT/IP device mode, since LIOB-15x/45x/55x devices are in LONMARK® or BACnet device mode by default. See Section 5.4 for setting up the LIOB-FT/IP device mode in LIOB-15x/45x devices. See Section 5.1 for setting up the LIOB-IP device mode in LIOB-55x devices. For LIOB-45x/55x devices in LIOB-IP device mode, the next step is the activation of the LIOB-IP channel in the L-IOB host, see Section 8.1. After that, the IP and host setup must be done in all LIOB-45x/55x devices, see Section 5.4 or Sections 6.2.4 and 6.2.6. Note: Older L-IOB hosts must be upgraded to firmware version 4.8 or higher. These upgraded L-IOB hosts then need a factory reset (once) to activate the support of the LIOB-IP bus. Otherwise, the LIOB-IP bus will not appear in the Web-UI of the L-IOB host. For both LIOB-15x devices in LIOB-FT device mode and LIOB-45x/55x devices in LIOBIP device mode, the user must then manually setup a unique Station-ID in each L-IOB device via the LCD UI (see Section 5.4). Alternatively, one can also setup the Node-IDs of all attached L-IOB devices in the L-IOB host’s Web UI and start a configuration run (see Section 8.3). In this case, the L-IOB Station-IDs are automatically set by the L-IOB host during the configuration run. Whenever a new configuration is downloaded into a L-IOB host (with connected LIOB15x/45x/55x devices), as well as whenever the user manually scans for devices or starts a configuration run in the L-IOB host, the L-IOB devices are detected, commissioned, and configured. This is done in the following steps: 1. Version 4.8 All L-IOB devices connected over the LIOB-FT/IP bus are detected. Enumeration is achieved via the Station-ID. LOYTEC electronics GmbH LIOB-10x/x5x User Manual 2. 45 LOYTEC All devices are configured and set online. At this point, the L-IOB data points are available in the L-IOB host application. 4.2.3 Device Installation (LONMARK® / Non-ECS device mode) For LIOB-45x devices in LONMARK® or Non-ECS device mode, the first step after hardware installation and IP setup is to add them to a CEA-852 channel, see Section 5.4 or Sections 6.2.4 and 6.2.7. Both LIOB-15x and LIOB-45x devices in LONMARK® or Non-ECS device mode must then be installed and commissioned like any other CEA-709 / LONMARK® node. Please consult the documentation of your CEA-709 network management tool on how to perform these tasks. For LNSTM based network management tools, the LOYTEC L-INX Configurator Software acts as an LNSTM plug-in to configure the L-IOB devices. It also installs the needed templates for all LIOB-15x/45x models when it is registered as a plug-in in the network management software. Both off- and online installation of the L-IOB devices is supported. For Non- LNSTM network management tools, a LOYTEC NIC such as the NIC-USB100 or NIC852 is needed for configuration. The devices must be configured (using the CEA-709 Connection method of the Configurator Software) before installing and commissioning them in the network management tool. Afterwards, the device templates must always be created online from the L-IOB devices if the network management tool does not support changeable network variables. If the network management tool does support changeable network variables, the L-IOB devices can also be created from the corresponding L-IOB XIF files shipped with the L-INX Configurator software (folder ‘XIF’). 4.2.4 Device Installation (BACnet Mode) Before the device can be used in the BACnet/IP network, the initial IP and BACnet setup must be done in the LCD UI (see Section 5.1) or Web UI (see Section 6.2). 4.3 Device Monitoring and Replacement 4.3.1 Device Monitoring and Replacement (L-INX Mode) Whenever a L-IOB device loses communication with the L-IOB host, the host automatically detects the missing L-IOB and starts to poll the L-IOB device until it is detected again. Refer to Chapter 12 for more information on L-IOB device replacement. 4.3.2 Device Monitoring and Replacement (LONMARK® Mode) Device monitoring and replacement works like with any other CEA-709 / LONMARK® node. Please consult the documentation of your CEA-709 network management tool on how to perform these tasks. If a device needs to be physically replaced (e.g. because it is defective), please use the ‘replace’ method of your network management tool. For NonLNSTM based tools, either download the old configuration in the new device beforehand (using the CEA-709 Connection method of the Configurator Software) or use the restore function of the Configurator if you have a recent backup of the original L-IOB device available. 4.3.3 Device Replacement (BACnet Mode) For replacing a LIOB-55x device, use the restore function of the Configurator (or LWEB tool) with a recent backup of the original L-IOB device. Version 4.8 LOYTEC electronics GmbH LIOB-10x/x5x User Manual 46 LOYTEC 5 L-IOB LCD Display The L-IOB device is equipped with an LCD display and jog dial for monitoring, testing, and configuration purposes. The LCD backlight is automatically switched off after 30 minutes of idle time (no jog dial or status button activity). 5.1 Main Page of LIOB-55x in BACnet Mode The LCD main page of the LIOB-55x I/O modules in BACnet device mode is shown in Figure 30. It is different from the other I/O modules, since it is derived from the main page of the LIOB-58x I/O controller, see [2]. Observe that when in LIOB-IP device mode, the LIOB-55x has the same LCD UI as the LIOB-45x. Figure 30: Main Screen of the LIOB-55x LCD in BACnet device mode The main page displays the device’s name, CPU load, system temperature, supply voltage, IP address, and Ethernet status. In the row where the CPU load is displayed, there is a language symbol on the right side, where the LCD language can be chosen. Observe that changing the language requires a system reboot. In the bottom part of the main page there are some menu items. Turn the jog dial to navigate between menu items and press to enter a menu or go into selection mode. When in selection mode, turn the jog dial to alter the value and press again to quit the selection. The I/O »» menu is described in Sections 5.2, 5.3, and 5.5. The Datapoints »» menu allows browsing through the data points on the device. The Device Settings »» menu allows configuring basic device settings. Navigate e.g. to the Device Management »» sub-menu, which is displayed in Figure 31. Figure 31: Device Management Menu on the LIOB-55x LCD in BACnet device mode This menu gives you e.g. the following options for basic device configuration: Version 4.8 TCP/IP Setup: IP Configuration page (IP-Address, etc.). LOYTEC electronics GmbH LIOB-10x/x5x User Manual 47 LOYTEC Send ID messages: send out an I-Am message. Reboot system: By choosing this item, the device performs a full reboot. Clear DP config: By choosing this item, the user can clear the device’s entire data point configuration. Factory Defaults: By choosing this item, the user can reset the entire device to its factory default. PIN: Alter the default PIN to any 4-digit number to protect certain operations on the LCD UI. The user will be prompted to enter the PIN on protected areas. Contrast: changes the display contrast. Language: changes the LCD language. Observe that this requires a device reboot. Reset I/O counters: resets all I/O counters like pulse count values. LIOB-IP Device Mode: the LIOB-55x device switches to LIOB-IP device mode. Observe that changing the device mode will clear all configuration data. 5.2 Main Page of LIOB-10x/15x/45x (I/O Overview Page) The main LCD page of the LIOB-10x/15x/45x models (and LIOB-55x in LIOB-IP device mode) is shown in Figure 32. The LIOB-55x models in BACnet device mode also contain this I/O overview page, but not as the main page. The top and bottom rows show the direction, state, and operating mode (without a letter = Auto, M = Manual, O = Override, D = Disabled) of all I/Os. Figure 32: L-IOB LCD Display Main Page The I/O state is shown as one of the following icons: Switch Icon: used for I/Os which generate a digital value as well as Inputs in Switch Mode, Bar Icon: used for I/Os which generate an analog value, Pulse Icon: used for pulse count inputs, House Icon: used for occupancy inputs, Exclamation Mark: shown for disconnected sensors or sensors which indicate an error, Check Icon: shown for sensors which indicate correct operation, COM Icon: used for all common terminals of relays and triacs. CD Icon: used for STId card reader code signals. Version 4.8 LOYTEC electronics GmbH LIOB-10x/x5x User Manual 48 LOYTEC DT Icon: used for STId card reader data signals. CK Icon: used for STId card reader clock signals. Refer to Section 9.3 for details on I/O types, configuration, and operating modes. When an I/O is selected, the middle part of the main page shows the I/O name, current value, terminal name, and terminal number. To the right, the device configuration icon (toothed wheel icon, see Section 5.4) and the device state icon is shown. When the device configuration icon is selected, the middle of the main page shows the device name, device state (offline, online, etc.), and station ID. The device state icon shows an exclamation mark if at least one I/O shows an exclamation mark. Otherwise it shows the checked icon to indicate that all I/Os are operating correctly. For LIOB-55x Models in BACnet device mode, the toothed wheel icon is replaced by an exit icon, which is used to exit the I/O overview page. By turning the jog dial, the user can cycle through all I/Os (resp. to the device configuration icon, see Section 5.4). This can be used to get a quick overview of all I/O states as well as the device state. Observe that the common terminal icons (COM) only show the name and information of that terminal. No further configuration is possible for common terminals. 5.3 Manual / Quick Edit Mode If the jog dial is pushed shortly on an I/O in manual mode (M), the quick edit mode is entered, which allows changing the I/O value by turning the jog dial. By pushing the jog dial shortly again, the quick edit mode is left. When pushing the jog dial shortly on an I/O in auto mode (normal mode without special letter), one can quickly switch to both manual mode and quick edit mode by turning to the jog dial. The manual mode (along with the quick edit mode) can be left again by pushing the jog dial for at least one second. The manual mode can also be setup in the corresponding I/O configuration page (see Section 5.5) or for all I/Os in the device configuration page (see Section 5.4). If an input is in manual mode, the physical input from the connected sensor is ignored and the user can setup a simulated input value to be used in the L-IOB host application or receiving node. This can be used e.g. to test the behavior of the application in the L-IOB host or receiving node depending on certain input values. If an output is in manual mode, the value coming from the L-IOB host or sending node is ignored and the user can set the value for the actuator connected to the physical output. This can be used to physically test the connected actuator. It is possible that changing the manual value is restricted via a PIN code. In this case, the user will be requested to enter a pin code before the value can be changed. The pin code only needs to be entered once except when the device is not operated manually for more than 30 minutes. 5.4 Device Information and Configuration (LIOB-10x/15x/45x) This page is available for the LIOB-10x/15x/45x models as well as the LIOB-55x models in LIOB-IP device mode. If the jog dial is pushed when the device configuration icon (toothed wheel icon to the right) is selected, the L-IOB device information and configuration page is entered, which allows viewing and changing device specific properties. If the jog dial is pushed shortly on a device property, the edit mode is entered, which allows changing the property by turning the jog dial. By pushing the jog dial again, the edit mode is left. Following is a list of all device properties: Version 4.8 LOYTEC electronics GmbH LIOB-10x/x5x User Manual 49 LOYTEC Remote LCD Access (L-INX Mode): here the user can exit the remote LCD access. This option is only available if the L-IOB device is remotely accessed via the L-IOB host’s LCD Display, see Section 7.2. Pin Code Access: here the user can explicitly log in and out with PIN code. This option is only available if a PIN code is set for the device. Operating Mode: here the user can change the operating mode of all I/Os except for disabled I/Os, which can only be changed via the I/O configuration page of that specific I/O. Display Contrast: here the user can setup the LCD display contrast. DHCP, IP Address/Mask/Gateway (LIOB-45x/55x models): here the user can configure the IP settings of the device. Observe that they must be confirmed with ‘Save IP Settings’ (see below). IP Addr. LIOB Host (LIOB-IP device mode): here the user can configure the IP address of the L-IOB host, the L-IOB device in LIOB-IP device mode shall be integrated with. Observe that NAT routers are not supported. Config Server Addr. (LONMARK® Mode of LIOB-45x): here the user can configure the IP Address of the CEA-852 Configuration Server, the LIOB-45x device in LONMARK® device mode shall become a member of. All further CEA-852 settings can be made in the L-IOB Web UI, see Section 6.2.7. Save IP Settings (LIOB-45x/55x models): here the user can confirm the IP settings. A device reboot will be performed automatically. Ethernet Status (LIOB-45x/55x models): shows the current Ethernet link status and connection speed. Station ID (L-INX Mode): shows the station ID (1-24) within the logical daisy chain of L-IOB devices on this L-IOB bus. For LIOB-FT/IP devices (LIOB-15x/45x/55x models), the user can edit this field to setup the order of L-IOB devices. Start Config Run (LIOB-FT/IP device mode): here the user can request a configuration run from the L-IOB host. At the end of the configuration run, the L-IOB device will either be set online or an error message will be displayed (e.g. if no configuration is available for the requested station ID or the ID is already taken). Domain Length, Domain, Subnet, Node, Set CEA709 Mode (LONMARK® Mode): with these properties, the user can get a LIOB-15x/45x device online on a CEA-709 network without the need for a network management tool. Device Name: name of the L-IOB device. Product Code: L-IOB model (e.g. LIOB-100). Device Status: shows the current status of the L-IOB device (offline, online, in configuration, configured). Firmware Image: shows if the L-IOB device has booted the primary or fallback image (should always be primary). Firmware Version: version of L-IOB primary firmware image. Firmware Build: firmware build timestamp. Version 4.8 LOYTEC electronics GmbH LIOB-10x/x5x User Manual 50 LOYTEC Serial Number: serial number of the L-IOB device. Node ID: world-wide unique node ID of the L-IOB device. CPU Load: current CPU load on the L-IOB device. System Temperature: current L-IOB system temperature. Supply Voltage: current supply voltage of the L-IOB device. Last Fatal Error: shows the last detected fatal error. Last Reset (L-INX Mode): timestamp of last reset resp. power cycle of the L-IOB device. This is only set correctly if the L-IOB device is connected to a L-IOB host. Current Date/Time: shows the current date and time of the L-IOB. This is only set correctly if the L-IOB device is connected to a L-IOB host or time server. Name of LIOB Host (L-INX Mode): shows the name of the L-IOB host (e.g. L-INX device). Host Project File (L-INX Mode): shows the file name of the L-IOB host project. Host Project Name (L-INX Mode): shows the name of the L-IOB host project. Host Project Date (L-INX Mode): shows the creation date and time of the L-IOB host project. Reset Count Values: here the user can set back all count values (counting inputs and the run hours and energy count of all outputs). Reset Device: here the user can reset the device or set back the device to factory defaults. Observe that in the latter case, the device mode might change too. Device Mode (LIOB-15x/45x/55x models): here the user can change the device mode of a LIOB-15x/45x/55x device between LONMARK®, Non-ECS, LIOB-FT/IP, and BACnet (LIOB-55x). Observe that changing the device mode will clear all configuration data. Model Number (LONMARK® Mode): shows the model number (last byte of the Program ID) and version number of the corresponding XIF file. Language: here the user can setup the language (English, German, or French) of the LCD display. It is possible that changing the device configuration is restricted via a PIN code. In this case, the user will be requested to enter a pin code before a value can be changed. The pin code only needs to be entered once except when the device is not operated manually for more than 30 minutes or the user logs out explicitly. 5.5 I/O Configuration If the jog dial is pushed for at least one second on any I/O, the configuration page for that I/O is entered, which allows viewing and changing configuration properties of the I/O. The properties which can be changed are enclosed by angle brackets (“<”, “>”). By turning the jog dial, the user can cycle through the configuration properties. If the jog dial is pushed Version 4.8 LOYTEC electronics GmbH LIOB-10x/x5x User Manual 51 LOYTEC shortly on a property, the edit mode is entered, which allows changing the property by turning the jog dial. By pushing the jog dial again, the edit mode is left. It is possible that changing properties is restricted via a PIN code. In this case, the user will be requested to enter a pin code before a value can be changed. The pin code only needs to be entered once except when the device is not operated manually for more than 30 minutes. To leave the configuration page, the user must turn the jog dial until the title line (I/O name) is selected and then push the jog dial. Alternatively, the jog dial can also be pushed anywhere on the page for at least 1 second. Observe that depending on the hardware type, signal type, and interpretation of an I/O, the list of configuration properties varies. Refer to Section 9.3 for detailed information on the different configuration properties. In addition to the configuration properties described there, for some I/Os, a “RawValue” property will be displayed. It shows the physical measured value for inputs (e.g. the resistance of an NTC) resp. the physical value for outputs (e.g. the actual voltage for analog outputs). Note that this information can be used for debugging sensors or actuators but is not available in the form of data points on the LIOB host. For counting inputs, two additional configuration options are available: ‘Pulse Count Reset’ and ‘Count Start Value’. Using ‘Pulse Count Reset’, the counter can either be reset to 0 or to the value set in ‘Count Start Value’. Version 4.8 LOYTEC electronics GmbH LIOB-10x/x5x User Manual 52 LOYTEC 6 L-IOB Web Interface (LIOB-45x/55x) The LIOB-45x/55x models come with a built-in Web server and a Web interface to configure the device and extract statistics information. The Web interface allows configuring the IP settings, CEA-852, BACnet, and other settings. 6.1 Device Information and Account Management In a Web browser, enter the default IP address 192.168.1.254 of the device. Note that if your PC has an IP address in a subnet other than 192.168.1.xxx, you must open a command tool and enter the following route command to add a route to the device. To Add a Route to the Device 1. Windows START Run 2. Enter ‘cmd’ and click OK. 3. In the command window enter the command line route add 192.168.1.254 %COMPUTERNAME% In Windows7 replace %COMPUTERNAME% with the PC's actual IP address. 4. Then open your Web browser and type in the default IP address ‘192.168.1.254’. 5. The device information page should appear as shown in Figure 33. The device information page shows information about the device and the current firmware version. Below, it shows operational parameters, such as free memory, CPU load, system temperature and supply voltage. The page also includes the unique node ID (“Neuron IDs”) of the CEA-709 network interfaces. This page can also be used to send the CEA-709 service pin messages. This is a useful feature when commissioning the device (LONMARK® Mode), since it is not necessary to be on-site to press the status button. Version 4.8 LOYTEC electronics GmbH LIOB-10x/x5x User Manual 53 LOYTEC Figure 33: Device Information Page Click through the menus on the left hand side to become familiar with the different screens. If you click on Config in the left menu, you will be asked to enter the administrator password in order to make changes to the settings as shown in Figure 34. Enter the default administrator password ‘loytec4u’ and select Login. Figure 34: Enter ‘loytec4u’ as the default administrator password. The Config menu opens. Click on Passwords in the Config menu, which opens the password configuration page as shown in Figure 35. The device has three user accounts: (1) guest allows the user to view certain information only, e.g., the device info page. By default the guest user has no password. (2) operator is able to read more sensible information such as calendar data. (3) admin has full access to the device and can make changes to its configuration. Note that the user accounts are also used to log on to the FTP and Telnet server. Version 4.8 LOYTEC electronics GmbH LIOB-10x/x5x User Manual 54 LOYTEC Figure 35: Password Configuration Screen. Please change the administrator password in order to protect yourself from unwanted configuration changes by anyone else. To do so, select the admin account in the drop-down box and enter the new password. If the administrator password is left empty, password protection is turned off and everyone can access the device without entering a password. Click on Change password to activate the change. 6.2 Device Configuration The device configuration pages allow viewing and changing the device settings. Here are some general rules for setting IP addresses, port numbers, and time values: An empty IP address field disables the entry. An empty port number field sets the default port number. An empty time value field disables the time setting. 6.2.1 System Configuration The system configuration page is shown in Figure 36. This page allows configuring the device’s system time and other system settings. The TCP/IP Configuration link is a shortcut to the Ethernet port configuration. Follow that link to change the IP settings of the device. The time sync source can be set to auto, manual, NTP, BACnet (LIOB-55x) or LonMark (LIOB-45x). In the auto mode, the device switches to the first external time source that is discovered. Possible external time sources are NTP, BACnet, or LonMark. The option manual allows setting the time manually in the fields Local Time and Local Date. In manual mode, the device does not switch to an external time source. Note, that if NTP is selected, the NTP servers have to be configured on the IP Configuration page (see Section 6.2.4). In order to use BACnet as the time source, a BACnet device (time master) must be configured to distribute time synchronization. For doing so, the BACnet address of the devices, which shall be synchronized, must be added to the device object of the BACnet time master. The device synchronizes automatically as soon as it is contacted by the BACnet time master. The time zone offset must be defined independently of the time source. It is specified as the offset to GMT in hours and minutes (e.g., Vienna/Austria is +01:00, New York/USA is Version 4.8 LOYTEC electronics GmbH LIOB-10x/x5x User Manual 55 LOYTEC -06:00). For setting the daylight saving time (DST) predefined choices are offered for Europe and USA/Canada. DST can be switched off completely by choosing none or set manually for other regions. In that case, start and end date of DST must be entered in the fields below. Figure 36: System Configuration Page, e.g., for Vienna, Austria. The next section on the page allows configuring the device’s earth position. This setting defines the longitude, latitude and elevation of the device. The latitude and longitude are entered as degrees, minutes, and seconds. The altitude is entered in meters height above sea level. This setting is used for an astronomical clock. For fixed locations such as a building, the position can be entered on this page. For generating CSV files for trend logs, alarm logs, etc., the delimiter for those CSV files can be configured. This setting can be changed between a comma ‘,’ and a semi-colon ‘;’. The change takes effect immediately for all files generated by the device. For an automatic restore from LWEB-822/900, the ‘Request remote config.’ option must be enabled. 6.2.2 Backup and Restore A configuration backup of the device can be downloaded via the Web interface. Press the backup link as shown in Figure 37 to start the download. The device assembles a single file including all required files. A file requestor dialog allows specifying the location where the backup file shall be stored. To restore the device settings, simply select a previously generated backup file in the Restore Configuration section of the page by clicking the button next to the Filename field. Then press the Restore button. The backed up configuration data consists of: Version 4.8 Device settings (Passwords, IP settings, e-mail config, etc.), LOYTEC electronics GmbH LIOB-10x/x5x User Manual 56 Data point configuration, CEA-709 binding information, BACnet server objects and client mappings, LIOB configuration and parameters, AST settings. LOYTEC Figure 37: Backup/Restore page. 6.2.3 Port Configuration This menu allows configuring the device’s communications ports. For the Ethernet communication port, a configuration tab is provided by the Web UI, as shown in Figure 38. It contains a selection of available communication protocols. By selecting a checkbox or radio button the various protocols can be enabled or disabled on the communication port. Figure 38: Port Configuration Page. Version 4.8 LOYTEC electronics GmbH LIOB-10x/x5x User Manual 57 LOYTEC When selecting a protocol, the protocol’s communication parameters are displayed in a box on the right-hand side. To save the settings of the currently opened protocol, click the Save Settings button. Pressing Get Settings retrieves the current settings from the device. 6.2.4 IP Configuration The TCP/IP configuration is shown in Figure 38. The mandatory IP settings, which are needed to operate the device, are marked with a red asterisk (IP address, netmask, gateway). The Enable DHCP checkbox switches between manual entry of the IP address, netmask, and gateway address, and automatic configuration from a DHCP server. Hostname and Domainname are optional entries and can be left empty. For some DHCP configurations it may be necessary to enter a hostname. Please contact your system administrator on how to configure DHCP to acquire an IP address. Further, you can configure up to 3 Domain Name Servers. The device comes configured with a unique MAC address. This address can be changed in order to clone the MAC address of another device. Please contact your system administrator to avoid MAC address conflicts. The device can be configured to synchronize its clock with NTP time. Enter the IP address of a primary and, optionally, a secondary NTP server. The device will use NTP as a time source if the time sync source in the system configuration page is set to NTP (see Section 6.2.1). The field NTP status below the NTP server settings displays the current NTP synchronization status (out-of-sync, or in-sync). If the device is operated with a 10 Mbit/s-only hub, the link speed should be switched from Auto Detect to 10Mbps/Half-Duplex. With modern 100/10 Mbit/s switches, this setting can be left at its default. Other standard protocols that are bound to the Ethernet interface are FTP, Telnet, and HTTP (Web server). By deselecting the checkbox, those protocols can be individually disabled. The standard UDP/TCP ports can be changed in the respective protocol settings. An example for the FTP server is shown for FTP in Figure 39. The FTP server is used for instance to update the firmware. Note that HTTP for the Web server can only be disabled using the device configuration of the Configurator. Figure 39: FTP server configuration on the Ethernet port. 6.2.5 VNC Configuration LIOB-45x/55x devices also provide remote access over Ethernet to the LCD display. The VNC protocol is used for this purpose and the device implements a VNC server for exposing the display. The VNC server is by default disabled on the device. On the PC a VNC client needs to be installed. Using the default settings, the VNC client connects to port 5900 of the device. The password is ‘loytec4u’. The VNC server can be configured on the Ethernet tab of the port configuration. To turn on the VNC server, enable the VNC for LCD UI checkbox. The VNC protocol settings are displayed in the settings box on the right-hand side as shown in Figure 40. The VNC port Version 4.8 LOYTEC electronics GmbH LIOB-10x/x5x User Manual 58 LOYTEC and VNC password can be changed. As a default, only one VNC client may connect. This limit may be increased in Max VNC clients. In order to protect changes made on the LCD UI over VNC with a PIN code, the Admin PIN code can be configured. To disable PIN protection, enter ‘0000’. Figure 40: VNC Configuration. 6.2.6 LIOB-IP Configuration (LIOB-IP Device Mode) As in the LCD UI (see Section 5.4), the IP Address of the L-IOB Host, which provides the LIOB-IP channel, can be setup here, see Figure 41. When the address is changed, the LIOB device is automatically deleted from the old host and added to the LIOB-IP channel of the new host. Figure 41: LIOB-IP Configuration. 6.2.7 CEA-852 Device Configuration (LONMARK® Mode) For LIOB-45x devices in LONMARK® Mode, the CEA-709 over IP (CEA-852) protocol is enabled by default, since it is the only means to communicate in a control network. The CEA-852 protocol settings are displayed in the settings box on the right-hand side as shown in Figure 42. Typically, the device is added to an IP channel by entering the relevant information on a configuration server. The configuration server then contacts the CEA-852 unit of the L-IOB device and sends its configuration. Version 4.8 LOYTEC electronics GmbH LIOB-10x/x5x User Manual 59 LOYTEC Figure 42: CEA-852 Device Configuration Page. The field Config server address and Config server port display the IP address and port of the configuration server, which manages the L-IOB device and the IP channel. The field Config client port represents the IP port of the L-IOB’s CEA-852 device. This setting should be left at its default (1628) unless there are more than one CEA-852 devices operating behind a single NAT router. Please refer to the L-IP User Manual to learn more about NAT configuration. In the field Device name the user can enter a descriptive name for the L-IOB, which will appear in the IP channel to identify this device. You can enter a device name with up to 15 characters. It is recommended to use unique device names throughout the IP channel. The Channel mode field reflects the current channel mode of the CEA-852 unit. It is configured by the configuration server. If there are any two devices in the channel which use the same IP address but different ports (e.g., multiple devices behind one NAT router) the channel switches to Extended NAT mode. Please refer to the L-IP User Manual to learn more about configuring the Extended NAT mode in the configuration server. The configuration server sets the SNTP server addresses and the Channel timeout. The filed Escrow timeout defines how long the CEA-852 unit on the L-IOB waits for outof-sequence CEA-852 data packets before they are discarded. Please enter the time in ms or ‘0’ to disable escrowing. The maximum time is 255 ms. The field Aggregation timeout defines the time interval in which multiple CEA-709 packets are combined into a single CEA-852 data packet. Please enter the time in ms or ‘0’ to disable aggregation. The maximum time is 255 ms. Note that disabling aggregation will negatively affect the performance of the CEA-852 device of the L-IOB. The field MD5 authentication enables or disables MD5 authentication. Note that MD5 authentication cannot be used together with the Echelon’s i.LON 1000 since the i.LON 1000 is not fully compliant with the CEA-852 authentication method. MD5 can be used with the i.LON 600. In the following field MD5 secret enter the 16-byte MD5 secret. Note that for security purposes the active MD5 secret is not displayed. You may enter the 16 bytes as one string or with spaces between each byte, e.g., 00 11 22 33 44 55 66 77 88 99 AA BB CC DD EE FF. Version 4.8 LOYTEC electronics GmbH LIOB-10x/x5x User Manual 60 LOYTEC Also note that entering the MD5 secret on the Web interface may pose a security risk. Since the information is transmitted over the network it can be subject for eavesdroppers on the line. It is recommended to use a cross-over cable. In the field Location string the user can enter a descriptive test which identifies the physical location of the device. A location string can have a maximum length of 255 characters. This is optional and for informational purposes only. If the CEA-852 unit on the L-IOB is used behind a NAT router, the public IP address of the NAT router or firewall must be known. To automatically detect the NAT address leave the Auto-NAT checkmark enabled. The Multicast Address field allows the user to add the CEA-852 unit of the L-IOB into a multi-cast group for the CEA-852 IP channel. Enter the channel’s IP multi-cast address here. Please contact your system administrator on how to obtain a valid multi-cast address. To learn when it is beneficial to use multi-cast addresses in your channel please refer to the L-IP User Manual. 6.2.8 BACnet Configuration (BACnet Mode) Figure 43 shows the BACnet device configuration page of a LIOB-55x in BACnet Mode. This configuration page allows setting the Device ID, which is the instance part of the Object_Identifier property of the BACnet Device object. The field Device name holds the name of the BACnet device object (property Object_Name). Important! The device ID and device name must be unique within the BACnet inter-network. Figure 43: BACnet Device Configuration Further, the description and location can be configured. These configuration items correspond to the properties Description, and Location respectively of the BACnet Device object. For tuning BACnet application timing parameters, set APDU timeout, APDU segment timeout, and APDU retry count. The timeout values are entered in seconds allowing decimal notation, e.g. "7.5". Note: If this page displays the message "Device communication is disabled via BACnet network!" the device has been externally disabled. Reboot the device to activate communication again. 6.2.9 BACnet/IP Configuration (BACnet Mode) For LIOB-55x devices in BACnet Mode, the BACnet/IP protocol is enabled by default, since it is the only means to communicate in a control network. The protocol is available on Version 4.8 LOYTEC electronics GmbH LIOB-10x/x5x User Manual 61 LOYTEC the Ethernet port. The BACnet/IP protocol settings are displayed in the settings box on the right-hand side as shown in Figure 44. If the BACnet/IP network uses a non-default UDP port number other than 47808/0xBAC0, enter this port in the BACnet/IP port field. Enter ‘0’ in this field for switching back to the default setting. Figure 44: BACnet/IP Configuration 6.2.10 Data Points and AST (BACnet Mode) The LIOB-55x I/O modules in BACnet Mode support internal, technology independent data points as well as alarming, scheduling, and trending (AST) similar to the LIOB I/O controllers. The corresponding Web UI device configuration items are named ‘Data Points’, ‘Trend’, ‘Scheduler’, ‘Calendar’, and ‘Alarm’. Since the main purpose of LIOB I/O modules is to directly expose I/Os to the control network (CEA-852 or BACnet/IP), these function will usually not be required. For more information on technology independent data points and AST, please refer to the L-INX user manual [1] or LIOB-x8x user manual [2]. 6.3 Device Statistics The device statistics pages provide advanced statistics information about the CEA-709 device, the CEA-852 device, the system log, and the Ethernet interface. 6.3.1 System Log The System Log page prints all messages stored in the system log of the device. An example is shown in Figure 45. This log data is important for trouble-shooting. It contains log entries for reboots and abnormal operating conditions. When contacting LOYTEC support, please have a copy of this log ready. Version 4.8 LOYTEC electronics GmbH LIOB-10x/x5x User Manual 62 LOYTEC Figure 45: System Log Page. 6.3.2 IP Statistics Figure 46 shows the IP statistics page. It allows finding possible problems related to the IP communication. Specifically, any detected IP address conflicts are displayed (if the device’s IP address conflicts with a different device on the network). Figure 46: IP Statistics Page. 6.3.3 CEA-852 Statistics (LIOB-IP or LONMARK® Mode) The CEA-852 statistics page displays the statistics data of the CEA-852 unit on the device. The upper part of the CEA-852 statistics page is depicted in Figure 47. To update the statistics data, press the button Update all CEA-852 statistics. To reset all statistics Version 4.8 LOYTEC electronics GmbH LIOB-10x/x5x User Manual 63 LOYTEC counters to zero, click on the button Clear all CEA-852 statistics. The field Date/Time of clear will reflect the time of the last counter reset. Figure 47: Part of the CEA-852 Statistics Page. 6.3.4 Enhanced Communications Test (LIOB-IP or LONMARK® Mode) The Enhanced Communications Test allows testing the CEA-852 communication path between the CEA-852 unit on the L-IOB device and other CEA-852 devices as well as the configuration server. The test thoroughly diagnoses the paths between individual members of the IP channel and the configuration server in each direction. Port-forwarding problems are recognized. For older devices or devices by other manufacturers, which do not support the enhanced test features, the test passes as soon as a device is reachable, but adds a comment, that the return path could not be tested. A typical output is shown in Figure 48. Figure 48: Enhanced Communication Test Output. Version 4.8 LOYTEC electronics GmbH LIOB-10x/x5x User Manual 64 LOYTEC The Round Trip Time (RTT) is measured as the time a packet sent to the peer device needs to be routed back to the device. It is a measure for general network delay. If the test to a specific member fails, a text is displayed to describe the possible source of the problem. The reasons for failure are summarized in Table 4. Text displayed (Web icon) Meaning OK, Return path not tested (green checkmark) Displayed for a device which is reachable but which does not support the feature to test the return path (device sending to this CEA-852 device). Therefore a potential NAT router configuration error cannot be detected. If the tested device is an L-IP, it is recommended to upgrade this L-IP to 3.0 or higher. Not reachable/not supported This is displayed for the CS if it is not reachable or the CS does not support this test. To remove this uncertainty it is recommended to upgrade the L-IP to 3.0 or higher. (red exclamation) Local NAT config. Error (red exclamation) Peer not reachable (red exclamation) This is displayed if the CEA-852 device is located behind a NAT router or firewall, and the port-forwarding in the NAT-Router (usually 1628) or the filter table of the firewall is incorrect. Displayed for a device, if it is not reachable. No RTT is displayed. The device is either not online, not connected to the network, has no IP address, or is not reachable behind its NAT router. Execute this test on the suspicious device to determine any NAT configuration problem. Table 4: Possible Communication Problems. 6.3.5 CEA-709 Statistics (LIOB-IP or LONMARK® Mode) The CEA-709 statistics page displays statistics data of the CEA-709 port on the device as shown in Figure 49. This data can be used to troubleshoot networking problems. To update the data, click on the button Update CEA-709 statistics. Figure 49: CEA-709 Statistics Page. 6.3.6 BACnet Bindings Statistics (BACnet Mode) The BACnet bindings statistics page displays a list of all currently active address bindings. This list can be used for troubleshooting to see, which BACnet device instance numbers Version 4.8 LOYTEC electronics GmbH LIOB-10x/x5x User Manual 65 LOYTEC could be resolved and to what BACnet network number and MAC address. See Figure 50 for an example list. In this case the device instance 224095 has been resolved to the local network and MAC address 192.168.24.95:BAC0. Figure 50: BACnet bindings statistics page 6.3.7 Scheduler and Alarm Log Statistics (BACnet Mode) The LIOB-55x I/O modules in BACnet Mode support scheduling and alarming similar to the LIOB I/O controllers. The corresponding Web UI statistics items are named ‘Scheduler’ and ‘Alarm Log’. Since the main purpose of LIOB I/O modules is to directly expose I/Os to the control network (CEA-852 or BACnet/IP), these function will usually not be required. For more information on scheduling and alarming, please refer to the L-INX user manual [1] or LIOB-x8x user manual [2]. 6.4 Reset, Contact, Logout Version 4.8 The menu item Reset allows rebooting the device from a remote location. The Contact item provides contact information and a link to the latest user manual and the latest firmware version. The Logout item closes the current session. LOYTEC electronics GmbH LIOB-10x/x5x User Manual 66 LOYTEC 7 L-IOB Host LCD Display (L-INX Mode) This chapter only applies to LIOB-10x models, LIOB-15x models in LIOB-FT device mode, and LIOB-45x/55x models in LIOB-IP device mode. The L-IOB host (L-INX or LIOB-48x/58x) provides an LCD interface to configure, operate, and test the connected L-IOB devices. Refer to the L-INX user manual [1] for general information on the L-INX LCD interface. Refer to the LIOB-x8x user manual [2] for general information on the LIOB-48x/58x LCD interface. 7.1 L-IOB Scan and Configuration Run Even without any configuration, the L-IOB bus can be scanned to check which L-IOB devices are connected to the L-IOB host. In the menu Device Settings »» LIOB »», LIOBFT »», or LIOB-IP »», select the item Scan LIOB bus to scan for attached L-IOB devices. During the scan process, the status of the currently configured L-IOB device is shown in the LCD. At the end, the LCD will show all detected L-IOB devices and their status resp. error state. By pushing the jog dial on a certain L-IOB device, some configuration properties of the device are displayed. Refer to Section 9.2 for information on these properties. If a configuration is downloaded to the L-IOB host using the Configurator software (see Chapter 10), a configuration run is started automatically and if the configuration matches the physically attached L-IOB devices, all L-IOB devices should go online. The configuration run can also be started manually at any time by selecting Configure LIOBs in the menu Device Settings »» LIOB »», LIOB-FT »», or LIOB-IP »». This is required e.g. when a L-IOB device is replaced without power-cycling the L-IOB host, see Section 12.1.2. L-IOB Devices can be enabled and disabled by pushing the jog dial on the corresponding device in Device Settings »» LIOB »», LIOB-FT »», or LIOB-IP »» and choosing Enable or Disable. To activate the new setting, a configuration run must be started afterwards by choosing Configure LIOBs as described above. 7.2 L-IOB Remote Access The LCD Display of a connected L-IOB device can be remotely accessed by pushing the jog dial on the corresponding device in menu Device Settings »» LIOB »», LIOB-FT »», or LIOB-IP »» and choosing Remote Display. To leave the remote display mode again, either push and hold the jog dial for at least 10s and then release it or exit via the Remote LCD Access menu item in the device configuration page of the L-IOB device (see Section 5.4). Version 4.8 LOYTEC electronics GmbH LIOB-10x/x5x User Manual 67 LOYTEC 7.3 L-IOB Data Points The L-IOB data points can be accessed in the menus Datapoints »» LIOB »», LIOB-FT »», and LIOB-IP »». Please refer to Section 9.6 for a detailed description of all L-IOB data points at bus, device, and I/O level. Version 4.8 LOYTEC electronics GmbH LIOB-10x/x5x User Manual 68 LOYTEC 8 L-IOB Host Web Interface (L-INX Mode) This chapter only applies to LIOB-10x models, LIOB-15x models in LIOB-FT device mode, and LIOB-45x/55x models in LIOB-IP device mode. The L-IOB host (L-INX or LIOB-48x/58x) provides a Web interface to configure, operate, and test the connected L-IOB devices. It also provides statistics information about the L-IOBs. Refer to the L-INX user manual [1] for general information on the L-INX Web interface. Refer to the LIOB-x8x user manual [2] for general information on the LIOB48x/58x Web interface. 8.1 LIOB-IP Bus (for LIOB-45x/55x) To be able to connect LIOB-45x/55x devices over the LIOB-IP bus, the firmware version of the L-IOB host must be 4.8 or higher. Figure 51: LIOB-IP Bus Version 4.8 LOYTEC electronics GmbH LIOB-10x/x5x User Manual 69 LOYTEC After upgrading, the L-IOB host must be reset to factory defaults to activate the new bus. The LIOB-IP bus will be enabled by default, as shown in Figure 51. It is possible to disable the LIOB-IP bus entirely by un-checking the LIOB-IP checkbox. The corresponding UDP/TCP ports 16028 and 16029 will then not be open anymore on the L-IOB host. Observe that the LIOB-IP bus only acts as a virtual medium, connecting the L-IOB host with the LIOB-45x/55x devices over Ethernet/IP. The rest of the configuration (device enumeration, etc.) must still be done as for LIOB-15x devices, see Section 8.3. 8.2 L-IOB Installation Page (LIOB-Connect Bus) The LIOB Installation page for the LIOB-Connect bus without a configuration is shown in Figure 52. Figure 52: LIOB-Connect Device Installation and Scan 8.2.1 L-IOB Scan and Configuration Run Even without any configuration, the L-IOB bus can be scanned to check which L-IOB devices are connected to the L-IOB host. This can be done by clicking Scan. During the scan process, the status of the connected L-IOB devices is shown in the web page. At the end, the page should e.g. look like Figure 52. In this case, 3 LIOB-100 devices and two LIOB-101 devices have been found. For all shown L-IOB devices, the Name is blank and the Status is “Not configured” since the L-IOB host does not have a configuration downloaded yet. If a configuration is downloaded to the L-IOB host using the Configurator software (see Chapter 10), a configuration run is started automatically and, if the configuration matches the physically attached L-IOB devices, all L-IOB devices should go online. The configuration run can also be started manually at any time by clicking Save Settings. This is required e.g. when a L-IOB device is replaced without power-cycling the L-IOB host, see Section 12.1.2. Figure 53 shows the LIOB installation page after clicking Save Settings. Version 4.8 LOYTEC electronics GmbH LIOB-10x/x5x User Manual 70 LOYTEC Figure 53: LIOB Configuration Run The LIOB Installation page will also show configuration errors. In Figure 54 e.g. the last LIOB device could not be detected. Figure 54: Missing L-IOB Device This could be caused by a communication problem or by a physically missing L-IOB device. In case it is OK that this device is missing, it must be disabled in the Web UI by un-checking the corresponding Enable checkbox and clicking Save Settings again, see Figure 55. Version 4.8 LOYTEC electronics GmbH LIOB-10x/x5x User Manual 71 LOYTEC Figure 55: Disabled L-IOB Device 8.3 L-IOB Installation Page (LIOB-FT/IP Bus) The LIOB Installation page for the LIOB-FT or LIOB-IP bus is shown in Figure 56. It works similar to the Installation page of the LIOB-Connect bus with a few differences: Figure 56: LIOB-FT/IP Device Installation and Scan Since the LIOB-FT/IP bus does not have a mechanism to automatically enumerate connected L-IOB devices, the user must determine the order manually. This is done either by setting the Station IDs in the LCD UI of the L-IOB devices (see Section 5.4) or by entering the Node IDs of the connected L-IOBs as shown in Figure 56 and clicking Save Settings. By clicking Scan, the order as currently configured in the L-IOB devices will be detected and displayed. The Node IDs can also be setup by clicking Get Node ID and then pressing the status button (see Section 3.6.3) of the corresponding L-IOB device. Whenever changes have been made in the Web UI, in the end the Save Settings button must be clicked to configure the connected L-IOB devices accordingly. Version 4.8 LOYTEC electronics GmbH LIOB-10x/x5x User Manual 72 LOYTEC 8.4 L-IOB Device Information and Statistics By clicking on one of the L-IOB device links in the Name column of the LIOB Installation page, the L-IOB device information and statistics page can be shown for that device, see Figure 57. The Device information part shows device specific configuration properties (see Section 9.2) and some live values of the device (CPU load, System temperature & voltage). The system log of the L-IOB device can be displayed by clicking on system log. The LIOB communication statistics part shows statistics information of the communication bus. These values are mainly used for support and debugging. Figure 57: L-IOB Device Information and Statistics 8.5 L-IOB Overview Page The LIOB Overview page provides a quick overview of all L-IOB devices and their I/Os. This page is also available for the local I/Os of a L-IOB host (LIOB-48x/58x). Figure 58 shows the Overview page for the first L-IOB device of a LIOB-Connect bus. With Reset All Count Values, the counter inputs as well as the run hours and energy count values of all outputs can be reset. This can also be done for each L-IOB device individually by clicking the Reset Count Values button of the device. Version 4.8 LOYTEC electronics GmbH LIOB-10x/x5x User Manual 73 LOYTEC Figure 58: LIOB Overview Further L-IOB devices can be displayed by scrolling down. The live value and a few properties are shown for each I/O of the L-IOB devices. The operating mode of each I/O can be changed in the Mode column. The Value column always shows the corresponding effective value (e.g. the override value in override mode). In case of manual operating mode (see Section 9.3.11), the manual value is displayed and can be changed in the Value column. By clicking on the link in the I/O Name column, a detailed view of each I/O can be invoked, see Figure 59. Please refer to Section 9.3 for a detailed description of all I/O properties. After changing configuration properties, the user must click Save Settings to activate the new configuration in the L-IOB device. Version 4.8 LOYTEC electronics GmbH LIOB-10x/x5x User Manual 74 LOYTEC Figure 59: L-IOB I/O Details 8.6 L-IOB I/O Test Page The LIOB I/O Test page provides the possibility of documenting tests of the connected actuators and sensors. This page is available for all L-IOB devices connected to the L-IOB host as well as the local I/Os of the host (LIOB-48x/58x). Figure 60 shows the L-IOB I/O test page of a connected L-IOB device. Figure 60: L-IOB I/O Test For each I/O, a Test Result (Not Tested, OK, NOT OK) can be chosen. The Test Date will then be set automatically but can be manually changed afterwards. An additional Test Comment can be entered. This data will be stored persistently in the L-IOB host until it is explicitly cleared or the type of the connected L-IOB device changes because of a new host configuration. To explicitly clear the test information, the buttons Clear Tests or Clear All Version 4.8 LOYTEC electronics GmbH LIOB-10x/x5x User Manual 75 LOYTEC Tests are used. The test information can also be exported to a CSV file by using Export Device (CSV) or Export All (CSV). 8.7 L-IOB Data Points The L-IOB data points are located in the folder LIOB of the L-IOB host data points. Figure 61 e.g. shows the data points of the first I/O of LIOB1. Please refer to Section 9.6 for a detailed description of all L-IOB data points at bus, device, and I/O level. Figure 61: L-IOB Data Points in Web UI Version 4.8 LOYTEC electronics GmbH LIOB-10x/x5x User Manual 76 LOYTEC 9 Concepts This chapter describes the basic concepts behind the configuration and data points of L-IOB devices. These concepts apply to the L-IOB part of the Configurator software (Chapter 10), the L-IOB host Web UI (Chapter 8) , the L-IOB Web UI (Chapter 6), the L-IOB host LCD UI (Chapter 7), and the L-IOB LCD UI (Chapter 5). Observe that not all properties and data points will be available in all configuration instances. Some properties e.g. can only be seen or setup at configuration time, others only at run time. 9.1 Technology-Independent Data Points (BACnet Mode) The LIOB-55x I/O modules in BACnet Mode support internal, technology independent data points as well as other advanced features such as alarming, scheduling, and trending (AST) similar to the LIOB I/O controllers. Since the main purpose of LIOB I/O modules is to directly expose I/Os to the control network (CEA-852 or BACnet/IP), these function will usually not be required. For more information on technology independent data points and AST, please refer to the L-INX user manual [1] or LIOB-x8x user manual [2]. 9.2 Bus and Device Configuration Each L-IOB device has certain configuration properties which are global to the whole bus (LIOB-Connect or LIOB-FT/IP device modes) or one device. The following sections describe these properties. 9.2.1 Index of first Device not in Daisy Chain (LIOB-Connect device mode) This is a property which is only available for the LIOB-Connect port. It is only required if the LIOB-Connect bus is extended with a 3-wire cable (without select signal) instead of a 4-wire cable. In this case the property specifies the first device after the 3-wire cable 9.2.2 Station ID (L-INX Mode) Each L-IOB device is assigned a station ID (1-24), unique to the L-IOB bus. The station ID represents the position of the L-IOB device in the L-IOB host configuration. In case of LIOB-Connect, it also represents the physical position in the daisy chain, see Chapter 4. 9.2.3 Minimum Firmware Version (L-INX Mode) This property can be used to specify a minimum for the required firmware version of the connected L-IOB devices, e.g. to enable advanced functions in the Configurator which are only available from a certain L-IOB firmware version on. Version 4.8 LOYTEC electronics GmbH LIOB-10x/x5x User Manual 77 LOYTEC 9.2.4 Enabled (L-INX Mode) The enabled flag can be used to disable certain L-IOB devices which are part of a common L-IOB host project but not part of a certain L-IOB host installation where this project shall be used. One could e.g. create a common L-IOB host project for 10 rooms where in some rooms, one or more L-IOB devices (resp. their data points) are not needed. In this case, the unneeded L-IOB devices can be disabled and the corresponding L-IOB units do not have to be physically installed. 9.2.5 Allow Upgrade (L-INX Mode) This flag can be used to prohibit the firmware upgrade function for certain L-IOB devices. This can be used e.g. to be sure a critical part of the installation is not changed when an uncritical part needs a firmware update to add some functions to the L-IOB devices. 9.2.6 Product Code The product code is the model name of the L-IOB device, e.g. “LIOB-100” 9.2.7 Device Name The device name is the user defined name of the L-IOB device. 9.2.8 PIN The PIN code can be used to restrict manual access to the L-IOB LCD UI (See Chapter 5). Values can only be changed after the user enters the pin code using the jog dial of the L-IOB device. 9.2.9 Alternative Unit This is a flag which is set if this device shows US units (instead of SI units). 9.2.10 Language This is the language setting of the L-IOB LCD Display (English, German, or French). 9.2.11 Group I/O Min/Max Send Times (LONMARK® Mode) These are parameters to setup a minimum wait time and maximum time between updates of the digital group network variables in LONMARK® Mode. 9.2.12 NID The NID (worldwide unique Node ID of each L-IOB device) is a standard requirement for each CEA-709 device. In L-INX Mode, it is used by the L-IOB host to detect L-IOB devices after a reboot and also to automatically enumerate L-IOB devices. 9.2.13 Translation Tables Translation tables are used to translate a physical input value (resistance, voltage, current, or frequency) to the actual value, the sensor is supposed to measure (e.g. temperature). The configuration of translation tables is explained at the end of Section 10.2.3. 9.3 I/O Configuration Each I/O in a L-IOB device has certain configuration properties which are specific to that I/O. Not all listed properties are available for all I/Os, dependent on the hardware type and certain other configuration properties. The following sections describe the I/O properties and their dependencies. Version 4.8 LOYTEC electronics GmbH LIOB-10x/x5x User Manual 78 LOYTEC 9.3.1 Name The name property is available for all I/Os. It is the user defined name of the I/O (e.g.: ‘Temperature1’). 9.3.2 HardwareType The hardware type property is available for all I/Os. The following hardware types are available (dependent on the L-IOB model): IN Analog/Digital 10V: universal analog/digital input (UI) which can be configured to measure resistance, voltage, or current (with or without internal shunt). Observe that this hardware type is also used for the internal pressure sensor (e.g. ‘PRESS’ in LIOB-154). In this case, 0V refers to 0P (Pascal) and 10V to 500P. IN Digital: digital S0 input (DI). OUT Analog 12V: analog 0-12 V output (AO). OUT Relay 6A: digital 6 A relay output (DO). OUT Relay 16A: digital 16 A relay output (DO). OUT Triac: digital 1 A triac output (DO). This hardware type property can not be configured of course. Refer to Section 16.1 for a detailed specification of the different I/O hardware types. 9.3.3 SignalType The signal type property is available for I/Os of hardware type “IN Analog/Digital 10V”. The following signal types can be configured: Resistance: measures resistance of about 1 kΩ to 100 kΩ. Voltage 0-10V: measures voltage from 0 to 10 V. Current 4-20mA: measures current from 4 to 20 mA. A value smaller than 3.5 mA is detected as a disconnected sensor. An external shunt of 249 Ω must be used for correct measurement. Voltage 2-10V: measures voltage from 2 to 10 V. A value smaller than 1.8V is detected as a disconnected sensor. Current 4-20mA Shunt: measures current from 4 to 20 mA. A value smaller than 3.5 mA is detected as a disconnected sensor. No external shunt is required. This setting is only available on some universal inputs which have an internal shunt, see Section 16.4. Observe that changing the signal type to this setting may result in changing the setting on other universal inputs too. In this case, a Configurator message will inform the user of the changes. 9.3.4 Interpretation The interpretation property is available for all I/Os. Depending on the hardware type and signal type, the following interpretations can be configured: CustomNTC: This interpretation is only available for universal inputs (hardware type “IN Analog/Digital 10V”) with signal type “Resistance”. It is used for connecting a custom NTC temperature sensor to the input. The parameters of the NTC can be setup as described in Section 9.3.24. Version 4.8 LOYTEC electronics GmbH LIOB-10x/x5x User Manual 79 LOYTEC PT1000: This interpretation is only available for universal inputs (hardware type “IN Analog/Digital 10V”) with signal type “Resistance”. It is used for connecting a PT1000 temperature sensor to the input. NTC10K: This interpretation is only available for universal inputs (hardware type “IN Analog/Digital 10V”) with signal type “Resistance”. It is used for connecting a NTC10K temperature sensor to the input. NTC1K8: This interpretation is only available for universal inputs (hardware type “IN Analog/Digital 10V”) with signal type “Resistance”. It is used for connecting a NTC1K8 temperature sensor to the input. Ni1000: This interpretation is only available for universal inputs (hardware type “IN Analog/Digital 10V”) with signal type “Resistance”. It is used for connecting a Ni1000 temperature sensor to the input. Linear: This interpretation is only available for universal inputs (hardware type “IN Analog/Digital 10V”). It is used to perform a linear transformation from a physical input value (resistance, voltage, or current, see Section 9.3.3) to the actual value, the sensor is supposed to measure (e.g. temperature, see Section 9.3.5). The input range is specified by the signal type: o Resistance: 0 … 10 kΩ o Voltage 0-10V: 0 … 10 V o Current 4-20mA: 4 … 20 mA o Voltage 2-10V: 2 … 10 V o Current 4-20mA Shunt: 4 … 20 mA The output range is specified by MinValue and MaxValue, see Section 9.3.20. In case of signal type “Voltage 2-10V” e.g. a measured value of 2 V would be transformed into MinValue and a measured value of 10 V would be transformed into MaxValue. Frequency: This interpretation is available for all inputs. It is used to measure the frequency of the digital input resp. universal input in digital mode. The period used for measurement is specified by the MinSendTime parameter, see Section 9.3.22. Translation Table: This interpretation is only available for universal inputs (hardware type “IN Analog/Digital 10V”). It is used to perform a transformation from a physical input value (resistance, voltage, or current, see Section 9.3.3) to the actual value, the sensor is supposed to measure (e.g. temperature, see Section 9.3.5) using a transformation table. The table can be selected with TransTable, see Section 9.3.23. The tables can be setup for each L-IOB device as explained at the end of Section 10.2.3. Frequency Table: This interpretation is available for all inputs. It is used to perform a transformation from a frequency value (measured as described above) to the actual value, the sensor is supposed to measure (e.g. velocity, see Section 9.3.5) using a transformation table. The table can be selected with TransTable, see Section 9.3.23. The tables can be setup for each L-IOB device as explained at the end of Section 10.2.3. Physical Unit Count: This interpretation is available for all inputs. It is used to count in a certain physical unit. The unit is setup with DataType, see Section 9.3.5. The increment for each pulse is setup using the Resolution property, see Section 9.3.16. Digital: This interpretation is available for all I/Os. In case of an analog output, the off and on output values are specified with OffValue and OnValue, see Section 9.3.27. Version 4.8 LOYTEC electronics GmbH LIOB-10x/x5x User Manual 80 LOYTEC Pulse Count: This interpretation is available for all inputs. It is used to count pulses of the digital input or universal input in digital mode. It is also used for connecting the code signal of STId card readers, see Section 9.5. Occupancy: This interpretation is available for all inputs. See Section 9.3.25 for details. Switch Mode (LONMARK® Mode): This interpretation is available for all inputs (restricted to LIOB-15x/45x in LONMARK® or Non-ECS device mode). See Section 9.4 for details. Clock: This interpretation is available for all interrupt-capable inputs. It is used for connecting the clock signal of STId card readers, see Section 9.5. Card Data: This interpretation is available for all inputs. It is used for connecting the data signal of STId card readers, see Section 9.5. Analog: This interpretation is only available for analog outputs (hardware type “OUT Analog 12V”). It is used to output a voltage between 0 and 12 V. In case of using data type “Percentage” (see Section 9.3.5), the output value (in percent) coming from the L-IOB host is scaled using the MinValue and MaxValue properties (see Section 9.3.20). An output value of 50% would e.g. translate into an actual voltage of just in the middle between MinValue and MaxValue, an output value of 100% would translate into a voltage of MaxValue. Note that an output value of 0% is still always translated into 0V. As soon as the output value is slightly raised above 0% however, the voltage jumps to MinValue. PWM: This interpretation is available for all outputs. It is used to generate a pulse width modulated output signal. The period is setup with PWMPeriod, see Section 9.3.28. In case of an analog output, the off and on output values are specified with OffValue and OnValue, see Section 9.3.27. The output value (in percent) coming from the L-IOB host is scaled using the MinValue and MaxValue properties (see Section 9.3.20). An output value of 50% would e.g. translate into an actual pulse width of just in the middle between MinValue and MaxValue, an output value of 100% would translate into a pulse width of MaxValue. Note that an output value of 0% is still always translated into zero pulse width (always off). As soon as the output value is slightly raised above 0% however, the pulse width jumps to MinValue. Fading: This interpretation is available for all analog outputs. It is equal to the “Analog” interpretation except for the behavior on a value change. The output is not immediately set to the new value but instead a slow fading from the current value to the new value is performed. The transition time used for fading from the current value to the new value (fading time) is setup in the property DeadTime, see Section 9.3.7. Since this time is constant, the transition speed depends on the difference between current and new value. Ramping: This interpretation is available for all analog outputs. It is equal to the “Fading” interpretation except that the DeadTime property (see Section 9.3.7) specifies the time it takes to ramp from the minimum value to the maximum value (ramping time). This way, the transition speed between current and new value is always equal, independent of the difference between the two values. 9.3.5 DataType The data type property is available for all inputs with interpretation “Linear”, “Translation Table”, “Frequency Table”, “Physical Unit Count”, “Digital”, “Occupancy”, and “Switch Mode”, as well as analog outputs with interpretation “Analog”, “Fading”, or “Ramping”. Version 4.8 LOYTEC electronics GmbH LIOB-10x/x5x User Manual 81 LOYTEC 9.3.6 SNVT The SNVT (Standard Network Variable Type) is available for all I/Os on a LIOB-15x/45x model in LONMARK® or Non-ECS device mode. Depending on the interpretation, different SNVTs will be available for selection. The SNVT determines the type of all changeable network variables and configuration properties of the I/O. 9.3.7 DeadTime for Fading and Ramping For interpretation “Fading”, the DeadTime property specifies the fading time from the current value to the new value. For interpretation “Ramping”, the DeadTime property specifies the ramping time from the minimum to the maximum value (independent of current and new value). 9.3.8 IOFunc, GroupNumber, and DeadTime for Interlocked Mode The IO function, group number, and dead time properties are available for all digital outputs. If IOFunc is set to “Interlocked”, the GroupNumber property can be used to form different interlocked groups. All digital outputs belonging to one interlocked group have the following characteristics: If a positive output value is written, it is interpreted as a period (in [ms]) in which the output shall be switched on. After that period, the output is automatically switched off again. If 0 is written to the output value, the output is switched off immediately. If negative output value is written, the output is switched on permanently. Whenever an output is switched on (as described above), it is checked before if another output in the same interlocked group is already switched on. In this case, the other output is switched off immediately. Then, for a period setup with DeadTime, all outputs of the group remain off. After that, finally the new output is switched on (either for a certain period of permanently). The interlocked mechanism can be used e.g. for sunblind motors where it must be ensured that the up and down motors are never active at the same time. 9.3.9 IOFunc, GroupNumber, and SubGroupNumber for Switch Mode The IO function, group number, and sub group number properties are available for all inputs with interpretation “Switch Mode” (only available for LONMARK® / Non-ECS device mode). If IOFunc is set to “2-Switch-Group”, the GroupNumber property can be used to form different two-input groups. With the SubGroupNumber property, the two inputs must be assigned to either the function “Switch 1” or “Switch 2”. Refer to Section 9.4 for more information on the switch mode. 9.3.10 IOFunc, GroupNumber, and SubGroupNumber for Card Reader Mode The IO function, group number, and sub group number properties are available for all inputs used for connecting the signals of an STId card reader, see Section 9.5. 9.3.11 OperatingMode, OverrideValue, and DefaultValue The operating mode property is available for all I/Os. For inputs, the OperatingMode property has the following meaning: Disabled: The physical input is disabled and the data point is set to DefaultValue. This can be used to disable unused inputs. Version 4.8 LOYTEC electronics GmbH LIOB-10x/x5x User Manual 82 LOYTEC Auto: The input measures the value from the connected sensor. Override: The physical input is disabled and the data point is set to OverrideValue. Manual: The physical input is disabled and the data point is set by the user on the LIOB LCD UI (see Chapter 5) or L-IOB host Web UI (see Chapter 8). This can be used to simulate input values for the connected node(s) or the L-IOB host. The DefaultValue is also used for inputs, when no sensor value has yet been read from the physical input. For outputs, the OperatingMode property has the following meaning: Disabled: The incoming output value is ignored in the L-IOB device and the physical output is set to DefaultValue. Auto: The output value is set as requested by the incoming value. Override: The incoming output value is ignored in the L-IOB device and the physical output is set to OverrideValue. This can be used e.g. for a 4-20 mA sensor which needs a 12 V supply voltage. Manual: The incoming output value is ignored in the L-IOB device and the physical output value is set by the user on the LIOB LCD UI (see Chapter 5). This can be used to test actuators. The DefaultValue is also used for outputs when no output value has yet been received by the L-IOB device resp. after a reboot, if the persistent flag is not set (see Section 9.3.12). 9.3.12 Persistent Flag The persistent flag is available for all outputs. It specifies the behavior of the L-IOB outputs after a power cycle of the L-IOB device or when the L-IOB device loses connection to the L-IOB host. If it is set, the output is set to the last stored value in the mentioned scenarios. If it is cleared, the output is set to the DefaultValue (see Section 9.3.11). Since the output values are only stored in the L-IOB device approx. every 20 minutes, it is possible that even in the first case, the output value temporarily changes. 9.3.13 Invert Flag The invert flag is available for all I/Os in digital/PWM mode or where the input is used to detect resp. count pulses. In the first case, the invert flag is used to invert the input or output. In the second case, the flag specifies whether the pulse shall be detected at the positive or negative edge. Observe that if the SignalType is set to “Resistance” (see Section 9.3.3), the Invert flag is set by default. This is because the ON state (“CLOSED”) refers to a small resistance value whereas the OFF state (“OPEN”) refers to a big resistance value. 9.3.14 PulseTime Flag The pulse time flag is available for all inputs with interpretation “Pulse Count” or “Physical Unit Count” (see Section 9.3.4). It activates the pulse time data point. Note that by setting this flag, additional traffic is generated. 9.3.15 SIUnit_OnText and USUnit_OffText The SI unit / on text and US unit / off text properties are available for all I/Os except for inputs with Interpretation “Pulse Count” (see Section 9.3.4). In case of analog values, the SIUnit_OnText property specifies the unit name in SI mode, in case of digital values, it specifies the ON text (shown when the digital I/O is active). In case of analog values, the USUnit_OffText property specifies the unit name in US mode, in case of digital values, it specifies the OFF text (shown when the digital I/O is inactive). Using the Configurator (Project Settings), the user can choose between SI and US units. Version 4.8 LOYTEC electronics GmbH LIOB-10x/x5x User Manual 83 LOYTEC 9.3.16 Resolution The resolution property is available for all I/Os with an analog data type. It specifies the resolution of the value display in the L-IOB LCD UI as well as the step width for the L-IOB jog dial when manually setting an analog value or property of that I/O. For interpretation “Physical Unit Count”, it also specifies the increment for each pulse, see Section 9.3.4. 9.3.17 MultUS and OffsUS The US Multiplier and Offset properties are available for all I/Os with an analog data type. Using the Configurator, the user can choose between SI and US units. In case of US units, the I/O values displayed in the L-IOB host Web UI and L-IOB LCD UI are converted using these properties (ValueUS = ValueSI * MultUS + OffsUS). The US unit name is setup in the USUnit_OffText property, see Section 9.3.15. Observe that the properties setup in the Configurator as well as the connected data points will still always carry SI units. 9.3.18 DisplayOnSymbol and DisplayOffSymbol The display on/off symbol properties are available for inputs with Interpretation “Digital” (see Section 9.3.4). They are used to specify the display of the two digital states ON and OFF. For both these states, the following symbols can be chosen: OPEN: open switch symbol CLOSED: closed switch symbol OK: check symbol ERROR: exclamation mark symbol 9.3.19 Offset The offset property is available for inputs with an analog data type. It is added at the end of the calculation to the (already processed) value. This way, e.g. temperature sensors can be calibrated in each room without changing the common application. 9.3.20 MinValue and MaxValue The minimum and maximum value properties are available for all I/Os with an analog data type (except for Interpretation “Physical Unit Count”) as well as for inputs with interpretation “Digital”, “Occupancy, or “Switch Mode”. They are used for: scaling inputs with interpretation “Linear” (see Section 9.3.4), scaling outputs with interpretation “Analog”, “PWM”, “Fading”, or “Ramping (see Section 9.3.4), scaling the bar icon in the L-IOB LCD UI (see Section 5.2), setting the active and inactive values of the SNVT_occupancy for digital or occupancy inputs (LONMARK® / Non-ECS device mode only), limiting the dimming values in Switch Mode (LONMARK® / Non-ECS device mode only, see Section 9.4). 9.3.21 COV and MaxSendTime The Change-Of-Value property is available for all inputs with an analog data type. It is used to specify a minimum delta value required to trigger a data point update. If the input value only changes within a range of –COV to +COV, no update is generated. Observe that in Version 4.8 LOYTEC electronics GmbH LIOB-10x/x5x User Manual 84 LOYTEC any case, after MaxSendTime an update is generated anyway to be sure to get the latest value at least at some point in time. If COV is set to 0, every input value change generates an update of the attached data point. 9.3.22 MinSendTime The minimum send time property is available for all I/Os. It specifies the minimum time that has to pass before a new update of an input or output feedback value is generated. If MinSendTime is set to 0, all changes of the inputs or output feedbacks immediately generate updates. For inputs with interpretation “Frequency” or “Frequency Table” (see Section 9.3.4), the MinSendTime property also specifies the period used for frequency measurement. For inputs with interpretation “Switch Mode”, the MinSendTime property specifies the repeat time for the long push events, see Section 9.4. 9.3.23 TransTable The translation table property is available for all inputs with interpretation “Translation Table” or “Frequency Table” (see Section 9.3.4). It specifies the translation table which shall be used for the translation. The configuration of translation tables is explained at the end of Section 10.2.3. 9.3.24 NTC_Rn, NTC_Tn, and NTC_B The Rn, Tn, and B properties are available for inputs with interpretation “Custom NTC” (see Section 9.3.4). Tn is specified in degree Celsius. Rn is the resistance of the NTC temperature sensor at the temperature Tn. The temperature value is calculated using the formula: T = B * (Tn + 273.16 degC) / (B + ln(R / Rn) * (Tn + 273.16 degC)) – 273.16 degC. T is the calculated temperature in degree Celsius and R is the measured resistance of the NTC temperature sensor. 9.3.25 HoldTime and DebounceTime These properties are available for all inputs where the Interpretation is set to “Occupancy” or “Switch Mode”. The HoldTime is also available for the data signal of STId card readers, see Section 9.5. Occupancy is detected using a sensor which creates pulses whenever the room is occupied. These pulses are converted to an occupancy value in the following way: When a pulse is detected, the value changes to OCCUPIED and stays there for at least the HoldTime. When new pulses are detected during the HoldTime, the timer for the HoldTime is started again. When no pulse is detected within the HoldTime, the state goes back to UNOCCUPIED. From this moment on, all pulses from the sensor are ignored for as long as the DebounceTime lasts. This is useful e.g. when light is switched off due to detecting the UNOCCUPIED state which leads to new pulses of the sensor and in turn leads to switching on the light again. To break this loop, the debounce time is used. In case of interpretation “Switch Mode”, the HoldTime specifies the time to distinguish between short and long pushes. The DebounceTime is used to distinguish between a combined push or two consecutive pushes of a 2-switch group. Version 4.8 LOYTEC electronics GmbH LIOB-10x/x5x User Manual 85 LOYTEC 9.3.26 EventGroup Modes and Values The EventGroupXyzModes (e.g. EventGroup1ShortPushMode) and EventGroupXyzValues (e.g. EventGroup1ShortPushValue) are available for Inputs with Interpretation “Switch Mode” (LONMARK® / Non-ECS device mode only). Refer to Section 9.4 for more information. 9.3.27 OffValue and OnValue The off and on value properties are available for analog outputs in digital mode. They specify the physical values (voltages) to be output for the OFF (inactive) and ON (active) state. 9.3.28 PWMPeriod The PWM period property specifies the period (in seconds) for outputs with Interpretation “PWM” (Pulse Width Modulation), see Section 9.3.4. 9.3.29 NominalPower The nominal power property is available for all outputs. It specifies the nominal resp. average expected power consumption of the device or appliance (e.g. lamp) connected to the output. For digital outputs it specifies the average power when the output is activated (e.g. relay closed), for analog outputs it specifies the average power when the output is set to 10 V. The nominal power property is used to calculate the energy count data point of the output. 9.4 Switch Mode (LONMARK® Mode) This chapter only applies to LIOB-15x/45x models in LONMARK® or Non-ECS device mode. The switch mode is available for all inputs as an interpretation option, see Section 9.3.4. It implements a configurable switch function with an optional secondary input and an additional feedback input network variable ‘nviInSwitchFb’ of type SNVT_switch (available for each input). An input in switch mode basically acts as a digital input with some additional functions described in the following sections. 9.4.1 General Function Whenever the state of an input in switch mode changes (a connected button or switch is pressed, released, or switched), the live value network variable updates it’s value according to the configuration properties described below. The type of the live value NV is determined by the DataType property (see Section 9.3.5) and can be set to Switch (SNVT_switch), Scene (SNVT_scene), or Setting (SNVT_setting). The following configuration properties are available for each input in switch mode: Version 4.8 EventGroup1ShortPushMode / EventGroup1ShortPushValue, EventGroup1ShortReleaseMode / EventGroup1ShortReleaseValue, EventGroup1LongPushMode / EventGroup1LongPushValue, EventGroup1LongReleaseMode / EventGroup1LongReleaseValue, EventGroup2ShortPushMode / EventGroup2ShortPushValue, EventGroup2ShortReleaseMode / EventGroup2ShortReleaseValue, LOYTEC electronics GmbH LIOB-10x/x5x User Manual 86 LOYTEC EventGroup2LongPushMode / EventGroup2LongPushValue, EventGroup2LongReleaseMode / EventGroup2LongReleaseValue, Whether EventGroup1 or EventGroup2 is active is either determined by toggling between them with one input (whenever the input becomes inactive) or explicitly, by using two inputs (see Section 9.4.2). The flow chart of the switch mode is depicted in Figure 62. Idle No Input Active No Yes Process ShortPush Process LongPush Yes HoldTime > 0 No Yes MinSend > 0 Yes Yes Start Hold Timer Start MinSend Timer Hold Timer Exceeded MinSend T. Exceeded No No Input Inactive Input Inactive No No No Input Inactive Yes Yes Process ShortRelease Process LongRelease Switch Event Group (one-input mode only) Switch Event Group (one-input mode only) Idle Idle Yes Figure 62: Switch Mode Flow Chart The event ShortPush is fired when the input becomes active. ShortRelease is fired when the input becomes inactive again before the HoldTime (see Section 9.3.25). LongPush is fired when the input is still active after HoldTime. If the MinSendTime (see Section 9.3.22) is greater than 0 for the input, the LongPush event is fired consecutively with a period of MinSendTime as long as the input stays active. If the input becomes inactive again after HoldTime, LongRelease is fired. For each event, a Mode and a Value property is available as listed above. The Value properties determine the values which shall be sent out when the corresponding events occur. They therefore always have the same type as the live value network variable of the input. The Mode properties determine the modes and conditions under which the Values are sent out. They are enumerations which define the following modes: Version 4.8 LOYTEC electronics GmbH LIOB-10x/x5x User Manual 87 LOYTEC Disabled: No value is sent out if the event occurs. If all modes of EventGroup2 are set to disabled, the EventGroup2 is disabled completely (no switching between event groups). Set: The value is sent out as specified. Set if Feedback State is 0: Same as ‘Set’ but only if the feedback .state member is 0. If not, the event group is switched and the corresponding Mode/Value properties of the other event group are processed instead. Set if Feedback State is 1: Same as ‘Set’ but only if the feedback .state member is 1. If not, the event group is switched and the corresponding Mode/Value properties of the other event group are processed instead. Increment (SNVT_switch only): The last value of the feedback .value member (when the feedback .state member was > 0) is increased by the .value member of the corresponding configuration property (EventGroupXyzValue) and sent with the .state member specified in the corresponding configuration property. The sent .value member is not increased above the .value member of the MaxValue property (see Section 9.3.20). Increment if Feedback State is 0 (SNVT_switch only): Same as ‘Increment’ but only if the feedback .state member is 0. If not, the event group is switched and the corresponding Mode/Value properties of the other event group are processed instead. Increment if Feedback State is 1 (SNVT_switch only): Same as ‘Increment’ but only if the feedback .state member is 1. If not, the event group is switched and the corresponding Mode/Value properties of the other event group are processed instead. Decrement (SNVT_switch only): The last value of the feedback .value member (when the feedback .state member was > 0) is decreased by the .value member of the corresponding configuration property (EventGroupXyzValue) and sent with the .state member specified in the corresponding configuration property. The sent .value member is not decreased below the .value member of the MinValue property (see Section 9.3.20). Decrement if Feedback State is 0 (SNVT_switch only): Same as ‘Decrement’ but only if the feedback .state member is 0. If not, the event group is switched and the corresponding Mode/Value properties of the other event group are processed instead. Decrement if Feedback State is 1 (SNVT_switch only): Same as ‘Decrement’ but only if the feedback .state member is 1. If not, the event group is switched and the corresponding Mode/Value properties of the other event group are processed instead. Set State (SNVT_switch only): The last value of the feedback .value member (when the feedback .state member was > 0) is sent with the .state member specified in the corresponding configuration property (EventGroupXyzValue). It is made sure that the sent .value member stays between the .value members of the MinValue and MaxValue properties (see Section 9.3.20). Set State if Feedback State is 0 (SNVT_switch only): Same as ‘Set State’ but only if the feedback .state member is 0. If not, the event group is switched and the corresponding Mode/Value properties of the other event group are processed instead. Set State if Feedback State is 1 (SNVT_switch only): Same as ‘Set State’ but only if the feedback .state member is 1. If not, the event group is switched and the corresponding Mode/Value properties of the other event group are processed instead. Version 4.8 LOYTEC electronics GmbH LIOB-10x/x5x User Manual 88 LOYTEC Set Value and Set Feedback State to 0 (SNVT_scene / SNVT_setting only): The value is sent out as specified and the feedback .state member is internally set to 0. Set Value and Set Feedback State to 1 (SNVT_scene / SNVT_setting only): The value is sent out as specified and the feedback .state member is internally set to 1. Set Value and Set Feedback State to 0 if Feedback State is 1 (SNVT_scene / SNVT_setting only): Same as ‘Set Value and Set Feedback State to 0’ but only if the feedback .state member is 1. If not, the event group is switched and the corresponding Mode/Value properties of the other event group are processed instead. Set Value and Set Feedback State to 1 if Feedback State is 0 (SNVT_scene / SNVT_setting only): Same as ‘Set Value and Set Feedback State to 1’ but only if the feedback .state member is 0. If not, the event group is switched and the corresponding Mode/Value properties of the other event group are processed instead. When using the conditional modes (… if Feedback State is 0/1), it must be made sure that the feedback network variable of the input always represents the current state of the object which shall be controlled. There are three possible ways to achieve that: The object which is controlled (e.g. a light) delivers a SNVT_switch network variable, which can be bound to the feedback network variable (‘nviInSwitchFb’) of the input. A turn-around binding between the live value (‘nvoInValue’) and the feedback network variable (‘nviInSwitchFb’) of the input is created. This is only possible if the DataType of the input is set to Switch (SNVT_switch). The feedback .state member is internally controlled using the ‘Set Value and Set Feedback State to …’ modes. This is only possible if the DataType of the input is set to Scene (SNVT_scene) or Setting (SNVT_setting). 9.4.2 Two-Input Mode Two inputs can be grouped together using the IOFunc, GroupNumber, and SubGroupNumber properties (see Section 9.3.9). Each event group is permanently assigned to a specific input and there is no back and forth between the two event groups. EventGroup1 is assigned to the input with the SubGroupNumber ‘Switch 1’ and EventGroup2 is assigned to the input with the SubGroupNumber ‘Switch 2’. The GroupNumber property must be the same for both inputs. In this case, both event groups described in Section 9.4.1 are defined in the first input object (‘Switch 1’). The two free event groups (in combination with the HoldTime and MinSendTime) of the second input are used to define the behavior when both inputs become active ‘at the same time’, meaning within the DebounceTime (see Section 9.3.25). The release events are fired when at least one input becomes inactive again. Both inputs must become inactive again before any new event is fired after that. The live value and feedback network variables of both inputs are fully functional. Between the two feedback network variables, the latest received value always wins. 9.4.3 Examples The following sections present some typical examples of using the switch mode. All examples can be found as I/O object template files in the folder ‘LIOB\objects’ of the L-INX Configurator Software. Since the switch mode is available both for universal and digital inputs, there are two versions of each example file: ‘UI_xyz.xml’ and ‘DI_xyz.xml’. The example files using the two-input mode are named ‘xyz_1.xml’ and ‘xyz_2.xml’. If Version 4.8 LOYTEC electronics GmbH LIOB-10x/x5x User Manual 89 LOYTEC several two-input (‘two_button’) examples are used within one L-IOB device, the GroupNumber properties must be changed so that each 2-Switch-Group has a unique group number. 9.4.3.1 Simple Switch This example is implemented in the following I/O object template files: UI_simple_switch.xml (universal input) DI_simple_switch.xml (digital input) The following properties are changed (from the default values) in this example: DataType = Switch (SNVT_switch, members: value / state) EventGroup1ShortPushMode = Set EventGroup1ShortPushValue = 100 / 1 EventGroup1LongReleaseMode = Set EventGroup1LongReleaseValue = 0 / 0 When the input is activated (switched on), 100/1 is sent out. When the input is deactivated, (switched off), 0/0 is sent out. Observe that the HoldTime is set to 0 to prevent the ShortRelease event from occurring. 9.4.3.2 One-Button Toggle This example is implemented in the following I/O object template files: UI_one_button_toggle.xml (universal input) DI_one_button_toggle.xml (digital input) The following properties are changed (from the default values) in this example: DataType = Switch (SNVT_switch, members: value / state) EventGroup1ShortPushMode = Set if Feedback State is 0 EventGroup1ShortPushValue = 100 / 1 EventGroup2ShortPushMode = Set if Feedback State is 1 EventGroup2ShortPushValue = 0 / 0 When the input is activated (button is pressed) and the feedback .state member is 0, 100/1 is sent out. If the feedback .state member is 1, 0/0 is sent out. It does not matter in which event group the input is currently in, since the conditional modes always make sure that the live value toggles. Observe that for this example, a turnaround network variable binding from the live value (‘nvoInValue’) to the feedback (‘nviInSwitchFb’) of the input object must be created. 9.4.3.3 One-Button Dimming This example is implemented in the following I/O object template files: UI_one_button_dimming.xml (universal input) DI_one_button_dimming.xml (digital input) The following properties are changed (from the default values) in this example: Version 4.8 DataType = Switch (SNVT_switch, members: value / state) MinValue = 10 / 1 LOYTEC electronics GmbH LIOB-10x/x5x User Manual 90 LOYTEC MaxValue = 100 / 1 MinSendTime = 0.2s HoldTime = 1s EventGroup1ShortReleaseMode = Set State if Feedback State is 0 EventGroup1ShortReleaseValue = 0 / 1 EventGroup1LongPushMode = Increment EventGroup1LongPushValue = 1 / 1 EventGroup2ShortReleaseMode = Set if Feedback State is 1 EventGroup2ShortReleaseValue = 0 / 0 EventGroup2LongPushMode = Decrement EventGroup2LongPushValue = 1 / 1 When the input is activated shortly (button is pressed shortly) and the feedback .state member is 0, the last feedback .value member (when the .state member was > 0) is sent out along with the .state member 1 (light is switched on). Using the ‘Set State …’ mode ensures that the last dimming value is restored. When the input is activated shortly (button is pressed shortly) and the feedback .state member is 1, 0/0 is sent out (light is switched off). If the input is activated for longer than 1s (HoldTime), the light is switched on and the .value member is incremented or decremented by 1 each 0.2s (MinSendTime). Using the MinValue property, it is made sure that the light level never goes below 10% as long as it is switched on. Observe that for this example, a turnaround network variable binding from the live value (‘nvoInValue’) to the feedback (‘nviInSwitchFb’) of the input object must be created. 9.4.3.4 Rocker Switch This example is implemented in the following I/O object template files: UI_rocker_switch_1.xml / UI_rocker_switch_2.xml (universal inputs) DI_rocker_switch_1.xml / DI_rocker_switch_2.xml (digital inputs) This example uses two inputs in a 2-Switch-Group. For the first input, the following properties are changed (from the default values) in this example: DataType = Switch (SNVT_switch, members: value / state) IOFunc = 2-Switch-Group GroupNumber = X (must be the same as for second input) SubGroupNumber = Switch 1 EventGroup1ShortPushMode = Set EventGroup1ShortPushValue = 100 / 1 EventGroup2ShortPushMode = Set EventGroup2ShortPushValue = 0 / 0 For the second input, the following properties are changed (from the default values) in this example: Version 4.8 DataType = Switch (SNVT_switch, members: value / state) IOFunc = 2-Switch-Group GroupNumber = X (must be the same as for first input) LOYTEC electronics GmbH LIOB-10x/x5x User Manual 91 LOYTEC SubGroupNumber = Switch 2 When the first input is activated (rocker switch up), 100/1 is sent out. When the second input is activated (rocker switch down), 0/0 is sent out. 9.4.3.5 Two-Button Dimming This example is implemented in the following I/O object template files: UI_two_button_dimming_1.xml / UI_two_button_dimming_2.xml (universal inputs) DI_two_button_dimming_1.xml / DI_two_button_dimming_2.xml (digital inputs) This example uses two inputs in a 2-Switch-Group. For the first input, the following properties are changed (from the default values) in this example: DataType = Switch (SNVT_switch, members: value / state) IOFunc = 2-Switch-Group GroupNumber = X (must be the same as for second input) SubGroupNumber = Switch 1 MinValue = 10 / 1 MaxValue = 100 / 1 MinSendTime = 0.2s HoldTime = 1s DebounceTime = 0.1s EventGroup1ShortReleaseMode = Set State EventGroup1ShortReleaseValue = 0 / 1 EventGroup1LongPushMode = Increment EventGroup1LongPushValue = 1 / 1 EventGroup2ShortReleaseMode = Set EventGroup2ShortReleaseValue = 0 / 0 EventGroup2LongPushMode = Decrement EventGroup2LongPushValue = 1 / 1 For the second input, the following properties are changed (from the default values) in this example: Version 4.8 DataType = Switch (SNVT_switch, members: value / state) IOFunc = 2-Switch-Group GroupNumber = X (must be the same as for first input) SubGroupNumber = Switch 2 HoldTime = 3s DebounceTime = 0.1s EventGroup1ShortReleaseMode = Set EventGroup1ShortReleaseValue = 100 / 1 EventGroup1LongPushMode = Set EventGroup1LongPushValue = 0 / -1 LOYTEC electronics GmbH LIOB-10x/x5x User Manual 92 LOYTEC The first input is configured and works exactly like the input in the one-button dimming example (Section 9.4.3.3) except for the conditional modes. A condition is not needed here since the event groups are explicitly mapped to the two inputs. Additionally, the properties of the second input are configured to setup the operation for pressing both buttons at the same time (resp. within the DebounceTime of 0.1s). If both buttons are pressed shortly, the light is fully switched on to 100%. If both buttons are pressed for longer than 3s (HoldTime of second input), the .state member is set to -1 which could be used to release control of the light. Observe that for this example, a turnaround network variable binding from the live value (‘nvoInValue’) to the feedback (‘nviInSwitchFb’) of the input object must still be created to be sure the dimming value is restored correctly. 9.4.3.6 Two-Button Sunblinds This example is implemented in the following I/O object template files: UI_two_button_sunblinds_1.xml / UI_two_button_sunblinds_2.xml (universal inputs) DI_two_button_sunblinds_1.xml / DI_two_button_sunblinds_2.xml (digital inputs) This example uses two inputs in a 2-Switch-Group. For the first input, the following properties are changed (from the default values) in this example: DataType = Setting (SNVT_setting, members: function / setting / rotation) IOFunc = 2-Switch-Group GroupNumber = X (must be the same as for second input) SubGroupNumber = Switch 1 HoldTime = 3s DebounceTime = 0.1s EventGroup1ShortPushMode = Set EventGroup1ShortPushValue = SET_UP / 0 / 0 EventGroup1ShortReleaseMode = Set EventGroup1ShortReleaseValue = SET_STOP / 0 / 0 EventGroup1LongPushMode = Set EventGroup1LongPushValue = SET_STATE / 100 / 0 EventGroup2ShortPushMode = Set EventGroup2ShortPushValue = SET_DOWN / 0 / 0 EventGroup2ShortReleaseMode = Set EventGroup2ShortReleaseValue = SET_STOP / 0 / 0 EventGroup2LongPushMode = Set EventGroup2LongPushValue = SET_STATE / 0 / 0 For the second input, the following properties are changed (from the default values) in this example: Version 4.8 DataType = Setting (SNVT_setting, members: function / setting / rotation) IOFunc = 2-Switch-Group GroupNumber = X (must be the same as for first input) SubGroupNumber = Switch 2 DebounceTime = 0.1s LOYTEC electronics GmbH LIOB-10x/x5x User Manual 93 LOYTEC EventGroup1ShortPushMode = Set EventGroup1ShortPushValue = SET_NUL / 0 / 0 When the first input is activated shortly (button pressed for less than HoldTime = 3s), the sunblinds go up for as long as the button is pressed (SET_UP). When it is released, the sunblinds stop (SET_STOP). When the second input is activated shortly (button pressed for less than HoldTime = 3s), the sunblinds go down for as long as the button is pressed (SET_DOWN). When it is released, the sunblinds stop (SET_STOP). When the first button is pressed for longer than 3s, the sunblinds go all the way up (SET_STATE) except if it is pressed shortly again. When the second button is pressed for longer than 3s, the sunblinds go all the way down (SET_STATE) except if it is pressed shortly again. If both buttons are pressed at the same time (resp. within the DebounceTime of 0.1s), control of the sunblinds is released (SET_NUL). 9.5 STId Card Reader Mode The L-IOB devices support STId card readers running the ISO2 protocol. Refer to Section 16.4 and the following sections for information on which L-IOB models support STId card readers. The card readers have three signals which must be connected to inputs on the LIOB device, as explained in the following sections. 9.5.1 Code Signal The code signal of the card reader must be connected to a universal or digital input of the L-IOB device. The following properties must be set for that input: SignalType (if universal input): “Voltage 0-10V”. Interpretation: “Pulse Count”. IOFunc: “Cardreader ISO2”. GroupNumber: must be equal for all three signals of one card reader. SubGroupNumber: will automatically be set to “Code”. Invert: checked if signal is low active, check data sheet of card reader. In its live value, this L-IOB input will represent the number of codes read from the card reader. 9.5.2 Data Signal The data signal of the card reader must be connected to a universal or digital input of the L-IOB device. The following properties must be set for that input: Version 4.8 SignalType (if universal input): “Voltage 0-10V”. Interpretation: “Card Data”. IOFunc: will automatically be set to “Cardreader ISO2”. GroupNumber: must be equal for all three signals of one card reader. SubGroupNumber: will automatically be set to “Data”. Invert: depends on implementation of card reader, check data sheet. LOYTEC electronics GmbH LIOB-10x/x5x User Manual 94 LOYTEC HoldTime: specifies the time, a new code remains in the L-IOB data point. After this time, the data point is set back to “0xBF …”, which means “not available”. If the HoldTime is set to 0, the last read value remains until a new value is read. In its live value, this L-IOB input will represent the read code in a 20-byte array (40 decimal digits). In LONMARK® mode, the SNVT_magcard (86) is used. 9.5.3 Clock Signal The clock signal of the card reader must be connected to a interrupt-capable universal or digital input of the L-IOB device. The corresponding interpretation “Clock” will only be available in the Configurator software, if the input is interrupt-capable. The following properties must be set for that input: SignalType (if universal input): “Voltage 0-10V”. Interpretation: “Clock”. IOFunc: will automatically be set to “Cardreader ISO2”. GroupNumber: must be equal for all three signals of one card reader. SubGroupNumber: will automatically be set to “Clock”. Invert: checked if signal is low active, check data sheet of card reader. The live value of that L-IOB input will not deliver any useful data. 9.6 Data Points (L-INX Mode) This section describes the data points available in a L-IOB host which has L-IOB devices connected to the LIOB-Connect bus (LIOB-10x models), LIOB-FT bus (LIOB-15x models in LIOB-FT device mode), or LIOB-IP bus (LIOB-45x/55x models in LIOB-IP device mode). As soon as communication between the L-IOB host and its connected L-IOB devices is established, the corresponding data points are available for the application running on the L-IOB host. Data points are available on the L-IOB bus level, device level, and I/O level. Observe that some L-IOB data points are read-only (e.g. ProductCode) and some are writeonly (e.g. PinCode). For data points which can be read and written, two “virtual” data points will be created on the L-IOB host, one with the extension “_Read” and one with the extension “_Write”. 9.6.1 Bus specific Data Points The bus specific data point names are preceded with the L-IOB bus number, e.g. ‘L1_FirstNonDCIndex_Read’. FirstNonDCIndex: see Section 9.2.1. MaxDeviceCount: maximum number of L-IOB devices on this L-IOB bus (8 or 24). 9.6.2 Device specific Data Points The device specific data point names are preceded with the L-IOB bus number and L-IOB station ID, e.g. ‘L1_2_ProductCode_Read’. ProductCode: see Section 9.2.6. Version 4.8 LOYTEC electronics GmbH LIOB-10x/x5x User Manual 95 LOYTEC DeviceName: see Section 9.2.7. NID: see Section 9.2.12. StationID: see Section 9.2.1. PinCode: see Section 9.2.6. ErrorMask: last error of this L-IOB device. CfgExists: flag is set if configuration for this device exists (always set). Enabled: flag is set if this device is enabled. Online: flag is set if this device is online. NotDetected: flag is set if this device could not be detected. EnableUpgrade: flag is set if firmware upgrade is allowed for this device. AlternativeUnit: flag is set if this device shows US units (instead of SI units). ManualMode: flag is set if at least one I/O is in manual mode. FMWVersion: firmware version of this device. FMWTimestamp: firmware build time stamp (date and time) of this device. Serial: serial number of this device. LastRebootTimestamp: date and time of last reboot of this device. SystemTemp: current system temperature of the device. SystemVoltage: current supply voltage of this device. CPULoad: current CPU load of this device. 9.6.3 I/O specific Data Points for Inputs The I/O specific data point names are preceded with the L-IOB bus number, L-IOB station ID, and I/O terminal name, e.g. ‘L1_2_UI5_Input_Read’. Input: current value of the input as measured and interpreted by the L-IOB device. This data point will go offline if the L-IOB device is detected offline by the L-IOB host. It will go out-of-service, if the sensor is detected disconnected by the L-IOB device. IOStatus: current status of input. This data point will go from “OK” to “Disconnected”, if the sensor is disconnected. PulseTime: time between the last two pulses for signal interpretation “Pulse Count” or “Physical Unit Count” (see Section 9.3.4). This can be used to quickly detect a change of the derivative of the physical value, e.g. a change of the electric power if the measured physical value is electric energy. Note that the PulseTime data point must be activated via the PulseTime flag, see Section 9.3.14. OperatingMode: see Section 9.3.11. Version 4.8 LOYTEC electronics GmbH LIOB-10x/x5x User Manual 96 LOYTEC OverrideValue: see Section 9.3.11. DefaultValue: see Section 9.3.11. Offset: see Section 9.3.19. MinValue: see Section 9.3.20. MaxValue: see Section 9.3.20. HoldTime: see Section 9.3.25. DebounceTime: see Section 9.3.25. PulseCountInit: when this data point is written, the pulse count is reset to the written value. This applies to inputs with Interpretation “Pulse Count” or “Physical Unit Count”, see Section 9.3.4. 9.6.4 I/O specific Data Points for Outputs The I/O specific data point names are preceded with the L-IOB bus number, L-IOB station ID, and I/O terminal name, e.g. “L1_1_DO4_Output_Write”. Feedback: the feedback data point will always be set to the current physical value of the output. If e.g. the L-IOB host application writes value A to the output data point, but the output is in manual mode and the user has set value B manually, the feedback data point will be set to value B. IOStatus: current status of output. This data point always has the value “OK”. RunHours: total time the digital output was switched on. EnergyCount: energy consumption of the device or appliance (e.g. lamp) connected to the output, see also Section 9.3.29. Output: current value of the output as set by the L-IOB host application. This data point will go offline if the L-IOB device is detected offline by the L-IOB host. SwitchCycles: Number of switching cycles of the digital output. This is useful for estimating the expected remaining life time of a relay. Observe that this data point is never reset, not even by a reset to factory defaults, see Section 3.6.3. OperatingMode: see Section 9.3.11. OverrideValue: see Section 9.3.11. DefaultValue: see Section 9.3.11. Offset: see Section 9.3.19. MinValue: see Section 9.3.20. MaxValue: see Section 9.3.20. PWMPeriod: see Section 9.3.28. RunHoursInit: when this data point is written, the RunHours data point is reset to the written value. Version 4.8 LOYTEC electronics GmbH LIOB-10x/x5x User Manual 97 LOYTEC EnergyCntInit: when this data point is written, the EnergyCount data point is reset to the written value. NominalPower: see Section 9.3.29. 9.6.5 Parameters Some bus, device, and I/O specific configuration properties are also available as parameters in the LWEB-821/900 Master Parameter Editor tool, see Figure 63. Figure 63: LWEB-821/900 Master Parameter Editor Using this software, L-IOB parameters can easily be set for multiple L-IOB host devices in a system without having to change the L-IOB host project for each L-IOB host in the Configurator. 9.7 Data Points (LONMARK® Mode) This section describes the network data points provided by a LIOB-15x or LIOB-45x device in LONMARK® or Non-ECS device mode. Since the L-IOB device acts as a common CEA-709 node in these device modes, the data points are represented as network variables (NVs) and configuration properties (CPs). These NVs and CPs are organized in functional blocks which form the CEA-709 interface of the node. All CPs are implemented as files (CPT, CPC, CPV files) and configured in the L-INX Configurator Software. The description in the following sections provides documentation of the CPs just for the sake of completeness, it is not meant to suggest manual CP setup (without the Configurator Software). 9.7.1 Device Global Configuration Properties The L-IOB device has some device global configuration properties not mapped to a functional block: Version 4.8 UCPTioDeviceExt (structure): This CP is reserved for future use. UCPTioPinCode (unsigned): This CP represents the PIN code of the L-IOB device, see Section 9.2.8. UCPTmsText (array of structures): This CP is reserved for future use. LOYTEC electronics GmbH LIOB-10x/x5x User Manual 98 LOYTEC UCPTtermDescr (array of structures): This CP contains the names and numbers of all terminals. UCPTtransTbl (array of structures): This CP contains the translation tables of the L-IOB device, see Section 9.2.13. 9.7.2 Node Object (UFPTnodeObject, FPT Key #0) The L-IOB device provides a node object conforming to the LONMARK® guidelines. The functional block type for the node object is derived from the Standard Functional Profile Template SFPTnodeObject (FPT Key #0) and was extended to the Template UFPTnodeObject. The essential NVs and CPs of the functional profile are depicted in Figure 64. Node Object #0 nviRequest SNVT_obj_request nvoStatus SNVT_obj_status nviTimeSet SNVT_time_stamp nvoSystemTemp nviGroupOutVal SNVT_state_64 nvoSupplyVolt SNVT_volt SNVT_temp nvoGroupInVal SNVT_state_64 nvoGroupOutValFb SNVT_state_64 SCPTdevMajVer SCPTdevMinVer SCPTobjMajVer SCPTobjMinVer SCPTlocation UCPTdeviceFlags UCPTlanguage SCPTmaxSendTime (nvoGroupInVal) SCPTminSendTime (nvoGroupInVal) SCPTmaxSendTime (nvoGroupOutValFb) SCPTminSendTime (nvoGroupOutValFb) Figure 64: Node Object nviRequest (SNVT_obj_request) / nvoStatus (SNVT_obj_status): The Node Object accepts the following commands via nviRequest: RQ_NORMAL, RQ_UPDATE_STATUS, RQ_REPORT_MASK, RQ_ENABLE, RQ_DISABLED, RQ_RMV_OVERRIDE, RQ_REMOTE_CTRL, RQ_MANUAL_CTRL, RQ_OVERRIDE. SCPTlocation (SNVT_str_asc): This CP represents the name of the device, see Section 9.2.7. UCPTdeviceFlags (unsigned quad): This CP allows setting some device specific flags: Version 4.8 o UCPT_DEVICE_FLAGS_US (0x00200000): for displaying US units instead of SI units in the L-IOB LCD Display, see Section 9.2.9. o UCPT_DEVICE_FLAGS_SET_ACC (0x10000000): this flag must be set to be able to set back counter values (energy count, run hours, and live values for interpretation ‘physical unit count’ or ‘pulse count’). During normal operation, it must be reset to ensure that commissioning the device does not automatically set back the counter values. UCPTlanguage (enumeration type): This CP allows setting the language in the L-IOB LCD Display: o UCPT_LANGUAGE_UNDEF (0): default language / leave language as is, o UCPT_LANGUAGE_ENG (1): English, o UCPT_LANGUAGE_GER (2): German, LOYTEC electronics GmbH LIOB-10x/x5x User Manual o 99 LOYTEC UCPT_LANGUAGE_FRA (3): French. nviTimeSet (SNVT_time_stamp): When writing to this NV, the system time is set. The time value is interpreted as local time. nvoSystemTemp (SNVT_temp): This NV can be used to poll the system temperature of the device. It does not send updates and must be polled. nvoSupplyVolt (SNVT_volt): This NV can be used to poll the supply voltage of the device. It does not send updates and must be polled. nvoGroupInVal (SNVT_state_64): This NV combines the binary values of all inputs with interpretation ‘digital’ or ‘occupancy’. The mapping of its bits is documented in Section 9.7.4. The NV has mapped a SCPTmaxSendTime and a SCPTminSendTime CP, see Section 9.2.11. nviGroupOutVal (SNVT_state_64): This NV allows setting all outputs with interpretation ‘digital’ at once. The corresponding bits for outputs with other interpretations are ignored. The mapping is documented in Section 9.7.4. nvoGroupOutValFb (SNVT_state_64): This NV combines the binary feedback values of all outputs with interpretation ‘digital’. The mapping is documented in Section 9.7.4. The NV has mapped a SCPTmaxSendTime and a SCPTminSendTime CP, see Section 9.2.11. 9.7.3 Common Terminal Object (UFPTcomTerm, FPT Key #20013) These functional blocks contain CPs of the common terminals of digital outputs for documentation and display in the L-IOB LCD only. They are configured via the L-INX Configurator Software. 9.7.4 Input / Output / Group Mapping The different LIOB-15x and LIOB-45x Models contain different amounts of input and output functional blocks. The following tables show the mapping between the functional blocks and the terminal names (as printed on the L-IOB enclosure) as well as the mapping to the digital group NVs. LIOB-150 / LIOB-450 Version 4.8 Terminal Name Functional Block Digital Group NV mapping UI1 Input[0] nvoGroupInVal.bit0 UI2 Input[1] nvoGroupInVal.bit1 UI3 Input[2] nvoGroupInVal.bit2 UI4 Input[3] nvoGroupInVal.bit3 UI5 Input[4] nvoGroupInVal.bit4 UI6 Input[5] nvoGroupInVal.bit5 UI7 Input[6] nvoGroupInVal.bit6 UI8 Input[7] nvoGroupInVal.bit7 DI1 Input[8] nvoGroupInVal.bit8 DI2 Input[9] nvoGroupInVal.bit9 AO1 Output[0] nviGroupOutVal.bit0 / nvoGroupOutValFb.bit0 AO2 Output[1] nviGroupOutVal.bit1 / nvoGroupOutValFb.bit1 DO2 Output[2] nviGroupOutVal.bit2 / nvoGroupOutValFb.bit2 DO3 Output[3] nviGroupOutVal.bit3 / nvoGroupOutValFb.bit3 LOYTEC electronics GmbH LIOB-10x/x5x User Manual 100 LOYTEC LIOB-150 / LIOB-450 Terminal Name Functional Block Digital Group NV mapping DO4 Output[4] nviGroupOutVal.bit4 / nvoGroupOutValFb.bit4 DO5 Output[5] nviGroupOutVal.bit5 / nvoGroupOutValFb.bit5 DO6 Output[6] nviGroupOutVal.bit6 / nvoGroupOutValFb.bit6 DO7 Output[7] nviGroupOutVal.bit7 / nvoGroupOutValFb.bit7 DO8 Output[8] nviGroupOutVal.bit8 / nvoGroupOutValFb.bit8 DO9 Output[9] nviGroupOutVal.bit9 / nvoGroupOutValFb.bit9 Table 5: LIOB-150/450 Object Mapping LIOB-151 / LIOB-451 Terminal Name Functional Block Digital Group NV mapping UI1 Input[0] nvoGroupInVal.bit0 UI2 Input[1] nvoGroupInVal.bit1 UI3 Input[2] nvoGroupInVal.bit2 UI4 Input[3] nvoGroupInVal.bit3 UI5 Input[4] nvoGroupInVal.bit4 UI6 Input[5] nvoGroupInVal.bit5 UI7 Input[6] nvoGroupInVal.bit6 UI8 Input[7] nvoGroupInVal.bit7 DI5 Input[8] nvoGroupInVal.bit8 DI6 Input[9] nvoGroupInVal.bit9 DI7 Input[10] nvoGroupInVal.bit10 DI8 Input[11] nvoGroupInVal.bit11 DI9 Input[12] nvoGroupInVal.bit12 DI10 Input[13] nvoGroupInVal.bit13 DI11 Input[14] nvoGroupInVal.bit14 DI12 Input[15] nvoGroupInVal.bit15 DI13 Input[16] nvoGroupInVal.bit16 DI14 Input[17] nvoGroupInVal.bit17 DI15 Input[18] nvoGroupInVal.bit18 DI16 Input[19] nvoGroupInVal.bit19 Table 6: LIOB-151/451 Object Mapping LIOB-152 / LIOB-452 Version 4.8 Terminal Name Functional Block Digital Group NV mapping UI1 Input[0] nvoGroupInVal.bit0 UI2 Input[1] nvoGroupInVal.bit1 UI3 Input[2] nvoGroupInVal.bit2 UI4 Input[3] nvoGroupInVal.bit3 LOYTEC electronics GmbH LIOB-10x/x5x User Manual 101 LOYTEC LIOB-152 / LIOB-452 Terminal Name Functional Block Digital Group NV mapping UI5 Input[4] nvoGroupInVal.bit4 UI6 Input[5] nvoGroupInVal.bit5 AO1 Output[0] nviGroupOutVal.bit0 / nvoGroupOutValFb.bit0 AO2 Output[1] nviGroupOutVal.bit1 / nvoGroupOutValFb.bit1 AO3 Output[2] nviGroupOutVal.bit2 / nvoGroupOutValFb.bit2 AO4 Output[3] nviGroupOutVal.bit3 / nvoGroupOutValFb.bit3 AO5 Output[4] nviGroupOutVal.bit4 / nvoGroupOutValFb.bit4 AO6 Output[5] nviGroupOutVal.bit5 / nvoGroupOutValFb.bit5 DO1 Output[6] nviGroupOutVal.bit6 / nvoGroupOutValFb.bit6 DO2 Output[7] nviGroupOutVal.bit7 / nvoGroupOutValFb.bit7 DO3 Output[8] nviGroupOutVal.bit8 / nvoGroupOutValFb.bit8 DO4 Output[9] nviGroupOutVal.bit9 / nvoGroupOutValFb.bit9 DO5 Output[10] nviGroupOutVal.bit10 / nvoGroupOutValFb.bit10 DO6 Output[11] nviGroupOutVal.bit11 / nvoGroupOutValFb.bit11 DO7 Output[12] nviGroupOutVal.bit12 / nvoGroupOutValFb.bit12 DO8 Output[13] nviGroupOutVal.bit13 / nvoGroupOutValFb.bit13 Table 7: LIOB-152/452 Object Mapping LIOB-153 / LIOB-453 Terminal Name Functional Block Digital Group NV mapping UI1 Input[0] nvoGroupInVal.bit0 UI2 Input[1] nvoGroupInVal.bit1 UI3 Input[2] nvoGroupInVal.bit2 UI4 Input[3] nvoGroupInVal.bit3 UI5 Input[4] nvoGroupInVal.bit4 UI6 Input[5] nvoGroupInVal.bit5 AO1 Output[0] nviGroupOutVal.bit0 / nvoGroupOutValFb.bit0 AO2 Output[1] nviGroupOutVal.bit1 / nvoGroupOutValFb.bit1 AO3 Output[2] nviGroupOutVal.bit2 / nvoGroupOutValFb.bit2 AO4 Output[3] nviGroupOutVal.bit3 / nvoGroupOutValFb.bit3 AO5 Output[4] nviGroupOutVal.bit4 / nvoGroupOutValFb.bit4 AO6 Output[5] nviGroupOutVal.bit5 / nvoGroupOutValFb.bit5 DO1 Output[6] nviGroupOutVal.bit6 / nvoGroupOutValFb.bit6 DO2 Output[7] nviGroupOutVal.bit7 / nvoGroupOutValFb.bit7 DO3 Output[8] nviGroupOutVal.bit8 / nvoGroupOutValFb.bit8 DO4 Output[9] nviGroupOutVal.bit9 / nvoGroupOutValFb.bit9 DO5 Output[10] nviGroupOutVal.bit10 / nvoGroupOutValFb.bit10 Table 8: LIOB-153/453 Object Mapping Version 4.8 LOYTEC electronics GmbH LIOB-10x/x5x User Manual 102 LOYTEC LIOB-154 Terminal Name Functional Block Digital Group NV mapping UI1 Input[0] nvoGroupInVal.bit0 UI2 Input[1] nvoGroupInVal.bit1 UI3 Input[2] nvoGroupInVal.bit2 UI4 Input[3] nvoGroupInVal.bit3 UI5 Input[4] nvoGroupInVal.bit4 UI6 Input[5] nvoGroupInVal.bit5 UI7 Input[6] nvoGroupInVal.bit6 PRESS Input[7] nvoGroupInVal.bit7 AO1 Output[0] nviGroupOutVal.bit0 / nvoGroupOutValFb.bit0 AO2 Output[1] nviGroupOutVal.bit1 / nvoGroupOutValFb.bit1 AO3 Output[2] nviGroupOutVal.bit2 / nvoGroupOutValFb.bit2 AO4 Output[3] nviGroupOutVal.bit3 / nvoGroupOutValFb.bit3 DO1 Output[4] nviGroupOutVal.bit4 / nvoGroupOutValFb.bit4 DO2 Output[5] nviGroupOutVal.bit5 / nvoGroupOutValFb.bit5 DO3 Output[6] nviGroupOutVal.bit6 / nvoGroupOutValFb.bit6 DO4 Output[7] nviGroupOutVal.bit7 / nvoGroupOutValFb.bit7 DO5 Output[8] nviGroupOutVal.bit8 / nvoGroupOutValFb.bit8 DO6 Output[9] nviGroupOutVal.bit9 / nvoGroupOutValFb.bit9 DO7 Output[10] nviGroupOutVal.bit10 / nvoGroupOutValFb.bit10 Table 9: LIOB-154 Object Mapping 9.7.5 Input Object (UFPTopenLoopSensor, FPT Key #1) The functional block type for inputs is derived from the Standard Functional Profile Template SFPTopenLoopSensor (FPT Key #1) and was extended to the Template UFPTopenLoopSensor. The functional profile is depicted in Figure 65. Version 4.8 LOYTEC electronics GmbH LIOB-10x/x5x User Manual 103 LOYTEC Open Loop Sensor #1 nviInManual <changeable> nvoInValue <changeable> nviInSwitchFb SNVT_switch <changeable> nvoInManual nvoInPulseTime SNVT_time_f nvoInLink UNVT_io_link SCPTobjMajVer SCPTobjMinVer SCPTmaxNVLength UCPTioHwType UCPTioHwFlags SCPTnvType UCPTioDataType UCPTioDispInfo UCPTioName UCPTioOpmode SCPTovrBehave SCPTovrValue SCPTdefOutput SCPTminSendTime SCPTmaxSendTime SCPTsndDelta UCPTioSigInterpr UCPTioSigType SCPToffset SCPTminRnge SCPTmaxRnge UCPTioFlags UCPTtrnsTblIdx UCPTntcParams SCPTholdTime SCPTdebounce UCPToffHystRaw UCPTonHystRaw UCPTpulseCntInit UCPTioFunc UCPTegXyzVal UCPTegXyzMode UCPTinputExt Figure 65: Input Object (Open Loop Sensor) 9.7.5.1 Input Network Variables nviInManual (changeable): If this NV is written, the value of the input in manual mode is set. The type of the NV is determined by the SCPTnvType CP, see Section 9.7.5.4. nviInSwitchFb (SNVT_switch): This NV provides feedback for the switch mode, see Section 9.4. 9.7.5.2 Output Network Variables Version 4.8 nvoInValue (changeable): This is the main value of the input. It represents the currently measured value of the input. The type of the NV is determined by the SCPTnvType CP, see Section 9.7.5.4. nvoInManual (changeable): This NV is updated whenever the value of the input in manual mode is changed on the L-IOB LCD Display. The type of the NV is determined by the SCPTnvType CP, see Section 9.7.5.4. nvoInPulseTime (SNVT_time_f): This NV represents the time between the last two pulses for signal interpretation “Pulse Count” or “Physical Unit Count” (see Section 9.3.4). This can be used to quickly detect a change of the derivative of the physical value, e.g. a change of the electric power if the measured physical value is electric energy. Note that the PulseTime NV must be activated via the PulseTime flag, see Section 9.3.14. nvoInLink (UNVT_io_link): This NV is only used internally by the Configurator software and is not required during normal operation. LOYTEC electronics GmbH LIOB-10x/x5x User Manual 104 LOYTEC 9.7.5.3 Read-Only Configuration Properties SCPTobjMajVer: major version of object. SCPTobjMinVer: minor version of object. SCPTmaxNVLength: maximum length of changeable type NVs (4). UCPTioHwType: hardware type of physical input, see Section 9.3.2. UCPTioHwFlags: hardware flags reserved for future use. 9.7.5.4 Read/Write Configuration Properties Version 4.8 SCPTnvType: specifies the type of the changeable NVs, see Section 9.3.6. UCPTioDataType: specifies the high-level data type of the input, see Section 9.3.5. UCPTioDispInfo: specifies the unit texts for analog inputs or the active/inactive texts for digital inputs (Section 9.3.15), the resolution (Section 9.3.16), alternative unit multiplicator and offset (Section 9.3.17), as well as the display on/off symbols (Section 9.3.18). UCPTioName: specifies the name of the input, see Section 9.3.1. UCPTioOpmode: specifies the operating mode, see Section 9.3.11. SCPTovrBehave: specifies the override behavior. This is set by the Configurator software so that in override mode, the override value (SCPTovrValue) is used. SCPTovrValue: specifies the override value, see Section 9.3.11. SCPTdefOutput: specifies the default value, see Section 9.3.11. SCPTminSendTime: specifies the minimum send time, see Section 9.3.22. SCPTmaxSendTime: specifies the maximum send time, see Section 9.3.21. SCPTsndDelta: specifies the change-of-value property, see Section 9.3.21. UCPTioSigInterpr: specifies the interpretation, see Section 9.3.4. UCPTioSigType: specifies the signal type, see Section 9.3.3. SCPToffset: specifies the offset, see Section 9.3.19. SCPTminRnge: specifies the minimum value, see Section 9.3.20. SCPTmaxRnge: specifies the maximum value, see Section 9.3.20. UCPTioFlags: specifies the invert flag (Section 9.3.13) and the pulse time flag (Section 9.3.14). UCPTtrnsTblIdx: specifies the index of the translation table, see Section 9.3.23. UCPTntcParams: specifies the custom NTC parameters, see Section 9.3.24. SCPTholdTime: specifies the hold time, see Section 9.3.25. SCPTdebounce: specifies the debounce time, see Section 9.3.25. UCPToffHystRaw: reserved for future use. UCPTonHystRaw: reserved for future use. UCPTpulseCntInit: initializes the pulse count for interpretation ‘physical unit count’ and ‘pulse count’. The UCPT_DEVICE_FLAGS_SET_ACC flag must be set in order to perform this operation, see Section 9.7.2. UCPTioFunc: specifies the I/O function, group number, and sub group number, see Section 9.3.9. LOYTEC electronics GmbH LIOB-10x/x5x User Manual 105 LOYTEC UCPTegXyzVal: these eight configuration properties specify the values to be sent out when the corresponding events occur in switch mode, see Section 9.4. UCPTegXyzMode: these eight configuration properties specify the modes for sending out values when the corresponding events occur in switch mode, see Section 9.4. UCPTinputExt: reserved for future use. 9.7.6 Output Object (UFPTclosedLoopActuator, FPT Key #4) The functional block type for outputs is derived from the Standard Functional Profile Template SFPTclosedLoopActuator (FPT Key #4) and was extended to the Template UFPTclosedLoopActuator. The functional profile is depicted in Figure 66. Closed Loop Actuator #4 nviOutValue <changeable> nvoOutValueFb <changeable> nviOutManual <changeable> nvoOutManual <changeable> nvoOutLink UNVT_io_link nvoOutRunHours SNVT_elapsed_tm nvoOutEnergy SNVT_elec_kwh nvoOutEnergyF SNVT_elec_whr_f nvoOutPower SNVT_power nvoOutCurrent SNVT_current nvoOutVoltage SNVT_voltage nvoOutPhase SNVT_phase SCPTobjMajVer SCPTobjMinVer SCPTmaxNVLength UCPTioHwType UCPTioHwFlags UCPTswCycleCntInit SCPTnvType UCPTioDataType UCPTioDispInfo UCPTioName UCPTioOpmode SCPTovrBehave SCPTovrValue SCPTdefOutput SCPTmaxRcvTime SCPTminSendTime SCPTmaxSendTime SCPTsndDelta UCPTioSigInterpr UCPTioSigType SCPToffset SCPTminRnge SCPTmaxRnge UCPTioFlags UCPToffHystRaw UCPTonHystRaw SCPTpwmPeriod UCPTdeadTime UCPTioFunc SCPTrunHrInit UCPTenergyCntInit UCPTnominalPower UCPTminSendTimeCnt UCPTmaxSendTimeCnt UCPTminSendTimeRaw UCPTmaxSendTimeRaw UCPToutputExt Figure 66: Output Object (Closed Loop Actuator) Version 4.8 LOYTEC electronics GmbH LIOB-10x/x5x User Manual 106 LOYTEC 9.7.6.1 Input Network Variables nviOutValue (changeable): This is the main live value of the output. If it is written, the output changes its physical value accordingly (in auto mode). The type of the NV is determined by the SCPTnvType CP, see Section 9.7.6.4. nviOutManual (changeable): If this NV is written, the value of the output in manual mode is set. The type of the NV is determined by the SCPTnvType CP, see Section 9.7.6.4. 9.7.6.2 Output Network Variables nvoOutValueFb (changeable): This is the feedback value of the output. It always represents the current physical value of the output. If e.g. the value A is written to the nviOutValue NV of the output, but the output is in manual mode and the user has set value B manually, the feedback value will be value B. The type of the NV is determined by the SCPTnvType CP, see Section 9.7.6.4. nvoOutManual (changeable): This NV is updated whenever the value of the output in manual mode is changed on the L-IOB LCD Display. The type of the NV is determined by the SCPTnvType CP, see Section 9.7.6.4. nvoOutLink (UNVT_io_link): This NV is only used internally by the Configurator software and is not required during normal operation. nvoOutRunHours (SNVT_elapsed_tm): This NV represents the total time the digital output was switched on. nvoOutEnergy (SNVT_elec_kwh): This NV represents the energy consumption of the device or appliance (e.g. lamp) connected to the output, see also Section 9.3.29. nvoOutEnergyF (SNVT_elec_whr_f): same as nvoOutEnergy but using a float type SNVT. nvoOutPower (SNVT_power): reserved for future use. nvoOutCurrent (SNVT_current): reserved for future use. nvoOutVoltage (SNVT_voltage): reserved for future use. nvoOutPhase (SNVT_phase): reserved for future use. 9.7.6.3 Read-Only Configuration Properties SCPTobjMajVer: major version of object. SCPTobjMinVer: minor version of object. SCPTmaxNVLength: maximum length of changeable type NVs (4). UCPTioHwType: hardware type of physical output, see Section 9.3.2. UCPTioHwFlags: hardware flags reserved for future use. UCPTswCycleCntInit: number of switching cycles of the digital output. This CP is useful for estimating the expected remaining life time of a relay. Observe that this data is never reset, not even by a reset to factory defaults, see Section 3.6.3. 9.7.6.4 Read/Write Configuration Properties Version 4.8 SCPTnvType: specifies the type of the changeable NVs, see Section 9.3.6. UCPTioDataType: specifies the high-level data type of the output, see Section 9.3.5. UCPTioDispInfo: specifies the unit texts for analog outputs or the active/inactive texts for digital outputs (Section 9.3.15), the resolution (Section 9.3.16), alternative unit multiplicator and offset (Section 9.3.17). UCPTioName: specifies the name of the output, see Section 9.3.1. LOYTEC electronics GmbH LIOB-10x/x5x User Manual Version 4.8 107 LOYTEC UCPTioOpmode: specifies the operating mode, see Section 9.3.11. SCPTovrBehave: specifies the override behavior. This is set by the Configurator software so that in override mode, the override value (SCPTovrValue) is used. SCPTovrValue: specifies the override value, see Section 9.3.11. SCPTdefOutput: specifies the default value, see Section 9.3.11. SCPTmaxRcvTime: specifies the maximum receive time. If no NV update on the main live value is received within this time, the output is set to the default value. SCPTminSendTime: specifies the minimum send time for the feedback value, see Section 9.3.22. SCPTmaxSendTime: specifies the maximum send time for the feedback value, see Section 9.3.21. SCPTsndDelta: specifies the change-of-value property for the feedback value, see Section 9.3.21. UCPTioSigInterpr: specifies the interpretation, see Section 9.3.4. UCPTioSigType: specifies the signal type, see Section 9.3.3. SCPToffset: reserved for future use. SCPTminRnge: specifies the minimum value, see Section 9.3.20. SCPTmaxRnge: specifies the maximum value, see Section 9.3.20. UCPTioFlags: specifies the persistent flag (Section 9.3.12) and the invert flag (Section 9.3.13). UCPToffHystRaw: specifies the off value, see Section 9.3.27. UCPTonHystRaw: specifies the on value, see Section 9.3.27. SCPTpwmPeriod: specifies the PWM period, see Section 9.3.28. UCPTdeadTime: specifies the dead time, see Section 9.3.8. UCPTioFunc: specifies the I/O function and group number, see Section 9.3.8. SCPTrunHrInit: initializes the run hours of the digital output. The UCPT_DEVICE_FLAGS_SET_ACC flag must be set in order to perform this operation, see Section 9.7.2. UCPTenergyCntInit: initializes the energy count of the output. The UCPT_DEVICE_FLAGS_SET_ACC flag must be set in order to perform this operation, see Section 9.7.2. UCPTnominalPower: specifies the nominal power, see Section 9.3.29. UCPTminSendTimeCnt: specifies the minimum send time for the run hours and energy count values. This CP is set to 10min by default. UCPTmaxSendTimeCnt: specifies the maximum send time for the run hours and energy count values. This CP is set to 0 (disabled) by default. UCPTminSendTimeRaw: reserved for future use. UCPTmaxSendTimeRaw: reserved for future use. UCPToutputExt: reserved for future use. LOYTEC electronics GmbH LIOB-10x/x5x User Manual 108 LOYTEC 9.8 Data Points (BACnet Mode) This section describes the network data points provided by a LIOB-55x in BACnet device mode. Since the L-IOB device acts as a common BACnet node in this device mode, the data points are represented as native BACnet server objects. 9.8.1 BACnet Technology Data points in the BACnet technology are known as BACnet objects. They have a specific type (e.g. analog input or binary output) and a set of properties, which describe the data point more closely. The actual value is stored in the “Present_Value”. On the device, there exist two classes of BACnet data points: BACnet server objects (SO): These BACnet objects configured by the Configurator software to be allocated locally on the device. These objects can be accessed by the BACnet building control system or operating workstations. They support COV subscriptions to deliver value changes in an event-driven way. BACnet client mappings (CM): For certain applications, it is necessary that the device acts as a BACnet client. This functionality can be configured by activating a client mapping. Client mappings can be of the type Poll, COV, Write, or Auto. This specifies how the BACnet client accesses other BACnet objects on the BACnet network. The Auto method determines the best way (poll, COV, or write) to talk with other server objects. Poll is used for objects that need to read data from other BACnet objects in a periodic manner. COV is used to subscribe for COV at other BACnet objects in order to get updates in an event-driven fashion. Write is used to send updates to other BACnet objects. On LIOB-55x devices, it is possible to add client mappings to the automatically created native I/O server objects. The direction of BACnet server objects deserves a closer look. The direction specified for data points in the Configurator software always refers to the network view of the communication. The definition of input and output objects in BACnet, however, refers to the process view, which is opposite to the network. Therefore, a BACnet analog input (AI) object is modeled as an analog output data point. The direction of client mappings naturally refers to the network communication. Therefore, a write client mapping is represented as an analog output data point. In BACnet, commandable objects can be written with values at a certain priority. The value with the highest priority is in effect. When revoking a written value, the NULL value is written. This takes back the value. When all written values are withdrawn, the Relinquish_Default value is in effect. The default value feature of a data point is mapped to the Relinquish_Default property for commandable objects. For BACnet objects, which are not commandable, the Present_Value is initialized with the specified default value. 9.8.2 Native BACnet Objects for I/Os On LIOB-55x devices in BACnet Mode, the L-IOB I/Os are directly exposed to BACnet server objects. Each L-IOB I/O object is represented by one BACnet object. All relevant I/O configuration properties are mapped to corresponding BACnet properties and reflect actual input/output values, I/O status, override/manual values, operating mode, inversion and adhere to all prescribed BACnet functions. For L-IOB devices, which are connected to a L-IOB host (L-INX or LIOB-48x/58x) via the LIOB-Connect or LIOB-FT/IP bus (L-INX Mode), the native BACnet objects can also optionally be created on the L-IOB host. The option can be switched for each I/O in the Configurator Software. Version 4.8 LOYTEC electronics GmbH LIOB-10x/x5x User Manual 109 LOYTEC The type of the created BACnet server object depends on the type of the live value I/O data point. If e.g. a universal input (UI) is used for measuring an analog value, the type of the live value (Input_Read data point) will be Double and thus, an Analog Input (AI) BACnet object will be created. Table 10 shows all possible native BACnet object types for I/Os. I/O I/O Live Value Type BACnet Object Feedback Object DI/UI Double Analog Input (AI) - DI/UI Boolean Binary Input (BI) - DI/UI LIOB/MagCard Analog Input (AI) - AO/DO Double Analog Output (AO) Analog Input (AI) AO/DO Boolean Binary Output (BO) - Table 10: Native BACnet object types for I/Os For an AO object, an additional AI object is generated as the feedback value object. For BO objects, a separate feedback object is not required, since a feedback value is already included in the BACnet BO object. For the STId Card Reader mode (see Section 9.5), the I/O live value type of the Card Data input is an array of 40 nibbles which contains the last read Card ID in BCD encoding (LIOB/MagCard). In this case, the first n BCD digits that form a number which can be displayed by a BACnet float are written to the Present_Value of the created BACnet AI object. An ASCII version of the entire BCD code is written to the Description property of the BACnet object. When using native BACnet objects for L-IOB outputs, the BACnet priority array concept is used in the I/O operating mode ‘Auto’ for determining the physical output value. Other I/O operating modes (‘Override’, ‘Manual’, ‘Disabled’, see Section 9.3.11) bypass the BACnet priority array. The physical value is determined by the override value or manual value in this case. The following L-IOB live value and configuration property data points are exposed to BACnet properties: Version 4.8 Input_Read: For L-IOB inputs in ‘Auto’ mode, the input value is written to the Present_Value property of the BACnet input object. When switching from another operating mode to ‘Auto’, the current input value is also written. Output_Write: The Present_Value of the BACnet object is written to the physical output in ‘Auto’ mode. OperatingMode: o Auto: The BACnet object is in normal operation as described above. Out_of_service and OVERRIDDEN flags of the BACnet object are cleared. o Override (Input): The BACnet input object is set to out-of-service. The Present_Value no longer reflects the physical L-IOB input value. The L-IOB override value is coupled to the Present_Value and vice-versa. Writing the Out_Of_Service property over the BACnet network can turn the ‘Override’ mode on or off (except if in ‘Manual’ or ‘Disabled’ mode). o Override (Output): The BACnet output object is set to out-of-service. The Present_Value no longer writes to the L-IOB output value. The L-IOB override value is coupled to priority slot ‘1’ and vice-versa. It is removed from priority slot ‘1’ when returning to ‘Auto’ mode. Writing the Out_Of_Service property over the BACnet network can turn the ‘Override’ mode on or off (except if in ‘Manual’ or ‘Disabled’ mode). o Manual: The BACnet object is set OVERRIDDEN. The Present_Value reflects the manual value and is decoupled from the L-IOB input value (input) or Priority_Array (output). Out_Of_Service is not set. The Out_Of_Service, Present_Value, and Reliability properties are made read-only and can no LOYTEC electronics GmbH LIOB-10x/x5x User Manual 110 LOYTEC longer be written over BACnet. This mode cannot be modified over the BACnet network. o Disabled: The BACnet object is set out-of-service, the OVERRIDDEN flag is set, and the reliability is set to ‘no fault detected’. The Out_Of_Service, Present_Value, and Reliability properties are made read-only and can no longer be written over BACnet. This mode cannot be modified over the BACnet network. OverrideValue: In ‘Override’ mode this value is written to the Present_Value of the BACnet object at priority ‘1’. When entering ‘Override’ mode, the current override value is written. When leaving ‘Override’ mode, NULL is written at priority ‘1’ for output objects and nothing is done for input objects. For input objects in ‘Override’ mode, the override value is updated by the Present_Value when written over BACnet. ManualValue: In ‘Manual’ mode, the L-IOB manual value is written to the Present_Value property of the BACnet object. The Present_Value cannot be written over BACnet in ‘Manual’ mode. DefaultValue: The L-IOB default value is written to the Relinquish_Default property of the BACnet object and vice-versa, if it exists. Invert: This L-IOB parameter is written to the Polarity property of BACnet BO and BI objects and vice-versa. IOStatus: The I/O status is reflected in the Reliability property of the BACnet object: o NO_FAULT_DETECTED: If the I/O does not report any error. o NO_OUTPUT/NO_SENSOR: If an output or sensor failure is detected. o COMMUNICATION_ERROR: If the L-IOB host reports a communication error. o UNRELIABLE_OTHER: For all other problems. Feedback_Read: For L-IOB outputs in digital mode, the feedback value is written to the Feedback_Value property of the BACnet BO object. For L-IOB outputs in analog mode, the feedback value is written to the dedicated BACnet AI feedback object. MinValue, MaxValue, Resolution: For analog BACnet objects, these L-IOB configuration properties are written to the corresponding BACnet properties when they change. The BACnet properties are read-only from the BACnet network. I/O Name and Description: Initially, the BACnet server object name and description are both set to e.g. ‘L1_1_UI1’ (for UI1). In the Configurator, the BACnet server object name and description can later be modified manually or synchronized with the current I/O name and description. 9.9 Default Configuration Every L-IOB device is shipped with a default I/O configuration, which can be used right away. This configuration is the same in every device mode (see Section 4.1) and is dependent on the hardware type (see Section 9.3.2) of the corresponding I/O: Universal Inputs (UI): measure voltage between 0V and 10V. The interpretation is ‘Linear’ with MinValue 0V and MaxValue 10V. Network variables of type SNVT_volt_f are used in LONMARK® Mode. Digital Inputs (DI): act as switch inputs. The interpretation is ‘Digital’. Network variables of type SNVT_switch are used in LONMARK® Mode. Version 4.8 LOYTEC electronics GmbH LIOB-10x/x5x User Manual 111 LOYTEC Pressure Sensors (PRESS): measure pressure between 0P and 500P (Pascal). The interpretation is ‘Linear’ with MinValue 0P and MaxValue 500P. Network variables of type SNVT_press_f are used in LONMARK® Mode. Analog Outputs (AO): deliver a voltage between 0V and 10V according to the given percentage level. The interpretation is ‘Analog’ with MinValue 0V and MaxValue 10V. Network variables of type SNVT_lev_percent are used in LONMARK® Mode. Digital Outputs (DO): relays or triacs close when the given value goes active and open when the value goes inactive. The interpretation is ‘Digital’. Network variables of type SNVT_switch are used in LONMARK® Mode. Observe that LIOB-55x devices in BACnet Mode need an initial configuration from the Configurator software to be accessible over the BACnet/IP network. Version 4.8 LOYTEC electronics GmbH LIOB-10x/x5x User Manual 112 LOYTEC 10 The Configurator This Chapter gives step-by-step instructions on how to commission a L-IOB I/O module, create a data point configuration in the L-INX Configurator, and how to manage and use those data points. Please refer to the L-INX User Manual [1] for general information on the Configurator Software. 10.1 Software Installation The L-INX Configurator must be used to setup the data point configuration of the L-IOB I/O modules. System requirements: Windows XP, Windows 2003 Server, Windows Vista, Windows 7, or Windows 2008 Server. The L-INX Configurator can be downloaded from the LOYTEC Web site http://www.loytec.com. When asked for the type of installation, there are two options to choose from. Select Typical to install the required program files. 10.2 Configuring L-IOB Modules (L-INX Mode) This section only applies to LIOB-10x models, LIOB-15x models in LIOB-FT device mode, and LIOB-45x/55x models in LIOB-IP device mode. Please refer to Section 4.1 for more information on L-IOB device modes. It is assumed in the following sections that the Configurator Software is started on a L-IOB host model capable of connecting LIOBConnect, LIOB-FT, or LIOB-IP devices (L-IOB tab available in the software). 10.2.1 Add L-IOB Modules L-IOB modules are added to the L-IOB host configuration in the Configurator. This configuration determines, which L-IOB modules are connected to the L-IOB host in which I/O configuration. To Add a L-IOB Module 1. Version 4.8 In the Configurator change to the L-IOB tab. LOYTEC electronics GmbH LIOB-10x/x5x User Manual 113 LOYTEC Figure 67: L-IOB tab in the Configurator 2. In the LIOB Configuration tree on the left, select the LIOB (LIOB-Connect), LIOB-FT, or LIOB-IP bus. 3. Click the Add Device(s) button. 4. In the file requestor, select a LIOB device template for your L-IOB model, e.g., liob100.xml. The L-IOB device appears in the LIOB Devices list. 5. Optionally, double-click on the Device name and enter a descriptive device name, e.g. ‘MyLIOB’. 6. To add more L-IOB devices repeat the add device step. Use the Up and Down button to organize the L-IOB devices in the order as they are connected to the L-IOB host. Station 1 is the first L-IOB, station 2 the second, and so on. 7. In the device parameters table (below the LIOB device table), check the Param check box, if this configuration property shall be exposed to the LWEB-821/900 Master Parameter Editor. 8. Refer to Section 9.2 for more information on the other device specific configuration properties. 10.2.2 Configure I/Os Once a L-IOB device has been added to a configuration, the I/Os have a default configuration. To adapt the I/Os to the specific needs in a project they can be freely configured. Note that certain changes to the I/O configuration must be committed before proceeding with other tasks. This can be done explicitly by clicking Commit changes. Otherwise, the user will be requested to commit by the Configurator. Changes can be canceled by clicking Cancel changes. To Configure I/Os 1. Version 4.8 Select a L-IOB device in the LIOB Configuration tree. LOYTEC electronics GmbH LIOB-10x/x5x User Manual 114 LOYTEC 2. The L-IOB tab displays the I/Os available on that L-IOB device in the Inputs / Outputs list. 3. To adapt the I/O name, double-click the name in the Name column and edit it, e.g., ‘RoomTemp’. 4. Select (or multi-select) an I/O in the Inputs/Outputs list and observe the Object parameters list below. These parameters can be used to configure the I/O. 5. For example, change the SignalType of the input UI1 to ‘Resistance’. 6. Note that the object configuration properties may change when changing the signal type or interpretation. For detailed information on available configuration properties and their dependencies refer to Section 9.3. In this example you may now edit the Interpretation to ‘NTC10K’, which will allow connecting an NTC temperature sensor to the input. 7. Check the Param check box, if this configuration property shall be exposed to the LWEB-821/900 Master Parameter Editor. 8. Native BACnet objects can be created in the L-IOB host using the BACnet objects checkbox. The BACnet server object names and descriptions will initially receive unique I/O names as described in Section 9.8.2. They can be set to the current I/O names and descriptions by using the button Set BACnet Names. 9. I/Os of the same hardware type can be copied using the Copy Object(s) and Paste Object(s) buttons. This can also be done between different L-IOB devices. 10.2.3 Manage L-IOB Configurations L-IOB configurations can be managed by the user. One may duplicate the device for repeated use in the project. Also, a new template may be generated from the L-IOB configuration, which can be re-used in other projects. To Manage L-IOB Configurations Version 4.8 1. Select the LIOB, LIOB-FT, or LIOB-IP folder in the LIOB Configuration tree. 2. In the LIOB Devices list, select a configured L-IOB device or use multi-select to select multiple devices at a time. 3. Click on the Duplicate Device(s) button. This duplicates the selected L-IOB devices and all I/O configurations. 4. Unneeded devices may be deleted again by clicking the Delete Device(s) button. LOYTEC electronics GmbH LIOB-10x/x5x User Manual 115 LOYTEC 5. To export a new template for a L-IOB configuration click the Export Template button. No multi-select is possible for this operation. In the file save dialog, enter a new L-IOB template file name and store it. This file can then be used in a different project using the Add Device(s) button. 6. Existing configurations can be updated with new L-IOB templates by using the Upgrade Template button. This can be used e.g. to migrate new functions which were not yet available in earlier template versions. It is highly recommended to backup the original L-IOB host project before upgrading templates. After upgrading the template, a log is displayed, which shows all information about the upgrade process. Please carefully review this log before using the updated configuration. 7. Another way of managing L-IOB configurations is using terminal configurations. A terminal configuration can be created from an I/O object in the Inputs / Outputs list by using the Export Object button next to the list. In this case, only the configuration of this I/O is stored in an XML file. Terminal configurations can be imported (to I/Os of the same hardware type) by using the Import Object button. 8. These terminal configurations can also be used to configure the I/Os of all L-IOB devices in a L-IOB host project. This is done by manually creating a CSV file with one line per I/O and the following eight columns: a. Bus: either “LIOB” or “LIOB-FT”. If the field in this column starts with “#”, the whole line is ignored. This can be used e.g. for a column header line or other comment lines in the CSV file. b. Station ID: station ID of the L-IOB device (1-8) within the bus. c. Device Template: file name of the device template, e.g. “liob100.xml”. d. Device Name: user defined name of the device, e.g. “LIOB_Heating”. e. NID: specifies the Node ID (see Section 9.2.12) of the device if already known. Otherwise, the field is left blank. f. Terminal: the terminal identifier as listed in the column “Terminal” of the Inputs / Outputs list, e.g. “UI1”. g. Terminal Name: user defined name of the I/O, e.g. “Temperature A” h. Terminal Template: file name of the terminal configuration (which was stored using Export Object), e.g. “Humid_Sensor.xml”. An example of such a CSV file is shown here: #Bus;St.ID;Dev.Template;Dev.Name;NID;Terminal;Term.Name;Term.Template LIOB;1;liob100.xml;LIOB_Heating;;UI1;TempA;NTC.xml LIOB;1;liob100.xml;LIOB_Heating;;UI2;TempB;NTC.xml LIOB;2;liob100.xml;LIOB_Cooling;;UI1;HumidA;Humid_Sensor.xml LIOB;2;liob100.xml;LIOB_Cooling;;UI2;HumidB;Humid_Sensor.xml LIOB-FT;1;liob150.xml;LIOB_Shades;;AO1;MotorUp;Motor.xml LIOB-FT;1;liob150.xml;LIOB_Shades;;AO2;MotorDown;Motor.xml The terminal configurations “NTC.xml”, “Humid_sensor.xml”, and “Motor.xml” would have to be present in the same folder as the CSV file. The file would e.g. look like this in MS Excel: Version 4.8 LOYTEC electronics GmbH LIOB-10x/x5x User Manual 116 LOYTEC The CSV file can finally be imported using the Import Terminal Config button. 9. It is also possible to export such a terminal configuration from an existing project using the Export Terminal Config button. After choosing a file location and name, the user will be asked if only customized objects shall be exported. If this option is enabled, only L-IOB devices with custom I/Os (where changes have been made) will be exported. 10. To setup translation tables for certain I/O interpretation modes, click the Translation Tables button. Figure 68: L-IOB Translation Tables 11. You can add and delete tables using the buttons Add table and Delete table. The data types for the xin and xout columns of the table can be setup in Type In and Type Out. In the Translation table entries list, you can enter the xin and xout values. The translation is done (with linear interpolation) from measured xin values to xout values which are used for the L-IOB data points. Further, the table values can be exported and imported (CSV files) with Import values and Export values. 10.2.4 Using L-IOB Data Points The L-IOB I/Os are exposed to data points on the L-IOB host. These data points comprise the present value of the I/O as well as status and configuration data. When adding a L-IOB device to the device configuration a folder appears in the data point manager tab of the Configurator. Figure 69 shows an example for a LIOB-100. Version 4.8 LOYTEC electronics GmbH LIOB-10x/x5x User Manual 117 LOYTEC Figure 69: L-IOB folder in the data point manager Under the L-IOB device folder there exist sub-folders for each I/O on the module. When selecting any of the folders, the data point list shows all data points in the scope of that folder. The data points on the LIOB folder provide data for the entire L-IOB bus. The data points on the L-IOB device folder provide data for the L-IOB device. The data points of the I/O sub-folders expose the present value as well as status and configuration data specific to the I/O. Refer to Section 9.6 for more information on L-IOB data points. The L-IOB data points can be used in the L-IOB host configuration just as all other data points. To expose an I/O directly as a variable to the PLC select the PLC check box. 10.2.5 Upgrade Firmware The L-IOB firmware can be upgraded through the L-IOB host, if the host is a L-INX device. For doing so, the Configurator needs to be connected to the L-IOB host to perform the upgrade of all connected L-IOB modules. Those L-IOB I/O modules, which have been configured with the Allow upgr check box as disabled, will be excluded from the firmware upgrade. To Upgrade the L-IOB Firmware over the L-INX 1. Start the Configurator and connect to the L-INX device, which hosts the L-IOB I/O modules. 2. Select menu Firmware / Update attached LIOB devices for LIOB-10x and LIOB-15x devices or Firmware / Update attached LIOB-IP devices for LIOB45x/55x devices. 3. This opens the Firmware Update dialog as shown in Figure 70. Click on the button and select the L-IOB firmware image. Observe that LIOB-45x/55x devices need a different firmware than the other models. Figure 70: L-IOB Firmware Update dialog of the Configurator Version 4.8 4. Click on Start. 5. Observe the download progress. When the download is complete, click Close. LOYTEC electronics GmbH LIOB-10x/x5x User Manual 118 LOYTEC The L-IOB firmware of LIOB-45x/55x devices in LIOB-IP device mode can also be directly updated over IP. This method is faster and also the only possible upgrade method if the L-IOB host is a LIOB-48x/58x device. To Upgrade the LIOB-45x/55x Firmware directly 1. Start the Configurator and connect directly to the L-IOB device using a TCP/IP Connection. 2. Select menu Firmware / Update. 3. This opens a Firmware Update dialog similar to Figure 70. Click on the button and select the L-IOB firmware image. Observe that LIOB-45x/55x devices need a different firmware than the other models. 4. Click on Start. 5. Observe the download progress. When the download is complete, click Close. 10.2.6 Printing Labels For documentation purpose, I/O labels can be printed and glued to the top and bottom of the LIOB enclosure. It is recommended to use Avery L6031REV labels for printing. To Print the L-IOB labels 1. Start the Configurator and open the L-IOB host project, which contains the L-IOB devices to print labels for. 2. Select menu File / Print. 3. This opens the Print View dialog as shown in Figure 71. Select Export LIOB Labels on the left side. Figure 71: Print View Version 4.8 4. Click on Export to generate a PDF file of the labels. 5. Click on Open to open the file in a separate PDF reader window. Click on Save to save the PDF file. LOYTEC electronics GmbH LIOB-10x/x5x User Manual 6. 119 LOYTEC Print the labels directly from the PDF reader embedded in the print view or from the opened / saved PDF file. 10.3 Configuring L-IOB Modules (LONMARK® / Non-ECS device mode) This section only applies to LIOB-15x/45x models in LONMARK® or Non-ECS device mode. Please refer to Section 4.1 for more information on L-IOB device modes. 10.3.1 Connecting to a L-IOB Module 10.3.1.1 Connection via LNSTM When an LNSTM based network management tool is used, the L-IOB device must first be commissioned in the tool (e.g. NL-220TM or LonMakerTM). Make sure to register the L-INX Configurator Software as a plug-in in the network management tool beforehand. The registration must be renewed, if an older version of the L-INX Configurator Software is already registered in the database. This will ensure that the required device templates for the different L-IOB models are installed and the Configurator Software is registered for these models. These templates are used to create and commission L-IOB devices (off- or online) in the database. Once the devices are created, the ‘Configure’ function of the network management tool can be used to invoke the Configurator Software. Alternatively, the LNSTM connection can also be done explicitly in the Configurator Software by choosing Connection / Connect via LNS. This will invoke the LNS connection dialog shown in Figure 72. Figure 72: LNS Connection Dialog Here the user can choose the network (database), channel, and L-IOB device to connect to. 10.3.1.2 Connection via LOYTEC NIC For non-LNSTM based network management tools, the L-IOB devices are configured independently from the network management tool by directly connecting via a LOYTEC NIC (Network Interface) such as a NIC-USB100 or NIC852. Observe that for LIOB-45x Models, a NIC852 must already be entered in the CEA-852 channel, the L-IOB device is a member of. Refer to the LOYTEC NIC Software documentation for more information. Version 4.8 LOYTEC electronics GmbH LIOB-10x/x5x User Manual 120 LOYTEC The first step is choosing Connection / Connect via FTP, which invokes the device connection template dialog shown in Figure 73. Figure 73: Device Connection Template Dialog A new connection template can be created by clicking New. The Admin Password of a L-IOB device is ‘loytec4u’ by default. The radio button CEA-709 Connection must be chosen. The connection template can be saved under a certain Name before connecting. In the field Interface, the LOYTEC NIC, the L-IOB device is connected to, must be chosen. The PC Address (subnet / node) must be chosen so that it does not interfere with any existing CEA-709 address on the network. The Domain must match the domain of the L-IOB device. The Device Address (subnet / node) of the L-IOB device can be entered manually or detected via the Auto-detect buttons. Observe that the L-IOB device must already be set online before connecting to the Configurator Software. This can be achieved by using the L-IOB LCD Display, see Section 5.4. By clicking Connect, the connection to the L-IOB device is finally established. Observe that if using a network management tool which does not support changeable network variables, the L-IOB device must be configured before commissioning it in the network management tool. In this case, the corresponding L-IOB device template of the network management tool must be created online from the device and not from the XIF file. 10.3.1.3 Connecting via IP (LIOB-45x) For updating the firmware of LIOB-45x devices, it is also possible to directly connect to the L-IOB device via IP. Observe that this connection method can only be used for firmware upgrade and not e.g. for configuration download. To connect via IP: 1. Select the FTP connection method by clicking on the Connect to device button in the tool bar of the main window. The connect dialog as shown in Figure 74 opens containing the managed device connection templates. Version 4.8 LOYTEC electronics GmbH LIOB-10x/x5x User Manual 121 LOYTEC Figure 74: TCP/IP connection dialog. 2. To add a new device connection, click on New or select an existing connection in the tree on the left-hand side. 3. Enter the host name or IP address of the device. Enter the admin password. The default password is ‘loytec4u’. 4. If your device is located behind a NAT router or firewall, you may change the FTP, Telnet, SSH, and HTTP ports to your needs for accessing the device. 5. Click on Save to store that connection. 6. Click on Connect. This establishes the connection to the device. 10.3.2 L-IOB Device Settings The LIOB-15x/45x model is chosen either automatically after connecting to the L-IOB device (see Section 10.3.1) or manually after starting the Configurator in the menu Model. The Configurator will show the L-IOB Device tab as depicted in Figure 75. Figure 75: LIOB Device Tab In the Device Parameters table, the device specific configuration properties can be set. Refer to Section 9.2 for more information on device specific configuration properties. 10.3.3 Configure I/Os Once a L-IOB device project is started, the I/Os have a default configuration. To adapt the I/Os to the specific needs in a project they can be freely configured. Whenever changes have been made, they can be explicitly validated by clicking on Validate Config in the L-IOB I/Os tab. Version 4.8 LOYTEC electronics GmbH LIOB-10x/x5x User Manual 122 LOYTEC To Configure I/Os 7. Select the L-IOB I/Os tab. 8. The L-IOB I/Os tab displays the I/Os available on that L-IOB device in the Inputs / Outputs list. 9. To adapt the I/O name, double-click the name in the Name column and edit it, e.g., ‘RoomTemp’. 10. Select (or multi-select) an I/O in the Inputs/Outputs list and observe the Object parameters list below. These parameters can be used to configure the I/O. 11. For example, change the SignalType of the input UI1 to ‘Resistance’. 12. Note that the object configuration properties may change when changing the signal type or interpretation. For detailed information on available configuration properties and their dependencies refer to Section 9.3. In this example you may now edit the Interpretation to ‘NTC10K’, which will allow connecting an NTC temperature sensor to the input. 13. I/Os of the same hardware type can be copied using the Copy Object(s) and Paste Object(s) buttons. 10.3.4 Manage L-IOB Configurations L-IOB configurations can be managed by the user. One may duplicate the device for repeated use in the project. Also, a new template may be generated from the L-IOB configuration, which can be re-used in other projects. To Manage L-IOB Configurations Version 4.8 1. To export a new template for a L-IOB configuration click the Export Template button in the L-IOB Device tab. In the file save dialog, enter a new L-IOB template file name and store it. This file can then be used in a different project using the Import Template button. 2. Existing configurations can be updated with new L-IOB templates by using the Upgrade Template button in the L-IOB Device tab. This can be used e.g. to migrate new functions which were not yet available in earlier template versions. It is highly recommended to backup the original L-IOB project before upgrading templates. After upgrading the template, a log is displayed, which shows all information about the upgrade process. Please carefully review this log before using the updated configuration. LOYTEC electronics GmbH LIOB-10x/x5x User Manual 123 LOYTEC 3. Another way of managing L-IOB configurations is using terminal configurations. A terminal configuration can be created from an I/O object in the Inputs / Outputs list of the L-IOB I/Os tab by using the Export Object button next to the list. In this case, only the configuration of this I/O is stored in an XML file. Terminal configurations can be imported (to I/Os of the same hardware type) by using the Import Object button. 4. To setup translation tables for certain I/O interpretation modes, click the Translation Tables button in the L-IOB Device tab, see Figure 68 as well as the end of Section 10.2.3. 10.3.5 Up- and Download of Configurations Once the L-IOB configuration is finished, it can be downloaded into the connected L-IOB device using Tools / Download Configuration. In case of an LNSTM connection, this can also be done if the device is not (yet) physically connected to the network. In this case, only the LNSTM database is updated. The download dialog will offer an option to reset all counter values in the L-IOB device under LIOB options / Reset counters. All counter inputs as well as output run hours and energy counts will be reset in this case. A configuration can also be uploaded from the connected L-IOB device using Tools / Upload Configuration. In case of an LNSTM connection, this can also be done if the device is not physically connected to the network or the network is offline. In this case, only the values from the LNSTM database are uploaded. 10.3.6 Using L-IOB Data Points The data points of the LIOB-15x/45x device are represented as network variables (NVs) and configuration properties (CPs). The NVs can be polled or bound in a network management tool. The CPs can be accessed via LONMARK® file transfer. Refer to Section 9.7 for more information about L-IOB NVs and CPs. 10.3.7 Upgrade Firmware The L-IOB firmware can be upgraded through the Configurator software. For doing so, the Configurator needs to be connected to the L-IOB device. To Upgrade the L-IOB Firmware 1. Start the Configurator and connect to the L-IOB device, see Section 10.3.1. 2. Select menu Firmware / Update. 3. This opens the Firmware Update dialog, which will look similar to Figure 70. Click on the button and select the L-IOB firmware image. Observe that LIOB-45x/55x devices need a different firmware than the other models. 4. Click on Start. 5. Observe the download progress. When the download is complete, click Close. 10.3.8 Backup and Restore A backup of the complete state of a L-IOB device, including the I/O configuration, commissioning data, binding information, L-IOB LCD settings, etc. can be created by using Tools / Backup Device Configuration. The L-IOB device must be connected to the Configurator to perform this operation, see Section 10.3.1. The backup will be stored as a ZIP file. This file can later be used to restore the old device configuration again. It can also be used to physically replace a device and copy the configuration of the old device to the new one. A device configuration is restored by using Tools / Restore Device Configuration. Version 4.8 LOYTEC electronics GmbH LIOB-10x/x5x User Manual 124 LOYTEC 10.3.9 Printing Labels For documentation purpose, I/O labels can be printed and glued to the top and bottom of the LIOB enclosure. It is recommended to use Avery L6031REV labels for printing. To Print the L-IOB labels 1. Start the Configurator and open the L-IOB project to print labels for. 2. Select menu File / Print. 3. This opens the Print View dialog as shown in Figure 71. Select Export LIOB Labels on the left side. 4. Click on Export to generate a PDF file of the labels. 5. Click on Open to open the file in a separate PDF reader window. Click on Save to save the PDF file. 6. Print the PDF directly from the PDF reader embedded in the print view or from the opened / saved PDF file. 10.4 Configuring L-IOB Modules (BACnet Mode) This section only applies to LIOB-55x models in BACnet device mode. Please refer to Section 4.1 for more information on L-IOB device modes. Observe that unlike the LIOB-45x models, the LIOB-55x models (in BACnet Mode) support advanced features such as technology-independent data points, alarming, scheduling, and trending (AST), etc. Please refer to the L-INX user manual [1] and LIOB-x8x user manual [2] for more information on these advanced features. In this section, only the essential features for operating as a BACnet I/O module are covered. 10.4.1 Connecting to a L-IOB Module For connecting to a LIOB-55x device in BACnet device mode: 1. Select the FTP connection method by clicking on the Connect to device button in the tool bar of the main window. The connect dialog as shown in Figure 74 opens containing the managed device connection templates. Version 4.8 LOYTEC electronics GmbH LIOB-10x/x5x User Manual 125 LOYTEC Figure 76: TCP/IP connection dialog. 2. To add a new device connection, click on New or select an existing connection in the tree on the left-hand side. 3. Enter the host name or IP address of the device. Enter the admin password. The default password is ‘loytec4u’. 4. If your device is located behind a NAT router or firewall, you may change the FTP, Telnet, SSH, and HTTP ports to your needs for accessing the device. 5. Click on Save to store that connection. 6. Click on Connect. This establishes the connection to the device. 10.4.2 Configure I/Os Once a L-IOB device project is started, the I/Os have a default configuration. To adapt the I/Os to the specific needs in a project they can be freely configured. Whenever changes have been made, they can be explicitly validated by clicking on Validate Config in the L-IOB tab. To Configure I/Os Version 4.8 1. Select ‘LIOB-LOCAL’ at the left side of the L-IOB tab. 2. The L-IOB tab displays the I/Os available on that L-IOB device in the Inputs / Outputs list. 3. To adapt the I/O name, double-click the name in the Name column and edit it, e.g., ‘RoomTemp’. 4. Select (or multi-select) an I/O in the Inputs/Outputs list and observe the Object parameters list below. These parameters can be used to configure the I/O. LOYTEC electronics GmbH LIOB-10x/x5x User Manual 126 LOYTEC 5. For example, change the SignalType of the input UI1 to ‘Resistance’. 6. Note that the object configuration properties may change when changing the signal type or interpretation. For detailed information on available configuration properties and their dependencies refer to Section 9.3. In this example you may now edit the Interpretation to ‘NTC10K’, which will allow connecting an NTC temperature sensor to the input. 7. The native BACnet server object names and descriptions will initially receive unique I/O names as described in Section 9.8.2. They can be set to the current I/O names and descriptions by using the button Set BACnet Names. 8. I/Os of the same hardware type can be copied using the Copy Object(s) and Paste Object(s) buttons. 10.4.3 Manage L-IOB Configurations L-IOB configurations can be managed by the user. One may duplicate the device for repeated use in the project. Also, a new template may be generated from the L-IOB configuration, which can be re-used in other projects. To Manage L-IOB Configurations 1. To export a new template for a L-IOB configuration click the Export Template button in the L-IOB tab. In the file save dialog, enter a new L-IOB template file name and store it. This file can then be used in a different project using the Import Template button. 2. Existing configurations can be updated with new L-IOB templates by using the Upgrade Template button in the L-IOB tab. This can be used e.g. to migrate new functions which were not yet available in earlier template versions. It is highly recommended to backup the original L-IOB project before upgrading templates. After upgrading the template, a log is displayed, which shows all information about the upgrade process. Please carefully review this log before using the updated configuration. 3. Another way of managing L-IOB configurations is using terminal configurations. A terminal configuration can be created from an I/O object in the Inputs / Outputs list of the L-IOB tab by using the Export Object button next to the list. In this case, only the configuration of this I/O is stored in an XML file. Terminal configurations can be imported (to I/Os of the same hardware type) by using the Import Object button. 4. To setup translation tables for certain I/O interpretation modes, click the Translation Tables button in the L-IOB tab, see Figure 68 as well as the end of Section 10.2.3. 10.4.4 Up- and Download of Configurations Once the L-IOB configuration is finished, it can be downloaded into the connected L-IOB device using Tools / Download Configuration. The download dialog will offer an option to reset all counter values in the L-IOB device under LIOB options / Reset counters. All counter inputs as well as output run hours and energy counts will be reset in this case. A configuration can also be uploaded from the connected L-IOB device using Tools / Upload Configuration. Version 4.8 LOYTEC electronics GmbH LIOB-10x/x5x User Manual 127 LOYTEC 10.4.5 Using L-IOB Data Points The data points of the LIOB-55x device are represented as BACnet server objects, see Section 9.8. The corresponding data points can be found in the LIOB-55X / BACnet Port / Datapoints / Local IO folder on the Datapoints tab, see Figure 77. Figure 77: L-IOB BACnet data point folder Usually, the BACnet server objects of network devices will be integrated using a central controller and BACnet operator workstation. In this case, the following two sections are not relevant. However, if such a central controller is not available, the L-IOB BACnet server objects can also be directly connected to BACnet server objects on other devices using client mappings. This is done in the Configurator by dragging an imported BACnet object and dropping it on the local L-IOB BACnet server object. Therefore it is required to first import the corresponding BACnet server objects from other devices, which is achieved via BACnet network scan or EDE file import as described in the following two sections. 10.4.5.1 Scan for BACnet Objects LOYTEC devices support an online network scan on the BACnet network. In this scan the device searches for other devices on the BACnet network and pulls in the BACnet object information of these devices. These BACnet objects can then be used on the device as the basis for client mappings. To Scan for BACnet Objects Version 4.8 1. Go to the Datapoints tab. 2. Select the folder BACnet Network Scan 3. Right-click on that folder and select Scan BACnet Network…. This opens the BACnet Network Scan dialog as shown in Figure 78. LOYTEC electronics GmbH LIOB-10x/x5x User Manual 128 LOYTEC Figure 78: BACnet network scan dialog. 4. Click on the button Discover Devices. This starts a network scan. The results are put in the device list box. A progress bar below indicates how many devices are being scanned. 5. Select a device in the device list and click the button Scan Objects. This scans the BACnet objects on the selected device and adds them to the BACnet Network Scan folder as a separate sub-folder for the device. 6. If the scan does not give the expected results, change the Device Scan Mode to normal or slow and try again. With this setting the scanner uses simpler but slower protocol features. 7. Click Close when all devices needed have been scanned. 10.4.5.2 Import from EDE File If the device is engineered offline or some of the required BACnet devices are not yet online in the network, the engineering process can be done by importing a device and object list from a set of EDE files. These objects also appear in the import folder and can be later used on the device as client mappings. There are a set of EDE files. Select the main EDE file, e.g. device.csv. The EDE import will also search for the other components, which must be named device-states.csv. Example EDE files can be found in the ‘examples’ directory of the LOYTEC Configurator software installation directory. To Import BACnet Objects from an EDE File Version 4.8 1. Go to the Datapoints tab. 2. Select the folder BACnet EDE File 3. Right-click and select Import File. In the following file selector dialog, choose the EDE import file and click OK. 4. Now the BACnet EDE File folder is populated with the imported BACnet objects. LOYTEC electronics GmbH LIOB-10x/x5x User Manual 129 LOYTEC 10.4.6 Upgrade Firmware The L-IOB firmware can be upgraded through the Configurator software. For doing so, the Configurator needs to be connected to the L-IOB device. To Upgrade the L-IOB Firmware 1. Start the Configurator and connect to the L-IOB device, see Section 10.4.1. 2. Select menu Firmware / Update. 3. This opens the Firmware Update dialog, which will look similar to Figure 70. Click on the button and select the L-IOB firmware image. Observe that LIOB-45x/55x devices need a different firmware than the other models. 4. Click on Start. 5. Observe the download progress. When the download is complete, click Close. 10.4.7 Backup and Restore A backup of the complete state of a L-IOB device can be created by using Tools / Backup Device Configuration. The L-IOB device must be connected to the Configurator to perform this operation, see Section 10.4.1. The backup will be stored as a ZIP file. This file can later be used to restore the old device configuration again. It can also be used to physically replace a device and copy the configuration of the old device to the new one. A device configuration is restored by using Tools / Restore Device Configuration. 10.4.8 Printing Labels For documentation purpose, I/O labels can be printed and glued to the top and bottom of the L-IOB enclosure. It is recommended to use Avery L6031REV labels for printing. To Print the L-IOB labels Version 4.8 1. Start the Configurator and open the L-IOB project to print labels for. 2. Select menu File / Print. 3. This opens the Print View dialog as shown in Figure 71. Select Export LIOB Labels on the left side. 4. Click on Export to generate a PDF file of the labels. 5. Click on Open to open the file in a separate PDF reader window. Click on Save to save the PDF file. 6. Print the PDF directly from the PDF reader embedded in the print view or from the opened / saved PDF file. LOYTEC electronics GmbH LIOB-10x/x5x User Manual 130 LOYTEC 11 L-IOB Firmware Update The L-IOB firmware supports remote upgrade over the L-IOB bus. To guarantee that the L-IOB is not destroyed due to a failed firmware update, the L-IOB firmware consists of two images: 1. fallback image, 2. primary image. The fallback image cannot be changed. Thus, if the update of the primary image fails or the image is destroyed by some other means, the fallback image is booted and allows reinstalling a valid primary image. When the L-IOB device boots up with the fallback image, the status LED is flashing red. 11.1 Firmware Update using the Configurator Refer to Sections 10.2.5, 10.3.7, and 10.4.6 for information on how to upgrade the L-IOB firmware using the Configurator Software. 11.2 Firmware Update using the LWEB-822/900 Master Device Manager Refer to the user manual of the LWEB-822/900 Master Device Manager tool for information on how to upgrade the L-IOB firmware using this tool. Version 4.8 LOYTEC electronics GmbH LIOB-10x/x5x User Manual 131 LOYTEC 12 L-IOB Device Replacement A defective L-IOB device can easily be replaced with a new device of the same type without the need for any configuration changes. 12.1 L-IOB Device Replacement (L-INX Mode) 12.1.1 LIOB-Connect Device Replacement with L-INX Power-Cycle This Section only applies to LIOB-10x devices. If a L-INX power cycle is acceptable, the L-IOB replacement on the LIOB-Connect bus can be performed without access to the L-INX Web UI or LCD UI using the following steps: 1. Switch off power of the L-INX device hosting the L-IOB device to be replaced. 2. Replace the L-IOB device with a new device of the same model. 3. Switch on power of the L-INX device again. 4. After a few minutes, all L-IOB devices including the replaced device will be online again. In case not all L-IOB devices come online, check the status of the L-IOB devices in the LINX Web UI (Chapter 8) or L-INX LCD UI (Chapter 7). 12.1.2 LIOB-Connect Device Replacement without L-INX Power-Cycle This Section only applies to LIOB-10x devices. If a L-INX power cycle is not acceptable, the L-IOB replacement on the LIOB-Connect bus can be performed using the following steps: 1. Replace the L-IOB device with a new device of the same model. Observe that this means that all L-IOB devices after the replaced one will reboot. 2. Go to the LIOB / Installation page of the L-INX Web UI and click Save Settings or go to the Device Settings / LIOB page of the L-INX LCD UI (Chapter 7) and click Configure LIOBs. 3. The L-IOB devices will be configured as shown in the L-INX Web UI or LCD UI. At the end of the configuration run, all L-IOB devices including the replaced device will be online again. In case not all L-IOB devices come online, check the status of the L-IOB devices in the LINX Web UI or LCD UI. Version 4.8 LOYTEC electronics GmbH LIOB-10x/x5x User Manual 132 LOYTEC 12.1.3 LIOB-FT/IP Device Replacement This Section only applies to LIOB-15x devices in LIOB-FT device mode and LIOB-45x/55x devices in LIOB-IP device mode. The L-IOB replacement on the LIOBFT/IP bus can be performed using the following steps: 1. Replace the L-IOB device with a new device of the same model and set the device to LIOB-FT resp. LIOB-IP device mode (see Section 4.1). 2. For LIOB-45x/55x devices, at first the IP and host configuration must be done (see Section 4.2.2). 3. In the L-IOB LCD interface, setup the station ID of the new device as it was configured in the replaced device (see Section 4.2.2). 4. In the L-IOB LCD interface, start a configuration run (also see Section 5.4). 5. After a few minutes, all L-IOB devices including the replaced device will be online again. In case not all L-IOB devices come online, check the status of the L-IOB devices in the L-IOB host Web UI (Chapter 8) or L-IOB host LCD UI (Chapter 7). 12.2 L-IOB Device Replacement (LONMARK® Mode) LIOB-15x/45x devices in LONMARK® or Non-ECS device mode can simply be replaced using the ‘replace’ method of the used network management tool. Alternatively, a backup of the old device can be created and restored into the new device using the LOYTEC NIC connection, see Section 10.3.8. 12.3 L-IOB Device Replacement (BACnet Mode) LIOB-55x devices in BACnet device mode can simply be replaced using the backup/restore function. This can either be done using the Web UI (see Section 6.2.2) or the Configurator Software (menu Tools / Backup Device Configuration and Tools / Restore Device Configuration). Version 4.8 LOYTEC electronics GmbH LIOB-10x/x5x User Manual 133 LOYTEC 13 Troubleshooting 13.1 Technical Support LOYTEC offers free telephone and e-mail support for the L-IOB product series. If none of the above descriptions solves your specific problem please contact us at the following address: LOYTEC electronics GmbH Blumengasse 35 A-1170 Vienna Austria / Europe e-mail : Web : tel : fax : [email protected] http://www.loytec.com +43 (1) 4020805-100 +43 (1) 4020805-99 or LOYTEC Americas Inc. N27 W23957 Paul Road Suite 103 Pewaukee, WI 53072 USA e-mail: Web: tel: fax: Version 4.8 [email protected] http://www.loytec-americas.com +1 (512) 402 5319 +1 (262) 408 5238 LOYTEC electronics GmbH LIOB-10x/x5x User Manual 134 LOYTEC 14 Application Notes 14.1 External Power Supply (not using LPOW-2415A) When using a non-LOYTEC power supply (see Figure 79), the following rules must be complied with: Consistent polarity must be maintained when connecting LOYTEC I/O controllers and modules to the transformer. That is, the ‘– ~’ terminal of each I/O controller and each I/O module must be connected to the same terminal on the secondary side of the transformer. The I/O controllers and modules are half-wave rectified. Connecting two half-wave rectified devices to the same transformer without maintaining polarity will cause short circuit. The GND terminals of the I/O controller or module are internally wired to the ‘– ~’ terminal. Therefore, if powering I/O controllers and modules with the same transformer, it is again essential to maintain polarity. Failure to do so will result in short circuit and/or damaged device. If the transformer output must be grounded, connect the ‘– ~’ terminal to earth ground. Figure 79: External power supply 14.2 Physical Connection of Inputs 14.2.1 Connection of Switches On- or off-switches can either be connected to the DIs (Digital Inputs) or to the UIs (Universal Inputs) in digital interpretation. Version 4.8 LOYTEC electronics GmbH LIOB-10x/x5x User Manual 135 LOYTEC 14.2.1.1 Switch connected to a DI A switch can be directly connected to a digital input as shown in Figure 80. Figure 80: Switch connected to DI The digital inputs (DI) recognize the following digital signals according to the connected resistance (switch): Resistance of Switch Status < 6.8 kΩ Closed Switch > 10 kΩ Open Switch 14.2.1.2 Switch connected to a UI A switch can be directly connected to a universal input with signal type resistance as shown in Figure 81. Figure 81: Switch connected to UI UIs recognize the following digital signals according to the input resistance (switch): Resistance Switch Status < 1.9 kΩ Closed Switch > 6.7 kΩ Open Switch 14.2.2 Connection of S0 Pulse Devices (Meters) S0 pulse meters must be connected to digital inputs (DI) as shown in Figure 82. Version 4.8 LOYTEC electronics GmbH LIOB-10x/x5x User Manual 136 LOYTEC Figure 82: S0 pulse meter connected to DI 14.2.3 Connection of Voltage Sources to Universal Inputs The Universal Input (UI) provides voltage measurement both if used as an analog or digital input. The signal type must be configured to ‘Voltage 0-10V’ or ‘Voltage 2-10V’ in both cases. 14.2.3.1 Voltage Source connected to UI with Analog Interpretation Figure 83 shows the connection of a voltage source to a universal input in analog mode. Figure 83: Voltage source on UI in analog mode 14.2.3.2 Voltage Source connected to UI with Digital Interpretation Figure 84 shows the connection of a voltage source to a universal input in digital mode. In this case, the voltage source acts as a switch with the depicted low and high levels. Figure 84: Voltage source on UI in digital mode 14.2.4 Connection of Voltage Sources to Digital Inputs Figure 85 shows the connection of a voltage source to a digital input. In this case, the voltage source acts as a switch with the depicted threshold. Version 4.8 LOYTEC electronics GmbH LIOB-10x/x5x User Manual 137 LOYTEC Figure 85: Voltage source on DI 14.2.5 Connection of 4-20mA Transmitters to Universal Inputs 14.2.5.1 4-20mA Transmitter connected to UI with Internal Shunt Some universal inputs have an internal shunt which can be activated (in pairs with another UI) in the Configurator software (signal type ‘Current 4-20mA Shunt’). Which UIs are equipped with shunts is documented in Section 16.4 and the following Sections. Figure 86 shows the connection of a 4-20mA transmitter to a universal input with internal shunt. Figure 86: 4-20mA transmitter with internal shunt on UI 14.2.5.2 4-20mA Transmitter connected to UI with External Shunt On universal inputs, which do not have an internal shunt, an external shunt must be used as shown in Figure 87. The signal type must be set to ‘Current 4-20mA’ in the Configurator software. Figure 87: 4-20mA transmitter with external shunt on UI 14.2.6 Connection of Resistive Sensors Figure 88 shows the connection of resistive sensors to the universal inputs with a temperature sensor as an example. Sensors in the resistance range of 1 kΩ to 100 kΩ can be measured. The signal type must be set to ‘Resistance’ in the Configurator software. Version 4.8 LOYTEC electronics GmbH LIOB-10x/x5x User Manual 138 LOYTEC Figure 88: Temperature measurement on UI 14.2.7 Connection of STId Card Readers Figure 89 shows the connection of an STId card reader to three L-IOB inputs (UIs or DIs). Observe that the clock signal must be connected to an interrupt-capable input of the L-IOB device. More information on STId card readers can be found in Section 9.5. Figure 89: STId card reader 14.3 Physical Connection of Outputs 14.3.1 6A Relays on LIOB-100 (Built-in Fuse) The LIOB-100 has a built-in fuse, rated with T 6.3A (time-lag), as shown in Figure 90. Figure 90: LIOB-100 6A relays Version 4.8 LOYTEC electronics GmbH LIOB-10x/x5x User Manual 139 LOYTEC 14.3.2 6A Relays with One External Fuse The total current of all used 6A relays must be restricted to 6A, if more than two relays share a common (COM) terminal. The wiring shown in Figure 91 can be used for all L-IOB models with common terminals (and without a built-in fuse). Figure 91: 6A relays with one external fuse 14.3.3 6A Relays on LIOB-xx2 using Separate Fuses Figure 92 shows the wiring of the 6A relays for the LIOB-102/152/452/552 models using separate fuses. In this case, two relays share one common terminal (COM). Figure 92: LIOB-102/152/452/552 6A relays 14.3.4 16A and 6A Relays on LIOB-xx3 The 16A and 6A relays on the LIOB-103/153/453/553 models all have two separate terminals per relay. There are no common (COM) terminals. This means that a 16A (or 6A) fuse must be wired to one of the two terminals of each relay, as shown in Figure 93. Version 4.8 LOYTEC electronics GmbH LIOB-10x/x5x User Manual 140 LOYTEC Figure 93: LIOB-103/153/453/553 16A/6A relays 14.3.5 External Relays and Inductive Loads When controlling an external relay or inductive load using a L-IOB relay, either an integrated suppressor circuit must be used for the inductor, or a free-wheeling diode, a varistor, RC circuit, etc. must be installed to suppress voltage peaks and sparking due to switching off inductive circuits. It is recommended to use diodes that are part of the 1N400x family and to place them close to the relay, as shown in Figure 94. Figure 95 shows the connection of a 230V relay with a varistor. Figure 94: Suppressor circuit with free-wheeling diode Figure 95: Suppressor circuit with varistor 14.3.6 1A Triacs Figure 96 shows the wiring of the 1A Triac Outputs. Version 4.8 LOYTEC electronics GmbH LIOB-10x/x5x User Manual 141 LOYTEC Figure 96: 1A Triacs 14.3.7 12V Analog Outputs Figure 97 shows the wiring of the 12V analog outputs (AO). Observe that the analog outputs are labeled ‘0-10V OUT’ but are in fact capable of delivering up to 12V. Figure 97: 12V analog outputs The input impedance of the connected load must be greater than or equal to 4.7 kΩ for linear output. Version 4.8 LOYTEC electronics GmbH LIOB-10x/x5x User Manual 142 LOYTEC 15 Security Hardening Guide This guide contains security-relevant information for operating the LIOB-45x/55x models on IT networks. The information refers to the firmware version and the instructions found in the previous chapters of this User Manual. 15.1 Installation Instructions Install the device over the Web interface: Set up the basic device functions and protocol settings as described in Chapter 6. Disable the FTP, and Telnet servers in the IP port configuration as described in Section 6.2.4. 15.2 Firmware The device is equipped with one piece of software. This is the firmware image and its related firmware version. The firmware is distributed as a downloadable file. The device can be upgraded by placing the firmware image onto the device using the procedure described in Chapter 11. 15.3 Ports This Section lists all ports, which may be used by the device. The ports are default settings for their respective services. If not stated otherwise, the ports can be changed. Required Ports: 80 tcp: This port is opened by the Web server. The port can be changed. 1628 udp/tcp: This is the data exchange port for CEA-852 (LON over IP). It is required for the primary function of the device to exchange control network data between devices over the IP network. Each device needs this port open. The port can be changed in case of the LONMARK® mode (see Section 4.1). 47808 udp (LIOB-55x): This is the data exchange port for BACnet/IP. It is required for the primary function of the device to exchange control network data between routers over the IP network. Each device needs this port open. The port can be changed. Optional ports not necessary for the primary product function. They can be disabled as described in the installation instructions in Section 15.1: Version 4.8 21 tcp: This port is opened by the FTP server. The port can be changed and disabled. LOYTEC electronics GmbH LIOB-10x/x5x User Manual 143 LOYTEC 23 tcp: This port is opened by the Telnet server. The port can be changed and disabled. 5900 tcp: This port is opened by the VNC server, if it is enabled. This port is disabled by default. The port can be changed. 15.4 Services Required services: CEA-852 (LON over IP): Primary function of the device. This service is in accordance with the standard ANSI/CEA-852-B. BACnet/IP (LIOB-55x): Primary function of the device. This service is in accordance with the standard ANSI/ASHRAE 135-2010. OPC XML-DA (LIOB-55x): This Web service provides access to data points over the OPC XML-DA standard. Optional services not necessary for the primary product function. They can be disabled as described in the installation instructions in Section 15.1: HTTP: Web server. It provides a Web-based configuration UI. The Web UI can be disabled after setting up the device. FTP and Telnet: The FTP and Telnet server is used for connection to the device by the Configurator for configuration, firmware upgrade, and access to the log file. These services must be enabled during device configuration. VNC: The VNC server can be used for remote access to the LCD display on devices that have it. The service is disabled by default. 15.5 Logging and Auditing The device contains a log file, which can be read out over FTP or the Web server. This log contains information when the device started and when crucial communication errors occur. Other information such user log-on are not logged as they are not part of the primary services of this device. Logged events: Version 4.8 Time of the last power-on reset of the device. Time and version of the last firmware upgrade. Time when the device was reset to factory defaults. Commission of the CEA-709 node. Static errors in the device and I/O configuration. System overload situations as one-time log messages since last power-on. Crucial communication errors as they occur. LOYTEC electronics GmbH LIOB-10x/x5x User Manual 144 LOYTEC 16 Specifications 16.1 I/O Specification 16.1.1 UI - Universal Input UIs are universal inputs for four different input types. Configuration is made via the L-IOB Configuration Software. They correspond to class 1 with 1 % accuracy, have an input voltage range of 0 to 10V, and can withstand up to 30 V. The ADC resolution is 16 bits. Galvanically isolated sensors resp. switches must be connected. Universal inputs can be configured as: Binary Input (Digital Input): input impedance > 20 kΩ, sampling rate 10 ms. o In voltage mode, the threshold values are < 0.8 V for low level and > 2 V for high level. o In resistance mode, the threshold values are < 1.9 kΩ for low level and > 6.7 kΩ for high level. Between the threshold values, the resulting level of the UI is not defined. Voltage Metering 0-10 V: input impedance > 20 kΩ, sampling rate 1 s, resolution 0.1 V. Current Loop 4-20 mA: input impedance 249 Ω, sampling rate 1 s. An internal shunt of 249 Ω is available for some universal inputs. Otherwise, an external resistor of 249 Ω must be used as a shunt. Resistance Measurement: input impedance 10 kΩ, sampling rate 1 s. Resistors in the range of 1 kΩ to 100 kΩ can be measured. 16.1.2 DI - Digital Input, Counter Input (S0-Pulse) DIs are fast binary inputs, which can also be used as counter inputs (S0). They follow the S0 specification for electric meters and have a sampling rate of 10 ms. They change state at a load of 195 Ω between the DI terminal and GND. Galvanically isolated sensors resp. switches must be connected. 16.1.3 AO - Analog Output AOs are analog outputs with a signal range of 0 to 12V, a resolution of 10 bits, and a maximum output current of 10 mA (short circuit proof). Version 4.8 LOYTEC electronics GmbH LIOB-10x/x5x User Manual 145 LOYTEC 16.1.4 DO - Digital Output The following digital outputs are available: Relay 6A Output: Switching capacity 6 A, 250 VAC resp. 30 VDC. Relay 16A Output: Switching capacity 16 A, 250 VAC resp. 30 VDC. TRIAC Output: Switching capacity 1 A, 24 to 230 VAC. When connecting an air gap switch to a L-IOB relay, a quenching circuit like a varistor or RC element must be used. 16.1.5 PRESS - Pressure Sensor These inputs represent differential pressure sensors which measure pressures from 0 - 500 Pascal. They are equipped with two 3/16” (4.8 mm) hose connectors. 16.2 Internal Translation Tables The L-IOB devices offer fixed internal translation tables for easy configuration of some temperature sensors. The xin/xout values of these tables are listed in Table 11. xout: Temp. [°C] xin: Resistance [Ω] PT1000 NTC10K NTC1K8 Ni1000 -30 882.2 176680 24500 842 -20 921.6 96970 14000 893 -10 960.9 55300 8400 946 0 1000.0 32650 5200 1000 10 1039.0 19900 3330 1056 20 1077.9 12490 2200 1112 25 1097.4 10000 1800 1141 30 1116.7 8060 1480 1171 40 1155.4 5320 1040 1230 50 1194.0 3600 740 1291 60 1232.4 2490 540 1353 70 1270.0 1750 402 1417 80 1308.9 1260 306 1483 90 1347.0 920 240 1549 100 1385.0 680 187 1618 120 1460.6 390 118 1760 Table 11: Internal translation table values 16.3 Maximum Number of L-IOB Devices per L-IOB Host Table 12 specifies the maximum number of L-IOB devices per L-IOB bus as well as the maximum total number of L-IOB devices per L-IOB host. Version 4.8 LOYTEC electronics GmbH LIOB-10x/x5x User Manual L-IOB Host 146 LOYTEC L-IOB Devices on L-IOB Devices on L-IOB Devices on L-IOB Devices LIOB-Connect Bus LIOB-FT Bus LIOB-IP Bus Total LINX-10x/11x/20x/21x LINX-12x/22x/15x - 8 8 8 24 24 24 24 - - 1 1 LIOB-48x/58x Table 12: L-IOB devices per L-IOB Host After the first four L-IOB devices, which can be directly connected to the L-IOB host, each additional (local) group of up to four L-IOB devices requires a separate power supply (e.g. LPOW-2415A). In case of LIOB-Connect, each group additionally requires two LIOB-A2 adapters and an extension cable between the two adapters. 16.4 Specification for LIOB-10x Models Dimensions [mm] 107 x 100 x 75 (L x W x H) Operating Temperature (ambient) 0C to +50C Storage Temperature -10C to +85C Humidity (non condensing) operating / storage 10 to 90 % RH @ 50C Environmental Protection IP 40 (enclosure); IP 20 (screw terminals) Power Supply 24 VDC ±10 %, powered over LIOB-Connect Installation DIN rail mounting (EN 50 022), attachable or connected with a 4-wire cable, max. 50 m Interface 1 x LIOB-Connect Types LIOB-100 LIOB-101 LIOB-102 LIOB-103 Power Consumption [W] 1.7 / 2.6 (all Relays on) 1.7 1.7 / 2.7 1.7 / 2.5 Universal Input (UI) 8 8 6 6 Digital Input (DI) 2 16 - - Analog Output (AO) 2 - 6 6 Digital Output (DO) 9 (5 x Relay, 4 x Triac) - 8 (8 x Relay) 5 (5 x Relay) Digital output specification Relay: 6 A Triac: 1 A @ 24-230 VAC - Relay: 6 A Relay: 16 A Internal shunt available for current measurement UI5 & UI6, UI7 & UI8 UI5 & UI6, UI7 & UI8 UI3 & UI4, UI5 & UI6 UI3 & UI4, UI5 & UI6 Supported STId card readers 3 2 - - Version 4.8 LOYTEC electronics GmbH LIOB-10x/x5x User Manual 147 LOYTEC 16.5 Specification for LIOB-15x Models Dimensions [mm] 107 x 100 x 75 (L x W x H) Operating Temperature (ambient) 0C to +50C Storage Temperature -10C to +85C Humidity (non condensing) operating / storage 10 to 90 % RH @ 50C Environmental Protection IP 40 (enclosure); IP 20 (screw terminals) Power Supply 24 VDC / 24 VAC ±10 % Installation DIN rail mounting (EN 50 022) Interface 1 x CEA-709/FT or LIOB-FT (configurable) Types LIOB-150 LIOB-151 LIOB-152 LIOB-153 LIOB-154 Power Consumption [W] 1.7 / 2.6 (all Relays on) 1.7 1.7 / 2.7 1.7 / 2.5 1.7 / 2.5 Universal Input (UI) 8 8 6 6 7 + 1 x Pressure Sensor Digital Input (DI) 2 12 - - - Analog Output (AO) 2 - 6 6 4 Digital Output (DO) 8 (4 x Relay, 4 x Triac) - 8 (8 x Relay) 5 (4 x Relay 16 A, 1 x Relay 6 A) 7 (5 x Relay, 2 x Triac) Digital output specification Relay: 6 A Triac: 1 A @ 24-230 VAC - Relay: 6 A Relay: 16 A and 6 A Relay: 6 A Triac: 1 A @ 24-230 VAC Internal shunt available for current measurement UI5 & UI6, UI7 & UI8 UI5 & UI6, UI7 & UI8 UI3 & UI4, UI5 & UI6 UI3 & UI4, UI5 & UI6 UI5 & UI6, UI7 Supported STId card readers 3 2 - - 1 Version 4.8 LOYTEC electronics GmbH LIOB-10x/x5x User Manual 148 LOYTEC 16.6 Specification for LIOB-45x Models Dimensions [mm] 107 x 100 x 75 (L x W x H) Operating Temperature (ambient) 0C to +50C Storage Temperature -10C to +85C Humidity (non condensing) operating / storage 10 to 90 % RH @ 50C Environmental Protection IP 40 (enclosure); IP 20 (screw terminals) Power Supply 24 VDC / 24 VAC ±10 % Installation DIN rail mounting (EN 50 022) Interface 1 x IP-852 or LIOB-IP (configurable) Types LIOB-450 LIOB-451 LIOB-452 LIOB-453 LIOB-454 Power Consumption [W] 1.7 / 2.6 (all Relays on) 1.7 1.7 / 2.7 1.7 / 2.5 not yet available Universal Input (UI) 8 8 6 6 not yet available Digital Input (DI) 2 12 - - not yet available Analog Output (AO) 2 - 6 6 not yet available Digital Output (DO) 8 (4 x Relay, 4 x Triac) - 8 (8 x Relay) 5 (4 x Relay 16 A, 1 x Relay 6 A) not yet available Digital output specification Relay: 6 A Triac: 1 A @ 24-230 VAC - Relay: 6 A Relay: 16 A and 6 A not yet available Internal shunt available for current measurement UI5 & UI6, UI7 & UI8 UI5 & UI6, UI7 & UI8 UI3 & UI4, UI5 & UI6 UI3 & UI4, UI5 & UI6 not yet available Supported STId card readers 3 2 - - 1 Version 4.8 LOYTEC electronics GmbH LIOB-10x/x5x User Manual 149 LOYTEC 16.7 Specification for LIOB-55x Models Dimensions [mm] 107 x 100 x 75 (L x W x H) Operating Temperature (ambient) 0C to +50C Storage Temperature -10C to +85C Humidity (non condensing) operating / storage 10 to 90 % RH @ 50C Environmental Protection IP 40 (enclosure); IP 20 (screw terminals) Power Supply 24 VDC / 24 VAC ±10 % Installation DIN rail mounting (EN 50 022) Interface 1 x BACnet/IP or LIOB-IP (configurable) Types LIOB-550 LIOB-551 LIOB-552 LIOB-553 LIOB-554 Power Consumption [W] 1.7 / 2.6 (all Relays on) 1.7 1.7 / 2.7 1.7 / 2.5 not yet available Universal Input (UI) 8 8 6 6 not yet available Digital Input (DI) 2 12 - - not yet available Analog Output (AO) 2 - 6 6 not yet available Digital Output (DO) 8 (4 x Relay, 4 x Triac) - 8 (8 x Relay) 5 (4 x Relay 16 A, 1 x Relay 6 A) not yet available Digital output specification Relay: 6 A Triac: 1 A @ 24-230 VAC - Relay: 6 A Relay: 16 A and 6 A not yet available Internal shunt available for current measurement UI5 & UI6, UI7 & UI8 UI5 & UI6, UI7 & UI8 UI3 & UI4, UI5 & UI6 UI3 & UI4, UI5 & UI6 not yet available Supported STId card readers 3 2 - - 1 Version 4.8 LOYTEC electronics GmbH LIOB-10x/x5x User Manual 150 LOYTEC 17 References Version 4.8 [1] L-INX User Manual, LOYTEC electronics GmbH, Document № 88073015, December 2012. [2] LIOB-x8x User Manual, LOYTEC electronics GmbH, Document № 88080304, December 2012. LOYTEC electronics GmbH LIOB-10x/x5x User Manual 151 LOYTEC 18 Revision History Date Version Author Description 2010-10-25 1.0 AB Initial Version. 2010-11-11 1.1 AB Added LIOB-150 Model. 2011-03-08 1.2 AB Added LIOB-151, -152, and -153 Models, Changed “Normal” mode to “Auto” mode, Section 5.2: Added common terminals and terminal numbers, Section 5.3: New user interface for quick edit and manual mode, Section 5.4: Added host information, Section 5.5: Added raw value, Section 9.3.4: for analog and PWM outputs, 0% is always off, Sections 9.3.14 & 9.6.3: Added PulseTime, Chapter 10: Added new Configurator functions. 2011-07-29 2.0 AB Added LIOB-15x LONMARK® and Non-ECS device modes, Added LCD language setup, New Section 7.2 L-IOB Remote Access, Section 5.4: Added L-IOB reset option, manual logout, and commissioning, Section 9.3.12: Added L-IOB host disconnect behavior, New Section 9.4: Switch Mode (LONMARK® Mode), New Section 9.9: Default Configuration, New Section 10.2.6: Printing Labels. 2012-01-12 2.0.1 AB Minor Corrections. 2012-02-03 2.1 AB Added Section 4.2.2: Device Installation (LIOB-FT/IP device mode), Added Interpretations Clock, Card Data, Fading, and Ramping in Section 9.3.4, Added Section 9.3.7: DeadTime for Fading and Ramping, Added Section 9.3.10: IOFunc, GroupNumber, and SubGroupNumber for Card Reader Mode, Added Section 9.5: STId Card Reader Mode. 2012-07-09 2.2 AB Added LIOB-154 model and LIOB-45x models, Corrected LED patterns in Section 3.5.8, Added counting input options in Section 5.5, Corrected I/O specifications in Section 16.1, Added Export Terminal Config function in Section 10.2.3, Added Chapter 15: Security Hardening Guide. 2012-12-14 4.8 AB Updated contact information in Section 13.1, Added Section 16.2: Internal Translation Tables, Version 4.8 LOYTEC electronics GmbH LIOB-10x/x5x User Manual Date Version Author 152 LOYTEC Description Added LIOB-55x (BACnet/IP) models, Added LIOB-48x/58x devices as L-IOB hosts on LIOB-IP bus, Added Section 8.6: L-IOB I/O Test Page, Added Section 16.3: Maximum Number of L-IOB Devices per L-IOB Host, Some updates and corrections of specifications in Chapter 16, Added applications notes for connecting I/Os in Chapter 14. Version 4.8 LOYTEC electronics GmbH