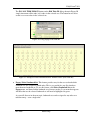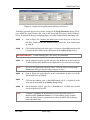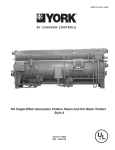
1
EddyVISION32 v6.0 MakeComp User Manual CoreStar International Corporation 1044 Sandy Hill Road Irwin, PA 15642 Telephone: 724.744.4094 Fax: 724.744.4093 www.corestar-corp.com EddyVision 6.0 Contents: Introduction........................................................................................................................................... 1 Starting the MakeComp Software ....................................................................................................... 2 Description of the Main Window ......................................................................................................... 3 Menu Bar - Main Window ..................................................................................................................... 4 File Menu............................................................................................................................................ 4 Edit Menu ........................................................................................................................................... 8 View Menu........................................................................................................................................ 12 Util Menu .......................................................................................................................................... 14 Help Menu ........................................................................................................................................ 15 Main Window Buttons ........................................................................................................................ 16 PARAMETERS Button ..................................................................................................................... 16 Parameters Tab ........................................................................................................................... 17 Landmarks Tab ............................................................................................................................ 19 Landmark Table - General Guidelines ......................................................................................... 19 Lengths Tab ................................................................................................................................. 24 Tube Labels Tab .......................................................................................................................... 25 Attributes Tab............................................................................................................................... 27 Groups Tab .................................................................................................................................. 30 Tubes Tab .................................................................................................................................... 31 ADD GROUP Button ........................................................................................................................ 32 PARAMETERS Button ................................................................................................................. 33 ZOOM Button ............................................................................................................................... 38 HORZ OFFSET Button ................................................................................................................ 38 VERT OFFSET Button ................................................................................................................. 38 Edit Menu – Adding/Editing Group Dialog ................................................................................... 39 View Menu – Adding/Editing Group Dialog.................................................................................. 41 General Notes About the Adding/Editing Group Dialog............................................................... 42 Keyboard & Mouse Shortcuts for the Adding/Editing Group Dialog ............................................ 43 REFRESH Button............................................................................................................................. 44 Popup Menu ........................................................................................................................................ 45 Keyboard & Mouse Shortcuts for the Main MakeComp Window .................................................. 53 Other Tips for Use in the Main MakeComp Window ....................................................................... 53 Tutorial: Building a Simple Heat Exchanger.................................................................................... 54 Creating a New Project .................................................................................................................... 54 Creating a Component File .............................................................................................................. 57 Adding Landmarks to a Component File.......................................................................................... 67 Rotating Groups of Tubes ................................................................................................................ 72 Timesaving Tips.................................................................................................................................. 73 A Final Word........................................................................................................................................ 73 June 2005 MakeComp i EddyVision 6.0 List of Figures: Figure 1. The Main MakeComp Window................................................................................. 2 Figure 2. Parts of the Main MakeComp Window..................................................................... 3 Figure 3. File Menu................................................................................................................... 4 Figure 4. Open Project Dialog .................................................................................................. 4 Figure 5. Import Model Dialog................................................................................................. 5 Figure 6. Export Model As Dialog ........................................................................................... 6 Figure 7. Print Dialog ............................................................................................................... 7 Figure 8. Recent Projects Fly-out Menu ................................................................................... 7 Figure 9. Warning Message Upon Exiting MakeComp............................................................ 8 Figure 10. Edit Menu ................................................................................................................ 8 Figure 11. Auto Tick Parameters Dialog .................................................................................. 9 Figure 12. Example of Periphery Tubes Identified on a Tubesheet Map ............................... 11 Figure 13. View Menu ............................................................................................................ 12 Figure 14. Example of the Flip Horizontal Function.............................................................. 13 Figure 15. Floating Tube ID Box............................................................................................ 13 Figure 16. Util Menu............................................................................................................... 14 Figure 17. HASP Keys Dialog................................................................................................ 14 Figure 18. Help Menu ............................................................................................................. 15 Figure 19. Project Info Dialog ................................................................................................ 15 Figure 20. About Dialog ......................................................................................................... 15 Figure 21. Buttons in the Main MakeComp Window............................................................. 16 Figure 22. Parameters Tab on the Main Parameters Dialog ................................................... 16 Figure 23. Examples of Tube Labels and Section Labels (Watermarks) ............................... 18 Figure 24. Landmarks Tab on the Main Parameters Dialog................................................... 19 Figure 25. Landmark Set 1...................................................................................................... 20 Figure 26. Understanding the ANGLE Value for UBEND Landmarks, i.e., AVBs .............. 22 Figure 27. Understanding the Fan Bar Intercept Value .......................................................... 23 Figure 28. D4 Steam Generator Landmark Table................................................................... 24 Figure 29. Lengths Tab on the Main Parameters Dialog ........................................................ 24 Figure 30. Tube Labels Tab on the Main Parameters Dialog ................................................. 26 Figure 31. Attributes Tab on the Main Parameters Dialog..................................................... 27 Figure 32. Determining Location Values for Vertical Straps in a Landmark Table............... 28 Figure 33. Determining Batwing Values on the Attributes Dialog ........................................ 29 Figure 34. Groups Tab on the Main Parameters Dialog ......................................................... 30 Figure 35. Tubes Tab on the Main Parameters Dialog ........................................................... 31 Figure 36. Adding Group Dialog ............................................................................................ 32 Figure 37. Group Parameters Dialog in the Adding Group Dialog ........................................ 33 Figure 38. Groups of Tubes Beginning With a First Row Other Than ‘1’............................. 34 Figure 39. Symmetrical Tube Pitch Designs .......................................................................... 35 Figure 40. Asymmetrical Tri-Pitch Design (30-30)................................................................ 35 Figure 41. Edit Menu in the Adding Group Dialog ................................................................ 39 Figure 42. Popup Menu on Main MakeComp Window (Right-click Map) ........................... 39 June 2005 MakeComp ii EddyVision 6.0 Figure 43. View Menu in the Adding/Editing Group Dialog ................................................. 41 Figure 44. Using the Vertical Mirror Function....................................................................... 41 Figure 45. Using the Horizontal Mirror Function................................................................... 42 Figure 46. Popup Menu in the Main MakeComp Window .................................................... 45 Figure 47. Popup Menu – Row Ticks Fly-out Menu .............................................................. 46 Figure 48. Popup Menu | Row Ticks | Align Group ............................................................... 46 Figure 49. Using Popup | Row Ticks | Add Selected.............................................................. 47 Figure 50. Using Popup | Edit Tube ID .................................................................................. 49 Figure 51. Example of Tube Identification for Thimble Tubes (Edit Tube ID) ..................... 49 Figure 52. Assigning Selected Tubes to a Different Landmark Set (Set Landmark Set) ....... 50 Figure 53. Landmark Set ‘0’ (Zero) After Reassigning Selected Tubes to a Different Landmark Set ........................................................................................................ 51 Figure 54. Radial Array Example ........................................................................................... 52 Figure 55. Radial Array Dialog .............................................................................................. 52 Figure 56. Project Table – Components Tab .......................................................................... 55 Figure 57. Completed EddyAdmin Dialog ............................................................................. 56 Figure 58. Tutorial Component (FWH3A) ............................................................................. 57 Figure 59. Parameters Dialog - Parameters Tab ..................................................................... 59 Figure 60. Parameters Dialog - Tube Labels Tab ................................................................... 59 Figure 61. Completed Group Parameters Dialog for Section 1 .............................................. 62 Figure 62. Adding Group Dialog - Section 1.......................................................................... 63 Figure 63. Auto Tick Param Dialog........................................................................................ 64 Figure 64. Completed Group Parameters Dialog for Section 2 .............................................. 66 Figure 65. Parameters dialog - Landmarks Tab Showing Landmark Set 0 ............................ 70 Figure 66. Parameters dialog - Landmarks Tab Showing Landmark Set 1 ............................ 71 June 2005 MakeComp iii EddyVision 6.0 List of Tables: Table 1. Landmarks for Tutorial Component - Section IN (Landmark Set 0) ....................... 68 Table 2. Landmarks for Tutorial Component – Section OUT (Landmark Set 1)................... 68 June 2005 MakeComp iv EddyVision 6.0 Introduction MakeComp v6.0 is part of the EddyVision32™ suite of eddy current related software products produced by CoreStar International Corporation. These products are designed to operate under a Windows XP or Windows 2000 environment (latest service packs). Windows 95/98/ME/NT are not supported. Some features of the MakeComp software are: Used to create component (cmp) files. These cmp files contain structural information about a component (heat exchanger) to be inspected, i.e., tubesheet map layout, internal landmarks, distance between landmarks, U-tubes or straight, tubing dimensions, tube pitch, tubesheet numbering, section identification, tube material, etc. Almost any conceivable tubesheet map design can easily and quickly be created. Allows for square, triangular, or any user-defined tube pitch or any combination of these on the same tubesheet map. Allows for alias names for inlet, outlet, sections, rows, and columns. If a cmp file is used for more than one heat exchanger, the cmp file only needs to be created once. Inlet and outlet tubesheet views available at a click of a mouse button. Easy to use zooming and panning for viewing tubesheet details. Optional section labels – section labels or watermarks actually appear within each section of a printed tubesheet map if desired. Optional tube numbers – tube numbers actually appear within each tube of a printed tubesheet map if desired. Powerful editing features - cmp files may be edited in any way at any time. Groups of tubes on a tubesheet map can be rotated to any orientation in order to match the actual physical view of a component. The tubesheet-mapping feature is mathematical-based; therefore, if dimensional information, i.e., tube pitch, tube ID, tube OD, etc., is entered accurately, the resulting tubesheet map will be a precise scale model. June 2005 MakeComp 1 EddyVision 6.0 Starting the MakeComp Software To start the MakeComp software, double-click the MakeComp icon on the Windows Desktop or located in the EddyVision 6.0 folder of the Start menu. After the program starts, the main window of the MakeComp program shown in Figure 1 will appear. The project that was open during the last program session will automatically open and the model or component (cmp) file displayed as shown in Figure 1. Figure 1. The Main MakeComp Window June 2005 MakeComp 2 EddyVision 6.0 Description of the Main Window All functions of the MakeComp software are accessed from the main window shown in Figure 2. Various functions are accessed via pull-down menus along the top left of the window, specialized buttons just below the pull-down menus, and a popup menu accessed by right-clicking within the working area of the main window. Figure 2 points out and offers descriptions of the different areas of the main window. Review the figure in order to familiarize yourself with the main window. Title Bar Indicates the currently open project. Pull-down Menus Special Buttons Main Working Area Displays the current tubesheet map in its entirety. Status Bar Shows total tube count, currently selected section, row, & tube number, and other pertinent information Figure 2. Parts of the Main MakeComp Window June 2005 MakeComp 3 EddyVision 6.0 Menu Bar - Main Window File Menu As shown in Figure 3, the File menu contains nine (9) choices. Each item is discussed below. Figure 3. File Menu ο File | Open Project (Ctrl+O) displays the Open Project dialog shown in Figure 4. Simply select the desired project file from those listed and click the Open button. Alternatively, you may simply double-click a file name as with any other Windows program. Afterwards, the program opens the project and displays the project.cmp file in the working area of the main window. Figure 4. Open Project Dialog June 2005 MakeComp 4 EddyVision 6.0 ο File | New Component clears the currently displayed cmp file from the main MakeComp window and resets MakeComp to default values for the new component. If you inadvertently select this function, simply choose Edit | Undo (Ctrl+Z). ο File | Save (Ctrl+S) simply saves the current component file of the currently open project as [project]\config\ system\project.cmp. ο File | Import displays the Import Model dialog shown in Figure 5. Simply select the desired component file from those listed and click the Open button. Alternatively, you may simply double-click a file name as with any other Windows program. The cmp file you open is displayed and replaces the project.cmp file in the currently open project. This is handy when you want to share a common cmp file between two or more projects. File | Import defaults to the following location: [EddyVision_Install_Path]\CoreStar\EddyVision 6.0\user\comp Regardless, you may navigate to any drive accessible from your computer in order to import a cmp file. Figure 5. Import Model Dialog June 2005 MakeComp 5 EddyVision 6.0 ο File | Export displays the Export Model As dialog shown in Figure 6. Type the desired name for the cmp file in the File name: field. There is no need to add the .cmp extension to the name since the program will add it automatically. The current project.cmp file displayed in MakeComp will be exported or saved with the filename you choose. This is handy when you want to share a common cmp file between two or more projects. File | Export defaults to the following location: [EddyVision_Install_Path]\CoreStar\EddyVision 6.0\user\comp Regardless, you may navigate to any drive accessible from your computer in order to export a cmp file. Figure 6. Export Model As Dialog ο File | Print Preview displays a dialog with an approximation of what the printed cmp will look like when printed. The Print Preview displays either portrait or landscape based on the current printer settings (please see Windows documentation for more information on Printer Settings). ο File | Print (Ctrl+P) displays a typical Windows Print dialog as shown in Figure 7. Select the desired printer, click the Preferences button to modify the printer's parameters as desired, then click Print to print; otherwise, click Cancel. June 2005 MakeComp 6 EddyVision 6.0 Figure 7. Print Dialog ο File | Recent Projects displays the fly-out menu in Figure 8 listing any recently opened projects. Click a project in the fly-out menu in order to open that project in MakeComp. This is a faster way of opening a project vs. using the File | Open Project method discussed earlier. Figure 8. Recent Projects Fly-out Menu HINT: June 2005 To clear the Recent Projects fly-out menu, start EddyAdmin and select Project | Clear Recent Projects. MakeComp 7 EddyVision 6.0 ο File | Exit simply closes the MakeComp software. Clicking the 'X' button in the upper right corner of the MakeComp window performs the same function. If no changes have been made or if File | Save has already been executed, the program simply closes. However, if changes have not been saved, the program displays the warning message box shown in Figure 9 asking you to confirm your desire to close the MakeComp software. Clicking Yes saves all changes, clicking No closes the program without saving any changes, and clicking Cancel leaves the program open. Figure 9. Warning Message Upon Exiting MakeComp Edit Menu As shown in Figure 10, the Edit menu contains seven (7) choices. Each item is discussed below. Figure 10. Edit Menu ο Edit | Undo (Ctrl+Z) will undo the last action performed. Continuing to select Undo will continue to undo previous actions up to the last 20 actions performed. A description of the next available action to be undone is displayed next to Undo in the Edit menu. For example in Figure 10, the last action was a change in the Parameters dialog. If no actions are available to be undone, then the Undo selection will be grayed out. June 2005 MakeComp 8 EddyVision 6.0 ο Edit | Auto Compute Ticks displays the dialog shown in Figure 11. Adjust the settings as desired, and then click OK to add row and/or column tick marks to the currently displayed tubesheet map in the main MakeComp window. Experimentation by the user is recommended to see the results of various settings. Review Figure 11 for a description of each setting. Align Ends: If enabled (green), row ticks will be lined Used: If enabled (green), row ticks will up as shown in Figure 1; else, the length of each row tick will be determined by the Tick Length & Max Length settings. First Always: If enabled (green), the Last Always: If enabled (green), the last row in each section or group as determined by the Do First/Last By first row in each section or group as determined by the Do First/Last By setting will be tick marked. be applied to the tubesheet map. setting will be tick marked. Do First/Last By: Applies row ticks by Inc: Determines the increment in which row ticks will be sections (SEC) first then by groups (GROUP) last or visa versa. applied to the tubesheet map. For example, a setting of ‘5’ will result in a row tick next to every 5th row. Tick Length: Determines the minimum Max Length: Determines the maximum length of each row tick. This setting is ignored if Align Ends is enabled. length of each row tick. Closest Allowed Tube: Determines how close a row tick can be located next to any tube around it. Very useful for complex condenser tubesheet maps. Col Ticks Section: All settings in this section are identical to the Row Ticks section above, except the settings are applicable to column ticks only. Figure 11. Auto Tick Parameters Dialog HINT: Column ticks work best on square-pitch tubesheet. Column ticks are not recommended for use on tri-pitch tubesheets. ο Edit | Delete All Ticks deletes all row and column tick marks from the currently displayed tubesheet map in the main MakeComp window. Use Edit | Undo afterwards if desired. June 2005 MakeComp 9 EddyVision 6.0 ο Edit | Delete Selected Tubes deletes all currently selected tubes from the tubesheet map in the main MakeComp window. Use Edit | Undo afterwards if desired. HINT: Selected tubes are highlighted in green. Methods of selecting tubes, groups of tubes, and sections are discussed later. ο Edit | Auto Compute Sec Labels automatically calculates the size and location of section labels (watermarks) on a tubesheet map. The section labels will only be visible in Print Preview and/or on the printed tubesheet map. Furthermore, for the section labels to be visible, Draw Sec Labels must be enabled on the Parameters tab of the main Parameters dialog. Click the Parameters button on the main window to display the Parameters dialog. To change the location and/or size of section labels, see Parameters Button | Tube Labels Tab later in this manual. ο Edit | Set Periph Tubes provides the user a method of identifying the periphery tubes of a tubesheet map. Depending on the tubesheet map and component, periphery tubes may differ from user to user. For example, one user may consider the periphery tubes for a typical feedwater heater to be only the outer tubes around the whole tube bundle. Another user may consider the periphery tubes to be the outer tubes around each pass (inlet & outlet) of the tube bundle. Still, others may consider the periphery tubes to be more that just one tube in from the perimeter of the tube bundle. This option was included so that each user could make his/her own determination of what constitutes the periphery tubes for a given tubesheet map on a case-by-case basis. To use this function, first select all the desired tubes by holding down the Shift key on the keyboard and clicking each tube to be set as a periphery tube. Once all desired tubes are selected, select Edit | Set Periph Tubes. The selected tubes will now be displayed as darker or bold circles as shown in Figure 12. The bold circles are for display only and do not print out in either MakeComp or DBMS. Identifying the periphery tubes is not a requirement of tubesheet map design, but rather an option. If you are using CoreStar's DBMS (database management system) software, the periphery tubes will be identified in the Tubes table once the component file has been uploaded to a database. In DBMS, there is an alternative method for identifying special groups or sets of tubes. For more information about the DBMS software, please see the EddyVISION32 DBMS User Manual. June 2005 MakeComp 10 EddyVision 6.0 Figure 12. Example of Periphery Tubes Identified on a Tubesheet Map ο Edit | Clear Periph Tubes provides the user a method of resetting some or all previously set periphery tubes of a tubesheet map. To use this function, first select all the desired periphery tubes by holding down the Shift key on the keyboard and clicking each tube to be reset as a non-periphery tube. Alternatively, whole sections of the tubesheet map may be selected using Select Section on the popup menu discussed later. This popup menu is accessed by right-clicking anywhere on the tubesheet map. Once all desired tubes are selected, select Edit | Clear Periph Tubes. Selected tubes will now be displayed normally, i.e., non-bolded circles. June 2005 MakeComp 11 EddyVision 6.0 View Menu As shown in Figure 13, the View menu contains four (4) choices. Each item is discussed below. Figure 13. View Menu ο View | Map Full Screen (Esc) automatically sizes and centers the current tubesheet map to fit within the working area of the main MakeComp window. Many software programs refer to this function as 'Fit to Screen'. The keyboard shortcut for this function is the Esc key, while the mouse shortcut is Ctrl+middle-click. ο View | Flip Horizontal 'flips' the currently displayed tubesheet map horizontally. This function is handy for creating inlet and outlet cmp files. For example, you build a main condenser waterbox tubesheet map as viewed from the inlet; however, some of the other waterboxes will be tested from the outlet. Once the inlet is built, export the cmp file for safe-keeping, and select View | Flip Horizontal. The tubesheet map immediately flips and provides an outlet (mirror) view of the tubesheet complete with correct section and tube numbers. Now export the outlet cmp file with a different name than the previously exported inlet cmp file. Now each cmp file can be imported into the appropriate project, i.e., inlet or outlet, as required. In most cases, you will only need to build any tubesheet map only once. Figure 14 shows the tubesheet map from Figure 1 after the View | Flip Horizontal function has been applied. Note in the View menu of Figure 14 that the Flip Horizontal is active as indicated by the small checkmark next to the selection. The horizontal flip is obvious since the row numbers now appear on the right side of the tubesheet map. Row numbers (ticks) are always anchored next to the first tube for a given row. June 2005 MakeComp 12 EddyVision 6.0 Figure 14. Example of the Flip Horizontal Function ο View | Flip Vertical 'flips' the currently displayed tubesheet map vertically. This function has the same benefits as the Flip Horizontal discussed previously. ο View | Show Floating ID displays the tube identification in a small ‘floating box’ as shown in Figure 15, which dynamically updates as the cursor is moved over the tubesheet map. When active, a small checkmark appears next to the selection as shown in Figure 13. Regardless of the state of this function, the tube identification is always shown in the status bar at the bottom of the main MakeComp window by clicking on any tube. Figure 15. Floating Tube ID Box June 2005 MakeComp 13 EddyVision 6.0 Util Menu As shown in Figure 16, the Util menu contains two (2) choices. Each item is discussed below. Figure 16. Util Menu ο Util | Print Tubes Per row creates a list of the number of tubes in each row for a tubesheet map and displays the list in Notepad from which the list can be printed or saved as a txt file. Among other uses, this feature is very handy when troubleshooting a newly built cmp file. ο Util | Show Keys displays the HASP Keys dialog shown in Figure 17, on which the user can check the status of a HASP key(s) currently connected to the computer or update a HASP key(s). In Figure 17, Analysis and Test keys are currently connected to USB ports of the computer, while no DBMS key is connected. The Timeout dates of all keys should be checked as part of inspection planning to ensure a key(s) will not timeout during the inspection. This menu selection is available in all the other software modules of EddyVision as well. For details on updating and/or troubleshooting HASP keys, please see the Getting Started manual. Figure 17. HASP Keys Dialog June 2005 MakeComp 14 EddyVision 6.0 Help Menu As shown in Figure 18, the Help menu contains two (2) choices. Each item is discussed below. Figure 18. Help Menu ο Help | Project Info displays the dialog shown in Figure 19. The dialog contains information pertinent to the currently open project. Figure 19. Project Info Dialog ο Help | About MakeComp displays the About dialog shown in Figure 20. This dialog includes software version and technical support information. Figure 20. About Dialog June 2005 MakeComp 15 EddyVision 6.0 Main Window Buttons This topic will discuss the purpose and use of each button located along the top of the main MakeComp window immediately below the pull-down menus. Review Figure 21 for a brief description about the function of each button. 'Repaints' the main window. Opens the Adding Group dialog & displays a new empty group of tubes. Opens the PARAMETERS dialog in the main MakeComp window. Figure 21. Buttons in the Main MakeComp Window PARAMETERS Button Selecting the Parameters button in Figure 21 causes the dialog shown in Figure 22 to appear. This interface is used to define and/or store certain parameters about the component. Typical parameters include, but are not limited to: • • • • optional alias names for row, columns, or sections; landmarks table – used by EddyVISION Analysis software to accurately identify & label landmarks (internal support structures) during data analysis; optional printed section watermarks for multi-sectioned components; optional printed tube numbers in every tube; Figure 22. Parameters Tab on the Main Parameters Dialog June 2005 MakeComp 16 EddyVision 6.0 Parameters Tab Each field on the Parameters tab of the main Parameters dialog is described below. Refer to Figure 22 for the following field locations. Component Type: Enter a generic name for the component, i.e., Feedwater Heater, Component Cooler, HPFWH, LPFWH, MC Waterbox, etc. Model Name: Enter a descriptive name for the component. If the .cmp file can be used for more than one component, this name should be generalized. For example, if the .cmp file is the same for all the 'A' feedwater heaters, then use a name such as A-Series FWHs. You only need to build a .cmp file once for identical components. Row Name: Enter the term you wish to use for the name of the rows in the .cmp file. The name 'ROW' is the most common; however, 'LIN' & 'LINE' have been used as well. The name you enter will appear throughout the EddyVision software modules when the project is open that uses the .cmp file containing the name. Col Name: Enter the term you wish to use for the name of the columns in the .cmp file. The name 'TUBE' is common for most heat exchangers; however, 'COL' has been used as well. The name you enter will appear throughout the EddyVision software modules when the project is open that uses the .cmp file containing the name. Sec Name: Enter the term you wish to use for the name of the sections in the .cmp file. The name 'SEC' is common for most heat exchangers; however, 'QUAD', 'ZONE', & 'PASS' may be used as well. The name you enter will appear throughout the EddyVision software modules when the project is open that uses the .cmp file containing the name. For steam generator .cmp files, sections are typically not used since the leg is used instead to identify the pass, i.e., INLET, HOT LEG, OUTLET, COLD LEG, etc. In these cases, you would leave the Sec Name field blank. Inlet Name: Enter the term you wish to use for the name of the inlet tube-end in the .cmp file. The name 'INLET' is common for most heat exchangers; however, 'HOT', 'COLD', 'EAST', 'WEST', 'NORTH', etc. may be used as well. The name you enter will appear throughout the EddyVision software modules when the project is open that uses the .cmp file containing the name. June 2005 MakeComp 17 EddyVision 6.0 Outlet Name: Enter the term you wish to use for the name of the outlet tubeend in the .cmp file. The name 'OUTLET' is common for most heat exchangers; however, 'HOT', 'COLD', 'EAST', 'WEST', 'SOUTH', etc. may be used as well. The name you enter will appear throughout the EddyVision software modules when the project is open that uses the .cmp file containing the name. Draw Sec Labels: When enabled (green), section labels (or watermarks) will be printed on the hard-copy map by the MakeComp & DBMS software modules. These watermarks will appear only on the hard-copy printout as shown in Figure 23. Use Tube Labels: When enabled (green), tube numbers will be printed within each tube on the hard-copy tubesheet map in the MakeComp & DBMS software modules. These tube numbers will appear only on the hard-copy printout as shown in Figure 23. Has Ubends: When enabled (green), the length of each U-bend is automatically calculated. The accuracy of these calculations is based on certain values entered on the Attributes tab and on the Group Parameters dialog for each tube group. If U-bends don't exist in the component or all straight-lengths of a U-bend component are visible in MakeComp, do not enable this function since it can have an adverse effect on the auto-landmarks feature in the Analysis software module. Use Tube Labels was enabled for this printout. Note that all the tubes shown contain tube labels or numbers inside each tube. The arrow is pointing to tube number OUT-19-13. Draw Sec Labels was enabled for this printout. Note the section label or watermark 'OUT'. Figure 23. Examples of Tube Labels and Section Labels (Watermarks) June 2005 MakeComp 18 EddyVision 6.0 Landmarks Tab Figure 24 shows the Landmarks tab of the main Parameters dialog. Landmark is a term used to describe the various internal support structures that many of the tubes pass through. These landmarks are easily detected during eddy current inspections. Most have a classic signal signature, which is easy to discern from other signals of interest, i.e., tube wall loss. If it is desired to use the auto-locating feature of the Analysis software, it will be necessary to build a landmark table. A cmp file may contain multiple sets of landmarks. For example, the landmarks detected by eddy current on the inlet leg of a typical 2-zone feedwater heater will be different from the landmarks detected on the outlet leg. If straight-lengths are being tested and the cmp file was built to display all the straight-lengths, then separate landmark sets must be used. To add an entry, click the gray box indicated in Figure 24 or right-click the box to remove the last entry. To delete an entry other than the last one, click on any field of the entry you wish to delete and press Shift+Delete. To insert an entry other than the bottom one, click on any field of the entry you wish the new entry to be inserted before and press Shift+Insert. Click here to add an entry or right-click to remove the last Figure 24. Landmarks Tab on the Main Parameters Dialog Landmark Table - General Guidelines The landmark table shown in Figure 24 is for the 2-zone feedwater heater containing U-tubes shown Figure 1. Note that the tubesheet map is displaying all the straight-lengths. If it were displaying only the U-tubes, only half the tube ends would be shown. The table was built from the inlet tube end to the last tube support before the U-bend. Note that the distance (POS) value is cumulative – that is, each landmark is referenced to the zero landmark. For example, landmark 'C08' is June 2005 MakeComp 19 EddyVision 6.0 324.500 linear units from landmark 'TEI' and both are assigned as INLET landmarks. The linear units in this case are inches. If a different scale of measurement is to be used, simply enter those values accordingly. Instead of entering 129.700 (inches) for landmark 'C03', a value of 329.438 (cm) could be entered if using centimeters. All POS values must be entered using the same measurement system. One rule to remember regarding landmark TYPEs is that the inlet tube end must be typed as 'TEH' while the outlet tube end must be typed as 'TEC'. The landmark NAME can be any term the user desires. The landmark NAME, not the TYPE, will appear along the auto-locate strip chart in the Analysis software. The UBEND selection under the LEG column is only used when landmarks actually exist within the U-bend region of some or all of the tubes of the current component file. If no physical landmarks exist in the U-bend region of any of the tubes, then no UBEND selection should be made – even if the component has U-bend tubes. Figure 25 shows the other landmark set for the outlet leg of the tubesheet shown in Figure 1. The Set drop-down list now shows the number ‘1’ vs. ‘0’ (zero) as in Figure 24. This landmark set is built much the same way that the inlet landmark set was built in Figure 24. The NAME column now reflects the names of the outlet leg landmarks. Note that the LEG column is still set to INLET. Since this cmp file is showing both tube ends or legs of a U-tube component, we must treat each leg as a separate tube bundle for auto-locate to work correctly. Think of the inlet tube end as being the inspection reference tube end. Figure 25. Landmark Set 1 June 2005 MakeComp 20 EddyVision 6.0 If a component contains only straight-tubes, i.e., condenser waterbox, then the landmark table is quite easy to build. The user simply builds the table in reference to the inlet tube end, enters all the landmarks, and ends the table with the name and type of the outlet tube end. INLET should be selected under the LEG column for all the landmarks in such a table. Think of the LEG selection this way: As the tubes are inspected from the inlet end, the landmarks will be 'seen' in this order and at these locations in reference to the inlet tube end. Descriptions of each field and/or column on the Landmarks tab are provided in the following sections. Set: Located in the upper left corner of the Landmarks tab, click in the dropdown list to select an available landmark set to add and/or modify. Landmark sets are assigned in the Group Parameters dialog discussed later (see Add GROUP Button). NAME: Enter a unique name for each landmark. The name can be any desired alphanumeric expression up to 7-characters long; however, it's recommended that it not exceed 3-characters in length. TYPE: Enter a landmark type for each landmark. The following list of landmark types are reserved for each specific landmark purpose: AVB: BAF: BW: FB: RB: SP: TEC: TEH: TSC: TSH: VS: Anti-vibrational bar Baffle Plate Bat Wing Fan Bar Radial Bar Tube Support Plate Tube End Cold Leg (or Outlet Tube End-required) Tube End Hot Leg (or Inlet Tube End-required) Top of Tubesheet-Cold Leg Top of Tubesheet-Hot Leg Vertical Strap User-defined landmark types may be used as well. For example, the subcooler end-plate in Figure 24 is typed and named ‘SEP’. NOTES: • • June 2005 TEH must be the first landmark type entered at the top of all landmark tables. Landmark types TEC and TSC are only used in either straight-tubed components OR in U-tubed components where only one-half of the component is used as the tubesheet map, i.e., steam generators. MakeComp 21 EddyVision 6.0 LEG: Enter the appropriate leg that each landmark applies to. Valid entries are INLET, OUTLET, or UBEND. For straight-tubed components, the landmark table only needs to be 'built' once from the inlet end. When eddy current data is acquired from the outlet tube end of the component, the Analysis software will automatically reverse the landmarks as 'seen' from the outlet tube end. POS: Enter the actual distance (position) in the linear units to be used for the location of each landmark from the reference tube end. In Figure 25, the 'H04' tube support, is located 144.500 linear units from the outlet tube (TEO). No position value is necessary for UBEND landmarks if present, i.e., AVB. The linear position of these landmarks is automatically calculated by the software based on the radius of the UBEND for a given tube. ANGLE: Enter the angle where a UBEND landmark, i.e., AVB, intercepts the UBEND. This angle value is measured as either a positive or a negative value in reference to the centerline of the tube bundle. The vertical centerline is considered 0°. As shown in Figure 26, positive values correspond with landmarks on the inlet side of the centerline while negative values coincide with landmarks on the outlet side of the centerline. This setting works with the FIRST and LAST values discussed below. Apex 0° AVB Bars +60° Inlet Leg Outlet Leg Figure 26. Understanding the ANGLE Value for UBEND Landmarks, i.e., AVBs June 2005 MakeComp 22 EddyVision 6.0 FB INT: Abbreviation for 'Fan Bar Intercept'. Fan bars, like AVBs, are UBEND support structures specifically used in Westinghouse Model CRF-80 steam generators. For each fan bar landmark, enter the distance (d) from the Ubend tangent to the point where the fan bar would intercept the vertical axis of the steam generator for the first row where each fan bar is present. This is necessary because the UBEND tangent is not at the same elevation from row to row for this model. The DELTA value, discussed later, allows the software to automatically calculate remaining fan bar locations. Review Figure 27 for a better understanding of the value required. Vertical Axis of Generator Fan Bar U-bend Tangent d Figure 27. Understanding the Fan Bar Intercept Value FIRST: For each landmark, enter the first row number where the landmark is present. In Figure 28, UBEND landmarks AV2 and AV3 are present beginning in row 21. This tells the auto-locate feature in the Analysis software not to look for AV2 and AV3 in rows 1 through 20. LAST: For each landmark, enter the last row number where the landmark is present. The LAST value works with the FIRST value (above) to create a range of rows where specific landmarks are known to be present. In Figure 28, the LAST value is 999 for all the landmarks in the table. The D4 model steam generator actually has only 49 total rows. This demonstrates that the exact value is not required as long as the number is equal to or greater than the last row number. REQ: Abbreviation for ‘required.’ Enter Y for yes or N for no. A Y(es) forces auto-locate in Analysis to label this landmark for every tube in the First - Last range of rows – even if the landmark is not present. An N(o) allows the Analysis software to detect if the landmark is present and, if so, locate and label it. In Figure 24, the baffles are marked as N in the REQ column because the baffles are not present in every tube of every row. June 2005 MakeComp 23 EddyVision 6.0 Figure 28. D4 Steam Generator Landmark Table Lengths Tab Figure 29 shows the Lengths tab of the main PARAMETERS dialog. In most cases, no entry is required on this tab. Values entered in this dialog are specifically used for components containing U-tubes of varying straight-lengths. Such a component is the Model F steam generator. Click here to add an entry or right-click to remove the last entry. Figure 29. Lengths Tab on the Main Parameters Dialog The DELTA value addresses this unique issue. The entry shown in Figure 29 indicates that an elevation difference (DELTA) of 4.5 linear units exists between the UBEND transitions from row to row beginning with row number 99. The straight-length (BASE) of the U-tubes in row 99 is 352.130 linear units. The software will calculate the straight-length for row 100 by adding the DELTA value to the BASE value of row 99, i.e., 356.630. This calculation will be repeated for each row in the specified range. The value for each field is defined below. To add an entry, click the gray box indicated in Figure 29 or right-click the box to remove the last entry. To delete an entry other than the last one, click on any field of the entry you wish to delete and press Shift+Delete. June 2005 MakeComp 24 EddyVision 6.0 To insert an entry other than the bottom one, click on any field of the entry you wish the new entry to be inserted before and press Shift+Insert. FIRST: Enter the first row number where the specified DELTA value applies. LAST: Enter the last row number where the specified DELTA value applies. BASE: Enter the straight-length of the U-tubes for the range specified by the FIRST and LAST values. DELTA: Enter the difference between the straight-length of the first row and the second row in the range specified by the FIRST and LAST values. If the straight-length is the same for all the tubes in the component, then no entries are required on this dialog. Example: First entry is FIRST=1, LAST = 10, BASE = 100.000, and DELTA = 0.0. Second entry is FIRST=11, LAST = 44, BASE = 101.000, and DELTA = 0.5 means that rows 1 to 10 have a straight-length of 100.000, row 11 has a straight-length of 101.000, row 12 has a straightlength of 101.500, and so on. Finally, row 44 would have a straightlength of 117.500 calculated as follows: [0.5(44-11)+101.000]. Tube Labels Tab Figure 30 shows the Tube Labels tab of the main Parameters dialog. This window allows the user to assign alias names to rows, columns, or sections. Figure 30 shows examples of the use of this feature. In the figure, row numbers 1, 2, and 3 have been assigned the alias names of A, B, and C, respectively. Column numbers 1, 2, and 3 have been assigned the alias names of X, Y, and Z, respectively. Finally, sections 0 and 1 have been assigned alias names of IN and OUT, respectively. Row and column number 0 (zero) was left blank intentionally since this row or column was not used in the example cmp file. This dialog is mostly used for alias naming section numbers. If no alias names are assigned, section, row, and column numbers default to their respective whole number (including zero if used). Whether the number zero is used or not, is specified within the parameters of each tube group added to the component. This feature is only used if alias names are desired. Assigned alias names will appear on the tubesheet map in the form of row ticks, column ticks, and section watermarks (if enabled). Finally, the user has the ability to relocate section labels (watermarks) on the printed tubesheet map as well as control over the character size of the watermarks. For example in Figure 30, Section 1 shows an X value of 20.325, a Y value of 7.745, and a Height value of 6.000. Since this cmp file was built based on inches, these values mean that the center of the watermark for Section 1, which is alias named OUT, will appear on the printed tubesheet map as 6-inch high characters June 2005 MakeComp 25 EddyVision 6.0 located 7.745-inches up from the origin and 20.325-inches to the right of the origin on the tubesheet map. The origin (X=0, Y=0) can easily be located on any tubesheet map by clicking and dragging while observing the status bar at the bottom of the main MakeComp window. For example in Figure 1, the point where the mouse was last clicked on the tubesheet map, which is near tube OUT-1-1, had coordinates of X=1.19 and Y=0.81. HINT: Select Edit | Auto Compute Sec Labels before adjusting watermark locations on the Tube Labels tab. To add an entry in any of the three alias name sections, click the appropriate gray box above the specific scroll bar or right-click the corresponding box to remove the last entry. The values for each field shown on this window are described below. Figure 30. Tube Labels Tab on the Main Parameters Dialog ROW#: As the gray box in the upper right corner of this area is clicked, a new entry appears with the next sequential row number. Enter the desired alias name for each row number in the adjacent LABEL field. COL#: As the gray box in the upper right corner of this area is clicked, a new entry appears with the next sequential column number. Enter the desired alias name for each column number in the adjacent LABEL field. SEC#: As the gray box in the upper right corner of this area is clicked, a new entry appears with the next sequential section number. Enter the desired alias name for each section number in the adjacent LABEL field. X: The horizontal distance that the watermark for the given section will be located from the origin of the tubesheet map. These values can be either positive or negative. Y: The vertical distance that the watermark for the given section will be located from the origin of the tubesheet map. These values can be either positive or negative. June 2005 MakeComp 26 EddyVision 6.0 Attributes Tab Figure 31 shows the Attributes tab of the main Parameters dialog. This dialog provides a place to enter additional details about the component. The majority of these values are optional as well as self-explanatory. The values of these fields are changed using either the mouse or keyboard entry. To change a value using the mouse, place the mouse cursor to the right of the desired field. Note that the cursor turns into a vertical two-way arrow. Clicking will increase or increment the value while right-clicking will decrease or decrement the value. If the Shift key is held down while performing either of these actions, the value will change by a factor of 10. If the Control key is held down while performing either of these actions, the value will change by a factor of 100. Similarly, if both the Control & Shift keys are held down while performing either of these actions, the value will change by a factor of 1,000. Finally, middle-clicking a field will set that field to zero. Alternatively, a value may simply be typed in manually. Each value is described below. Figure 31. Attributes Tab on the Main Parameters Dialog Baffle Thickness: Enter the thickness of any baffle plates in the component. The linear unit of measure should be the same throughout the component file. If inches are in use, then all linear measurements should be entered in inches. If any landmarks are typed as baffles (BAF) in the landmark table, an entry here could improve the accuracy of the auto-locate feature in the Analysis software. SP Thickness: Enter the thickness of the tube support plates in the component. Strap Thickness: Enter the thickness of the vertical straps (VS) in the component. Vertical straps are only present along the straight portion of square UBENDs in CE Model 80 steam generators. If vertical straps are present, enter the distance in linear units in the ANGLE column of the landmark table for each vertical strap as measured from the vertical axis of the tube bundle. June 2005 MakeComp 27 EddyVision 6.0 Vertical straps toward the inlet (hot) leg are positive values while those toward the outlet (hot) leg are negative values. See Figure 32 for clarification. +d -d Vertical Straps (VS) Square-bend Tubes Inlet (Hot Leg) Vertical Axis Outlet (Cold Leg) Figure 32. Determining Location Values for Vertical Straps in a Landmark Table Batwing Thickness: The batwing is unique to CE Model 80 steam generators. Enter the thickness of the batwing. In Figure 33, the Batwing Thickness is shown as dimension 'c'. If the batwing is not present, leave this field set to 0 (zero). Batwing Angle: Enter the angle of the batwing. In Figure 33, the Batwing Angle is shown as angle 'b'. If the batwing is not present, leave this field set to 0 (zero). Batwing Base: Enter the length of the base of the batwing. In Figure 33, the Batwing Base is shown as dimension 'a'. If the batwing is not present, leave this field set to 0 (zero). Batwing Pos: Enter the distance in linear units from the base of the batwing to the tube end at the inlet-outlet tubesheet. In Figure 33, the Batwing Pos is shown as dimension 'd'. If the batwing is not present, leave this field set to 0 (zero). June 2005 MakeComp 28 EddyVision 6.0 Row 1 Rad: Enter the radius of the U-bend for the first (inboard) row of tubes measured in linear units. If Has Ubends on the Parameters tab is disabled, this field will be ignored. Square Bend Rad: Enter the radius of the first (inboard) row of square-bend tubes measured in linear units. This value is used to determine the length of the square-bend. First Square Ubend: Enter the first row where the tubes change from normal U-bends to square-bends. Figure 32 points out the concept of square-bend tubes. If these types of tubes do not exist in the component, set this field to a large number, i.e., 999 (default). In addition, if Has Ubends on the Parameters tab is disabled, this field will be ignored. Batwing c b a d Inlet (Hot Leg) Outlet (Cold Leg) Figure 33. Determining Batwing Values on the Attributes Dialog June 2005 MakeComp 29 EddyVision 6.0 Groups Tab In MakeComp, tubes make groups, groups make sections, and sections make tubesheet maps. Figure 34 shows the Groups tab of the main Parameters dialog. This dialog simply displays the details about the groups of tubes that exist within the current cmp file. The majority of these values are self-explanatory. These values cannot be changed in this dialog, but rather are displayed for information purposes only. If one or more of the parameters for a specific group of tubes is edited, the change(s) for that group can be viewed here. Various details for each group of tubes are shown in this dialog, including: the section each group of tubes is assigned to, the rotation angle for each group, the X/Y offset for each group, the horizontal tube pitch for each group, the pitch angles for each group, and the ID and OD of the tubes within each group. The Groups tab shown in Figure 34 is from a complex main condenser cmp file, which contains 26 groups of tubes – each with its own individual parameters. Figure 34. Groups Tab on the Main Parameters Dialog Another useful purpose of this dialog is to identify any empty groups that may exist in the component file. If you know that you actually have four (4) groups of tubes in the current cmp file and more that four (4) groups are listed on the Groups tab, simply select File | Save on the main MakeComp window in order to remove them. Empty groups unnecessarily use computer memory. Empty groups can be inadvertently created while building a cmp file by clicking the ADD GROUP button, then clicking OK on the Adding Group dialog without first enabling any tubes on the building grid. See the ADD GROUP button topic for more information. June 2005 MakeComp 30 EddyVision 6.0 Tubes Tab Figure 35 shows the Tubes tab of the main Parameters dialog. This dialog simply displays the details about each tube that exists within the current component. The majority of these values are self-explanatory. These values cannot be changed in this dialog, but rather are displayed for information purposes only. If a specific group of tubes is edited, the change for the affected tubes can be viewed here. Various details for each tube are shown, including: section number, row number, column number, straight-length, U-bend length (if applicable), the X/Y coordinate where each tube is located on the main tubesheet map, each tube's location on the building grid for the group the tube resides in, the tube group number that each tube resides in, and the landmark set assigned to each tube. Figure 35. Tubes Tab on the Main Parameters Dialog June 2005 MakeComp 31 EddyVision 6.0 ADD GROUP Button Selecting the ADD GROUP button in Figure 21 causes the Adding Group dialog shown in Figure 36 to appear. The circles in the window indicate possible tube locations. A circle represents a disabled tube location on the building grid while a black filled circle indicates an enabled tube. This dialog is used to: • • • • • • • • build a group of tubes to be added to the main tubesheet map; specify details about a group of tubes; edit existing groups of tubes; specify the section a group of tubes belongs to; specify tube pitch and angles; specify the numbering system and origin; specify the rotation angle for a given group of tubes; duplicate an existing group of tubes; Figure 36. Adding Group Dialog As with most of the dialogs in EddyVision, the OK button confirms changes or edits while the Cancel button discards any changes or edits. The Cancel button is similar to the Undo feature in other common software products. IMPORTANT: June 2005 In the Adding Group dialog, rows are always horizontal. You’ll learn how to rotate groups of tubes to any angle in the next topic. MakeComp 32 EddyVision 6.0 PARAMETERS Button Clicking the Parameters button on the Adding Group dialog shown in Figure 36 causes the Group Parameters dialog shown in Figure 37 to appear. All the necessary details about a new group of tubes should be entered on this dialog before building the group; however, they can be entered anytime. These parameters define the building grid that will be created in the Adding Group dialog. Each parameter on this dialog is defined below. Please refer to Figure 37 as each parameter is described. Figure 37. Group Parameters Dialog in the Adding Group Dialog Num Row: Enter a number slightly greater than the actual number of rows in the group of tubes being built. For example, the feedwater heater shown in Figure 1 has a total of twenty-one (21) rows in the inlet leg (lower half). For this group, a value of thirty-one (31) would work well in the Num Row field as shown in Figure 37. This value simply defines the number of rows that will be available on the resulting building grid in the Adding Group dialog. Any of these parameters on this dialog may be edited at anytime – even after the tubesheet map has been completed – in order to fine tune the final appearance of the main tubesheet map. Num Col: Enter a number slightly greater than the actual number of tubes in the longest row of the group being built. For example, the feedwater heater shown in Figure 1 has a total of forty-six (46) tubes in the longest row (Row 3) in the inlet leg (lower half). For this group, a value of fifty-eight (58) would work well in the Num Col field as shown in Figure 37. This value simply defines the number of columns that will be available on the resulting building grid in the Adding Group window. HINT: June 2005 If there are non-existent tubes, i.e., stay-rods, vent gaps, etc., along a given row on a tubesheet map, it will make the building process easier if they are included in the Num Col value. They can be easily removed on the main MakeComp window later. For example in Figure 1, Row 3 has forty-six (46) tubes and two (2) missing tubes at the vent gaps. So, consider Row 3 as having forty-eight (48) tubes for the purpose of determining the value for the Num Col field. MakeComp 33 EddyVision 6.0 First Row: Enter the row number of the first row in the group. The default is '1' (one); however, additional groups may begin with a row number other than '1' (one). In Figure 38, ten (10) groups of tubes are shown, all assigned to the same section. Note that each group begins with a different First Row number. Figure 38 is a portion of a complex main condenser tubesheet map, which was captured from the main MakeComp window. Figure 38. Groups of Tubes Beginning With a First Row Other Than ‘1’ Group Angle: This parameter allows the user to rotate a group to any desired angle. This feature is especially useful when building complex tubesheet maps such as main condensers containing steam lanes at a variety of angles. If no rotation is desired, set the field to '0' (zero). In Figure 38, each group shown is rotated about 1° from the adjacent group. Furthermore, note that the general direction of the rows is vertical and numbered from the top to the bottom. X Offset: This parameter determines where the X-coordinate of the grid origin will be placed on the main tubesheet map. This parameter in conjunction with the Y Offset below is useful for accurately lining-up groups on the main tubesheet map. The default is '0' (zero). Y Offset: This parameter determines where the Y-coordinate of the grid origin will be placed on the main tubesheet map. This parameter in conjunction with the X Offset above is useful for accurately lining-up different tube groups on the main tubesheet map. The default is '0' (zero). June 2005 MakeComp 34 EddyVision 6.0 Tube Pitch: Enter the horizontal center-to-center tube pitch. For square-pitch and equilateral tri-pitch, the tube pitch is the same horizontally or vertically as shown in Figure 39. Interior angles of right-triangle are 45° & 90° Interior angles of triangle are 60° y y Pitch Angle1 x Pitch Angle2 Square-pitch (45-90 or 90-45) Pitch Angle1 Pitch Angle2 Equilateral Tri-pitch (60-60) Figure 39. Symmetrical Tube Pitch Designs The tube pitch provided on most specification drawings is not the horizontal tube pitch (x), but rather the tube pitch (y) along either side of a triangle created by selecting a tube in any row and drawing vectors down to the 2 adjacent tubes directly below it. In the first graphic of Figure 39, this action creates a right-triangle with either leg being equal (x = y). In the second graphic, an equilateral triangle is created with all sides being equal (x = y). All the interior angles of the equilateral triangle are 60° while the interior angles of the righttriangle are 45°, 45°, and 90°. In both of these cases, the horizontal tube pitch (x) is the same as the vertical tube pitch (y) as shown. However, a common tri-pitch design used in some heat exchangers is referred to as '30-30' tri-pitch. In this case, the resulting triangle is not equilateral and the interior angles are 30°, 30°, and 120° as shown in Figure 40. The y dimension shown along one of the legs of the triangle is typically the tube pitch value given on manufacturer's specification drawings. MakeComp needs the horizontal tube pitch (x) to accurately calculate the position of the tubes on the building grid. Interior base angles of triangle are 30° Pitch Angle1 Pitch Angle2 y x Figure 40. Asymmetrical Tri-Pitch Design (30-30) June 2005 MakeComp 35 EddyVision 6.0 To calculate the horizontal tube pitch for the 30-30 tri-pitch layout shown in Figure 40 when only the y dimension is provided, use the following formula: Cos30° × y × 2 = x where, x is the horizontal tube pitch; y is the slanted or offset tube pitch given on the specification drawing; and, Cos30° is the cosine of 30° and is a constant value of 0.866; If y equals 0.938-inch (15/16-inch), which is a common tube pitch for many heat exchangers, we get the following result: 0.866 × 0.938 × 2 = 1.625 Therefore, the horizontal tube pitch (x) would equal 1.625-inches and this value would be entered into the Tube Pitch field in the Group Parameters dialog. Pitch Angle1: Enter the left interior base angle of the triangle created as shown in Figure 39 or Figure 40. For square-pitch and equilateral tri-pitch, Pitch Angle1 is 45° or 90° for square-pitch dependant on how the triangle is drawn, and 60° for equilateral tri-pitch. For asymmetrical tri-pitch (Figure 40), enter the actual base angles. In the example shown in Figure 40, a value of 30° would be entered in this field. By entering accurate values in this field, the Pitch Angle2 field, and the Tube Pitch field, any conceivable tubesheet map can be created since these three (3) values are used to accurately calculate the position of each tube and their relationship to other tubes. Pitch Angle2: Enter the right interior base angle of the triangle created as shown in Figure 39 or Figure 40. For square-pitch and equilateral tri-pitch, Pitch Angle2 is 45° or 90° for square-pitch dependant on how the triangle is drawn, and 60° for equilateral tri-pitch. For asymmetrical tri-pitch (Figure 40), enter the actual base angles. In the example shown in Figure 40, a value of 30° would be entered in this field. See Pitch Angle1 above for addition details. TIPS: June 2005 • • 30-30 pitch is simply 60-60 pitch rotated 90°. When the actual horizontal tube pitch for a 60-60 tubesheet isn’t readily available, simply add 0.188-inch (3/16-inch – a common ligament value in many heat exchangers) to one tube diameter and enter this sum as the Tube Pitch value in MakeComp. MakeComp 36 EddyVision 6.0 Tube ID: Enter the inside diameter (ID) of the tubes in this group in decimal format. Tube OD: Enter the outside diameter (OD) of the tubes in this group in decimal format. This value controls the size of the circles displayed as tubes on the tubesheet map; therefore, be sure it's entered accurately. Material: Select the tube material from the drop-down list. HINT: If the Material list box is empty, this is because there are no entries in the Materials project lookup table. Please refer to the EddyAdmin User Manual for details on editing Project Lookup Tables. Sec: Enter the section number that the current group is assigned to. Remember that sections can have more than one group of tubes. The first Sec number is ‘0’ (zero). Land Set: Enter the landmark set (discussed earlier) that this group of tubes will use. The first Land Set number is ‘0’ (zero). Numbering: Click the drop-down box and select the desired column (tube) numbering scheme. The choices include: Grid: Column numbering based on the building grid. On a square-pitch building grid, if the first tube enabled on the building grid is grid location ‘row= 1 col=25’, then the first tube in Row 1 for the current section on the main tubesheet map will be 1-25 not 1-1. TIP: In the Adding/Editing Group dialog, when a tube is clicked, its grid location is displayed in the status bar at the bottom of the dialog. Row (Count Spaces): Column numbering where the first tube in each row begins with 1 on the main tubesheet map; however, any spaces along a row where no tube exists is counted as well. These spaces typically include vent gaps & stay-rods. Row (Skip Spaces): Column numbering where the first tube in each row begins with 1 and continues along each row counting only locations where a tube actually exists. This is the most common column (tube) numbering system used for most balance-ofplant heat exchangers. Origin: Click the drop-down box and select the origin (relative location) of the first tube in the first row of the group of tubes being built. Looking at a map, sketch, or picture being used to build the tubesheet map from, select one of the four available choices in the drop-down, including: Upper Left, Upper Right, Lower Left, or Lower Right. The origin for the group that makes up the inlet leg (bottom half) of the feedwater heater tubesheet shown in Figure 1 should be Upper Left. June 2005 MakeComp 37 EddyVision 6.0 ZOOM Button The ZOOM button provides a way to zoom in, out, or auto-fit while working in the Adding Group dialog when greater or lesser detail is desired to be viewed. The button is used as follows: Click zooms in to the center of the building grid. Continue clicking to zoom in until the level of detail is achieved. Right-click zooms out and centers the building grid. Continue right-clicking to zoom out until the level of detail is achieved. Middle-click resets the building grid to fit within the Adding Group window. HORZ OFFSET Button The HORZ OFFSET button shown in Figure 36 allows the user to move enabled tubes to the left or to the right on the building grid. Care should be exercised when using this feature since enabled tubes will be deleted if moved beyond the perimeter of the building grid. The button is used as follows: Click moves enabled tubes on the building grid one column to the left. Continue clicking until the desired location is reached. Right-click moves enabled tubes on the building grid one column to the right. Continue right-clicking until the desired location is reached. VERT OFFSET Button The VERT OFFSET button shown in Figure 36 allows the user to move enabled tubes up or down on the building grid. Care should be exercised when using this feature since enabled tubes will be deleted if moved beyond the perimeter of the building grid. The button is used as follows: Click moves enabled tubes on the building grid up one row. Continue clicking until the desired location is reached. Right-click moves enabled tubes on the building grid down one row. Continue rightclicking until the desired location is reached. June 2005 MakeComp 38 EddyVision 6.0 Edit Menu – Adding/Editing Group Dialog As shown in Figure 41, the Edit menu on the Adding Group dialog contains seven (7) choices. Each item is explained below. Figure 41. Edit Menu in the Adding Group Dialog Edit | Dupe Group: This is one of the most powerful features in MakeComp. As the name implies, Dupe Group does exactly that. Since many tubesheet maps contain groups, which are symmetrical or mirror images of each other, a duping feature can increase map creation dramatically. Figure 42. Popup Menu on Main MakeComp Window (Right-click Map) To duplicate an existing group of tubes, right-click the desired group on the tubesheet map displayed in the main MakeComp window, and select Edit Group from the popup menu as shown in Figure 42. Next, the selected group of tubes is displayed in the Editing Group dialog (essentially the same as the Adding Group dialog shown in Figure 36). Immediately click Edit | Dupe Group. This action duplicates and displays the newly duplicated group. June 2005 MakeComp 39 EddyVision 6.0 Note that in the title bar of the dialog it now displays Adding Group x, where x is the next available group number automatically assigned by MakeComp. Now that the desired group has been duped, click the PARAMETERS button and change any fields as appropriate for the newly duped group on the Group Parameters dialog. Typical changes may include the section number, the landmark set to be used for this group, the first row number in the new group, the origin, etc. Finally, click OK on both the Group Parameters dialog, and then the Adding Group dialog. The newly duped tube group now appears in the main MakeComp window. Use the Move Group feature on the popup menu in Figure 42 to move the new group to the desired location. The features of the popup menu are discussed in detail later in the Popup Menu topic. Edit | Flood Fill: Selecting Edit | Flood Fill (or Alt+F) enables all tubes on the building grid contained within an area defined by an enclosed boundary of enabled tubes. To demonstrate, create a rectangular pattern of enabled tubes, click a disabled tube within the pattern, and then click Edit | Flood Fill. Edit | Flood Clear: The opposite of Flood Fill. Selecting Edit | Flood Clear disables all tubes on the building grid contained within an area defined by an enclosed boundary of enabled tubes. To demonstrate, click an enabled tube within the pattern created in Edit | Flood Fill above, and then click Edit | Flood Clear. Edit | Set Tube Offset: This feature allows the user to offset an enabled tube on the building grid by entering X and Y offset values. To demonstrate, click on an enabled tube on the building grid, select Edit | Set Tube Offset, enter say 10 for X Offset and -10 for Y Offset, and click OK. The tube color turns to blue. This indicates that the tube has been offset from its apparent location. Click OK on the Adding/Editing Group dialog to return to the main MakeComp window. The tube should be offset 10 linear units to the right and 10 linear units down from its original location. This function is rarely used, but is handy for rows of tubes that are zigzagged or staggered and not in a straight line. Edit | Null Tube Offsets: This feature clears all tube offsets for a given group of tubes on the building grid. To demonstrate, in the main MakeComp window, right-click the group of tubes containing the offset tube in the paragraph above and select Edit Group on the popup menu to open the group in the Editing Group dialog. Observe that the offset tube is still colored blue. Select Edit | Null Tube Offsets and click Yes on the message box that appears. All tubes on the building grid are now reset to their normal location on the building grid and all the enabled tubes are black (default). June 2005 MakeComp 40 EddyVision 6.0 Edit | Reset Landmark Sets: Resets all tubes to their originally assigned landmark sets. This same selection is available on the popup menu in Figure 42. Using the Set Landmark Set on the popup menu in Figure 42 allows the user to assign existing or create new landmark sets for a single tube, individually selected tubes, group(s) of tubes, sections, or whole tubesheet maps. Reset Landmark Sets provides a way to reset all landmark sets to the way they were originally assigned in the Group Parameters dialog (Figure 37) when each group was built. Edit | Clear All: Choose this selection to reset all the enabled tubes on the building grid to disabled. View Menu – Adding/Editing Group Dialog As shown in Figure 43, the View menu on the Adding/Editing Group dialog contains two (2) choices. Each item is explained below. Figure 43. View Menu in the Adding/Editing Group Dialog View | Mirror Vertical: (V) Selecting View | Mirror Vertical flips or mirrors the enabled tubes on the building grid horizontally. Think of holding a mirror vertically next to the building grid. The pattern on the grid in the mirror would appear flipped horizontally. Figure 44 shows an asymmetrical pattern before and after using the View | Mirror Vertical function. The origin (x-y) of the building grid remains the same as represented by the cross-hair cursors in Figure 44. Before Applying Vertical Mirror After Applying Vertical Mirror Figure 44. Using the Vertical Mirror Function June 2005 MakeComp 41 EddyVision 6.0 View | Mirror Horizontal: (H) Selecting View | Mirror Horizontal flips or mirrors the enabled tubes on the building grid vertically. Think of holding a mirror horizontally next to the building grid. The pattern on the grid in the mirror would appear flipped vertically. Figure 45 shows an asymmetrical pattern before and after using the View | Mirror Horizontal function. The origin (x-y) of the building grid remains the same as represented by the cross-hair cursors in Figure 45. Before Applying Horizontal Mirror After Applying Horizontal Mirror Figure 45. Using the Horizontal Mirror Function General Notes About the Adding/Editing Group Dialog NOTES: • • • • June 2005 Rows are ALWAYS horizontal when viewed in either the Adding or Editing Group dialogs. Use the Group Angle feature in the Group Parameters dialog to rotate a group of tubes to the proper perspective when viewed on the main MakeComp window. Only enabled (filled) tubes on the building grid will be displayed in the main MakeComp window. When starting a new group of tubes on a building grid, always start the first row indented a little from the origin (x=1, y=1). In general, try to center the pattern on the building grid. This will leave a little ‘wiggle room’ if the group needs to be edited later. Other than the ‘wiggle room’ mentioned in the note above, don’t make the building grid much larger than it needs to be. MakeComp 42 EddyVision 6.0 Keyboard & Mouse Shortcuts for the Adding/Editing Group Dialog The following keyboard & mouse shortcuts are available when working in the Adding/Editing Group dialog. Panning the Building Grid: To move the building grid around within the Adding/Editing Group dialog, right-click & drag. Selecting a Tube: To select a tube on the building grid, click the tube. Once selected, the tube will have a red cross-cursor intersecting it. Moving the Cursor to Other Tubes: The arrow keys on the keyboard may be used as an alternative method to select a tube on the building grid. Enabling a Single Tube: To enable a single disabled tube on the building grid, select the tube and press either the Shift or Insert keys on the keyboard. The tube turns black (filled) indicating that the tube is now enabled. Disabling a Single Tube: To disable a single enabled tube on the building grid, select the tube and press either the Control or Delete keys on the keyboard. The tube turns clear (unfilled) indicating that the tube is now disabled. Enabling a Row of Tubes: To enable a whole row of tubes at once on the building grid, position the cursor on the first tube in the row, enter the number of tubes in the row using the numeric keypad, and then press the Insert key on the keyboard. The specified number of tubes will be enabled in a positive direction based on the Origin selection in the Group Parameters dialog (see Figure 37). Disabling a Row of Tubes: To disable a whole row of tubes at once on the building grid, position the cursor on any tube in the row, and press Shift + Delete on the keyboard. Running Enable: Holding down the Shift key while pressing any of the arrow keys on the keyboard continuously enables the tubes that the cursor passes over in the direction of the arrow key pressed. Free-hand Enable: While holding down the Shift key, click & drag the mouse over tubes to enable them. Running Disable: Holding down the Control key while pressing any of the arrow keys on the keyboard continuously disables the tubes that the cursor passes over in the direction of the arrow key pressed. June 2005 MakeComp 43 EddyVision 6.0 Free-hand Disable: While holding down the Control key, click & drag the mouse over enabled tubes to disable them. Symmetrical Insert: This is an extremely powerful feature of MakeComp for creating symmetrical tubesheets maps – which includes most feedwater heat exchangers. To use this feature: 1. Position the cursor over the first tube in the first row of the building grid, typically # 1-1; 2. Enable the first row of tubes using the Enabling a Row of Tubes technique above, which uses the numeric keypad on the keyboard; 3. Position the cursor at the first tube of the next row and press the asterisk (*) key on the numeric keypad. A new row will be enabled that is symmetrically indented or expanded depending upon the cursor placement for the second row; 4. Repeat the step above until the group of tubes is completed; REFRESH Button Clicking the REFRESH button on the main MakeComp window shown in Figure 21 simply repaints or refreshes the window. Use it to rid the window of extraneous video remnants, which can appear on some monitors if the video capabilities and memory of the PC system are less than optimal. June 2005 MakeComp 44 EddyVision 6.0 Popup Menu This topic will discuss the purpose and use of each selection on the Popup menu in the main MakeComp window shown in Figure 46. To access the Popup menu, right-click anywhere in the main MakeComp window, and then click the desired item from the menu. REMEMBER: Edit | Undo or Ctrl+Z may be used at anytime to undo any deletions or changes made using any of the following features. Popup Menu Right-click tubesheet map to access. Figure 46. Popup Menu in the Main MakeComp Window Popup| Row Ticks: Clicking the Row Ticks selection on the Popup menu displays the fly-out menu shown in Figure 47. Each selection is discussed below: Align Group causes the row ticks to line up as shown on the upper half of the tubesheet map in Figure 48. Note that the lower half of the tubesheet map remains unaligned. If the row ticks are already aligned (see Edit | Auto Compute Ticks discussed earlier), selecting this function will have no apparent effect. To use, right-click the group of tubes you wish to align the row ticks for and then select Row Ticks | Align Group from the Popup menu. June 2005 MakeComp 45 EddyVision 6.0 Figure 47. Popup Menu – Row Ticks Fly-out Menu Figure 48. Popup Menu | Row Ticks | Align Group June 2005 MakeComp 46 EddyVision 6.0 Add Selected allows the user to add row tick-marks manually. To add row ticks manually, click the first tube in the row where a row tick is desired. Shift+click additional first tubes in other rows if more than one row tick is desired. Select Popup | Row Ticks | Add Selected. The Manual Ticks Parameters dialog shown in Figure 49a is displayed. Adjust the parameters as desired, and then click OK. Figure 49b shows the row tick results based on the settings in Figure 49a. Manual Row Ticks Parameters Dialog (a) Manual Row Ticks Applied (b) Figure 49. Using Popup | Row Ticks | Add Selected Delete Selected allows the user to remove or delete selected row tick-marks manually. To remove row ticks manually, click the first tube in a row where a row tick is no longer desired. Shift+click additional first tubes in other rows if more than one row tick is no longer desired. Select Popup | Row Ticks | Delete Selected and the row ticks for the selected tubes will disappear. HINT: Popup | Select Group or Select Section may be used along with Popup | Row Ticks | Delete Selected as well. Popup | Col Ticks: Clicking the Col Ticks selection on the Popup menu displays a flyout menu with the same choices shown in Figure 47. These three (3) features function in the save way as the Row Ticks selection previously discussed, except for column ticks instead. Please refer to the Popup | Row Ticks topic above for use of these features. Popup | Edit Group: This function allows the user to edit an existing group of tubes. To use this feature, right-click on the group of tubes to be edited, then click Edit Group on the Popup menu. An Editing Group dialog similar to Figure 44 opens with the selected group displayed on a building grid. If the incorrect group appears, click Cancel on the Editing Group dialog and try selecting the correct group for editing again in the main MakeComp window; otherwise, make the desired edits and click OK for the changes to take affect. June 2005 MakeComp 47 EddyVision 6.0 Popup | Move Group: This function allows the user to manually move a group of tubes to a new location on the main MakeComp window. To use this feature, click Move Group on the Popup menu, move the cross-hair cursor over a tube in a group, click & drag to the new location, then release. The center of the selected tube is moved to the new location. Popup | Select Group: This function allows the user to select one or more groups of tubes for further action. To use this feature, right-click on the group of interest and click Select Group on the Popup menu. The group becomes selected, i.e., all tubes in the group are now highlighted in green. To select multiple groups, hold down Shift and repeat the procedure for each additional group of tubes. Popup | Delete Group: This function allows the user to delete an existing group of tubes from the tubesheet map. To use this feature, right-click on a group of tubes to be deleted, click Delete Group on the Popup menu. Popup | Select Section: Similar to Select Group above, this function allows the user to select one or more sections of a tubesheet map for further action. To use this feature, right-click on the section of interest and click Select Section on the Popup menu. The section becomes selected, i.e., all tubes in the section are now highlighted in green. To select multiple sections, hold down Shift and repeat the procedure for each additional section. REMEMBER: Tubes make up groups, groups make up sections, and sections make up tubesheet maps. Popup | Select Row:This function allows the user to select one or more rows of a tubesheet map for further action. To use this feature, right-click on the row of interest and click Select Row on the Popup menu. The row becomes selected, i.e., all tubes in the row are now highlighted in green. To select multiple row, hold down Shift and repeat the procedure for each additional row. Popup | Edit Tube ID: This function is used to assign a different tube identification to a given tube. Tube identification is usually in the format of SEC-ROW-COL. For example in Figure 50, the cursor is pointing to a tube with a tube identification of OUT-1-1. If the Sec Name field on the Parameters tab of the main Parameters dialog is left blank, then tube identifications will be in the format ROW-COL. To assign a different tube identification for a given tube, click Edit Tube ID on the Popup menu. The Edit Tube ID dialog shown in Figure 50 appears. Click on the tube you wish to re-identity. A green cursor box appears around the tube. Next, click or right-click in the SEC, ROW, and TUBE fields as necessary to dial-in the new Tube ID. Continue this process until all the tubes of interest have been re-identified. This function, though rarely used, is extremely valuable in setting the Tube IDs of seal-table thimble tubes as shown in the example in Figure 51. June 2005 MakeComp 48 EddyVision 6.0 The INC ALL TUBE IN ROW button on the Edit Tube ID dialog shown in Figure 50 simply increments all the tube (col) values in the selected row. The button has no effect on the sec or row values in the selected row. Figure 50. Using Popup | Edit Tube ID Figure 51. Example of Tube Identification for Thimble Tubes (Edit Tube ID) Popup | Select Landmark Set: This feature provides way for the user to check which landmark sets are assigned to which tubes. This is very useful for cmp files that have more than one landmark set. To use this feature, click Select Landmark Set on the Popup menu, and then click the landmark set of interest on the fly-out menu that appears. All tubes that use the selected landmark set will now be highlighted in green. As you will discover in the next topic, landmark sets can be assigned to any tubes on a tubesheet map – even a single tube. June 2005 MakeComp 49 EddyVision 6.0 Popup | Set Landmark Set: This feature provides way for the user to assign any selected tubes to an existing or new landmark set. In Figure 1, the feedwater heater cmp file has two (2) landmark sets, ‘0’ (zero) and ‘1’. Landmark set ‘0’ is assigned to all the inlet leg tubes on the lower half of the tubesheet map, while landmark set ‘1’ is assigned to all the outlet leg tubes on the upper half. In Figure 52, a pattern of tubes has been selected on the inlet leg. Clicking Set Landmark Set on the Popup menu causes the Landmark dialog box to appear as shown in Figure 52. In this example, ‘2’ has been entered in the Landmark Set Number field. Clicking OK on this dialog will cause the selected ‘EV’ tubes to be reassigned to a new landmark set numbered ‘2.’ Now, when landmark set ‘0’ is selected on the fly-out menu after clicking Popup | Select Landmark Set, the user would now see the result in Figure 53. This indicates that the ‘EV’ pattern of tubes is no longer using landmark set ‘0’. In addition to using manual select as shown in this example, Select Group, Select Section, and Select Row may also be used with this feature. Figure 52. Assigning Selected Tubes to a Different Landmark Set (Set Landmark Set) HINT: June 2005 Landmark sets are generally assigned in the Group Parameters dialog when a group of tubes is initially created. The Select Landmark Set feature is handy if, for example, the user forgets to assign an additional landmark set to, say, a section that may be made up of fifty (50) groups of tubes. The whole section could be assigned to a new landmark set at once without having to edit all fifty (50) groups. MakeComp 50 EddyVision 6.0 Figure 53. Landmark Set ‘0’ (Zero) After Reassigning Selected Tubes to a Different Landmark Set Popup | Reset Landmark Sets: This feature simply resets all tubes to their originally assigned landmark sets. This same selection is available on the Edit menu in Figure 41. Using the Set Landmark Set feature discussed in the previous topic, users can assign existing or create new landmark sets for a single tube, individually selected tubes, group(s) of tubes, sections, or whole tubesheet maps. Reset Landmark Sets on the Popup menu provides a way to reset all landmark sets to the way they were originally assigned in the Group Parameters dialog (Figure 37) when each group was built. Popup | Radial Array: This function allows the user to quickly create a radial tubesheet map like the example shown in Figure 54. To demonstrate this function, create a single row of tubes in a new group. On the main MakeComp window, right-click, then click Radial Array on the Popup menu. The Radial Array control dialog shown in Figure 55 appears. Zoom Out (Ctrl+right-click) and click a point on the window some distance from the first tube in the row (group). This establishes a center-point that the Radial Array will be drawn around. The X and Y values in the control dialog will automatically update and display the new coordinates of this point. In the Angle field, enter the desired angle or arc for the Radial Array. In the Count field, enter the number of rows to be duplicated within the arc specified and click OK. The new Radial Array appears. The settings shown in Figure 55 were used to create the Radial Array tubesheet map shown in Figure 54. June 2005 MakeComp 51 EddyVision 6.0 Figure 54. Radial Array Example Figure 55. Radial Array Dialog Popup | Cancel: Click Cancel on the Popup menu to cancel or clear the Popup menu from the window. Alternatively, when the Popup menu is displayed, the user may simply click anywhere in the MakeComp window to cancel the Popup menu. June 2005 MakeComp 52 EddyVision 6.0 Keyboard & Mouse Shortcuts for the Main MakeComp Window The following keyboard & mouse shortcuts are available when working in the main MakeComp window. To Zoom In on a map, Ctrl+Click. To Zoom Out on a map, Ctrl+Right-click. To Auto-zoom a map, Ctrl+Middle-click or ESC key. To Move or Pan a map, Middle-click+Drag. To move a group of tubes to a new location, right-click the tubesheet map, select Move Group. The cursor becomes a crosshair pointer. Click & drag any tube in any group to the new location and release. To manually select more than one tube at a time on the tubesheet map, click on the first tube to highlight it (green), and then Shift+click the remaining tubes. Alternatively, pressing Shift+any arrow key selects sequential tubes in the direction of the arrow key pressed. Shift+click a highlighted tube to deselect it. Click a tube to view statistics about the tube in the Status Bar at the bottom of the window. Statistics include the tube identification, the X-Y coordinates of the tube, the group the tube belongs to, and the landmark set assigned to the tube. Other Tips for Use in the Main MakeComp Window Enable and disable the floating ID box by toggling View | Show Floating ID. Select File | Import to copy an existing external cmp file into the current project. The copied file name becomes project.cmp. Select File | Export to save a copy of the current cmp file to a location other than the current project. Any user-defined filename may be used during Export. June 2005 MakeComp 53 EddyVision 6.0 Tutorial: Building a Simple Heat Exchanger The following procedures will take you through a systematic process to create a project, and then build a simple 2-pass heat exchanger component file for use in the new project using MakeComp. Creating a New Project In EddyVision v6.0, a project is simply a directory, which contains all of the information associated with a given component. There are several ways to create a project. This procedure will show you how to create a new project from ‘scratch’. For more information about creating and managing projects, please refer to the EddyAdmin User Manual. STEP 1: Using Windows Explorer, create a directory on your hard drive named C:\v6.0_Projects. STEP 2: Start EddyAdmin by double-clicking the EddyAdmin icon on the desktop. STEP 3: Select Project | New from the menu bar. STEP 4: In the New Project dialog, browse to C:\v6.0_Projects. STEP 5: In the Project Name box, type in the name of the project and click Save. This should be the name of the component to be inspected. In this example, we’ll be inspecting Feedwater Heater-3A. Let’s use FWH3A as the name. NOTE: EddyAdmin will create the following directory for the project: C:\v6.0_Projects\FWH3A\ STEP 6: Click Edit | Project Lookup Tables. STEP 7: Click the Components tab. STEP 8: Click the * (asterisk) above the vertical scroll bar. A new row appears at the bottom of the Components table. STEP 9: Click in each field of the new row and type in the following information: SITE CODE = CIC, COMPONENT = FWH3A, OWNER = ABC POWER GROUP, TZ (Timezone) = -4, UNIT = 2. The entry should appear as shown in Figure 56. Click OK. June 2005 MakeComp 54 EddyVision 6.0 Figure 56. Project Table – Components Tab STEP 10: Select CIC as the Site Code on the main EddyAdmin dialog. STEP 11: Ensure that the Data Format for DSET 1 is set to CoreStar. STEP 12: Ensure that the Data Directory for DSET 1 is set to ecdata\. STEP 13: In the Outage field, type 2RF05 as the outage name. HINT: In the outage name 2RF05, ‘05’ is ‘zero five’. Also, ‘2’ is for the unit, ‘RF’ means ‘refuel’, and ‘05’ is the 5th outage since startup. This is an example of one of the many possible naming conventions. STEP 14: The Date field can contain the first day of the outage, today’s date, or an earlier date. Let’s enter today’s date in the format: MM/DD/YYYY. STEP 15: Click the DBMS list box and choose the version of MS Access that will be used to manage any databases created with this project. For the purpose of this tutorial, select Access 97. NOTE: EddyVISION 32 can work with any of the three Access database formats shown in the DBMS list box. The choice made will determine the Access format used when a new database is created in this project. STEP 16: In the Tester list box, choose OMNI-100. STEP 17: In the Pusher list box, choose Track Drive. STEP 18: Click the History button to enable the use of a history file. The button turns green. STEP 19: Set the Table Rows to 5. STEP 20: Set the Table Fields to 11. STEP 21: Click the Show Oper Type button to enable it. The button turns green. June 2005 MakeComp 55 EddyVision 6.0 STEP 22: Click the Require Logon button to enable it. The button turns green. STEP 23: Optional: In the Project Notes area at the bottom of the EddyAdmin dialog, you may enter a description for the project. The final EddyAdmin dialog should appear as shown in Figure 57. Figure 57. Completed EddyAdmin Dialog STEP 24: Exit EddyAdmin. STEP 25: You will be asked if you wish to save changes. Choose Yes. TIP: June 2005 You may return to EddyAdmin anytime to make desired edits to a project. MakeComp 56 EddyVision 6.0 Creating a Component File The cmp file is one of the most important parts of good inspection planning. The author cannot express its significance enough. Take the time to create a component file that meets the needs of the inspection – especially in terms of tube identification. For this tutorial, we will create a U-tubed feedwater heater showing both halves (legs) of the tube bundle. The intent is to inspect only the straight-lengths on each leg and we will setup the component file accordingly. Figure 58 shows the component that we’ll build during this tutorial. 18 1 1 1 15 1 1 1 1 1 10 1 1 1 1 5 1 1 1 1 1 1 5 3 2 3 3 2 1 4 3 2 1 1 3 2 2 1 10 5 4 3 3 2 1 5 4 2 5 3 2 1 2 1 5 3 2 4 3 1 15 6 5 4 2 1 7 6 6 5 3 2 4 3 1 2 1 18 1 19 19 21 20 20 22 21 21 22 22 22 22 23 23 23 25 25 10 11 12 13 14 15 16 17 18 19 20 21 22 23 24 12 13 12 12 13 13 12 11 10 11 9 10 9 7 8 5 9 6 5 10 7 6 4 8 17 12 9 18 15 10 16 14 11 12 11 8 15 14 13 12 9 16 15 14 13 10 17 16 15 14 11 18 17 16 15 19 18 12 18 17 13 21 20 19 18 33 34 31 25 26 27 28 29 30 31 28 27 27 25 26 25 23 22 34 33 32 31 31 29 29 28 27 26 30 28 28 27 26 25 29 27 27 26 25 24 28 26 34 33 33 32 31 30 33 32 32 31 30 29 32 31 31 30 29 28 31 30 30 29 28 27 30 29 29 28 27 26 29 28 28 27 22 21 32 34 33 30 24 23 31 32 29 25 24 23 22 20 19 17 16 22 21 24 23 30 31 33 33 28 26 24 29 30 32 27 26 25 25 23 23 22 21 20 24 22 22 21 20 19 23 21 21 20 19 18 22 20 20 19 18 17 21 19 19 18 17 16 20 18 18 17 13 10 7 17 15 13 19 17 25 24 28 29 31 32 32 26 27 26 28 30 31 31 32 31 25 27 26 26 25 24 23 26 25 25 24 23 22 25 24 24 23 22 21 24 23 23 22 21 20 23 22 22 21 20 19 22 21 21 20 19 18 16 12 9 6 16 14 11 8 5 14 11 18 21 20 20 19 17 15 13 10 7 15 13 19 16 14 12 9 17 20 19 18 16 16 14 12 18 15 13 11 8 15 13 11 16 19 18 17 15 14 12 10 7 14 12 17 15 18 17 16 14 13 11 16 14 13 17 16 15 13 12 10 15 13 12 16 15 14 12 11 3 14 12 11 15 14 13 11 4 14 29 30 31 30 30 30 30 29 30 29 29 29 29 29 28 29 28 28 28 28 27 27 27 27 27 27 26 26 24 26 26 26 26 28 28 28 27 28 27 27 27 27 26 27 26 26 26 26 25 26 25 25 25 25 24 24 24 24 24 24 23 23 23 24 25 23 4 2 18 20 21 21 22 24 22 6 3 17 18 20 20 21 23 23 21 6 3 2 17 19 20 22 22 24 25 25 25 25 23 23 24 24 24 24 20 8 5 18 19 19 21 21 23 19 8 5 4 16 18 18 19 20 22 23 18 9 7 16 18 20 21 22 22 22 23 23 17 9 7 6 15 17 19 19 21 22 16 10 8 15 17 17 17 18 18 20 21 22 15 10 8 7 16 17 19 20 21 20 21 21 14 10 9 14 16 16 16 17 18 19 20 20 20 19 19 13 10 9 8 13 15 14 16 15 17 18 19 18 18 19 19 20 14 17 17 18 18 19 13 16 16 17 17 18 18 15 15 16 16 17 17 17 16 15 15 16 16 16 15 16 14 15 12 14 12 11 9 14 13 15 14 15 15 15 14 15 15 14 14 13 13 14 11 13 11 11 9 8 12 11 10 8 7 5 10 12 14 13 13 14 13 13 14 12 13 14 14 14 11 10 12 10 11 10 8 7 9 9 7 6 4 9 12 11 10 12 13 13 13 12 9 11 12 13 13 13 12 12 11 9 9 8 7 6 4 3 8 6 5 9 8 6 10 12 11 11 12 10 11 12 8 10 11 12 12 12 11 11 10 8 7 5 4 9 8 7 10 10 9 11 10 11 11 9 10 11 11 11 10 10 8 7 6 4 3 1 6 8 7 6 5 9 8 7 9 10 10 10 9 10 10 10 9 9 7 6 6 5 4 7 9 9 8 8 9 8 8 7 6 5 4 7 6 5 7 9 8 8 9 8 8 7 7 6 5 4 4 6 6 5 7 9 8 9 8 8 7 7 7 7 7 7 6 6 5 4 3 3 2 1 4 6 5 5 6 6 9 8 8 7 8 7 7 6 7 6 6 5 6 5 5 5 6 6 6 5 5 4 3 2 2 1 4 5 5 4 5 5 4 6 4 4 3 4 3 3 4 5 5 5 4 4 3 2 1 1 3 3 2 4 3 4 4 2 3 4 4 4 3 3 2 1 1 2 3 3 3 2 3 3 3 2 2 2 2 2 1 2 2 2 2 2 2 2 32 30 30 29 28 27 24 23 20 19 14 Figure 58. Tutorial Component (FWH3A) June 2005 MakeComp 57 EddyVision 6.0 To build the component shown in Figure 58: STEP 1: Double-click the MakeComp icon on the desktop. The FWH3A project should open. If not, select File | Open Project, select c:\v6.0_Projects\FWH3A, and click Open. STEP 2: Select File | New Component. STEP 3: Click the Parameters button on the main screen. STEP 4: Click the Parameters tab on the Parameters dialog. STEP 5: In the Component Type field, type Feedwater Heater. STEP 6: In the Model Name field, type FWH3. This component can be used for feedwater heaters 3A, 3B, and 3C; therefore, it only has to be built once and shared between the other projects. TIP: STEP 7: In the Row Name field, type ROW. STEP 8: In the Col Name field, type TUBE. STEP 9: In the Sec Name field, type PASS. STEP 10: In the Inlet Name field, type INLET. STEP 11: In the Outlet Name field, type OUTLET. STEP 12: Enable Draw Sec Labels and Use Tube Labels by clicking the button beside each. The buttons turn green. STEP 13: If necessary, disable Has Ubends by clicking the button beside it. The button turns gray (not green) and appears raised. NOTE: June 2005 Has Ubends is turned on only when building a U-tubed component for a project where the U-bends will be inspected and only half the component will be shown on the map. This feature calculates the length of each U-bend for each tube. MakeComp 58 EddyVision 6.0 The Parameters tab of the Parameters dialog should now appear as shown in Figure 59. Figure 59. Parameters Dialog - Parameters Tab STEP 14: Click the Tube Labels tab. STEP 15: Click the * (asterisk) at the top of the scroll bar for the Sec Labels 3 times. This creates 3 blank rows beginning with 0 (zero). STEP 16: Click in the Sec Label field for Sec 1 and type IN. STEP 17: Click in the Sec Label field for Sec 2 and type OUT. The Sec Label fields on the Tube Labels tab should now appear as shown in Figure 60. Figure 60. Parameters Dialog - Tube Labels Tab NOTE: Sec 0 (zero) may be used at the discretion of the user; however, it’s easier to keep track of the sections of multi-section components if the first section used is 1. STEP 18: Click OK on the Parameters dialog. NOTE: June 2005 We’ll come back and enter the landmarks later. MakeComp 59 EddyVision 6.0 Now that the preliminary parameters are setup, let’s add the first group of tubes for the component: STEP 1: Ensure that View | Flip Horizontal and View | Flip Vertical are both disabled (i.e. no checkmark beside either one). STEP 2: Click the Add Group button at the top of the main MakeComp screen. STEP 3: Click the Parameters button to display the Group Parameters dialog. STEP 4: In the Num Row field, type 23. (i.e., about 5 more rows than each group of tubes.) STEP 5: In the Num Col field, type 37. (i.e., about 3 more tubes than the longest row.) STEP 6: In the First Row field, type 1. STEP 7: In the Group Angle field, type 0. STEP 8: In the X Offset field, type 0. STEP 9: In the Y Offset field, type 0. STEP 10: In the Tube Pitch field, type 0.938. STEP 11: In the Pitch Angle1 field, type 60. STEP 12: In the Pitch Angle2 field, type 60. HINT: For detailed information regarding Tube Pitch and Pitch Angle values required by MakeComp, please review these items under the Add Group Button topic discussed earlier. STEP 13: In the Tube ID field, type 0.652. STEP 14: In the Tube OD field, type 0.750. STEP 15: Click the Material list box. Note that the list box is empty. This is because there are no entries in the Materials project lookup table. Let’s add an entry. STEP 16: Click OK on the Group Parameters dialog, but leave the Adding Group dialog open. STEP 17: Click Start | Programs | EddyVision 6.0 | EddyAdmin. June 2005 MakeComp 60 EddyVision 6.0 STEP 18: If necessary, select File | Open Project and open the FWH3A project. STEP 19: Select Edit | Project Lookup Tables. STEP 20: Click the Materials tab. STEP 21: Click the * (asterisk) above the vertical scroll bar. A new row appears at the bottom of the Materials table. STEP 22: Click in the Name field and type 304SS. STEP 23: Click in the Conductivity field and type 2.5. STEP 24: Click OK on the Project Table dialog. STEP 25: Select File | Save. STEP 26: Select File | Exit. TIP: Use the preceding steps to add or edit entries to any of the Project Lookup Tables. Simply choose the lookup table of interest. STEP 27: Return to the Adding Group dialog in MakeComp, click the Parameters button to display the Group Parameters dialog. STEP 28: Click the Material list box and select 304SS. STEP 29: Click in the Sec field until 1 is displayed. STEP 30: Ensure the Land Set field is set to 0 (zero). STEP 31: Click the Numbering list box and select Row (Skip Spaces). STEP 32: Click the Origin list box and select Upper Left. STEP 33: The Group Parameters dialog should look like Figure 61. Click OK on the Group Parameters dialog. June 2005 MakeComp 61 EddyVision 6.0 Figure 61. Completed Group Parameters Dialog for Section 1 A building grid now appears based on the settings in the Group Parameters dialog. We’ll now enable the group of tubes that exist in the lower half (inlet pass) of the feedwater heater. A printout of the page containing Figure 58 will be helpful for the remaining steps STEP 1: Look at Figure 58. Counting the blank spaces in the first row on the lower half (IN), decide on the total number of tubes in row #1. You should come up with 33. STEP 2: Click on the building grid in the upper left corner so that Grid row=1 col =1 is displayed in the status bar are the bottom of the Adding Group dialog. REMEMBER: STEP On the building grid, rows always are horizontal. 3: On the numeric keypad, type 33 and press the Insert key on the keyboard. 33 filled (black) tubes should now be displayed for row #1 from left to right. If you are not getting the expected results, verify the entries in the Group Parameters dialog per the preceding sequence of steps. TIP: STEP 4: Look at Figure 58 again. Decide on the total number of tubes in row #2. You should come up with 34. STEP 5: Click on the building grid so that Grid row=2 col =1 is displayed in the status bar at the bottom of the Adding Group dialog. STEP 6: On the numeric keypad, press the * (asterisk) key. 34 filled tubes should now be displayed for row #2. TIP: June 2005 Using the * (asterisk) on the numeric keypad as described above is a function called Symmetrical Insert. Use it for building groups of tubes where the tube pattern is symmetrical or balanced such as this feedwater heater tubesheet map. MakeComp 62 EddyVision 6.0 STEP 7: Click on the building grid so that the red crosshairs are over the first tube in row #3 (Grid row=3 col =1). Relative to the first tube in row #2, you could say, “This tube is down and in one tube from the previous tube”. STEP 8: On the numeric keypad, press the * (asterisk) key. 33 filled tubes should now be enabled for row #3. STEP 9: Repeat the two steps above for the remaining rows of the lower half of the component before continuing to the next step. STEP 10: The Adding Group dialog should now look like the one shown in Figure 62. Click OK on the Adding Group dialog. MakeComp returns to the main screen and displays only the enabled tubes on the building grid. Figure 62. Adding Group Dialog - Section 1 Let’s temporarily add row tick marks to the map. The row ticks will help us to quickly identify and remove the blank tubes later. STEP 1: Select Edit | Auto Compute Ticks. STEP 2: In the Row Ticks section of the Auto Tick Param dialog, enable (green) Used, Align Ends, First Always, and Last Always. STEP 3: In the Row Ticks section of the Auto Tick Param dialog, click in the Do First/Last By field until SEC is displayed. June 2005 MakeComp 63 EddyVision 6.0 STEP 4: In the Row Ticks section of the Auto Tick Param dialog, click in the Inc field until 5 is displayed. STEP 5: In the Row Ticks section of the Auto Tick Param dialog, click in the Tick Length field until 1.0 is displayed. STEP 6: In the Row Ticks section of the Auto Tick Param dialog, click in the Max Length field until 5.0 is displayed. STEP 7: In the Row Ticks section of the Auto Tick Param dialog, click in the Closest Allowed Tube field until 1.0 is displayed. STEP 8: In the Col Ticks section of the Auto Tick Param dialog, disable (gray) Used. The remaining settings in this section may be disregarded. The Auto Tick Param dialog should now look like Figure 63. Figure 63. Auto Tick Param Dialog STEP 9: Click OK on the Auto Tick Param dialog. Row ticks now appear on every 5th row of the section, plus the first and last rows. Compare the tubesheet map on-screen to the lower half of Figure 58. TIP: June 2005 Press ESC on the keyboard to auto-fit the tubesheet map to the screen. MakeComp 64 EddyVision 6.0 NOTE: The section watermark (IN) will not appear on-screen. Watermarks only appear on the printed map. To remove the blank tubes: STEP 1: Click the 8th tube in row #1. A green cursor box appears around the tube. STEP 2: Press the Shift key on the keyboard and click the 8th tube from the end of row #1. A green cursor should now appear only around these two tubes. STEP 3: Select Edit | Delete Selected Tubes. The selected tubes disappear from the map. If the wrong tubes are deleted, simply select Edit | Undo Delete Selected Tubes (Ctrl+Z) and try again. TIP: STEP 4: Click the center tube (IN-9-16) in row #9. A green cursor box appears around the tube. STEP 5: Select Edit | Delete Selected Tubes. The selected tube disappears from the map. STEP 6: Click the 4th tube in row #18. A green cursor box appears around the tube. STEP 7: Press the Shift key on the keyboard and click the 4th tube from the end of row #18. A green cursor should now appear only around these two tubes. STEP 8: Select Edit | Delete Selected Tubes. The selected tubes disappear from the map. A total of 504 tubes should now be displayed in the lower left side of the MakeComp screen. STEP 9: Select File | Save. We’re about done creating the basic component. Let’s create the other half of the component by using the Dupe Group feature as follows: STEP 1: Click any tube in the map. A green cursor box appears around the tube. STEP 2: Right-click the selected tube and click Edit Group in the popup. The group is opened in the Editing Group dialog (same as the Adding Group dialog when adding a new group). STEP 3: Select Edit | Dupe Group. The dialog’s title changes to Adding Group 1. June 2005 MakeComp 65 EddyVision 6.0 STEP 4: Click the Parameters button. The Group Parameters dialog appears. STEP 5: Select Lower Left in the Origin list box. STEP 6: Click in the Sec field until 2 is displayed. STEP 7: Click in the Land Set field until 1 is displayed. STEP 8: The Group Parameters dialog should look like Figure 64. Click OK on the Group Parameters dialog. Figure 64. Completed Group Parameters Dialog for Section 2 If the new tube group appears staggered or zigzagged, simply click the Vert Offset button in the upper right of the Adding Group dialog once. TIP: STEP 9: Click OK on the Adding Group dialog. The complete map is now displayed on the main MakeComp screen. STEP 10: Select Edit | Auto Compute Ticks. STEP 11: Click OK on the Auto Tick Param dialog. The tubesheet map on-screen should now match the one shown in Figure 58. STEP 12: Select Edit | Auto Compute Sec Labels. Before continuing, perform either File | Print Preview or Print in order to see the effect of the Auto Compute Sec Labels feature. Note the large centered watermarks. STEP 13: Click the Parameters button on the main MakeComp screen. STEP 14: Click the Tube Labels tab. STEP 15: Click in the Height field for Sec 1 and type 7. STEP 16: Click in the Height field for Sec 2 and type 7. June 2005 MakeComp 66 EddyVision 6.0 STEP 17: Click OK on the Parameters dialog. When printed, the watermarks will now appear centered in each pass at a reasonable font size. STEP 18: Select File | Save. STEP 19: Proceed to the next tutorial topic for Adding Landmarks to a Component File. Adding Landmarks to a Component File In this tutorial, unlike the ‘real world’, the landmarks and their associated distances are readily available. Many times, however, landmark information is difficult to obtain. In those instances, you can use the eddy current data to determine the landmarks in the component as well as the distance each one is located from the tube end. To do this, physically measure the straight-length, setup a manual scale in the analysis software, and review eddy current data of selected tubes in both halves of the component. Using the manual scale, landmark distances can easily be measured, noted, and entered accordingly into the cmp file. Because the landmarks are typically different in the lower half (inlet pass) of a horizontal feedwater heater vs. the upper half (outlet pass), each half must be treated as an independent tube bundle with its own landmark set. Table 1 and Table 2 each show a list of the landmarks for each landmark set used for each section or pass. Each table shows all the values required to setup each landmark set. We will refer to this table while entering the landmarks for the component; therefore, a printed copy will be handy. NOTE: June 2005 Landmarks in the cmp file are only required if EddyVision Analysis software will be used to analyze the eddy current data and either manual or auto-landmarks will be used to identify the landmarks in the heat exchanger. MakeComp 67 EddyVision 6.0 Table 1. Landmarks for Tutorial Component - Section IN (Landmark Set 0) LAND# 1 2 3 4 5 6 7 8 9 10 11 12 13 14 Landmark NAME TYPE LEG Inlet Tube End Inlet Tubesheet Baffle Plate Baffle Plate Baffle Plate Subcooler End Plate TSP TSP TSP TSP TSP TSP TSP TSP TEI TSI B01 B02 B03 TEH TSH BAF BAF BAF Inlet Inlet Inlet Inlet Inlet SEP SP C03 C04 C05 C06 C07 C08 C09 C10 SP SP SP SP SP SP SP SP POS(ition) ANGLE FB INT FIRST LAST REQ 0.000 6.563 30.376 54.376 78.376 1 1 1 1 1 18 18 18 18 18 Y Y N N N Inlet 104.063 1 18 Y Inlet Inlet Inlet Inlet Inlet Inlet Inlet Inlet 156.376 210.376 264.376 315.376 364.376 415.376 469.376 523.376 1 1 1 1 1 1 1 1 18 18 18 18 18 18 18 18 Y Y Y Y Y Y Y Y FIRST LAST REQ 1 1 1 1 1 1 1 1 1 1 1 1 18 18 18 18 18 18 18 18 18 18 18 18 Y Y Y Y Y Y Y Y Y Y Y Y Table 2. Landmarks for Tutorial Component – Section OUT (Landmark Set 1) LAND# 1 2 3 4 5 6 7 8 9 10 11 12 Landmark NAME TYPE Outlet Tube End Outlet Tubesheet TSP TSP TSP TSP TSP TSP TSP TSP TSP TSP TEO TSO H01 H02 H03 H04 H05 H06 H07 H08 H09 H10 TEH TSH SP SP SP SP SP SP SP SP SP SP NOTES: • • • • • June 2005 LEG Inlet Inlet Inlet Inlet Inlet Inlet Inlet Inlet Inlet Inlet Inlet Inlet POS(ition) 0.000 6.563 54.376 102.376 156.376 210.376 264.376 315.376 364.376 415.376 469.376 523.376 ANGLE FB INT No values are required in either the Angle or FB INT columns. POS values are cumulative from the tube end. Since each section is treated independently, Inlet must be used in the LEG column in both landmark sets – even in Landmark Set 1 for the outlet section. The Cold leg of a feedwater heater is the inlet, while the Hot leg is the outlet; hence, the C and H used in the Names. Landmark types TEC and TSC are only used in either straight-tubed components OR in U-tubed components where only one-half of the component is used as the tubesheet map, i.e., steam generators. MakeComp 68 EddyVision 6.0 Let’s get started by entering the landmarks for Landmark Set 0. STEP 1: Assuming the tutorial project (FWH3A) is opened in MakeComp, click the Parameters button at the top of the main MakeComp screen. STEP 2: Click the Landmarks tab on the Parameters dialog. STEP 3: In the Set list box, select 0. HINT: STEP 4: Click in the Name field of the first row of the Landmark table and type TEI (Tube End Inlet). The landmark Name can be any user-defined term. This is the landmark label that will appear in the landmark strip in the analysis software. TIP: STEP We’ve already assigned Landmark Set 0 to Group 0, which was assigned to Section 1. All this was done in the Group Parameters dialog for the lower half of the component. 5: Click in the Type field of the first row of the Landmark table and type TEH. NOTE: TEH, TSH, SP, BAF, BW, AVB, FB, RB, VS, TSC, and TEC are reserved landmark types. For auto-locate to work properly during analysis, TEH must be the first landmark type entered at the top of all landmark tables. STEP 6: Click in the Leg field of the first row of the Landmark table and type the letter I. INLET will automatically be entered by the software. STEP 7: Click in the Pos(ition) field of the first row of the Landmark table and type 0. STEP 8: Leave all Angle and FB Int fields blank for the tutorial. STEP 9: Click in the First field of the first row of the Landmark table and type 1. This defines the first row where this landmark is expected to be present. STEP 10: Click in the Last field of the first row of the Landmark table and type 18. This defines the last row where this landmark is expected to be present. NOTE: June 2005 The component shown in Figure 58 has 18 rows of tubes in each half. The default value of 999 for the Last field would be acceptable as well. MakeComp 69 EddyVision 6.0 STEP 11: Click in the Req(uired) field of the first row of the Landmark table and type Y(es). This forces auto-locate to label this landmark for every tube in the First - Last range of rows. STEP 12: Click the * (asterisk) above the vertical scroll bar. A new row appears in the Landmark table. STEP 13: Continue entering the remaining landmarks for Landmark Set 0 while referring to Table 1. When you have completed this step, continue to the next series of steps to enter the landmarks for Landmark Set 1 (upper half). When you have finished, the Landmarks tab of the Parameters dialog should look like the one shown in Figure 65. Figure 65. Parameters dialog - Landmarks Tab Showing Landmark Set 0 To enter the landmarks for Landmark Set 1: STEP 1: Ensure that the Landmarks tab of the Parameters dialog is currently being displayed. STEP 2: In the Set list box, select 1. A blank landmark table will appear. HINT: June 2005 We’ve already assigned Landmark Set 1 to Group 1, which was assigned to Section 2. All this was done in the Group Parameters dialog for the upper half of the component. MakeComp 70 EddyVision 6.0 STEP 3: Enter all the landmarks shown in Table 2 using the same techniques as in the previous series of steps for entering the landmarks in Landmark Set 0. STEP 4: When you have finished, the Landmarks tab of the Parameters dialog should look like the one shown in Figure 66. Click OK on the Parameters dialog. Figure 66. Parameters dialog - Landmarks Tab Showing Landmark Set 1 Finally, you should double-check the landmark set assignments as follows: STEP 1: Right-click on the tubesheet map and choose Select Landmark Set | 0 from the popup menu. All tubes assigned to Landmark Set 0 should be highlighted. If not, right-click the tubesheet map and select Reset Landmark Sets from the popup menu. STEP 2: Right-click on the tubesheet map and select Select Landmark Set | 1 from the popup menu. All tubes assigned to Landmark Set 1 should be highlighted. STEP 3: Select File | Save on the main menu bar of MakeComp. STEP 4: Exit MakeComp. June 2005 MakeComp 71 EddyVision 6.0 Rotating Groups of Tubes The following steps are provided so that you can experience how to rotate groups of tubes so that the final tubesheet map displayed in the main MakeComp window appears in the same orientation as the physical heat exchanger. To demonstrate this concept, you will be shown how to rotate both groups (sections) of the cmp file you just finished creating in this tutorial so that the tube bundle will appear to be rotated 30°. To begin, open the FWH3A project in MakeComp. STEP 1: Right-click the inlet pass (lower half) of the tubesheet map, and select Edit Group from the Popup menu. MakeComp opens the group in an Editing Group dialog. STEP 2: Click the PARAMETERS button to display the Group Parameters dialog shown in Figure 61. STEP 3: In the Group Angle field, enter a value of −30 (minus 30), then click OK. No effect will be seen in the Editing Group dialog. STEP 4: Click OK on the Editing Group dialog to return to the main MakeComp window. Note that the inlet pass has been rotated 30° clockwise. STEP 5: Repeat steps 1 through 4 for the outlet Pass (upper half) of the tubesheet map. STEP 6: Finally, all that's left to do is add the row tick marks by selecting Edit | Auto Compute Ticks. Notice how the row tick lines line-up to the axis of the rows. If you wish to return to the original tubesheet perspective before any rotation was applied to the tubesheet map above, you may choose either Edit | Undo several times or simply exit MakeComp without saving; however, the latter assumes that you saved the cmp file in the previous topic. June 2005 MakeComp 72 EddyVision 6.0 Timesaving Tips The following timesaving tips are offered by the author based on past experiences: The quality of the source tubesheet maps used to build from is directly related to the time it takes to complete the task. Clear, concise source maps will greatly reduce the time required. Inversely, poor quality or faxed maps can be a nightmare to build from. Make a scale for your source tubesheet map for measuring the number of tubes per row. Fold a piece of paper in half, line the edge up with the longest row of tubes on the source map, and mark the location of the center of each tube along the row on the edge of the scale. Number your scale every fifth tube or so. Now you can quickly measure each row with the scale vs. counting your life away. Build identical components only once! For example, if a main condenser waterbox tubesheet is the same in all the waterboxes, there's no need to build it more than once. The same component file can be used for all the waterbox projects. The same goes for all types of heat exchangers. Don't build both an inlet and outlet component file for the same straight-tubed component. Build and save only a component as viewed from the inlet end. If an outlet end view is required, open the inlet file, select View | Flip Horizontal, and File | Export using a different name indicating outlet view. This cmp file can then be imported into the applicable outlet project. When stay rods, cutouts, vent gaps, and other blank areas exist on a source tubesheet map, go ahead and build each group as if tubes are present in those locations. Then, remove them all at once on the main MakeComp window by first selecting them, then deleting them using the Edit | Delete Selected Tubes feature on the menu bar. Finally, the better the design information available, the better the final tubesheet map will appear. Accurate horizontal tube pitch, interior pitch angles, and tube OD are essential values that greatly influence the appearance of the final tubesheet map. A Final Word MakeComp can be used to build almost any conceivable tubesheet map. After some practice, you'll be building simple to complex tubesheet maps in no time. June 2005 MakeComp 73