1
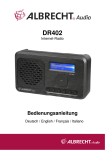
User Manual
Internet Radio
WR-230
Please read this user manual carefully before using the receiver.
Before you start
Please ensure the following is ready:
You have a broadband internet connection.
A wireless broadband router is connected to the internet successfully.
The radio supports Wireless B, G connection (Wireless N router can also be used with the
setting on B or G).
You know the Wired Equivalent Privacy (WEP) or Wi-Fi Protected Access (WPA) data
encryption code/password. You need to key in the correct code when the radio is connected
to the wireless router for network connection.
If you do not know the code/password, please contact the person /technician who set up the
router/network for you.
The radio can work via Wireless network connection (Wi-Fi connection)
Precautions
The radio should not be used in a high temperature or high humidity environment over
prolonged periods of time as this may damage the unit.
Keep the radio away from liquids as it may get damaged. Please switch off the radio
immediately if water or liquids is spilled into the radio. Consult with the shop you bought this
radio for any question.
Avoid using or storing the unit in dusty or sandy environment.
Do not open and repair the radio by yourself.
Use only the AC adaptor supplied with the radio.
Connecting a power supply with a different rating will cause permanent damage to the radio
and may be hazardous.
Clean only with dry cloth.
1
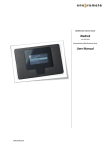
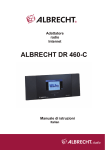
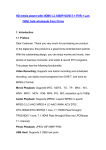
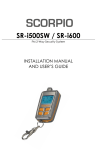
Location of Controls
Front
1
2
1. Remote control sensor
2. LCD display
3. Speaker
4. Left / Back button
5. Right button
6. Standby button
3
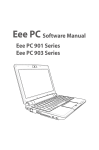
Top
4
8
9
5
6
7. Volume / Dial / Select rotary knob
(Rotate to adjust the volume or browse
the menu. Push down the button to
confirm selection)
7
10
8. Up button
9. Preset button
10. Down button
11
12
11. Home button
12. Sleep timer button
13. Alarm button
13
14. Snooze button
14
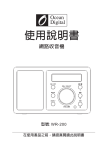
Back
15. 3.5 mm Line out jack
16. 3.5 mm earphone jack
17. DC jack
Line out
15 16 17
2
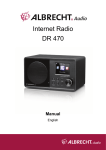
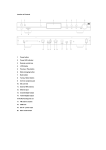
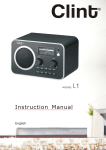
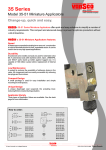
Remote controller
Switch speaker on/off
Standby button
0... 9 Call up favorites/memory;
input letters and numbers
Favorites button
Long pressing to preset station.
Press it briefly to recall station.
Dim display illumination
Up cursor button
Left cursor button
Right cursor button
OK Confirm selection
Down cursor button
Increase volume
Alarm button
Decrease volume
Sleep timer button
MODE
To switch between the radio functions
Main menu button
EQ Set tone
Media Center:
back one track
Media Center:
forward one track
Media Center:
play/pause
Battery compartment on the rear
3
Remote controller Key Definition
key 0: ‘0’->‘DEL’(Delete button)
key 1: ‘1’->‘@’->‘ ’(Space)->‘!’-> ”(double quotes) ->‘#’->‘$’->‘%’->‘&’-> ’(single
quotes)->‘(’->‘)’->‘*’->‘+’->‘,’->‘-’->‘.’->‘/’->‘:’->‘;’->’<’->’=’->’>’->‘?’->‘[’->‘\’->‘]’->‘^’>‘_’->‘’’->’{’->‘|’->’}’->‘~’
Key 2: ‘2’->‘A’->‘B’ ->‘C’->‘a’ ->‘b’ ->‘c’
Key 3: ‘3’->‘D’->‘E’ ->‘F’->‘d’ ->‘e’ ->‘f’
Key 4: ‘4’->‘G’->‘H’ ->‘I’->‘g’ ->‘h’ ->‘i’
Key 5: ‘5’->‘J’->‘K’ ->‘L’->‘j’ ->‘k’ ->‘l’
Key 6: ‘6’->‘M’->‘N’ ->‘O’->‘m’ ->‘n’ ->‘o’
Key 7: ‘7’->‘P’->‘Q’->‘R’->‘S’->‘p’->‘q’->‘r’->‘s’
Key 8: ‘8’->‘T’->‘U’ ->‘V’->‘t’ ->‘u’ ->‘v’
Key 9: ‘W’->‘X’->‘Y’->‘Z’->‘w’->‘x’->‘y’->‘z’
Remark: press ‘"
’ to move to next character and press 'OK' button to confirm.
You can also press #
$
to change the character /number, then press the right key to confirm the
entry.
After you finish the entry, press the select button to confirm.
Setting up
Connect the radio with the AC adapter, one end to the socket labeled DC at the back of the
radio, the other end to plug in to the wall socket. Then power on the radio.
Caution: Use only the mains adapter supplied with the radio. Connecting a power supply with
a different rating will cause permanent damage to the radio and may be hazardous.
1. The display on the front of the radio will light up and say:
Welcome
2. Then you can see the different languages option, you can tune the knob then press to
choose the one you need.
8:54AM
• English
Deutsch
Français
<
2/7
8
3. Then it will ask if you want to Enable ‘Check network when Power On’, please select Yes.
4. Please choose <Yes> to start configure the network. Then please choose Wireless to select
the Network. (the Wired version is not available on this model)
12:00AM
Would you like to
configure Network now?
Yes
Yes(WPS)
Then it will start scanning for Wireless Network.
8:54AM
Scanning for
Wireless Network...
>>>>>>
4
NO
5. It will display a list of the available Wi-Fi network available.
12:00AM
HN-linksys
DEMO
KCG_AP1
<
6/10
>
Select your Wi-Fi network, it will request to input the WEP (Wired Equivalent Privacy) or
WPA (Wi-Fi Protected Access) code if your network is configured with the encryption code.
If it is not configured with encryption code, it will connect to the network automatically.
To enter the encryption code of your Wi-Fi network, follow the steps below.
1. Select your network:
<linksys>
2. Then it will show you
12:01AM
Enter Password
1/1
! MOVE "
INPUT:0-9#
$
OK8
Note: The encryption code would have been set up by the person who set up and configured
your network. Please follow the same character in upper or lower case of your password.
Please refer to the <Remote Controller Key Definition> section to know more details of the
“Remote control character list” for you to enter the passwords. Press “"
” button to go to the
next word, press “!” button to delete the wrong word you have entered. Press #
$
to select
the character or numbers to enter.
If you want to enter the passwords on the radio unit, you can use the Dial/Select rotary knob.
Follow the steps below:
- Rotate the knob to select the character.
- Press the "
button to go to the next entry.
- After you finish the entries, push down the Rotary knob to confirm.
3. If you complete the key then press OK to confirm. The display shows “Connecting to
network” as the radio connects to the network.
12:00AM
Connecting
to Network...
>>>>>>
4. If the connection is OK, it will show the main menu as below:
8:55AM
Internet Radio
Media Center
Information Center
1/6
>
5. If your network router has WPS function, you can choose the WPS to continue. To activate
the WPS function, hold and press the <Mode> button on the remote controller over 3
seconds. It will pop up the message and ask you to press the WPS key on the router.
5
Using the Radio
You can now start listening to thousands of radio stations over the world. You will find the
options below on the main menu:
-Internet Radio
-Media Center
-Information Center
-Configuration
Select <Internet Radio>, then <Radio Station/Music> to start listening the worldwide radio
stations,
My Favorite
This is to show the list of your Favorite stations which have been assigned to the presets.
To preset a station:
While you are playing the favorite station, simply hold and press the ★ key on the remote
controller until the following screen appears:
Add to My Favorite
1 .977 The 80s Channel
.977 The 90s Chanr
MOVE# 2/2
OK8
The icon
will appear, it means the station is added to the radio preset.
The presets will be stored in ascending order. You can store up to 250 presets.
You can edit your Favorite list with the following options:
Delete – To delete the selected station
Shift up/Shift down – To shift the selected station to a particular ranking on the list.
Rename – To rename the selected station
Play – press and play the selected station
To do the edit, simply press the ★ button briefly to enter the Preset station list.
Choose the radio station that you want to make with the above changes. Then press the Right
key, it will enter into the list with the options listed above. Then choose your desire action.
iRadio
Delete
Shift Up
Shift Down
<
1/5
>
To recall a preset station:
Press the ★ button briefly and choose your desire station.
Auto scan
This function provides a trial listening of every station for 30 seconds on the station list you
have selected. It will play every station from the current station list for 30 seconds and scan
the next station automatically.
Remark: Press ‘Select’ button or the “OK” button on the remote to stop station scanning and
remain on the current station.
Play
Play the current radio station.
6
Radio Station / Music
Select this option, then you can select your desired radio station by Category, Genre or
Location.
Local Radio
If you want to access quickly the radio station located in your area, select this function and it
will display the list of the stations available in your area.
History
The radio will memorize the stations you have listened on the radio. It can memorize up to 10
stations.
If you have listened more than 10 stations, it will supersede the first station that you have
listened.
Service
Search Stations
You can find your desire radio station by entering the name of the radio.
Add New Radio Station
If you cannot find your desire station from the Radio station list and you have the URL
address, you can input the link here and add to your favorite list.
Media Center
UPnP (Universal Plug and Play)
You can stream music from the Networked device which supports UPnP function, allow
sharing of the data and entertainment. For instance, most of the latest computer laptop
supports UPnP, and you can stream the music from Windows Media Player application on the
computer and listen on your radio.
1. If your PC is running Microsoft Windows XP, then you can use Windows Media Player
11(WMP11) to act as your UPnP( Universal Plug and Play) media server. (For Windows 7 or
above, please download the correspond version of Windows Media Player). Windows
Media Player 11 may be downloaded from Microsoft’s website and install by following the
instructions detailed in its installation wizard.
2. Once installed, Windows Media Player 11 will create a library from all the media files
available to it on your PC. To add new media files to the library, select’ File > Add to
Library…> Advanced Options’, Click ‘Add’ and choose the files you wish to add and click’
OK’.
3. You will now need to connect your Internet radio to Windows Media Player 11 and configure
it to allow the radio to access your media library. In order to this , you will need to do the
following:
a. Go to the main menu of the radio, select <Media Player> <UPnP>.
b. It will scan for all available UPnP servers . Note, this may take a few seconds for the radio
to complete its scan and before the scan has completed, the radio will display ‘[Empty]’.
The radio will continue to display ‘[Empty]’ if no UPnP servers and found.
c. After a successful scan. Select your UPnP server, by rotating the dial if there is more than
one UPnP server, and then press SELECT (note, your radio will display’ Access Denied’ at
this stage)
4. Your PC will now prompt you that a device has attempted to connect to your UPnP server. In
order to allow the radio to have access to the media files, you will need to click the ‘Library’
tab from Windows Media Player 11 and select the <Media Sharing> item to open the ‘Media
Sharing’ window.
Selecting ‘Media Sharing…’ for Windows Media Player11:
7
5. From the ‘Media Sharing’ windows , the radio will be listed as an unknown device. Click on
the unknown device listed, then click the ‘Allow’ button and then click ‘OK’. Allowing the
Radio to Connect:
Note:
When you are playing the music under UPnP, you are able to change the mode of playback via
selecting Media Player/Playback Mode.
My playlist
User can view the playlist under this menu.
You can add your favorite songs from UPnP to the “My Playlist”, hold and press the Dial/Select
button for the song until there is a sign shown as attached photo. Then the particular song will
be added to the “My Playlist”.
Clear my playlist
User can clear the playlist under this section.
Information Center
Go to “Information Center”, you will see other information available as “Weather information”,
“Financial information”, “System information”.
Weather Information
You can learn the current weather and weather forecast all over the world.
Select Weather information, and choose the region you want to check. It will display the
8
current weather and forecast of the selected region. If you want to add it to display when the
unit on Standby, press the right key “"
”and select “Add to Standby Display”. Then press
“Enter” to confirm.
“Currently Date & Time” and “Currently Weather” will display alternately every 10 seconds
under standby if the weather forecast display is activated.
On standby, you also can press “Select/OK” button for switching of <Currently Date & Time>
and <Currently Weather>, and you can press ! "
buttons to display the previous/next day
weather forecast.
Remark: The weather information is just for reference only and there may be some deviation
to the actual weather.
Financial Information
You can learn the information of the major stock markets.
Remark: The financial information is just for reference only and there may be deviation to the
actual stock market information.
System Information
You can learn the information of the Software Version the radio, the Wi-Fi network information
and MAC address. This is useful for future service purpose.
Configuration
Manage my mediaU
You can tailor made your own favorite station list using your computer.
Firstly you need to enable “Manage my MediaU” on your radio.
Go to Configuration"
Manage my MediaU"
Enable
Then you will see “My mediaU” appear on the main menu.
On your computer, go to http://www.mediayou.net/web/index.php , this is the radio portal
playing on your radio.
Register as member by selecting “Join now”. After you have become the member, then you
can login and register your radio. Select “Radio” on the following screen and do the radio
registration.
You can then organize your own favorite stations or add any new station which is currently not
found on the station list. Once the changes is done, your radio will synchronize the changes
immediately and you will find your favorite list under “My MediaU” on the radio menu.
iRadio
My mediaU
Internet Radio
Media Center
<
2/7
9
>
Network
Wireless Network Configuration
Select this to scan for wireless network available.
There is an option using WPS function, which means you can set the wireless without enter
any passwords for Wi-Fi protected if your router has the WPS function.
Manual Configuration
You can set the DHCP on or off, and enter the SSID as you known, or delete the connected
WiFi.
Check network when power on
This is set to enable or disable “Check network when power on”.
Date & Time
You can press #
$
buttons to set the digit, use ! "
button move to the next entry. Press
<Select/OK> to confirm the setting.
Time Format setting
Time format setting: 12hours / 24hours
Date Format setting
Date format: YY/MM/DD, DD/MM/YY and MM/DD/YY
Daylight Saving Time (DST)
Daylight Saving Time setting: On / Off
GMT: Set the currently time as GMT
Alarm Clock
1. Alarm Clock types (2 Alarm Clock setting)
You can select your favorite Alarm setting for every day, once or particular day in the week.
2. Alarm Clock (NAP function): If you would like to take a nap or need the Alarm in short time,
you can use this function. You can select the time from 5 minutes up to 120 minutes. No
Snooze function available for the NAP alarm.
3. Alarm Sounds setting: Beep/Melody/Internet Radio/FM
Remark: The NAP Alarm will only with beeping sound.
4. When the Alarm rings, press any key except “Power” button, you can enter into the “Snooze”
mode. The alarm will ring again in an interval of 5 minutes. You can press “Power” button to
turn off the alarm any time.
Remark: You can select any internet radio station as Alarm tone from the Favorite/Preset
station. In case there is wireless network error and cannot connect to internet radio, it will
automatically switch to Beeping sound after 1 minute.
Language
There are 8 Languages available
You can choose the language from
English/German/French/Dutch/Danish/Norwegian/Russian/Swedish.
Dimmer
You can adjust the backlight of the LCD with below settings:
1. Power Saving
You can set the backlight to dim down when there is no operation for a certain time of period.
This option allows you to select your preferred backlight level when it is dim down. There
are 20 levels available.
2. Turn on
You can adjust the backlight level you desire when the radio is under operation, i.e. when
you are operating the radio or checking on the menu.
3. Dimmer Timer
You can select to dim down the backlight after certain time of period with no operation on the
radio.
10
Power Management
This function is to allow the radio to go to Standby if there is no internet signal received in order
to save power. The default setting is 30 minutes. When the radio does not receive any internet
signal, the radio will go into Standby after 30 minutes. Other time frame for 5 minutes and 15
minutes are available.
Sleep Timer
You can set the timer to put the radio on standby after certain time elapsed, from 15 minutes to
180 minutes with the interval of 15 minute.
You also can do the setting with the “Sleep” button from remote control, when you press
“Sleep”, then you can see the sleep timer on the top right corner of the display.
Buffer
You can select your preferred buffering time.
Weather
You can set the display of weather forecast on the standby mode and the temperature units.
-You can select Weather Display On/Off and Location.
-Temperature units: 1) Centigrade(℃) 2) Fahrenheit (℉)
Local Radio Setup
The radio will detect your local area stations automatically and it will display under the
<Internet radio>. You will find all the stations under <Internet radio> "
<Local Radio>.
If you would like to change the Local area stations to other countries, you can choose <Manual
setup> to make the change.
Playback Setup
You can set up the playback as Off, Repeat one, Repeat all, Shuffle
Equalizer
Select at your prefer style.
Software update
1) Upgrade information will pop up on the display when there is upgrade version on the server.
2) When there is upgrade version available on the server, you can do the manual upgrade from
the update menu.
Reset to default
You can do this factory reset to empty all of the settings and it comes back to default settings.
**Please note all the Station presets, Settings and configuration will be lost after you have
performed the “Factory Reset”.
Remark: Playing stopped when it comes back to default settings and skip into Language
Setting automatically, after that it will turn to the internet setting.
Trouble Shooting
1. If you have trouble connecting the radio to your wireless network, these steps may
help to resolve the problem:
- Confirm that a Wi-Fi or Ethernet Wired connected PC can access the internet (i.e. can
browse the web) using the same network.
- Check that a DHCP server is available, or that you have configured a static IP address on
the radio.
- Check that you firewall is not blocking any outgoing ports.
- Some access points may be set so that only equipment with registered MAC addresses
can connect to them. This is one possible cause of the Internet Radio being unable to
11
connect to the Wi-Fi network, and the Internet Radio display will show Bad ESSID or key.
To overcome this problem you will need to add the Internet Radio’s MAC address to the
list of allowed equipment in your access point. The Internet Radio’s MAC address can be
found using the menu <Information Center ->System Information -> Wireless Info MAC
address>. You will need to refer to the guide for you Access Point in order to enter the
Internet Radio as an allowed piece of equipment.
- If you have an encrypted network, check that you have entered the correct key or
passphrase into the radio. Remember that text-format keys are case sensitive.
- If your wireless network name(ESSID) is ‘Hidden’(a setting on the wireless access point),
then you can either turn on the name, or you can manually enter the name into the internet
radio and media player, Select <Configure -> Network -> Manual Configuration->
Wireless -> Enter ESSID>. Confirm if the Network is encrypted, e.g. requires a WEP or
WPA key, then enter the network name.
2. If your radio can connect to the network successfully, but is unable to play particular
stations, it may be due to one of the following reasons:
- The station is not broadcasting at this time of the day (remember it may be located in a
different time zone).
- The station has too many people trying to attach to the radio station server and the server
capacity is not large enough.
- The station has reached the maximum allowed number of simultaneous listeners.
- The station is not broadcasting anymore.
- The link on the radio is out of date. This is updated automatically every day, so the next
time you turn on the link will be recognised.
- The internet connection between the server (often located in a different country) and
yours is slow. Some internet service providers may fail to stream in certain geographical
areas. Try using a PC to play back the stream via the broadcaster’s web site. If you can
play back the station with a PC, you can report to us at [email protected] .
If you have a laptop, try connecting it if your Internet Radio cannot find the station.
3. When you scan for PCs under UPnP function, none can be found, or the PC you are
looking for does not appear in the list:
- You have not connected to the wireless Access point. On the internet radio, select
‘Configuration’, ‘Network ’, ‘Wireless network connection’ and then select your Wireless
network. (You may need to enter a security key to access the network wirelessly).
- You have a firewall set on your PC which is stopping you accessing shared files.
- If you have a third party firewall (Like Norton, or Zone Alarm) that will have its own control
panel and you will need to consult the manual for your firewall.
- If your PC is connected to a managed network, with a server sometimes the PC being
searched for needs to be server Workgroup.
4. You can see the PC you want to play music from, but cannot find any folders on the
PC:
- You have a firewall running which is preventing the internet radio from seeing the shared
folder. As a quick check, you can disable firewalls like Norton to see if this overcomes the
problem, if this resolves the issue then you can either leave the firewall off, or allow file
sharing through the fire wall.
Note: If you firewall is required to provide security for your system, it should not be left off.
5. I can’t share a folder , as the option is not highlighted:
The share folder option will not be available until you have turned simple file sharing
on. Run the wizard.
Scan Error:
When the internet radio is scanning the content of the folders on a PC, it is possible that a
scan error may occur if the windows file sharing application times out. This is most likely to
occur if both the PC with the media content and the Internet Radio are connected wirelessly.
Try re-connecting the PC with the media content into the network via cable. This will
dramatically increase the speed at which the Internet Radio is able to scan the content of
the Media PC.
12
Playlists:
Some media ripping applications allow ‘Playlists’ to be created. The Internet Radio is able to
detect and stream these playlists, but they must be stored in the folder with the rest of the
Media content and they must have the file extension.m3u.
Windows Media player can create suitable playlist, just select ‘create new playlist’, drag
and drop the tracks you want into the playlist, then use ‘Save as’ to ensure the file type is
.m3u. (Existing play lists can be opened and re-saved in this format) When the Internet
Radio detects you have playlists, it will enable a new menu option allowing the playlist to be
selected and added to the queue.
If you re-connect to another PC of folder, which does not have any Playlists in the .m3u.
format, the playlist option will not be presented in the menu.
6. If the Internet Radio keeps re-buffering radio station:
- The Internet Radio is streaming the data from the radio station via your broadband
connection, if there is a high error rate on your broadband connection, or the connection
is intermittent, then it will cause the Internet Radio to pause until the connection is reestablished and it has received enough data to start playing again.
- If your Internet Radio keeps stopping, please check the DSL modem to ensure that the
Broadband line is not suffering a high error rate or disconnections. If you are experiencing
these problems, you will need to contact your broadband supplier.
7. What is Buffering?
When playing a stream, the Internet Radio/Media player, downloads a small amount of the
stream before it starts playing. This is used to fill in any gaps in the stream that may occur if
the internet or the wireless network is busy.
The Internet Radio streams music data from the PC while you are listening. If a stream gets
blocked or experiences Internet congestion while transferring it may stop/interfere with the
quality of play. If this happens, check your internet connection speed- it must be faster than
the speed of the streams.
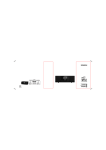
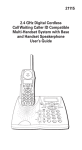
Technical Specification
Model: WR-230
Power input: 7.5V 1.2A
Power voltage: 100-240V~50/60Hz
Wireless Network: IEEE802.11b/g/n
Security Protocol: WEP/WPA/WPA2
Audio output power: 3W (RMS)
Audio sockets: 3.5mm earphone jack, 3.5mm Line-out jack
Unit Dimension: 195 x 128 x 117 mm (L x H x D), including feet and knob.
Remark: Specification may vary without notice
What is included in the box
* Internet Radio
* Power adaptor
* Remote controller
* User manual
13