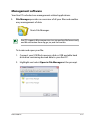
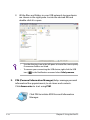
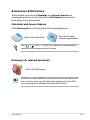
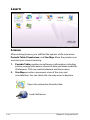
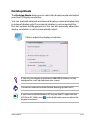
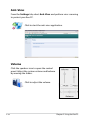
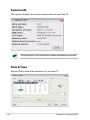
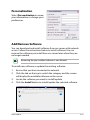
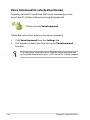
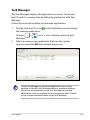
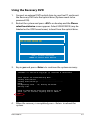
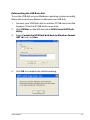
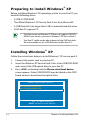
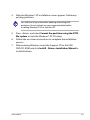
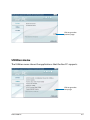
1
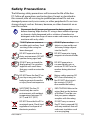
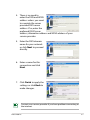
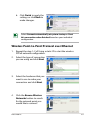
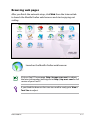
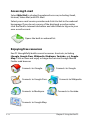
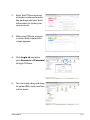
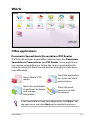
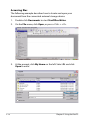
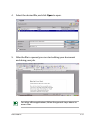
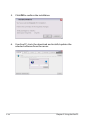
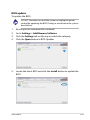
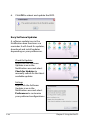
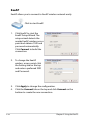
Eee PC Software Manual
Eee PC 901 Series
Eee PC 903 Series
Table of Contents
Chapter 1:
Introducing the Eee PC
About This User’s Manual............................................................................. 1-2
Notes for This Manual.................................................................................... 1-2
Safety Precautions.......................................................................................... 1-3
Chapter 2:
Using the Eee PC
Internet............................................................................................................... 2-2
Configuring a wireless network connection........................................ 2-2
Configuring a network connection......................................................... 2-4
Wireless Point-to-Point Protocol over Ethernet.................................. 2-9
Browsing web pages..................................................................................2-11
Accessing E-mail..........................................................................................2-12
Enjoying free resources.............................................................................2-12
Controlling your Eee PC afar....................................................................2-13
Using web storage......................................................................................2-14
Chatting with friends.................................................................................2-16
Work ...............................................................................................................2-17
Office applications......................................................................................2-17
Management software..............................................................................2-21
Accessories & Dictionary...........................................................................2-23
Learn ...............................................................................................................2-24
Science .........................................................................................................2-24
Language........................................................................................................2-25
Math .........................................................................................................2-25
Paint .........................................................................................................2-26
Web Learn .....................................................................................................2-26
Mebook ........................................................................................................2-26
Kids Game .....................................................................................................2-26
Go Chinese.....................................................................................................2-26
Play ...............................................................................................................2-27
DVD Player.....................................................................................................2-27
Media Player..................................................................................................2-27
Music Manager.............................................................................................2-28
Photo Manager.............................................................................................2-29
Video Manager.............................................................................................2-29
ii
Table of Contents
Webcam.........................................................................................................2-30
Sound Recorder...........................................................................................2-30
Picasa .........................................................................................................2-30
Games .........................................................................................................2-30
Settings.............................................................................................................2-31
Bluetooth (on selected models).............................................................2-31
Desktop Mode..............................................................................................2-33
Anti-Virus........................................................................................................2-34
Volume .........................................................................................................2-34
Instant Shutdown........................................................................................2-35
Printers .........................................................................................................2-35
System Info....................................................................................................2-36
Date & Time...................................................................................................2-36
Personalization.............................................................................................2-37
Add/Remove Software..............................................................................2-37
Touchpad........................................................................................................2-41
Disk Utility......................................................................................................2-41
Diagnostic Tools...........................................................................................2-42
EeeAP .........................................................................................................2-44
Instant Key (on selected models)...........................................................2-45
Voice Command (in selected territories).............................................2-46
Task Manager................................................................................................2-47
Favorites...........................................................................................................2-48
Customize.......................................................................................................2-48
System Recovery............................................................................................ 3-1
Chapter 3:
System Recovery
System Recovery............................................................................................. 3-2
Using Hidden Partition................................................................................ 3-2
Using the Recovery DVD............................................................................. 3-3
Using USB Flash Disk.................................................................................... 3-4
Chapter 4:
Installing Windows® XP
Preparing to install Windows® XP.............................................................. 4-2
Installing Windows® XP.................................................................................. 4-2
Support CD information............................................................................... 4-4
ASUS Eee PC
iii
Running the support CD............................................................................. 4-4
Drivers menu................................................................................................... 4-4
Utilities menu.................................................................................................. 4-5
Contact ........................................................................................................... 4-6
Other information......................................................................................... 4-6
Appendix
Trademark Statements..................................................................................A-2
GNU General Public License........................................................................A-3
Copyright Information............................................................................... A-14
Limitation of Liability.................................................................................. A-15
Service and Support.................................................................................... A-15
iv
Table of Contents
About This User’s Manual
Notes for This Manual
Safety Precautions
1
Introducing
the Eee PC
About This User’s Manual
You are reading the Eee PC User’s Manual. This User’s Manual
provides information about how to use Eee PC. The following are
major sections of this User’s Manual:
1. Using the Eee PC
Provides information on using the Eee PC’s utilities.
2. System Recovery
Gives you information on system recovery.
3. Installing Windows® XP
Gives you information on how to install Windows® XP on your
Eee PC and the content of the support CD.
4. Appendix
Provides you QVL and gives safety statements.
Notes for This Manual
A few notes and warnings are used throughout this guide, allowing
you to complete certain tasks safely and effectively. These notes have
different degrees of importance as follows:
WARNING! Important information that must be followed for safe
operation.
IMPORTANT! Vital information that must be followed to prevent
damage to data, components, or persons.
TIP: Tips for completing tasks.
NOTE: Information for special situations.
1-2
Chapter 1: Introducing the Eee PC
Safety Precautions
The following safety precautions will increase the life of the Eee
PC. Follow all precautions and instructions. Except as described in
this manual, refer all servicing to qualified personnel. Do not use
damaged power cords, accessories, or other peripherals. Do not use
strong solvents such as thinners, benzene, or other chemicals on or
near the surface.
Disconnect the AC power and remove the battery pack(s)
before cleaning. Wipe the Eee PC using a clean cellulose sponge
or chamois cloth dampened with a solution of nonabrasive
detergent and a few drops of warm water and remove any extra
moisture with a dry cloth.
DO NOT place on uneven or
unstable work surfaces. Seek
servicing if the casing has
been damaged.
DO NOT place or drop
objects on top and do not
shove any foreign objects
into the Eee PC.
DO NOT expose to dirty or
dusty environments. DO NOT
operate during a gas leak.
DO NOT expose to strong
magnetic or electrical fields.
DO NOT press or touch the
display panel. Do not place
together with small items
that may scratch or enter the
Eee PC.
DO NOT expose to or
use near liquids, rain, or
moisture. DO NOT use the
modem during electrical
storms.
DO NOT leave the Eee PC on
your lap or any part of the
body to prevent discomfort
or injury from heat exposure.
Battery safety warning: DO
NOT throw the battery in
fire. DO NOT short circuit
the contacts. DO NOT
disassemble the battery.
SAFE TEMP: This Eee PC
should only be used in
environments with ambient
temperatures between 5°C
(41°F) and 35°C (95°F)
INPUT RATING: Refer to the
rating label on the bottom
of the Eee PC and be sure
that your power adapter
complies with the rating.
DO NOT throw the Eee PC in
municipal waste. Check local
regulations for disposal of
electronic products.
DO NOT carry or cover a
Eee PC that is powered ON
with any materials that will
reduce air circulation such
as a carrying bag.
ASUS Eee PC
1-3
1-4
Chapter 1: Introducing the Eee PC
Internet
Work
Learn
Play
Settings
Favorites
2
Using the Eee PC
Internet
Configuring a wireless network connection
1. Press
+
(<Fn> +
<F2>) to activate the wireless
LAN function.
2. Click Wireless Networks
from Internet tab.
3. Select the wireless access
point you want to connect
to from the list and click
Connect to build the
connection.
Ensure that the box before Enable wireless is checked.
4. When connecting, you may
have to enter a password.
2-2
Chapter 2: Using the Eee PC
5. After a connection has been
established, the connection is
shown on the list.
6. You can see the wireless
signal strength bars in the
Notification area.
In Windows XP environment, the wireless connection icon
disappears when you disable the wireless LAN by pressing
+
(<Fn> + <F2>). Activate the wireless LAN function before
configuring a wireless network connection.
Right-click the wireless signal bar in the Notification area to
quickly Connect to another network, Create new connection,
or browse All Network Connections.
ASUS Eee PC
2-3
Configuring a network connection
If you want to obtain network access, connect the network cable,
with RJ-45 connectors on each end, to the network port on the Eee
PC and the other end to a hub or switch. The illustration below is the
example of your Eee PC connected to a network hub or switch for
use with the built-in Ethernet controller. Connect to network before
enjoying all the network services and functions in Eee PC.
Network hub or switch
Network cable with RJ-45 connectors
Local Area Network
Using a dynamic IP:
1. From the Internet tab,
select Network to start
the configuration.
2-4
Chapter 2: Using the Eee PC
2. Click Create to create a
network connection.
3. Select the type of
connection you are using
and click Next.
4. Select the hardware that
you want to use to make
your connection and
click Next.
5. Toggle the first option
Dynamic IP address
(DHCP) and click Next.
6. Enter a name for this
connection and click
Next.
ASUS Eee PC
2-5
7. Click Finish to apply the
settings or click Back to
make changes.
Click the box before
Connect automatically
at system startup or
before the box Start this
connection when finished
based on your needs.
Using a static IP:
1. Repeat the step 1–4 of Using a dynamic IP to start the static
IP network configuration.
2. Toggle the second
option Static IP address
and click Next.
3. Enter the IP address,
Subnet mask and
Gateway from your
service provider.
2-6
Chapter 2: Using the Eee PC
4. There is no need to
enter the DNS and WINS
address unless you want
to override the server
provided DNS server
address. If so, enter the
preferred DNS Server
address, alternative address and WINS address of your
service provider.
5. Enter the DNS domain
name for your network
or click Next to proceed
directly.
6. Enter a name for this
connection and click
Next.
7. Click Finish to apply the
settings or click Back to
make changes.
Contact your service provider if you have problem connecting to
the internet.
ASUS Eee PC
2-7
Point-to-Point Protocol over Ethernet (PPPoE)
1. Repeat the step 1–2 of Using a static IP to start the PPPoE
network configuration.
2. Select the type of connection
you are using and click Next.
3. Select the hardware that you
want to use to make your
connection and click Next.
4. Enter your user name and
password and click Next.
5. Enter a name for this
connection and click Next.
2-8
Chapter 2: Using the Eee PC
6. Click Finish to apply the
settings or click Back to
make changes.
Select Connect automatically at system startup or Start
this connection when finished based on your individual
configuration.
Wireless Point-to-Point Protocol over Ethernet
1. Repeat the step 1–2 of Using a static IP to start the wireless
PPPoE network configuration.
2. Select the type of connection
you are using and click Next.
3. Select the hardware that you
want to use to make your
connection and click Next.
4. Click the Browse Wireless
Networks button to search
for the network point you
would like to connect.
ASUS Eee PC
2-9
5. Enter the wireless channel
information and click Next.
6. Set the encryption
information for the wireless
connection and click Next.
7. Enter your user name and
password and click Next.
8. Enter a name for this
connection and click Next.
9. Click Finish to apply the
settings or click Back to
make changes.
2-10
Chapter 2: Using the Eee PC
Browsing web pages
After you finish the network setup, click Web from the Internet tab
to launch the Mozilla Firefox web browser and start enjoying net
surfing.
Launches the Mozilla Firefox web browser
Visit our Eee PC homepage (http://eeepc.asus.com) to obtain
the latest information and register at http://vip.asus.com for full
service of your Eee PC.
If you think the browser font size too small to read, go to View >
Text Size to adjust.
ASUS Eee PC
2-11
Accessing E-mail
Select Web Mail to display the webmail accesses, including Gmail,
Hotmail, Yahoo Mail, and AOL Mail.
Select your e-mail service provider and click it to link to the webmail
homepage. If you do not use any of the displayed e-mail provider,
click the Back to Internet tab button and select Web to log onto your
own e-mail account.
Opens the built-in webmail list.
Enjoying free resources
Eee PC thoughtfully builds several resources shortcuts, including
iGoogle, Google Docs, Wikipedia, Mediayou, Youtube, and Google
Map. Click an item and enjoy a charge-free service through Mozilla
Firefox web browser.
Connects to iGoogle.
Connects to Google Docs.
Connects to Mediayou.
Connects to Google.
Connects to Wikipedia.
Connects to Youtube.
Connects to Google Map.
2-12
Chapter 2: Using the Eee PC
Controlling your Eee PC afar
Eee Connect allows you to control one Eee PC with another Eee PC
remotely.
To start using Eee Connect
Ensure that both Eee PCs are connected to the Internet.
1. Click Eee Connect
from the Internet tab and
enter your e-mail to activate
your account.
2. Your Eee PC Assist account
is shown on the screen. Click
Close to leave
3. Click Eee Connect
from the Internet tab again.
Click Accept from to set
up the Eee PC you want to
connect.
4. Enter an Authentication
code and click Connect.
DO NOT click the Ask
whenever receives
connection request
box if you want to freely
connect to this Eee PC.
ASUS Eee PC
2-13
5. The Eee Connect icon
appears in the Notification
area.
6. Repeat the step 1–2 on another Eee PC to generate another
account and click Connect to.
7. Enter the account you
want to connect and the
authentication code, then
click Connect.
If you click the Ask whenever receives connection request box
on the other Eee PC, you would need to wait for the permission.
8. When the connection is successfully built, you can control the
other Eee PC from the Localhost Remote Desktop connection
screen.
Using web storage
Eee PC users can enjoy free online space. With Internet connection,
you can access and share any files whenever you want and wherever
you are.
To use YOStore
1. Click YOStore
from
the Internet tab and click
Activate my account.sh.
Ensure that your Eee PC is
connected to the Internet.
2-14
Chapter 2: Using the Eee PC
2. Enter the YOStore account
activation code enclosed in
the package and your basic
information to create your
own account.
3. After your YOStore account
is successfully created, this
screen appears.
4. Click Login.sh and enter
your Account and Password
to login YOStore.
5. You can easily drag and drop
to upload files onto your free
online space.
ASUS Eee PC
2-15
Chatting with friends
1. Select Messenger from the Internet tab and the Welcome to
Pidgin screen displays. Press the Add button to configure your
instant messaging account.
2. Select an instant messaging service you are using from the
drop-down list and fill out your password along with other
necessary information to login your account.
If you do not have an IM account, apply one from the service
providers. If you have multiple IM accounts from different service
providers, press Add button again to add and configure more IM
accounts.
2-16
Chapter 2: Using the Eee PC
Work
Office applications
Documents/Spreadsheets/Presentations/PDF Reader
The Work tab includes several office software items like Documents,
Spreadsheets, Presentations, and PDF Reader. Some applications
may require setup before use. Follow the steps as provided by the
respective wizard to finish the initialization and get your jobs done
more efficiently.
Starts Adobe® PDF
reader.
Starts the application
to create, and share
presentations.
Starts the spreadsheet
to perform calculation
and manage
information .
Starts the word
processor to edit
documents
If you have problems using these applications, click Help on the
top right corner and select Work tab for detailed instructions.
ASUS Eee PC
2-17
Accessing files
The following example describes how to locate and open your
document from the connected external storage device:
1. Double-click Documents to start StarOffice Writer.
2. On the File menu, click Open, or press <Ctrl> + <O>.
3. At the prompt, click My Home on the left. Select D: and click
Open to enter.
2-18
Chapter 2: Using the Eee PC
4. Select the desired file, and click Open to open.
5. After the file is opened, you can start editing your document
and doing your job.
For other office applications, follow the general steps above to
access files.
ASUS Eee PC
2-19
Mail
The Mozilla Thunderbird e-mail client allows to import preferences,
account settings, address books, and other data from an existing
account in your original personal computer or notebook. Follow the
Account Wizard for new account setup.
Starts the Mozilla Thunderbird e-mail client.
Contact your service provider If you do not know the incoming
and outgoing server address of your e-mail account.
Notes
Notes allows you to write down important messages as a reminder.
You can have several memos at a time.
Opens a post-it-on like sticker to leave messages.
Math
Draw
StarOffice Math is convenient
for you to create equations
and formulas in reports and
presentations.
StarOffice Draw is an illustration
tool that you can use to export
and share drawings.
Opens StarOffice
Math.
Opens StarOffice
Draw.
Free Mind
Free Mind is a mind-mapping software which you can use to do the
brainstorming, project-tracking, database creating, etc..
Starts Free Mind.
2-20
Chapter 2: Using the Eee PC
Management software
Your Eee PC includes two management-related applications.
I.
File Manager provides an overview of all your files and enables
easy management of data.
Starts File Manager.
Eee PC supports file compression in a zip and tgz file format only,
and file extraction from zip, gz, tar, and rar formats.
To locate and open your file:
1. Connect your USB flash memory disk or USB portable hard
disk drive containing desired data to your Eee PC.
2. Highlight and select Open in File Manager at the prompt.
ASUS Eee PC
2-21
3. All the files and folders in your USB external storage device
are shown in the right pane. Locate the desired file and
double-click it to open.
• Use the directory tree in the left pane to locate files more quickly
if numerous folders are listed.
• To remove your connecting the USB device, right click the USB
icon
in the Notification area and select Safely remove.
II. PIM (Personal Information Manager) helps manage personal
information like appointments, to-do items and contacts.
Click Accessories to start using PIM.
Click PIM to initiate KDE Personal Information
Manager.
2-22
Chapter 2: Using the Eee PC
Accessories & Dictionary
The bundled accessories, Calculator and Screen Capture, are
convenient and easy to use; the built-in Dictionary prevents you
from being lost in translation.
Calculator and Screen Capture
Click Accessories to start using the following applications.
Opens the calculator.
Runs the Screen
capture application.
Press
+ (<Fn> + <Prt Sc>) to initiate the screen capture
tool directly and capture the full screen.
Dictionary (in selected territories)
Starts the Dictionary.
Dictionary is only available in selected territories by default, but
users in other areas can still obtain this application from ASUS
server through the Add/Remove Software function.
ASUS Eee PC
2-23
Learn
Science
After entering Science, you will find the options of the interactive
Periodic Table, Planetarium, and Star Map. Move the pointer over
and start your science learning.
1. Periodic Table provides miscellaneous information, including
picture, energy information, chemical data, and atom model for
all elements. Click any wanted element and know more.
2. Star Map provides a panoramic view of the stars and
constellations. You can check the star map even in daytime.
Opens the interactive Periodic table.
Loads Stellarium.
2-24
Chapter 2: Using the Eee PC
Language
Several English learning games are included in Language, providing
entertaining exercises for English typing and spelling.
Starts the typing practice tool.
Starts the vocabulary spelling game.
Starts the Hangman game.
Math
Study fractions with your personal tutor in Eee PC. Fraction Tutorial
clearly demonstrates and teaches you fractions.
TuxMath teaches math more fun, teaching math by incorporating a
shooting game.
The Geometry tool allows drawing objects like points, lines, polygons,
etc. to construct spatial objects.
Function Plotter is a useful tool to plot different function expressions.
You can zoom in and out the corresponding graph.
ASUS Eee PC
Starts Fraction
Tutorial.
Starts TuxMath.
Starts the interactive
Geometry tool.
Starts Function
Plotter.
2-25
Paint
Paint includes an image editing program (Paint) and a drawing
program (Tux Paint).
Starts mtPaint.
Starts Tux Paint.
Web Learn
This is a shortcut to Skoool. Double-click the item to link to Skoool
interactive learning site (www.skoool.com). Click your own country
or the country you would like to visit and enter.
Mebook
Starts the MeReader for e-books reading.
Kids Game
Learn through games.
Go Chinese
It will not be all Chinese to you anymore. IQ Chinese
provides both traditional Chinese and simplified
Chinese classes with live pronunciation.
2-26
Chapter 2: Using the Eee PC
Play
DVD Player
Starts DVD Player.
The Eee PC package
does not include an
external optical disk drive.
Purchase an optional
optical disk drive based
on your needs.
Media Player
Enjoy your music
and movies with
Media Player.
Move the pointer over
the items on the user
interface, and the pop out
message would show the
function of the button or
the slider.
ASUS Eee PC
2-27
Music Manager
The built-in music manager helps you arrange your multi-media data
in a well-organized fashion.
Starts Music Manager.
Connect your iPod to your Eee PC and click the Media Device
tab to show the playlists in your iPod. You can drag and drop the
desired files to create your playlist in the right pane.
• Closing the main window only minimizes the music manager
in the Notification area. Quit the music manager by clicking
Actions > Quit.
• All rights of the built-in music samples are reserved by Michelle
Chen. Unauthorized copy, reproduction, broadcasting and public
performance are prohibited.
2-28
Chapter 2: Using the Eee PC
Photo Manager
Manage, view, and edit image files with the Photo
Manager.
Photo Manager supports image files in PNG, JPG, TIF, TIFF, GIF,
BMP, XPM, PPM, PNM, XCT, PCX format.
Video Manager
Starts Photo Manager.
ASUS Eee PC supports video and audio files in the following
format: wmv, DVD, MPEG1, MPEG2, MPEG4 SP, Xvid, mp3, wma,
ogg, wav, MPEG4 AAC, PCM, Dolby digital (2.0 decode) format.
The actual supported codecs vary depending on model.
ASUS Eee PC
2-29
Webcam
Click Webcam and start video recording or image capture.
Activates Webcam.
Sound Recorder
Allows you to record a sound clip.
Initiates Sound Recorder.
Picasa
Allows you to manage and upload your photos easily.
Starts Picasa2.
Games
Select an available game and have fun.
2-30
Chapter 2: Using the Eee PC
Settings
Bluetooth (on selected models)
Bluetooth technology eliminates the need for cables for connecting
Bluetooth-enabled devices. Examples of Bluetooth-enabled devices
may be Notebook PCs, Desktop PCs, mobile phones, and PDAs.
Turning ON and Launching Bluetooth Utility
1. Press <Fn> + <F2> repeatedly until Bluetooth ON or WLAN &
Bluetooth ON is shown.
2. From the Settings tab, click Bluetooth.
3. Click Discovery > Device Discovery, or press <F5> directly to
search for the nearby devices.
2
3
4.
Select the Bluetooth-enabled device you would like to connect
and click Discovery > Service Discovery to detect the available
services.
ASUS Eee PC
2-31
5.
The colored buttons are the
available services, and the
unavailable ones will be
dimmed.
6.
To transfer files to the selected
device, click the File Transfer
button and click Connect.
You can also click Object Push if you want to send, get or
exchange cards.
2-32
7.
Enter the Passkey to create the
paired relationship with the
selected Bluetooth-enabled
device and click OK.
8.
After the paired relationship
is successfully built, you
can transfer files through
Bluetooth.
Chapter 2: Using the Eee PC
Desktop Mode
The Desktop Mode allows you to select the display mode and adjust
your Eee PC display resolution.
You can use both external and internal displays, external display only
or internal display only. If an external display is not connected, the
first two options will be grayed out. You can also manually adjust the
display resolution or set it automatically adjust.
Click to adjust the display resolution.
If you set your display resolution to 600x480 or below, use the
touchpad to scroll up and down the screen.
Connect an external monitor before booting up the Eee PC.
If you have installed Windows XP to your Eee PC, right-click the
ASUS Eee PC Utility icon
in the Notification area to adjust the
display resolution.
ASUS Eee PC
2-33
Anti-Virus
From the Settings tab, select Anti-Virus and perform virus scanning
to protect your Eee PC.
Click to start the anti-virus application.
Volume
Click the speakers icon to open the control
panel. Adjust the system volume and balance
by moving the sliders.
Click to adjust the volume.
2-34
Chapter 2: Using the Eee PC
Instant Shutdown
Click Instant Shutdown and select an action from the dialog box
shown below. You can activate the task manager, put the system in
standby, restart, or shut down the system.
Printers
To setup your printer, double-click Printers and press Add to add a
new printer. The installed printers display in the window.
Refer to the QVL in Appendix or visit our website for the latest
qualified vendor for the printers.
ASUS Eee PC
2-35
System Info
This option displays the system information of your Eee PC.
The displayed system information differs depending on model.
Date & Time
Adjusts the system date and time of your Eee PC.
2-36
Chapter 2: Using the Eee PC
Personalization
Select Personalization to renew
your information or change your
preferences.
Add/Remove Software
You can download and install software from our server with network
access. Follow the instructions below to install software. You can
remove the software you install from our server later when they are
no longer needed.
Removing the pre-installed software is not allowed.
To install new software or update the existing software:
1. Ensure that you have connected to network.
2. Click the tab on the top to switch the category and the screen
will display the available software on the server.
3. Locate the software you want to install/update.
4. Click the Install button to install/update the selected software.
2
3
ASUS Eee PC
4
2-37
5. Click OK to confirm the installation.
6. Your Eee PC starts the download and installs/updates the
selected software from the server.
2-38
Chapter 2: Using the Eee PC
BIOS update
To update the BIOS:
DO NOT shut down or reset the system or unplug the power
cord while updating the BIOS! Doing so would cause the system
boot failure!
1.
2.
3.
4.
Ensure you are connected to a network.
Go to Settings > Add/Remove Software.
Click the Settings tab on the top to switch the category.
Click the Open button in BIOS Updates
3
4
5. Locate the latest BIOS and click the Install button to update the
BIOS.
ASUS Eee PC
2-39
6. Click OK to reboot and update the BIOS.
Easy Software Updates
A software update icon in the
Notification area functions as a
reminder. It will check for updates,
download and install updates
depending on your preferences.
Check for Updates
Right-click the Software
Updates icon in the
Notification area and select
Check for Updates to
manually search for the latest
available updates.
Settings
Right-click the Software
Updates icon in the
Notification area and select
Preferences to customize
your preferred configurations.
2-40
Chapter 2: Using the Eee PC
Touchpad
Edit your touchpad preferences by clicking Touchpad. You can
adjust all touchpad settings.
Disk Utility
Selecting Disk Utility allows you to
check your Eee PC disk condition
including total disk space, the
used space, and the remaining
space. Click the tabs to switch the
displayed disk drive.
• Extra Drive may not be available for all Eee PC models.
• The disk space varies depending on model.
ASUS Eee PC
2-41
Diagnostic Tools
The Diagnostic Tool helps you with easy trouble-shooting.
System Info.
Click the System Info. button on the left to display the system
information.
Click the Details button on the top to switch between system
information summary and details
The system information varies depending on model.
System Test
Click the System Test button on the left to start the system checkup.
Select the item you want to test and follow the wizard to complete
the test.
2-42
Chapter 2: Using the Eee PC
Contact us
If you can't find a solution to your problem after the system test, you
can visit our support website or click Send Feedback with System
Log to send the test log to ASUS support team. Our technical
personnel would help you with the problems.
Before you send the log, remember to set up your e-mail account
in the Mozilla Thunderbird client first. Refer to page 4-20 for
details.
ASUS Eee PC
2-43
EeeAP
EeeAP allows you to connect to EeeAP wireless network easily.
Click to start EeeAP.
1. Click EeeAP to start the
EeeAP Setup Wizard. The
setup wizard detects the
nearby EeeAP wireless access
point and obtains SSID and
password automatically.
Click Connect to build the
connection.
2. To change the EeeAP
wireless access point, click
the Setting tab on the top
and enter a preferred SSID
and Password.
3. Click Apply to change the configuration.
4. Click the Connect tab on the top and click Connect on the
bottom to create the new connection.
2-44
Chapter 2: Using the Eee PC
Instant Key (on selected models)
Customize your own instant keys which allow you to launch
frequently used applications with one touch of a button.
Click to customize the instant keys.
1. Click Instant Key from the Settings tab.
2. Click the Change button to configure.
3. Select a preferred application for the instant key and click OK.
4. Click EXIT to finish the instant key setup.
ASUS Eee PC
2-45
Voice Command (in selected territories)
Operate your Eee PC hands-free. With voice command, you can
launch Eee PC utilities without touching the keyboard.
Click to activate VoiceCommand.
Follow the instructions below to use voice command:
1. Click VoiceCommand from the Settings tab.
2. Dr. E appears to teach you how to use the VoiceCommand
function.
Dr. E hides after a period of time. Click the VoiceCommand icon
in the Notification area or press <F10> to call Dr. E when needed.
2-46
Chapter 2: Using the Eee PC
Task Manager
The Task Manager displays the application processes. Tweak your
Eee PC up if it is running slow by killing the application with Task
Manager.
Follow the instructions below to terminate applications:
1. Double click the SOS icon
the running applications.
Or, press
+
in the Notification area to display
(<Fn> + <F6>) directly to launch Task
Manager.
2. Select an unnecessary application that uses the system
resources and click Kill to terminate the process.
Using Task Manager to terminate applications may cause
damage to the files that the application is reading or editing.
We do not recommend you use Task Manager to stop the
applications that are working on your important data. Or, back
up your important data before using Task Manager.
ASUS Eee PC
2-47
Favorites
Click to link to
ASUS VIP and give
suggestions.
Click to link to
ASUS website for
the latest product
information.
Customize
Customize your favorites on the
Favorites tab. Click Customize
and start to add or remove your
favorites.
From the available favorites list in
the left pane, select a desired item
to include in your favorites, and
click Add. To remove a favorite from your current favorites list, select
an item from the right pane and click Remove.
The item order in the list corresponds to the display order on the
Favorites tab.
2-48
Chapter 2: Using the Eee PC
System Recovery
3
System Recovery
System Recovery
There are three ways to perform the system recovery. Refer to the
following sections for details.
The OS image file bundled in the Recovery DVD may be not the
latest version. After the system recovery, use the Add/Remove
Software in the Settings tab to update your OS.
You will lose all your data during the system recovery. Ensure to
back up your important data before recovering your system.
Using Hidden Partition
1. Hold <F9> during bootup (requires a Recovery Partition).
If you have installed WIndows XP to your Eee PC, the builtin hidden partition would be cleared and cannot be used for
system recovery.
2. Highlight Restore Factory Settings and press <Enter> to start
the system recovery.
Normal Boot
Perform Disk Scan
Restore Factory Settings
Use the ↑ and ↓ keys to select which entry is highlighted.
Press enter to boot the selected OS, 'e' to edit the
commands before booting, or 'c' for command-line.
If the system recovery fails, there might be something wrong with
your Eee PC disk drive. Contact your local RMA for support.
3-2
Chapter 3: System Recovery
Using the Recovery DVD
1. Connect an external DVD optical drive to your Eee PC and insert
the Recovery DVD into the optical drive (System needs to be
powered ON).
2. Restart the system and press <ESC> on bootup and the Please
select boot device screen appears. Select USB:XXXXXX (may be
labeled as the ODD brand name) to boot from the optical drive.
Please select boot device:
HDD:SM-ASUS-PHISON SSD
HDD:SS-ASUS-PHISON SSD
USB:XXXXXXXX
↑ and ↓ to move selection
ENTER to select boot device
3. Key in yes and press <Enter> to continue the system recovery:
ISOLINUX 3.11 2005-09-02 Copyright (C) 1994-2005 H. Peter Anvin
.
Press <Space> for Troubleshooting Menu...
Loading /boot/vmlinuz.......................
Loading /boot/initrd.gz..............................
Ready.
Uncompressing Linux... Ok, booting the kernel.
Waiting 5 Sec
Ready to image Eee PC using build 2008.03.05_21.08.
Enter "yes" to continue, anything else to reboot.
yes
4. When the recovery is completed, press <Enter> to reboot the
system.
ASUS Eee PC
3-3
Using USB Flash Disk
You need another PC and a USB flash disk (larger than 2GB) for Eee
PC system recovery.
You will lose all your data on the USB flash disk. Back up
important data before using the USB disk as a recovery disk.
To use your USB flash disk to perform system recovery:
1. Connect your USB flash disk (size larger than 2GB) to another
PC/NB (bundled with Windows XP or later version) and insert
the Support CD to that PC/NB at the same time.
2. Click Utilities on the left and select ASUS Linux USB Flash
Utility.
3. Select Copy Eee PC image
files to USB flash and make
it bootable.
Note that the disk for Eee
PC recovery is correct
if you have several USB
flash disks connected to
the PC.
3-4
Chapter 3: System Recovery
4. Eject the Support CD, insert the Recovery DVD, and click Run.
5. Click Yes to continue. The system starts formatting your USB
flash disk.
6. A dialog box appears. Follow the instructions to eject the USB
disk and replug it to your PC/NB. Click Retry to continue.
7. Click OK to complete the process.
ASUS Eee PC
3-5
8. Connect the USB flash disk to your Eee PC.
9. Restart the system and press <ESC> on bootup and the Please
select boot device screen appears. Select USB:XXXXXX (may be
labeled as the USB flash brand name) to boot from the USB flash
disk drive.
Please select boot device:
HDD:SM-ASUS-PHISON SSD
HDD:SS-ASUS-PHISON SSD
USB:XXXXXXXX
↑ and ↓ to move selection
ENTER to select boot device
10. Key in yes and press <Enter> to continue the system recovery.
ISOLINUX 3.11 2005-09-02 Copyright (C) 1994-2005 H. Peter Anvin
.
Press <Space> for Troubleshooting Menu...
Loading /boot/vmlinuz.......................
Loading /boot/initrd.gz..............................
Ready.
Uncompressing Linux... Ok, booting the kernel.
Waiting 5 Sec
Ready to image Eee PC using build 2008.03.05_21.08.
Enter "yes" to continue, anything else to reboot.
yes
11 When the recovery is completed, remove the USB flash disk and
press <Enter> to reboot the system.
3-6
Chapter 3: System Recovery
Reformatting the USB flash disk
To use the USB disk on your Windows operating system normally,
follow the instructions below to reformat your USB disk.
1. Connect your USB flash disk to another PC/NB and insert the
Support CD to that PC/NB at the same time.
2. Click Utilities on the left and select ASUS Linux USB Flash
Utility.
3. Select Format the USB flash disk back to Windows format
(FAT16) and click Run.
4. Click OK to complete the disk formatting.
ASUS Eee PC
3-7
3-8
Chapter 3: System Recovery
Preparing to Install Windows® XP
Installing Windows® XP
Support CD Information
4
Installing Windows® XP
Preparing to install Windows® XP
Before installing Windows® XP operating system to your Eee PC, you
need the following items.
•
•
•
•
A USB 2.0 DVD-ROM
The official Windows® XP Service Pack 2 disc from Microsoft®
A USB flash disk (size larger than 1GB) or external hard disk drive
ASUS Eee PC support CD
• The older version of Windows® OS does not support USB DVDROM. Ensure the disc you have is Windows® XP Service Pack 2.
• Your Eee PC might not be able to detect all the USB flash disks.
We recommend you use a USB flash disk smaller than 2 G.
Installing Windows® XP
Follow the instructions below to install Windows® XP service pack 2:
1. Connect the power cord to your Eee PC.
2. Insert the Windows XP Service Pack 2 disc to the USB DVD-ROM
and connect the USB optical drive to your Eee PC.
3. Press <ESC> on bootup and the Please select boot device
screen appears. Select USB:XXXXXX (may be labled as the ODD
brand name) to boot from the optical drive.
Please select boot device:
HDD:SM-ASUS-PHISON SSD
HDD:SS-ASUS-PHISON SSD
USB:XXXXXXXX
↑ and ↓ to move selection
ENTER to select boot device
4-2
Chapter 4: Installing Windows® XP
4. After the Windows® XP installation screen appears. Delete any
existing partitions.
You will lose all your data after deleting all existing disk
partitions. Ensure to back up your important data before
installing Windows® XP to your Eee PC.
5. Press <Enter> and select Format the partition using the NTFS
file system to start the Windows® XP OS setup.
6. Follow the on-screen instructions to complete the installation
process.
7. After entering Windows, insert the Support CD to the USB
DVD/CD-ROM and click InstAll - Drivers Installation Wizard to
install all drivers.
ASUS Eee PC
4-3
Support CD information
The support CD that comes with the Eee PC package contains the
drivers, software applications, and utilities that you can install to
avail all the features.
All the following screens appear only in the Windows® XP SP2
environment.
Running the support CD
Insert the support CD in the external optical drive. The CD
automatically displays the Drivers menu if Autorun is enabled in
your computer.
If Autorun is NOT enabled in your computer, browse the
contents of the support CD to locate the file ASSETUP.EXE from
the BIN folder. Double-click the ASSETUP.EXE file to run the CD.
The drivers and utilities bundled in the support DVD are subject
to change without notice.
Drivers menu
The Drivers menu shows available device drivers when the system
detects installed devices. Install the necessary drivers to activate the
devices.
Click to go to the
next page
4-4
Chapter 4: Installing Windows® XP
Click to go to the
previous page
Utilities menu
The Utilities menu shows the applications that the Eee PC supports.
Click to go to the
next page
ASUS Eee PC
4-5
Click to go to the
previous page
Contact
Click the Contact tab to display the ASUS contact information.
Other information
The icons on the top right corner of the screen provide additional
information on the Eee PC and the contents of the support CD. Click
an icon to display the specified information.
4-6
System information
Technical support
CD content
File list
Chapter 4: Installing Windows® XP
Trademark Statements
GNU General Public License
Copyright Information
Limitation of Liability
Service and Support
A
Appendix
Trademark Statements
Google Talk service and its logos are trademarks of Google Inc..
GroupWise service and its logos are trademarks of Novell Inc..
MSN service and its logos are trademarks of Microsoft Corporation.
QQ service and its logos are trademarks of Tencent Inc..
Yahoo! service and its logos are trademarks of Yahoo! Inc..
All other services and logos are either trademarks or registered
trademarks of their respective owners.
A-2
Appendix
GNU General Public License
Licensing Information
This product includes copyrighted third-party software licensed
under the terms of the GNU General Public License. See The GNU
General Public License for the exact terms and conditions of this
license.
Specially, the following parts of this product are subject to the GNU
GPL:
•
•
•
•
•
•
•
•
•
•
•
•
•
•
•
The Linux operating system kernel
Firefox
• Tux, of Math Command
Kworldclock
• Kig
Pidgin
• KmPlot
KCal
• mtPaint
Kontact
• Tux Paint
KSnapshot
• KPatience
Thunderbird
• Frozen Bubble
Knotes
• Crack Attack
Kalzium
• GNOME Sudoku
Kstars
• KTuberling
Tux Typing
• LTris
KMessedWords
• The KControl Xprinters Module
KHangMan
• The KControl Clock Module
Kbruch
• GSynaptics
All listed software packages are copyright by their respective
authors. Refer to the source code for detailed information.
ASUSTeK COMPUTER Inc. has exposed the full source code of the
GPL licensed software, including any scripts to control compilation
and installation of the object code. All future firmware updates will
also be accompanied with their respective source code. For more
information on how you can obtain our open source code, visit our
website (http://support.asus.com.tw/download/).
ASUS Eee PC
A-3
GNU GENERAL PUBLIC LICENSE
Version 2, June 1991
Copyright (C) 1989, 1991 Free Software Foundation, Inc.,
51 Franklin Street, Fifth Floor, Boston, MA 02110-1301 USA
Everyone is permitted to copy and distribute verbatim copies
of this license document, but changing it is not allowed.
Preamble
The licenses for most software are designed to take away your
freedom to share and change it. By contrast, the GNU General Public
License is intended to guarantee your freedom to share and change
free software--to make sure the software is free for all its users.
This General Public License applies to most of the Free Software
Foundation's software and to any other program whose authors
commit to using it. (Some other Free Software Foundation software
is covered by the GNU Lesser General Public License instead.) You
can apply it to your programs, too.
When we speak of free software, we are referring to freedom, not
price. Our General Public Licenses are designed to make sure that
you have the freedom to distribute copies of free software (and
charge for this service if you wish), that you receive source code or
can get it if you want it, that you can change the software or use
pieces of it in new free programs; and that you know you can do
these things.
To protect your rights, we need to make restrictions that forbid
anyone to deny you these rights or to ask you to surrender the rights.
These restrictions translate to certain responsibilities for you if you
distribute copies of the software, or if you modify it.
For example, if you distribute copies of such a program, whether
gratis or for a fee, you must give the recipients all the rights that
you have. You must make sure that they, too, receive or can get the
source code. And you must show them these terms so they know
their rights.
A-4
Appendix
We protect your rights with two steps: (1) copyright the software,
and (2) offer you this license which gives you legal permission to
copy, distribute and/or modify the software.
Also, for each author's protection and ours, we want to make certain
that everyone understands that there is no warranty for this free
software. If the software is modified by someone else and passed
on, we want its recipients to know that what they have is not the
original, so that any problems introduced by others will not reflect
on the original authors' reputations.
Finally, any free program is threatened constantly by software
patents. We wish to avoid the danger that redistributors of a free
program will individually obtain patent licenses, in effect making the
program proprietary. To prevent this, we have made it clear that any
patent must be licensed for everyone's free use or not licensed at all.
The precise terms and conditions for copying, distribution and
modification follow.
TERMS AND CONDITIONS FOR COPYING,
DISTRIBUTION AND MODIFICATION
0. This License applies to any program or other work which contains
a notice placed by the copyright holder saying it may be distributed
under the terms of this General Public License. The "Program",
below, refers to any such program or work, and a "work based on the
Program" means either the Program or any derivative work under
copyright law: that is to say, a work containing the Program or a
portion of it, either verbatim or with modifications and/or translated
into another language. (Hereinafter, translation is included without
limitation in the term "modification".) Each licensee is addressed as
"you".
Activities other than copying, distribution and modification are not
covered by this License; they are outside its scope. The act of running
the Program is not restricted, and the output from the Program is
covered only if its contents constitute a work based on the Program
(independent of having been made by running the Program).
Whether that is true depends on what the Program does.
ASUS Eee PC
A-5
1. You may copy and distribute verbatim copies of the Program's
source code as you receive it, in any medium, provided that
you conspicuously and appropriately publish on each copy an
appropriate copyright notice and disclaimer of warranty; keep intact
all the notices that refer to this License and to the absence of any
warranty; and give any other recipients of the Program a copy of this
License along with the Program.
You may charge a fee for the physical act of transferring a copy, and
you may at your option offer warranty protection in exchange for a
fee.
2. You may modify your copy or copies of the Program or any portion
of it, thus forming a work based on the Program, and copy and
distribute such modifications or work under the terms of Section 1
above, provided that you also meet all of these conditions:
A-6
a) You must cause the modified files to carry prominent notices
stating that you changed the files and the date of any change.
b) You must cause any work that you distribute or publish, that
in whole or in part contains or is derived from the Program or
any part thereof, to be licensed as a whole at no charge to all
third parties under the terms of this License.
c) If the modified program normally reads commands
interactively when run, you must cause it, when started running
for such interactive use in the most ordinary way, to print or
display an announcement including an appropriate copyright
notice and a notice that there is no warranty (or else, saying
that you provide a warranty) and that users may redistribute
the program under these conditions, and telling the user how
to view a copy of this License. (Exception: if the Program itself is
interactive but does not normally print such an announcement,
your work based on the Program is not required to print an
announcement.)
Appendix
These requirements apply to the modified work as a whole. If
identifiable sections of that work are not derived from the Program,
and can be reasonably considered independent and separate works
in themselves, then this License, and its terms, do not apply to those
sections when you distribute them as separate works. But when you
distribute the same sections as part of a whole which is a work based
on the Program, the distribution of the whole must be on the terms
of this License, whose permissions for other licensees extend to the
entire whole, and thus to each and every part regardless of who
wrote it.
Thus, it is not the intent of this section to claim rights or contest your
rights to work written entirely by you; rather, the intent is to exercise
the right to control the distribution of derivative or collective works
based on the Program.
In addition, mere aggregation of another work not based on the
Program with the Program (or with a work based on the Program)
on a volume of a storage or distribution medium does not bring the
other work under the scope of this License.
3. You may copy and distribute the Program (or a work based on it,
under Section 2) in object code or executable form under the terms
of Sections 1 and 2 above provided that you also do one of the
following:
a) Accompany it with the complete corresponding machinereadable source code, which must be distributed under the
terms of Sections 1 and 2 above on a medium customarily used
for software interchange; or,
b) Accompany it with a written offer, valid for at least three
years, to give any third party, for a charge no more than your
cost of physically performing source distribution, a complete
machine-readable copy of the corresponding source code, to
be distributed under the terms of Sections 1 and 2 above on a
medium customarily used for software interchange; or,
ASUS Eee PC
A-7
c) Accompany it with the information you received as to the
offer to distribute corresponding source code. (This alternative
is allowed only for noncommercial distribution and only if you
received the program in object code or executable form with
such an offer, in accord with Subsection b above.)
The source code for a work means the preferred form of the work for
making modifications to it. For an executable work, complete source
code means all the source code for all modules it contains, plus any
associated interface definition files, plus the scripts used to control
compilation and installation of the executable. However, as a special
exception, the source code distributed need not include anything
that is normally distributed (in either source or binary form) with
the major components (compiler, kernel, and so on) of the operating
system on which the executable runs, unless that component itself
accompanies the executable.
If distribution of executable or object code is made by offering
access to copy from a designated place, then offering equivalent
access to copy the source code from the same place counts as
distribution of the source code, even though third parties are not
compelled to copy the source along with the object code.
4. You may not copy, modify, sublicense, or distribute the Program
except as expressly provided under this License. Any attempt
otherwise to copy, modify, sublicense or distribute the Program is
void, and will automatically terminate your rights under this License.
However, parties who have received copies, or rights, from you under
this License will not have their licenses terminated so long as such
parties remain in full compliance.
5. You are not required to accept this License, since you have not
signed it. However, nothing else grants you permission to modify
or distribute the Program or its derivative works. These actions are
prohibited by law if you do not accept this License. Therefore, by
modifying or distributing the Program (or any work based on the
Program), you indicate your acceptance of this License to do so, and
all its terms and conditions for copying, distributing or modifying the
Program or works based on it.
A-8
Appendix
6. Each time you redistribute the Program (or any work based on
the Program), the recipient automatically receives a license from the
original licensor to copy, distribute or modify the Program subject
to these terms and conditions. You may not impose any further
restrictions on the recipients' exercise of the rights granted herein.
You are not responsible for enforcing compliance by third parties to
this License.
7. If, as a consequence of a court judgment or allegation of patent
infringement or for any other reason (not limited to patent issues),
conditions are imposed on you (whether by court order, agreement
or otherwise) that contradict the conditions of this License, they do
not excuse you from the conditions of this License. If you cannot
distribute so as to satisfy simultaneously your obligations under this
License and any other pertinent obligations, then as a consequence
you may not distribute the Program at all. or example, if a patent
license would not permit royalty-free redistribution of the Program
by all those who receive copies directly or indirectly through you,
then the only way you could satisfy both it and this License would
be to refrain entirely from distribution of the Program.
If any portion of this section is held invalid or unenforceable under
any particular circumstance, the balance of the section is intended
to apply and the section as a whole is intended to apply in other
circumstances.
It is not the purpose of this section to induce you to infringe any
patents or other property right claims or to contest validity of
any such claims; this section has the sole purpose of protecting
the integrity of the free software distribution system, which is
implemented by public license practices. Many people have made
generous contributions to the wide range of software distributed
through that system in reliance on consistent application of that
system; it is up to the author/donor to decide if he or she is willing to
distribute software through any other system and a licensee cannot
impose that choice.
ASUS Eee PC
A-9
This section is intended to make thoroughly clear what is believed to
be a consequence of the rest of this License.
8. If the distribution and/or use of the Program is restricted in certain
countries either by patents or by copyrighted interfaces, the original
copyright holder who places the Program under this License may
add an explicit geographical distribution limitation excluding
those countries, so that distribution is permitted only in or among
countries not thus excluded. In such case, this License incorporates
the limitation as if written in the body of this License.
9. The Free Software Foundation may publish revised and/or new
versions of the General Public License from time to time. Such new
versions will be similar in spirit to the present version, but may differ
in detail to address new problems or concerns.
Each version is given a distinguishing version number. If the Program
specifies a version number of this License which applies to it and
"any later version", you have the option of following the terms and
conditions either of that version or of any later version published
by the Free Software Foundation. If the Program does not specify
a version number of this License, you may choose any version ever
published by the Free Software Foundation.
10. If you wish to incorporate parts of the Program into other free
programs whose distribution conditions are different, write to the
author to ask for permission. For software which is copyrighted by
the Free Software Foundation, write to the Free Software Foundation;
we sometimes make exceptions for this. Our decision will be guided
by the two goals of preserving the free status of all derivatives of our
free software and of promoting the sharing and reuse of software
generally.
A-10
Appendix
NO WARRANTY
11. BECAUSE THE PROGRAM IS LICENSED FREE OF CHARGE, THERE
IS NO WARRANTY FOR THE PROGRAM, TO THE EXTENT PERMITTED
BY APPLICABLE LAW. EXCEPT WHEN OTHERWISE STATED IN WRITING
THE COPYRIGHT HOLDERS AND/OR OTHER PARTIES PROVIDE THE
PROGRAM "AS IS" WITHOUT WARRANTY OF ANY KIND, EITHER
EXPRESSED OR IMPLIED, INCLUDING, BUT NOT LIMITED TO, THE
IMPLIED WARRANTIES OF MERCHANTABILITY AND FITNESS FOR
A PARTICULAR PURPOSE. THE ENTIRE RISK AS TO THE QUALITY
AND PERFORMANCE OF THE PROGRAM IS WITH YOU. SHOULD
THE PROGRAM PROVE DEFECTIVE, YOU ASSUME THE COST OF ALL
NECESSARY SERVICING, REPAIR OR CORRECTION.
12. IN NO EVENT UNLESS REQUIRED BY APPLICABLE LAW OR AGREED
TO IN WRITING WILL ANY COPYRIGHT HOLDER, OR ANY OTHER
PARTY WHO MAY MODIFY AND/OR REDISTRIBUTE THE PROGRAM AS
PERMITTED ABOVE, BE LIABLE TO YOU FOR DAMAGES, INCLUDING
ANY GENERAL, SPECIAL, INCIDENTAL OR CONSEQUENTIAL DAMAGES
ARISING OUT OF THE USE OR INABILITY TO USE THE PROGRAM
(INCLUDING BUT NOT LIMITED TO LOSS OF DATA OR DATA BEING
RENDERED INACCURATE OR LOSSES SUSTAINED BY YOU OR THIRD
PARTIES OR A FAILURE OF THE PROGRAM TO OPERATE WITH ANY
OTHER PROGRAMS), EVEN IF SUCH HOLDER OR OTHER PARTY HAS
BEEN ADVISED OF THE POSSIBILITY OF SUCH DAMAGES.
ASUS Eee PC
A-11
END OF TERMS AND CONDITIONS
How to Apply These Terms to Your New Programs
If you develop a new program, and you want it to be of the greatest
possible use to the public, the best way to achieve this is to make it
free software which everyone can redistribute and change under
these terms.
To do so, attach the following notices to the program. It is safest
to attach them to the start of each source file to most effectively
convey the exclusion of warranty; and each file should have at least
the "copyright" line and a pointer to where the full notice is found.
<one line to give the program's name and a brief idea of what it
does.> Copyright (C) <year> <name of author>
This program is free software; you can redistribute it and/or modify it
under the terms of the GNU General Public License as published by
the Free Software Foundation; either version 2 of the License, or (at
your option) any later version.
This program is distributed in the hope that it will be useful, but
WITHOUT ANY WARRANTY; without even the implied warranty of
MERCHANTABILITY or FITNESS FOR A PARTICULAR PURPOSE. See the
GNU General Public License for more details.
You should have received a copy of the GNU General Public
License along with this program; if not, write to the Free Software
Foundation, Inc., 51 Franklin Street, Fifth Floor, Boston, MA
02110-1301 USA.
Also add information on how to contact you by electronic and paper
mail.
If the program is interactive, make it output a short notice like this
when it starts in an interactive mode:
Gnomovision version 69, Copyright (C) year name of author
Gnomovision comes with ABSOLUTELY NO WARRANTY; for details
type `show w'. This is free software, and you are welcome to
redistribute it under certain conditions; type `show c' for details.
A-12
Appendix
The hypothetical commands `show w' and `show c' should show
the appropriate parts of the General Public License. Of course, the
commands you use may be called something other than `show
w' and `show c'; they could even be mouse-clicks or menu items-whatever suits your program.
You should also get your employer (if you work as a programmer) or
your school, if any, to sign a "copyright disclaimer" for the program, if
necessary. Here is a sample; alter the names:
Yoyodyne, Inc., hereby disclaims all copyright interest in the program
`Gnomovision' (which makes passes at compilers) written by James
Hacker.
<signature of Ty Coon>, 1 April 1989
Ty Coon, President of Vice
This General Public License does not permit incorporating your
program into proprietary programs. If your program is a subroutine
library, you may consider it more useful to permit linking proprietary
applications with the library. If this is what you want to do, use the
GNU Lesser General Public License instead of this License.
ASUS Eee PC
A-13
Copyright Information
No part of this manual, including the products and software
described in it, may be reproduced, transmitted, transcribed, stored
in a retrieval system, or translated into any language in any form
or by any means, except documentation kept by the purchaser
for backup purposes, without the express written permission of
ASUSTeK COMPUTER INC. (“ASUS”).
ASUS PROVIDES THIS MANUAL “AS IS” WITHOUT WARRANTY OF ANY
KIND, EITHER EXPRESS OR IMPLIED, INCLUDING BUT NOT LIMITED TO
THE IMPLIED WARRANTIES OR CONDITIONS OF MERCHANTABILITY
OR FITNESS FOR A PARTICULAR PURPOSE. IN NO EVENT SHALL ASUS,
ITS DIRECTORS, OFFICERS, EMPLOYEES OR AGENTS BE LIABLE FOR
ANY INDIRECT, SPECIAL, INCIDENTAL, OR CONSEQUENTIAL DAMAGES
(INCLUDING DAMAGES FOR LOSS OF PROFITS, LOSS OF BUSINESS,
LOSS OF USE OR DATA, INTERRUPTION OF BUSINESS AND THE LIKE),
EVEN IF ASUS HAS BEEN ADVISED OF THE POSSIBILITY OF SUCH
DAMAGES ARISING FROM ANY DEFECT OR ERROR IN THIS MANUAL
OR PRODUCT.
Products and corporate names appearing in this manual may or
may not be registered trademarks or copyrights of their respective
companies, and are used only for identification or explanation and to
the owners’ benefit, without intent to infringe.
SPECIFICATIONS AND INFORMATION CONTAINED IN THIS MANUAL
ARE FURNISHED FOR INFORMATIONAL USE ONLY, AND ARE SUBJECT
TO CHANGE AT ANY TIME WITHOUT NOTICE, AND SHOULD NOT
BE CONSTRUED AS A COMMITMENT BY ASUS. ASUS ASSUMES NO
RESPONSIBILITY OR LIABILITY FOR ANY ERRORS OR INACCURACIES
THAT MAY APPEAR IN THIS MANUAL, INCLUDING THE PRODUCTS
AND SOFTWARE DESCRIBED IN IT.
Copyright © 2008 ASUSTeK COMPUTER INC. All Rights Reserved.
A-14
Appendix
Limitation of Liability
Circumstances may arise where because of a default on ASUS’ part
or other liability, you are entitled to recover damages from ASUS.
In each such instance, regardless of the basis on which you are
entitled to claim damages from ASUS, ASUS is liable for no more
than damages for bodily injury (including death) and damage to real
property and tangible personal property; or any other actual and
direct damages resulted from omission or failure of performing legal
duties under this Warranty Statement, up to the listed contract price
of each product.
ASUS will only be responsible for or indemnify you for loss, damages
or claims based in contract, tort or infringement under this Warranty
Statement.
This limit also applies to ASUS’ suppliers and its reseller. It is the
maximum for which ASUS, its suppliers, and your reseller are
collectively responsible.
UNDER NO CIRCUMSTANCES IS ASUS LIABLE FOR ANY OF
THE FOLLOWING: (1) THIRD-PARTY CLAIMS AGAINST YOU FOR
DAMAGES; (2) LOSS OF, OR DAMAGE TO, YOUR RECORDS OR DATA;
OR (3) SPECIAL, INCIDENTAL, OR INDIRECT DAMAGES OR FOR ANY
ECONOMIC CONSEQUENTIAL DAMAGES (INCLUDING LOST PROFITS
OR SAVINGS), EVEN IF ASUS, ITS SUPPLIERS OR YOUR RESELLER IS
INFORMED OF THEIR POSSIBILITY.
Service and Support
Visit our multi-language web site at http://support.asus.com
ASUS Eee PC
A-15
A-16
Appendix