1
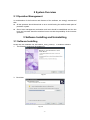
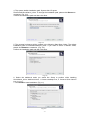
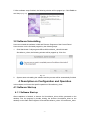
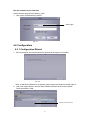
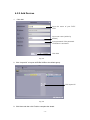
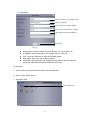
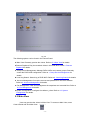
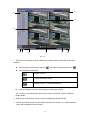
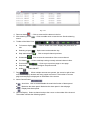
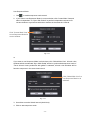
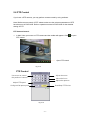
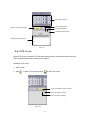
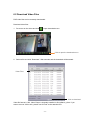
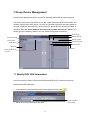
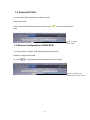
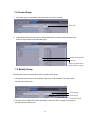
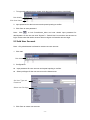
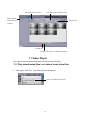
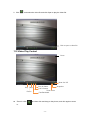
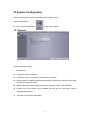
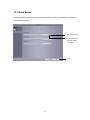
User’s Manual Surveillance Client PC Software for Windows OS & Mac OS Central Management Software Surveillance Client Contents 1 Product Description.........................................................................................................4 1.1 Important Disclaimer ................................................................................................ 4 1.2 Software Related Files ............................................................................................ 4 1.2.1 Software Installation Directory.......................................................................... 4 1.3 Application Enviroment ............................................................................................ 4 2 System Overview.............................................................................................................. 5 2.1 Operation Management ...........................................................................................5 3 Software Installing and Uninstalling .............................................................................. 5 3.1 Software Installing .................................................................................................... 5 3.2 Software Uninstalling................................................................................................ 7 4 Description on Configuration and Operation................................................................ 7 4.1 Software Start-up......................................................................................................7 4.1.1 Software Start-up ............................................................................................... 7 4.2 Configuration.............................................................................................................. 8 4.2.1 Configuration Wizard ......................................................................................... 8 4.2.2 Add Devices ........................................................................................................10 5 Preview Screen and Control Panel ............................................................................ 11 5.2 Control Panel ......................................................................................................14 5.3 Main View ...........................................................................................................15 5.4 Use Multiple Windows or Monitors...................................................................18 5.5 Sequence Mode..................................................................................................19 5.6 PTZ Control ..........................................................................................................21 5.6.1 PTZ Cruise.......................................................................................................22 6 Remote Playback..........................................................................................................23 6.1 Remote Playback Control ..................................................................................24 6.2 Download Video Files ........................................................................................25 7 Group Device Management .......................................................................................26 7.1 Modify DVR Information .......................................................................................26 7.2 Delete DVR.........................................................................................................27 7.3 Remote Configuration of DVR ..........................................................................27 7.4 Create Group ......................................................................................................28 7.5 Modify Group........................................................................................................28 7.6 Delete Group ......................................................................................................29 8 Local Log Search .........................................................................................................29 8.1 Backup Logs .......................................................................................................30 9 Account Management ...................................................................................................31 9.1 Enable Password of Admin Account................................................................31 9.2 Add User Account..............................................................................................32 9.3 Modify User Account..........................................................................................33 9.4 Delete User ..........................................................................................................34 10 File Management ........................................................................................................34 11 Video Player ................................................................................................................35 -2- 11.1 Play downloaded files/Cut videos/Local video files.......................................35 11.2 Video Play Control ...........................................................................................36 12 System Configuration..................................................................................................37 12.1 General...............................................................................................................37 12.2 File......................................................................................................................38 12.3 Alarm Sound .....................................................................................................39 -3- 1 Product Description 1.1 Important Disclaimer Thank you for using Surveillance_client series products. Please carefully read the software operation manual before operation. As the software may be updated at any time, the contents of the operation manual are subject to change without prior notice. Disclaimer: The company has sought to the integrity and accuracy of the contents of the operation manual during the compilation process and will not be held liable for any errors or omissions. The company reserves the right to change the software mentioned in the operation manual at any time without prior notice. Thank you for choosing our products. Please carefully read this manual before operation. We assume no economic and legal responsibility for the losses caused by the operation not according to the stipulations. 1.2 Software Related Files The files for software installing, running, recording and sharpshooting are in the following folders by specific paths. 1.2.1 Software Installation Directory The default software installation path: C:\Program Files\Dvrsoft\Surveillance_client. User can define the path for installation. 1.3 Application Environment Requirements for system configuration: Hardware CPU:Intel Core 2 Duo 2.4GHZ or Higher RAM:2GB or higher VGA:DirectX 9.0 compatible VGA card, NVIDIA GeForce 9500GT or higher, with video memory of 512MB or larger (Make sure the graphics driver provided by the computer supplier has been installed.) Network Card: Recommend to use gigabit NIC, (including network card, router, switch and network cables of 5e or higher specifications for RJ45 port) Disk Space: At least 1GB space should be available except the required space for recording. OS: Window Vista Business, Enterprise, Ultimate(32 bit or 64 bit) Window 7 Professional, Enterprise, Ultimate(32 bit or 64 bit) Window 8, Window 8 professional, DirectX 9.1 or higher Mac OS: 10.6 or higher -4- 2 System Overview 2.1 Operation Management In consideration of the functions and features of the software, we strongly recommend that: All the operators should be trained so as to avoid forming the artificial weak point of protection system. Sound user management mechanism and level should be established and the low level user’s access should be restricted so as to avoid the possibility of the incorrect operation. 3 Software Installing and Uninstalling 3.1 Software Installing Double click the installation file “Surveillance_client_(version)” 1 The following window will be popped up. Fig.3-1 3. Click Next Fig.3-2 -5- to install the software. 4. The system default installation path: System disk:\ Program Files\Dvrsoft\Surveillance_client. To change the installation path, please click Browse to customize. (Fig. 3-2) Confirm the installation path and then click Next. Fig. 3-3 5. The program’s shortcut will be created in the following Start Menu folder. The default installation path is Dvrsoft\Surveillance_client. If you want to select a different folder, please click Browse to customize. (Fig. 3-3) Confirm the installation path and then click Next. Fig. 3-4 6. Select the additional tasks you would like Setup to perform while installing Surveillance_client. Additional icons: 1. Create a desktop icon, 2. Create a Quick Launch icon. (Fig.3-4)。 7. Click Install to start installation. (Fig. 3-5) Fig. 3-5 -6- 5. After software setup finished, the following window will be popped up. Click Finish to exit Setup. (Fig. 3-6) Fig. 3-6 3.2 Software Uninstalling User can uninstall the software in Add and Remove Programs of the Control Panel. User can also run the Uninstall program by the following steps: 1. Click Start button All programsDvrsoft\Surveillance_clientUninstall Surveillance_client, the following window will be popped up. Click Yes. Fig. 3-7 2. System starts uninstalling the software and the process will be automatically finished. 4 Description on Configuration and Operation In this chapter, we’ll learn the specific operation of Surveillance_client. 4.1 Software Start-up 4.1.1 Software Start-up After installation is finished, a shortcut for Surveillance_client will be generated on the desktop. Run the program by double clicking the shortcut Surveillance_client on the desktop or click Start All Programs Dvrsoft\Surveillance_client Surveillance_client. -7- Run the software for the first time Please start the program Surveillance_client. 1. Click Login. No password by default. Click Login Fig. 4-1 4.2 Configuration 4.2.1 Configuration Wizard 1. Run Surveillance_client and Add Device Wizard will be opened. Click Next. Fig. 4-2 Note: If Add Device Wizard is not opened, please single click Help to manually open it. 2. Click “Add Online Device” and the client software will scan all the online network DVRs and NVRs in LAN. Display online devices Fig. 4-3 -8- 3. Click a DVR/ NVR in the list and the added devices, IP address, port and channel number will be displayed. Click “Add Selected Device” to add. Click a DVR/ NVR in the list. Fig. 4-4 Note:If your DVR/ NVR is not available in the list, click Exit and then click add to manually input the IP address of DVR/ NVR. 4.Input the name of the selected DVR in Device Name field, e.g. home, office, etc. 5.Input user name in User Name field (default name is admin) 6.Input password in Password field. The password field is blank by default. You may change the login password of DVR/ NVR. -9- 4.2.2 Add Devices 1. Click Add. Input the name of your DVR/ NVR Input user name (admin by default) Input password if the password verification is activated. Click Add Fig. 4-5 2.Click “Import All” to import all DVRs/ NVRs to the default group. Click Import All Fig. 4-6 9.Click Next and then click Finish to complete the wizard. - 10 - 5 Preview Screen and Control Panel 1. Click Main View Fig.5-1 2. Click and drag it to the default group in the show grid. Fig. 5-2 - 11 - 5.1 Add DVR/ NVR by Using DNS If DVRs/ NVRs use dynamic domain names, you may add them into Surveillance_client。 Preconditions: Create a DDNS account. Enter domain information and enter DVR/ NVR local. Map the port to the router. Add a DVR/ NVR by using DDNS: 1. Select ‘Control Panel’ option and click “Group Device Management”. Click Group Device Management Fig. 5-3 2. Click Add Device. - 12 - 3. Configuration: Input the name of your DVR/ NVR Input IP address Input Client Port (dfault: 9000) Input user name (default: admin) Input password (default:blank) Click Add Fig. 5-4 Device Name: Input the name of your DVR/ NVR e.g. home, office, etc. IP Address: Input domain name, for example, ddvvrr. 3322.org. Port:Input the client port of DVR/ NVR (default: 9000). User Name: Input user name (default: admin). Password:Input password. The password field is blank by default unless the password verification has been activated for DVR/ NVR. 4. Click Add. 5.Click import all to import all DVRs/ NVRs to the default group. 6.Click “Control Panel” option. 7.Click Main View. Click Main View Fig. 5-5 - 13 - 8.Click and drag it to the default group in the displayed window. Fig. 5-6 Result Fig. 5-7 5.2 Control Panel You may access to your DVR through control panel to preview and playback the videos. You can also open control panel and click the control panel option at any time. - 14 - Fig. 5-8 The following options can be found in the Control Panel: Main View: Remotely preview the videos. Refer to 5.3 Main View for details. Remote Playback: Play the recorded videos in the DVR/ NVR. Refer 6. Remote Playback for details. Group Device Management: Manage DVRs/ NVRs and camera groups. Remotely control the DVR/ NVR configuration. Refer to 7. Group Device Management for details. Local Log Search: Search log of DVR/ NVR. Refer to 8. Local Log Search for details. Account Management: Set up the account and password for the client software. Refer to 9. Account Management for details. File Management: View and management the snapshots and recorded files. Refer to 10. File Management for details. System Configuration: Configure Surveillance_client. Refer to 12. System Configuration for details. 5.3 Main View User may preview the videos in Main View. To access to Main View, enter Control Panel and click Main View ( ) - 15 - ⑩ ① ⑨ ② ③ ④ ⑤ ⑦ ⑥ ⑧ Fig. 5-9 1.DVR/ NVR List: Display all DVRs/ NVRs and camera groups connecting to the client software. Camera group is indicated by the icon Icons related to DVR/ NVR: and DVR is indicated by the icon 。 Camera is online Preview the camera video Camera is offline(connection problem) Click and drag the camera, camera group or show grid to open. Tip: You may click and drag the camera and create customized view from different DVRs/ NVRs. 2.Hide the list of DVR/NVR: Click the arrow to hide/display DVR/ NVR list. 3. Alarms: Click alarm panel and the system alarm list and events, e.g. motion detection event, will be displayed on the screen. - 16 - Fig. 5-10 :Click to remove all the alarms in the list. 4. Remove alarms :Click to enable mute or cancel mute. Set the alarming 5. Mute alarming sound sound. 6. Toolbar of the Main View: Full screen display exit. Selecting a layout Stop status display Screenshot Cut videos Previous/Next Sequence Audio :Click to enable full screen display and press ESC to :Split screen mode selection key. :Click to stop all channel previews. :Click to save the screenshot of the current channel. :Click to start/stop cutting currently selected channel video. :Click to go to previous page or next page. :Click to configure sequence mode. :Audio ON/OFF :When multiple cameras are opened, the screen is split to form 7. Page multi-screen display window and many pages are formed. The number of current page and total page is displayed on the bottom of the screen. 8. Alarm Control Panel: Auto-hide:Click to enable/disable the auto-hide function of alarm panel. Maximize the alarm panel: Maximize the alarm panel in the tab page. Display/hide alarm panel. 9. Camera Display:Select a channel and put the cursor on the toolbar of the channel. The toolbar contains the following options: - 17 - Click a channel to open toolbar. Fig. 5-11 Cut videos Screenshot PTZ :Click to start or stop cutting the currently selected channel video. :Click to save the screenshot of the current channel. :Click to use PTZ control. Refer to PTZ Control for details. Stop Video :Click to stop the current channel video. Digital Zoom :Click to use digital zoom mode. Color setting :Open the color setting menu of the current camera. Mute :Enable/ disable mute of the current preview video. 10.CPU status:Display CPU utilization. 5.4 Use Multiple Windows or Monitors Create multiple tab pages of preview video windows. Customize the preview video windows as required (4 tab pages can be opened at most). Open multiple windows: - 18 - Click preview tab page and drag it out of the main window to create the 2nd display window. Click and drag it out of the main window. Fig. 5-11 Result: Open multiple tab pages. You can monitor different videos from multiple monitors. Fig. 5-12 5.5 Sequence Mode When Sequence Mode is enabled, the main view will be in automatic cycle mode in setting time. You may set sequence mode for one or all preview video window. - 19 - Use Sequence Mode: 1. Click to enable sequence mode control. 2. If you want to use Sequence Mode in current window, click Current Main View and select “Independent” or “Sync With Global” to perform independent sequence for current window or synchronize with other windows in the same time interval. Click “Current Main View” to use Sequence Mode for current window. Fig. 5-13 or If you want to use Sequence Mode in all windows, click ‘Global Main View’. All main view windows which are selected “Sync With Global” will be in synchronized sequence mode. If “Force all main view synchronize with global” is selected, all main view windows will be forced to sequence in the same time interval. Click “Global Main View” to use Sequence Mode in all windows. Fig. 5-14 3.Use slider to set the Switch Interval (dwell time). 4.Click to start sequence mode. - 20 - 5.6 PTZ Control If you have a PTZ camera, you may perform remote control by using software. Note: Before remote control of PTZ, please make sure the relevant parameters of PTZ have been set in DVR/ NVR. Refer to operation manual of DVR/ NVR for the detailed setting of PTZ. PTZ Camera Control: 1. In Main View, put cursor on PTZ camera and the toolbar will appear. Click PTZ control. Open PTZ control Fig. 5-15 PTZ Control Use cursor to control Adjust the zoom the position of camera Adjust the focus Adjust the aperture Adjust PTZ speed Start/Stop PTZ Cruise Configure/Call preset point Fig. 5-16 - 21 - to open Set PTZ position Call preset point Click to set Preset point Set preset point Delete preset point Select preset number Fig. 5-17 5.6.1 PTZ Cruise When PTZ cruise is enabled, PTZ will start cruising through saved preset point. Set more than two preset points and cruising can be started. Start/Stop PTZ cruise. 1.Click Cruise. 2.Click to start PTZ cruise and click to stop PTZ cruise. Click to enable cruise control Click to stop cruising Click to start cruising Fig. 5-18 - 22 - 6 Remote Playback User can view the audios and videos recorded by DVR/ NVR in the computer through remote playback. Remote Playback: 1.Click remote control on the control panel. 2.Select the video channel for remote playback. 3.Playback can be done in 4 channels at the same time. 4.Select playback in calendar. The red triangle icon indicates that there is video available for playback. 5.Click “Search” to show the current videos of DVR/ NVR. 6.Click to play the selected event. 7.Click to select play time in time fence. Select a camera to play Select a date in calendar Click Start to play Click the time fence to select play time. - 23 - 6.1 Remote Playback Control Select DVR/NVR Group Select Camera Playback Select File Type Enable Synchronous Playback Select Playback Date Search Video Previous period Move to the right Click to select playing time Amplify time Narrow down time Download Step Forward Fast Forward Fast Backward Stop Pause Play Zoom in/out Snapshot Mute Cut video Mute Four split screen One split screen Full Screen Fast Forward Fast Backward Stop Pause Play - 24 - 6.2 Download Video Files DVR video files can be remotely downloaded. Download video files: 1. Put cursor on the video and click to open download menu. Click to open the download menu. 2. Select a file and click “Download”. Wait seconds and the download will be started. Video Files Click to download Video file format is .264. Video Player is internally installed in Surveillance_client. If you want to convert .264 to AVI, please use AVITool on the attached CD. - 25 - 7 Group Device Management Group Device Management Menu is used for managing DVR/ NVR and camera group. The device panel on the left allows you to add, modify and delete DVR/ NVR system and remotely control DVR/ NVR device. You can set up camera group by the group panel on the right. Import the channels from device panel into group panel to access the videos or playback. You can select different channels from multiple devices to a group. The default group is created by default. You may create new groups as required. Add group Modify group Manually add Delete group Camera group DVR/ NVR DVR/ NVR DVR/ NVR Camera Camera Scan DVR/ NVR in LAN 7.1 Modify DVR/ NVR Information User can modify the name of DVR/ NVR and delete DVR/ NVR or camera from group. Modify DVR/ NVR information: 1.In the device list, left click DVR/ NVR to be modified and then click . Click to select 2.Modify DVR/ NVR information and save. - 26 - DVR/ NVR 7.2 Delete DVR/ NVR You may delete DVR/ NVR from Surveillance_client. Delete DVR/ NVR: Click to select DVR/ NVR to be deleted and then click and save to delete DVR/ NVR. Click to delete DVR/ NVR 7.3 Remote Configuration of DVR/ NVR You may remotely configure DVR/ NVR parameters by software. Remotely configure DVR/ NVR: Click to set parameters. Refer operation manual for details. Click to configure the parameters of DVR/ NVR. - 27 - 7.4 Create Group 1. Click Add. Input a customized name and then click Yes to confirm. Click Add 2. Import DVR/ NVR channel to group. Select DVR/ NVR or camera to be imported in the left list to import them to the selected group. Import the selected camera Import all channels of DVR/ NVR into group. 7.5 Modify Group Modify group name or Delete DVR/ NVR or camera from group. 1. Click group name and then click Modify. Input name to be modified in the pop-up box and save by clicking Yes. Click Modify Click Group Click DVR/ NVR 2. Click the name of DVR/ NVR and click Modify. Input the name to modify in the pop-up box and save by clicking Yes. - 28 - 7.6 Delete Group Delete the name of Group/ DVR/ NVR/ Camera 1.Click Group/ DVR/ NVR/ Camera. 2.Click Delete and then click Yes to confirm. Click Delete Click camera group Click camera group and click Delete. Click Yes to confirm. 8. Local Log Search “Local Log Search” refers to searching the log of Surveillance_client. Defaultly it can search one week’s log. User may define the log reservation time as one month. Refer to system setting for details. Search log: 1.Click Local Log Search on the Control Panel. 2.Set the following search options: User Name:Select “All Users” to search logs created by all users, or select “Specific User” to view his log. Log Type:Alarm log records, motion detection, alarms, and system alarms. Operation log records configuration change or access of system users to log system (such as login and logout) All Type: Select to search logs of all type or specific type. Group:Select DVR/ NVR or Camera group to search desired logs or select All Groups to search logs of all DVRs/ NVRs and camera groups. Start Time/End Time: Select start time or end time of searching. 3.Click Search and all logs meeting search conditions will be displayed in the list. - 29 - Set searching parameters Click Search 8.1 Backup Logs User can back up the log search result in the hard disk or view backup log. Backup log: 1.Search log by following above steps. 2.Click Backup Click Backup 3.Select a folder and input a file name and then click Save. Open saved log file: - 30 - 1. Click to view backup. Click to view Backup and open saved log files. 2. Select log file and click Open. 9 Account Management User may use Account Management menu to create Surveillance_client user account. The client software includes the following user types: Admin:When you firstly run the client software, the default account is admin. The administrator has the privilege to operate client software and remotely configure DVR/ NVR parameters. The administrator can add, modify or delete any other user accounts. User:It is standard user account. User’s privileges are assigned by administrator. User cannot change software setting or change other user account. User can change his own password. Visit Account Management: • Click Account Management on the Control Panel. 9.1 Enable Password of Admin Account The password for admin account is blank by default. No password input is needed to log in Surveillance_client. If password is set for admin account, operator has to input password to log in the client. Create password for admin account. - 31 - 1. To login with admin account, please click admin account and then click Modify. Click Modify Click User Name 2.Input password for admin account and repeat inputting to confirm. 3.Click Save to save password. Note : Click to lock Surveillance_client and user should input password for administrator. Or the user can click “System” > “Switch User” to use other user account to login. Please note that admin account does not logout until another account login. 9.2 Add User Account Note:Only administrator is allowed to create new user account. 1.Click Add Click Add 2.Configuration: Input password for user account and repeat inputting to confirm. Select privileges for the user account on the bottom area. Set User Type and Password Select user Privilege 3.Click Save to create user account. - 32 - 9.3 Modify User Account 1. Click the account to be modified and click Modify. Click Modify Click user 2.Edit the settings and privileges of common users and click Save. Note:Common users can only modify his own password while administrator can modify the password or privileges of any user. - 33 - 9.4 Delete User Click user you want to delete and click Delete and click Yes to confirm. Click Delete Click user Note: Only administrator can delete common users. 10 File Management Use file management to view local videos and snapshots. Use file management: 1.Click file management on the Control Panel. 2.Select the camera or DVR/ NVR you want to search on the left of the screen. 3.Click “Video” to search manual videos or click “Picture” to search snapshots. 4.Set start time and end time. Time period for cutting videos and pictures is for recording original videos, not for saving files. 5.Click “Search” to search files. 6.Double click to open files or use button on the bottom of the screen to delete or save files in your computer. - 34 - Select Picture or Video Set Start Time and End Time Select group, Search file DVR/ NVR or camera. Delete file Click to save file in a different location. 11 Video Player Video player can play downloaded files/ cut videos/ local video files. 11.1 Play downloaded files/ cut videos/ local video files 1.Click “Open Video File”. The video player will be opened. Click “File Open Video File” - 35 - 2.Click and select the video file and click Open to play the video file. Click to open a video file. 11.2 Video Play Control Close Mute On/ Off Play Stop Pause Zoom in: click Play by frame Fast Forward Zoom in/out Fast Backward Snapshot and then click and drag on the picture, and click again to zoom in. - 36 - 12 System Configuration System configuration is used for configuring Surveillance_client. System configuration: Click system configuration on the Control Panel. 12.1 General Configure general settings: 1.Configuration: Language: Select a language. Log Keeping Time: One Week/ Half a Month/ One Month. Enable audio on multiple channels simultaneously: Enable multi-channel audio output and play multi-channel audio. Enable auto-login: Automatically login without inputting account and password. Resume Live View Status: Open software and the last live view status will be automatically resumed. 2. Click Save to save the modification. - 37 - 12.2 File Set saving path of files (Video files and image files) You can set an alarm message. When the disk space for saving files is less than the set space, the alarm message will appear. The default setting is 600MB. Configure the folder for saving files: 1.Click and select the required folder. 2.Click Save to save the changes. Set alarm for insufficient disk space: Alarm will appear if disk space is insufficient. When the disk space for saving is less than set space, the alarm will appear. The minimum value is 500MB. - 38 - 12.3 Alarm Sound Customize alarm sound: Allow you to configure alarm sound. You may use any WAV file to be the alarm sound. Play audio alarm Click to select an audio for alarm (wav file) Save - 39 - www.nesscorporation.com National Customer Service Centre Ph: 1300 551 991 [email protected] All rights reserved. No part of this publication may be reproduced, transmitted or stored in a retrieval system in any form or by any means, electronic, mechanical, photocopying, recording, or otherwise, without the prior written permission of Ness. Ness reserves the right to make changes to features and specifications at any time without prior notification in the interest of ongoing product development and improvement. © Ness Corporation Pty Ltd ABN 28 069 984 372