1
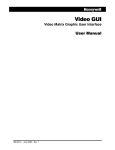
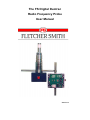
The FS Digital Duotrac
Radio Frequency Probe
User Manual
Version 6
FOREWORD
This item of equipment has been manufactured by Fletcher Smith Ltd. It is of a rugged construction,
using the best materials and workmanship. With proper care, a long trouble free life is ensured.
The correct application of the Operating and Maintenance Procedures contained in this manual will
ensure the unit performs to the high standard for which it was designed.
It is important these instructions are thoroughly read and understood before operating the unit or its
accessories.
Liability
Fletcher Smith's liability under the contract for the supply of this item of equipment is subject at all
times to the correct application of the procedures set out in this manual. Fletcher Smith Limited can
accept no liability for any loss resulting from any departure from the instructions contained in this
manual. If in doubt the operator should contact Fletcher Smith Limited for advice and guidance.
Authority for Use and Reproduction
Copyright in this manual is vested in Fletcher Smith Limited. It must not be reproduced or copied
other than with the written consent of Fletcher Smith Limited, and may be used only in connection
with the item of equipment supplied with it.
Amendment Procedure
The information contained in the Manual may be amended from time to time in accordance with our
policy for equipment development. However, manuals issued to clients will not normally be replaced
by amended copies unless the amendment is to correct errors found in the issued document; in which
case copies of the amended pages would be forwarded for insertion into the manual.
Table of Contents
1.
General Description......................................................................................... 1
1.1
2.
Specification .................................................................................................... 2
2.1
2.2
2.3
2.4
2.5
2.6
2.7
2.8
2.9
2.10
2.11
3.
Dismantling the Duotrac Probe ....................................................................................... 18
Re-assembling the Digital Duotrac Probe ....................................................................... 20
Safety ............................................................................................................. 21
EMC Compliance ........................................................................................... 22
11.1
11.2
12.
13.
Removal of Probe from Pan ............................................................................................ 17
Cleaning .......................................................................................................................... 17
Reinstallation ................................................................................................................... 17
Dismantling and Re-Assembly of Probe...................................................... 18
9.1
9.2
10.
11.
Block Diagram of R.F. Probe........................................................................................... 15
The Radio Frequency Generator..................................................................................... 15
The Series Resistance Measurement Circuit.................................................................. 16
The Phase Detector and Control Circuit ......................................................................... 16
Probe and Tuning Circuit................................................................................................. 16
Removal and Cleaning of Probe................................................................... 17
8.1
8.2
8.3
9.
Field Calibration............................................................................................................... 12
Workshop Calibration ...................................................................................................... 12
Computer Calibration ...................................................................................................... 13
Software Upgrades.......................................................................................................... 14
Basic Theory of Operation ............................................................................ 15
7.1
7.2
7.3
7.4
7.5
8.
Mode Selection.................................................................................................................. 9
Field Check...................................................................................................................... 10
Field Calibration (MODE 3) ............................................................................................. 10
Workshop Calibration (MODE 4)..................................................................................... 11
Processed Output (MODE 2) .......................................................................................... 11
Calibrating The Probe With The Supplied Software ................................... 12
6.1
6.2
6.3
6.4
7.
Probe Dimensions ............................................................................................................. 4
Mounting Socket and Plug ................................................................................................ 5
Mounting Details................................................................................................................ 6
Electrical Connections .................................................................................... 8
Calibration ........................................................................................................ 9
5.1
5.2
5.3
5.4
5.5
6.
Power Supply .................................................................................................................... 2
Radio Frequency Generator.............................................................................................. 2
Outputs .............................................................................................................................. 2
Temperature ...................................................................................................................... 2
Pressure - mounted in a standard housing ....................................................................... 2
Calibration ......................................................................................................................... 2
Electronic Stability ............................................................................................................. 2
Environment ...................................................................................................................... 2
Cabling .............................................................................................................................. 2
Mounting............................................................................................................................ 3
Certification........................................................................................................................ 3
Mechanical Details........................................................................................... 4
3.1
3.2
3.3
4.
5.
Ordering Information ......................................................................................................... 1
Manufacturers Recommendations .................................................................................. 22
Installation Requirements................................................................................................ 22
Appendix 1 ..................................................................................................... 24
History Sheet ................................................................................................. 26
1.
General Description
The DIGITAL DUOTRAC R.F. Probe is an instrument which measures complex impedances. The
unit consists of a probe body on the end of which is mounted an enclosure housing the electronics.
The probe provides simultaneous measurements of massecuite series resistance and series
capacitance which are available as two separate 4-20 milliamp output signals.
These signals may be used individually or in combination for control depending on the application.
For example, on beet massecuites, the series resistance signal correlates closely to massecuite brix,
whereas the series capacitance signal is influenced more by mother liquor brix. For improved control
of continuous pans, a signal highly biased towards crystal content may be derived by linear
combination of the two signals in a predetermined ratio. The method of measurement and the use of
the two signals to derive an optimum signal for control is patented and makes the DUOTRAC probe
superior to other R.F. probes which only provide a single output.
The DUOTRAC probe is designed to be used in processes operating at constant temperature. All of
the standard applications for which the probe is supplied are absolute pressure controlled or
temperature controlled. Should the probe be used in a non-standard application where such control is
not in place it should be noted that, as with any instrument measuring electrical properties of
solutions, the output of the probe will be affected by temperature changes.
For control of cane sugar refinery white pans where ash is low, the series capacitance signal gives
good results. This signal provides a measure of liquor brix at the beginning of the boil which can be
used to establish seeding point. Also this signal responds to crystal content during the boil and can
also be used to control boiling up of the pan to strike.
The instrument can also be used for brix measurement and control on various liquors.
The probe is available in two lengths, a long version suitable for use in continuous pans or in batch
pans, and a short version for brix measurement of liquors, or for use in pans where there is a space
restriction or where the probe may be subjected to severe forces.
With each probe a calibrator is provided to facilitate workshop calibration to a standard range.
1.1
Ordering Information
The variables that must be specified when ordering are:
1.
Probe length (165mm or 320mm)
2.
a)
b)
c)
d)
e)
f)
Proposed application
Material to be measured
Brix and crystal content, maximum and minimum values
Purity
Ash content %
Average measurement temperature
The above information will allow selection and supply of the correct range card and calibrator.
Page 1
2.
Specification
2.1
Power Supply
Voltage:
Current:
24v D.C. ±10%
250mA typically
The supply and outputs are isolated from the probe body with respect to D.C.50V.
2.2
Radio Frequency Generator
Frequency:
Max power output to probe:
Spectral purity:
2.3
27.00 MHZ crystal controlled
70 mW
Harmonics more than 45 dB down on the fundamental
Outputs
Two 4-20mA outputs, one corresponding to series resistance and the other to series capacitance.
Load resistance:
2.4
0-800Ω
Temperature
Maximum continuous operating temp of probe: 100 °C
Maximum operating ambient temp:
70 °C
2.5
Pressure - mounted in a standard housing
Maximum working pressure:
2.6
Full vacuum to 100 kPa gauge
Calibration
Calibration can be carried out in the workshop using a calibrator which clips on to the end of the
probe. This allows calibration of the probe to a standard range.
2.7
Electronic Stability
Typically series resistance output variation is better than 0.05% of span per °C temperature change
(dependent on calibration range).
Series capacitance output variation better than 0.1% per °C.
2.8
Environment
The probe and electronics housing are to IP65 standard and designed to operate in a factory
environment.
2.9
Cabling
The R.F. probe requires a four-core cable with overall screen (normal instrument cable). Length of
cable is not critical.
Electrical connections to the probe are through a bayonet type MIL spec. fitting. The probe is
supplied with a plug, which fits into a socket mounted on the probe housing, and 1.95 metres of cable.
Page 2
A comms cable is also supplied so that the user can take advantage of the computer calibration
functions.
2.10
Mounting
The probe fits into a Brass or Bronze housing mounted on the pan and is held in position by a handtightened screw. This allows easy removal of the probe for cleaning or service. Sealing of the probe
into the fitting is by means of an “O” ring. This mounting arrangement is NOT recommended on
applications where there is a positive pressure.
2.11
Certification
The Digital Duotrac Probe is CE Marked.
Page 3
3.
3.1
Mechanical Details
Probe Dimensions
The probe dimensions and general mounting arrangement are shown in Fig. 1.
Figure1: Probe Dimensions
Page 4
3.2
Mounting Socket and Plug
The probe is push fitted into a housing and is retained by a hand tightened locking screw. The socket
fits into a mild steel or stainless steel mounting ring welded into the side of, or under the vessel. A
plug is inserted into the socket when the probe is taken out for cleaning or service. Manufacturing
details are given in Fig.2.
Figure 2: Manufacturing Detail - Probe and Plug
Page 5
3.3
Mounting Details
3.3.1
Pans
The probe may be mounted in the bottom, or in the side of a pan provided there is a suitable downtake next to the pan wall. The probe should be installed in a position where there is good circulation
of massecuite and well away from the liquor inlet where pockets of unmixed liquor may exist.
If possible, the probe should not be installed to within 0,5m from any metal objects in the pan since
these will affect calibration. The probe should never be installed above the calandria, or above a
proof stick or circulation steam inlet since vapour or air bubbles passing the probe will cause
fluctuating output signals.
Typical installation positions in batch and continuous pans are shown in Fig.3.
Figure 3: Mounting Positions
Page 6
3.3.2
Liquor Brix Measurement
Although it is feasible to mount a probe directly in the side of a tank, it is preferable to mount the
probe in a pipeline which may more easily be isolated if the probe is to be removed.
Care must be taken to ensure that no air or vapour bubbles pass the probe or that the probe is not
mounted in a position where it could be affected by air locking.
Care should be taken not to mount the probe downstream of a restriction which could result in
flashing.
A typical installation in a vertical pipeline is shown in Fig.4.
Figure 4: Typical Installation - Liquor Brix Measurement
Page 7
4.
Electrical Connections
Each probe is supplied with a plug and 1.9 metres of screened cable. The cable connections are
given below:
Table 1: Electrical Connections
Core Colour
Description
White
+24v D.C. supply
Brown
Common
Yellow
Series resistance output (Rs) 4-20 mA.
Green
Series capacitance output (Xs) 4-20 mA.
The probe cable supplied with the probe has its screening cable earthed via the plug to the main
probe body. When installing extension cables, care must be taken to ensure that the screening is
earthed in such a way as to not form a closed loop through a second earthing point. The plug
connections on the probe are shown in Fig.5.
Figure 5: Plug Connections
Page 8
5.
Calibration
Each probe has been factory calibrated to a range suitable for the application. A calibrator and
calibration data sheet (Appendix 1) is supplied. These may be used to check probe calibration or
used as a reference if changes in calibration are required.
Careless use of measuring equipment or tools during the calibration procedure can damage the
probe. It is essential that only people qualified and experienced in this type of work should attempt
either calibration or dismantling of the probe.
When the probe is calibrated using the calibrator, care must be taken to keep the end of the probe
well away from conducting objects or material containing water as these can affect output signals.
The probe may be rested on a wooden table, or the end supported by a block of wood during
calibration.
The probes must be connected to the 24V power supply for at least 20 minutes to allow the electronic
components to warm up and stabilise before beginning the calibration procedure.
A simple wooden bracket (as shown in Fig.6) may be fixed to the edge of a work bench to support the
probe in an upright position during calibration.
Figure 6: R.F. Probe Calibration Jig
5.1
Mode Selection
With the cover of the probe removed, the desired application, is selected via the rotary switch, by
using a small screw driver. When the probe is first powered up it will be in mode 1, that is the standard
output mode. To select one of the other modes hold down the UP, DOWN and SELECT/ENTER keys
simultaneously until the desired mode is reached. Release all the keys. Now press the
SELECT/ENTER key on its own which will stop the mode digit from flashing. The top PCB
component layout is shown in figure 7.
Page 9
Figure 7: Top PCB Component Layout
5.2
Field Check
Calibration of the probe can be easily checked in the field by the following procedure:-
5.3
1.
Remove the probe from the pan, clean the wetted part and clip the calibrator on the probe
so that the clips make good contact with the metal on either side of the insulator.
2.
Disconnect the two outputs (yellow and green wires of probe cable) and power up.
Switch the calibrator to position 1 and then measure the two output signals. The series
resistance output (Rs), and the series capacitance output (Xs) signals may be measured
by connecting a milliammeter first from the yellow wire to supply negative, and then from
the green wire to supply negative. Switch the calibrator to position 2 and again measure
Rs and Xs outputs. (NB: The mA output readings will take some time to stabilize
when switching between positions 1 and 2.)
3.
These readings may then be checked against the initial calibration set up values given in
Appendix 1. If calibration is out, then the probe must be calibrated.
Field Calibration (MODE 3)
1. Remove the probe from the pan, clean the wetted part and clip the calibrator on the probe so
that the clips make good contact with the metal on either side of the insulator.
2. Remove the lid from the probe and select mode 3. The state display will be flashing 1,
indicating that the calibrator must be switched to position 1. Once this has been done, wait
until the lock led stops flashing, and remains on then press the SELECT/ENTER key. Wait
Page 10
awhile (up to 60 seconds) until the state display is flashing 2, then switch the calibrator to
position 2, wait until the lock led stops flashing and remains on and then press the
SELECT/ENTER key. The calibration is complete once the mode display has gone back to 1.
5.4
Workshop Calibration (MODE 4)
This calibration is used to set up the 4 to 20 mA outputs.
1.
2.
3.
4.
5.5
This calibration will require the use of a digital milliammeter.
Remove the lid from the probe and select mode 4. Connect the milliammeter to the green
wire (Xs) of the probe cable. Adjust the milliamp reading via the UP and DOWN keys until
4.00 mA is achieved, then press the SELECT/ENTER key. Wait until step 2 is displayed
on the state display, again adjust UP and DOWN until 20.00 mA is achieved, then press
the SELECT/ENTER key.
Disconnect the green wire and connect up the yellow wire (Rs) to the milliammeter. The
state display will display a 3. Once again adjust UP and DOWN until 4.00 mA is reached,
press the SELECT/ENTER key. The state display will now display a 4, adjust UP and
DOWN until 20.00 mA is reached, then press the SELECT/ENTER key.
The mode display will now go to mode 3 (Field Calibration). Continue with the field
calibration as before, until the mode display is back at 1.
Processed Output (MODE 2)
If a direct output is required in Brix, the Rs 4 to 20 mA signal (yellow wire) may be used to output this
value. This mode should only be selected once a Computer Calibration has been performed as
described in section 6.1.3
1.
To turn this mode on remove the lid from the probe and select mode 2.
2.
To turn this mode off again select mode 1.
Page 11
6.
Calibrating The Probe With The Supplied Software
This calibration will require the use of a P.C. with the following minimum requirements a 386SX, DOS,
640K Ram, 1.44 Mb stiffy drive, and a VGA monitor.
The probe is shipped with a 1.44 Mb stiffy disk. RFCAL.EXE is the file that is run to calibrate the
probe via software.
Copy the file RFCAL.EXE from the supplied disk to the PC’s hard disk.
1. Remove the cover from the probe and power the probe up. Connect the 3 pin
communication link cable from the probe to a 9 pin comms port on the PC.
2. The desired application, one of eight, is selected via the rotary switch.
3. When the probe is first powered up it will be in mode 1 that is the standard output mode.
Run the file RFCAL.EXE from DOS. The software will prompt you to choose a comms port,
the default value is 1. Decide on which comms port you wish to use and press enter. (Note
if you do not select the correct comms port no communication will take place between the
PC and the RF probe.)
4. You will then be presented with the Main Menu. The mode display on the probe will indicate
a 5.
Note: The software will also run under Windows 3.1 and Windows 95, conflicts with the comms ports
can however result.
6.1
Field Calibration
1.
Select item 3) Field Calibration from the main menu. The state digit on the probe will
now display a flashing 1, if this does not happen there is a problem with the
communications and this should be resolved before proceeding any further.
2.
Clean the wetted part of the probe, and clip the calibrator on the probe so that the clips
make good contact with the metal on either side of the insulator. Switch the switch on the
calibrator to position 1.
3.
Select item 1) To Continue from the Menu. The probe will now perform the first part of
the calibration which can take up to 60 seconds. Wait for the next menu and then switch
the calibrator to position 2. Again select item 1) To Continue, the probe will now perform
the second part of the calibration which again can take up to 60 seconds. When this is
complete select item 1) to accept these new values. You will now return to the main
menu.
6.2
Workshop Calibration
1.
This calibration is used to set up the 4 to 20 mA outputs.
1.
This calibration will require the use of a digital milliammeter.
2.
Select item 4) Workshop Calibration from the main menu. The state digit on the probe
will now display a flashing 1.
3.
Connect the milliammeter between the power supply common and the green wire of the
probe cable. Increase/decrease the Xs milliamp reading via the menu by pressing enter
until 4.00 mA is displayed on the digital milliammeter. Once this has been done select
item 3) To Proceed to Xs 20 mA Output. Now adjust the Xs milliamp reading via the
menu until 20.00 mA is displayed on the digital milliammeter. Once this has been done
select item 3) To Proceed to Rs 4 mA Output.
Page 12
4.
Connect the milliammeter between the power supply common and the yellow wire of the
probe cable. Once again adjust up and down until 4.00 mA is reached, then Proceed to
the 20.00 mA Output calibration, this time adjust up and down until 20.00 mA is
achieved. Then select item 3) To Accept New Values. You will now return to the main
menu.
5.
It is recommended to re-run the “Field Calibration“ procedure to ensure accurate results.
6.3
Computer Calibration
If a direct output is required in Brix, the Rs 4 to 20 mA signal may be used to output this value. It will
be necessary to obtain a set of calibration data comprising sample Brixes and the corresponding Rs
and or Xs values recorded when those samples were taken.
A minimum of 8 data points are required if either Rs or Xs values are used and a minimum of 12 data
points are required if Both Rs and Xs are used.
1.
Select item 5) Computer Calibration.
2.
Select either item 1) To calculate new coefficients, item 2) To use existing
coefficients or item 3) To use previously down loaded coefficients.
3.
If item 1) is selected the number of sets of data points will then be required. The minimum
number being 8 and the maximum number being 40. If only one signal is being used do
not input data for the other signal.
4.
After entering the data press F10 to continue.
5.
Input the maximum brix value, this will correspond to an Rs value of 20 mA and press
enter, then input the minimum brix value this will correspond to an Rs output of 4 mA.
(These maximum and minimum values need to be sensible values spanned by the data
points)
6.
The coefficients of a polynomial regression A.B.C....G are then calculated and once the
user has checked these for their correctness these can be down loaded to the probe by
pressing F10. The mode display will now show a 2 indicating that the computer calibration
processed output is being used. NB the output is only on the Rs output that is the
yellow wire. The format of the regression formula is:
Z = A.Rs + B.Rs2 + C.Rs3 + D.Xs + E.Xs2 + F.Xs3 + G
7.
If the user no longer desires the probe to run with the computer calibrated coefficients go
to the main menu and select item 6) Disable Computer Calibration Mode. The mode
display will now return to 1, indicating standard output mode.
User Defined Calibration Points
1.
Using a suitable computer, run the program RFCAL.EXE.
2.
Set up the probe for normal operation.
3.
Turn the "Application Selector Switch" to position 9 - there will be no change to the
LED display at this stage.
4.
Select F7 - User Calibration, input the required User Settings, and download the new
required mA values for Rs and Xs outputs.
5.
Select F2 - to check these values have been accepted by the probe (check the last
four values at the bottom of the page).
6.
Carry out the "Field Calibration" as described in the manual.
7.
Once complete, check the Xs and Rs outputs correspond to the User Settings as
input in Step 2.
8.
Note the LED display should now show Mode=1, and Application / State Display=9.
Page 13
Other Software Options
1.
It is possible to send Rs, Xs and Z values from the probe down the RS 232 link to a
remote computer (where Rs is the resistance output, Xs is the capacitance output
and Z the approximate Brix output).
Select from the Main Menu item 8) Start Sending Rs, Xs & Z values. The serial communications are
configured so that the three values are sent as a continuous stream, using the format of a letter
followed by four numbers (i.e. R---,X---,Z---), without polling.
The other comms options are baud rate 9600, no parity, 8 data bits, 1 stop bit and CTS not required.
2.
6.4
To stop the probe sending Rs, Xs and Z values select from the Main Menu item 9)
Stop Sending Rs, Xs & Z values.
Software Upgrades
As new software upgrades become available these will be available by contacting the Probe supplier.
Page 14
7.
Basic Theory of Operation
Referring to Fig.8 the probe consists of a constant voltage source in the radio frequency range which
is connected across a resistor R, a tuning circuit, and the probe all connected in series.
The material being measured is depicted as being equivalent to a series resistance Rs and a series
capacitance Cs.
The tuning circuit consists of a series inductance L, and a variable capacitor Ct. During operation the
variable capacitor Ct, which is a varicap diode, is continuously adjusted by a control circuit to keep the
series circuit consisting of R, Ct, L, Rs and Cs in resonance. Under these conditions the impedance
across B and C is equal to Rs since the reactance of Ct and Cs are cancelled out by the reactance of
L.
Figure 8: Equivalent Circuit
The voltage across A and B is therefore related to the series resistance Rs since this voltage will
change if Rs changes. This voltage therefore is converted to an output signal representative of Rs.
Similarly, the value of Ct is related to the series capacitance Cs since any change in Cs will result in
the controller adjusting Ct to maintain resonance. The voltage signal supplied to the varicap diode Ct
is therefore related to series capacitance Cs and this is converted to a second output signal.
7.1
Block Diagram of R.F. Probe
A block diagram of the probe is given in Fig.9 below. A description follows.
7.2
The Radio Frequency Generator
Referring to Fig.9, this consists of a crystal oscillator operating at 27 MHZ feeding a variable gain
amplifier. The output from this amplifier is passed through a low pass filter to remove harmonics.
The amplitude of the output signal is controlled by a detector and automatic gain control circuit which
controls the gain of the amplifier.
Page 15
7.3
The Series Resistance Measurement Circuit
The constant voltage output from the radio frequency generator is fed to a voltage divider consisting
of resistor R and the probe and tuning circuit. The voltage across the probe and tuning circuit is
converted to a 4-20 mA instrumentation signal which is related to series resistance.
7.4
The Phase Detector and Control Circuit
Resonance of the probe and tuning circuit is detected by a phase detector connected across R. The
output of this detector is fed to a phase control circuit which provides an output voltage signal used to
vary probe tuning to maintain zero phase angle across R.
7.5
Probe and Tuning Circuit
The tuning circuit contains a fixed series inductor and a number of fixed value and varicap capacitors
which form part of the series tuned circuit and calibration system. The circuit is continuously kept in
resonance by the output signal from the phase controller which controls the voltage on one of the
varicap diodes. This control voltage is converted into a 4-20 mA signal representative of series
capacitance.
Figure 9: Block Diagram
Page 16
8.
Removal and Cleaning of Probe
Treat the probe with care and respect - shock will damage the probe and/or components inside its
housing.
8.1
Removal of Probe from Pan
1. Have a dummy probe (plug) at the ready.
2. Disconnect the cable from the probe housing by unplugging the bayonet fitting.
3. Loosen the locking screw and remove the probe by pulling and twisting on the handles.
4. Immediately the probe is withdrawn, insert the dummy probe.
5. Take care to prevent the probe from being subjected to shock by rough handling or dropping.
6. During removal do not allow the probe to be sucked back into the pan unrestrained, as this
will subject the unit to shock which could damage the electronics.
7. Do not use a hammer on the handles.
8. Do not pull on the electronics enclosure.
8.2
Cleaning
1.
Use clean warm water (max. 50 C) and a cloth to wash the shaft and “O” ring. Any hard
massecuite may be scraped off. Inorganic scale may be removed by light rubbing with a
fine abrasive pad.
2.
Do not clean with steam
3.
Check that the “O” rings and insulator are not damaged.
4.
The electronics enclosure may be wiped with detergent and a damp cloth if necessary.
Do not inundate the enclosure with water and avoid ingress of moisture into the plug
socket.
8.3
Reinstallation
1.
Remove the dummy probe and immediately insert the tip of the probe into the housing
and whilst holding both handles, gently insert the complete probe until it engages fully into
the pan body socket.
2.
Take care not to release the probe before fully inserted as the pan vacuum will suck the
probe into the housing with considerable force, resulting in shock that could cause
damage to the electronics.
3.
Tighten the locking screw.
4.
Reconnect the cable to the socket.
5.
To prevent injury do not attempt to clean the pan body socket when the pan is under
vacuum.
Page 17
9.
Dismantling and Re-Assembly of Probe
Under normal circumstances it will not be necessary to dismantle the probe. (Calibration only
requires that the lid of the probe housing be removed to enable the necessary adjustments to be
made). However should it be necessary to remove the electronic circuit boards from the probe
housing, or further dismantle the probe, care must be taken to prevent damage to the components
and to ensure that the probe is correctly re-assembled. Incorrect re-assembly of the probe can cause
the unit to malfunction and may also permanently damage electronic components. Dismantling of the
probe should only be carried out in a clean workshop or laboratory type environment. The use of an
earthing strap to prevent damage to the electronic components is recommended.
9.1
Dismantling the Duotrac Probe
Inside the probe housing are three main electronic circuit boards.
1. Remove the two top boards first, by removing the necessary screws, washers and spacers.
Where ever possible use a standard socket and driver to perform this job. The use of an
unsuitable tool, such as a pair of pliers, is likely to result in damage to adjacent electronic
components.
2. Remove the two screws holding down the range card and remove the range card. (This will
improve access to the nut holding down the centre of the main board).
3. Disconnect the main board from the socket on the housing by unplugging the short cable
which interconnects them.
4. Remove the five nuts which hold down the main board (one at each corner and one in the
centre). A standard 10mm socket type nut driver is an ideal tool for this duty. It is not
necessary to remove the four threaded studs from the corners of the housing.
5. Remove the main board, taking care not to lose the five star washers that were between each
nut and the main board, or the five star washers from below the main board.
Fig.10 shows an exploded view of how the main boards are mounted in the housing.
Page 18
Figure 10: R.F. Probe Control Box Assembly Procedure
Page 19
9.2
Re-assembling the Digital Duotrac Probe
Re-assembly of the probe is reversal of the dismantling process.
1. If for any reason the lock washer and two nuts on the centre rod have been removed, these
must be replaced and tightened as indicated in Fig.10. It is important that these components
are fitted as shown, not only to properly secure the probe tip, but also to provide a level
mounting for the main circuit board. (Incorrect assembly can distort and damage the main
circuit board).
2. Before replacing the main board, position the five washers which are used below the main
board to improve electrical contact. One star washer must go on each of the four threaded
studs and one on the central threaded rod. Position the board, place the five star washers
above the board and then secure it in place with the five nuts (one at each corner and one in
the centre). A standard 10mm nut driver is an ideal tool for this duty. The use of an
unsuitable tool, such as a pair of pliers, is likely to result in damage to adjacent electronic
components.
3. Connect the main board to the socket on the housing by plugging in the short cable
connected to the socket.
4. Replace the range card and secure it with its two screws.
5. Lastly replace the two top boards. Ensure that all components are securely in place.
Page 20
10. Safety
The FS Digital Duotrac Radio Frequency Probe should be installed, used and maintained in
accordance with:
1. Normal safety procedures.
2. Installation and operating instructions contained in this manual.
3. Relevant local regulations, standards and codes of practice as they relate to instrumentation
in process control systems.
The equipment should be effectively earthed and should meet any local electrical regulations.
All cables, conduits and junction boxes must be watertight.
Changes to the calibration settings should only be made by a competent person who has an intimate
knowledge of the plant being controlled by the system.
Due to the nature of the Radio Frequency measurement principle, mobile phones, and other sources
of electromagnetic radiation, should not be operated in close proximity to the FS Digital Duotrac Radio
Frequency Probe. Measurement signals may vary if the unit is exposed to these strong
electromagnetic fields. Consult the supplier if you require any further information.
Fletcher Smith does not recommend the use of the FS Digital Duotrac Radio Frequency Probe in any
safety critical or plant shutdown systems.
NOTE:
The above notes do not take responsibility for safe working procedures away from the persons
involved in operating and working on any moving equipment. Sensible working practices and
adherence to correct safety regulations must be a normal working practice.
Page 21
11. EMC Compliance
The FS Digital Duotrac Radio Frequency Probe conforms with the protection requirements of the EC
Directive 89/336/EEC, and amended by 92/31/EEC and 93/68/EEC. The unit satisfies the general
requirements of an industrial environment as described by BS EN 50081-2 : 1994 and BS EN 500822 : 1995, when used in accordance with the manufacturers recommendations.
11.1
Manufacturers Recommendations
The FS Digital Duotrac Radio Frequency Probe is designed for measuring the complex impedances of
a liquid solution using the radio frequency measurement principle as described in Section 7. Due to
the nature of this measurement, the probe may suffer degraded performance if it is exposed to strong
electromagnetic fields. It is therefore important that the device is not used in any safety critical or
shutdown systems (refer to Safety Section). When used as generally intended, the probe will provide
reliable and accurate measurements.
Fletcher Smith is confident that the probe will operate reliably and provide accurate measurements
when used as intended.
11.2
Installation Requirements
To ensure trouble-free operation of the probe, and to ensure compliance with the European EMC
Directive, certain installation precautions are necessary. These are as follows:1. Always use a good quality shielded instrumentation cable to protect the probe from electrical
noise. Braided type shielded cable is preferred, but foil type shielded cable may also be used.
2. Cable shields should be terminated to ground at the control panel end, and should be
connected to the earth wire provided at the probe end of the cable. See Figure 11 for typical
cable termination.
3. Should the earth suffer from circulating currents, connect it at one end only.
4. A two pair twisted pair cable with overall screen is recommended.
5. To minimise pick-up of electrical noise, wiring should be routed as far away from high current
power cables, transformers, motors, and power supplies as possible. A minimum distance of
1 meter is recommended.
6. Cable routes should cross at right angles.
7. Use PVC insulated cable with an insulation rating of at least 300V.
8. Use cable with an appropriate temperature rating for the installation.
9. In order to protect the cabling from water or mechanical damage it is recommended that
conduit, ducting or cable racking be used. It should be noted that the probe outputs are not
galvanically isolated. If isolated outputs are required, then loop isolators will be required at the
control panel end of the installation.
Page 22
Figure 11: Typical Cable Termination
Page 23
Duotrac
Series
Green
Earth
Series Resistance
Yello
Earth
0
Brow
Capacitance
24 Volts
White
2 pair, overall screened twisted pair cable
(Belden 9502, or similar)
4 - 20 mA
Input Channel
4 - 20 mA
Input Channel
24V
OV
12. Appendix 1
Calibration Data Sheets
Position
1
2
Position
1
2
Position
1
2
Position
1
2
Position
1
2
Position
1
2
Position
1
2
Position
1
2
Position
1
2
Position
1
2
(1) RAW SUGAR A MASSECUITE - BATCH PAN
COMPONENT VALUES FOR CALIBRATOR 07
Resistance (OHMS)
Capacitance (pF)
60.0 (150 + 100)
288 (220 + 68)
40.5 (68 + 100)
1120 (560 + 560)
PROBE OUTPUT VALUES USING CALIBRATOR 07
Series Resistance Output (mA)
Series Capacitance Output (mA)
17.9
10.3
10.05
15.44
(2) RAW SUGAR A MASSECUITE - CONTINUOUS PAN
COMPONENT VALUES FOR CALIBRATOR 07
Resistance (OHMS)
Capacitance (pF)
60.0 (150 + 100)
288 (220 + 68)
40.5 (68 + 100)
1120 (560 + 560)
PROBE OUTPUT VALUES USING CALIBRATOR 07
Series Resistance Output (mA)
Series Capacitance Output (mA)
18.2
10.3
5.42
15.52
(3) BEET MASSECUITE - LONG PROBE
COMPONENT VALUES FOR CALIBRATOR 06
Resistance (OHMS)
Capacitance (pF)
41.9 (47 + 390)
183 (150 + 33)
18
430 (330 + 100)
PROBE OUTPUT VALUES USING CALIBRATOR 06
Series Resistance Output (mA)
Series Capacitance Output (mA)
14.4
7.3
6.00
12.50
(4) BEET MASSECUITE - SHORT PROBE
COMPONENT VALUES USING CALIBRATOR 06
Resistance (OHMS)
Capacitance (pF)
41.9 (47 + 390)
183 (150 + 33)
18
430 (330 + 100)
PROBE OUTPUT USING CALIBTRATOR 06
Series Resistance Output (mA)
Series Capacitance Output (mA)
15.7
7.8
6.40
13.80
(5) REFINERY WHITE BOILINGS
COMPONENT VALUES FOR CALIBRATOR 02
Resistance (OHMS)
Capacitance (pF)
31.0 (39 + 150)
56
6.4 (10 + 18)
127 (100 + 27)
PROBE OUTPUT VALUES USING CALIBRATOR 02
Series Resistance Output (mA)
Series Capacitance Output (mA)
16.50
6.5
4.7
18.60
Page 24
Position
1
2
Position
1
2
Position
1
2
Position
1
2
Position
1
2
Position
1
2
(6) SYRUP BRIX MEASUREMENT - LOW RANGE
COMPONENT VALUES FOR CALIBRATOR 08
Resistance (OHMS)
Capacitance (pF)
18.0
390
8.18 (18 + 15)
Short
PROBE OUTPUT VALUES USING CALIBRATOR 08
Series Resistance Output (mA)
Series Capacitance Output (mA)
16.7
10.7
7.50
15.00
(7) SYRUP BRIX MEASUREMENT - HIGH RANGE
COMPONENT VALUES FOR CALIBRATOR 08
Resistance (OHMS)
Capacitance (pF)
18.0
390
8.18 (18+15)
Short
PROBE OUTPUT VALUES USING CALIBRATOR 08
Series Resistance Output (mA)
Series Capacitance Output (mA)
13.9
10.8
6.62
15.00
(8) REFINERY JET BRIX
COMPONENT VALUES FOR CALIBRATOR 08
Resistance (OHMS)
Capacitance (pF)
18.0
390
8.18 (18 + 15)
Short
PROBE OUTPUT VALUES USING CALIBRATOR 08
Series Resistance Output (mA)
Series Capacitance Output (mA)
17.9
13.8
9.33
20.00
Page 25
13. History Sheet
Issue
Date
Description
1
Sept'88
Initial Issue
2
Nov'88
Table 1 Modified. Power Lines Swapped: White = +24V, Brown = 0V
3
Sep'92
Additional information added to Section 5, Section 7 & 8 added to
Manual
4
May'97
Digital Duotrac Probe Rewrite
5
Nov'98
Forward section added. Procedure for User Defined Calibrator Points
added to section 6. Sections on Safety and EMC compliance added.
6
Feb’04
Modifications to Sections 5, 5.3 and 6.4
Page 26