1
EN
Wear ear and eye protection
wear a dustmask
Keep bystanders away
Special safety instructions
• The following points need to be checked:
• Do the connecting voltage of the machine
correspond with the mains voltage.
• Are the mains lead and the mains plug in
a good condition; strong, without ravels or
damages.
• For functional reasons the turning parts of this
machine are not covered. Therefore it is of
utmost importance to be careful. Hold the
workpiece firmly, to prevent it from slipping
from your hands. Never touch the sanding
surfaces of a working machine with your
hands.
• Avoid the use of long extension cables.
• If necessary, secure the sanding machine with
screws.
Before you operate the machine:
• Always keep the mains cable away from
moving parts of the machine.
• Use safety goggles.
• Use a dust mask.
Electrical safety
When using electric machines always observe the
safety regulations applicable in your country to
reduce the risk of fire, electric shock and personal
injury. Read the following safety instructions and
also the enclosed safety instructions.
Always check that the power supply
corresponds to the voltage on the rating
plate.
Replacing cables or plugs
Immediately throw away old cables or plugs
when they have been replaced by new ones. It is
dangerous to insert the plug of a loose cable in
the wall outlet.
6
Using extension cables
Only use an approved extension cable suitable
for the power input of the machine. The minimum
conductor size is 1.5 mm2. When using a cable
reel always unwind the reel completely.
Immediately switch off the machine when:
• Excessive sparking of the carbon brushes and
verticiliosis in the collector.
• Interruption of the mains plug, mains lead or
mains lead damage.
• Defect switch
• Smoke or stench of scorched isolation
3. Before putting the machine
into operation
Installation
Avoid the use of long extension cables. If
necessary, secure the sanding machine on a
working bench with help of screws through the
holes in the feet of the machine frame. Do not
forget to leave enough space around the machine
for the workpieces to be sanded.
Assembly
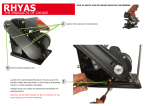
• Put the machine frame on its head and press
the four rubber stops into the foot of the frame.
• Machine frame, aluminium disc (10) and work
plate (12) are supplied in separate packaging.
• Push the aluminium disc on the shaft and
fasten the disc with the socket bolt in the side
of the disc (Fig.2 - 4).
• Place the work plate (12) with the shaft in the
machine frame and secure the work plate with
the bolt in the side of the machine frame.
Check with a 90° sash angle on the work plate
and against the sanding disc if the angle is
exactly 90° (Fig.5).
• If necessary, adjust this angle with the
calibration indicator.
• The mitre scale (13), which is also supplied
separately, can be placed on the work plate
(12). With the use of this mitre scale the angle
of grinding can be determined precisely.
• The fence (8) for the belt sander can be placed
behind the uppermost bolt of the V-belt guard.
In this way the workpiece can be held firmly
against the belt, without great hazards.