1
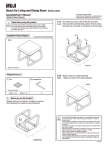
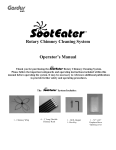
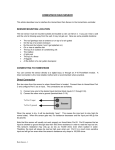
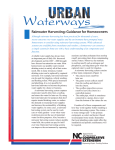
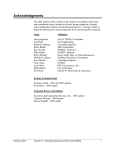
Rotary Gutter Cleaning System
Operator’s Manual
Thank you for purchasing the VertaLok™ Rotary Gutter Cleaning System.
Please follow the important safeguards and operating instructions included within this
manual to enjoy the benefits and safe operation of the VertaLok™ System.
BEFORE
AFTER
Accessories Included
Works with your cordless drill
Rotary Paddle Brush
Gutter Brush with Water
Jet Nozzle
Gutter Scoop with Water Jet Nozzle
Digital Camera Mount—
inspect gutters before
and after cleaning
Camera not included
Important Safeguards
> Read all safety & operating instructions before use.
> All warnings in the manual must be strictly adhered to.
> Failure to comply with the safety and operating instructions may result in property damage or personal
injury.
> Retain the operator’s manual for future use.
> Not all gutters can be cleaned from the ground level. In some cases, the gutter opening may be too narrow
or the debris too compacted to remove with the VertaLok™ Tools. In these cases, it may be necessary
to use other means of cleaning the gutter. Always consider hiring a professional if the situation warrants.
WARNING
Hazard of Electric Shock or Burn!
The extension poles and all other parts of the VertaLok™ System or extension kit are NOT to be used ON
or NEAR electrical wiring of any type. Keep at least 10 feet (3 meters) away from any power lines. Use extreme
caution when raising, lowering or while working with the VertaLok™ Tools and Extensions.
Important Tips
> Always wear eye protection
> Keep all loose clothing and objects tucked in to prevent them from being tangled around the rotating
drill and tools.
> Use a CORDLESS DRILL, set the clutch/torque adjustment on the drill to a half way point to reduce the
risk of damage to the tool, the gutter system or personal injury.
> Do not attempt to use the tool if you cannot safely and effectively control the operation of the tool.
This is especially important when the tool is used for higher reach applications such as 2nd story gutter
cleaning, etc.
Limited Warranty
The VertaLok™ System and all accessories are designed for homeowner use. All components are
warranted for a period of 1 Year from the date of purchase. Should any components fail due to manufacturing
defect, return the defective part to Gardus, Inc. and we replace it free of charge. A return authorization number
(RAN) is required prior to returning any item. Please call 203-985-0208 to obtain return shipping information
and RAN.
Gardus, Inc. does not warranty failure of any part due to operator error. Be sure to read all operating
instructions and safety precautions before operating any of the tools.
Manufacturer accepts no liability for property damage or personal injury caused by the operation of these tools
and accessories. This is the full extent of the warranty made by Gardus, Inc. There is no other expressed or
written warranty. All implied warranties are hereby excluded.
2
Table of Contents
What’s Included
1. Rotary Drive Extension
Poles
2
2. Rotary Paddle Brush
Getting Started . . . . . . . . . . . . . . . . . . . . . . . . . . . . 4
Cleaning Gutters with Rotary Paddle Brush. . . . . . . 5–6
Cleaning Gutters with Non-Rotary Tools . . . . . . . . . 7–8
Cleaning Gutter Exterior . . . . . . . . . . . . . . . . . . . . . . 8
Additional Applications . . . . . . . . . . . . . . . . . . . . . . . 8
3. Gutter Brush with Water
Jet Nozzle
4. Gutter Scoop with Water
Jet Nozzle
5. Curve Tube with Flex
Drive
3
6. Grip Handle
1
7. Water Control Handle
8. Digital Camera Mount
9. Drill Adapter
10. Button Release Tool
4
11. Right Angle Gear Drive
12. Flow-Thru Threaded
Adapter
5
7
Rotary Gutter Cleaning System
9
6
The VertaLok™ System utilizes a combination
of Rotary and Non-Rotary cleaning tools specially
designed to remove all types of debris commonly
found in gutters. It’s easy to use, lightweight and
works with any cordless drill.
10
8
12
11
3
Getting Started
2
Assembling Tool for Rotary Gutter Cleaning
Step 1. Connect Pole Sections:
3
4
> Loosen coupling nut slightly on lower pole section.
> Depress button on pole to be connected and slide in complete. Be sure upper pole section
is locked into place by rotating section until button locks into sleeve.
> Hand tighten threaded coupling nut.
Step 2. Attach Curved Tube:
> Connect Curved Tube by sliding into top pole section using the same method as described
above. Be sure curved tube is locked into place by rotating section until button locks into
sleeve.
> Hand tighten threaded coupling nut.
Step 3. Attach Right Angle Gear Assembly:
> Depending on direction of cleaning, right to left or left to right, connect the Right Angle Gear
Assembly to the Curved Tube at desired angle by inserting into Curved Tube then hand
tighten coupling nut securely.
Note: To help prevent debris from falling near or on you, angle the gear assembly slightly away
from you instead of at a right angle.
Step 4. Attach Rotary Paddle Brush:
> Align spring button on right angle gear shaft with hole in paddle brush then press onto shaft.
Be sure spring button locks into hole on paddle brush securely.
1
Step 5. Attach Grip Handle:
> Open the hinged handle clamp by loosening thumb screw
completely.
>Attach Grip Handle around bottom pole section by closing
clamp around pole using thumb screw.
> Position handle for best control and comfort then tighten
securely by hand.
Step 6. Attach Drill Adapter:
>Slide Drill Adapter onto bottom pole section until adapter
locks securely with spring button of lower pole section.
Step 7. Connect Your Cordless Drill:
> It may be easier to raise the assembly and rest it in the
gutter before attaching your drill. Once resting in gutter,
insert shaft of Drill Adapter into chuck of cordless drill and
tighten securely.
> Be sure to set clutch/torque adjustment on drill to a midrange setting.
5
Note: The Drill Adapter can also be attached to cordless drill
first, then connected to bottom pole section while tool is resting
in gutter.
6
NOTE:
> Connect additional pole sections for higher reach
> 6 ft. Extension Kit sold separately—Item # VXT006
7
4
Determine Type of Build-Up In Gutters
Step 1.
Once the tool is assembled, use the “Camera Mount” with your digital camera to get a
photo or short video of your gutters “Before & After” cleaning. This will help determine what
type of debris is in the gutter and what cleaning attachment to choose for the job.
Important Note: Do Not use your camera while cleaning as it may cause permanent
damage to your camera. Gardus accepts no liability for damage to your camera.
Step 2.
If you don’t have a digital camera, simply use the Gutter Brush attached to the curved
section to drag and lift the debris up and out of the gutter to determine what type of
build-up is inside the gutter before choosing the best cleaning tool for the type of build-up.
Step 3.
For easier clean up, place a tarp on the ground under the gutter while cleaning. Otherwise,
the debris can easily be raked up afterwards. If you haven’t cleaned your gutters in a long
time, it’s likely the debris build-up is very compact, similar to compost. It is recommended
that you use the Gutter Brush or Gutter Scoop to remove this type debris and then use the
Rotary Paddle Brush for routine maintenance throughout the year. Rotary cleaning will help
make it fast and easy to maintain your gutters on a regular basis.
The Digital Camera Mount can be attached
anywhere along the curved tube section and
in any position. The camera itself can also be
rotated to any desired position. (Camera not
included)
Rotary Gutter Cleaning
Step 1.
The Rotary Paddle Brush is great for fast removal of dry, loose leaves and ideal for routine
gutter maintenance. While spinning with your cordless drill, the paddles lift the debris up and
out of the gutter.
Important Notes:
- Position Paddle Brush in gutter as shown in the photo below with the rubber paddles inside
the gutter at a 90° angle. The front (rounded) portion of the Paddle Brush should always face
away from you and towards the debris while cleaning as shown.
- Set clutch adjustment on cordless drill to a mid range setting.
- Operate at a moderate speed using extra caution around gutter supports.
- Always spin the Rotary Paddle Brush AWAY from the roof.
Example:
> When working from right to left spin your drill in the counter-clockwise direction.
(put drill in reverse)
> When working from left to right spin your drill in the clockwise direction. (forward)
Helpful Hints:
> On windy days, work in the same direction as the wind (with the wind). This will prevent
the leaves from blowing toward you as you work.
> Angle the rotary gear assembly slightly away from you while rotary cleaning to help
prevent the debris from falling toward you.
WARNING
Hazard of Electric Shock or Burn!
The extension poles and all other parts of the
VertaLok System or extension kit are NOT to
be used ON or NEAR electrical wiring of any
type. Keep at least 10 feet (3 meters) away
from any power lines. Use extreme caution
when raising, lowering or while working with
the VertaLok Tools and Extensions.
5
Rotary Gutter Cleaning (cont.)
Step 2. Cleaning Around Gutter Supports:
Important Note: Use caution while spinning Paddle Brush near gutter supports. Operate drill at half speed or less especially
while cleaning under supports.
1) Clean completely under the support until the Curved Tube makes contact with the gutter support.
2) Pull the Paddle Brush back slightly and lift up and over gutter support.
3) Lower the Paddle Brush back into the gutter and continue cleaning.
Step 3. Collect Debris on Tarp and Dispose:
It’s best to clean the ground area before rinsing the
gutter clean with water.
Step 4. Rinsing the Gutter:
Remove the Right Angle Gear Assembly with Paddle Brush from the curved tube and
attach Gutter Brush.
Remove Drill Adapter from bottom pole section. Connect garden hose to Water
Control Valve then connect Water Control Valve to bottom pole section. Use the Gutter
Brush with built in water jet nozzle to rinse the inside and outside of the gutter clean.
Built-In Water Jet Nozzle
6
Cleaning with Non-Rotary Attachments
Remove and Rinse Cleaning with the Gutter Brush and Gutter Scoop
Step 1. Determine Type of Build-up
in Gutters
Attach Grip Handle to end of base pole
section facing up as shown
> Refer to page 4
Step 2:
Connect as many pole sections as
needed to reach desired gutter height.
Note: A 6 ft. Extension Kit is available
and sold separately (Item #VXT006)
Step 3:
Attach the Gutter Brush or Gutter Scoop to the curved tube section at an angle
and direction best suited for your cleaning method.
Step 4:
Install Grip Handle at the very bottom of base pole section facing up (See
photo at left). This gives you much more control as you apply a twisting motion
while lifting the debris up and out of gutter.
Step 5:
It’s recommended that you start cleaning the gutter from the down spout end
and drag the debris away from the downspout. This helps prevent excessive
debris from falling into the downspout.
Helpful Hints:
> On windy days, work in the same direction as the wind (with the wind).
This will prevent the leaves from blowing toward you as you drag and lift
them out of the gutter.
> Angle the Gutter Brush or Gutter Scoop slightly away from you while cleaning
to help prevent the debris from falling toward you.
Step 6:
As you drag the Gutter Brush or Gutter Scoop down the gutter, stop
occasionally to remove the debris. Remove the debris by tilting the tool back
slightly and push into the debris as you lift the debris up and out of the gutter.
Twist the poles as the debris lifts out of the gutter to help drag away from
gutter opening.
When you reach a gutter support, lift as much debris out of the gutter as
possible and then push remaining debris under and past support.
Lift the Gutter Brush or Gutter Scoop up and over support. While lowering back
into gutter, angle the brush back under support to grab debris then continue
the drag and lift process.
WARNING
Hazard of Electric Shock or Burn!
The extension poles and all other parts of the VertaLok System or Extension Kit are
NOT to be used ON or NEAR electrical wiring of any type. Keep at least 10 feet (3
meters) away from any power lines. Use extreme caution when raising, lowering or
while working with the VertaLok Tools and Extensions.
7
Cleaning with Non-Rotary Attachments
Step 7. Collect Debris on Tarp and Dispose:
It’s best to clean the ground area before rinsing the gutter clean
with water.
Step 8. Rinsing the Gutter:
Connect garden hose to Water Control Valve then connect Water
Control Valve to bottom pole section and turn water on.
Use the Gutter Brush or Gutter Scoop with built in water jet
nozzle to rinse the inside and outside of the gutter clean.
Additional Cleaning and Painting Applications
The included Flow-Thru
Threaded Adapter can
be used with a variety of
cleaning brushes, painting
tools and window washing
attachments.
Cleaning Gutter Exterior
Painting
Window Washing
Watch for additional VertaLok accessories coming soon!
Gardus, Inc.
888-985-0208 (Toll Free)
www.gardusinc.com · www.vertalok.com
8