1
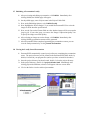
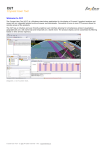
PresenterPLUS
Quick Start
1.1 Overview
The following is a Quick Start for Accordent’s PresenterPLUS presentation authoring
software. This document will guide you through installation of PresenterPLUS and using
PresenterPLUS to: i) create a presentation using a local media file (residing on your desktop,
network drive, or CD); and ii) to publish the presentation to your desktop.
The PresenterPLUS workflow is comprised of five easy steps:
Selecting Media: PresenterPLUS supports several different media formats, including
RealMedia, WindowsMedia, MPEG 1, 4, MP3, .wav., .avi., and more. PresenterPLUS
enables a content author to use audio/video that resides locally, is stored on a web server
(RealMedia only), or that is captured live and published on demand. For purposes of this
Quick Start, we will be focused on using a media file that has already been created and is
available on your local desktop, network drive, or a CD.
Selecting An Interface: Once a media source or file has been selected, you will use the
Skins page to select and customize a presentation interface. PresenterPLUS includes
several customizable skins and, since skins are standards-based, you can easily create
your own using virtually any third party graphics program.
Synchronizing Assets: Use the “Sync” page to synchronize images, including jpegs,
gifs, and PDFs, Flash files, URLs, as well as bookmarks that will enable the audience to
jump to specific parts of the presentation. PresenterPLUS enables synchronized assets to
be targeted to different regions of the interface.
Previewing & Editing A Presentation: Once you have created a synchronized
presentation, use the preview features to watch the presentation directly within
PresenterPLUS. You can preview a specific synchronization region, multiple
synchronization regions, and even undock the preview frames to resize them and move
them around your desktop. If you need to make a change, simply drag the asset tags to
different locations on the time bar, delete tags, or add new tags.
Publishing A Presentation: Once you have finished your presentation, you can publish
it locally, to CD, or to a web and streaming server – all automatically. For purposes of
this Quick Start, we will focus on publishing it locally to your desktop.
This Quick Start is not a complete manual and does not address many PresenterPLUS features
that may be useful for future presentations. For additional instructions, please see the
PresenterPLUS User Manual.
1
1 Installing PresenterPLUS
1.1 Download & Installation of PresenterPLUS
1. If you are installing PresenterPLUS from a CD skip to step 3.
2. When PresenterPLUS is downloaded it will be delivered as a self-extracting .exe file.
3. Click Setup (setup.exe).
4. When the Welcome screen appears, click Next.
5. On the Destination Location screen, either select a location for PresenterPLUS using
the Browse button or use the default setting and click Next.
6. On the Start Installation screen, click Next. PresenterPLUS will begin installing.
7. As soon as PresenterPLUS is done installing, the Successful Installation screen will
appear. Click Finish.
1.3 Launching PresenterPLUS
1. To launch PresenterPLUS, first click the desktop Start menu.
2. Next, click Programs, then Accordent, and then PresenterPLUS.
3. If PresenterPLUS is being launched for the first time, the Accordent end-user license
agreement will appear. Click I Agree.
4. After clicking I Agree, the product registration page will appear. Complete the
registration page and click Register.
5. Immediately after clicking Register, the “Select Media Source” screen will appear
(See Figure 1-1).
Fig. 1-1
2
2. Getting Started & Creating A Presentation
2.1 Getting Started: Selecting a Local Media File
1. Launch PresenterPLUS. Immediately after launching PresenterPLUS, the “Select
Media Source” screen will appear.
2. On the “Select Media Source” screen, select Local Media File and click Next.
Immediately after clicking Next, the “Browse” screen will appear.
3. On the “Browse” screen, click Browse. In the Browse window, select a media file
and click OK
4. After clicking OK, the Local Media file will appear in the “File” field. If this is the
media file that you want to incorporate into your presentation, click Begin.
5. Immediately after clicking Begin, PresenterPLUS will appear. The local media file
will be accessible in the audio/video window in the upper left-hand corner of
PresenterPLUS.
2.2 Selecting An Interface
Once you have selected a media file, it is next necessary to select the interface (or “Skin”) in
which the presentation will be displayed. Only Skins that are compatible with the selected
media format will be available. If you select a media file encoded to a different format,
different Skins will be available.
1. By default the Skins page should be displayed. If it is not displayed, click the Skins
tab.
2. On the Skins page, select a skin by clicking on one of the skin thumbnails displayed
in the “Skin Preview” window.
Note: You can preview a skin by double-clicking on a skin in the “Skin
Preview” window.
3. After selecting a skin, a thumbnail of the interface will appear directly beneath the
media player. The thumbnail will indicate where the skin target regions are and
should be used when targeting synchronized content to different regions of the skin.
4. After selecting a skin, click the Custom tab. Immediately after clicking Custom, the
Custom page will appear. The fields displayed on the Custom page are used to
customize the text that is displayed in the skin (e.g. Presenter Name, Date, etc.).
3
2.3 Synchronizing Images
1. After selecting and customizing a skin, click Sync. Immediately after clicking Sync,
the Sync page will appear. The sync page contains the Images, URLs, and
Bookmarks tabs. (If you are not interested in synchronizing images, skip to Section
2.4).
2. After clicking Sync, the Images screen should be displayed. If it is not displayed,
click the Images tab.
3. On the Images screen, there are four import buttons that are used to import images,
PowerPoint slides, PDF documents, and Flash files. Click on the button that
indicates the type of assets that you want to import. Once you have imported images,
they will appear in the Preview window. You can preview thumbnails or the images
or zoom in on a specific image.
Note: You can import as many times and as many file types as you want.
4. To begin synchronizing images, click Play directly below the Media window. As
soon as the media starts playing, highlight the first image that you want to
synchronize.
Note: If you select the “auto-generate” field, a bookmark will be automatically
generated every time you synchronize an image. Creating custom chapters is
addressed in Section 2.5.
5. Next, use the “Target to Region” fields to select where the synchronized image will
be targeted. You can use the interface thumbnail as a reference.
6. When you want to synchronize the image, click Sync. A hash-mark will appear on
the Time Bar indicating that you have synchronized an image and the time at which it
was synchronized.
Tip: If you have the timings for the synchronized assets, you do not have to
watch the media to synchronize. You can highlight the image, enter the time in
the TimeBar Timer, and click Sync.
7. Use this process to synchronize as many images as desired.
2.4 Synchronizing URLs
1. To access the URLs screen, click the URLs tab. Immediately after clicking URLs,
the URLs screen should appear.
2. To synchronize a URL, first enter the desired URL in the URL field.
3. If you would like to prepare several URLs before synchronizing, click Add to List
and enter additional URLs in the URL field. If you want to synchronize the URL,
first click Play directly beneath the media.
4. As soon as the media starts playing, highlight the first URL that you want to
synchronize.
5. Next, use the “Target to Region” fields to select where the synchronized URL will be
targeted. You can use the interface thumbnail as a reference.
4
6. When you want to synchronize the URL, click Sync. An orange hash-mark will
appear on the Time Bar indicating that you have synchronized an image and the time
at which it was synchronized.
7. Use this process to synchronize as many URLs as desired.
2.5 Synchronizing Bookmarks
1. To access the Bookmarks screen, click the Bookmarks tab. Immediately after
clicking Bookmarks, the Bookmarks screen should appear.
2. To synchronize a Bookmark, first enter the bookmark title in the “Bookmark Title”
field.
3. Next, click Play directly beneath the media.
4. As soon as the media starts playing, click Sync Bookmark.
5. Use this process to synchronize as many bookmarks as desired.
Once you have synchronized all of the desired assets, click Preview. Immediately after
clicking Preview, the Preview page will appear.
2.6 Previewing A Presentation
After synchronizing assets around your media file, you may want to preview the presentation
to ensure that you have synchronized all of the necessary assets and that the synchronization
timings are accurate. The preview features described below will enable you to preview and
edit the presentation.
1. After synchronizing a presentation, click Preview.
2. On the Preview page, use the buttons located directly above the “Preview” window to
select the preview layout. You can use this feature to view an individual target
region or multiple target region.
Note: In the same row of buttons is the “Un-Dock” button. The “Un-Dock”
button is used to release the view windows from PresenterPLUS so that they can
be reshaped and placed anywhere on the desktop.
3. Once you have selected a view, click Play directly below the media player. As soon
as the media starts playing, the timer will start moving. As soon as the timer reaches
a synchronized asset, that asset will appear in the appropriate preview frame.
4. As you are previewing a presentation, you can edit asset timings and delete
synchronized assets.
•
Deleting Assets: Right-click on the asset hash-mark on the timeline and click
Delete.
•
Edit Asset Timings: Click on the asset hash-mark and drag it to the correct
time on the timeline.
Note: If you have automatically generated chapters, these chapter may be locked
to synchronized images. If you want to move or delete one without moving or
deleting the other, right-click on the image and click Undock.
5
2.7 Publishing A Presentation Locally
1. After previewing and editing a presentation, click Publish. Immediately after
clicking Publish, the Publish page will appear.
2. On the publish page, enter a Project name in the Project Folder field.
3. Next, under Publishing Options, select Publish Locally.
4. Next, highlight the “Resize Images” if you would like PresenterPLUS to resize the
images to fit the interface specifications.
5. Next, use the Conversion Format fields to select whether images will be converted to
jpegs or gifs. If you select jpegs, you can use the “Image Compression Quality” bar
to specify the image conversion quality.
6. After selecting an image conversion format, click Publish. Immediately after
clicking Publish, presentation content will be generated.
7. After PresenterPLUS has completed generating the presentation content, you can
view the final presentation by clicking Launch Presentation.
2.8 Viewing the Locally Stored Presentation
1. PresenterPLUS automatically created a project directory containing the presentation
assets. The project directory will be located in the PresenterPLUS folder which, by
default, is located in your program files (unless you chose to install it elsewhere).
2. Once the project directory has been located, double-click on the project directory.
3. In the project directory, double-click project/cd/index.html. Immediately after
clicking project/cds/links.htm, a browser will appear with one or more links.
4. Click on the link to view the archived presentation.
6