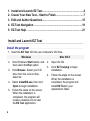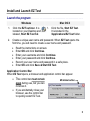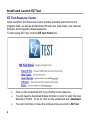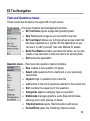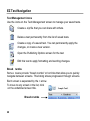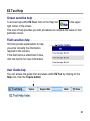
1
INSTRUCTOR’S TESTING AND RESOURCE CDROM McGrawHill’s Instructor’s Testing and Resource CDROM is a powerful tool designed to help instructors easily access textspecific tests and resources for classroom use. Organized by textbook, this easytouse crossplatform CD ROM contains testing software and a collection of instructor resources. The assets contained on this CD are presented at the chapter level and may be available as a Word or PDF document, or both. One feature of this CD is the Computerized Test Bank featuring McGrawHill’s EZ Test testing software, the most flexible and easytouse electronic testing program available in higher education. This crossplatform software allows instructors to create tests from bookspecific items. It accommodates a wide range of question types and instructors may add their own questions. Multiple versions of the test can be created and any test can be exported for use with course management systems, such as WebCT, BlackBoard, PageOut or EZ Test Online. For further information on how to install and use EZ Test, please see the following pages of this guide. System Requirements Windows Mac OS X Windows 2000 or better Mac OS X 10.3.9 or better Minimum 256 MB main memory; 512 MB recommended Minimum 256 MB main memory; 512 MB recommended 100 MB or better free hard disk space 100 MB or better free hard disk space Microsoft Word 2000 or better Microsoft Word X or better Safari 1.3 or better Starting the Program If the CD doesn’t launch automatically: Windows 1. Click on the Start button on the taskbar. Scroll down and select Run. 2. Type the letter of your CDROM drive followed by :\Start_Here.exe For example, if your CDROM drive is named D, you would type D:\Start_Here.exe 3. Click OK or press [Enter]. 2 Mac OS X 1. Doubleclick on the file named Start_Here on the CD. A guide to help you quickly build your first test EZ TEST™ FOR WINDOWS and MACINTOSH 3 1. Install and Launch EZ Test ..........................................................4 2. Create Your New Test – Start to Finish .......................................7 3. Edit and Author Questions ........................................................15 4. EZ Test Navigation .....................................................................19 5. EZ Test Help ...............................................................................21 Install and Launch EZ Test Install the program . . . . . . . . . . . . . . . . . . . . . . . . . . . . . . . . . . . . . . . . . . . . . . . . . 1. Insert the EZ Test CD into your computer's CD drive. Windows 2. Click Windows’ Start button, and 2. then select the Run option. 3. 3. Click Browse. Select your CD drive from the Look in drop 4. down list. 4. Select InstallEZ.exe, then click Open to begin installation. 5. Follow the steps on the screen. When the installation is completed, the program will create a desktop icon to start the EZ Test application. 4 Mac OS X Open the CD. Click EZ Test.pkg to begin installation. Follow the steps on the screen. When the installation is completed, the program will install EZ Test in your Applications folder. Install and Launch EZ Test Launch the program . . . . . . . . . . . . . . . . . . . . . . . . . . . . . . . . . . . . . . . . . . . . . . . . Windows 1. Click the EZ Test icon. It is located on your Desktop and labeled, Start EZ Test 6.2. Mac OS X 1. Click the file, Start EZ Test. It is located in the /Applications/EZ Test folder. 2. Create a unique user name and password. When EZ Test opens the first time, you will need to create a user name and password. · · · · · · Read the instructions on screen. Enter OK and click Continue. Enter your username and click Continue. Enter your password and click Continue. Record your user name and password in a safe place. Enter OK and click Save & Start EZ Test. Application Control Bar When EZ Test opens, a browser and application control bar appear. · The control bar must remain · open during use, but you can minimize it. If you accidentally close your browser, use the control bar to quickly restart EZ Test. Minimize button 5 Install and Launch EZ Test EZ Test Resource Center . . . . . . . . . . . . . . . . . . . . . . . . . . . . . . . . . . . . . . . . . . . Once launched, the Resource Center window provides quick links to the program itself, as well as the McGraw Hill web site, help index, user manual, tutorials, and frequently asked questions. To start using EZ Test, click the EZ Test Home link. 6 · Click on the underlined text to go directly to the resource. · You will need to download Adobe Acrobat in order to open the User Manual or FAQ’s. To do so, click on the underlined text, download. · You can minimize or close the window while you work in EZ Test. Create Your New Test – Start to Finish Name the test . . . . . . . . . . . . . . . . . . . . . . . . . . . . . . . . . . . . . . . . . . . . . . . . . . . . . . . 1. To create a new test, click on the New Test button. 2. Enter a descriptive name for your test. Click Create. Set your preferences . . . . . . . . . . . . . . . . . . . . . . . . . . . . . . . . . . . . . . . . . . . . . . . 1. Choose your screen layout. Horizontal icon Click the icon in the top Vertical icon navigation bar to select the layout. You can view the source questions and your selected test questions in a horizontal (top/bottom) or vertical (side/side) layout. 2. Choose your question view. Show full question box Click the show full question box in the upper right to show the question with its answers, pictures, formulae, and embedded computations. Click the box again to show only the question stem. 7 Create Your New Test – Start to Finish Select questions from a test bank . . . . . . . . . . . . . . . . . . . . . . . . . . . . . . . . . . 1. Click Test Banks to view the questions supplied by the publisher. 2. Click on the book title to open the test bank. 3. To view the chapter questions, click the chapter title. 4. To view the available questions, click the Open button next to the folder icon. The available questions for selection appear in the source frame. Source frame Test frame 5. To add a question, click Select next to the left of the question. The selection appears in the test frame. 6. Continue adding questions until you have the number you need. Click Close to return to see other question types you may want. 8 Create Your New Test – Start to Finish Organizing and editing questions . . . . . . . . . . . . . . . . . . . . . . . . . . . . . . . . . . Once you’ve added your questions, use the icons in the test frame to reorder, edit, preview, and delete test questions. Moves the question to the first position in the list. Moves the question up one position in the list. Moves the question to arbitrary position in the list. Moves the question down one position in the list. Moves the question to the last position in the list. Deletes the question from this test. Creates a copy of the test question. Previews the selected question in a new window. Edits or formats the selected question. 9 Create Your New Test – Start to Finish Add instructions . . . . . . . . . . . . . . . . . . . . . . . . . . . . . . . . . . . . . . . . . . . . . . . . . . . . 1. Click the Edit Instructions or Test Title icon at the top of the test frame. The Test Editing screen appears. 2. Enter or edit the student instructions for the entire test in the Instructions box. 3. Click Save Changes. Change the title (optional) . . . . . . . . . . . . . . . . . . . . . . . . . . . . . . . . . . . . . . . . . . 1. From the Test Editing screen, edit the test name in the Title box. 2. Click Save Changes. NOTE: Font changes made in the boxes on this screen apply only to the text in these boxes (and override for this text only the test’s default selection). To change the global font, go to the Publishing Options screen by clicking on the Format/Print button, and then make your selections from the dropdown list. 10 Create Your New Test – Start to Finish Preview your test . . . . . . . . . . . . . . . . . . . . . . . . . . . . . . . . . . . . . . . . . . . . . . . . . . . 1. Click the Format/Print button. 2. The Publishing Options screen opens. Click Preview. The test and answer key open in a new window. When you are finished reviewing the test, click the Close box in the upper right. NOTE: Windows users running the Opera browser (included with EZ Test 6.1 Win) can print tests that are paginated properly from within EZ Test using the PRINT button in the Preview window. 11 Create Your New Test – Start to Finish Save your test as a Word document . . . . . . . . . . . . . . . . . . . . . . . . . . . . . . . Note to Mac users: The file will automatically be downloaded to your desktop. You will not be prompted with the dialogue boxes mentioned below. 1. 2. 3. 4. On the Publishing Options screen, click Save as MS Word. Click Save. In the Save As dialog box, enter the file name and click Save. Optionally, check the box next to "add table formatting" if you want the test to be output with extra tables to indent the test numbers, questions and answers. The Word document will be more difficult to edit your due to the nested tables used when this option is selected. Save your test as a PDF document . . . . . . . . . . . . . . . . . . . . . . . . . . . . . . . 1. Click Save as PDF. 2. When prompted, click Save. 3. In the Save As dialog box, enter the file name and click Save. 12 Create Your New Test – Start to Finish Print your test . . . . . . . . . . . . . . . . . . . . . . . . . . . . . . . . . . . . . . . . . . . . . . . . . . . . . . 1. First save your test. 2. Open the saved test and use the commands in the MS Word or Adobe Acrobat application to print. NOTE: Windows users running the Opera browser (included with EZ Test Windows) can print tests that are paginated properly from within EZ Test using the PRINT button when viewing a Preview of the test. However, you have more control of the formatting and pagination in the saved MS Word file. The Adobe Acrobat file “locks” the formatting, so the document is ready for printing. You cannot make any changes to the formatting or pagination. Print question type labels (optional) . . . . . . . . . . . . . . . . . . . . . . . . . . . . . . . You may choose to add labels above the question types. For instance, you can print Multiple Choice Questions above that question type on the test. 1. From the Publishing Options screen, click the Labels box. · To remove the labels, click the box again to remove the check. · See the User Manual for complete instructions on using this feature. Print a condensed answer key (optional) . . . . . . . . . . . . . . . . . . . . . . . . . . You can print a shorter key with the test question number and correct answer. 1. On the Publishing Options screen, click the dropdown arrow next to Key. 2. Select with ONLY answers from the list. · To print the full answer key, click the dropdown arrow again and select with questions and answers. Select none if you do not want the answer key to be printed. 13 Create Your New Test – Start to Finish Create multiple versions . . . . . . . . . . . . . . . . . . . . . . . . . . . . . . . . . . . . . . . . . . . These steps are performed from the Publishing Options screen. 1. Select scramble question by type from the dropdown menu shown below. 2. Under the Scrambled Output Order, click on the dropdown menu next to the numbered position and select the order for the question types to appear on the test. 3. To scramble all the multiple choice question distractors, check the box next to scramble ALL multiple choice distractors. 4. Next, select the number of versions of the scrambled test you wish to create using the Versions to create drop down select box. 5. Save your test(s) as either MS Word or PDF. 14 Edit and Author Questions Edit your questions . . . . . . . . . . . . . . . . . . . . . . . . . . . . . . . . . . . . . . . . . . . . . . . . . 1. To edit an individual question, click the Edit question icon next to the question. NOTE: If you enter changes in the source frame, the edits are permanently applied to your source questions (i.e., your test bank or previously saved test). If you enter changes in the test frame, the edits are applied only to the selected question in this specific test. The question editing screen opens for the question type selected. 2. When you have finished editing the question, click any of the active navigation buttons at the top of the screen to save your work except for the Revert button. The Revert button will undo your recent changes to revert the question to its original state. 15 Edit and Author Questions Author a new question . . . . . . . . . . . . . . . . . . . . . . . . . . . . . . . . . . . . . . . . . . . . . There are two methods to create a new question. Both methods allow you to author new questions. However, one is only available while you are in the Question Editing mode. The first method is the Questions Menu Method. The second method is the Question Editing Mode Method and is only available while you are editing questions. Method 1 Questions Menu Method 1. From the Questions menu, select New. The Choose New Question Type screen appears. 2. Select the type of question you want to author from the menu list. The question editing screen opens for the question type selected. This new question is inserted as the last question in your test. See the User Manual for question type details. 16 Edit and Author Questions Author a new question continued. . . . . . . . . . . . . . . . . . . . . . . . . . . . . . . . . . 3. Complete the new question fields in the Rich Text editor. To save this question, click any of the active navigation buttons at the top of the screen except for the Revert button. The Revert button will reset the question to an empty new question. · To return to the list of questions in your test, click the List button. Method 2 Question Edit Mode Method The second method is only available while you are editing/authoring a question. This method makes it easy to add a new question without having to leave the question editing screen. 1. While in the Question Edit Mode, select a question type from the New drop down list on the right side of the question editing navigation bar. 2. Click New. 3. The current question will be saved and a new blank question of the type you selected will appear. This new question will be inserted into the test directly after the previous question you were editing. 17 Edit and Author Questions Author a new question continued. . . . . . . . . . . . . . . . . . . . . . . . . . . . . . . . . . 4. Complete the new question fields in the Rich Text editor. To save this question, click any of the active navigation buttons at the top of the screen except for the Revert button. The Revert button will reset the question to an empty new question. · To return to the list of questions in your test, click the List button. · While editing a question, Method 1 Questions Menu Method of creating a new question to author will not be available. You will be prompted to use the Question Editing navigation bar method instead. 18 EZ Test Navigation Tests and Questions menus . . . . . . . . . . . . . . . . . . . . . . . . . . . . . . . . . . . . . . . These menus are located on the upper left of each screen. Tests menu This menu contains test management activities. · EZ Test Home opens a page listing existing tests · New Test opens a page so you can build a new test · EZ Test Import allows you to bring someone else’s test that has been exported as a .zip file into the application so you can use it or edit it yourself. See User Manual for details · Build Test Banks bundles your tests into banks, so you can create a new test bank or add your test to an existing bank · Exit leaves the application Question menu This menu lists question creation activities. · New creates a new question (13 types) · Select adds questions from a test bank or your previously saved tests · Import brings in questions from a text file · List returns to the list of questions selected in the current test · Sort reorders the sequence of the questions · Categorize applies a category type to a question · Multimedia manages graphics, audio files and formulae allowing you to add, preview or delete · Title/Instructions opens Title/Instructions edit screen · Format/Print opens the Publishing Options screen 19 EZ Test Navigation Test Management icons Use the icons on the Test Management screen to manage your saved tests. Create a .zip file that you can share with others. Delete a test permanently from the list of saved tests. Create a copy of a saved test. You can permanently apply the changes, or create a new version. Open the Publishing Options screen for the test. Edit this test to apply formatting and wording changes. Bread crumbs Some screens provide "bread crumbs" or hot links that allow you to quickly navigate between screens. This listing shows progression through screens. Each screen is separated by the > arrow. To move to any screen in the list, click on the underlined screen title. Bread crumbs 20 EZ Test Help Screen sensitive help . . . . . . . . . . . . . . . . . . . . . . . . . . . . . . . . . . . . . . . . . . . . . . . To access help within EZ Test, click on the Help icon in the upper right corner of the screen. This level of help provides you with procedures to complete the tasks on that particular screen. Field sensitive help . . . . . . . . . . . . . . . . . . . . . . . . . . . . . . . . . . . . . . . . . . . . . . . . . Hot links provide explanations to help you enter correctly the information required in the text box. If the field name is underlined in blue, click the hot link for more information. User Guide help . . . . . . . . . . . . . . . . . . . . . . . . . . . . . . . . . . . . . . . . . . . . . . . . . . . . You can access this guide from anywhere within EZ Test by clicking on the Help icon, then the Topics button. 21 EZ TEST FOR WINDOWS AND MACINTOSH Quick Index Here’s a listing of directions contained in this guide. Add instructions, 10 Author a new question, 16 Change the title, 10 Control bar, 5 Create multiple versions, 14 Edit your questions, 15 Help, 21 Icons, 20 Install the program, 4 Launch the program, 5 Menus, 19 Name the test, 7 Organizing and editing questions, 9 Preview your test, 11 Printing, 13 Resource Center, 6 Save your test, 12, 14 Select questions, 8 Set your preferences, 7 System Requirements, 2 . . . . . . . . . . . . . . . . . . . . . . . . . . . . . . . . . . . . . . . . . . . . . . . . . . . . . . . . . . . . . . . . . . . . . . EZ Test™ for Windows and Macintosh Copyright © 2007, The McGrawHill Companies Inc. All rights reserved. Windows is a trademark of Microsoft, Inc./Macintosh is a trademark of Apple Computer, Inc. If you are experiencing difficulties with this product, visit McGrawHill Higher Education Technical Support http://www.mhhe.com/support You can also call the Help Desk at (800) 3315094. Version 06.25.07 22