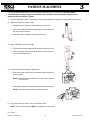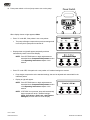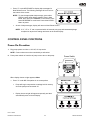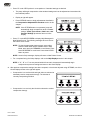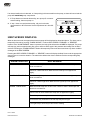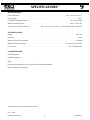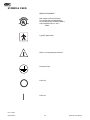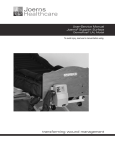
1
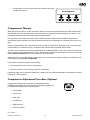
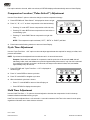
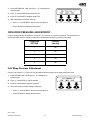
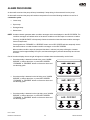
USER MANUAL
P/N 215279 Rev A
MARCH 2006
®
This PlexiPulse® User Manual is not a guarantee or warranty as to this product. It is intended only as a quick
reference source and not a comprehensive guide. For additional information or for specific questions please
contact KCI® Customer Service.
In order for KCI® products to function properly, the following conditions must be met. Failure to comply with these
conditions will void any pertinent warranties.
• All assembly, operation, adjustment, modification, maintenance and/or repair must be carried out only by
qualified personnel authorized by KCI.
• The electrical installation of the room must comply with the appropriate electrical wiring standards.
• The product must be used in accordance with this manual and all applicable labeling.
The only servicing to be carried out by the user is described in the Maintenance chapter of this manual.
Upon meeting confidentiality and other requirements, KCI will make available upon request circuit wiring
diagrams, component parts lists, descriptions, calibration instructions, or other information which will assist the
user’s appropriately qualified personnel to repair those parts of the equipment designated by the manufacturer as
repairable.
NOTICE
This product has been configured from the manufacturer to meet the specific voltage requirements. Refer to the
Product Information label to verify voltage configuration.
Rev. A 03/06
PlexiPulse® User Manual
®
PlexiPulse® User Manual
®
TABLE OF CONTENTS
INTRODUCTION . . . . . . . . . . . . . . . . . . . . . . . . . . . . . . . . . . . . . . . . . . . . . . . . . . . . . . . . . . . . . . . . . . . . . . . . 1-1
Indications . . . . . . . . . . . . . . . . . . . . . . . . . . . . . . . . . . . . . . . . . . . . . . . . . . . . . . . . . . . . . . . . . . . . . . . . . . . . 1-1
Contraindications . . . . . . . . . . . . . . . . . . . . . . . . . . . . . . . . . . . . . . . . . . . . . . . . . . . . . . . . . . . . . . . . . . . . . . . 1-1
Risks And Precautions . . . . . . . . . . . . . . . . . . . . . . . . . . . . . . . . . . . . . . . . . . . . . . . . . . . . . . . . . . . . . . . . . . . 1-2
Safety Information . . . . . . . . . . . . . . . . . . . . . . . . . . . . . . . . . . . . . . . . . . . . . . . . . . . . . . . . . . . . . . . . . . . . . . 1-2
Caregiver Convenience . . . . . . . . . . . . . . . . . . . . . . . . . . . . . . . . . . . . . . . . . . . . . . . . . . . . . . . . . . . . . . . . . . 1-2
PREPARATION FOR USE . . . . . . . . . . . . . . . . . . . . . . . . . . . . . . . . . . . . . . . . . . . . . . . . . . . . . . . . . . . . . . . . 2-1
Unboxing And Inspection . . . . . . . . . . . . . . . . . . . . . . . . . . . . . . . . . . . . . . . . . . . . . . . . . . . . . . . . . . . . . . . . 2-1
Unit Setup . . . . . . . . . . . . . . . . . . . . . . . . . . . . . . . . . . . . . . . . . . . . . . . . . . . . . . . . . . . . . . . . . . . . . . . . . . . . 2-1
PATIENT PLACEMENT . . . . . . . . . . . . . . . . . . . . . . . . . . . . . . . . . . . . . . . . . . . . . . . . . . . . . . . . . . . . . . . . . . . 3-1
Control Panel Functions . . . . . . . . . . . . . . . . . . . . . . . . . . . . . . . . . . . . . . . . . . . . . . . . . . . . . . . . . . . . . . . . . 3-3
Power-On Procedure . . . . . . . . . . . . . . . . . . . . . . . . . . . . . . . . . . . . . . . . . . . . . . . . . . . . . . . . . . . . . . . . 3-3
Compression Therapy . . . . . . . . . . . . . . . . . . . . . . . . . . . . . . . . . . . . . . . . . . . . . . . . . . . . . . . . . . . . . . . 3-5
Compression Adjustment Procedure (Options) . . . . . . . . . . . . . . . . . . . . . . . . . . . . . . . . . . . . . . . . . . . . 3-5
Compression Location (“Pulse Select?”) Adjustment . . . . . . . . . . . . . . . . . . . . . . . . . . . . . . . . . . . . . . . 3-6
Cycle Time Adjustment . . . . . . . . . . . . . . . . . . . . . . . . . . . . . . . . . . . . . . . . . . . . . . . . . . . . . . . . . . . . . . . 3-6
Hold Time Adjustment . . . . . . . . . . . . . . . . . . . . . . . . . . . . . . . . . . . . . . . . . . . . . . . . . . . . . . . . . . . . . . . 3-6
Inflation Pressure Adjustment . . . . . . . . . . . . . . . . . . . . . . . . . . . . . . . . . . . . . . . . . . . . . . . . . . . . . . . . . . . . . 3-7
Left Wrap Pressure Adjustment . . . . . . . . . . . . . . . . . . . . . . . . . . . . . . . . . . . . . . . . . . . . . . . . . . . . . . . . 3-7
Right Wrap Pressure Adjustment . . . . . . . . . . . . . . . . . . . . . . . . . . . . . . . . . . . . . . . . . . . . . . . . . . . . . . . 3-8
Therapy Hour Meter . . . . . . . . . . . . . . . . . . . . . . . . . . . . . . . . . . . . . . . . . . . . . . . . . . . . . . . . . . . . . . . . . . . . . 3-8
Alarm Procedure . . . . . . . . . . . . . . . . . . . . . . . . . . . . . . . . . . . . . . . . . . . . . . . . . . . . . . . . . . . . . . . . . . . . . . . 3-9
Help Screen Displays . . . . . . . . . . . . . . . . . . . . . . . . . . . . . . . . . . . . . . . . . . . . . . . . . . . . . . . . . . . . . . . . . . 3-10
Power-Off Procedure . . . . . . . . . . . . . . . . . . . . . . . . . . . . . . . . . . . . . . . . . . . . . . . . . . . . . . . . . . . . . . . . . . . 3-11
NURSING CARE . . . . . . . . . . . . . . . . . . . . . . . . . . . . . . . . . . . . . . . . . . . . . . . . . . . . . . . . . . . . . . . . . . . . . . . . 4-1
CPR . . . . . . . . . . . . . . . . . . . . . . . . . . . . . . . . . . . . . . . . . . . . . . . . . . . . . . . . . . . . . . . . . . . . . . . . . . . . . . . . . 4-1
Skin Care . . . . . . . . . . . . . . . . . . . . . . . . . . . . . . . . . . . . . . . . . . . . . . . . . . . . . . . . . . . . . . . . . . . . . . . . . . . . . 4-1
CARE AND CLEANING . . . . . . . . . . . . . . . . . . . . . . . . . . . . . . . . . . . . . . . . . . . . . . . . . . . . . . . . . . . . . . . . . . . 5-1
Infection Control Procedure . . . . . . . . . . . . . . . . . . . . . . . . . . . . . . . . . . . . . . . . . . . . . . . . . . . . . . . . . . . . . . 5-1
Cleaning Procedures for the PlexiPulse® Pump . . . . . . . . . . . . . . . . . . . . . . . . . . . . . . . . . . . . . . . . . . . . . . . 5-1
MAINTENANCE . . . . . . . . . . . . . . . . . . . . . . . . . . . . . . . . . . . . . . . . . . . . . . . . . . . . . . . . . . . . . . . . . . . . . . . . 6-1
Scheduled Maintenance . . . . . . . . . . . . . . . . . . . . . . . . . . . . . . . . . . . . . . . . . . . . . . . . . . . . . . . . . . . . . . . . . 6-1
Unscheduled Maintenance . . . . . . . . . . . . . . . . . . . . . . . . . . . . . . . . . . . . . . . . . . . . . . . . . . . . . . . . . . . . . . . 6-1
TROUBLESHOOTING . . . . . . . . . . . . . . . . . . . . . . . . . . . . . . . . . . . . . . . . . . . . . . . . . . . . . . . . . . . . . . . . . . . . 7-1
REPLACEMENT PARTS . . . . . . . . . . . . . . . . . . . . . . . . . . . . . . . . . . . . . . . . . . . . . . . . . . . . . . . . . . . . . . . . . . 8-1
SPECIFICATIONS* . . . . . . . . . . . . . . . . . . . . . . . . . . . . . . . . . . . . . . . . . . . . . . . . . . . . . . . . . . . . . . . . . . . . . . 9-1
Symbols Used . . . . . . . . . . . . . . . . . . . . . . . . . . . . . . . . . . . . . . . . . . . . . . . . . . . . . . . . . . . . . . . . . . . . . . . . . 9-2
QUESTIONS AND INFORMATION . . . . . . . . . . . . . . . . . . . . . . . . . . . . . . . . . . . . . . . . . . . . . . . . . . . . . . . . . 10-1
Rev. A 03/06
PlexiPulse® User Manual
1
®
Rev. A 03/06
2
PlexiPulse® User Manual
®
INTRODUCTION
1
The PlexiPulse® System offers a therapeutic edge in foot and leg compression. PlexiPulse® System is a pneumatic
compression system designed to increase blood flow in non-ambulatory or resting patients.
The veins in the calf and foot provide a natural pump that, when compressed, push blood back towards the heart.
The PlexiPulse® System helps this natural calf and foot pump circulate blood throughout the patient’s system
when venous blood flow is impaired from surgery, injury or disease.
The PlexiPulse® pump is connected by tubing to individual inflatable calf wraps and/or foot wraps that can be
operated together or independently. Each calf and foot wrap is designed to provide a comfortable fit around the
calf and foot with an air bladder that squeezes the soleus sinus in the calf and the venous plexus in the arch, plus
collateral veins in both calf and foot. The PlexiPulse® pump can accommodate all the following PlexiPulse® wraps
with just one pump, and the patient can use different wraps on left and right side at the same time:
• Foot Wrap - Provides excellent proximal Deep Vein Thrombosis (DVT) prophylaxis by squeezing the venous
plexus in the arch and collateral veins in the foot.
• Calf Wrap - May help provide good distal and proximal DVT prophylaxis.
• Combo Wrap - A combination of both therapies may provide the most aggressive DVT prophylaxis.
INDICATIONS
The PlexiPulse® System is indicated for patients who would benefit from:
• Prevention of Deep Vein Thrombosis (DVT)
• Prevention of venous stasis in the lower extremities
• Enhanced arterial circulation in lower extremities
• Reduced post-operative pain and swelling in the lower extremities
• Reduced edema in the lower extremities
• Reduced wound healing time for non-ambulatory, surgical and trauma patients
• Treatment and assistance with healing of cutaneous ulceration in the lower extremities
• Reduced compartmental pressures in the lower extremities
• Reduced need for anti-coagulation medications prescribed for the prevention of (DVT)
CONTRAINDICATIONS
Patient conditions for which the PlexiPulse® product is contraindicated include:
• Presumptive evidence of congestive heart failure
• Suspected pre-existing Deep Vein Thrombosis (DVT)
Rev. A 03/06
PlexiPulse® User Manual
1-1
Introduction
®
RISKS AND PRECAUTIONS
• Oxygen Use – DANGER: Risk of explosion if used in the presence of flammable anesthetics. Use of this
product in an oxygen-enriched environment may produce potential of fire hazard. This equipment is not
suitable for use in the presence of a flammable anesthetic mixture with air or with oxygen or nitrous oxide.
CAUTION: Position PlexiPulse® pump only at foot end of bed when using Oxygen Administering Equipment.
• Electromagnetic Interference – Although this equipment conforms with the intent of the directive 89/336/
EEC in relation to Electromagnetic Compatibility, all electrical equipment may produce interference. If
interference is suspected, move equipment away from sensitive devices or contact the manufacturer.
• Shock Hazard – Electrical shock hazard, do not open any electrical cover on pump case. Refer to Qualified
Service Personnel.
SAFETY INFORMATION
Do Not Walk In Foot Wrap - Foot wraps must always be removed before a patient is allowed to walk.
Skin Care – Monitor skin conditions regularly, especially at bony prominences and areas where moisture or
incontinence may occur or collect, and consider adjunct or alternative therapies for high acuity patients. Early
intervention may be essential to preventing serious skin breakdown.
Fluids – Avoid spilling fluids on PlexiPulse® pump case. If spills do occur, clean fluids from pump case wearing
rubber gloves to avoid any possibility of shock. Once fluid is removed, check operation of components in area of
spill.
NOTE: Fluids remaining on the pump controls can cause corrosion, which may cause components to fail or
operate erratically, possibly producing potential hazards to patient and caregivers.
Avoid Fire Hazards – To minimize risk of fire, connect the unit’s power cord directly into a wall-mounted outlet.
Do not use extension cords or multiple outlet strips. Review and follow FDA’s Safety Tips for Preventing Hospital
Bed Fires (dated 12/18/03) and other information referenced at http://www.kci1.com/products/FDASafetyAlert.
Tobacco Smoke – If routine laundering and cleaning procedures as described in the Preventive Maintenance
section of the Maintenance chapter of this Manual are not followed, tobacco smoke build-up may conceivably
reduce the amount of air flow through the product. Severe air restrictions (whatever the source) may cause the
pump to overheat and automatically deactivate.
Power Cord – Ensure power cord is kept free from all pinch points and moving parts and is not trapped under
casters of bed. Improper handling of the power cord can cause damage to the cord, which may possibly produce
risk of fire or electrical shock.
General Protocols – Follow all applicable safety rules and institution protocols concerning patient and caregiver
safety.
CAREGIVER CONVENIENCE
The PlexiPulse® pump contains the following features to facilitate patient care.
• Easy on/off disposable foot wrap(s).
• Pre-set compression therapy.
• Portable and lightweight design.
• Help screens.
Rev. A 03/06
Introduction
1-2
PlexiPulse® User Manual
®
2
PREPARATION FOR USE
Preparing the PlexiPulse® System for use entails inspecting the PlexiPulse® pump for damaged or unserviceable
components as well as performing procedures outlined in the Unboxing and Inspection and Unit Setup
sections. Carefully read the Contraindications, Safety Information and Risks and Precautions in the
Introduction Chapter of this manual prior to placing the PlexiPulse® product into service.
If there are questions about proper assembly and disassembly of the PlexiPulse® System, contact your local KCI
representative or KCI Customer Service Department 1-800-275-4524.
The PlexiPulse® pump is shipped from the manufacturer fully assembled and ready to place into service. Before
putting pump into service, the following steps are necessary:
UNBOXING AND INSPECTION
1. Open carton.
WARNING
Do not use sharp instruments to open carton. Damage could
result to pump case or hoses.
2. Inspect Pump Case for visible damage occurring during transport and contact carrier and KCI Customer
Service Department, 1-800-275-4524, immediately if damage is observed.
UNIT SETUP
Procedures to verify proper operation of the PlexiPulse® Pump are provided in the following steps. Refer to
Operating Instructions section of the Patient Placement chapter of this manual if necessary. If results of this
procedure are not as specified, refer to the Troubleshooting chapter.
1. Plug pump power cord into a 115V AC, 15 Amp. outlet.
2. Connect tubes from wraps to pump.
3. Press Power Switch and verify the following:
• Light in switch illuminates.
• Pump activates.
• “New Patient?” display appears on control panel.
4. Press “B” for YES in response to display prompt and observe the following:
• Pump automatically begins compression at standard settings.
NOTE: Wraps will inflate/deflate.
• Press OPTIONS button to sequence through compression options, the standard settings will be displayed
(Both, Cycle 20 sec., Hold 2 sec., Pressure Settings 3).
Rev. A 03/06
PlexiPulse® User Manual
2-1
Preparation for Use
®
5. Press OPTIONS button to sequence and customize available compression therapy options following
procedures in Compression Adjustment Procedures section of the Patient Placement chapter of this
manual if necessary. Results of the procedures must correspond with those outlined.
NOTE: An electrical leakage test has already been performed on the pump. Leakage is below 100 microamps.
All additional required tests to meet UL-60601standards have also been performed before shipment.
Rev. A 03/06
Preparation for Use
2-2
PlexiPulse® User Manual
3
PATIENT PLACEMENT
It is recommended that all sections of this manual be reviewed prior to product use. Carefully read the
Contraindications, Safety Information and Risks and Precautions in the Introduction Chapter prior to
patient use of the PlexiPulse® System.
1. Hang the PlexiPulse® pump on footboard of bed using adjustable hanging arms on back side of pump case.
2. Apply foot wrap(s) as shown at right:
• Position foot over wrap and fold first flap over top of foot.
• Fold second flap (with hook-and-loop patch) comfortably over
top of first flap and secure.
• Wrap back strip comfortably over heel and secure.
3. Apply calf wrap(s) as shown at right:
• Position wrap behind calf and fold first flap around front of calf.
• Fold second flap (with hook-and-loop patch) comfortably over
top of first flap and secure.
4. Connect tube(s) from wrap(s) to pump case:
• Press valve tab to ensure valve is prepared for tube insertion, as
shown at right.
NOTE: Valve will click into position if it is not in correct position
to receive tube.
• Insert tube connector into appropriate valve as shown at right.
NOTE: Valve will click when tube is locked into place.
5. Plug pump power cord into a 115V AC 15 Amp. outlet.
NOTE: Power to the outlet must NOT be controlled by a wall switch.
Rev. A 03/06
PlexiPulse® User Manual
3-1
Patient Placement
6. Press power switch on front of pump case to turn on the pump.
Power Switch
ALARM SIL ENCE
HELP SCREEN
FOR WARD
SC R O LL
OPTIONS
A
B
C
REVERSE
When display shown at right appears, either:
• Press “A” under NO, if the patient is not a new patient:
• The pump will begin compression at previous settings held
in memory since pump was last turned off.
• Display shown at right will appear temporarily and then
automatically return to the Home Display.
NOTE: Press OPTIONS button to begin adjustments as
described in the Compression Adjustment section
of the Operating Instructions chapter of this
manual.
• Press “B” under YES, if the patient is a new patient or if standard settings are desired.
• Pump begins compression at the standard settings, but can be adjusted and customized for the
individual patient.
• Display at right will appear.
NOTE: Press OPTIONS button to begin adjustments as
described in the Compression Adjustment section
of the Operating Instructions chapter of this
manual.
NOTE: If OPTIONS is not pressed, pump will automatically
begin compression at the “standard settings”
(Both, Cycle 20 sec., Hold 2 sec., and Pressure
Settings 3) and then return to Home Display.
Rev. A 03/06
Patient Placement
3-2
PlexiPulse® User Manual
• Press “C” under HELP GUIDE to display help messages for
New Patient Screen. The following message will scroll across
the bottom of the screen:
NOTE: To view the appropriate help message, press either
SCROLL button when help is needed. Once in Help
Mode, press and hold FORWARD to scroll faster. Press
and hold REVERSE to scroll back. Press either SCROLL
button to pause.
• At end of help messages, display will return to New Patient Screen.
NOTE: If “A”, “B” or “C” are not pressed within 25 seconds, the pump will automatically begin
compression at previous settings and return to the Home Display.
CONTROL PANEL FUNCTIONS
Power-On Procedure
1. Plug pump power cord into a 115V AC, 15 Amp outlet.
NOTE: Power outlet must not be controlled by a wall switch.
2. Press power switch on front face of pump case to turn on the pump.
Power Switch
ALARM SIL ENCE
HELP SCREEN
FOR WARD
SC R O LL
OPT IONS
A
B
C
RE VERSE
When display shown at right appears, either:
• Press “A” under NO if the patient is not a new patient.
• Pump will begin compression at settings held in memory
since the pump was last turned off.
• Display shown at right will appear temporarily and then
automatically return to Home Display.
Rev. A 03/06
PlexiPulse® User Manual
3-3
Patient Placement
• Press “B” under YES if patient is a new patient or if standard settings are desired.
• The pump will begin compression at the standard settings and can be adjusted and customized for
the individual patient.
• Display at right will appear.
• Press OPTIONS button to begin adjustments described in
the Compression Adjustment Procedures section in this
chapter.
NOTE: If the OPTIONS button is not pressed, pump will
automatically begin compression at the “standard
settings” (Both, Cycle 20 sec., Hold 2 sec., and
Pressure Settings 3) and then return to Home
Display.
• Press “C” under HELP SCREEN to display Help Messages for
New Patient Screen. The following message will scroll across
the bottom of the screen:
NOTE: To view the appropriate help message, press either
SCROLL button when help is needed. Once in Help
Mode, press and hold FORWARD to scroll faster. Press
and hold REVERSE to scroll back. Press either SCROLL
button to pause.
NOTE: At end of help message, display will return to New Patient Screen.
• For a complete listing of all help displays, refer to the Help Displays section in this chapter.
NOTE: If “A”, “B” or “C” are not pressed within 25 seconds, the pump will automatically begin
compression at previous settings and return to the Home Display.
3. After previous compression settings have been accepted, or have been adjusted using OPTIONS, one of the
Home Displays shown at the right will appear.
• Compression is on and both left and right sides are selected to
alternately receive compression therapy. The side that is
currently compressing will flash.
• Compression is on and only the left side is selected to receive
compression therapy.
Rev. A 03/06
Patient Placement
3-4
PlexiPulse® User Manual
• Compression is on and only the right side is selected to receive
compression therapy.
Compression Therapy
When the pump is turned on or after the alarm is silenced, compression always begins at a lower pressure than
that selected and slowly increases to the selected pressure over a period of approximately 2 to 3 minutes. Slow
incremental increases in pressure helps maximize patient comfort.
As compression is provided, the pump monitors inflation pressures. With pressure feedback, the pump will
automatically adjust its output to provide the selected pressure and compensate for a wrap that is too loose or too
tight.
If pressure abnormalities (e.g., tubing disconnected at the wrap, kinked hose, damaged wrap, or an open wrap)
are detected for 5 consecutive cycles, compression will continue while an audible alarm sounds.
The alarm can be temporarily silenced by pressing either “ALARM SILENCE” or any “Help” button. The pump will
slowly increase, perform approximately 5 cycles, and then alarm again if the abnormality has not been corrected.
Refer to Alarm Procedure section in this chapter for more information.
Additionally, if the pump malfunctions or the wraps aren’t connected to the pump correctly, an audible alarm will
sound and the pump will stop compression.
If pump stops compression perform the following:
• Turn pump Off then On, check for compression.
• Disconnect then re-connect tubing, check for compression.
If the above steps do not resolve the malfunction, contact your local sales representative or KCI Customer Service
Department 1-800-275-4524.
Compression Adjustment Procedure (Options)
Compression settings may be adjusted by repeatedly pressing
OPTIONS button shown at right. Compression adjustment options will
be sequentially displayed in the following order:
• Pulse Select?
• Cycle Time
• Hold Time
• Left Pressure
• Right Pressure
• View Hour Meter?
Rev. A 03/06
PlexiPulse® User Manual
3-5
Patient Placement
If no option selection is made, within one minute, all OPTION displays will automatically return to Home Display.
Compression Location (“Pulse Select?”) Adjustment
Use the “Pulse Select?” option to select the side(s) to receive compression therapy.
1. Press OPTIONS until “Pulse Select?” is displayed as shown at right.
2. Press “A”, “B”, or “C” to direct compression to the desired side(s):
• Pressing “A” under LEFT directs compression to left side only.
• Pressing “B” under BOTH directs compression to both sides on
an alternating cycle.
• Pressing “C” under RIGHT directs compression to right side
only.
NOTE: The compression option selected (“LEFT,” “BOTH” or “RIGHT”) will flash.
3. Press button under flashing selection to return to Home Display.
Cycle Time Adjustment
Use the “Cycle Time Secs. = XX” option to view and adjust approximate time required for wrap(s) to inflate, hold
pressure and deflate.
NOTE: Cycle time can be adjusted from 20 to 60 seconds in 10-second increments.
Example: If both sides are selected for compression and the cycle time is 30 seconds, each side will
alternately, inflate, hold, and deflate over a period of approximately 30 seconds. If only one side is selected
for compression and the cycle time is 30 seconds, the wrap on that side will inflate, hold, and deflate
approximately every 30 seconds.
1. Press OPTIONS until “Cycle Time Secs. = XX” is displayed as
shown at right.
2. Press “A” under DECR to shorten cycle time.
3. Press “B” under INCR to lengthen cycle time.
4. When the desired cycle time is shown:
• Press “C” under HOME to return to Home Display, or
• Press OPTIONS to display the next option.
Hold Time Adjustment
Use the “Hold Time Secs. = X” option to view and adjust the time that the compression is held in the wrap
between inflation and deflation during a cycle.
Hold Time can be adjusted from 1 to 5 seconds in 1-second increments. Hold Time is the same for each option,
regardless of whether one or both sides are selected.
Rev. A 03/06
Patient Placement
3-6
PlexiPulse® User Manual
1. Press OPTIONS until “Hold Time Secs. = X” is displayed as
shown at right.
2. Press “A” under DECR to shorten Hold Time.
3. Press “B” under INCR to lengthen Hold Time.
4. When the desired Hold Time is shown:
• Press “C” under HOME to return to Home Display, or
• Press OPTIONS to display the next option.
INFLATION PRESSURE ADJUSTMENT
Pressure settings can be adjusted from a value of 1 to 5 seconds in 1-second increments. The following chart
shows what each pressure setting corresponds to in Millimeters of Mercury (mm Hg) at the wrap.
PRESSURE
SETTING
Pressure
(mm Hg)
1
140
2
150
3
160
4
170
5
180
Left Wrap Pressure Adjustment
Use the “Left Pressure = X” option to view and adjust inflation pressure of left wrap during each cycle.
1. Press OPTIONS until “Left Pressure = X” is displayed as
shown at right.
2. Press “A” under DECR to reduce pressure.
3. Press “B” under INCR to heighten pressure.
4. When desired left pressure setting is displayed:
• Press “C” under HOME to return to Home Display, or
• Press OPTIONS to display the next option.
Rev. A 03/06
PlexiPulse® User Manual
3-7
Patient Placement
Right Wrap Pressure Adjustment
Use the “Right Pressure = X” option to view and adjust inflation
pressure of right wrap during each cycle. The display shown at the right
will appear.
NOTE: Pressure adjustment for the right wrap is the same as the
pressure adjustment for the left wrap described in steps 1
through 4 above.
THERAPY HOUR METER
Use the “View Hour Meter?” option to view the number of therapy hours on pump and hours to left and right sides.
NOTE: Left, Right, and Pump hours are shown to the nearest 1/10 hour.
1. Press OPTIONS until “View Hour Meter?” is displayed as shown at
right.
2. Press “A” under LEFT to view therapy hours provided to left side.
Display shown at right will appear.
• Press “A” to reset number of hours for the left side to 0.
• Press “C” under EXIT to return to View Hour Meter? display.
3. With View Hour Meter? showing, press “B” under RIGHT to view
therapy hours provided to right side. Display shown at right will
appear.
• Press “A” to reset hours for right side to 0.
• Press “C” under EXIT to return to View Hour Meter? display.
4. With View Hour Meter? showing, press “C” under Unit Hours to
view total hours of Pump operation. Display shown at right will
appear.
NOTE: Unit Hours cannot be reset.
• Press “C” under EXIT to return to View Hour Meter? display.
• Press OPTIONS to begin sequence of options again.
Rev. A 03/06
Patient Placement
3-8
PlexiPulse® User Manual
ALARM PROCEDURE
An alarm will sound and the pump will stop immediately if wrap tubing is disconnected from the pump.
An alarm will sound and the pump will continue compression if one of the following conditions occurs for 5
consecutive cycles.
• Loose wrap.
• Open wrap.
• Damaged wrap.
• Kinked hose.
NOTE: An alarm situation generates alarm condition messages which are displayed on the HELP SCREEN. The
condition messages will indicate which of the above conditions exist and steps to correct the condition.
Pressing “ALARM SILENCE” will tempoarily silences an alarm but clears the alarm condition messages
from the Help Screen.
Pressing either the “FORWARD” or “REVERSE” button on the HELP SCREEN will also tempoarily silence
the alarm but does not clear the alarm condition messages on the HELP SCREEN.
When an alarm condition stops the pump and the alarm is silenced, the pump will begin to increase
pressure, perform approximately five cycles, and then alarm again if pressure abnormality has not been
resolved.
One of the alarm displays shown at right will appear to indicate where the abnormality can be found.
• If an abnormality is detected on both sides, press “ALARM
SILENCE” to silence the alarm, or press HELP SCREEN
“FORWARD” or “REVERSE” button to silence the alarm and
use the help guide.
• If an abnormality is detected on the left side, press “ALARM
SILENCE” to silence the alarm, or press HELP SCREEN
“FORWARD” or “REVERSE” button to silence the alarm and
use the help guide.
• If an abnormality is detected on the right side, press “ALARM
SILENCE” to silence the alarm, or press HELP SCREEN
“FORWARD” or “REVERSE” button to silence the alarm and
use the help guide.
Rev. A 03/06
PlexiPulse® User Manual
3-9
Patient Placement
If an internal malfunction is detected, or if wrap tubing is disconnected from the pump, an alarm will sound and the
pump will immediately stop compression.
1. If Pump detects an internal abnormality, turn pump off, reconnect
external tubing, then turn pump on.
2. If step 1 does not resolve abnormality, call your local sales
representative or KCI Customer Service Department at 1-800-2754524.
HELP SCREEN DISPLAYS
When an alarm sounds, the appropriate alarm message will be displayed as described above. The alarm can be
temporarily silenced by pressing “ALARM SILENCE” or either HELP SCREEN “FORWARD” or “REVERSE”
buttons. If the “ALARM SILENCE” button is pressed, the help guide information will NOT be displayed. The pump
will ramp-up, perform approximately five cycles, and then alarm again if the pressure abnormality has not been
resolved. Pressing the “ALARM SILENCE” Button will temporarily silence the alarm and clear any alarm condition
messages in the HELP SCREEN.
Pressing the HELP SCREEN “FORWARD” or “REVERSE” button will display the Help Screen and the appropriate
steps to take to correct the situation. The table below defines the alarm conditions and the corresponding help
messages:
ALARM CONDITION
ALARM - CHECK LEFT
HELP MESSAGE
Check for a left wrap that is too loose. Check for leaks in the left wrap or
hose connections.
Check for a kinked left hose. Make sure the left wrap is not applied too
tightly.
ALARM - CHECK RIGHT
Check for a right wrap that is too loose. Check for leaks in the right wrap or
hose connections.
Check for a kinked right hose. Make sure the right wrap is not applied too
tightly.
ALARM - CHECK BOTH
Make sure both wraps are not too loose. Check for leaks in both wraps and
both hose connections.
Check hoses for kinks. Make sure wraps are not applied too tightly.
The left wrap or hose may be too loose or leaking.
The left hose may be kinked or the left wrap may be too tight.
The right wrap or hose may be too loose or leaking.
Rev. A 03/06
Patient Placement
3-10
PlexiPulse® User Manual
ALARM CONDITION
HELP MESSAGE
The right hose may be kinked or the right wrap may be too tight.
UNIT ALARM
CHECK HELP SCREEN
Make sure left hose is attached. Power down and restart. If problem persists,
call for service.
Send to biomed for recalibration.
Make sure right hose is attached. Power down and restart. If problem
persists, call for service.
POWER-OFF PROCEDURE
1. Press Power Switch to turn off the PlexiPulse® System.
Power Switch
2. Unplug pump power cord from outlet.
NOTE: Compression settings are retained in memory when Pump is
turned off. During Power-On Procedure, the operator is
given an option to resume previous compression settings or
go to standard settings for a new patient.
ALARM SIL ENCE
HELP SCRE EN
FOR WARD
SC R O L L
OPTIONS
A
B
C
RE VERSE
3. Remove and discard wraps and tubing.
Rev. A 03/06
PlexiPulse® User Manual
3-11
Patient Placement
Rev. A 03/06
Patient Placement
3-12
PlexiPulse® User Manual
4
NURSING CARE
It is recommended that all sections of this manual be reviewed prior to product use. Carefully read the
Contraindications, Risk and Precautions and Safety Information in the Introduction chapter prior to
performing nursing care for a patient using the PlexiPulse® System.
CPR
1. Level bed.
2. Press power switch on front of PlexiPulse® pump to turn pump off.
Power Switch
3. Begin CPR.
ALARM SIL ENCE
HELP SCRE EN
FOR WARD
SC R O L L
OPTIONS
A
B
C
RE VERSE
SKIN CARE
1. Remove excess moisture and keep skin dry and clean.
2. Watch for changes in skin condition and provide appropriate care.
3. Follow the physician’s recommended protocol for this product and all associated therapies.
4. Frequently monitor skin conditions in wrap area and notify physician of any skin changes.
5. Change wound dressings as prescribed by physician.
Rev. A 03/06
PlexiPulse® User Manual
4-1
Nursing Care
Rev. A 03/06
Nursing Care
4-2
PlexiPulse® User Manual
5
CARE AND CLEANING
The following are KCI® recommended routine cleaning procedures for the PlexiPulse® System.
INFECTION CONTROL PROCEDURE
Follow all regulations outlined in OSHA Occupational Exposure to Bloodborne Pathogens 29 CFR Part 1910.30
regarding infection control procedures to be used when cleaning the PlexiPulse® system.
Follow all hospital or institutional infection control protocols when handling contaminated equipment.
CLEANING PROCEDURES FOR THE PLEXIPULSE® PUMP
1. Press power switch to turn pump off.
2. Unplug power cord from wall outlet.
3. Wear rubber or disposable gloves and an impervious apron or gown to prevent contact with cleaning solution
and/or contaminated equipment.
4. Wear eye protection to prevent splashing cleaning solution into eyes.
WARNING
Germicide concentrates can cause serious corneal damage
if allowed to contact the eyes. If contact does occur, flush
immediately with generous amounts of fresh water. Should
irritation persist, consult a physician.
5. The pump case must be cleaned after every placement.
• Always follow universal precautions.
• IMPORTANT: Handle soiled items as little as possible, with minimum agitation to prevent gross microbial
contamination of the air and personnel.
• Disinfectants used for scrubbing pump case should be a disinfectant solution made of an EPA-approved
high-quality disinfectant mixed according to manufacturer's instructions.
• After scrubbing pump case with disinfectant, wipe with a damp cloth containing Chlorine Solution mixed
at 2 oz. of high-quality chlorine bleach per gallon of water to provide a final disinfection.
6. Remove protective clothing if used. Discard or clean according to instructions from healthcare professional.
7. Wash hands.
8. Allow pump case to air dry thoroughly.
Rev. A 03/06
PlexiPulse® User Manual
5-1
Care and Cleaning
WARNING
Avoid spilling fluids on any part of the pump. Fluids
remaining on electronic controls can cause corrosion, which
may cause electronic components to fail or operate
erratically, possibly producing hazards to patient and
caregiver.
WARNING
Spray bottles are not to be used. Improperly spraying
solutions can lead to inhalation of toxic fumes.
WARNING
Avoid spilling fluids on any part of the control panel or
electronics. Fluids remaining on controls can cause
corrosion, which may cause the electronic components to
fail or operate erratically, possibly producing potential
hazards for patients and staff.
IMPORTANT
Germicidal concentrates can damage the touch pad control
switches and power switch. Do not allow such agents to
come in contact with these areas. It is recommended that a
cloth moistened only with disinfectant be used to clean and
disinfect these areas.
Rev. A 03/06
Care and Cleaning
5-2
PlexiPulse® User Manual
6
MAINTENANCE
This chapter contains Scheduled Maintenance, Unscheduled Maintenance and pertinent warnings for the
PlexiPulse® System.
Information in this chapter should be used in conjunction with information provided in the Troubleshooting
chapter of this manual.
All maintenance procedures in this chapter must be carried out only by KCI authorized personnel.
SCHEDULED MAINTENANCE
Scheduled maintenance on the PlexiPulse® system must be performed only by qualified service technicians at
scheduled intervals while the pump is in operation and after each patient placement. This maintenance includes
the following steps:
1. Exercise the functions of the PlexiPulse® outlined in the Unit Setup section of the Preparation for Use
chapter and observe operation of the pump. If there are abnormalities in the pump operation, refer to the
Troubleshooting chapter for remedies.
2. Inspect the PlexiPulse® Pump for visible signs of wear or damage.
3. Replace unserviceable items with approved replacement parts.
4. Perform infection control procedures in the Care and Cleaning chapter of this manual.
UNSCHEDULED MAINTENANCE
The PlexiPulse® System is made up of several components that should not be opened, disassembled, or
otherwise modified by the user. These parts should be replaced as a unit. Removal and replacement instructions
as well as electrical/pneumatic schematics and exploded drawings are provided for these assemblies. All
assembly, operations, modification, maintenance, and repairs must be carried out only by KCI authorized
personnel.
The following Warnings and Cautions should be observed during all maintenance procedures.
High voltage equipment to be serviced by trained, qualified
personnel only. Dangerous voltages can present a significant
shock or burn hazard to personnel.
WARNING
Power must be switched off and pump unplugged prior to any
maintenance procedure.
WARNING
CAUTION
Carefully observe and mark locations and routing of all cables
and tubing removed while performing the procedure in order to
properly locate connections, cables and their tie-wraps during
replacement. Wiring and tubing must be reinstalled exactly as
before removal to insure unit operation.
Rev. A 03/06
PlexiPulse® User Manual
6-1
Maintenance
WARNING
Wear ground strap whenever handling printed circuit boards
and board components. An electrostatic discharge (ESD) may
cause components to fail or operate erratically, possibly
producing hazards for patient and staff.
Rev. A 03/06
Maintenance
6-2
PlexiPulse® User Manual
7
TROUBLESHOOTING
Troubleshooting procedures for the PlexiPulse® system are provided in the following table. Each section provides
technical information for use in identifying causes of abnormal conditions.
Any modifications, repairs or parts replacement must be carried out by qualified personnel authorized by KCI.
Please contact your dealer or see contact information provided in chapter 10 of this manual.
The following Cautions and Warnings should be observed during all troubleshooting procedures:
High voltage equipment to be serviced by trained, qualified
personnel only. Dangerous voltages can present a significant
shock or burn hazard to personnel.
WARNING
Power must be switched off and pump unplugged prior to any
maintenance procedure.
WARNING
CAUTION
Carefully observe and mark locations and routing of all cables
and tubing removed while performing the procedure in order to
properly locate connections, cables and their tie-wraps during
replacement. Wiring and tubing must be reinstalled exactly as
before removal to insure unit operation.
WARNING
Wear ground strap whenever handling printed circuit boards
and board components. An electrostatic discharge (ESD) may
cause components to fail or operate erratically, possibly
producing hazards for patient and staff.
Rev. A 03/06
PlexiPulse® User Manual
7-1
Troubleshooting
SYMPTOM
PlexiPulse pump will not
activate. “Power” light
does not illuminate.
Pump is “On” but wrap
does not inflate.
POSSIBLE CAUSE
REMEDY
Power cord may be unplugged
from the wall outlet.
Verify power cord is properly
plugged in.
Pump may be plugged into a
non-functioning outlet or an outlet
controlled by a wall switch.
Relocate to functioning wall
outlet or outlet not controlled
by a wall switch.
Circuit breaker or fuse for the wall
outlet may be blown.
Reset circuit breaker.
Pump may be damaged.
Return pump for repair.
Air hoses not properly connected
to pump.
Check to ensure air hose
properly connected to pump.
Air hoses may be kinked or
pinched.
Check to ensure air hose is not
kinked or pinched.
The wrap may have rips, tears or
punctures.
Replace wrap.
Rev. A 03/06
Troubleshooting
7-2
PlexiPulse® User Manual
REPLACEMENT PARTS*
8
The following replacement parts are available for the PlexiPulse® System.
MAJOR PARTS
PlexiPulse® System. . . . . . . . . . . . . . . . . . . . . . . . . . . . . . . . . . . . . . . . . . . . . . . . . . . . . . . 205600 . . . . . . . . 1
Single patient use wraps:
Spiral wrap 3/4” . . . . . . . . . . . . . . . . . . . . . . . . . . . . . . . . . . . . . . . . . . . . . . . . . . . . . 4100256 . . . . . . . . 1
Foot wrap (5 pair). . . . . . . . . . . . . . . . . . . . . . . . . . . . . . . . . . . . . . . . . . . . . . . . . . . 28900016 . . . . . . . . 1
Calf wrap (10 each) . . . . . . . . . . . . . . . . . . . . . . . . . . . . . . . . . . . . . . . . . . . . . . . . . 28900000 . . . . . . . . 1
Foot and Calf combo wrap (3 pair) . . . . . . . . . . . . . . . . . . . . . . . . . . . . . . . . . . . . . 28900001 . . . . . . . . 1
Tubing extention kit . . . . . . . . . . . . . . . . . . . . . . . . . . . . . . . . . . . . . . . . . . . . . . . . . . . . 28900027 . . . . . . . . 1
* Replacement parts are subject to availability.
Rev. A 03/06
PlexiPulse® User Manual
8-1
Replacement Parts
Rev. A 03/06
Replacement Parts
8-2
PlexiPulse® User Manual
SPECIFICATIONS*
9
SPECIFICATIONS
Pump Dimensions . . . . . . . . . . . . . . . . . . . . . . . . . . . . . . . . . . . . . . . . . . . . . . . . . . . . . . . . . 12" L x 10 3/4” W x 7” D
Pump Weight . . . . . . . . . . . . . . . . . . . . . . . . . . . . . . . . . . . . . . . . . . . . . . . . . . . . . . . . . . . . . . . . . . . . . . . . . . . . 15 lbs.
Compressor Operating Pressure . . . . . . . . . . . . . . . . . . . . . . . . . . . . . . . . . . . . . . . . . . . . . . . . . . . . 717 - 1150 mm Hg
Maximum Output Pressure . . . . . . . . . . . . . . . . . . . . . . . . . . . . . . . . . . . . . . . . . . . . . . . . . . . . . . . . 180 +/-15 mm Hg
Transport and Storage Conditions . . . . . . . . . . . . . . -40C (-40 F) to+70C (158 F), 10% to100% RH, 500 to 1060 hPa
ELECTRICAL DATA
Voltage . . . . . . . . . . . . . . . . . . . . . . . . . . . . . . . . . . . . . . . . . . . . . . . . . . . . . . . . . . . . . . . . . . . . . . . . . . . . . . . 120V AC
Frequency . . . . . . . . . . . . . . . . . . . . . . . . . . . . . . . . . . . . . . . . . . . . . . . . . . . . . . . . . . . . . . . . . . . . . . . . . . . . . . 60 Hz
Maximum Current Consumption . . . . . . . . . . . . . . . . . . . . . . . . . . . . . . . . . . . . . . . . . . . . . . . . . . . . . . . . . . 0.33 Amp
Maximum Electrical Leakage . . . . . . . . . . . . . . . . . . . . . . . . . . . . . . . . . . . . . . . . . . . . . . . . . Less than 100 microamps
Power Cord . . . . . . . . . . . . . . . . . . . . . . . . . . . . . . . . . . . . . . . . . . . . . . . . . . . . . . . . . . . . . . . . . .16 ft. Hospital Grade
CLASSIFICATIONS
Class I Equipment
Type BF applied part
IXPO
Equipment not suitable for use in the presence of flammable anesthetics
Mode of Operation: Continuous
*Specifications subject to change without notice.
Rev. A 03/06
PlexiPulse® User Manual
9-1
Specifications*
SYMBOLS USED
MEDICAL EQUIPMENT
C
US
With respect to Electrical Shock,
Fire and Mechanical Hazards Only
In accordance with UL/IEC/EN 60601-1
and CAN/CSA C22.2 no. 601.1
5KA5
Type BF Applied Part
Refer to accompanying documents
Protective Earth
O
I
Power off
Power on
Rev. A 03/06
Specifications*
9-2
PlexiPulse® User Manual
QUESTIONS AND INFORMATION
10
For additional information concerning the PlexiPulse® system or it’s operation, please contact your KCI
representative or:
®
KCI-USA Inc.
P.O. Box 659508
San Antonio, Texas 78265-9508
Call Toll Free 1-800-275-4524
FAX 1-800-275-3417
www.kci1.com
C
US
All other trademarks and service marks designated herein are property of KCI Licensing, Inc. and it’s affiliates.
This product is patented and/or subject to pending patent.
© 2006 KCI Licensing, Inc. All Rights Reserved 03/06 P/N 215279 Rev A
Rev. A 03/06
PlexiPulse® User Manual
10-1
Questions and Information
Rev. A 03/06
Questions and Information
10-2
PlexiPulse® User Manual