1
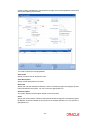
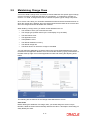
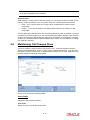
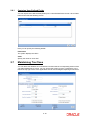
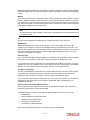
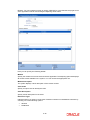
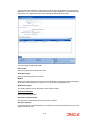
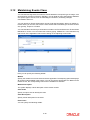
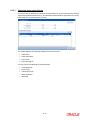
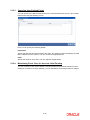
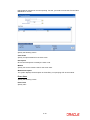
Class User Guide Oracle FLEXCUBE Universal Banking Release 12.0.87.1.0 Part No. E56600-01 August 2014 Class User Guide August 2014 Oracle Financial Services Software Limited Oracle Park Off Western Express Highway Goregaon (East) Mumbai, Maharashtra 400 063 India Worldwide Inquiries: Phone: +91 22 6718 3000 Fax:+91 22 6718 3001 www.oracle.com/financialservices/ Copyright © 2007, 2014, Oracle and/or its affiliates. All rights reserved. Oracle and Java are registered trademarks of Oracle and/or its affiliates. Other names may be trademarks of their respective owners. U.S. GOVERNMENT END USERS: Oracle programs, including any operating system, integrated software, any programs installed on the hardware, and/or documentation, delivered to U.S. Government end users are "commercial computer software" pursuant to the applicable Federal Acquisition Regulation and agency-specific supplemental regulations. As such, use, duplication, disclosure, modification, and adaptation of the programs, including any operating system, integrated software, any programs installed on the hardware, and/or documentation, shall be subject to license terms and license restrictions applicable to the programs. No other rights are granted to the U.S. Government. This software or hardware is developed for general use in a variety of information management applications. It is not developed or intended for use in any inherently dangerous applications, including applications that may create a risk of personal injury. If you use this software or hardware in dangerous applications, then you shall be responsible to take all appropriate failsafe, backup, redundancy, and other measures to ensure its safe use. Oracle Corporation and its affiliates disclaim any liability for any damages caused by use of this software or hardware in dangerous applications. This software and related documentation are provided under a license agreement containing restrictions on use and disclosure and are protected by intellectual property laws. Except as expressly permitted in your license agreement or allowed by law, you may not use, copy, reproduce, translate, broadcast, modify, license, transmit, distribute, exhibit, perform, publish or display any part, in any form, or by any means. Reverse engineering, disassembly, or decompilation of this software, unless required by law for interoperability, is prohibited. The information contained herein is subject to change without notice and is not warranted to be error-free. If you find any errors, please report them to us in writing. This software or hardware and documentation may provide access to or information on content, products and services from third parties. Oracle Corporation and its affiliates are not responsible for and expressly disclaim all warranties of any kind with respect to third-party content, products, and services. Oracle Corporation and its affiliates will not be responsible for any loss, costs, or damages incurred due to your access to or use of third-party content, products, or services. Contents 1. Preface ...................................................................................................... 1-1 1.1 1.2 1.3 1.4 1.5 1.6 2. 1-1 1-1 1-1 1-1 1-1 1-2 Creating Classes ...................................................................................... 2-1 2.1 2.2 2.3 2.4 2.5 2.6 2.7 2.8 2.9 2.10 2.11 2.12 2.13 3. Introduction.............................................................................................................. Audience.................................................................................................................. Documentation Accessibility.................................................................................... Organization ............................................................................................................ Glossary of Icons..................................................................................................... Related Documents ................................................................................................. Introduction.............................................................................................................. 2-1 Maintain Interest Class ............................................................................................ 2-1 Maintaining Interest Class ....................................................................................... 2-6 2.3.1 Capturing Interest Limits............................................................................. 2-9 Maintaining Accrual Fee Class ................................................................................ 2-9 2.4.1 Capturing User-Defined Fields ................................................................. 2-10 Maintaining Charge Class ..................................................................................... 2-11 2.5.1 Events ...................................................................................................... 2-13 Maintaining Old Charges Class ............................................................................. 2-16 2.6.1 Capturing User-Defined Fields ................................................................. 2-18 Maintaining Tax Class ........................................................................................... 2-18 2.7.1 Defining Issuer Taxes as Classes ............................................................ 2-20 Maintaining Adhoc Fee Class................................................................................ 2-22 Maintaining Branch Currency Restriction Class .................................................... 2-22 Maintaining Customer Restriction Class................................................................ 2-24 Maintaining Discount Accrual Class ...................................................................... 2-26 Maintaining Events Class ...................................................................................... 2-29 2.12.1 Capturing Accounting Entries ................................................................... 2-30 2.12.2 Capturing Advices .................................................................................... 2-31 2.12.3 Capturing User-Defined Fields ................................................................. 2-32 2.12.4 Maintaining Event Class for Account Initial Funding ................................ 2-32 Maintaining Role to Head Mapping Class ............................................................. 2-35 2.13.1 Capturing User-Defined Fields ................................................................. 2-36 2.13.2 Maintaining a Class for Account Opening Charge.................................... 2-37 Function ID Glossary ............................................................................... 3-1 1. Preface 1.1 Introduction This manual is designed to help you get acquainted with the manner in which various classes can be set up in Oracle FLEXCUBE. You can further obtain information specific to a particular field by placing the cursor on the relevant field and striking <F1> on the keyboard. 1.2 Audience This manual is intended for the following User/User Roles: 1.3 Role Function Back office clerk Input functions for contracts Back office managers/officers Authorization functions Product Managers Product definition and authorization End of day operators Processing during end of day/ beginning of day Financial Controller / Product Managers Generation of reports Documentation Accessibility For information about Oracle's commitment to accessibility, visit the Oracle Accessibility Program website at http://www.oracle.com/pls/topic/lookup?ctx=acc&id=docacc. 1.4 1.5 Organization Chapter 1 About this Manual gives a brief introduction to the module. It also lists the various chapters in the User Manual. Chapter 2 Creating Classes details the procedure to set up different classes in Oracle FLEXCUBE. Glossary of Icons This User Manual may refer to all or some of the following icons. Icons Function Exit Add row Delete row Option List 1-1 1.6 Related Documents For further information on procedures discussed in the manual, refer to the Oracle FLEXCUBE manuals on: Procedures 1-2 2. Creating Classes 2.1 Introduction You need to create a class and attach certain attributes to it. You can build a charge class, for instance, with the attributes of a specific type of charge, such as Charges for provision of services. Similarly, you can build an event class with the attributes of a specific type of events, such as a Booking a Transaction, Collecting Charges, Cancellation and so on. Once you create classes, you can link them suitably to products thereby avoiding the need to specify the generic attributes available in the class. In Oracle FLEXCUBE, you can categorize these classes into Mandatory and Optional. Unless certain mandatory classes are maintained, you will not be able to process transactions. The mandatory classes that you need to maintain are: Interest Class Interest Class (SE) Fee Class Charge Class Old Charges Class Tax Class The optional classes that you can maintain are: 2.2 Adhoc Fee Class Branch Currency Restriction Class Customer Restriction Class Discount Accrual Class Events Class Role to Head Mapping Class Maintain Interest Class You need to define the attributes of an interest class, in the ‘Interest Class Definition’ screen, invoked from the Application Browser. You can invoke the ‘Interest Class Maintenance’ 2-1 screen by typing ‘CFDINCLS’ in the field at the top right corner of the Application tool bar and clicking the adjoining arrow button. You need to specify the following details: Class Code Specify a unique code to identify the class. Class Description Specify a brief description for the class. Rule Code Specify the rule that should be linked to the class. The adjoining option list displays all valid rules maintained in the system. You can choose the appropriate one. Rule Description The system displays the description based on the rule chosen. Event Specify the event at which collection of the interest should be triggered, The adjoining option list displays all events available in the system for the module specified. You can choose the appropriate one. 2-2 Module Specify the module to which the class should be applicable. The adjoining option list displays all module codes available in the system. You can choose the appropriate one. Basis You can indicate the following details: Amount Type If the interest rate type is Fixed or Floating, specify the basis amount on which the interest rate has to be applied. For example, for the FT module, it could be the Transfer amount, for the LC module, it could be the LC Contract Amount and so on. Settlement Currency The Settlement Currency is the currency in which the interest amount will be calculated. The interest amount applicable for a contract will be calculated in this currency. The appropriate conversion rate (defined for the product as the applicable Rate Type) will be applied to carry out a conversion if the repayment account is in a different currency. Category If the interest rate type is Fixed or Floating, specify the type of balance that has to be considered for interest application. It could be any one of the following: Expected Overdue Normal Outstanding Accruals Check this box to indicate that accruals have to be carried out for the accruable components. Bulk Amount When a contract gets rolled over, you may wish to split it into two contracts - one for the interest amount (I) and the other for the principal amount (P). If you want the floating rate pickup for both the new contracts (tenor/amount) to be based on P+I of the original contract, check this box. Allow Amendment If you would like to allow amendment of the interest amount calculated by the system as per the charge rule, check this box. Stop Application Check this box to indicate that collection should stop for the interest component. Grace Period Specify the number of grace days, beyond the main interest due date, after which that interest component becomes applicable. Prepayment Method Select the method for actual prepayment penalty computation from the adjoining drop-down list. The options available are: Oracle FLEXCUBE - This option is used where pre-payment has to be applied on the deposit contract for contract elapsed days. Custom - If the Prepayment Method is Custom, then the prepayment penalty in this case will be the minimum of prepayment penalty and Gross interest on the premature withdrawal amount. The system computes the interest amount to be liquidated due to 2-3 prepayment of principal. You will not be allowed to specify the interest amount during the Payment input in such a case. Note Here, the system does not include the Acquired interest for processing. Also, if you have chosen the prepayment method as Custom, you cannot prepay or manually liquidate either the interest or the principal component. This option is used where pre-payment has to be applied on the deposit contract for contract remaining days. Main Component Check this box to indicate that the component should be treated as the main interest component. Link Contract as Ratecode Check this box to indicate that a fixed rate contract may be linked to the floating rate component, instead of a rate code. Propagation Required Check this option to indicate that the charge collected from the borrower must be passed on to the participants of the contract. Consider as Discount Check this box to indicate that the fee component should be considered as part of discount accrual. Interest Specify the following details: Rate Type Indicate whether the interest is a Fixed Rate, a Floating Rate or a Special amount. If the Rate Type is a Floating Rate, you should also specify the Rate Code. Rate Code Each Rate Code corresponds to a rate defined for a combination of Currency, Amount (if it is necessary) and an Effective Date. These details are maintained in the ‘Floating Rates Input’ screen. This rate will be applied to all contracts under products linked to the class. Code Usage Specify the method in which the floating rates have to be applied. It could either be automatic application (meaning the rate has to be applied every time it changes), or periodic application (meaning the rate has to be applied at a regular frequency, defined for each contract involving the product linked to this class). Reset Tenor Floating interest rates are defined for specific amount slabs and tenor combinations. If you are defining a floating interest component or a fixed type with rate code attached, you can indicate the reset tenor for which floating rates need to be picked up. The tenor that you specify for the component is defaulted to all contracts with which the floating interest component is associated. Borrow Lend Indicator Indicate the nature of the floating rate that needs to be picked up for the interest component. The options available are: 2-4 Borrow Lend Mid Rate Cycle Type For floating type of interest components and fixed type with rate code attached, you can indicate the manner in which floating rates should be applied. The preference that you specify here is used when an interest component does not fit into any direct parameter defined for the floating rate code. The options available are: Up – Choose this option to indicate that the rate of the upper tenor slab should be used. Down - Choose this option to indicate that the rate of the lower tenor slab should be used. Interpolate - Choose this option to indicate that the rate should be interpolated between the rates of the upper and lower slabs. Round Off - Choose this option to indicate that the tenor of the component should be rounded off to the nearest whole number. The rate defined for the derived tenor will be applied to the component. Margin Application Indicate the frequency of margin application by choosing one of the following options from the drop-down list. Margin Basis Indicate the basis for the interest margin and the method for applying the interest margin on the selected interest component. The available options are: Facility – The system defaults the margin from the borrower facility contract with which the drawdown is linked. Tranche – The system defaults the margin from the borrower tranche contract with which the drawdown is associated. Drawdown – If this option is chosen, you must enter the applicable margin when the interest rate is fixed. – This component which you select is excluded from all the processing including liquidation and this calculation type is only used for margin application. – After defining this component, booked formula for main interest component needs to be modified by replacing INTEREST_RATE with INTEREST_RATE + MARGIN_RATE. By doing this the interest gets calculated based on resolved interest rate (i.e. including floating rate and spread if applicable) and the margin. Customer – If this option is chosen, then the margin will be applicable to all drawdown contracts under the selected customer. Limits Specify the following details: Currency Specify the currency of interest rate application. The adjoining option list displays all valid currency codes maintained in the system. You can choose the appropriate one. Default Rate Specify the default rate that should be applied for on contracts under the products linked to this class. 2-5 Minimum Rate Specify the minimum interest rate that can be applied on contracts under the products linked to this class. Maximum Rate Specify the maximum interest rate that can be applied on contracts under the products linked to this class. Default Spread You are allowed to specify both positive and negative spread as default for the class you are maintaining. The system validates this spread against the maximum and minimum spread you have specified for the currency. Subsequently, the spread will be defaulted to the contract under the products linked to this class. Minimum Spread Specify the minimum spread that can be applied on the rate for the currency. Maximum Spread Specify the maximum spread that can be applied on the rate for the currency. 2.3 Maintaining Interest Class You need to maintain an Interest class specific to the Securities module. For instance, for a Security, you can build an interest class with the attributes of a specific type of coupon, the quarterly coupon paid on the current face value. This section explains how interest classes are built and how attributes are defined for Securities and Derivatives products and contracts. You can define the attributes of an interest class, in the ‘Interest Class Maintenance’ screen, invoked from the Application Browser. You can invoke the ‘Interest Class Maintenance’ screen by typing ‘CFDINTCE’ in the field at the top right corner of the Application tool bar and clicking the adjoining arrow button. 2-6 Before defining the attributes of an interest class, you should assign the class a unique identifier, called the Class Code and briefly describe the class. A description would help you easily identify a class. Module An interest class is built for use in a specific module. This is because; an interest component would be applied on different basis amounts, in different modules. Note Please note that the Basis Amount Tags available would depend on the module for which you build the class. Interest Type While building an Interest Class, you can define two kinds of interest: Primary Interest Coupon Events and the Basis Amount The term Event can be explained with reference to a deal. A deal goes through different stages in its life cycle, such as: Deal Booking Money Settlement of Deal Reversal of Deal Cancellation of Deal Each stage is referred to as an Event in Oracle FLEXCUBE. The event at which you would like to associate the interest component, being defined, to a contract is referred to as the Association Event. The basis on which an interest is calculated is referred to as the Basis Amount. For instance, a coupon can be on the basis of the current face value of a security. When building an interest class, you have to specify the tag associated with the Basis Amount. The attributes defined for an interest class, will default to all products with which you associate the class. When maintaining interest details for a product, you can change these default attributes. Contracts maintained under a product will acquire the attributes defined for the securities product. Accrual Required You can choose to accrue the interests due on a contract. To accrue the interest payable on a contract, choose the ‘Accrual Required’ option. The accrual details that you define for an interest class will default to all products with which you associate the class. When maintaining interest accrual details for a product, you can change these default details. Contracts maintained under a product will acquire the accrual details defined for the product. However, you can define unique accrual details for a contract. Rate Type The interests paid on contracts can be at a Fixed Rate, or on the basis of a Floating Rate. If you indicate that interests should be calculated on the basis of a Floating Rate, you must specify the ‘Periodic’ Floating Rate Type. 2-7 For all contracts maintained under products, associated with a class, the interest will be by default calculated using the specified Rate type. Default Rate Code Interest payable on contracts would be calculated at specific rates. When building an interest component, you have to specify the rate at which the interest should be computed. When associating a rate code (that you have maintained in the Rate Codes Maintenance screen) with the interest component that you are building, the rates corresponding to the code will be used to compute interest. The details defined for an interest class will default to all products with which the class is associated. When maintaining interest details for a product, you can change this default information. Contracts maintained under a product will acquire the interest details defined for the contract product. However, you can define unique interest details specific to a contract. When maintaining a contract, you can choose to waive the rate code altogether or amend the properties of the code to suit the security. If you allow amendment of a rate code, you can specify if you would like to allow rate code amendment after the association event. You can also allow the amendment of the rate value (corresponding to a rate code). Default Tenor Each rate code is associated with a tenor. For instance you have a Rate Code ‘LIBOR’. You can link any number of tenor codes to the same rate code. Tenor Code Description 1W One week rate 2W Two week rate 2M Two months rate 6M Six months rate 1Y One year rate When building an interest component, you can specify a Tenor Code that you would like to associate, with the Floating Interest Rate Code. Interests for contracts (maintained under a product with which you associate the class) will be calculated using the rate corresponding to the Rate Code and the Tenor Code. 2-8 2.3.1 Capturing Interest Limits Click ‘Rate’ button and invoke the ‘Interest Limits’ screen. 2.4 Maintaining Accrual Fee Class You need to define the attributes of an accrual fee class in the ‘Accrual Fee Class Maintenance’ screen, invoked from the Application Browser. You can invoke this screen by typing ‘CFDACFCL’ in the field at the top right corner of the Application tool bar and clicking the adjoining arrow button. Here you can specify the following details: Class Code Specify a unique code to identify the class. Class Description Specify a brief description for the class. 2-9 Module Specify the module to which the class should be applicable. The adjoining option list displays all module codes available in the system. You can choose the appropriate one. Basis Amount Select the basis amount from the adjoining drop-down list: Expected Outstanding Balance Expected Balance Fee Type Select the fee type from the adjoining drop-down list: Income Expense Allow End Date Input Check this box to indicate that the end date for accrual can be entered at the time of entering the fee details for a particular class. Otherwise, the maturity date of the associated contract will get defaulted as the end date for accrual. Accrual Required Check this box to indicate that accrual of fees is required. Consider as Discount Check this box to indicate that the fee component should be considered as part of discount accrual. 2.4.1 Capturing User-Defined Fields You can capture user-defined fields (UDFs) in the ‘User Defined Fields’ screen. Click ‘Fields’ button and invoke the following screen. Here you can specify the following details: Field Name The system displays the UDFs. Value Specify the value for each UDF. 2-10 2.5 Maintaining Charge Class You have to build a charge class, for instance, with the attributes of a specific type of charge, such as ‘Charges for amending the terms of a transaction’, or ‘Charges for provision of services’. To recall, a charge rule is built to calculate a specific type of charge component. Once such a rule is built, you can define attributes like what should be the basis amount on which the charge rule is applied, when the charge should be associated to the contract and when the charge should be calculated and collected. When building a charge class, you define certain attributes such as: The module in which you would use the class The charge type (whether borne by the counterparty or by the bank) The association event The application event The liquidation event The default settlement currency The default charge rule The basis amount on which the charge is calculated You can define the attributes of a charge class in the ‘Charge Class Maintenance’ screen, invoked from the Application Browser. You can invoke this screen by typing ‘CFDCHGCE’ in the field at the top right corner of the Application tool bar and clicking the adjoining arrow button. The following are the features of the Charge Class Maintenance screen. Class Code Before defining the attributes of a charge class, you should assign the class a unique identifier, called the Class Code and briefly describe the class. A description would help you easily identify the class. 2-11 Module A charge class is built for use in a specific module. As a charge component would be applied on different basis amounts, in different modules. In the Letters of Credit module, for instance, you would apply a flat processing charge or fee on all LCs. In the Securities module, you could levy a flat charge or fee on portfolios that you maintain on behalf of a customer. The basis on which the component is applied is different, in these two cases. Note The Basis Amount Tags available would depend on the module for which you build the class. Charge Type Charges can be collected from the counter party or from a third party. You can select one of the following values from the adjoining drop-down list: Counter Party – This indicates that the customer is captured as part of the contract. Third Party – This indicates that the charges are levied on another entity on behalf of customer (Eg: Custodian) Their Charges – This indicates that your bank is collecting other bank’s charges as in the case of LC and BC contracts. The charges or fee that you levy will be recovered, typically, from the counterparty involved. Therefore, when building a charge class, you may indicate the charge to be of ‘Counterparty’ type. Third Party Type If a charge component that you associate with a product is of ‘third party’ type, specify the party type. Debit /Credit Choose the Debit option in this field, if the charge component associated with the product is to be debited to the customer. If you would bear the charge component, choose the ‘Credit’ option. The following example illustrates how a charge could be of a ‘Credit’ type. Propagation Required Check this option to indicate that the charge collected from the borrower must be passed on to the participants of the contract. Net Consideration The sum of the different components of a contract determines the net value of the contract. You can indicate that a charge component should be taken into account when determining the net value of a contract by choosing the Net Consideration option. Note The Net Consideration option is applicable if you are defining a charge class for Securities module. Add/Subtract If you choose to include the charge component in the net value, you should indicate if the charge component is to be added, while calculating the net consideration amount, or subtracted. 2-12 SWIFT Qualifier You can report the charge component of a contract in the SWIFT messages that you generate. To do this, identify the component, when building it in the ‘Charge Class Maintenance’ screen, with the appropriate SWIFT code. 2.5.1 Events A contract goes through different stages in its life cycle, such as: Initiation Amendment Rollover Each of these stages is referred to as an ‘Event’ in Oracle FLEXCUBE. At any of these events, you can choose to apply a charge or fee. When defining a charge class, you should specify: The association event The application event Liquidation event The event at which you would like to associate a charge component to a contract is referred to as the Association Event. At this event, no accounting entry (for the charge component) is passed. The event at which the charge component is actually calculated is referred to as the Application Event. At this event, no accounting entry (for the charge component) is passed. The charge or fee is liquidated at the Liquidation event that you specify. If the event chosen for the liquidation of the charge component at the charge class and the event chosen for liquidating the same charge component at the ‘Product Events and Accounting Entries’ screen are different, the charge will not be liquidated and accounting entries will not be posted. In FX, FT and SI modules, the concept of association, application and liquidation events is not applicable. The charge component is liquidated at the event chosen in the product. Hence, charge class for these three modules are defined under Old Charge Class (The Old Charge Class is found under product class. The charge classes for FX, FT and SI have to be defined under this.). The charge components are linked to three different events. This mapping gives you the option to change the charge amount before it is liquidated. Basis Amount Tag The basis on which interest, charge, fee, or tax is calculated is referred to as the Basis Amount. (A charge or fee can be on the basis of the contract amount, for instance.) The different basis amounts, available in a module, are associated with a unique ‘tag’. When building a charge component, you have to specify the tag associated with the Basis Amount. When charge or fee is calculated for a contract, the basis amount corresponding to the tag will be picked up automatically. Basis amount refers to: Principal amount or commitment Transaction amount in the case of a teller entry Transfer amount in case of a Remittance SI Amount in case of Standing Instruction 2-13 LC amount in the case of a Letter of Credit Bill amount in the case of a Bill Buy/Sell amount in the case of an FX deal Deal Nominal amount for a Security Deal Default Charge Rule You can link a charge rule that you have defined to the charge component that you are building. When you link a rule to a component, the attributes that you have defined for the rule will default to the component. To recall, a charge rule identifies the method in which charge or fee of a particular type is to be calculated. A rule is built with, amongst others, the following attributes: The charge currency Whether the charge or fee is to be a flat amount or calculated on a rate basis The minimum and maximum charge that can be applied The tier or slab structure on which the charge is to be applied The customer and currency restrictions, etc. The charge component to which you link a rule acquires these properties. Charges for the product with which you associate a charge component will be calculated, by default, according to the rule linked to the component. However, when processing a contract, you can choose to waive the rule altogether. When building a charge class, you can choose to allow the amendment of the rule linked to it, in the following conditions: You can choose to allow amendment after the association event You can choose to allow amendment after the application event You can choose to allow amendment of the charge amount Default Settlement Currency Charges or fees levied on a contract will be settled in the Settlement Currency that you specify for the charge class associated with the product (under which the contract is processed). However, when processing a contract, you can choose to settle the charge in another currency. The charge currency defined for the rule is used only for booking charges. The actual settlement is done in the default settlement currency' maintained for the charge class. The final charge is computed based on preferences defined in the charge rule set-up. The amount is converted to the settlement currency in case the charge currency is different from the contract currency. Note – For the liquidation of charge components with a charge currency not equal to the contract currency during discounting, the charge amount is calculated in the contract currency based on the exchange rate between the settlement currency and the contract currency as on the discounting date. The charge amount in contract currency is used for accounting. – If the charge currency is different from the contract currency and the contract currency is same as the settlement account currency, the exchange rate maintained for the settlement account through the ‘Settlement Message Details – Account Details’ screen is used to convert the charge amount into the contract currency amount. 2-14 When you associate a charge component with a product, you can choose to allow the amendment of the rule linked to it, under the following conditions: Allow Rule Amendments If you would like to allow the amendment of a rule for a charge component when linked to a contract, check this box. Amend after Association If you would like to allow the amendment after association of a rule for a charge component, check this box. Once checked the system will allow you to modify the rule after the association event is triggered for the linked contract. Allow Amount Amendment If you would like to allow amendment of the charge amount calculated by the system as per the charge rule, check this box. Amend After Application If you would like to allow the amendment of the charge amount after application of a rule for a charge component, check this box. Once checked the system will allow you to modify the charge amount after the application event is triggered for the linked contract. Default Waiver Check this box to indicate that even if charge is computed, it should not be liquidated. Capitalize You can capitalize the payment of charges and fees. If the charge is not paid on a scheduled date, the outstanding charge amount will be added to the outstanding principal and this becomes the principal for the next schedule. If a partial payment has been made, the unpaid amount will be capitalized (the unpaid charge is added to the unpaid principal and this becomes the principal for the next schedule). Note If the ‘Capitalize’ option is not checked for the broker, deal, product and currency combination, then the option ‘Consider as discount’ cannot be checked for the securities module. Consider as Discount While defining a charge class for either the securities or the bills module, you can indicate whether the charge component is to be considered for discount accrual on a constant yield basis. If you select this option the charge received against the component is used in the computation of the constant yield and subsequently amortized over the tenor of the associated contract. Checking this option also indicates that the component is to be used for IRR calculation. Note IRR, the Internal Rate of Return is the annualized effective compounded return rate which can be earned on the invested capital, i.e. the yield on the investment. Accrual Required Checking this indicates that the charges have to be accrued. Subsequently, the charges are accrued using the upfront fee system. 2-15 Note This option is disabled for BC contracts. Discount Basis While defining a charge class for the bills module, you can define the discount basis for the purpose of IRR computation. You can choose either of the following as discount basis: Inflow – If you choose Inflow, the charge will be considered as an inflow for IRR computation Outflow – If you choose Outflow, the charge will be treated as an outflow for IRR computation You can define discount basis only if the ‘Consider as Discount’ option is enabled. If you have not opted for ‘Consider as Discount’, the Discount Basis field will be disabled. If the ‘Consider as Discount’ option is enabled Discount basis has to be defined. On enabling the ‘Consider as Discount’, the default value of Discount Basis will be ‘Inflow’ and you will have to change it to ‘Outflow’ if required. 2.6 Maintaining Old Charges Class You have to define a charge class for transactions in FT, FX and SI modules using the ‘Charge Class Maintenance’ screen, invoked from the Application Browser. You can invoke this screen by typing ‘CFDOCHCL’ in the field at the top right corner of the Application tool bar and clicking the adjoining arrow button. Here you can specify the following details: Class Details Indicate the following basic details. Class Code Specify a unique code to identify the class. 2-16 Class Description Specify a brief description for the class. Module Specify the module to which the class should be applicable. The adjoining option list displays all module codes available in the system. You can choose the appropriate one. Class Preferences Specify the following class preferences: Rule Identification Specify the rule that should be linked to the class. The adjoining option list displays all valid rules maintained in the system. You can choose the appropriate one. Description The system displays the description based on the rule chosen. Component Description Define a component here for the rule. Based on this component, six corresponding accounting roles will be generated by the system. Amount Type Specify the basis amount type for collection of charge. The adjoining option list displays all valid basis amount types available in the system. You can choose the appropriate one. Settlement Currency Specify the currency for collection of the charge. The adjoining option list displays all valid currency codes maintained in the system. You can choose the appropriate one. Stop Application Check this box to indicate that collection should stop for the charge component. Category Select ‘Normal’ as the category of the basis amount on which charge should be collected. Event Specify the event at which collection of the charge should be triggered, The adjoining option list displays all events available in the system for the module specified. You can choose the appropriate one. Advice Charge Check this box to indicate that charge should be collected for dispatching the customer advice. 2-17 2.6.1 Capturing User-Defined Fields You can capture user-defined fields (UDFs) in the ‘User Defined Fields’ screen. Click ‘Fields’ button and invoke the following screen. Here you can specify the following details: Field Name The system displays the UDFs. Value Specify the value for each UDF. 2.7 Maintaining Tax Class You can define the attributes of a transaction level tax under the corresponding section of the ‘Tax Class Maintenance’ screen. You can invoke this screen by typing ‘TADTAXCL’ in the field at the top right corner of the Application tool bar and clicking the adjoining arrow button. 2-18 Before defining the attributes of a Transaction Tax Class, assign the class a unique identifier, called the Class Code, and briefly describe the class. A description would help easily identify a class. Module A tax class is built for use in a specific module. This is because the basis amounts on which the tax is applied could vary with the modules. In the Foreign Exchange module, for instance, you might want to levy tax on the brokerage paid. In the Securities module, you might have to pay a tax on the value of a security that you purchase. The basis on which the tax component is calculated is different in these two cases. Note The Basis Amount Tags available, in this screen, would depend on the module for which you build the class. Tax The type of tax indicates who bears the tax, whether the bank or the customer. Withholding Withholding type tax is borne by the beneficiary on an income (either the bank or the customer). For example, the tax on the brokerage paid would be borne by the broker. You withhold this component in a Tax Payable account, by debiting the customer account (since brokers are defined as Customers in Oracle FLEXCUBE) and later paying the tax to the government on behalf of the broker. Expense Type If you choose to bear the tax that is payable on brokerage, you would define it as an expense type of tax. The tax entries, in this case, would be posted to an Expense account. If you bear the tax, there could either be an immediate cash Outflow or payment, or a mere crediting of it to a Tax Payable account. In the latter case, there would not be an immediate Outflow. The tax would be paid at a later date, from the Tax Payable account. The Net Consideration The sum of the different components of a contract determines the net value of the contract. To indicate that a transaction level tax component should be taken into account when determining the net value of a contract, choose the Net Consideration option. If you choose to include the tax component in the net value of the contract, you should also indicate if the tax component is to be added or subtracted, while calculating the net consideration amount. Defining the Events and the Basis Amount Each contract that your bank enters into goes through different stages, each of which is referred to as an Event in Oracle FLEXCUBE. A securities deal, for instance, goes through different stages in its life cycle, such as: Deal Booking Money Settlement of Securities Deal Settlement of Securities Deal Reversal of Securities Deal Cancellation of Securities Deal Each of these stages is referred to as an Event in Oracle FLEXCUBE. 2-19 The following are examples of the events for a portfolio that you maintain: Booking of Contingent Asset Accrual of Discount Earned Accrual of Interest Earned Forward Profit and Loss Accrual At any of these events, you can choose to apply a tax. The event at which you would like to associate a tax component, is referred to as the Association Event. At this event, no accounting entry (for the tax component) is passed. The event at which the tax component is actually computed is referred to as the Application Event. The tax is liquidated at the Liquidation Event. The basis on which a tax is calculated is referred to as the Basis Amount. A tax can be on the basis of the principal, the brokerage paid and so on. When building a tax class, you have to specify the tag associated with the Basis Amount. Choosing the Default Tax Rule A tax rule can be linked to the tax component that you are building. When you link a rule to a component, the attributes that you have defined for the rule, will default to the component. A tax rule identifies the method in which tax, is to be calculated. A rule is built with attributes such as the following: The tax currency Whether the tax is to be a flat amount or calculated on a rate basis The minimum and maximum tax that can be applied The tier or slab structure on which the tax is to be applied The currency restrictions, etc. The tax component to which you link a rule acquires ITS properties. Tax for the contracts with which you associate a tax component will, by default, be calculated according to the rule linked to the component. However, when processing a contract, you can choose to waive the rule. When building a tax class, you can choose to allow the amendment of the rule linked to it, under the following conditions: You can choose to allow amendment after the association event You can choose to allow amendment after the application event You can choose to allow amendment of the tax amount Including a Component in SWIFT Messages To report a component of a contract in the SWIFT messages that you generate, identify the component with the appropriate SWIFT code. You can identify a tax component with its SWIFT code when building the component. 2.7.1 Defining Issuer Taxes as Classes An issuer tax can be levied on the coupon paid, or on a cash dividend. The issuer of a security determines the tax. To process the tax levied on a security, you have to maintain Issuer Tax classes. An Issuer Tax class can be maintained in its corresponding section of the Tax Class Maintenance screen invoked from the Application Browser. 2-20 Note Please note that it is not necessary to associate tax rules to an Issuer Tax class. For an Issuer Tax component, you only have to furnish the following details: – The Association Event – The Basis Amount – The Rate Code – Other operational controls A security goes through different stages in its life cycle, such as: Booking Interest Accrual Liquidation, etc. Each stage is referred to as an Event, in Oracle FLEXCUBE. When defining an Issuer Tax class, you should specify the following: The Association Event Basis Amount The event at which you would like to associate a tax component to a security is referred to as the Association Event. The basis on which interest, charge or tax is calculated or levied is referred to as the Basis Amount. (An Issuer Tax can be on the basis of the coupon paid, or on a cash dividend.) The different basis amounts available in the Securities module are associated with a unique ‘tag’. When building a tax component, you have to specify the tag associated with the Basis Amount. When tax is calculated for a security, the basis amount corresponding to the tag will be picked up automatically. 2-21 2.8 Maintaining Adhoc Fee Class You can define the attributes of an adhoc fee class in the ‘Adhoc Charges’ screen, invoked from the Application Browser. You can invoke this screen by typing ‘CFDADFEE’ in the field at the top right corner of the Application tool bar and clicking the adjoining arrow button. Here you can maintain the following details. Class Code Specify a unique identifier for the class. Description Specify a description for the class code. Report Module Specify the module to which the class should be applicable. The adjoining option list displays all module codes available in the system. You can choose the appropriate one. Module Description The system displays a brief description of the chosen module. Participation Propagation Check this box to indicate that the charge collected should be propagated to all participants of the transaction. 2.9 Maintaining Branch Currency Restriction Class You can define the attributes of a branch and currency restriction class in the ‘Branch Currency Restrictions Class Maintenance’ screen, invoked from the Application Browser. You 2-22 can invoke this screen by typing ‘CSDCBRCL’ in the field at the top right corner of the Application tool bar and clicking the adjoining arrow button. Here you can specify the following details: Class Code Specify a unique code to identify the class. Class Description Specify a brief description for the class. Module Specify the module to which the class should be applicable. The adjoining option list displays all module codes available in the system. You can choose the appropriate one. Module Description The system displays a brief description of the chosen module. Branch Restrictions Indicate whether you want to create a list of allowed branches or disallowed branches by choosing one of the following options: Allowed Disallowed Currency Restrictions Indicate whether you want to create a list of allowed currencies or disallowed currencies by choosing one of the following options: Allowed Disallowed 2-23 Branch Restrictions Specify the following details: Branch Code Specify the branch that should be included in the allowed or disallowed list. The adjoining option list displays all branch codes available in the system. You can choose the appropriate one. Description The system displays a brief description of the branch code. You can choose multiple branches. Currency Restrictions Specify the following details: Currency Code Specify the currency that should be included in the allowed or disallowed list. The adjoining option list displays all currency codes available in the system. You can choose the appropriate one. Description The system displays a brief description of the currency code. You can choose multiple currencies. 2.10 Maintaining Customer Restriction Class You can define the attributes of a customer category and customer restriction class in the ‘Branch Currency Restrictions Class Maintenance’ screen, invoked from the Application 2-24 Browser. You can invoke this screen by typing ‘CSDCUCCL’ in the field at the top right corner of the Application tool bar and clicking the adjoining arrow button. Here you can specify the following details: Module Specify the module to which the class should be applicable. The adjoining option list displays all module codes available in the system. You can choose the appropriate one. Module Description The system displays a brief description of the chosen module. Class Code Specify a unique code to identify the class. Class Description Specify a brief description for the class. Restriction Type Indicate whether you want to create a list of allowed customers or disallowed customers by choosing one of the following options: Allowed Disallowed 2-25 Customer Categories Specify the following details: Code Specify the customer category code that should be included in the allowed or disallowed list. The adjoining option list displays all customer category codes available in the system. You can choose the appropriate one. Description The system displays a brief description of the branch code. You can choose multiple customer categories. Customer Access Class You can exclude certain customers belonging to the allowed/disallowed category from being part of the list. Customer ID Specify the customer ID that you want to exclude from the allowed/disallowed list. The adjoining option list displays all customer identification number (CIF) available in the system. You can choose the appropriate one. Category The system displays the category to which the customer belongs. Customer Name The system displays the name of the customer. Restriction Type If you have maintained an allowed list, choose the option ‘Disallowed’ and vice-versa. 2.11 Maintaining Discount Accrual Class A discount accrual fee class specifies the accrual parameters for interest, charges and fees. Before defining the attributes of a discount accrual fee class, you should assign the class a unique identifier, called the Class Code and briefly describe the class. A description would help you easily identify the class. When building a discount accrual fee class, you define certain attributes such as: Whether Discount accrual should be performed for the class. The frequency at which discount accrual should be performed. This can be either Daily or Monthly. For monthly accruals, the discount accrual will be done on the last day of the month. How foreclosures in respect of the contracts using the class, must be handled. You can opt for complete accruals, or refund. The day count methods for each currency using the class. You can define the day count methods for both the numerator and the denominator. 2-26 You can define the attributes of a discount accrual fee class in the ‘Discount Accrual Class Maintenance’ screen. You can invoke this screen by typing ‘DADACRCL’ in the field at the top right corner of the Application tool bar and clicking the adjoining arrow button. You can specify the following details. Class Code Specify a unique code to identify the class. Class Description Specify a brief description for the class. Module Specify the module to which the class should be applicable. The adjoining option list displays all module codes available in the system. You can choose the appropriate one. Module Description The system displays a brief description of the chosen module. Accrual Preference Specify the following details: Discount Accrual Required Check this box to indicate that discount accrual is required. Accrual Frequency If you check the box ‘Accrual Required’, you will have to select the accrual frequency from the adjoining drop-down list: 2-27 Daily Weekly Monthly Half-Yearly Annual Handling of Foreclosure Select the method of handling foreclosure from the adjoining drop-down list: Complete Accrual Refund Acquisition Type The Acquisition Type is determined by the cash flows of Interest, charges and fees for which 'Consider as Discount' option is checked. The drop down list comprises of the following values: Par Par/Discount Par/Premium Par/Discount/Premium If the incoming cash flows of all the above components are greater than outgoing cash flows considering Incoming flow as Positive (In case of Loans) then acquisition type is considered as Discount. If the incoming cash flows of all the above components are less than outgoing cash flows considering Incoming flow as Positive (In case of Loan) then acquisition type is considered as Premium. If the incoming cash flows of all the above components are equal to outgoing cash flows considering Incoming flow as Positive (In case of Loan) then acquisition type is considered as Par. Class Currency Preference Specify the following details: Currency Specify the currency code. The adjoining option list displays all currency codes available in the system. You can choose the appropriate one. Currency Name The system displays the name of the currency. Numerator Method Specify the numerator method. Denominator Method Specify the denominator method. You can maintain multiple currency codes. 2-28 2.12 Maintaining Events Class You can build a charge class, for instance, with the attributes of a specific type of charge, such as Charges for provision of services. Similarly, you can build an event class with the attributes of a specific type of events, such as a Booking a Transaction, Collecting Charges, Cancellation and so on. You can identify an Events Class with a unique Code and Description. When you define an Events Class, you choose, first of all, the set of events that would belong to the class. Events are, typically, unique to a module. You can build the events that you would like to include in an Events Class in the ‘Events Class Maintenance’ screen. You can invoke this screen by typing ‘CSDACTCL’ in the field at the top right corner of the Application tool bar and clicking on the adjoining arrow button. Here you can specify the following details: Module Specify the module to which the class should be applicable. The adjoining option list displays all module codes available in the system. You can choose the appropriate one. Based on the module chose, the corresponding events will be available for selection. Module Description The system displays a brief description of the chosen module. Class Code Specify a unique code to identify the class. Class Description Specify a brief description for the class. Event Class You can specify the following details. 2-29 2.12.1 Capturing Accounting Entries For every event constituting the class that you are building, you have to specify the accounting entries that should be passed (if any), and the advices that should be generated. You can do this through the ‘Accounting Entries’ screen. The system displays the following details from the main screen: Class Code Class Description Event Code Event Description You can specify the following accounting details: Accounting Role Amount Tag Transaction Code Netting Indicator MIS Head 2-30 2.12.2 Capturing Advices At an event, you can opt to generate an advice if the accounting entry involves a customer account. Click ‘Advices’ button to define the advices that should be generated for an event. The system displays the following details from the main screen: Class Code Class Description Event Code Event Description Event Advice Class You need to specify the following details: Advice Name Specify the advices that you would like to generate. The adjoining option list displays all advices that can be generated at an event. You can choose the appropriate one. Description The system displays a brief description of the advice. Generation Time Specify the time of generation. Suppress Select this option to suppress this message. Priority You can indicate the order of importance in the Priority field. 2-31 2.12.3 Capturing User-Defined Fields You can capture user-defined fields (UDFs) in the ‘User Defined Fields’ screen. Click ‘Fields’ button and invoke the following screen. Here you can specify the following details: Field Name Specify the UDF that should be linked to the class. The adjoining option list displays all valid UDFs maintained in the system. You can choose the appropriate one. Value Specify the value for each UDF. You can maintain multiple UDFs. 2.12.4 Maintaining Event Class for Account Initial Funding You can create an event class to define accounting entries that should be posted for initial funding on a customer account. Similarly, you can also define accounting entries for charges 2-32 that should be collected on account opening. For this, you need to invoke the ‘Events Class Maintenance’ screen. Specify the following values. Class Code Specify a unique identifier for the class code. Description Give a brief description to identify the class code. Module Specify ‘DE’ as the module code for the event class. Module Description The system displays the description as ‘Data Entry’ on specifying ‘DE’ as the module. Event Class Specify the following events. Event Code Specify ‘INIT’. 2-33 Click ‘Accounting Entries’ button and invoke the following screen. You need to maintain the following accounting entries. Accounting Role Amount Tag Dr/Cr Description OFS_ACC TXN_AMT Debit Offset Account OFS_ACC_USER TXN_AMT Credit Customer Account CHARGEINC CHG-AMT Credit Charge Income OFS_ACC_USER CHG-AMT Debit Customer Account. Click ‘Advices’ button and invoke the following screen. You need to associate the message ‘ACC_OPADV’ to the event ‘INIT’. Refer the section’ Maintaining Message Type for Account Opening’ in the chapter titled ‘Maintaining Messaging Branch Preferences’ in the Messaging System User Manual for details about maintaining messages. 2-34 2.13 Maintaining Role to Head Mapping Class You can build a role to head mapping class in the ‘Role to Head Mapping Class Maintenance’ screen. You can invoke this screen by typing ‘CSDRHCLM’ in the field at the top right corner of the Application tool bar and clicking on the adjoining arrow button. Here you can specify the following details: Class Code Specify a unique code to identify the class. Class Description Specify a brief description for the class. Module Specify the module to which the class should be applicable. The adjoining option list displays all module codes available in the system. You can choose the appropriate one. Module Description The system displays a brief description of the chosen module. Role to Head Mapping Specify the following details: Accounting Role Specify an Accounting Role. The adjoining option list displays all roles available in the system. You can select the appropriate one by double clicking on it. Next, in the Account Head column, select an accounting head from the adjoining option list. Accounting Role Description A brief description of each accounting role that you choose is displayed. Account Head If you choose not to associate the product with a class, you have to specify the account heads for the product, in this field. You can invoke a list of the accounting heads that you have 2-35 maintained from the option list positioned next to this field. Choose a head by double clicking on it. Accounting Head Description A brief description of each accounting head that you choose is displayed. 2.13.1 Capturing User-Defined Fields You can capture user-defined fields (UDFs) in the ‘User Defined Fields’ screen. Click ‘Fields’ button and invoke the following screen. Here you can specify the following details: Field Name The system displays the UDFs. Value Specify the value for each UDF. 2-36 2.13.2 Maintaining a Class for Account Opening Charge You can create a class to define role to head mapping for levying charges on account opening. For this, you need to invoke the ‘Role to Head Mapping Class Maintenance’ screen. Specify the following values. Class Code Specify a unique identifier for the class code. Description Give a brief description to identify the class code. Module Specify ‘DE’ as the module code for the event class. Module Description The system displays the description as ‘Data Entry’ on specifying ‘DE’ as the module. Role To Head Mapping Maintain the following details. Accounting Role Specify the role available for charge income. Accounting Head Specify an accounting head (GL) that should be used for recovering account opening charge. 2-37 3. Function ID Glossary CSDCUCCL .............................2-25 CSDRHCLM .............................2-35 C CFDACFCL ................................ 2-9 CFDADFEE .............................. 2-22 CFDCHGCE ............................. 2-11 CFDINCLS ................................. 2-2 CFDINTCE ..................................2-6 CFDOCHCL ............................. 2-16 CSDACTCL .............................. 2-29 CSDCBRCL ............................. 2-23 D DADACRCL ..............................2-27 T TADTAXCL ...............................2-18 3-1


![[December] [2010] Oracle Part Number E51712-01](http://vs1.manualzilla.com/store/data/005705420_1-4b383e67b8ec6628c44005398bb7935f-150x150.png)