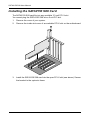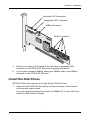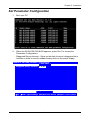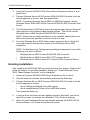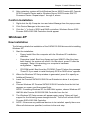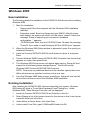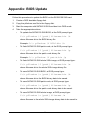
1
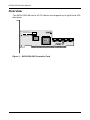
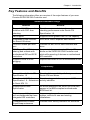
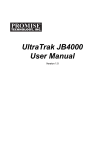
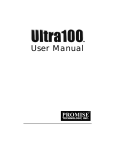
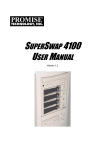
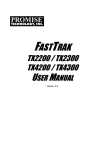
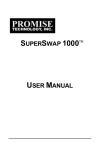
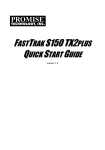
SATAII150 SX8
USER MANUAL
Version 1.7
SATAII150 SX8 User Manual
Copyright
© 2005 Promise Technology, Inc. All Rights Reserved.
Copyright by Promise Technology, Inc. (Promise Technology). No part of this
manual may be reproduced or transmitted in any form without the expressed,
written permission of Promise Technology.
Trademarks
Promise, and the Promise logo are registered in U.S. Patent and Trademark
Office. All other product names mentioned herein may be trademarks or
registered trademarks of their respective companies.
Important data protection information
You should back up all data before installing any drive controller or storage
peripheral. Promise Technology is not responsible for any loss of data resulting
from the use, disuse or misuse of this or any other Promise Technology product.
Notice
Although Promise Technology has attempted to ensure the accuracy of the
content of this manual, it is possible that this document may contain technical
inaccuracies, typographical, or other errors. Promise Technology assumes no
liability for any error in this publication, and for damages, whether direct, indirect,
incidental, consequential or otherwise, that may result from such error, including,
but not limited to loss of data or profits.
Promise Technology provides this publication “as is” without warranty of any kind,
either express or implied, including, but not limited to implied warranties of
merchantability or fitness for a particular purpose.
The published information in the manual is subject to change without notice.
Promise Technology reserves the right to make changes in the product design,
layout, and driver revisions without notification to its users.
This version of the User Manual supersedes all previous versions.
Recommendations
The appearance in this manual of products made by other companies, including,
but not limited to software, servers and disk drives, is for the purpose of
illustration and explanation only. Promise Technology does not recommend,
endorse, prefer or support any product made by another manufacturer.
ii
Contents
Chapter 1: Introduction . . . . . . . . . . . . . . . . . . . . . . . . . . . . . . . . . . . . . . . . . . . 1
About This Manual . . . . . . . . . . . . . . . . . . . . . . . . . . . . . . . . . . . . . . . . . . . . . . . . 1
Overview . . . . . . . . . . . . . . . . . . . . . . . . . . . . . . . . . . . . . . . . . . . . . . . . . . . . . . . 2
Key Features and Benefits . . . . . . . . . . . . . . . . . . . . . . . . . . . . . . . . . . . . . . . . . . 3
Specifications . . . . . . . . . . . . . . . . . . . . . . . . . . . . . . . . . . . . . . . . . . . . . . . . . . . . 4
Chapter 2: Installation . . . . . . . . . . . . . . . . . . . . . . . . . . . . . . . . . . . . . . . . . . . . 5
Unpack your SATAII150 SX8 . . . . . . . . . . . . . . . . . . . . . . . . . . . . . . . . . . . . . . . . 5
Installing the SATAII150 SX8 Card . . . . . . . . . . . . . . . . . . . . . . . . . . . . . . . . . . . 6
Install the Disk Drives . . . . . . . . . . . . . . . . . . . . . . . . . . . . . . . . . . . . . . . . . . . . . . 7
Set Parameter Configuration . . . . . . . . . . . . . . . . . . . . . . . . . . . . . . . . . . . . . . . . 9
Chapter 3: Install Software Drivers . . . . . . . . . . . . . . . . . . . . . . . . . . . . . . . . . 11
Windows Server 2003
New Installation . . . . . . . . . . . . . . . . . . . . . . . . . . . . . . . . . . . . . . . . . . . . . . 11
Existing Installation . . . . . . . . . . . . . . . . . . . . . . . . . . . . . . . . . . . . . . . . . . . 12
Confirm Installation . . . . . . . . . . . . . . . . . . . . . . . . . . . . . . . . . . . . . . . . . . . 13
Windows XP
New Installation . . . . . . . . . . . . . . . . . . . . . . . . . . . . . . . . . . . . . . . . . . . . . . 13
Existing Installation . . . . . . . . . . . . . . . . . . . . . . . . . . . . . . . . . . . . . . . . . . . 14
Confirm Installation . . . . . . . . . . . . . . . . . . . . . . . . . . . . . . . . . . . . . . . . . . . 14
Windows 2000
New Installation . . . . . . . . . . . . . . . . . . . . . . . . . . . . . . . . . . . . . . . . . . . . . . 15
Existing Installation . . . . . . . . . . . . . . . . . . . . . . . . . . . . . . . . . . . . . . . . . . . 15
Confirm Installation . . . . . . . . . . . . . . . . . . . . . . . . . . . . . . . . . . . . . . . . . . . 16
Additional Drivers, Updated Drivers . . . . . . . . . . . . . . . . . . . . . . . . . . . . . . . . . . 16
Chapter 4: Troubleshooting . . . . . . . . . . . . . . . . . . . . . . . . . . . . . . . . . . . . . . 17
Frequently Asked Questions . . . . . . . . . . . . . . . . . . . . . . . . . . . . . . . . . . . . . . . 17
Contact Technical Support . . . . . . . . . . . . . . . . . . . . . . . . . . . . . . . . . . . . . . . . . 18
Limited Warranty . . . . . . . . . . . . . . . . . . . . . . . . . . . . . . . . . . . . . . . . . . . . . . . . 20
Return Product For Repair . . . . . . . . . . . . . . . . . . . . . . . . . . . . . . . . . . . . . . . . . 21
Appendix: BIOS Update . . . . . . . . . . . . . . . . . . . . . . . . . . . . . . . . . . . . . . . . . . 23
iii
SATAII150 SX8 User Manual
iv
Chapter 1: Introduction
•
About This Manual, below
•
Overview, page 6
•
Key Features and Benefits, page 7
•
Specifications, page 8
Thank you for purchasing Promise Technology’s SATAII150 SX8 PCI-X Serial
ATA Host Bus Adapter card.
About This Manual
This User Manual describes how to setup, use and maintain the SATAII150 SX8
Serial ATA HBA card.
This manual includes a full table of contents, chapter task lists and crossreferences to help you find the specific information you are looking for.
Also included are four levels of notices:
Note
A Note provides helpful information such as hints or alternative
ways of doing a task.
Important
An Important calls attention to an essential step or point required
to complete a task. Important items include things often missed.
Caution
A Caution informs you of possible equipment damage or loss of
data and how to avoid them.
Warning
A Warning notifies you of probable equipment damage or loss of
data, or the possibility of physical injury, and how to avoid them.
1
SATAII150 SX8 User Manual
Overview
The SATAII150 SX8 card is a PCI-X device and supports up to eight Serial ATA
disk drives.
Figure 1. SATAII150-SX8 Controller Card
2
Chapter 1: Introduction
Key Features and Benefits
The following information offers an overview of the major features of your new
Promise SATAII150 SX8 Controller card.
Advanced Hardware Design
Features
Benefits
Supports 150 MB/s per drive
transfers with CRC error
checking
Provides maximum data transfer and error
checking performance under Serial ATA
Specification 1.0.
LBA support
Supports drives greater than 137 GB capacity.
Independent data channels
for Serial ATA drives
Each drive uses a separate data channel.
One LED header per drive
port
Provides for an LED for each individual disk
drive.
PCI Plug-n-Play, PCI Interrupt
sharing and coexists with
motherboard IDE and SCSI
controllers
Easy to install; supports up to 8 Serial ATA
drives on the SATAII150 SX8 Controller card
while still supporting 4 devices on motherboard
ATA controller.
Supports Serial ATA hot
plugging
Reports disk drives to OS as removeable drives.
Compatibility
Features
Compatible with Serial ATA
Specification 1.0
Benefits
Provides full compatibility with first generation
Serial ATA hard drives.
Complies with SATA II
Provides staggered drive spinup and HDD
Specification 1.0 – Extensions activity indication.
to Serial ATA 1.0
Supports BIOS Boot
Specification
All drives attached to the SATAII150-SX8 card
appear in the BBS-compliant motherboards
BIOS boot list.
Tested compatibility to coexist Improves system performance and minimizes
with motherboards that have system conflicts for new and existing
integrated IDE controllers
installations.
Compatible with Promise
SuperSwap enclosures
Provides HDD activity indication for enclosure.
3
SATAII150 SX8 User Manual
Specifications
•
Low-profile printed circuit board
•
Supports PCI-X 66, 100 and 133 MHz
•
Controller card dimensions (excluding bracket):
2.28 x 7.48 x 0.51 inches (58 x 190 x 13 mm)
•
Operating Temperature range 32° to 122°F (0°C to 50°C)
•
Relative Humidity range 5% to 95% (non-condensing)
•
Certifications: CE, FCC Class B, BSMI, C-tick, UL, cUL, MIC, VCCI
4
Chapter 2: Installation
•
Unpack your SATAII150 SX8 (below)
•
Install the SATAII150 SX8 card (page 6)
•
Install the disk drives (page 7)
•
Set Parameter Configuration (page 9)
Unpack your SATAII150 SX8
The SATAII150 SX8 box contains the following items:
•
SATAII150 SX8 Host Bus Adapter
Card
•
Diskette with Drivers for Windows
Server 2003, XP and 2000
•
(8) 65-cm [25-inch] Serial ATA
Cables
•
CD with all Drivers and User
Manual in PDF format
•
(1) Low-profile Bracket
•
Quick Start Guide
Warning
SATAII150 SX8, like other parts of your system, is subject to
damage by static electricity. Be sure that you are properly
grounded (Promise recommends that you wear an anti-static strap
or touch a grounded object) and that you unplug your system
before installing SATAII150 SX8 or handling its components.
Important
If you wish to include your current bootable Serial ATA drive using
the Windows 2000, XP or Server 2003 operating system on your
SATAII150 SX8 card, do NOT connect the disk drive to the card
yet.
You MUST install the Windows 2000, XP or Server 2003 driver
software first onto this drive while it is still attached to your existing
hard drive controller.
5
SATAII150 SX8 User Manual
Installing the SATAII150 SX8 Card
The SATAII150 SX8 card fits into any available 3.3-volt PCI-X slot.
You cannot plug the SATAII150 SX8 into a 5-volt PCI slot.
1.
Remove the cover of your system.
2.
Remove the inside slot cover of an available PCI-X slot on the motherboard.
3.
Install the SATAII150 SX8 card into the open PCI-X slot (see above). Secure
the bracket to the system’s frame.
6
Chapter 2: Installation
Individual LED Connectors
Aggregate LED Connectors
SMBus Connector
SATA Connectors
4.
Attach your system’s LED cables to the individual or aggregate LED
connectors on the SATAII150 SX8 card as appropriate (above).
5.
If your system supports SMBus, attach your SMBus cable to the SMBus
connector on the SATAII150 SX8 card.
Install the Disk Drives
SATAII150 SX8 card supports up to eight Serial ATA disk drives.
1.
Install all of the Serial ATA disk drives into the drive bays of your system,
including their power cables.
If you are using SuperSwap Enclosures, the SMBus ID of each HDD must
match the HDD Channel number.
7
SATAII150 SX8 User Manual
2.
Attach one Serial ATA data cable to each disk drive. Then attach the other
end of the cable to a Serial ATA port on the SATAII150 SX8 card. All of the
connectors are keyed so they will only attach one way.
SATAII150 SX8 Card
Port 7
Port 5
Port 3
Port 1
Port 8
Port 6
Port 4
Port 2
There are eight ports or channel connectors on the SATAII150 SX8 card.
The figure above shows how they are numbered.
3.
Close your PC when you are finished.
8
Chapter 2: Installation
Set Parameter Configuration
1.
Boot your PC.
2.
When the SATAII150 SX8 BIOS appears, press Ctrl-F to access the
Parameter Configuration.
Staggered Spinup Interval – Spins up the disk drives at a staggered time
intervals in order to avoid a sudden heavy drain on the power supply.
SATAII150 SX8 SROM parameter configuration
[ Main Menu ]
Staggered Spinup Interval: 0.5 sec
[ Keys Available ]
[ ]Up [ ]Down [Space]Change [Tab]Function Switch [ESC]Exit [Ctrl-Y]Save
9
SATAII150 SX8 User Manual
3.
In the first screen, press the Spacebar to move between Staggered Spinup
Intervals. The choices are:
•
0.5 second
•
1.0 second
•
1.5 seconds
•
2.0 seconds
•
2.5 seconds
•
3.0 seconds
•
Disable (all drives spin up together)
To exit the Configuration without saving your settings, press the Esc key, then
press Y to confirm your exit.
Go on to Chapter 3: Install Software Drivers.
10
Chapter 3: Install Software Drivers
•
Windows Server 2003 (below)
•
Windows XP (page 17)
•
Windows 2000 (page 19)
•
Additional Drivers, Updated Drivers (page 20)
Following are driver installation procedures for the Windows operating systems
that support the Promise SATAII150 SX8 Controller card. The SATAII150 SX8
software drivers for Windows are included on the driver diskette. Additional and
updated drivers are downloadable from the Promise website at
www.promise.com.
Important
If you wish to include your current bootable Serial ATA drive using
the Windows 2000, XP or Server 2003 operating system on your
SATAII150 SX8 card, do NOT connect the disk drive to the card
yet.
You MUST install the Windows 2000, XP or Server 2003 driver
software first onto this drive while it is still attached to your existing
hard drive controller.
Windows Server 2003
New Installation
The following details the installation of the SATAII150 SX8 drivers while installing
Windows Server 2003.
1.
2.
Start the installation:
•
Floppy Install: Boot the computer with the Windows Server 2003
installation diskettes.
•
Floppyless Install: Boot from floppy and type WINNT. After files have
been copied, the system will reboot. On the reboot, press F6 after the
message: “Setup is inspecting your computer’s hardware
configuration...” appears.
•
CD-ROM Install: Boot from the CD-ROM. Press F6 when the message
“Press F6 if you need to install third party SCSI or RAID driver” appears.
When the Windows Server 2003 Setup window is generated, press S to
specify an Additional Device(s)
11
SATAII150 SX8 User Manual
3.
Insert the Promise SATAII150 SX8 Series Driver Diskette into drive A: and
press Enter.
4.
Choose Windows Server 2003 Promise SATAII150 SX8 Controller from the
list that appears on screen, and then press Enter.
NOTE: If installing Windows Server 2003 for AMD 64bit system, choose
Windows Server 2003 AMD 64-bits Promise SATAII150 SX8 Controller from
the list.
5.
The Windows Server 2003 Setup screen will appear again saying “Setup will
load support for the following mass storage devices:” The list will include
Windows Server 2003 Promise SATAII150 SX8 Controller.
NOTE: If there are any additional devices to be installed, specify them now.
When all devices are specified, continue to the next step.
6.
From the Windows Server 2003 Setup screen, press the Enter. Setup will
now load all device files and then continue the Windows Server 2003
installation.
NOTE: If a Windows Logo Testing warning dialog box appears for any of the
following, click the Yes button.
•
Windows Server 2003 Promise SATAII150 SX8 Controller
•
Windows Server 2003 Promise SAF-TE Processor Device
•
Windows Server 2003 Promise API Console SCSI Processor Device
Existing Installation
After installing the SATAII150 SX8 card and rebooting your system, Windows XP
setup will show a “Found New Hardware” dialog box. Under Windows Server
2003, “Mass Storage Controller” will be displayed.
1.
Insert the Promise SATAII150 SX8 Driver Diskette into the A:\ drive.
2.
Choose Install the software automatically and press the Enter key.
3.
Choose Windows Server 2003 Promise SATAII150 SX8 Controller from the
list that appears on screen:
•
Use a:\i386\wnet\s150sx8.inf for x86 system
•
Use a:\amd64\wnet\s150sx8.inf for AMD 64bit system
Then press the Enter key.
4.
If using a driver that has not been digitally signed by Microsoft, you will be
asked if you want to continue the installation. Click Continue Anyway.
5.
When the New Hardware Wizard has finished installing the SATAII150 SX
Series software, click Finish and restart the system.
12
Chapter 3: Install Software Drivers
6.
After restarting, system will find Windows Server 2003 Promise API Console
SCSI Processor Device and/or Windows Server 2003 Promise SAF-TE
Processor Device. Repeat steps 1 through 5, above.
Confirm Installation
1.
Right-click the My Computer icon and select Manage from the popup menu.
2.
Click Device Manager in the menu tree.
3.
Click the “+” in front of SCSI and RAID controllers, Windows Server 2003
Promise SATAII150 SX8 Controller should appear.
Windows XP
New Installation
The following details the installation of the SATAII150 SX8 drivers while installing
Windows XP.
1.
Start the installation:
•
Floppy Install: Boot the computer with the Windows XP installation
diskettes.
•
Floppyless Install: Boot from floppy and type WINNT. After files have
been copied, the system will reboot. On the reboot, press F6 after the
message: “Setup is inspecting your computer’s hardware
configuration...” appears.
•
CD-ROM Install: Boot from the CD-ROM. Press F6 when the message
“Press F6 if you need to install third party SCSI or RAID driver” appears.
2.
When the Windows XP Setup window is generated, press S to specify an
Additional Device(s)
3.
Insert the Promise SATAII150 SX8 Driver Diskette into drive A: and press
Enter.
4.
Choose Windows XP Promise SATAII150 SX8 Controller from the list that
appears on screen, and then press Enter.
NOTE: If installing Windows XP for AMD 64bit system, choose Windows XP
AMD 64-bits Promise SATAII150 SX8 Controller from the list.
5.
The Windows XP Setup screen will appear again saying “Setup will load
support for the following mass storage devices:” The list will include WinXP
Promise SATAII150 SX8 Controller.
6.
NOTE: If there are any additional devices to be installed, specify them now.
When all devices are specified, continue to the next step.
13
SATAII150 SX8 User Manual
7.
From the Windows XP Setup screen, press the Enter. Setup will now load all
device files and then continue the Windows XP installation.
NOTE: If a Windows Logo Testing warning dialog box appears for any of the
following, click the Yes button.
•
Windows XP Promise SAF-TE Processor Device
•
Windows XP Promise API Console SCSI Processor Device
Existing Installation
After installing the SATAII150 SX8 card and rebooting your system, Windows XP
setup will show a “Found New Hardware” dialog box. Under Windows XP, “Mass
Storage Controller” will be displayed.
1.
Insert the Promise SATAII150 SX8 Driver Diskette into the A:\ drive.
2.
Choose Install the software automatically and press the Enter key.
3.
Choose Windows XP Promise SATAII150 SX8 Controller from the list that
appears on screen:
•
Use a:\i386\wnet\s150sx8.inf for x86 system
•
Use a:\amd64\wnet\s150sx8.inf for AMD 64bit system
Then press the Enter key.
4.
If using a driver that has not been digitally signed by Microsoft, you will be
asked if you want to continue the installation. Click Continue Anyway.
5.
When the New Hardware Wizard has finished installing the SATAII150 SX
Series software, click Finish and restart the system.
6.
After restarting, system will find Windows XP Promise API Console SCSI
Processor Device and/or Windows XP Promise SAF-TE Processor Device.
Repeat steps 1 through 5, above.
Confirm Installation
1.
Right-click the My Computer icon and select Manage from the popup menu.
2.
Click Device Manager in the menu tree.
3.
Click the “+” in front of SCSI and RAID controllers. Windows XP Promise
SATAII150 SX8 Controller should appear.
14
Chapter 3: Install Software Drivers
Windows 2000
New Installation
The following details the installation of the SATAII150 SX8 drivers while installing
Windows 2000.
1.
Start the installation:
•
Floppy Install: Boot the computer with the Windows 2000 installation
diskettes.
•
Floppyless Install: Boot from floppy and type WINNT. After files have
been copied, the system will reboot. On the reboot, press F6 when the
message “Setup is inspecting your computer’s hardware
configuration...” appears.
•
CD-ROM Install: Boot from the CD-ROM. Press F6 when the message
“Press F6 if you need to install third party SCSI or RAID driver” appears.
2.
When the Windows 2000 Setup window is generated, press S to specify an
Additional Device(s).
3.
Insert the Promise SATAII150 SX8 Driver Diskette into drive A: and press
Enter.
4.
Choose Windows 2000 Promise SATAII150 SX8 Controller from the list that
appears on screen then press Enter.
5.
The Windows 2000 Setup screen will appear again saying “Setup will load
support for the following mass storage devices:” The list will include
Windows 2000 Promise SATAII150 SX8 Controller.
NOTE: If there are any additional devices to be installed, specify them now.
When all devices are specified, continue to the next step.
6.
From the Windows 2000 Setup screen, press Enter. Setup will now load all
device files and then continue the Windows 2000 installation.
Existing Installation
After installing the SATAII150 SX8 card and rebooting your system, Windows
2000 setup will show a “Found New Hardware Found” dialog box. Under
Windows 2000, “Mass Storage Controller” will be displayed.
1.
Insert the Promise SATAII150 SX8 Driver Diskette in drive A:\.
2.
Select Display a list of the known drivers for this device so that I can choose
a specific driver and click Next.
3.
Under Select a Device driver, click Have Disk....
4.
Under Install From Disk, type A:\i386\win2000 and click OK.
15
SATAII150 SX8 User Manual
5.
Under Select a Device Driver, select Windows 2000 Promise SATAII SX8
Controller and click Next.
6.
Under Start Device Driver Installation, click Next.
7.
If using a driver that has not been digitally signed by Microsoft, you will be
asked if you want to continue the installation. Click Yes
8.
Under Completing the Found New Hardware Wizard, remove the diskette
and click Finish to restart the system. Windows 2000 will then restart for the
driver installation to take effect
NOTE: If a Windows Logo Testing warning dialog box appears for any of the
following, click the Yes button.
•
Windows 2000 Promise SAF-TE Processor Device
•
Windows 2000 Promise API Console SCSI Processor Device
Confirm Installation
1.
Right-click the My Computer icon and select Manage from the popup menu.
2.
Click Device Manager in the menu tree.
3.
Click the “+” in front of SCSI and RAID controllers. Windows 2000 Promise
SATAII150 SX8 Controller should appear.
Additional Drivers, Updated Drivers
You can download additional drivers and updates to existing drivers, as they
become available, from the Promise website at www.promise.com.
16
Chapter 4: Troubleshooting
•
Frequently Asked Questions (below)
•
Contact Technical Support (page 22)
•
Warranty (page 24)
•
Return Product for Repair (page 25)
Frequently Asked Questions
This section lists frequently asked questions involving pre-installation, drive
issues, installation, and post-installation.
While booting Windows Server 2003, XP or 2000 during a floppyless install,
why does the message “Inaccessible Boot Device” appear?
You did not press the F6 key at the appropriate time. Reboot the system, and
press the F6 key when the message “Press F6 if you need to install third
party SCSI or RAID driver” appears.
While booting Windows Server 2003, XP or 2000 during a CD-ROM disk
install, why does the message “No Hard Drives Found” appear?
You did not press the F6 key at the appropriate time. Reboot the system, and
press the F6 key when the message “Setup is inspecting your computer’s
hardware configuration…” appears or the message “Press F6 if you need to
install third party SCSI or RAID driver” appears.
The SATAII150 SX8 BIOS not appearing during boot. The SATAII150 SX8
driver does not load. Data transfer rates are too slow. How can you resolve
these problems?
Move the SATAII150 SX8 Controller card to a different PCI-X slot.
Why won’t the SATAII150 SX8 card won’t fit into my system’s PCI slot?
You are trying to insert the SATAII150 SX8 into a 5-volt PCI slot. The
SATAII150 SX8 only fits into a 3.3-volt PCI-X slot.
Can you use a software RAID with the SATAII150 SX8 Controller?
Yes. You can use the SATAII150 SX8 controller with a software RAID
application.
17
SATAII150 SX8 User Manual
Contact Technical Support
Promise Technical Support provides several support options for Promise users to
access information and updates. We encourage you to use one of our electronic
services, which provide product information updates for the most efficient service
and support.
If you decide to contact us, please have the following information available:
•
Product model and serial number
•
BIOS and driver version numbers
•
A description of the problem / situation
•
System configuration information, including: motherboard and CPU type,
hard drive model(s), ATA/ATAPI drives & devices, and other controllers.
Technical Support Services
Promise Online™ Web
Site
http://www.promise.com
(technical documents, drivers, utilities, etc.)
North and South America
E-mail Support
[email protected]
Fax Technical Support
(408) 228-1097
Attention: Technical Support
Phone Technical Support
(408) 228-1400 option 4
7:30-5:30pm M-F Pacific Standard Time
If you wish to write us for
support:
Promise Technology, Inc.
Attn: Technical Support
580 Cottonwood Drive
Milpitas, CA 95035, USA
18
Chapter 4: Troubleshooting
Europe, Africa and Middle East
E-mail Support
[email protected]
Fax Technical Support
+31 (0) 40 256 9463
Attention: Technical Support
Phone Technical Support
+31 (0) 40 235 2600
8:30-5:00pm The Netherlands Time
If you wish to write us for
support:
Promise Technology Europe B.V.
Attn: Technical Support
Luchthavenweg 81-125
5657 EA Eindhoven, The Netherlands
Pacific Rim
E-mail Support
[email protected]
Fax Technical Support
+886 3 578 23 90
Attention: Technical Support
Phone Technical Support
+886 3 578 23 95 (ext. 8870)
9:00-5:30pm Taiwan Time
If you wish to write us for
support:
Promise Technology, Inc.
Attn: Technical Support
2F, No. 30, Industry E. Rd. IX
Science-based Industrial Park
Hsinchu, Taiwan, R.O.C.
China
E-mail Support
[email protected]
Fax Technical Support
+86 010 8857-8015
Attention: Technical Support
Phone Technical Support
+86 010 8857-8085 / -8095
9:00-6:00pm China Time
If you wish to write us for
support:
Promise Technology China
Attn: Technical Support
Room 1205, Tower 3, Webok Time Center No. 17
South Zhong Guan Cun Road
Hai Dian District, Beijing 100081
P.R. China
19
SATAII150 SX8 User Manual
Limited Warranty
Promise Technology, Inc. (“Promise”) warrants that for three (3) years from the
time of the delivery of the product to the original end user:
a)
the product will conform to Promise’s specifications;
b)
the product will be free from defects in material and workmanship under
normal use and service.
This warranty:
a)
applies only to products which are new and in cartons on the date of
purchase;
b)
is not transferable;
c)
is valid only when accompanied by a copy of the original purchase
invoice.
This warranty shall not apply to defects resulting from:
a)
improper or inadequate maintenance, or unauthorized modification(s),
performed by the end user;
b)
operation outside the environmental specifications for the product;
c)
accident, misuse, negligence, misapplication, abuse, natural or
personal disaster, or maintenance by anyone other than a Promise or a
Promise-authorized service center.
Disclaimer of other warranties
This warranty covers only parts and labor, and excludes coverage on software
items as expressly set above.
Except as expressly set forth above, Promise DISCLAIMS any warranties,
expressed or implied, by statute or otherwise, regarding the product, including,
without limitation, any warranties for fitness for any purpose, quality,
merchantability, non-infringement, or otherwise. Promise makes no warranty or
representation concerning the suitability of any product for use with any other
item. You assume full responsibility for selecting products and for ensuring that
the products selected are compatible and appropriate for use with other goods
with which they will be used.
Promise DOES NOT WARRANT that any product is free from errors or that it will
interface without problems with your computer system. It is your responsibility to
back up or otherwise save important data before installing any product and
continue to back up your important data regularly.
No other document, statement or representation may be relied on to vary the
terms of this limited warranty.
20
Chapter 4: Troubleshooting
Promise’s sole responsibility with respect to any product is to do one of the
following:
a)
replace the product with a conforming unit of the same or superior
product;
b)
repair the product.
Promise shall not be liable for the cost of procuring substitute goods, services,
lost profits, unrealized savings, equipment damage, costs of recovering,
reprogramming, or reproducing of programs or data stored in or used with the
products, or for any other general, special, consequential, indirect, incidental, or
punitive damages, whether in contract, tort, or otherwise, notwithstanding the
failure of the essential purpose of the foregoing remedy and regardless of
whether Promise has been advised of the possibility of such damages. Promise
is not an insurer. If you desire insurance against such damage, you must obtain
insurance from another party.
Some states do not allow the exclusion or limitation of incidental or consequential
damages for consumer products, so the above limitation may not apply to you.
This warranty gives specific legal rights, and you may also have other rights that
vary from state to state. This limited warranty is governed by the State of
California.
Your Responsibilities
You are responsible for determining whether the product is appropriate for your
use and will interface with your equipment without malfunction or damage. You
are also responsible for backing up your data before installing any product and
for regularly backing up your data after installing the product. Promise is not liable
for any damage to equipment or data loss resulting from the use of any product.
Return Product For Repair
If you suspect a product is not working properly, or if you have any questions
about your product, contact our Technical Support Staff through one of our
Technical Services, making sure to provide the following information:
•
Product model and serial number (required)
•
Return shipping address
•
Daytime phone number
•
Description of the problem
•
Copy of the original purchase invoice
The technician will assist you in determining whether the product requires repair.
If the product needs repair, the Technical Support Department will issue an RMA
(Return Merchandise Authorization) number.
21
SATAII150 SX8 User Manual
Return ONLY the specific product covered by the warranty (do not ship cables,
manuals, diskettes, etc.), with a copy of your proof of purchase to:
USA and Canada:
Promise Technology, Inc.
Customer Service Dept.
Attn.: RMA # ______
1745 McCandless Drive
Milpitas, CA 95035
Other Countries:
Return the product to your dealer
or retailer.
Contact them for instructions
before shipping the product.
You must follow the packaging guidelines for returning products:
•
Use the original shipping carton and packaging
•
Include a summary of the product’s problem(s)
•
Write an attention line on the box with the RMA number
•
Include a copy of proof of purchase
You are responsible for the cost of insurance and shipment of the product to
Promise. Note that damage incurred due to improper transport or packaging is
not covered under the Limited Warranty.
When repairing returned product(s), Promise may replace defective parts with
new or reconditioned parts, or replace the entire unit with a new or reconditioned
unit. In the event of a replacement, the replacement unit will be under warranty
for the remainder of the original warranty term from purchase date, or 30 days,
whichever is longer.
Promise will pay for standard return shipping charges only. You will be required to
pay for any additional shipping options (such as express shipping).
22
Appendix: BIOS Update
Follow this procedure to update the BIOS on the SATAII150 SX8 card.
1.
Create a DOS bootable floppy disk.
2.
Copy the pflashcm.exe file to the floppy disk.
3.
Start the computer with SATAII150 SX8 and boot into DOS mode.
4.
Take the appropriate actions.
•
To update the SATAII150 SX8 BIOS, at the DOS prompt type:
C:\> pflashcm /f [path] filename.bin /b
where filename.bin is the BIOS binary file.
Example: C:\> pflashcm /f BIOS.bin /b
•
To flash SATAII150 SX8 patch code, at the DOS prompt type:
C:\> pflashcm /f [path] filename.bin /p
where filename.bin is the patch code binary file.
Example: C:\> pflashcm /f patch.bin /p
•
To flash SATAII150 SX8 whole 256k image, at DOS prompt type:
C:\> pflashcm /f [path] filename.bin /w
where filename.bin is the whole 256k image binary file.
•
To save SATAII150 SX8 BIOS, at DOS prompt type:
C:\> pflashcm /s [path] filename.bin /b
where filename.bin is the BIOS binary data to be saved.
•
To save SATAII150 SX8 patch code, at DOS prompt type:
C:\> pflashcm /s [path] filename.bin /p
where filename.bin is the patch code binary data to be saved.
•
To save SATAII150 SX8 whole image, at DOS prompt type:
C:\> pflashcm /s [path] filename /w
where filename is the whole 256k image binary data to be saved to.
23
SATAII150 SX8 User Manual
24