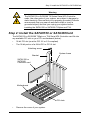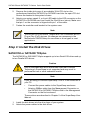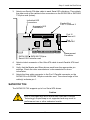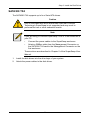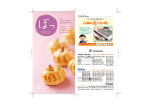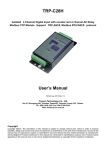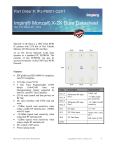
1
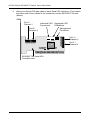
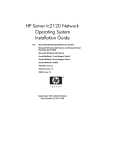
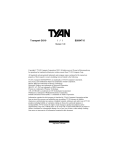
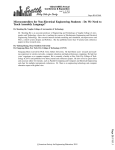
SATAII150
AND SATA 300
TX SERIES
QUICK START GUIDE
Version 1.5
© 2005 Promise Technology, Inc. All Rights Reserved.
SATAII150 and SATA300 TX Series Quick Start Guide
SATAII150 TX Series Task List
Installation and setup consists of the following steps:
1.
Unpack Your SATAII150 or SATA300 Card, below
2.
Install the SATAII150 or SATA300 Card (page 3)
3.
Install the Disk Drives:
SATAII150 TX2plus or SATA300 TX2plus (page 4)
SATAII150 TX4 (page 5)
SATA300 TX4 (page 7)
4.
Install Driver (page 9)
Step 1: Unpack Your SATAII150 or SATA300 Card
When you receive the SATAII150 or SATA300 TX2plus card, the package should
contain the items listed below:
•
SATAII150 or SATA300 TX2plus Serial ATA Controller card
•
Quick Start Guide
•
Two 0.65 m (26 inch) Serial ATA data cables. 1.5 Gb cables for SATAII150,
3.0 Gb cables for SATA300
•
One 80-wire 40-pin ATA cable
•
CD with drivers and SATAII150 and SATA300 TX Series User Manual
When you receive the SATAII150 or SATA300 TX4 card, the package should
contain the items listed below:
•
SATAII150 or SATA300 TX4 Serial ATA Controller card
•
Quick Start Guide
•
Four 0.65 m (26 inch) Serial ATA data cables. 1.5 Gb cables for SATAII150,
3.0 Gb cables for SATA300
•
CD with drivers and SATAII150 and SATA300 TX Series Manual
If ANY of the contents are missing or appear to be damaged, please contact your
dealer or distributor immediately.
Warning
Before installing the adapter into an existing system, backup any
important or useful data. Failure to follow this accepted PC
practice could result in data loss.
2
Step 2: Install the SATAII150 or SATA300Card
Warning
The SATAII150 or SATA300 TX Series Serial ATA Controller
cards, like other parts of your system, are subject to damage by
static electricity. Be sure that you're properly grounded (Promise
recommends that you wear an anti-static strap or touch a
grounded object) and that you unplug your system before
installing the SATAII150 or SATA300 TX2plus and TX4.
Step 2: Install the SATAII150 or SATA300Card
The SATAII150 or SATA300 TX2plus or TX4 Serial ATA Controller card fits into
any available PCI slot on your PC's motherboard (below):
•
32-bit PCI slot (must be PCI 2.2 or 2.3 compliant)
•
The 32-bit portion of a 64-bit PCI or PCI-X slot
Attaching screw
System frame
Bracket
SATAII150 or
SATA300
Controller card
Motherboard
PCI slots
•
Remove the cover of your system.
3
SATAII150 and SATA300 TX Series Quick Start Guide
5.
Remove the inside slot cover of an available 32-bit PCI slot on the
motherboard.Install the SATAII150 or SATA300 card into the open PCI slot.
Secure the bracket to the system's frame.
6.
Attach your system case's 2- or 4-pin LED cable to the LED connector on the
SATAII150 or SATA300 card (see Install the Disk Drives, below). Make sure
that pin 1 on the connector is aligned with pin 1 of the cable.
7.
Fasten the controller card bracket to the system case.
Note
The SATAII150 or SATA300 TX2plus and TX4 Controllers are PCI
Plug-n-Play (PnP) devices. No changes are necessary in the
Motherboard CMOS Setup for resources or drive types in most
applications.
Step 3: Install the Disk Drives
SATAII150 or SATA300 TX2plus
The SATAII150 or SATA300 TX2plus supports up to two Serial ATA drives and up
to two Parallel ATA drives.
Caution
Use of removable disk drive enclosures other than Promise
Technology's SuperSwap is not supported and may result in
performance loss or other undesired results.
Note
If you are using a Promise SuperSwap 1100 or 4100 enclosure in
your PC:
•
Connect the power cables to the SuperSwap enclosure.
•
Attach a SMBus cable from the Management Connector on
the SATAII150 or SATA300 TX2plus card to the Management
Connector on the first enclosure
These actions are described in Chapter 2 of the SuperSwap User
Manual.
1.
Install the disk drives into the drive bays of your system.
2.
Attach the power cables to the disk drives.
4
Step 3: Install the Disk Drives
3.
Attach one Serial ATA data cable to each Serial ATA disk drive. Then attach
the other ends of the cables to the connectors on the SATAII150 or SATA300
TX2 plus card (below).
Individual LED
Connectors
Parallel Port
Port 3 / Channel 3
Aggregate LED
Connectors
Port 2 /
Channel 2
Port 1 /
Channel 1
TX2plus
ATAII150
Management
Connector
SATAII150 or SATA300 TX2plus
Serial ATA Controller card
4.
Attach a black connector of the Ultra ATA cable to each Parallel ATA hard
drive.
5.
Verify that the Master and Slave drives each have the appropriate pin
settings. Check the drive manufacturer’s documentation for more
information.
6.
Attach the blue cable connector to the Port 3 Parallel connector on the
SATAII150 or SATA300 TX2plus controller card. The colored edge of the
cable(s) indicates pin 1.
SATAII150 TX4
The SATAII150 TX4 supports up to four Serial ATA drives.
Caution
Use of removable disk drive enclosures other than Promise
Technology's SuperSwap is not supported and may result in
performance loss or other undesired results.
5
SATAII150 and SATA300 TX Series Quick Start Guide
Note
If you are using a Promise SuperSwap 1100 or 4100 enclosure in
your PC:
•
Connect the power cables to the SuperSwap enclosure.
•
Attach a SMBus cable from the Management Connector on
the SATAII150 TX4 card to the Management Connector on
the first enclosure
These actions are described in Chapter 2 of the SuperSwap User
Manual.
1.
Install the disk drives into the drive bays of your system.
2.
Attach the power cables to the disk drives.
3.
Attach one Serial ATA data cable to each Serial ATA disk drive. Then attach
the other ends of the cables to the connectors on the SATAII150 TX4 card
(below).
Individual LED
Connectors
Aggregate LED
Connectors
Port 1 /
Channel 1
Management
Connector
Port 3 /
Channel 3
Port 2 /
Channel 2
TX4
ATAII150
SATAII150 TX4
Serial ATA Controller card
6
Port 4 /
Channel 4
Step 3: Install the Disk Drives
SATA300 TX4
The SATA300 TX4 supports up to four Serial ATA drives.
Caution
Use of removable disk drive enclosures other than Promise
Technology's SuperSwap is not supported and may result in
performance loss or other undesired results.
Note
If you are using a Promise SuperSwap 1100 or 4100 enclosure in
your PC:
•
Connect the power cables to the SuperSwap enclosure.
•
Attach a SMBus cable from the Management Connector on
the SATA300 TX4 card to the Management Connector on the
first enclosure
These actions are described in Chapter 2 of the SuperSwap User
Manual.
1.
Install the disk drives into the drive bays of your system.
2.
Attach the power cables to the disk drives.
7
SATAII150 and SATA300 TX Series Quick Start Guide
3.
Attach one Serial ATA data cable to each Serial ATA disk drive. Then attach
the other ends of the cables to the connectors on the SATA300 TX4 card
(below).
Port 1 /
Channel 1
Individual LED Aggregate LED
Connectors
Connectors
Port 2 /
Channel 2
Management
Connector
Port 3 /
Channel 3
Port 4 /
Channel 4
TX4
ATA 300
SATA300 TX4 Serial ATA
Controller card
8
Step 4: Install Drivers
Step 4: Install Drivers
•
Make a Driver Installation Diskette (Windows), below
•
Windows Server 2003
•
•
•
•
•
New, page 10
•
Exsting, page 10
•
Confirm, page 11
Windows XP
•
New, page 11
•
Exsting, page 12
•
Confirm, page 12
Windows 2000
•
New, page 12
•
Exsting, page 13
•
Confirm, page 14
RedHat Linux
•
New, page 14
•
Exsting, page 15
SuSE Linux
•
New, page 15
•
Exsting, page 16
Following are driver installation procedures for the Windows operating systems
that support the SATAII150 and SATA300 TX Series Serial ATA Controller cards.
The drivers for Windows are included on the CD.
Drivers and installation instructions for Linux operating systems are
downloadable from the Promise website at www.promise.com.
Make an Installation Floppy Diskette (Windows)
This procedure requires one write-enabled blank 3.5-inch diskette.
4.
Place your blank diskette in the appropriate drive.
5.
Insert the Promise CD into your CD-ROM drive.
The display screen should open automatically.
If the display screen does not open, click on MyComputer > CD Drive D: and
double-click on the Launch.exe icon.
6.
Click on the Windows Driver button.
The Disk Copy Utility opens.
9
SATAII150 and SATA300 TX Series Quick Start Guide
7.
Click the Create button in the Utility.
A confirmation box appears.
8.
Click the Yes button in the confirmation box.
The utility prepares your driver installation diskette.
When the utility is finished, it displays a message.
9.
In the message, click the OK button.
10. Click the Exit button to close the Promise CD.
Windows Server 2003
New Installation
The following details the installation of the SATAII150 or SATA300 Serial ATA
Controller drivers while installing Windows Server 2003.
1.
Start the installation:
•
Floppy Install: Boot the computer with the Windows Server 2003
installation diskettes.
•
CD-ROM Install: Boot from the CD-ROM. Press F6 after the message
“Press F6 if you need to install third party SCSI or RAID driver” appears.
2.
When the Windows Server 2003 Setup window is generated, press S to
specify an Additional Device(s).
3.
Insert the driver diskette into drive A: and press Enter.
4.
Choose Windows Promise SATAII150/SATA300TX2plus [or TX4] (tm) IDE
Controller from the list that appears on screen, and then press the Enter.
5.
Press S to use the driver on the floppy disk and then press Enter to continue
with installation.
6.
The Windows Server 2003 Setup screen will appear again saying “Setup will
load support for the following mass storage devices:” The list will include
“Windows Promise SATAII150/SATA300TX2plus [or TX4] (tm) IDE
Controller”.
NOTE: If there are any additional devices to be installed, specify them now.
When all devices are specified, continue to the next step.
7.
From the Windows Server 2003 Setup screen, press the Enter. Setup will
now load all device files and then continue the Windows Server 2003
installation.
Existing Installation
After installing the STAII150 or SATA300 Serial ATA Controller card and rebooting
your system, Windows Server 2003 setup will show a “Found New Hardware”
dialog box. Under Windows 2003, “Mass Storage Controller” will be displayed.
1.
Insert the driver diskette into the A:\ drive.
10
Step 4: Install Drivers
2.
Choose Install the software automatically and press the Enter key.
3.
Choose Windows Promise SATAII150/SATA300TX2plus [or TX4] (tm) IDE
Controller from the list that appears on screen, and then press the Enter
key.
4.
If using a driver that has not been digitally signed by Microsoft, you will be
asked if you want to continue the installation. Click Continue anyway.
5.
When the New Hardware Wizard has finished installing the SATAII150 or
SATA300 driver, click Finish.
Confirm Installation
1.
Right-click on the My Computer icon and select Manage from the popup
menu.
2.
From the left panel, select Device Manager.
3.
Click the “+” in front of SCSI and RAID controllers. “Windows Promise
SATAII150/SATA300TX2plus [or TX4] (tm) IDE Controller” should appear.
Windows XP
New Installation
The following details the installation of the SATAII150 or SATA300 Serial ATA
Controller drivers while installing Windows XP.
1.
Start the installation:
•
Floppy Install: Boot the computer with the Windows XP installation
diskettes.
•
CD-ROM Install: Boot from the CD-ROM. Press F6 after the message
“Press F6 if you need to install third party SCSI or RAID driver” appears.
2.
When the Windows XP Setup window is generated, press S to specify an
Additional Device(s).
3.
Insert the driver diskette into drive A: and press Enter.
4.
Choose Windows Promise SATAII150/SATA300TX2plus [or TX4] (tm) IDE
Controller from the list that appears on screen, and then press the Enter.
5.
Press S to use the driver on the floppy disk and then press Enter to continue
with installation.
6.
The Windows XP Setup screen will appear again saying “Setup will load
support for the following mass storage devices:” The list will include
“Windows Promise SATAII150/SATA300TX2plus [or TX4] (tm) IDE
Controller”.
NOTE: If there are any additional devices to be installed, specify them now.
When all devices are specified, continue to the next step.
11
SATAII150 and SATA300 TX Series Quick Start Guide
7.
From the Windows XP Setup screen, press the Enter. Setup will now load all
device files and then continue the Windows XP installation.
Existing Installation
After installing the SATAII150 or SATA300 Serial ATA Controller card and
rebooting your system, Windows XP setup will show a “Found New Hardware”
dialog box.
1.
Insert the driver diskette into the A:\ drive.
2.
Choose Install the software automatically and press the Enter key.
3.
Choose Windows Promise SATAII150/SATA300TX2plus [or TX4] (tm) IDE
Controller from the list that appears on screen, and then press the Enter
key.
4.
If using a driver that has not been digitally signed by Microsoft, you will be
asked if you want to continue the installation. Click Continue anyway.
5.
When the New Hardware Wizard has finished installing the SATAII150 or
SATA300 driver, click Finish.
Confirm Installation
1.
Right-click on the My Computer icon and select Manage from the popup
menu.
2.
From the left panel, select Device Manager.
3.
Click the “+” in front of SCSI and RAID controllers. “Windows Promise
SATAII150/SATA300TX2plus [or TX4] (tm) IDE Controller” should appear.
Windows 2000
New Installation
The following details the installation of the SATAII150 or SATA300 Serial ATA
Controller drivers while installing Windows 2000.
1.
Start the installation:
•
Floppy Install: Boot the computer with the Windows 2000 installation
diskettes.
•
CD-ROM Install: Boot from the CD-ROM. Press F6 after the message
“Press F6 if you need to install third party SCSI or RAID driver” appears.
2.
When the Windows 2000 Setup window is generated, press S to specify an
Additional Device(s).
3.
Insert the driver diskette into drive A: and press Enter.
4.
Choose Windows Promise SATAII150/SATA300TX2plus [or TX4] (tm) IDE
Controller from the list that appears on screen then press Enter.
12
Step 4: Install Drivers
5.
The Windows 2000 Setup screen will appear again saying “Setup will load
support for the following mass storage devices:” The list will include
“Windows Promise SATAII150/SATA300TX2plus [or TX4] (tm) IDE
Controller”.
NOTE: If there are any additional devices to be installed, specify them now.
When all devices are specified, continue to the next step.
6.
From the Windows 2000 Setup screen, press Enter. Setup will now load all
device files and then continue the Windows 2000 installation.
Existing Installation
After installing the SATAII150 or SATA300 Serial ATA Controller card and
rebooting your system, Windows 2000 setup will show a “New Hardware Found”
dialog box. Under Windows 2000, “PCI Mass Storage Controller” will be
displayed.
1.
Choose Add New Hardware Wizard from the list, and then press Enter.
2.
Choose Add/Troubleshoot a device and click Next. The new hardware
wizard will show device list.
3.
The screen show a “Welcome to the Found New Hardware Wizard” dialog
box. Click Next.
4.
Choose Display a list the known drivers for this device so that I can choose a
specific driver, then click Next.
5.
Select SCSI and RAID controllers, then click Next.
6.
When the Windows 2000 supported SCSI adapter drivers list appears, click
Have disk.
7.
Insert the driver diskette in drive A:\
8.
Type A:\ in the text box, then click OK
9.
Choose Windows Promise SATAII150/SATA300TX2plus [or TX4]( tm ) IDE
controller from the list that appears on screen, then click Next.
10. If using a driver that has not been digitally signed by Microsoft, you will be
asked if you want to continue the installation. Click Yes.
11. Click Yes to confirm continue the installation and copy the driver to system.
12. Remove the diskete and click Finish to restart the system. Windows 2000
will then restart for the driver installation to take effect.
13
SATAII150 and SATA300 TX Series Quick Start Guide
Confirm Installation
1.
Right-click on the My Computer icon and select Manage from the popup
menu.
2.
From the left panel, select Device Manager.
3.
Click the “+” in front of SCSI controllers. “Windows Promise SATAII150/
SATA300TX2plus [or TX4] (tm) IDE Controller” should appear.
RedHat Linux
Prepare a driver diskette:
1.
Download the RedHat Linux driver from the Promise website at
www.promise.com
2.
Extract the contents of the ZIP file on to a formatted floppy disk. Use WinZIP
in Windows or unzip in Linux.
3.
Label the disk “SATAII 150 Driver Disk”.
New Installation
1.
Boot the Linux system from the Red Hat Linux Installation with CD.
At the “Welcome to Red Hat linux ...” installation screen, a prompt
labeled “boot:” will appear at the bottom of the screen.
2.
At the boot prompt, type expert and press the Enter key.
3.
At the Devices dialog box, insert the SATAII 150 Driver Disk in the floppy
drive and then select OK or Yes.
4.
Continue with the installation as normal.
5.
When installation is at the Congratulations menu, press Ctrl-Alt-F2 to switch
screens.
6.
Insert the SATAII 150 Driver Disk into the floppy drive.
7.
Type the following commands to load SATAII 150 driver:
See the Note below.
# umount /tmp/fd0 (if this command fails, ignore it and go to the next one)
# chroot /mnt/sysimage
# mount /dev/fd0 /mnt
# cd /mnt
# sh setup-ut
# cd /
# umount /mnt
# exit
8.
Please Press Ctrl-Alt-F7 and click the Exit button to finish the installation.
14
Step 4: Install Drivers
NOTE: Red Hat Linux will not provide onboard IDE as standard ide0 and ide1 on
some mother boards. To solve this condition, append the boot parameters as
follows.
ide0=0x1f0,0x3f6,14 ide1=0x170,0x376,15 ide2=0 ide3=0 ide4=0 ide5=0 ide6=0
ide7=0 ide8=0 ide9=0
Existing Installation
1.
Boot the Linux system and log in as root.
2.
Insert SATAII 150 Driver Disk
3.
In a terminal window, enter the following commands:
# mount /dev/fd0 /mnt/floppy
# cd /mnt/floppy
# sh install
Note: At the prompt answer Yes to load SATAII 150 driver every time Linux
boots.
# cd ..
# umount /dev/fd0
SuSE Linux
Prepare a driver diskette:
1.
Download the RedHat Linux driver from the Promise website at
www.promise.com
2.
Extract the contents of the ZIP file on to a formatted floppy disk. Use WinZIP
in Windows or unzip in Linux.
3.
Label the disk “SATAII 150 Driver Disk”.
New Installation
1.
Boot the Linux system from the SuSE Linux Installation with CD.
2.
When system boots, press F3 for Driver Disk and select the Installation
option.
See the Note below.
3.
When “Please insert the Driver Update floppy” displays, insert the SATAII
150 Driver Disk into the floppy drive.
4.
When Driver Update Menu appears, select OK then select “back” to return to
the installer.
5.
Continue with the installation as normal.
6.
If you are using SMP system, add a parameter “acpi=off” to “kernel boot
parameters” in the Booting menu of Installation Settings.
15
SATAII150 and SATA300 TX Series Quick Start Guide
NOTE: There is a SMP issue on the SuSE Linux SMP kernel. If you encounter
problems on SuSE with SMP system, append “acpi=off” parameters into boot
loader or select “Installation – ACPI Disabled” on SuSE Linux SMP.
Existing Installation
1.
Boot the Linux system and log in as root.
2.
Insert SATAII 150 Driver Disk
3.
In a terminal window, enter the following commands:
# mount /dev/fd0 /floppy
# cd /floppy
# sh install
Note: At the prompt answer Yes to load SATAII 150 driver every time Linux
boots.
# cd /
# umount /floppy
16