1
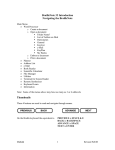
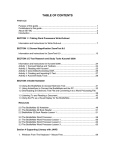
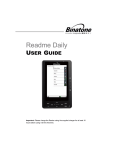
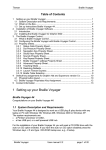
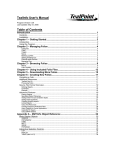
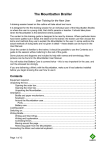
Section 3: Braille Notetaker
SECTION 3
BRAILLE NOTETAKER
Introduction
A Braille note taker is a portable computer or personal data assistant that has a Braille
display built onto it. These devices can be used in a stand-alone mode for taking notes,
doing basic word-processing, scheduling appointments and performing other tasks. They
can also be connected to a computer with screen reading software and act as a Braille
terminal.
“It is clear through this project that refreshable Braille can clearly be an
integral component of an adaptive workstation. In conjunction with
speech, refreshable Braille increases accessibility of information. Benefits
include: reading comprehension, proof reading work, dealing with
numerical, columnar, and tabular information, using programming code,
and learning and reading foreign languages. Although computer tasks
could be done with screen reading technology only, refreshable Braille
displays proved to be more than incidental peripherals when performing
these tasks.” Findings from “FOSTERING INDEPENDENCE
THROUGH REFRESHABLE BRAILLE TECHNOLOGY PROJECT”
January 2002 - a research project funded by Human Resources
Development Canada through the Office of Learning Technology.
The project was an innovative partnership between the Adult Services
Program (BC), Vancouver Community College, the University of British
Columbia, Aroga Technologies Inc. and Freedom Scientific Inc.
The Braille Notetaker presentation module contains the following sections:
1.0
Using the BrailleNote to Access Electronic Text
1.1
Using ActiveSync to Connect the BrailleNote and the PC
1.2
Downloading an Electronic Text File and Converting It to a Word
Processing File
1.3
Listening To and Reading a Document
1.4
Using the PC as a Visual Display for the BrailleNote
Vision Technologies: Access to Literacy - ALT-VI 2003
Page 30
Section 3: Braille Notetaker
1.0 Using the BrailleNote to Access Electronic Text
Introduction
The module, Using the BrailleNote to Access Electronic Text, will concentrate on using
ActiveSync with the PC and the BrailleNote to access electronic files.
Description of student need
The student using this type of system could address the following needs:
•
•
•
•
•
•
•
•
•
•
Portability
Compact (Disk Scan)
Quiet braille writer
Quick and easy access to the Internet without using JAWS
Internet access and files all in one device
Refreshable braille display
Access to a Book Reader (KeyBook)
Organizer (KeyPlan)
Compact Integrated system including:
Word Processor (KeySoft)
Book Reader (KeyBook)
Calculator (KeyPlus)
e-Mail (KeyMail)
Address Book (KeyList)
Internet Access (KeyWeb)
Electronic User Manual
Dealing quickly with electronic files in either text or Word format
•
Easy and quick translation of text files to braille files and braille files to text files
Assumptions
This activity is intended for independent implementation by the student. This session is
not designed to teach a student how to use the Internet, therefore, his or her prior
technology knowledge, and experience, will impact the level of independence achieved.
This activity can be simplified by having someone other than the student, retrieve the
information, put it on the compact flash disk, and assist the student with the insertion of
the disk into the back of the BrailleNote and vice versa. This will leave the student with
only the manipulation of the BrailleNote.
Vision Technologies: Access to Literacy - ALT-VI 2003
Page 31
Section 3: Braille Notetaker
Prerequisites
The student will need to have:
•
•
•
•
•
•
•
•
Functional braille reading skills
Functional listening skills
Functional level of expertise with the BrailleNote
Understand how files are saved and retrieved in the Windows environment
Ability to remember and execute computer commands
Ability to understand and work on the Internet
Ability to hook and unhook all the cables on the BrailleNote and the computer, or use
the infrared connections
Prior experience of connecting the BrailleNote and computer
Team support needed to set up and implement technology
The level of support required by the student will be directly related to the level of
Internet, computer, BrailleNote, knowledge, and experience, that he or she has. Adult
intervention can be given at any point along the way to simplify the task. The ultimate
goal is to make the student as independent as possible.
There are many ways to exchange electronic files between the BrailleNote and other
devices. In this session we will focus on using ActiveSync to communicate between the
BrailleNote and the PC.
1.1
Using ActiveSync to Connect the BrailleNote and the PC
“The ActiveSync option in the Utilities Menu allows the BrailleNote disk drives to
be viewed on a PC with Window Explorer.
This feature allows file management of your BrailleNote to be performed from the
PC. Files and Folders can be copied, moved, or deleted, just as you would on
the normal PC drives. You can quickly transfer files to and from the BrailleNote
using this option.” (BrailleNote manual 14-1)
Classroom implications
•
•
•
•
•
•
•
Electronic files can be transferred very quickly from the
BrailleNote to the PC or vice versa. This has implications in
notes, worksheets, internet research, tests, and electronic texts.
Text can now be stored and accessed very efficiently and quickly.
No longer a need for a braille hardcopy or a transcriber. A direct link between
the teacher and the student.
Very portable in the school environment
Instant access to the Internet without having to deal with JAWS.
No longer, does the student requiring braille, need a separate room to store
their texts and workbooks.
The entire system is integrated into one device.
Vision Technologies: Access to Literacy - ALT-VI 2003
Page 32
Section 3: Braille Notetaker
Common barriers or challenges that might occur
•
•
•
The level of technology and computer knowledge and prior experience the
student has.
Setting up the initial connection between the PC and the BrailleNote using
ActiveSync.
Having a visual display, this requires:
o
o
•
•
•
The BrailleNote is a little heavier than a BrailleLite
Setting up the Internet service provider or the network connection
Knowledge of computer braille when required
o
•
•
•
A PC with a 9 pin serial communication port
Or a pocket PC with terminal emulation software
E-mail addresses
Canadians do not have open access to bookshare.org
School environment needs a technology resource person/vision teacher that
can assist the student through the steps required to make the BrailleNote
communicate with other devices in sharing and viewing electronic files.
Locating the information and technical support persons needed to assist the
student in learning the required technology skills.
Information and Instructions for the Braille Note 32
Using ActiveSync to Connect the BrailleNote and the PC
1. Ensure that the most recent version of ActiveSync has been loaded onto the
PC (included on your BrailleNote CD) and that a prior successful connection
has been established at least once between the BrailleNote and PC.
2. With the assistance of JAWS on the PC, the student will locate, highlight, and
copy, the section of text he/she would like to work with.
3. On the PC the student will paste the information into a word processor and
save the information as a text file. Save this file on the desktop for easy
access. The file can be moved later to My Documents if the student chooses
to keep it on the hard drive.
Vision Technologies: Access to Literacy - ALT-VI 2003
Page 33
Section 3: Braille Notetaker
4. Ensure that the 9 pin serial communications cable, pictured below, has one
end plugged into the BrailleNote serial port and the other into the mating
socket on the PC terminal. If the terminal has a 25 pin D type connector
instead, use the 9 pin to 25 pin adapter. Ensure that the BrailleNote and the
PC are turned on.
5. Start ActiveSync on the PC, the following window will open on your desktop.
Vision Technologies: Access to Literacy - ALT-VI 2003
Page 34
Section 3: Braille Notetaker
6. Under the file menu select Get Connected. The following window appears.
7. On the BrailleNote, from the Main Menu, type U for the Utilities menu. Hit
the space bar and Keysoft will display
“Connect to ActiveSync”
8. On the computer click Next in the Get Connected window. As soon as the
following window appears on the computer hit Enter on the BrailleNote
Vision Technologies: Access to Literacy - ALT-VI 2003
Page 35
Section 3: Braille Notetaker
Keysoft will display
“Utilities Menu”
Don’t be fooled it is now looking for ActiveSync and will make a connection
shortly.
Note: If you have been using the serial port for the Visual Display option,
this must be turned off, otherwise when you connect to ActiveSync it will tell
you that the port is not available.
9. When the connection has been made your BrailleNote and PC will “chirp”
and the following window will appear on the PC.
Vision Technologies: Access to Literacy - ALT-VI 2003
Page 36
Section 3: Braille Notetaker
10. As soon as the connection has been made the Partnership window below will
open. The default is set at yes, select No and click the Next button.
You will be returned to the Microsoft ActiveSync window and you will see
the word Connected in the Guest list.
Vision Technologies: Access to Literacy - ALT-VI 2003
Page 37
Section 3: Braille Notetaker
11. Click on the Explore button and a window similar to the one below will open.
12. Double click on the icon My Handheld PC. The window that appears on your
desktop is the schematic of the folders on the BrailleNote. Files can now be
moved back and forth between the BrailleNote and the PC just like you would
manage them on any windows desktop. Files should be kept in the Flash
Disk Folder. Note that electronic books can be kept in two locations: 1) in the
Books folder on the KeySoft system disk, or 2) in the Flash Disk folder and
then in the My Books folder.
Note: There may be an additional icon in this window if you have the
compact flash disk attached to the back of the BrailleNote. You may also
save file to the disk where they will be permanently stored.
Remember to save files in the Flash Disk folder and have your External
Drive attached to the BrailleNote when copying and transferring files from the
compact flash disk. When you double click on the Flash Disk icon a
window similar to the one below will open and you will then have access to
management of your BrailleNote files on the PC. Remember that the process
of copying files is the same as managing files on your desktop.
Vision Technologies: Access to Literacy - ALT-VI 2003
Page 38
Section 3: Braille Notetaker
Freeing the Serial Port
“If you need to use the PC’s serial port for another function, go to the File
Menu of the ActiveSync menu bar, select “Connection Settings” and un-check
the “Allow serial cable or infrared connection to this Comm Port” option.
Remember, that next time you connect, you have to “check” this option.”
(BrailleNote manual page 14-4)
1.2
Downloading an Electronic Text File and Converting It to
a Word Processing File
1. Navigate to the Gutenberg site by putting the name. Gutenberg in the search engine
or by entering the following path in the box at the top of the window:
http://gutenberg.net/. Scroll down until the following box appears on the screen.
2. To download a list of all books click on Authors (ZIPped). This will download a list
of titles, sorted by author. The following window will appear:
Vision Technologies: Access to Literacy - ALT-VI 2003
Page 39
Section 3: Braille Notetaker
3. Save this file to the desktop. When it has finished downloading, minimize your
windows and go to the desktop. The file on the desktop will be labelled AUTHORS.
Double click on the file and it will extract. For now extract it directly onto your
desktop. You can create a folder title Electronic Books if you so choose to do so.
4. After the file has been extracted search to see if The Adventures of Reddy Fox by
Thornton W. Burgess is available for downloading.
5. Maximize the Internet Explorer window showing the Gutenberg site, and enter the
title or author in the appropriate boxes and click on Search.
6. The following window appears:
Click on the title of your book. It should be highlighted with a different colour. The
following window appears:
Vision Technologies: Access to Literacy - ALT-VI 2003
Page 40
Section 3: Braille Notetaker
7. If you have room on your hard drive, click on the English .txt file. It is larger;
however, it does not have to be unzipped.
8. When the Gutenberg file comes up, under the File menu, select Save As, and save it
in My documents, and then in the folder My eBooks. Rename the file if you desire a
more descriptive title.
9. Open the file that contains the text you just downloaded. Notice that the file opens in
NotePad. Clean up the first part where the Gutenberg Project outlines their
restrictions. To make it easier for student to read delete all the text that comes
before the title. Now resave the file. At this point you can save it into any word
processor you choose to. To do this, go to step #10.
10. Under the Edit menu, choose Select All, or use the keyboard shortcuts CTRL-A.
Copy this file onto the clipboard and open up the word processor you would like to
save the file in. Under the Edit menu, choose Paste, or use the keyboard shortcut,
CTRL-V. You should now see the text in your word processor and at this point you
should save the file. Note, at this point it will no longer be a text file, it will be
rewritten as a Word or AppleWorks etc. file.
11. If it is not already open, open the file you just saved in your preferred word
processor. If it is a talking word processor, select portions of the text you want read
back to you. If it is a regular word processor try to manipulate the text.
12. Go back and download two more e-books. If you choose you may download the
Titles index as well.
Vision Technologies: Access to Literacy - ALT-VI 2003
Page 41
Section 3: Braille Notetaker
1.3
Listening To and Reading a Document
Listening to a Document
Spacebar & G (for Go)
BACKSPACE & ENTER
Read the entire document without stopping
Stop reading
You can start and stop as you wish with the above two keys.
SPACE with dots 1,2,3
SPACE with dots 4,5,6
Go to the top of the document
Go to bottom of document
SPACE with dot 3
SPACE with dots 3,6
SPACE with dot 6
Move back a character and read it
Read current character
Move forward a character and read it
SPACE with dot 2
SPACE with dots 2,5
SPACE with dot 5
Move back a word and read it
Read current word
Move forward a word and read it
SPACE with dot 1
SPACE with dots 1,4
SPACE with dot 4
Move back a sentence and read it
Read current sentence
Move forward a sentence and read it
SPACE with dots 2,3
SPACE with dots, 2,3,5,6
SPACE with dots 5,6
Move back a paragraph and read it
Read current paragraph
Move forward a paragraph and read it.
Notice the patterns:
Left side of keyboard used for moving backward
Right side of the keyboard used for moving forward
Both sides used for reading current character, word, etc
Outer fingers, on dots 3 and 6, are used to read small elements, or characters
Inner fingers, on dots 1 and 4 are used for larger elements like sentences
Hot Tip: You do not have to release the spacebar after each command. For
example hold the SPACEBAR down and tap dot 2 several times to move back
several words. With the SPACEBAR held down, tap dot 6 several times to move
forward several characters. Finally release the SPACEBAR.
Vision Technologies: Access to Literacy - ALT-VI 2003
Page 42
Section 3: Braille Notetaker
Reading a Document
ADVANCE
BACK
PREVIOUS & BACK
PREVIOUS & ADVANCE
1.4
Moves braille display forward one window
Moves braille display back one window
Move braille display one word to the left
Move braille display a word to the right
Using the PC as a Visual Display for the BrailleNote
“ BrailleNote can provide a text output to the serial or infrared ports that reflects what the
BrailleNote displays on the braille display or what is spoken….Sighted observers or
teachers can use the visual display screen to view KeySoft’s prompts and help
messages, and your text if you are typing a document.”
(BrailleNote manual page 2-10)
1. The first thing that you must check is to make sure the program Hyperterminal is
installed on your computer. It usually can be found in the Start Menu under
Programs/Accessories/Communications/Hyperterminal. If it is not, it can be
downloaded from the Internet and installed on your PC.
2. Ensure that the 9 pin serial communications cable, pictured below, has one end
plugged into the BrailleNote serial port and the other into the mating socket on the
PC terminal. If the terminal has a 25 pin D type connector instead, use the 9 pin to
25 pin adapter. Ensure that the BrailleNote and the PC are turned on.
3. On your PC start the Hyperterminal program. The New Connection window will
open. Type in BrailleNote for the Name and leave the default icon selected. Click
OK.
Vision Technologies: Access to Literacy - ALT-VI 2003
Page 43
Section 3: Braille Notetaker
4. The Connect To window will open. In the Connect using drop down menu select,
Direct to Com 1. Click OK.
5. The Com 1 Properties window will open. Under the Bits per second drop down
menu, select 38400. Click OK.
Vision Technologies: Access to Literacy - ALT-VI 2003
Page 44
Section 3: Braille Notetaker
6. The following window will open.
7. On the BrailleNote open the Options Menu (SPACE with O) then type V for Visual
display. KeySoft will display
“Visual display off”
8. To send the visual display to the Serial port type S followed by ENTER. KeySoft will
display
“Serial”
and take you back to the Main Menu. You will now see the visual display of the
BrailleNote on the Hyperterminal screen. It will look similar to the window below.
Vision Technologies: Access to Literacy - ALT-VI 2003
Page 45
Section 3: Braille Notetaker
9. It is very important to remember to turn the Visual Display back to Off when you are
finished, especially if you are planning on using Active Sync or connecting to JAWS
with the BrailleNote. You need to free up the serial port currently being used for the
Visual Display. In the Options Menu, select V for Visual Display. KeySoft will
display
“Visual display serial”
Type F followed by ENTER to turn the visual display off. KeySoft will display
“Off”
and return you to the Main Menu. You will no longer be able to view text in the
BrailleNote Hyperterminal window.
Note:
When you close Hyperterminal you will be asked if you want to save the
BrailleNote Connection settings. Respond yes to this and an icon will be put into
the Hyperterminal menu. The next time you connect just double-click on the
BrailleNote icon and the settings will have been saved for you.
Equipment needed
•
•
•
•
•
•
•
•
•
BrailleNote with KeySoft 5.0.
Smartscan
Compact Flash Disk
9 pin serial communication cable
Computer with 9 pin serial communication port
Access to the Internet
MicroSoft ActiveSync loaded onto the PC
Desk and powerbars
Access to a printer and required cables
Note: The biggest support is in the availability of a vision teacher or technology
consultant that can assist the team in finding the required information and then
knowing how to make it all work together. The second biggest impact on support
is the student’s knowledge and prior experience in computer and BrailleNote
skills.
FAQ
1. What if I just can’t get the connections to work?
Call the technicians at the PulseDate center. Have all your equipment
available, plugged in, and ready when you call for support. 1-925-681-4636
Vision Technologies: Access to Literacy - ALT-VI 2003
Page 46
Section 3: Braille Notetaker
2. What are the disk drives that you can access with the BrailleNote?
•
•
•
Compact Flash - refers to the small disk that can be inserted in the back of
the BrailleNote and into the SmartDisk Drive.
Flash Disk – storage area within the BrailleNote
Keysoft System Disk – cannot save to this disk it is for the operating
system of the BrailleNote
3. Where can I get e-text from?
There are many sites available through the Internet. You need only put
electronic books or electronic texts in the search engine and many sites will
appear. Some are free and some are to purchase.
Example of some sites are listed below:
http://gutenberg.net/
http://www.bookshare.org/web/Welcome.html
http://www.ipl.org/div/books/
http://www.free-books.org/
http://www.stockton.lib.ca.us/ebooks.htm#free
http://www.downloadfreetrial.com/educational/e-books.html
http://www.bartleby.com/
http://etext.lib.virginia.edu/ebooks/ebooklist.html
http://www.memoware.com/
http://www.bibliomania.com/
http://www.learningpage.com/free_pages/ewe_preview.html
http://www.classicbookshelf.com/library/
http://digital.library.upenn.edu/books/search.html
http://integratingtheinternet.com/index/primary3.html#art
http://www.night.net/tucker/
http://schools.sd68.bc.ca/fore/enrichment.htm
http://kidsdomain.com/down
http://www.sd22.bc.ca/hillview/prod/govres.htm
A “Related Materials” section is included in this resource book. Please refer to the
Related Materials section for a list of narrated screen demonstrations that have been
developed for each content section. All narrated screen demonstration files are included
on your Accessing Literacy CD, also included with this resource book.
Vision Technologies: Access to Literacy - ALT-VI 2003
Page 47
Section 3: Braille Notetaker
RESOURCES
This BrailleNote resources module contains the following sections:
2.0
The BrailleNote 32 Notetaker
2.1
The BrailleNote 32 Book Reader
2.2
BrailleNote 32 Book Reader Lesson 1
3.0
The BrailleNote Word Processor
3.1
The BrailleNote Word Processor Lesson 1
3.2
The BrailleNote Word Processor Lesson 2
3.3
The BrailleNote Word Processor Lesson 3
2.0
The BrailleNote 32 Notetaker
A Braille note taker is a portable computer or personal data assistant that has a Braille
display built onto it. These devices can be used in a stand-alone mode for taking notes,
doing basic word-processing, scheduling appointments and performing other tasks. They
can also be connected to a computer with screen reading software and act as a Braille
terminal.
Classroom implications
•
•
•
•
•
•
•
Electronic files can be transferred very quickly from the BrailleNote to the PC or vice
versa. This has implications in notes, worksheets, internet research, tests, and
electronic texts.
Text can now be stored and accessed very efficiently and quickly.
No longer a need for a braille hardcopy or a transcriber. A direct link between the
teacher and the student.
Very portable in the school environment
Instant access to the Internet without having to deal with JAWS.
No longer, does the student requiring braille, need a separate room to store their
texts and workbooks.
The entire system is integrated into one device.
Vision Technologies: Access to Literacy - ALT-VI 2003
Page 48
Section 3: Braille Notetaker
Common barriers or challenges that might occur
•
•
•
The level of technology and computer knowledge and prior experience the student
has.
Setting up the initial connection between the PC and the BrailleNote using
ActiveSync.
Having a visual display, this requires:
o
o
•
•
•
The BrailleNote is a little heavier than a BrailleLite
Setting up the Internet service provider or the network connection
Knowledge of computer braille when required
o
•
•
•
A PC with a 9 pin serial communication port
Or a pocket PC with terminal emulation software
E-mail addresses
Canadians do not have open access to bookshare.org
School environment needs a technology resource person/vision teacher that can
assist the student through the steps required to make the BrailleNote communicate
with other devices in sharing and viewing electronic files.
Locating the information and technical support persons needed to assist the student
in learning the required technology skills.
Equipment needed
•
•
•
•
•
•
•
•
•
BrailleNote with KeySoft 5.0.
Smartscan
Compact Flash Disk
9 pin serial communication cable
Computer with 9 pin serial communication port
Access to the Internet
MicroSoft ActiveSync loaded onto the PC
Desk and powerbars
Access to a printer and required cables
Note: The biggest support is in the availability of a vision teacher or technology
consultant that can assist the team in finding the required information and then knowing
how to make it all work together. The second biggest impact on support is the student’s
knowledge and prior experience in computer and BrailleNote skills.
FAQ
1. What if I just can’t get the connections to work?
Call the technicians at the PulseDate center. Have all your equipment available,
plugged in, and ready when you call for support. 1-925-681-4636
Vision Technologies: Access to Literacy - ALT-VI 2003
Page 49
Section 3: Braille Notetaker
2. What are the disk drives that you can access with the BrailleNote?
•
•
•
Compact Flash - refers to the small disk that can be inserted in the back of the
BrailleNote and into the SmartDisk Drive.
Flash Disk – storage area within the BrailleNote
Keysoft System Disk – cannot save to this disk it is for the operating system of
the BrailleNote
3. Where can I get e-text from?
There are many sites available through the Internet. You need only put electronic
books or electronic texts in the search engine and many sites will appear. Some are
free and some are to purchase.
Example of some sites are listed below:
http://gutenberg.net/
http://www.bookshare.org/web/Welcome.html
http://www.ipl.org/div/books/
http://www.free-books.org/
http://www.stockton.lib.ca.us/ebooks.htm#free
http://www.downloadfreetrial.com/educational/e-books.html
http://www.bartleby.com/
http://etext.lib.virginia.edu/ebooks/ebooklist.html
http://www.memoware.com/
http://www.bibliomania.com/
http://www.learningpage.com/free_pages/ewe_preview.html
http://www.classicbookshelf.com/library/
http://digital.library.upenn.edu/books/search.html
http://integratingtheinternet.com/index/primary3.html#art
http://www.night.net/tucker/
http://schools.sd68.bc.ca/fore/enrichment.htm
http://kidsdomain.com/down
http://www.sd22.bc.ca/hillview/prod/govres.htm
Vision Technologies: Access to Literacy - ALT-VI 2003
Page 50
Section 3: Braille Notetaker
2.1
The BrailleNote 32 Book Reader
KeyBook “enables you to read electronic books in any standard Braille or text format
including MICROSOFT Word format….you can read using the Braille display or listen as
KeyBook reads out loud…”
“If the book is in text format, KeyBook can translate the text into your preferred reading
grade instantly, as you read….The underlying text is still in its original form…”
*** Braille files can only be read in the grade in which they were created.
The electronic book cannot be edited in KeyBook.
For this exercise the introduction from the Gutenberg files has been removed to make
the book reading easier.
2.2
BrailleNote 32 Book Reader Lesson #1
In this lesson the student will access electronic books from locations other that the
“Books” folder in the KeySoft System Disk and in both text and Microsoft Word format.
NOTE: For this lesson the electronic book(s) should be transferred by the teacher onto
the student’s compact flash disk. Some samples from the Gutenberg site
(www.gutenberg.net) have been included to assist you with this lesson. The forward
has been removed in the electronic book for ease of reading for the student. A copy of
their forward is included at the end of this lesson.
1. From the Main Menu select Book Reader the quick way by brailling the letter “b”.
You may also access the Book Reader by scrolling through the options (pressing the
spacebar and backspace on the Braille keyboard or using the Back and Advance
thumbkeys) at the Main Menu until you hear “Book Reader” and then press ENTER.
Keybook will prompt:
“Read book in which folder? Press ENTER for (KeyBook will suggest the last
folder that was opened or says NONE)
2. Press Backspace to change the current drive. Remember you can do this
any time you are prompted for a folder name. KeyBook will prompt:
Drive? Press ENTER for (KeyBook will prompt the last drive used)
If your prompt was not Compact Flash scroll through the choices using either the
thumbkeys or Braille keyboard and press ENTER when the Compact Flash is
prompted.
Vision Technologies: Access to Literacy - ALT-VI 2003
Page 51
Section 3: Braille Notetaker
3. KeyBook will prompt:
“Read book in which folder? Press ENTER for None.”
Press ENTER since our first book we will read is not in a folder.
4. KeyBook will prompt:
“Book name. Press ENTER for (KeyBook will give you the name of the first book
on the list). Computer Braille is required.”
Scroll through the choices until you hear The Adventures of Reddy Fox.txt and
press ENTER.
5. KeyBook will prompt:
“Review the Options?”
Braille the letter “n” for No.
You will hear the Braille display changing and the BrailleNote will beep once or twice
indicating it is busy loading the book. Once the book is loaded if you have not read it
before, KeyBook will prompt:
“Top of Document. The” (KeyBook will always read the word or what appears in
the first cell if it is a space or punctuation)
6. Use either the refreshable braille display with the thumbkeys to read some of
the text or the braille keyboard commands to listen to some of the text, or a
combination of both.
Refer to the file Listening To and Reading a Document for the list of
commands.
7. When you are finished, press SPACE and E to exit and save your place in the book.
When you reopen this book it will automatically take you to the place where you left
off.
Vision Technologies: Access to Literacy - ALT-VI 2003
Page 52
Section 3: Braille Notetaker
8. On the PC the student will paste the information into a word processor and save the
information as a text file. Save this file on the desktop for easy access. The file
can be moved later to My Documents if the student chooses to keep it on the hard
drive.
9. Ensure that the 9 pin serial communications cable, pictured below, has one end
plugged into the BrailleNote serial port and the other into the mating socket on the
PC terminal. If the terminal has a 25 pin D type connector instead, use the 9 pin to
25 pin adapter. Ensure that the BrailleNote and the PC are turned on.
Vision Technologies: Access to Literacy - ALT-VI 2003
Page 53
Section 3: Braille Notetaker
10. Start ActiveSync on the PC, the following window will open on your desktop.
11. Under the file menu select Get Connected. The following window appears.
12. On the BrailleNote, from the Main Menu, type U for the Utilities menu. Hit the
space bar and Keysoft will display
“Connect to ActiveSync”
13. On the computer click Next in the Get Connected window. As soon as the following
window appears on the computer hit Enter on the BrailleNote
Vision Technologies: Access to Literacy - ALT-VI 2003
Page 54
Section 3: Braille Notetaker
Keysoft will display
“Utilities Menu”
Don’t be fooled it is now looking for ActiveSync and will make a connection shortly.
Note: If you have been using the serial port for the Visual Display option, this must
be turned off, otherwise when you connect to ActiveSync it will tell you that the port
is not available.
14. When the connection has been made your BrailleNote and PC will “chirp” and the
following window will appear on the PC.
15. As soon as the connection has been made the Partnership window below will open.
The default is set at yes, select No and click the Next button.
Vision Technologies: Access to Literacy - ALT-VI 2003
Page 55
Section 3: Braille Notetaker
You will be returned to the Microsoft ActiveSync window and you will see the word
Connected in the Guest list.
16. Click on the Explore button and a window similar to the one below will open.
Vision Technologies: Access to Literacy - ALT-VI 2003
Page 56
Section 3: Braille Notetaker
17. Double click on the icon My Handheld PC. The window that appears on your
desktop is the schematic of the folders on the BrailleNote. Files can now be moved
back and forth between the BrailleNote and the PC just like you would manage them
on any windows desktop. Files should be kept in the Flash Disk Folder. Note that
electronic books can be kept in two locations: 1) in the Books folder on the KeySoft
system disk, or 2) in the Flash Disk folder and then in the My Books folder
Note: There may be an additional icon in this window if you have the compact flash
disk attached to the back of the BrailleNote. You may also save file to the disk
where they will be permanently stored.
Remember to save files in the Flash Disk folder and have your External Drive
attached to the BrailleNote when copying and transferring files from the compact
flash disk. When you double click on the Flash Disk icon a window similar to the
one below will open and you will then have access to management of your
BrailleNote files on the PC. Remember that the process of copying files is the same
as managing files on your desktop.
Freeing the Serial Port
“If you need to use the PC’s serial port for another function, go to the File Menu of the
ActiveSync menu bar, select “Connection Settings” and un-check the “Allow serial
cable or infrared connection to this Comm Port” option. Remember, that next time
you connect, you have to “check” this option.” (BrailleNote manual page 14-4)
Vision Technologies: Access to Literacy - ALT-VI 2003
Page 57
Section 3: Braille Notetaker
3.0
The BrailleNote Word Processor
This lesson will introduce the BrailleNote word processor, KeyWord. At the end of the
lesson the student will have a basic understanding of creating, editing and reading a
simple document.
The default for KeyWord is a braille document, with the automatic layout and format for
a braille page embossing directly. A braille document can be sent “to an ink printer or
another computer or e-mail it, and KeySoft automatically translates it into a suitable
format.”
You can create a text document with the layout and format for an ink-print page. A text
document can also be embossed using automatic braille translation.
“KeyWord allows you to format a document for embossing and independently format the
same document for printing. The two sets of formatting controls are independent….The
document remains unchanged when you send it to an embosser or printer.
Word Processor - KeyWord
KeyWord Menu
•
•
•
•
Create a Document
Open a Document
Emboss a Document
Print a Document
You can select an item by scrolling through the options and when you arrive at the
prompt you are looking for, press ENTER. You can also select options quickly by
brailling the first letter of the option when you are in the KeyWord menu.
i.e. “c” will take you quickly to Create document.
Documents: Each file must be identified by a unique name allowing KeySoft to
distinguish one file from another. “A name may be up to 250 characters long, and can
contain any braille sign.” You can use spaces and Grade One or Two braille in your
filename. When opening an existing document the exact unique name must be used.
Folders: To help you organize your files, documents can be stored in groups called
folders. Initially the BrailleNote comes with folders named “General”, “Work”,
“Manual” (contains the User Manual), and a number of others which the KeySoft
system uses. You can create as many folders as you wish, using up to 250 characters
in the name and any braille signs. You can use spaces and Grade One or Two braille in
your filename.
Vision Technologies: Access to Literacy - ALT-VI 2003
Page 58
Section 3: Braille Notetaker
Drives: (there are 3 drives)
•
•
•
KeySoft System Disk – You cannot save files here as this is used for the
information provided originally from the factory and what makes the BrailleNote
operate, think of it as the BrailleNote operating system.
Flash Disk – Memory within the BrailleNote that you would usually store files for
fast, secure storage. “You can copy, rename, erase or edit and re-save documents
to the Flash Disk.”
Compact Flash – refers to the small disk that can be inserted in the back of the
BrailleNote or into the SmartDrive, for access to other computers with a USB port.
Hot Tip: You may find it helpful to print a hardcopy of the file Listening To and
Reading a Document to have a list of commands available to you while doing
these exercises with your student.
Changing the Current Drive
You can change the drive anywhere in the BrailleNote. When you are at the prompt for a
filename or folder name, press BACKSPACE. KeySoft prompts:
“Drive? (last drive used)”
To scroll through the list of available drives press the thumbkey ADVANCE or SPACE
on the braille keyboard. To select a drive press the thumbkey NEXT or on the braille
keyboard, ENTER.
You have 3 options for drives if you have the storage card in the back of the BrailleNote:
•
•
•
Compact Flash - refers to the small disk that can be inserted in the back of the
BrailleNote and into the SmartDisk Drive.
Flash Disk – storage area within the BrailleNote
Keysoft System Disk – cannot save to this drive as it is for the operating system
Hot Tip: The Compact Flash Disk has a little lip to it. The lip goes down when
placing it into the BrailleNote. The lip goes to the left when inserting it into the
SmartDisk drive. If you share this with your students it will assist him/her in
inserting the disk properly into both devices. It does take a bit of pulling to
extract the disk from the BrailleNote, it sometimes helps to GENTLY rock it to the
left and right. Do not be concerned.
Vision Technologies: Access to Literacy - ALT-VI 2003
Page 59
Section 3: Braille Notetaker
3.1 The BrailleNote Word Processor Lesson #1
Note: Please use the listening and reading commands at any time in these exercises to
reinforce their use. They are listed for you in the document titled Listening To and
Reading a Document, included with this tutorial.
In this exercise you will create a new file called Spelling. You will enter some words and
sentences, Save the file and then exit.
1. From the Main Menu braille the letter “w” to get to the word processor quickly. If you
forgot what letter to braille, you could scroll through the options with the thumbkeys
or braille keyboard and select KeyWord by pressing NEXT or ENTER.
KeySoft prompts:
“KeyWord menu”
2. Scroll through all the options in the KeyWord menu by using the thumbkeys or
braille keyboard. When you hear the prompt, “End of Menu”, braille the letter “c” to
quickly select, Create a document. Press ENTER or NEXT to select it. KeySoft
prompts”
“Drive? Press ENTER for (last drive used)”
3. Locate the COMPACT FLASH if it is not prompted and press ENTER.
KeyWord will prompt:
“Folder Name? Press ENTER for NONE”. Press ENTER.
4. KeyWord prompts:
“Document to Create?”
Call this file “spelling”. KeyWord does not use caps to search documents.
**Notice that the braille display shows the name of your file and uses cells 7 & 8 to
shows you where the character you type will be entered (cursor). Use Grade One or
Two braille. Press ENTER. KeyWord prompts:
“Spelling.Top of Document. Blank.”
You are now at the top of a blank braille document. Braille in the following spelling
lesson:
Vision Technologies: Access to Literacy - ALT-VI 2003
Page 60
Section 3: Braille Notetaker
NOTE: For now, to keep this lesson simple, if brailling mistakes are made use the
backspace key, just like you would on a computer, to delete the text. Use the
buttons at the top of each cell to route your cursor to the point you want in the text
and then use the backspace key to delete.
BrailleNote
document
compact Flash
advance
enter
next
space
thumbkeys
keyboard
1. If I want to scroll through the list in a menu, I can use the thumbkeys or the
braille keyboard.
2. If I want to select an option I press Enter on the braille keyboard or the
thumbkey, Next.
3. (Leave this line blank. We will come back to fill it in, in lesson 2)
5. Your document is automatically saved; however, it is always a good habit to return to
the Main Menu before powering down. This automatically saves your files even if the
battery should go completely flat. Do this now by brailling the letter “e” and pressing
the spacebar at the same time. Keysoft will prompt:
“Exit. KeyWord menu.”
Use the thumbkey Previous to return to the Main Menu.
Note: There are many ways to navigate back to the Main Menu using the
thumbkeys, braille keyboard, or a combination of both as in the above example.
Each student will develop their own pathways that suit them best.
Vision Technologies: Access to Literacy - ALT-VI 2003
Page 61
Section 3: Braille Notetaker
3.2
The BrailleNote Word Processor Lesson #2
This lesson teaches the student to open a previously created file, add to it, and translate
it to a Word file for the teacher.
Note: Please use the listening and reading commands at any time in these exercises to
reinforce their use. They are listed for you in the document titled Listening To and
Reading a Document, included with this tutorial.
Insure that the student’s compact flash disk is in the BrailleNote as you will be opening
the file Spelling created in Lesson 1.
1. Open the word processor by brailling the letter W from the Main Menu. KeySoft will
prompt:
“KeyWord menu.”
2. Braille the letter O to Open a Document. KeyWord will prompt:
“Drive? Press ENTER for (suggested drive).”
Note: The BrailleNote always defaults to the last drive used for quick access to the
last file you were working on.
3. If KeySoft did not prompt the COMPACT FLASH DISK, use the SPACEBAR or
ADVANCE thumbkey to scroll through the three drive options. Press ENTER or
NEXT thumbkey to select the drive. KeySoft will prompt:
“Folder Name? Press ENTER for (suggested folder)” i.e.NONE
4. Press ENTER. KeySoft prompts:
“Document to Open? Press ENTER for (suggested file)”
Note: The BrailleNote always defaults to the last file used for quick access.
If Spelling was not suggested scroll through the options using the SPACEBAR or
ADVANCE thumbkey until you hear Spelling. Press ENTER or NEXT thumbkey to
open the file.
5. Keysoft will place you back in your document where you left off. In this case at the
bottom of the spelling exercise. Keysoft should prompt:
“3 period”
You are now ready to add the following text for the third sentence.
Vision Technologies: Access to Literacy - ALT-VI 2003
Page 62
Section 3: Braille Notetaker
6. If I want to exit any menu, I can braille the letter E and press the spacebar
same time.
at the
NOTE: For now, to keep this lesson simple, if brailling mistakes are made use the
backspace key, just like you would on a computer, to delete the text. Use the
buttons at the top of each cell to route your cursor to the point you want in the text
and then use the backspace key to delete. Simple editing will be addressed in the
next lesson.
7. Return to the Main Menu when you have finished entering the third sentence for the
spelling exercise.
8. You will now use the following directions to translate your Keysoft file to a Word file
so that you may hand it into your teacher for correction and comments.
9. From the Main menu, type F to open the File Manager, type T for the Translation
menu, type E for Export Document. Keysoft will prompt:
“Drive? Press Enter for (last disk used)”
If the suggestion for the drive was not COMPACT FLASH scroll through the options
and select this drive. Keysoft will prompt:
“Export Document from which folder? Press ENTER for (none).”
Keysoft may also reverse these two prompts depending on where you were last
working on your BrailleNote.
10. Keysoft will prompt:
“Document Name? Press Enter for (suggested document).”
11. Using the SPACEBAR or ADVANCE key scroll through until you locate the file you
want to translate. Press ENTER to select the file. Keysoft will prompt:
“Export to which device?”
12. Type F for File type. Keysoft will prompt:
“Export as which File type? ASCII text file?”
13. Type SPACE with dots 3,4 repeatedly until you hear Microsoft Word file and press
ENTER. Keysoft will prompt:
“Destination Drive? Press Enter for (suggested drive).”
NB If the suggested drive is not the COMPACT FLASH scroll through the choices
until you hear it announced.
Vision Technologies: Access to Literacy - ALT-VI 2003
Page 63
Section 3: Braille Notetaker
14. Select Compact Flash by pressing ENTER. Keysoft will prompt:
“Directory Name? Press Enter for slash. Computer Braille is required.”
15. Press ENTER. Keysoft will prompt:
“Destination FileName? Compuer Braille is required.”
16. Type in the name of new Microsoft Word file you want to create. For example you
could call it “Spelling (today’s date)”. Press ENTER. Keysoft will prompt
“1 file Exported. Translation Menu.”
17. You may now return to the Main Menu and remove the compact flash from the
BrailleNote and insert it into the SmartDisk drive and attach it to your teacher’s PC
through the USB port. In My Computer, double click on the Removable Disk and the
teacher will see your file. It can be opened in Word. The teacher can correct it, add
to it, save it and then return it to the student. They would open it in the regular way
through the word processor.
Refer to pages 12-16 and 12-17 in the user manual for additional information.
Vision Technologies: Access to Literacy - ALT-VI 2003
Page 64
Section 3: Braille Notetaker
3.3
The BrailleNote Word Processor Lesson #3
This lesson will teach the student how to open a Word file in Keysoft and some basic
editing features.
Note: Please use the listening and reading commands at any time in these exercises to
reinforce their use. They are listed for you in the document titled Listening To and
Reading a Document, included with this tutorial.
Insure that the file Homework! Oh, Homework! has been copied onto your students
Compact Flash Disk using the computer to do this and the SmartDisk.
1. From the Main Menu open the word processor quickly by typing in the letter W.
2. Braille the letter O to Open a Document. When prompted for the drive please select
the Compact Flash. When prompted for the Folder Name select None. Keysoft
will prompt:
“Document to open?”
Use the SPACEBAR to scroll through the choices until you hear Homework! Oh
Homework! and press ENTER on the braille keyboard to open the file. Keysoft will
prompt:
“Review the options?”
3. Type the letter Y for Yes. Keysoft will prompt,
“Translate into Braille? Currently (suggestion)”
4. Type Y for Yes and press Enter. Keysoft will prompt:
“End of list”
5. Press SPACE and E to exit and go to the top of the document to begin reading
and/or editing. KeySoft will prompt:
“Exit. Top of Document. Homework!”
(KeyWord always prompts what is at the beginning of the file)
Vision Technologies: Access to Literacy - ALT-VI 2003
Page 65
Section 3: Braille Notetaker
6. You are now at the top of the document and we will be editing the text for errors.
Please read the following poem to the student before beginning the exercise in order
for him/her to know what corrections to make. You may even want to print out a
braille copy for some of the students to refer to.
Homework! Oh, Homework!
By Jack Prelutsky
Homework! Oh, Homework!
I hate you! You stink!
I wish I could wash you
away in the sink,
if only a bomb
would explode you to bits.
Homework! Oh Homework!
You’re giving me fits.
This is the student file for editing:
Homework! Oh, Homework!
By Jack Prelutsky
Homewrk! Oh, Homewrk!
I hate you! You sftink!
I wish I could wash wash you
away in the stink,
if only a bmb
would explode you explode to bits.
Hoomework! Oh Hmework!
You’re giving me
fits.
7. Use the refreshable braille display to read and edit the text. Use the thumbkeys
ADVANCE and BACK to move the braille display one line forward or backward at a
time.
8. “To insert a character, word, sentence, or any amount of text, you need only to
position the cursor at the point where you want to insert the text, and start typing. No
special command is required because KeyWord is always in insert mode.”
Remember that the little grey keys above each cell are used to route the cursor to
the point in the text where you want to edit. For example in the first line of text to
correct Homewrk is missing an o. Position the cursor on the r and then braille the
letter o. Do the same for the second Homewrk.
Vision Technologies: Access to Literacy - ALT-VI 2003
Page 66
Section 3: Braille Notetaker
9. There are two ways of deleting. For this exercise we will be using the Quick
Commands. Please refer to page 3-17 & 3-18 in the manual for using the Delete
Menu. The full set of delete command is:
Backspace
Delete current character
Delete current word
Delete previous word
Delete to end of sentence
Delete to end of paragraph
Delete to end of document
press the BACKSPACE key on its own
BACKSPACE with dots 3,6
BACKSPACE with dots 2,5
BACKSPACE with dot 2
BACKSPACE with dots 1,4
BACKSPACE with dots 2,3,5,6
BACKSPACE with dots 4,5,6
Note: Notice that the above commands “correspond to the Read commands, but
use the BACKSPACE key instead of SPACE. For example, “Read current
character” is SPACE with dots 3,6, so “Delete current character” is BACKSPACE
with dots 3,6.”
10. In the second line of the poem the letter f must be removed from the word sftink.
Place the cursor on the letter t and press the BACKSPACE key. The BrailleNote will
give a little beep to indicate the delete is finished.
11. In the third line of the poem the word wash is written twice. Position the cursor
anywhere in the word and press BACKSPACE with dots 2,5 to delete the current
word. The BrailleNote will beep to let you know that the delete is complete and the
cursor moves to the beginning of the next word.
12. Continue to edit the remainder of the poem. When you are finished use the read all
command SPACEBAR and the letter G, to read the edited poem.
Hot Tip: “On reading your document again, you may find a word misspelled.
When using speech it is often simpler to delete the word and rebraille it
correctly, followed by a single space, rather than delete one or two characters
and correct on a letter by letter basis.”
13. If you made any alterations to the file when you exit by using SPACE and E Keysoft
will prompt:
“Exit. Document was modified. Save as a KeyWord Document?”
14. If you wanted to save this file as a braille file, type Y for Yes. Keysoft prompts:
“Document name? Press Enter for (suggestion).”
Vision Technologies: Access to Literacy - ALT-VI 2003
Page 67
Section 3: Braille Notetaker
15. Enter the new name and press Enter. Keysoft now returns you to the KeyWord
menu.
If you have not altered the document when you exit by using SPACE and E,
Keysoft will prompt:
“Document was translated into Braille. Save as a KeyWord Document?”
16. Type Y if you want to save the document. This would mean you would not have to
translate it every time you wanted to open it. e.g. tests, reading assignments.
Keysoft will prompt:
“Document name? Press Enter for (suggestion).”
17. Enter a new name for the braille file and press Enter. Keysoft now returns you to the
KeyWord menu.
Vision Technologies: Access to Literacy - ALT-VI 2003
Page 68