1
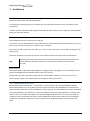
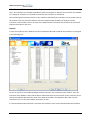
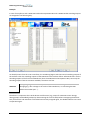
User manual for Expansion Box Valid for Firmware version 1.02 and later As of 04/20/2010 Bedienungsanleitung Contents 1 PREFACE ............................................................................................................................................................ 3 1.1 1.2 1.3 1.4 1.5 2 INSTALLATION ................................................................................................................................................... 5 2.1 2.2 2.3 2.4 3 POSITIONING THE EXPANSION BOX ............................................................................................................................. 5 CONNECTION OF THE EXPANSION BOX ........................................................................................................................ 5 CONNECTION OF THE PAB ....................................................................................................................................... 5 STATUS DISPLAY OF THE EXPANSION BOX ..................................................................................................................... 6 ASSIGN THE EXPANSION BOX TO THE PROFILUX ............................................................................................... 7 3.1 3.2 3.3 3.4 3.5 3.6 4 CONCERNING THIS MANUAL...................................................................................................................................... 3 CHARACTERISTICS ................................................................................................................................................... 3 INCLUDED IN DELIVERY............................................................................................................................................. 3 IMPORTANT OPERATING INSTRUCTIONS....................................................................................................................... 4 CONNECTIONS ....................................................................................................................................................... 4 REQUIREMENTS ..................................................................................................................................................... 7 ASSIGN THE EXPANSION BOX .................................................................................................................................... 7 THE RESOURCES (SENSORS AND INTERFACES) OF THE EXPANSION BOX .............................................................................. 7 THE SENSORS OF THE EXPANSION BOX ........................................................................................................................ 7 THE 1-10 V INTERFACES OF THE EXPANSION BOX ......................................................................................................... 9 THE SWITCHING OUTPUTS OF THE EXPANSION BOX ..................................................................................................... 10 HARDWARE MODULES .................................................................................................................................... 12 4.1 4.2 4.3 4.4 4.5 GENERAL ............................................................................................................................................................ 12 OPEN THE HOUSING .............................................................................................................................................. 13 INSERT THE MODULE ............................................................................................................................................. 13 CLOSE THE HOUSING ............................................................................................................................................. 13 STARTUP............................................................................................................................................................. 14 5 WARRANTY/ LIABILITY .................................................................................................................................... 14 6 FURTHER INFORMATION ................................................................................................................................. 14 6.1 6.2 7 HELP AND INFORMATION ....................................................................................................................................... 14 FIRMWARE UPDATE .............................................................................................................................................. 14 TECHNICAL DATA ............................................................................................................................................. 15 As of 04/20/2010 Seite 2/16 Bedienungsanleitung 1 Preface 1.1 Concerning this manual This manual is valid for the Expansion Box. The availability of certain functions depends on the existing extensions. 1.2 Characteristics We thank you for your trust in our ProfiLux products! You have herewith acquired an expansion box for your aquarium computer ProfiLux 3 or ProfiLux 3 eX. With this expansion box you are able to connect additional sensors und light bars to a ProfiLux 3 (eX) aquarium computer. Overview of the characteristics: 4 analog outputs 1-10 V with shut-off signal (expandable to max. 16) Connection option for temperature sensor Connection option for pH sensor Connection option for a conductivity sensor (selectable for salt or fresh water) Connection option for a Redox sensor Connection option for 2 level sensors 5 expansion slots for module cards Additional characteristics (with corresponding expansion): Up to 32 switchable outputs (e.g. for switching sockets) In order to be able to use our products optimally, you should take your time to read through this manual. Please pay especially attention to the operating and warranty instructions. 1.3 Included in delivery Before you start, you should check if the delivery is complete. The following articles belong to the shipment: Expansion Box Power supply unit This manual PAB connection cables, as well as all sensors are not part of the shipment of the Expansion Box and have to be ordered separately. As of 04/20/2010 Seite 3/16 Bedienungsanleitung 1.4 Important operating instructions To guarantee a safe and riskless operation, the mentioned instructions in the ProfiLux manual have to be absolutely followed! If they are ignored, the warranty expires resp. the manufacturer rejects any responsibility resp. liability for damages! Also please take notice of the safety instructions in the ProfiLux manual and of these of the respective manufacturer. 1.5 Connections The device disposes of several labeled connections on the rear side. On the picture below you can see the rear side of an Expansion Box. For all connections it is valid: Connect only original accessory for ProfiLux aquarium computers of GHL (except of the pH-sensor connection)! The connections have to be treated with care – do not use force to plug in! Important: A false connection (e.g. plugging in a light bar plug into a powerbar socket) can lead to a destruction of the ProfiLux! A possible repair is no warranty case and therefore it is with costs! So please establish the connections always with greatest care. The rear side of Expansion Box 3 9 10 11 12 13 14 15 16 18 17 1 2 4 5 6 7 8 The connections of the Expansion Box: (1) (2) (3) (4), (5) 12VDC Temp Level1 – Level2 L1L2, L3L4 (6) (7), (8) (9) (10) (11) (12) – (16) (17), (18) SF PAB pH Cond Redox Modul 0 – Modul 4 As of 04/20/2010 Power supply connection of ProfiLux 12 V/1.5 A Connection for temperature sensor Connection for level sensors 1-10 V outputs for illumination control (dimmable light bars / LED lamps), current pumps Conductivity selection switch between salt and fresh water Connections for ProfiLux Aquatic Bus (PAB) Connection for pH sensor Connection for conductivity sensor Connection for redox sensor Module slots for PLM-extensions State LED, communication LED (not available on some devices) Seite 4/16 Bedienungsanleitung 2 Installation 2.1 Positioning the expansion box Position the device at a water-protected place. In principle each mounting position is allowed, but you should pay attention to the accessibility of the connections. Consider also the maximum cable lengths of the PAB connection cables, sensors, light bars and powerbars when you select the position. 2.2 Connection of the expansion box The temperature sensor is connected to Temp (2). Level sensors for the determination of the water level are connected with the level connections (3). If two level sensors shall be connected, a Y-cable (PL-LY) is necessary. The sensors for pH, conductivity and redox are – as far as they are present – connected accordingly to (9), (10) and (11). Please pay attention to the hints for sensors in the ProfiLux manual and of the sensor manufacturer. Hint In case of the conductivity sensor the sensor type (salt or fresh water) must be selected with the selection switch (6), in order that the conductivity is measured correctly. The control cables of dimmable lamps (light bars, hanging lamps, moonlight etc.) or controllable current pumps are plugged into the Western sockets L1L2 (4) or L3L4 (5). Plug the DC-plug of the wall power supply into the socket labeled 12VDC (1). Do not use in any case another power supply, since a false polarity or voltage can destroy the device! 2.3 Connection of the PAB Devices with ProfiLux Aquatic Bus – in short PAB – are connected to the corresponding RJ45 sockets. Several PAB devices are so to say daisy-chained. This means that the first PAB device is connected via a PAB connection cable with one of the PAB ports of the ProfiLux 3. The next PAB device is either connected to the free PAB port at the ProfiLux 3 or at the free PAB port of the preceding PAB device. A further PAB device is then connected to free PAB port of the preceding PAB device and so on. Also several ProfiLux computers can be connected to this bus. The last PAB devices therefore have always one free PAB port. Trough this, the PAB-bus represents a line connection via the single participants from one end to the other. As of 04/20/2010 Seite 5/16 Bedienungsanleitung Example: Attention Never connect the last two PAB devices through an additional PAB connection cable in order to get a ring connection. Such a ring connection will lead to malfunctions. The last devices at the PAB must always have one free PAB port. 2.4 Status display of the expansion box The Expansion Box has two light-emitting diodes (17), (18) on the rear side for the status display (not available on some devices). The state LED (17) is the lower one, the communication LED (18) is above. Display Meaning State LED flashing fast Expansion Box boots, Firmware-Update State LED glows Expansion Box is ready State LED flashes in a second cycle Expansion Box receives since more than 30 seconds no PAB commands from ProfiLux Communication LED flashing Expansion Box receives PAB commands Communication LED and state LED are both off Expansion Box has no power supply As of 04/20/2010 Seite 6/16 Bedienungsanleitung 3 Assign the Expansion Box to the ProfiLux 3.1 Requirements Before the Expansion Box can be assigned to the ProfiLux, all hardware modules have to build in. Furthermore it is important that the select switch for the conductance is in the right position for the used sensor type and the Expansion Box is powered up. 3.2 Assign the Expansion Box If all PAB connections have been made and power supplied to all devices at the PAB, the Expansion Box can be assigned. Therefore select menu item Assign devices in ProfiLux system menu Config PAB. The ProfiLux scans all devices connected at the PAB and afterwards the serial numbers of the found devices are displayed. Then select all the serials you want to assign to this ProfiLux and accept with the Return-key. Further information can be found at Description PAB. After this the resources (sensors and interfaces) of the Expansion Box are available. 3.3 The resources (sensors and interfaces) of the Expansion Box After assigning, the resources are ordered in the ProfiLux in the following manner: The numbering starts in every case with the internal resources of the ProfiLux, followed by the resources of the module cards installed in the slots of the ProfiLux. The numbering of the resources of the module cards depends on the order in the slots. Then the resources of the first found and assigned PAB device follows, afterwards those of the second PAB device, and so on. The resources in an expansion box are numbered just as those at the ProfiLux. First the internal resources of the Expansion Box, then the resources of the module cards in the slots of the Expansion Box. The numbering of the resources of the module cards depends on the order in the slots, too. 3.4 The sensors of the Expansion Box When the Expansion Box has been assigned to the ProfiLux, then the additional sensors and interfaces are available immediately. The numbering starts with the internal sensors followed by the sensors on the module cards at the ProfiLux. Then the internal sensors of the first Expansion Box found by the ProfiLux and the sensors on the module cards in the slots of the Expansion Box. After then the sensors of the second Expansion Box, and so on. As of 04/20/2010 Seite 7/16 Bedienungsanleitung Example: In case of a ProfiLux 3 eX with a PLM-Oxygen card and an Expansion Box with a PLM-Humidity-Temp and a further Expansion Box with a PLM-ADIN, the sensors are assigned in the following way: Level 1 …, pH-value 1, Temperature 1, Conductivity (S) 1 and Redox 1 are the internal sensor inputs of ProfiLux 3 eX. Thereafter the sensor of the PLM-Oxygen card in the ProfiLux follows. Level 4 …, Temperature 2, Conductivity (S) 2 and Redox 2 are the internal sensor inputs of the first (found by ProfiLux) Expansion Box. Airtemperature 1 and Humidity 1 originate from the PLM-Humidity-Temp in this Expansion Box. Level 7 …, Temperature 3, Conductivity (F) 1 and Redox 3 are the internal sensor inputs of the second (found by ProfiLux) Expansion Box. Voltage 1 and Voltage 2 originate from the PLM-ADIN in this Expansion Box. If – for example – an additional PLM-CondF card is inserted after the PLM-Humidity-Temp in the first Expansion Box, Conductivity (F) 1 would be shown for it. The conductivity sensor of the second Expansion Box then would be named Conductivity (F) 2. As of 04/20/2010 Seite 8/16 Bedienungsanleitung 3.5 The 1-10 V interfaces of the Expansion Box The 1-10 V interfaces are available immediately after the assignment. Which of the interfaces are available isn’t displayed. Therefore it is possible to know how the interfaces are numbered. The numbering starts with the internal 1-10 V interfaces followed by the interfaces on the module cards at the ProfiLux. Then the internal interfaces of the first Expansion Box found by the ProfiLux and the interfaces on the module cards in the slots of the Expansion Box. Thereafter the interfaces of the second Expansion Box follow, and so on. Example: In case of a ProfiLux 3 with a PLM-4L card and an Expansion Box with a PLM-4L the interfaces are assigned in the following way: As you can see here, the numbering begins with the internal 1-10 V interfaces of the ProfiLux. Then the interfaces of the PLM-4L in the ProfiLux follows. Afterwards there are the internal 1-10 V interfaces of the first found Expansion Box and then those of the PLM-4L installed in the Expansion Box. Here only the interfaces from L1 to L16 are available, the others are free. If a second Expansion Box would be connected, the interfaces of the second Expansion Box would follow. As of 04/20/2010 Seite 9/16 Bedienungsanleitung In the case of a ProfiLux 3 eX instead of a ProfiLux 3 the ProfiLux would have six internal 1-10 V interfaces (L1-L6) instead of four (L1-L4) and the interfaces of the PLM-4L and the Expansion Box would be shifted backwards. Attention During assigning devices it is possible that the numbering of the resources is changing (e.g. due to a change in the order of the PAB devices or connecting the PAB cables into another port …). Therefore it is important that critical devices and functions (e.g. pumps for automatic water change, dosing pumps) are disabled (perhaps by disconnecting the control cable) before reassigning the devices. Only if all sensors and interfaces are checked and correctly assigned again, the disabled devices can return to in operation again. 3.6 The switching outputs of the Expansion Box There are no switching outputs at the Expansion Box itself. But switching outputs can be realized via module cards. As it is the case for the 1-10 V interfaces, the switching outputs are immediately available after the assignment. Which of the interfaces are available isn’t displayed. Therefore it is possible to know how the interfaces are numbered. The numbering starts with the internal switching outputs followed by the switching outputs on the module cards in the ProfiLux. Then the switching outputs on the module cards at the first Expansion Box found by the ProfiLux follow. Thereafter the switching outputs at the second Expansion Box, and so on. As of 04/20/2010 Seite 10/16 Bedienungsanleitung Example: In case of a ProfiLux 3 with a PLM-2L4S card and an Expansion Box with a PLM-2L4S the switching outputs are assigned in the following way: As already known from the 1-10 V interfaces, the numbering begins with the internal switching outputs of the ProfiLux. Then the switching outputs of the PLM-2L4S in the ProfiLux follow. Afterwards there are the switching outputs of the first found PAB device (here the PLM-2L4S at the Expansion Box). Here only the switching outputs from S1 to S16 are available, the others are free. Attention During assigning devices it is also possible here that the numbering of the resources is changing (e.g. due a change in the order of the PAB devices, or connecting the PAB cables into another port …). Therefore it is important that critical devices and functions (e.g. pumps for automatic water change, dosing pumps) are disabled (perhaps by disconnecting the control cable) before reassigning the devices. Only if all sensors and interfaces are checked and correctly assigned again, the disabled devices can return to operation again. As of 04/20/2010 Seite 11/16 Bedienungsanleitung 4 Hardware modules 4.1 General The Expansion Box is modularly expandable. To be able to use additional sensors, powerbars, dimmable lamps etc., the installation of up to 5 additional modules is possible. In case of any change (add, remove or exchange) of module cards the Expansion Box needs to be assigned again to the ProfiLux, so that the ProfiLux detects and stores the changes. Thereby the assignment of the resources in the ProfiLux may change. Therefore all assignments should be checked before reactivation. Hint To be able to use the modules, possibly a firmware update of the Expansion Box or aquarium computer is necessary. Have a look here also at the instructions which are delivered together with the module. If you do not like to do the installation by yourself, we can do this for you for a low charge (possibly together with a firmware-update). In the last slot Modul 4 only analog measurement cards are supported at the moment. Intelligent cards – like PLM-2L4S, PLM-4L, PLM-Humidity-Temp, PLM-ADIN or similar – can’t be operated there. Hint The firmware 1.02 supports the following cards Analog measurement cards Double measurement cards Intelligent cards PLM-pH PLM-pH-Temp PLM-2L4 PLM-Temp PLM-pH-Redox PLM-4L PLM-Redox PLM-CondS-Redox PLM-Humidity-Temp PLM-CondS PLM-CondF-Redox PLM-ADIN PLM-CondF PLM-CondS-pH PLM-Oxygen PLM-CondF-pH The installation of a module requires greatest care! You have to pay attention that First the aquarium computer is currentless (remove plug of power supply) The electronics is not damaged through electrostatic charging (ground resp. discharge yourself; earthed work environment) You treat the housing with special care. As of 04/20/2010 Seite 12/16 Bedienungsanleitung 4.2 Open the housing Before you can insert a module, it is necessary to open the housing. The steps to do this are described in the ProfiLux manual. The opened device looks as follows: In the top left-hand you can see the sockets in which the modules have to be inserted. Next to it on the right you can see the connectors of the built-in sensor inputs. In front of the Expansion Box there are the 5 module cover plates and the more narrow back plate for the – seen from the back – the right side. 4.3 Insert the module The new module can be inserted into any slot – except slot Modul 4 (slot nearest to the housing). This slot only supports analog measurement cards at the moment. When you insert it, pay attention that all contact pins of the module disappear in a socket of the slot. No contacts may "remain"! The insertion has to be possible easily and without having to use any force! 4.4 Close the housing Now the housing can be closed again. First attach the upper housing part again carefully in the right direction (look at interior of cover). Check here that front panel and rear plate move properly into the right slots, if necessary correct their position slightly. Also here is important: Do not use force! Afterwards attach again the 8 covering caps. As of 04/20/2010 Seite 13/16 Bedienungsanleitung 4.5 Startup Now the Expansion Box and the power supply can be reconnected again. For any change the Expansion Box must be assigned to the ProfiLux again, so that all resources (sensors and interfaces) can be detected. Furthermore the before assigned resources may be shifted. Therefore it is important to check the assignments of the interfaces (particularly level sensors, pumps and valves for water change, dosing pumps) and to correct it if necessary before reactivation. 5 Warranty/ liability You have a 2-year warranty beginning from invoice date. This applies to material and manufacturing defects. We guarantee that the supplied products correspond to the specifications and that the products do not have material resp. manufacturing defects. For the accuracy of the programming manual we do not take over a guarantee. For damages of any type which result from an improper operation or from a not suited surrounding of the aquarium computer or accessory we are not liable. Furthermore we do not take over warranty for damages that are caused through a false connection. We assume no liability for direct damages, indirect damages, consequential damages and third party damages as far as it is legally permitted. We do not take over guarantee that our product package corresponds to the requirements of the buyer. Our warranty expires if the delivered original product is damaged or modified. 6 Further information 6.1 Help and information You will get from your specialist retailer. If you dispose of an Internet access, you can get tips and helpful suggestions on our website www.aquariumcomputer.com. Please also note the links to several forums there. 6.2 Firmware update The firmware of our Expansion Box and ProfiLux aquarium computers is continuously further developed. If you would like to use new functions or modules which are not yet supported by your current firmware, you can program your aquarium computer with the newest firmware. For this, there are several options: You send your Expansion Box to your specialist retailer or to GHL and let it be newly programmed (at cost price). You do the update by yourself. Therefore you need the newest firmware and the PC program ProfiLuxControl, both can be downloaded free of charge from our website, as well as our USB cable or serial connection cable. On the website also the instruction for the firmware update can be found. As of 04/20/2010 Seite 14/16 Bedienungsanleitung Hint Before updating the firmware there must be made sure that only one PAB device (this Expansion Box) is connected directly to the ProfiLux. Other PAB devices at the ProfiLux during the update are not allowed! During the firmware update the sensors are not read, measurement values are not available. Interface outputs (pumps, illuminations) aren’t accessed anymore. Therefore all accessed devices (like pumps, valves, switching plugs, dosing pumps …) should be disabled or disconnected. Sensors or illuminations are generally noncritical and can remain connected. 7 Technical data Input voltage 12 VDC Power consumption 200 mA pH-measurement BNC input for pH-sensors, accuracy 0.1 pH, measurement range 3.0 pH to 10.5 pH Temperature measurement Mini-DIN socket for delivered temperature sensor, accuracy 0.1 °C, measurement range 11.5 °C to 38 °C Conductivity measurement BNC input for conductivity sensor, in fresh water accuracy 1 µS, measurement range 0 µs to 2000 µS, in salt water accuracy 0.1 mS, 0 mS to 100 mS Redox measurement BNC input for Redox sensor, accuracy 1 mV, measurement range -1000 mV to 1000 mV Level inputs Mini-DIN socket for 2 level inputs Control dimmable lamps 2 modular jacks a‘ 2 dimming channels with analog output each 110 V for light intensity control and shut off Dimensions H x B x T = 58 mm x 240 mm x 198 mm Module slots 5 (4 for all module card types, one only for analog measurement cards) As of 04/20/2010 Seite 15/16 Bedienungsanleitung As of 04/20/2010 Seite 16/16