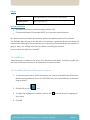
1
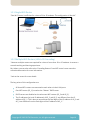
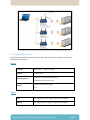
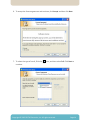
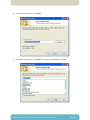
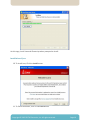
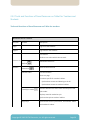
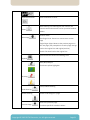
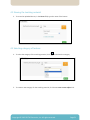
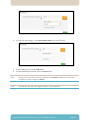
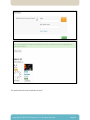
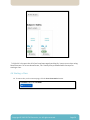
NovoClassroom
User Guide
Table of Content
LEGAL NOTICE
4
1. TERM BEGINS
8
1.1 INTRODUCING THE PRODUCT .......................................................................................8
1.2 DEPLOYMENT PLAN ...................................................................................................9
1.2.1 Single WiFi Router ................................................................................................... 10
1.2.2 Multiple WiFi Routers (LAN-LAN Cascading)............................................................ 10
1.3 SYSTEM REQUIREMENT ............................................................................................11
1.4 INSTALLATION ........................................................................................................12
1.4.1 Installing the NovoClassroom on Server .................................................................. 12
1.4.2 Installing the NovoClassroom on Tablets................................................................. 20
2. CLASS GOES VIRTUAL
21
2.1 NOVOCLASSROOM ON SERVER ..................................................................................21
2.1.1 Running NovoClassroom on Server ......................................................................... 21
2.2 THE NOVOCLASSROOM ...........................................................................................26
2.2.1 Starting NovoClassroom on Tablet .......................................................................... 26
2.2.2 Logging on NovoClassroom ..................................................................................... 27
2.3 Knowing basic tools and functions ............................................................................. 29
2.3.2 Tools and Functions of NovoClassroom on Tablet for Teachers and Students ........ 30
3. FORMING A CLASS
34
3.1 MAINTAINING STUDENTS’ AND TEACHERS’ ACCOUNTS .....................................................34
3.1.1 Creating Accounts .................................................................................................... 34
3.2 MAINTAINING CLASS AND STUDENTS OF THE CLASS .........................................................40
3.2.1 Modifying the name of the class.............................................................................. 40
3.2.2 Deleting a class ........................................................................................................ 41
3.2.3 Viewing the list of students in a class ...................................................................... 42
3.2.4 Exporting the list of students of a class ................................................................... 43
3.3 MAINTAINING THE CATEGORY OF TEACHING MATERIAL ....................................................44
3.3.1 Creating a category .................................................................................................. 44
3.3.2 Modifying a category ............................................................................................... 46
3.3.3 Deleting a category .................................................................................................. 47
4. TEACHING A CLASS
49
2
Copyright © 2013 DELTA Electronics, Inc. All rights reserved.
Page 2
4.1 UPLOADING TEACHING MATERIAL OR LECTURES .............................................................49
4.2 NAMING THE TEACHING MATERIAL .............................................................................51
4.3 SELECTING CATEGORY OF LECTURES ............................................................................51
4.4 REMOVING LECTURES ..............................................................................................54
4.5 VIEWING THE LIST OF LECTURES .................................................................................55
4.6 STARTING A CLASS ..................................................................................................56
4.7 PREPARING A CLASS.................................................................................................58
5. ATTENDING A CLASS
59
5.1 TEACH MODE .........................................................................................................59
5.2 STUDY MODE .........................................................................................................65
6. QUIZ TIME!
66
6.1 CREATING A QUIZ....................................................................................................66
6.2 TAKING A QUIZ .......................................................................................................69
6.3 DISPLAYING THE QUIZ REPORTS ..................................................................................71
7. HOMEWORK
74
8. TROUBLESHOOTING
76
NOVOCLASSROOM MOBILE LEARNING PLATFORM ..............................................................76
8.1 TABLET USAGE .......................................................................................................76
8.2 NOVOCLASSROOM ON SERVER ..................................................................................77
3
Copyright © 2013 DELTA Electronics, Inc. All rights reserved.
Page 3
Legal Notice
1. Copyright
Copyright © 2013 DELTA Electronics, Inc. All rights reserved.
The software contains proprietary information of DELTA Electronics, Inc. It is provided under a
license agreement containing restrictions on use and disclosure and is also protected by
copyright law. Reverse engineering of the software is prohibited. Please read the license
agreement for full details.
Due to continued product development, this information can change without notice. The
information and intellectual property contained herein is confidential between DELTA
Electronics and the client and remains the exclusive property of DELTA Electronics. If you find
any problems in the documentation, please report them to us in writing. DELTA Electronics
does not warrant that this document is error-free. No part of this publication may be
reproduced, stored in a retrieval system, or transmitted in any form or by any means, electronic,
mechanical, photocopying, recording or otherwise without the prior written permission of
DELTA Electronics. Licensed users are granted the right to print a single hardcopy of the user
manual per licensed copy of the software, but may not sell, distribute or otherwise dispose of
the hardcopy without written consent of DELTA Electronics.
2. Disclaimer and Applicability
2.1 Disclaimer
The Software and other information are provided on an “as is” basis. DELTA does not warrant
that the Use by the User on any Compatible Computer will be error-free. DELTA does not
provide any warranty about the performance or results obtained by the User from the Use of
this software. Other than any warranty, condition, statement or provision that cannot be
restricted or excluded in accordance with the applicable laws of the jurisdiction where the user
is located, DELTA provides no expressed or implied warranty condition, statement or provision
in accordance with any legislation, common law, custom, practice or other regulation, including
but not limited to: no warranty about non-infringement of third party right, no warranty about the
4
Copyright © 2013 DELTA Electronics, Inc. All rights reserved.
Page 4
merchantability of the software, no warranty about the completeness, satisfactory quality or
fitness for any particular purpose of the software. If this license is terminated or deemed invalid
for any reason, this article and Article 8 shall remain valid, provided that no implication or
permission is given to the user to continue using the Software after termination or nullification
of this license.
2.2 Applicability of the License Once the Software has been installed in full or in part, it shall be
deemed that the User has accepted the terms of this license. After acceptance of the provisions
of this license, the validity of this license shall cover the User and any other entity that acquires
the Software, as well as any individual using the Software on behalf of such entity. If the User
does not agree to the terms of this license, the download, or use of the Software, should be
stopped immediately.
3. Software License
3.1 Once the User downloads the Software, he/she shall comply with the terms and conditions
of this license and use the Software in the following manner and purpose. This license is nonexclusive.
3.2 The User may install and use the Software in one Compatible Computer. For important
restrictions about the use of the Software, please refer to Article 4.
3.3 This license does not allow the user to install or use the Software on any Computer server,
central server or SQL server.
3.4 This license does not grant the User the right to sub-license, distribute, transmit or
disseminate the Software.
4. User Obligations and Restrictions
4.1 The User may not, either directly or indirectly, use any peripheral device that is not
provided or allowed by DELTA to implement the Software, nor shall the User use the Software
for the purpose of controlling or operating any peripheral device that is not provided or allowed
by DELTA.
4.2 The User shall not revise or remove any statement of license, copyright or other entitlement
shown in the Software.
5
Copyright © 2013 DELTA Electronics, Inc. All rights reserved.
Page 5
4.3 No alteration or reverse engineering shall be performed. The user shall not, nor shall they
procure any other person to alter, change, translate, or produce any derivative work from this
software, nor shall they perform, or procure any other person to perform any reverse
engineering, reverse editing, reverse compilation or try to explore the source code of the
software in any other manner.
5. Restriction on Assignment It is prohibited for the User to lend, lease, sub-license, assign or
transfer the Software. The User is not allowed to reproduce all or any part of the Software in
any other Computer.
6. Intellectual Property Right Any intellectual property rights of the Software and any copy
produced by any user all belongs to DELTA. The structure, organization and program codes of
this software are the valuable intellectual property of DELTA (such as trade secrets and
confidential information). This license is protected by law, including (but not limited to) the
Copyright Act of the United States and other countries. This software is also protected by
international treaties. Unless expressly specified in this license, DELTA reserves all rights besides
those granted hereunder.
7. Third Party Provisions. The User recognizes and agrees to the following:
7.1 This license may allow the user to access third party content, software application,
programs information and services (including diversified network application programs) and
may interact with them (hereinafter “Third Party Provisions”). User access to, and the use of,
any Third Party Provision (including any product, service or information) shall be governed by
the terms and conditions related to such Third Party Provision, as well as the copyright law of
the applicable country. Third Party Provision does not belong to DELTA, nor is it provided by DELTA.
DELTA will not control, warrant or accept any liability for any Third Party Provision. Any
agreement reached between the User and any third party about Third Party Provisions,
including the privacy policy of such party and use of the personal information of the User,
delivery of product and services, payment and other terms and conditions, warranties or
declarations related to such transaction, shall be exclusively between the user and such third
party without any involvement of DELTA.
7.2 Unless otherwise expressly agreed by DELTA and the third party in writing, the user shall be
subject to the restrictions about warranty and liability under Articles 2.1 and 8 of this license
6
Copyright © 2013 DELTA Electronics, Inc. All rights reserved.
Page 6
and shall bear all risks in using DELTA and Third Party Provisions.
8. Restrictions on Liability In no event shall DELTA be liable for compensation for any loss,
damage or relevant expenses incurred by the user, including any derivative, indirect or
consequential damage or loss of profit or earnings, even if the DELTA representative has been
informed of the possibility of the occurrence of such type of loss, damage or compensation in
advance. The total accumulated amount of compensation to be borne by DELTA under this
license shall be limited to the sale price of the Software. The scope of rights that may be
exercised by DELTA shall be limited to the exclusions and/or restrictions of obligations,
warranties and liabilities declared under this license and does not include any other matter or
serve any other purpose.
7
Copyright © 2013 DELTA Electronics, Inc. All rights reserved.
Page 7
1. Term Begins
1.1 Introducing the product
Mr. Stanley, principle of Berkeley High has decided to make teaching more interactive and fun.
At the beginning of the term, he introduces the NovoClassroom Mobile Learning Platform to
the teachers and students. During assembly time, Mr. Stanley has arranged for a presentation
where he will talk about the software.
“Hello Berkeley High, it is very nice to see all of you after a long vacation. This term, we are
going to try something different with the way we teach, and the way we learn. Let me
introduce to you, the NovoClassroom Mobile Learning Platform. This software makes teaching
interactive and fun. For example, Mr. Adams can now upload his history lectures on the
software and anyone taking his class can access these lectures using your tablets.
Instead of using the conventional teaching method, let us use the modern technology.
How many of you use tablets for entertainment? Well, I guess almost everyone. It is exciting to
use a tablet, right? Let us use this technology for learning at Berkeley High.”
Mr. Stanley’s enthusiasm seems to be catching on to the students and teachers alike and they
begin to ask several questions.
“What does this software do?”
“How does this software work?”
“What are the environment requirements?”
Mr. Stanley interrupts, “I can understand your excitement. Please have patience! I will take you
through the software step by step. Let us become familiar with the software first.”
What does this software do? “Before we start using the software, let us understand what this
software is all about. Well, as the name suggests, it’s a learning system.
NovoClassroom Mobile Learning Platform is here to assist learning like never before. It will
transform your idea of learning. Teachers and students will use tablets instead of books in this
system.
Teachers will upload lectures and also create quizzes on the server. Students will have access to
the lecture through their accounts.
The task for the teachers will be to create students’ accounts, classes, upload lectures and make
quizzes before starting the teaching session.
Teachers will start the lecture, guide students and take the quiz during the teaching session.
They will be able to switch between lecture mode and class mode; teacher’s screen and
students’ screen.
8
Copyright © 2013 DELTA Electronics, Inc. All rights reserved.
Page 8
After the teaching session, the teacher can view the answers of the students. Students can also
review lectures, that is, if they want to.
Here is the most interesting thing! You will be using your tablets to do all these activities.”
“I can see a couple of big question marks on some of your faces.” Pointing at the girl in the first
row, “Yes, you.”
“Mr. Stanley, what are the environment requirements for this software?” asked Susan.
“That is a good question; the software has certain environment requirements like any other
software.”
1.2 Deployment plan
“Now, Mr. Bradley the IT head for the school will discuss the equipment required to configure
the network," said Mr. Stanley.
"You need the following equipment to configure the networkWiFi Access Points or WiFi Routers
Windows PC but Windows 7 is preferred.”
Mr. Adams asked, “Is the configuration process independent of the number of students in a
class?”
Mr. Bradley replied, “No, Mr. Adams, it’s not so, let me explain.”
9
Copyright © 2013 DELTA Electronics, Inc. All rights reserved.
Page 9
1.2.1 Single WiFi Router
“One Wi-Fi router is sufficient for a class of 10 to 15 students. The configuration is like this”
1.2.2 Multiple WiFi Routers (LAN-LAN Cascading)
“However multiple routers are required for a class of more than 10 to 15 students. It ensures a
smooth teaching and learning experience.
Mr. Adams, you can also refer to the ‘Cascading Routers’ from WiFi router’s user manual or
online documentation for more information.
“Look at the screen for more detailsThe key points of this configuration are:
All three WiFi routers are connected to each other via their LAN ports.
One WiFi router (AP_1) is used as the “Master” DHCP server.
DHCP servers are disabled on the other two WiFi routers (AP_2 and AP_3).
The IP addresses (or Local IP addresses) of AP_2 and AP_3 are different from the IP
address of AP_1. This is done to ensure that the final digits of the IP address of AP_2 and
AP_3 are different from the final digits of the IP address of AP_1. “
10
Copyright © 2013 DELTA Electronics, Inc. All rights reserved.
Page 10
1.3 System Requirement
NovoClassroom Mobile Learning Platform will need the physical devices matching the
specifications as below:
Server
Processor
Intel CORE TM i5.2GHz or higher
Memory
4 GB or more
Operating System
Browser
Windows 7, 32 bit/ Enterprise/64 bit
Windows XP Professional SP3
Chrome 18 (recommended)
IE 9
Tablet
iPad
9.7" Tablets iOS 4.3 or higher, Resolution 1024x768
Android
10” Tablets OS3.2 or higher, Resolution 1280x800
11
Copyright © 2013 DELTA Electronics, Inc. All rights reserved.
Page 11
Others
IWB
Delta NovoBoard or other Interactive Whiteboard
Wireless Routers
802.11g or 802.11n
System Limitation
The maximum content conversion page numbers is 60.
Connection between PC and tablet MUST be in the same network domain.
Mr. Stanley now continued the presentation with the installation process of the software.
“So, Berkeley High, this was an introduction to the software. I guess you have an idea about the
software after listening to the introduction part. Assuming you understand how the software is
going to work, I am moving to the next part which is installing the software.
Let us see how this software is installed.”
1.4 Installation
“NovoClassroom is installed on the server first, and then on the tablets. Installing is simple; you
just have to follow the instructions as displayed on the user interface.
1.4.1 Installing the NovoClassroom on Server
1. To show everyone how to install the software, Mr. Stanley inserted the NovoClassroom
Mobile Learning Platform CD into the CD ROM of the server and told them to follow the
steps as stated.
2. Double click on the
icon.
3. To select the language of installation, click on the
your choice.
icon and select the language of
4. Click OK.
12
Copyright © 2013 DELTA Electronics, Inc. All rights reserved.
Page 12
5. To run the setup, click Next.
13
Copyright © 2013 DELTA Electronics, Inc. All rights reserved.
Page 13
6. To accept the license agreement and continue, click Accept and then click Next.
7. To select the type of install, Click the
continue.
icon, and then select Full. Click Next to
14
Copyright © 2013 DELTA Electronics, Inc. All rights reserved.
Page 14
8. To continue the process, click Next.
9. To install the software, click Install. This starts the installation process.
15
Copyright © 2013 DELTA Electronics, Inc. All rights reserved.
Page 15
At this stage, install Java and Ghostscript when prompted to install.
Installation of Java
10. To install Java, Click the Install button.
11. To finish installation, click on the Close button.
16
Copyright © 2013 DELTA Electronics, Inc. All rights reserved.
Page 16
Installation of Ghostscript
12. To permit installation, click the OK button.
13. To install Ghostscript, Click the Next button.
17
Copyright © 2013 DELTA Electronics, Inc. All rights reserved.
Page 17
14. To review the license terms, click the I Agree button.
15. To start installation, click the Install button.
18
Copyright © 2013 DELTA Electronics, Inc. All rights reserved.
Page 18
16. To finish installation, click the Finish button.
17. To finalize the installation process, click the Finish button.
Note
This finishes the installation of NovoClassroom Mobile Learning Platform on the server.
19
Copyright © 2013 DELTA Electronics, Inc. All rights reserved.
Page 19
You can also create a shortcut of the software on desktop.
1.4.2 Installing the NovoClassroom on Tablets
1. To install the NovoClassroom on a tablet, connect your tablet to the IP shown on the
screen.
2. Click on the Download App button to install the software on the tablet.
20
Copyright © 2013 DELTA Electronics, Inc. All rights reserved.
Page 20
2. Class goes virtual
After explaining how to install the software, Mr. Stanley wanted to continue with explaining the
basic tools and functions of the NovoClassroom Mobile Learning Platform.
“Well, as we have learned how to install the software? Don’t you guys want to have a look at its
interface? Of course you want to, right? So let us see, how its interface looks.”
“Could you give us a run through of the basic tools and software?”asked Ms. Ryan, the
chemistry teacher.
“Yes Ms. Ryan, let us also have a look at the basic tools and functions of the software. First let
us log on to the NovoClassroom Mobile Learning Platform.”
2.1 NovoClassroom on Server
2.1.1 Running NovoClassroom on Server
1. To start the NovoClassroom on the server, double click the
icon.
2. To select the language of your choice, click Settings.
21
Copyright © 2013 DELTA Electronics, Inc. All rights reserved.
Page 21
3. To activate the license key, in the License Key, UserName and Email fields, type the license key,
user name and e-mail, and click
.
Note
The system must be connected to the Internet during the activation of the license key.
Note
Once the user has been validated, the next time they open the NovoClassroom portal, the
previous data is automatically shown in grey and users do not have to type the License
key to validate again.
4. To start the server, click Service, and then click Start Server.
22
Copyright © 2013 DELTA Electronics, Inc. All rights reserved.
Page 22
5. “Starting server, Please wait…” message displays on the lower-left corner.
6. After the server starts, click the Open Portal button to run NovoClassroom.
23
Copyright © 2013 DELTA Electronics, Inc. All rights reserved.
Page 23
24
Copyright © 2013 DELTA Electronics, Inc. All rights reserved.
Page 24
7. To exit NovoClassroom, Click the Stop Server Button.
8. To log on to the portal, click the Login button.
25
Copyright © 2013 DELTA Electronics, Inc. All rights reserved.
Page 25
9. Type username and password in the Username and Password fields, and click the Sign in
button.
Note
The default Username and Password is “admin”.
“Does anyone have any questions?” Looking at Alan’s raised hand, “Yes, Go on Alan.”
“Mr. Stanley, when do we start using tablets for NovoClassroom?”
“Alright, as the server has now started, we can start with our tablets. Let us now start the
NovoClassroom for teachers as well as students”.
2.2 The NovoClassroom
2.2.1 Starting NovoClassroom on Tablet
1. To start the NovoClassroom, double click the
icon.
26
Copyright © 2013 DELTA Electronics, Inc. All rights reserved.
Page 26
2.2.2 Logging on NovoClassroom
2. Type the IP address, account and password in the IP Address, Account and Password
fields.
Note
Teachers can log on to the NovoClassroom using their account and password. Students
can also log on to the NovoClassroom using their account and password.
3. Click the Login button.
27
Copyright © 2013 DELTA Electronics, Inc. All rights reserved.
Page 27
“Let us finish this for now and we will start the presentation tomorrow. As we can now access
the software, I would request you to explore the software.”
Mr. Stanley continued the presentation next morning.
There was a buzz in the school hall as Mr. Stanley entered.
“I have a question, Mr. Stanley”, asked, Mr. Adams, the history teacher. “How do the ‘accounts’
functions work?”
“How can I view a lecture?”
“How do I take a quiz?”
“I see everyone has explored the software, one at a time please. Yes Ms. Ryan?” said Mr.
Stanley.
“I have explored the software, and have come across many new tools and functions. I need to
know how to use those tools and functions.”
“That’s right Ms. Ryan; it would be tough to use the software without knowing the tools and
their functions. I will now explain the basic tools and their functions.”
28
Copyright © 2013 DELTA Electronics, Inc. All rights reserved.
Page 28
2.3 Knowing basic tools and functions
2.3.1 Tools and functions of NovoClassroom on Server
Main Function
Sub function
Description
Illustrates the most up-to-date version of
NovoClassroom Software
Home
Logs on to the software
Login
Logs off from the software
Logout
Teaching Contents
Retains teaching material.
Materials can be accessed by the originator only.
Sets the teaching material as a quiz and resets the
quiz into subject matter.
Class Starts
The teacher can select a class to teach.
Presents material sent from the
NovoClassroom.
(Teachers and students can send contents and
drawings from their tablets to the NovoClassroom
software on PC)
Content
Quiz Results
Offers this function after a class begins.
Quiz reports are generated based on answers
submitted by the students.
Displays a summary of students' quiz results.
Displays quiz results of each student.
Settings
Accounts
Retains students’ and teachers’ accounts, which
are used to log on to NovoClassroom.
Classes
Groups existing accounts into classes
Subjects
Retains teaching material into categories
29
Copyright © 2013 DELTA Electronics, Inc. All rights reserved.
Page 29
2.3.2 Tools and Functions of NovoClassroom on Tablet for Teachers and
Students
Tools and functions of NovoClassroom on Tablet for teachers
NovoClassroom for Teachers
Function
Feature
Description
Login
Logs on to the software
Logout
Logs off from the software
Lists classes.
Teachers can select which class to teach.
Lecture List
Refresh
Content
Lecture list
Content index
Reload the lecture list
Takes to the lecture list
Lists the contents
Goes to a page
Functions specific for teachers’ tablets
Synchronizes content and drawing to the PC.
Synchronizes content to students' tablets.
Teach/Quiz mode
Switches between the teach mode and the quiz mode.
Quiz mode:
Displays material marked as quiz.
Synchronizes quiz to students' tablets.
Syc/Unsyc
Synchronizes and un-synchronizes, the teachers’ tablet
with students’ tablets.
30
Copyright © 2013 DELTA Electronics, Inc. All rights reserved.
Page 30
Upload Annotation
Saves annotation to server
Focus
After zooming in or zooming out over content, the
content zoom and move stat can be synced to students'
tablets.
Gesture mode:
Move Page
Two-Finger Pinch: Zooms in or zooms out or moves
page
Single-Finger Swipe: Moves to the previous page or to
the next page (The prerequisite is that the page must go
back to the original size and original position.)
Double Tab: Goes back to the original size
Synchronizes the content and drawing to PC
Upload
Black/Blue/Red pen
Translucent yellow highlighter
Drawing
Clears/Undoes drawing
Undo Drawing
Delete Drawing
Deletes all drawings on a page
Goes to the previous page.
Previous Page
Functions specific for teachers’ tablets-
31
Copyright © 2013 DELTA Electronics, Inc. All rights reserved.
Page 31
Synchronize content and drawing to PC.
Synchronize content to students' tablets.
Goes to the next page.
Next Page
Functions specific for teachers’ tabletsSynchronize content and drawing to PC.
Synchronize content to students' tablets.
Tools and functions of NovoClassroom on Tablet for students
NovoClassroom for Students
Function
Feature
Description
Login
Logs on to the software
Logout
Logs off from the software
Content
Content index
Lists the contents
Goes to a page
Functions specific for teachers’ tabletsSynchronizes content and drawing to the PC.
Synchronizes content to students' tablets.
Upload Annotation
Saves annotation to server
Gesture mode:
Move Page
Two-Finger Pinch: Zooms in or zooms out or moves page
Single-Finger Swipe: Moves to the previous page or to the
next page (The prerequisite is that the page must go back to
the original size and original position.)
Double Tab: Goes back to the original size
Synchronizes the content and drawing to PC
Upload
32
Copyright © 2013 DELTA Electronics, Inc. All rights reserved.
Page 32
Black/Blue/Red pen
Translucent yellow highlighter
Drawing
Undo Drawing
Clears/Undoes drawing
Delete Drawing
Deletes all drawings on a page
Previous Page
Goes to the previous page.
Functions specific for teachers’ tabletsSynchronize content and drawing to PC.
Synchronize content to students' tablets.
Goes to the next page.
Next Page
Functions specific for teachers’ tabletsSynchronize content and drawing to PC.
Synchronize content to students' tablets.
Take Quiz
Submits an answer to the PC.
Exits offline Reading
Exit
“I hope that you have understood how some of the tools and functions of NovoClassroom
works. In our next session we will see how to best utilize these tools to form a class and get
down to the actual teaching process,” and with that Mr. Stanley ended the day’s presentation.
33
Copyright © 2013 DELTA Electronics, Inc. All rights reserved.
Page 33
3. Forming a Class
“Folks, it’s time we form a class.”
“How do we form a class Mr. Stanley?” asked Andy.
“Well, Andy, we will first create students’ accounts and teachers’ accounts. Then we’ll group
students with a particular teacher from the existing accounts and categorize the teaching
material.
Let us start with creating accounts for students and teachers.”
3.1 Maintaining students’ and teachers’ accounts
3.1.1 Creating Accounts
1. To create accounts for teachers and students, on the lecture panel, click Settings.
2. To manage the accounts, on the Accounts section, click Manage.
34
Copyright © 2013 DELTA Electronics, Inc. All rights reserved.
Page 34
3. To add a user account, click on the Add user button.
Note
4.
5.
6.
7.
8.
Note
Repeat the process to add multiple users
Type the user’s ID, full name and password in the ID, Fullname and Password fields.
To select the role of the user, click on Teacher or Student.
Select the class.
To submit the details, click the Add button.
To modify the details click the Reset button.
All the fields in this section are mandatory. The ID field allows only letters, numbers and
underscore.
35
Copyright © 2013 DELTA Electronics, Inc. All rights reserved.
Page 35
You can also edit or delete a user account if required.
9. To edit or delete accounts, click the edit and delete buttons.
10. To edit an account, in the New password (optional), Fullname fields, type the new password
and full name.
11. To update the details, click the Update button.
12. To cancel, click the Reset button.
36
Copyright © 2013 DELTA Electronics, Inc. All rights reserved.
Page 36
13. To delete an account, click the Delete button.
14. To cancel the deletion, click the Cancel button.
15. To add multiple users, click on the Add users by .csv file button.
16. To upload the user list, click the Choose File button, browse and upload the file.
Note
The file should be in a “UTF-8” format. You can download the template by clicking on the
format example link.
The template is in the “one record one row” format. Fields are separated by commas.
37
Copyright © 2013 DELTA Electronics, Inc. All rights reserved.
Page 37
Field description: ID, user name, user password, is a teacher or a student, class code, class name
Class code and Class name fields are not required if the user is a teacher.
38
Copyright © 2013 DELTA Electronics, Inc. All rights reserved.
Page 38
17. To submit the file, click the Submit button.
18. To cancel submission, click the Reset button.
You can also export the list of the students uploaded.
19. To export the list of the students, click the Export list of students button.
39
Copyright © 2013 DELTA Electronics, Inc. All rights reserved.
Page 39
3.2 Maintaining class and students of the class
1. To manage the class, on the Accounts section, click Manage.
You can modify or delete a class. You can also view the list of students for a particular class and
export the list of students.
3.2.1 Modifying the name of the class
2. To modify the name of the class, click the Modify button.
40
Copyright © 2013 DELTA Electronics, Inc. All rights reserved.
Page 40
3. To change the name, type the new name in the New class name field.
4. To update the new name, click the Update button.
5. To cancel, click the Reset button.
3.2.2 Deleting a class
6. To delete a class, click the Delete button.
41
Copyright © 2013 DELTA Electronics, Inc. All rights reserved.
Page 41
3.2.3 Viewing the list of students in a class
7. To view the list of students in a class, click the Student list button.
42
Copyright © 2013 DELTA Electronics, Inc. All rights reserved.
Page 42
3.2.4 Exporting the list of students of a class
8. To export the list of students in a class, select the class and click the Export class list button.
43
Copyright © 2013 DELTA Electronics, Inc. All rights reserved.
Page 43
“Let us see, how to create a category of the teaching material. In the event that we have to
make any changes, let us also see how to modify a category and delete a category.”
3.3 Maintaining the category of teaching material
3.3.1 Creating a category
1. To manage the teaching material categories, on the Subjects section, click Manage.
44
Copyright © 2013 DELTA Electronics, Inc. All rights reserved.
Page 44
2. To add a new subject category, click the Add new subject button.
3. To add a subject, in the Subject name field type the name of the subject.
4. To submit the category, click the Add button.
5. To cancel, click the Reset button.
45
Copyright © 2013 DELTA Electronics, Inc. All rights reserved.
Page 45
3.3.2 Modifying a category
6. To edit the name of the subject, click the Edit subject name button.
7. To change the name of the subject, in the New subject name field, type the new subject name.
8. To update the new name, click the Update button.
9. To cancel, click the Reset button.
46
Copyright © 2013 DELTA Electronics, Inc. All rights reserved.
Page 46
3.3.3 Deleting a category
10. To delete a category, click the delete button.
11. To confirm the deletion, click the Delete button.
12. To cancel the deletion, click the Cancel button.
47
Copyright © 2013 DELTA Electronics, Inc. All rights reserved.
Page 47
48
Copyright © 2013 DELTA Electronics, Inc. All rights reserved.
Page 48
4. Teaching a class
“What have we learnt about the software so far, Andy?” asked Mr. Stanley.
“Mr. Stanley, we have learnt:
What NovoClassroom does
How to install NovoClassroom in PCs and in Tablets
How to run the software and log on
What are the basic tools and their functions are
How to create accounts for teachers and students
And how to maintain a class.”
“Thanks, Andy.”
“Ok, like any other method of teaching, we need actual teaching material in order to learn. So,
we will see how to upload teaching material in the NovoClassroom.”
“I have a question, Mr. Stanley”, asked Mr. Adams, the history teacher.
“Yes, Go on Mr. Adams.”
“What are the different content formats, the NovoClassroom supports?”
“Well, it supports PDF, PPT (Microsoft Office) and ODP (Open Office). But, PDF and PPT fits the
software layout best.
So, let us see how to upload lectures to NovoClassroom.”
4.1 Uploading teaching material or lectures
1. To upload lectures, on the content page, click the New lecture button
49
Copyright © 2013 DELTA Electronics, Inc. All rights reserved.
Page 49
2. Click on the lecture to be uploaded, and then click open.
“How do we ensure that the teaching material ends up in the correct location?”
“Well, Ms. Ryan that depends on how you name the teaching material and under what category
you put it.”
50
Copyright © 2013 DELTA Electronics, Inc. All rights reserved.
Page 50
4.2 Naming the teaching material
3. To name the uploaded lecture, in the Name field, type the name of the lecture.
4.3 Selecting category of lectures
4. To select the category of the teaching material, click
and select the category.
5. To create a new category for the teaching material, click the or create a new subject link.
51
Copyright © 2013 DELTA Electronics, Inc. All rights reserved.
Page 51
6. To name the new category, in the Input subject name field, type the name.
7. To upload the lecture, click the Add button.
8. To cancel uploading the lecture, click the Cancel button.
Note
During conversion of the lecture the status shows QUEUED and after the conversion is
complete the status changes to READY.
Note
Only persons with the role assigned ‘teacher’ can load lectures.
52
Copyright © 2013 DELTA Electronics, Inc. All rights reserved.
Page 52
“So, we have learnt how to upload a lecture.”
53
Copyright © 2013 DELTA Electronics, Inc. All rights reserved.
Page 53
“What if a wrong lecture is uploaded or what do we do with the lectures after the teaching
session is over?” Asked the geography teacher, Ms. Park.
Mr. Stanley replied, “That’s not an issue at all. If required, you can delete uploaded lectures.
So, let us see how to delete a lecture” he continued.
4.4 Removing lectures
9. To delete a lecture, on the content page, click the Delete button on the lecture icon.
10. To confirm the deletion, click the Delete button.
11. To cancel the deletion, click the Cancel button.
“Can we see the lectures category wise?” asked Mr. Adams.
54
Copyright © 2013 DELTA Electronics, Inc. All rights reserved.
Page 54
“Yes, we can see the lectures category wise.”
12. To view all the lectures, on the content page, click Select subject button and then click All.
4.5 Viewing the list of lectures
13. To view the lectures of any particular subject, click that subject.
55
Copyright © 2013 DELTA Electronics, Inc. All rights reserved.
Page 55
“I think this is the part that all of you have been eagerly waiting for, how to start a class using
NovoClassroom. So let me demonstrate, “Mr. Stanley then proceeded with the steps for
starting a class.
4.6 Starting a Class
14. To start a class, on the content page, click the Start Presentation button.
56
Copyright © 2013 DELTA Electronics, Inc. All rights reserved.
Page 56
15. To select the class, click the class name.
Note
The QR code is the NovoClassroom Mobile Learning Platform IP address. If the tablet
provides QR code reader, the QR code reader can be used to read the code.
“So does that mean that once the teaching material is posted on the server we’ll be able to
access it?” asked Alex.
“Not exactly,” replied Mr. Stanley, “the teachers’ and students’ accounts need to be enabled.”
57
Copyright © 2013 DELTA Electronics, Inc. All rights reserved.
Page 57
4.7 Preparing a class
16. To prepare a class, in the left frame, check the color of the names of the students.
Note
The list in the left frame shows teachers and students for a class. The list shows students
in an alphabetical order. Names of those students, who are logged on to NovoClassroom
are shown in blue and those who are not logged on to NovoClassroom are shown in grey.
If a student leaves the class during the teaching session, the student’s name turns grey.
Teacher can easily track the student by this function.
Uploaded content from the teacher’s tablet is displayed in the right frame. Student and
teacher can upload content from their tablets.
“Now that you know how NovoClassroom actually works, let’s go ahead see all the fun things
that we can do with this technology.”
58
Copyright © 2013 DELTA Electronics, Inc. All rights reserved.
Page 58
5. Attending a class
“Hi everyone, welcome back; hope the presentations have been interesting so far. As I
promised you in our last session, I will now show you all the wonderful things that you can do
with NovoClassroom.
We’ll start with basics first, and that is how to attend a class.
Teachers and students both have to log on to the NovoClassroom to attend the class.”
“I guess this means no more sick days,” said Alex ruefully.
“I guess not Alex” replied Mr. Stanley.
5.1 Teach mode
“After logging on, the teacher sees the following screen.”
59
Copyright © 2013 DELTA Electronics, Inc. All rights reserved.
Page 59
1. To view all the uploaded lectures, click All.
2. To view the lectures of a specific subject, click on the subject’s name.
3. To refresh the lecture list, click
4. To exit NovoClassroom, click
.
.
60
Copyright © 2013 DELTA Electronics, Inc. All rights reserved.
Page 60
5. To change the password, click
.
6. To view information about NovoClassroom, click
.
61
Copyright © 2013 DELTA Electronics, Inc. All rights reserved.
Page 61
7. To select a category for teaching, on the left frame, click the name of the category.
Note
The lectures in that category are displayed on the right frame.
8. To start the lecture, on the right frame, click on the lecture.
Note
The left frame displays the index of the lecture. The right frame displays the selected
content of the lecture. This selected content is also displayed on the students’ tablets.
“Wow,” said Ms. Park, “This technology really makes our work easier.”
“And it makes learning fun,” said Susan.
62
Copyright © 2013 DELTA Electronics, Inc. All rights reserved.
Page 62
9. To view previous and next slides of the lecture, click
and
.
10. To upload annotation to the PC, click
11. To synchronize and un-synchronize, the teachers’ tablet with students’ tablets, click
12. To switch between the teach mode and the quiz mode, click
13. To go to the lecture list, click
.
.
.
14. To focus on a particular portion of the content, click
15. To move a page of the content, click
.
.
16. To synchronize the content and drawing to PC, click
.
63
Copyright © 2013 DELTA Electronics, Inc. All rights reserved.
Page 63
“Mr. Stanley, can we also view the lecture in the same manner?” asked Andy.
“No Andy, for students the process is a little different, let me explain.”
64
Copyright © 2013 DELTA Electronics, Inc. All rights reserved.
Page 64
5.2 Study mode
“After logging on, the student sees the same screen as the teacher’s screen; but the students’
tablet does not display any content until teacher selects the content.”
Students will use the following tools in study mode.
1. To upload annotation to the PC, click
2. To move a page of the content, click
.
.
3. To synchronize the content and drawing to PC, click
4. To exit NovoClassroom click
5. To change the password click
.
.
.
6. To view information about NovoClassroom click
.
“And that is how both students and teachers attend class using NovoClassroom.
Now I shall move on to how the teachers can create quizzes and assess the class.”
65
Copyright © 2013 DELTA Electronics, Inc. All rights reserved.
Page 65
6. Quiz time!
“So Mr. Stanley how can we evaluate the students using NovoClassroom?”
“Well Mr. Saunders we can use NovoClassroom to create quizzes and assess the students.
You can select the quiz slides from the teaching material and create a quiz in NovoClassroom
for a class. It is simple and easy. You can also grade the quiz and display the quiz reports.”
6.1 Creating a quiz
1. To create a quiz, in the lecture panel, click a lecture name.
Note
Slides of the lecture are displayed on the left frame.
66
Copyright © 2013 DELTA Electronics, Inc. All rights reserved.
Page 66
2. Click the quiz slide, on the left frame.
3. To set the quiz type, click
and select from the drop-down.
4. To set the quiz as multiple choice questions, check Multiple.
Note
Keep this unchecked, if the quiz is not a multiple choice question
67
Copyright © 2013 DELTA Electronics, Inc. All rights reserved.
Page 67
“Under quiz there are several options- multiple select, single select and Yes and No questions.
There are also options for either numerals or alphabets if the teacher has created answer
choices a,b, c, and so forth instead of 1,2,3,” said Mr. Stanley.
5. To set the correct answer, click
and select the correct answer from the drop-down.
6. To set points for the quiz, type points on the Points field.
7. To set the content as quiz, click the
button.
“What happens if we create a quiz using the wrong content? Is it possible to change the
quiz material back to teaching content if we require?” asked Ms. Ryan.
68
Copyright © 2013 DELTA Electronics, Inc. All rights reserved.
Page 68
“It is possible to convert the quiz back into content Ms. Ryan,” replied Mr. Stanley.
To change the quiz back to content, click
.
6.2 Taking a quiz
“So then can we students take the quiz as soon as it’s ready?”
“Not quite Susan, we have just seen how to create a quiz, let us now see how to take a quiz.”
8. In order to start the quiz, on the lecture panel of the teacher’s tablet, the teacher clicks
Note
.
Only after teacher switches to quiz mode, students can take the quiz.
9. To answer the quiz, the student selects the correct answer from the options available on the
screen.
69
Copyright © 2013 DELTA Electronics, Inc. All rights reserved.
Page 69
10. To submit the answer, the student clicks
.
70
Copyright © 2013 DELTA Electronics, Inc. All rights reserved.
Page 70
“Is it possible to view the results of a single student or do we see the results of the class as a
collective whole?” asked Ms. Park.
“The teacher can also view the quiz reports of the class, as well as the quiz result and answer
sheet of individual student.”
6.3 Displaying the quiz reports
11. To display the quiz reports of the class, click the summary link on the tablet.
71
Copyright © 2013 DELTA Electronics, Inc. All rights reserved.
Page 71
12. To display the quiz result of a student, on the left frame, click the student’s name.
13. To display the answer sheet of the student, click the
button.
72
Copyright © 2013 DELTA Electronics, Inc. All rights reserved.
Page 72
“I think this quiz application will allow teachers to review the students on an instant basis and
know where each individual stands,” stated Mr. Saunders.
“I think the NovoClassroom quiz function with its quick grading; will be immensely beneficial to
both teachers and students,” said Ms. Ryan.
73
Copyright © 2013 DELTA Electronics, Inc. All rights reserved.
Page 73
7. Homework
Mr. Stanley rubbing his hands with glee said, “We now come to my favorite part, how to assign
homework,”
There was a collective groan from the students.
“I can see that all of you are as excited as I am.”
“Mr. Stanley is there any way that students can review the material covered in class, post the
lecture?”
“Yes Andy, you will be able to view the content once it has been put on to the server.
NovoClassroom saves the lectures learned in the class in the students’ tablets. So, a student can
review the lectures taught in the class in offline mode.”
1. To review the lectures, click Offline Reading.
2. To select a lecture, on the left frame, click on the lecture.
3. To view the lecture, on the left frame, click on the proper slide.
Note
The clicked slide is displayed on the right frame.
74
Copyright © 2013 DELTA Electronics, Inc. All rights reserved.
Page 74
“And with that we come to the end of the sessions on how to learn to use NovoClassroom. Now
we can incorporate this technology to add entertainment to studies.”
“I sure am excited to use NovoClassroom, it seems really cool,” said Alex.
Mr. Adams, “NovoClassroom will definitely change the way I teach. I’m no longer limited to
conventional methods of teaching.”
“With NovoClassroom I hope to combine learning and fun, and usher Berkeley High into a new
era,” ended Mr. Stanley.
75
Copyright © 2013 DELTA Electronics, Inc. All rights reserved.
Page 75
8. Troubleshooting
NovoClassroom Mobile Learning Platform
Mr. Stanley said, “Good morning everyone. Now technology in itself is not infallible and we will
experience a few glitches as we attempt to integrate NovoClassroom; so Mr. Bradley the head
of the IT department and I will be giving you solutions to some commonly faced problems.”
8.1 Tablet Usage
I can’t log on to NovoClassroom from my Tablet.
“Mr. Stanley, I’ve been experiencing issues logging on to NovoClassroom,” said Alex.
“For issues regarding logging on, check the followingIf the IP address entry is valid;
If your tablet and the NovoClassroom on Server are connected to the same local network;
If your tablet is connected to WiFi network properly, sometimes, you might need to restart the
tablet in order to restart the WiFi connection properly.”
I forgot my password.
“What happens if I forget my password?”
“Well Ms. Ryan that can be sorted easily, just log on to the NovoClassroom as user ‘admin’, this
allows you to reset your password.”
Some pages of a lecture presentation are missing on my Tablet. What should I do?
“On a few occasions I’ve noticed that some pages of a lecture presentation are missing on my
tablet, what should I do in that case?” asked Ms. Park
“Clicking the corresponding page will trigger a download. Students, however, please note that
this action will only happen when your teachers is presenting this lecture.”
76
Copyright © 2013 DELTA Electronics, Inc. All rights reserved.
Page 76
Sometimes the screen display of students’ tablets is not synchronized with their
teacher’s.
“Mr. Stanley, sometimes I cannot see what is displayed on the teacher’s screen, why is that?”
inquired Susan.
“First check that the ‘synchronization’ mode is enabled on the teacher’s tablet.”
Mr. Bradley interjected, “If the ‘synchronization’ mode doesn’t work then check if there’s a
problem with the WiFi connection. If too many tablets are connected to the same WiFi network,
it could degrade the network performance greatly. Typically it is recommended that there are
10 to 20 tablets per WiFi router.”
Sometimes NovoClassroom on Tablet exits unexpectedly.
“Sometimes the NovoClassroom on Tablet exits unexpectedly,” said Andy.
“Typically this problem occurs when network connection is lost. Please check your network
connection status. Sometimes you might need to restart your network router,” replied Mr.
Bradley.
I want to delete lectures that have been downloaded.
“How do I delete lectures that have been uploaded?” asked Mr. Saunders
“On an Android Tablet, the lecture material is stored in a folder “NovoClassroom”. You can
open a file explorer on Android or Windows when connected to a Windows PC. Then locate the
lecture by folder name and then delete the corresponding folder,” answered Mr. Bradley.
8.2 NovoClassroom on Server
I can’t import some files to NovoClassroom on Server.
Mr. Saunders then said, “I find that I cannot import some files to the NovoClassroom on
Server.”
Mr. Bradley replied “The supported file formats are PDF and PPT. Other file formats are not
supported currently. Also the maximum number of pages per file is 60. Files exceeding this limit
will not be imported.”
I can’t create new users.
“I can’t create new users,” claimed Mr. Adams.
77
Copyright © 2013 DELTA Electronics, Inc. All rights reserved.
Page 77
“If you create users by importing a CSV file, please make sure it follows the template. Invalid
data format could lead to import failure.
Please make sure your user accounts do not exceed NovoClassroom license’s limit,” explained
Mr. Bradley.
I can’t open NovoClassroom on Server’s control panel.
“I can’t seem to open NovoClassroom on server’s control panel,” said Mr. Saunders.
“The Java environment for NovoClassroom on server’s control panel is SE v-7, update 21 or
above. Locate the version from the Windows control panel, and upgrade the version if required,”
replied Mr. Bradley.
I can’t open NovoClassroom on Server’s portal page.
“I can’t seem to open NovoClassroom server’s on portal page,” said Ms. Ryan
“Internet Explorer 7 and 8 have issues in supporting NovoClassroom on Server.
It is recommended to use Google Chrome browser. You may set Chrome as your default web
browser to simplify NovoClassroom operations.”
In addition, make sure port 8080 is unblocked in your PC’s firewall configuration. Contact your
IT department for this issue.”
“With that we end this presentation. If you have any more queries you can contact Mr. Bradley,
he will be happy to help you out.”
78
Copyright © 2013 DELTA Electronics, Inc. All rights reserved.
Page 78