1
Exprodo Database
User Manual
October 2015
Exprodo Database 7.0.52
© 2010-2015 Exprodo Software
Contents
3
Table of Contents
Foreword
Part I Getting Started
Part II Exprodo DB User Guide
0
8
10
2.1 Getting
...................................................................................................................................
A User Account
10
2.2 Change
...................................................................................................................................
Password
13
2.3 User
...................................................................................................................................
Settings
14
e
14
2.3.1 Date & Tim.........................................................................................................................................................
Em
ail
.........................................................................................................................................................
14
2.3.2
Menu
.........................................................................................................................................................
14
2.3.3
2.4 Toolbar
...................................................................................................................................
Button Standard Definitions
15
2.5 Conditions
................................................................................................................................... 17
2.6 Searching
...................................................................................................................................
For Information
27
2.6.1 Search ......................................................................................................................................................... 27
Report
28
2.6.1.1 Single Item..................................................................................................................................................
2.6.1.2 List Report.................................................................................................................................................. 28
.................................................................................................................................................. 31
2.6.1.3 Summary Report
.................................................................................................................................................. 34
2.6.1.4 Group Report
..................................................................................................................................................
Information
36
2.6.1.5 Editing Search
..................................................................................................................................................
Reusing Searches
38
2.6.1.6 Saving And
......................................................................................................................................................... 40
2.6.2 Report Manager
2.6.3 History ......................................................................................................................................................... 45
......................................................................................................................................................... 46
2.6.4 Data Explorer
2.7 Web
...................................................................................................................................
Browser Compatability
52
Part III Exprodo DB Administration
Guide
54
3.1 User
...................................................................................................................................
Administration
54
......................................................................................................................................................... 54
3.1.1 User Properties
.........................................................................................................................................................
Process
57
3.1.2 The User Approval
.........................................................................................................................................................
Page
57
3.1.3 The User Requests
......................................................................................................................................................... 62
3.1.4 User Search
......................................................................................................................................................... 66
3.1.5 Creating Users
Users
67
3.1.6 Modifying.........................................................................................................................................................
A User's Settings
70
3.1.7 Changing .........................................................................................................................................................
......................................................................................................................................................... 70
3.1.8 Special User
3.2 Using
...................................................................................................................................
Exprodo DB To Send Emails
71
3.3 Report
...................................................................................................................................
Manager
74
3.4 Import
................................................................................................................................... 75
.........................................................................................................................................................
port Files
75
3.4.1 Exam ple Im
.........................................................................................................................................................
Page
82
3.4.2 The Im port
3.5 System
...................................................................................................................................
Events
89
Part IV Exprodo DB Configuration Guide
92
4.1 Types
...................................................................................................................................
and Groups
93
4.2 Configuring
...................................................................................................................................
Types And Groups
94
4.3 Permissions
................................................................................................................................... 97
© 2010-2015 Exprodo Software
4
Exprodo Database User Documentation
issions Work
97
4.3.1 How Perm.........................................................................................................................................................
issions Editor
104
4.3.2 The Perm.........................................................................................................................................................
Perm issions
108
4.3.3 Exam ple .........................................................................................................................................................
4.4 Automatic
...................................................................................................................................
Emails
116
.........................................................................................................................................................
atic Em ail Editor
117
4.4.1 The Autom
Exam
ple
.........................................................................................................................................................
Autom
atic
Em
ails
126
4.4.2
4.5 Menu
...................................................................................................................................
Editor
129
4.6 User
...................................................................................................................................
Authentication Methods
140
.........................................................................................................................................................
Methods
140
4.6.1 Authentication
.........................................................................................................................................................
Methods Editor
142
4.6.2 Authentication
4.7 Global
...................................................................................................................................
Preferences
143
......................................................................................................................................................... 144
4.7.1 Appearance
Tim e
145
4.7.2 Date And.........................................................................................................................................................
4.7.3 Em ail ......................................................................................................................................................... 146
4.7.4 General ......................................................................................................................................................... 148
4.7.5 Licence ......................................................................................................................................................... 149
4.7.6 Menus ......................................................................................................................................................... 150
Metrics
151
4.7.7 Netw ork .........................................................................................................................................................
4.7.8 Security ......................................................................................................................................................... 152
.........................................................................................................................................................
Statistics
154
4.7.9 System Usage
4.7.10 Users ......................................................................................................................................................... 155
4.8 Layout
...................................................................................................................................
Editor
156
4.9 Bakery
................................................................................................................................... 173
Storage Mechanism s
173
4.9.1 Property.........................................................................................................................................................
......................................................................................................................................................... 175
4.9.2 Biskit Definitions
Definitions
180
4.9.3 Property.........................................................................................................................................................
..................................................................................................................................................
Definitions
185
4.9.3.1 Biskit Property
..................................................................................................................................................
Definitions
186
4.9.3.2 Boolean Property
..................................................................................................................................................
Definitions
187
4.9.3.3 Double Property
..................................................................................................................................................
Definitions
188
4.9.3.4 Int Property
........................................................................................................................................... 188
4.9.3.4.1 Mapped Integers
4.9.3.4.1.1 Bit Sets ...................................................................................................................................... 190
...................................................................................................................................... 190
4.9.3.4.1.2 User Roles
..................................................................................................................................................
Property Definitions
191
4.9.3.5 Java Enum
...........................................................................................................................................
Definitions
191
4.9.3.5.1 Java Enum
..................................................................................................................................................
Definitions
192
4.9.3.6 Set Property
..................................................................................................................................................
Definitions
194
4.9.3.7 String Property
........................................................................................................................................... 195
4.9.3.7.1 Mapped Strings
..................................................................................................................................................
Property Definitions
196
4.9.3.8 String Enum
........................................................................................................................................... 197
4.9.3.8.1 String Enumerations
4.9.4 Form ulae......................................................................................................................................................... 197
......................................................................................................................................................... 200
4.9.5 Bakery Editior
..................................................................................................................................................
Examples
206
4.9.5.1 Bakery Editor
........................................................................................................................................... 206
4.9.5.1.1 Adding Properties
...........................................................................................................................................
Properties
209
4.9.5.1.2 Adding Formulaic
...........................................................................................................................................
For File Attachments
212
4.9.5.1.3 Adding Properties
...........................................................................................................................................
For Created/Updated/Vesion
214
4.9.5.1.4 Adding Properties
New Yes-No Mapped Int Property
216
4.9.5.1.5 Adding A ...........................................................................................................................................
New Basic BiskitDef
219
4.9.5.1.6 Creating A...........................................................................................................................................
Set Of BiskitDef (Attachments)
220
4.9.5.1.7 Creating A...........................................................................................................................................
Hierarchy Of BiskitDef
224
4.9.5.1.8 Creating A...........................................................................................................................................
Master-Slave Biskit Relationship
229
4.9.5.1.9 Creating A...........................................................................................................................................
...........................................................................................................................................
Inheriting BiskitDef (Booking)
234
4.9.5.1.10 Creating An
4.10 Backing
...................................................................................................................................
Up The Database
235
Part V Exprodo DB Installation Guide
240
© 2010-2015 Exprodo Software
Contents
Part VI Glossary
Index
© 2010-2015 Exprodo Software
5
250
255
Part
I
8
1
Exprodo Database User Documentation
Getting Started
Exprodo Database (Exprodo DB) is a program based on Exprodo for creating bespoke
database applications.
This documentation was written for version 7.0.52 of Exprodo DB and was last changed on
October 29, 2015.
© 2010-2015 Exprodo Software
Part
II
10
2
Exprodo Database User Documentation
Exprodo DB User Guide
This guide explains how to use Exprodo DB to access and search your bespoke database.
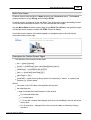
2.1
Getting A User Account
Local Exprodo DB Account
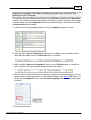
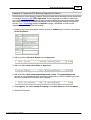
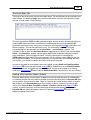
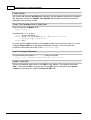
To get a local user account, first open a web browser. Exprodo DB supports the most
popular web browsers - see Web Browser Compatibility 52 for the full list. The administrator
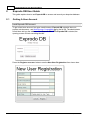
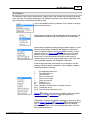
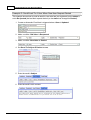
should have told you the address of the Exprodo DB. When Exprodo DB is started, the
opening screen will look something like this:
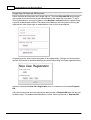
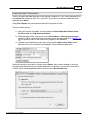
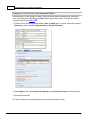
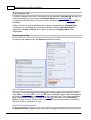
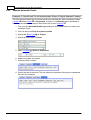
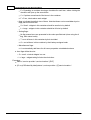
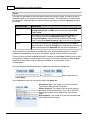
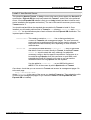
Press the Register new user button to see the New User Registration form shown here
© 2010-2015 Exprodo Software
Exprodo DB User Guide
11
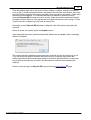
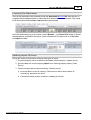
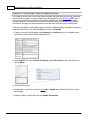
Enter the desired login name, which can consist of letters, numbers, and other characters
such as @!:/(). Enter the password that is required by the user with conformation, then enter
the given name (usually the first name) and family name (usually the last name). Finally enter
the required email address. It is important that the email address is entered correctly
because Exprodo DB will send an email to confirm it has received the registration request
and again to inform when or if the request has been approved and the user can log in. If User
Types have been configured you will need to choose one.
Depending on how Exprodo DB has been configured, other information may need to be
selected.
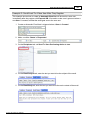
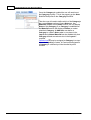
When all values are entered, press the Register button.
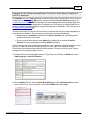
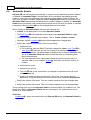
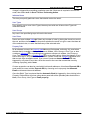
If the requested login name, password and email address are acceptable, then a message
like this will appear:
This means that the registration request has been received, but the user cannot log in yet.
They will receive an email to tell them when they can log in using the login name and
password selected. Note that the administrator will not know any passwords, nor have any
way to find out what they are. However, the administrator is able to reset a password if
required.
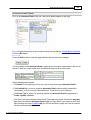
When a user first logs in to Exprodo DB, they will see the Data Explorer
© 2010-2015 Exprodo Software
46
page
12
Exprodo Database User Documentation
Single Sign On Exprodo DB Account
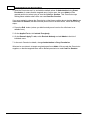
Some customer environments use a single sign on. To access Exprodo DB using a single
sign system a user would need to get authenticated by the single sign on system. To log in
click on the button for your sign in system or the Register new user button to register using
a specific authentication method. The names on the button(s) will have been chosen by the
administrator when single sign on authentication is set up so may be different.
If registering a new user choose the system to be registered by. If using a non-local method
the user will need to be authenticated by that system before filling in the new registration form.
And then complete the New User Registration form, to create an account within Exprodo
DB.
Once this account has been accepted by the administrator of Exprodo DB then the user will
be able to login. This enables administrators to control whom has access to Exprodo DB.
© 2010-2015 Exprodo Software
Exprodo DB User Guide
2.2
13
Change Password
If logged in using a local authentication method, in the top-right corner of every page of
Exprodo DB, there is a Change Password link. Click on this if the user would like to change
their password. A pop-up will appear that requests the old password and two copies of the
new password. Press the Apply button to change the password.
© 2010-2015 Exprodo Software
14
2.3
Exprodo Database User Documentation
User Settings
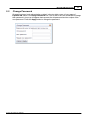
The User Settings page lets the user configure various options that control how Exprodo
DB looks. Access it by going to the Settings link that is shown in the top-right corner of every
page in Exprodo DB.
This will show the users settings with several tabs, as described below. Once the settings
have been changed then press the Save button to save all your changes.
2.3.1
Date & Time
This tab allows selection of the format to use for displaying the day and date at the top of
each day in any calendar, and also the date and time format used everywhere else. Also
specify whether US date format is preferred.
2.3.2
Email
This tab allows the user to choose whether to opt out of automatic emails (not reminders).
2.3.3
Menu
This tab allows the user to choose how the menu operates. Either configure it so that each
sub menu opens up just by placing the mouse over a menu, or that the user must click on a
menu for its sub menu to open.
Also, Exprodo DB can show different menus to different user roles. If the user has sufficient
permission 251 to change their menu, then a drop-down that lets you select which menu you
should see will be shown.
© 2010-2015 Exprodo Software
Exprodo DB User Guide
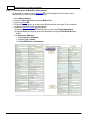
2.4
15
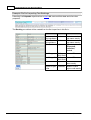
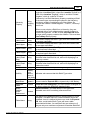
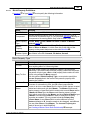
Toolbar Button Standard Definitions
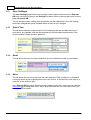
Exprodo DB uses toolbars in a number of places to provide options for editing and displaying
information. This chapter will define the standard button operations. Below is an example of a
toolbar with some options greyed out.
When a toolbar is being described, the text will refer to this chapter, and describe either those
buttons not mentioned here or whose operation is significantly different from the norm.
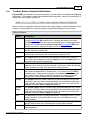
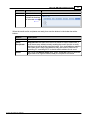
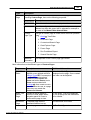
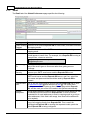
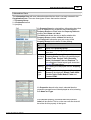
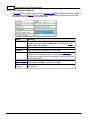
Editing Buttons
Button
Description
Edit
The Edit button is greyed out if there is no item selected, or the user does
not have permission 251 to edit the item. Pressing the button put the item
into Edit mode. There will be a warning if another user is already editing the
Biskit, and if the Biskit has the Version Property meta-property 251 set up,
then the user will be warned if an older version is being edited,
The Apply button is active only while an item is in edit mode. Press it to save
the item, and stay in edit mode.
The Save/OK button is active only while an item is in edit mode. Press it to
save the item, and the item will revert back to a read-only view.
The Cancel button is active only while an item is in edit mode. Press it to
throw away any changes since the last Apply (if there is an Apply option on
the menu) and move out of edit mode.
The View button is used to revert back to a view of the item's details, in
read-only mode. If there is no item selected, or the item's details are already
shown in read-only mode, then the button will be greyed out.
The Delete button is greyed out if there is no item selected, the selected
item cannot be deleted due to Permissions, or it is being referenced 252 by
something else. If there are many things in the database that reference the
item, then it may be difficult to delete it, because the references must be
removed first. Press to delete the selected items from the database.
The Create button will create a new item of the selected type, but it will be
greyed out if the user does not have permission to create items of that type.
Once pressed, the item will go into edit mode. The item will not exist in the
database until either Save or Apply are pressed.
Apply
Save/OK
Cancel
View
Delete
Create
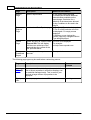
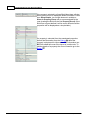
Create
Copy
The Create Copy button will create a copy of the selected type, but it will be
greyed out if the user does not have permission to create items of that type.
Once pressed, the item will go into edit mode. The item will not exist in the
database until either Save or Apply are pressed.
Cut
The Cut button cuts the currently selected item, removing it from its current
position and puts it in the edit buffer for later use, overwriting the current
buffer contents.
The Copy button takes a copy of the currently selected item and puts it in
the edit buffer for later use, overwriting the current buffer contents.
The Paste button pastes the current paste buffer contents to the currently
selected position.
Copy
Paste
© 2010-2015 Exprodo Software
16
Exprodo Database User Documentation
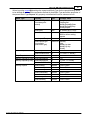
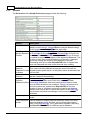
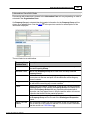
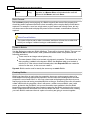
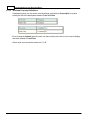
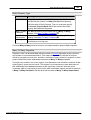
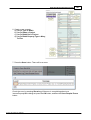
Viewing Buttons
Button
Description
Refresh
The Refresh button reloads the current page from the database.
Open All
The Open All button opens up the whole tree so that all the information can
be seen.
Close All
The Close All button closes the tree information so only the top of each tree
can be seen.
Printable
View
The Printable View button will reformat the page to make it printer friendly,
including removing the list of items and retaining only the selected item.
Then use the browser's Print option to print the item's details. Click
anywhere on the page to revert back to the normal view.
Columns.. The Columns... button allows the user to decide which properties 252 will be
.
displayed. The default is always the Name property.
The References Button
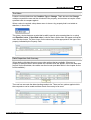
This button will show a list of everything that references the currently selected item. It will be
greyed out if there is nothing referring to the item. Once pressed a list of the references will
be viewed:
This shows a table with the Biskit Type 250 of the referrer, the unique database identifier of the
referrer and its name. Either press the References button again, or press the Back button
on the browser, to return to the original view.
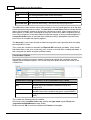
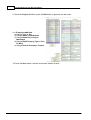
The History Button
This will show a change history 251 of the selected item, like this:
This shows who has changed the item and when, and also shows some of the item's
properties 252 as they changed over time. The "complex" properties are not shown. Exprodo
DB does not record the history of properties that store lists of items, like lists of projects 251
and lists of user groups 252 . The History button will be greyed out if there is no item selected
or if the item's history is already being shown. To revert back to showing the item's details,
press the View button or the History button.
© 2010-2015 Exprodo Software
Exprodo DB User Guide
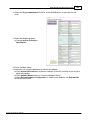
2.5
17
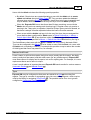
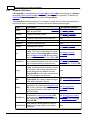
Conditions
Conditions 250 are used in several places within Exprodo DB, most notably Searching 27 ,
Automatic Emails 116 and Permissions 97 . Understanding Conditions is essential in order to
be able to configure Exprodo DB properly because of their pervasive use. Their purpose is to
allow you to specify what situations generate an email, or to which situations a Permission 97
applies. The chapter on Setting Search Conditions goes through basic conditions and how to
use the Conditions Panel. This chapter will expand on how to use conditions for the more
complex tasks required in Automatic Emails 116 , and Permissions 97 .
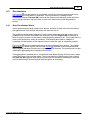
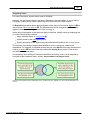
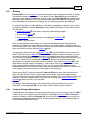
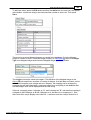
The Anatomy Of A Condition
A Condition 250 extracts one or two properties 252 from the context and checks whether a
relation 252 holds true. If it does, the Condition is said to match. A Condition consists of the
following items, in this order:
The Condition Type indicates the source of a property.
The Property Path 252 tells how to reach a property from that source.
The Relation provides an operator to compare the value of that property to another value.
The Value provides a value to do the comparison against.
The Accuracy specifies how accurate the comparison should be (used with dates).
The Condition Type and Property Path are always present, but the others may not be. For
example, if the user hasn't selected a Property Path, then the Relation, Value and Accuracy
do not show. If the context does not specify a Biskit Type 250 , then when a Condition is first
created, it will look like this:
The above picture shows the default Condition Type of Value with a red border because
Value cannot be used without a Biskit Type being available in the context. The Property Path
also has a red border and shows there are no properties available for the same reason.
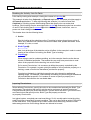
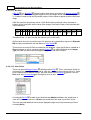
Choosing a Biskit Type of anything other than Any data type changes the Property Path
selector to show there are now properties that can be selected: :
The Property Path selector still shows in red because a Property Path is required, but hasn't
been selected yet. Clicking where it says Select a property would now generate a dropdown menu with a list of all the properties that exist on the Biskit Type 250 selected in the
current context.
© 2010-2015 Exprodo Software
18
Exprodo Database User Documentation
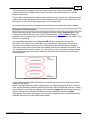
The Conditions Panel
Everywhere that conditions are used, they appear in a panel that looks something like this in a
writeable context:
When there are no conditions, it looks like this in a writeable context:
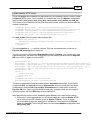
When editing Conditions, add a new Condition by pressing the Add Condition button. At any
time clicking on the green + button will add a new condition after the current one, clicking the
red - button will delete the condition the button is associated with.
Whenever there are multiple Conditions, they will appear in the Conditions Panel, each in
their own row.
The Conditions Context
A Conditions Panel is subject to the context within which it is used. There are two parts to
the context that affect the way the Conditions Panel behaves: the Biskit Type 250 the
condition is being placed upon, and whether used for an update so that there are two
instances of the data available (the Old Value and the New Value) or whether there is just
one instance available (the Value).
For an Automatic Email 116 , the context Biskit Type is the type that triggers the email. If the
email is triggered by any Bisikit Type, then it means the context has no Bisikit Type. There's
a New Value available when the action that triggered the email is an Update and not when
the action is Create or Delete.
For a Permission 97 , it's a very similar situation. The context Bisikit Type is the Bisikit Type
that the Permission 251 controls access to, and if the Permission applies to any Bisikit Type,
then the context has no Bisikit Type. The New Value is available when the action being
controlled is Update and not when the action is anything else.
For a Search 27 the context Bisikit Type is the Bisikit Type that the Search is on, and the
only Condition Type available is Value.
© 2010-2015 Exprodo Software
Exprodo DB User Guide
19
The Conditions Type
When a condition is created or edited, the type has four possible values:
Condition Type: Old Value
A Condition Type of Old Value means the condition will be placed upon the value of a
property 252 before any change has been made to it. For a condition within an Automatic
Email 116 this means the value of the property in a Create or Delete action and the old value
of the property for an Update action. For a Permission 97 this means the value of the
property on an object somebody is trying to Create or Delete, and the original value they are
trying to change from when somebody is trying to Update a Biskit 250 .
A Condition Type of Old Value is only suitable when the condition context specifies a bisikit
type.
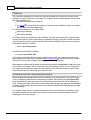
When a Condition Type of Old Value is specified, the property path 252 will show all the
properties of the type defined by the context's bisikit type, and any properties that can be
reached from those properties. When the context bisikit type is set to a Resource, clicking
where it says Select a property shows this:
A Resource 252 has a number of properties, as shown. One of them, Location, is itself an
object that has properties of its own that can be selected. As soon as you select a property
from the drop-down, the Relation 252 part of the condition will change from No property path
selected to something appropriate for the property selected (described further below).
Condition Type: New Value
A Condition Type of New Value is only available when a bisikit type has been specified, and
even then only in some contexts. For an Automatic Email 116 , Permission 97 or Booking Rule,
a Condition Type of New Value is only available for the Update action. Selecting New
Value means that the condition will be placed on the value of the property after the update
has occurred. The property path will display the same as for a Condition Type of Old Value.
© 2010-2015 Exprodo Software
20
Exprodo Database User Documentation
Condition Type: Change
A Condition Type of Change is available in the same contexts as New Value and the
property path displays the same as for both Old Value and New Value. This Condition Type
means that a restriction is placed upon the change of a property. For example,it can be
restricted so that the condition matches when the selected property does not change, does
change, increases or decreases. The increase and decrease restrictions are only available
for properties for which such a concept makes sense. This is described further below.
Condition Type: Meta-Property
A Condition Type of Meta-Property is available in all contexts. When this type is selected,
the property path displays the following:
A Meta-Property 251 lets you place restrictions on:
the type of the data that was Created, Updated or Deleted
the date and time that the action took place
the user that caused the action
This is called a Meta-Property because it's not a property of whatever was created, updated
or deleted, but rather, it's a property of the action itself.
The Property Path
As described above, the properties shown in the property path depend upon the Condition
Type selected. However, each property that is shown has it own way of being displayed,
regardless of how it came to be there. For example, any date/time property that is shown will
display with sub-properties.
A Resource 252 has a number of properties, as shown. One of them, Location, is itself an
object that has properties of its own that can be selected. The Relation, Value and Accuracy
part of the condition will not show unless a property path has been selected. Once a property
is selected, the extra parts of the condition appear, and they reflect the type of the property
selected and the choice of Condition Type.
© 2010-2015 Exprodo Software
Exprodo DB User Guide
21
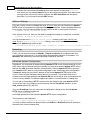
The Relation
The Relation is only shown when there's a bisikit type in the context and a property path has
been selected. The options displayed in the Relation drop-down menu differ depending on the
type of property selected by the property path.
This is the standard choice of relations for an integer or floating
point number property.
A date property displays with semantically identical options, but
using different words to match the English you would expect.
Not all integer properties display using the above options. That's
because some integer properties are defined as a bit set of
values of named integers (see Bit Sets 190 for details). A good
example of this is a user's roles 253 . There are up to 32 roles
defined, and a user may be deemed to have any number of
these roles. For such properties it doesn't make sense to
compare two sets of roles using greater than or less than, and
so the available relations are changed to reflect this.
A text property displays with options for comparison with the
starting, ending or interior characters. Also available is pattern
matching using the following:
^
$
.
*
+
?
X|Y
{n}
{n,m}
[a-z]
[^a-z]
The beginning of the line.
The end of the line.
Any character.
Zero or more times.
One or more times.
Once or not at all.
Either X or Y.
Exactly n times.
At least n times but not more than m times.
Characters a to z.
Any character other than a to z
Search 27 conditions are not case sensitive, while non-search
(Automatic Email 116 , Permission 97 or Booking Rule)
conditions are case sensitive.
Depending on whether the pattern matching is going to be done
in Java (Automatic Email 116 , Permission 97 or Booking Rule) or
SQL (Search 27 ) will depend on which additional matching
features are available. It is recommended that users only use
the options listed above.
© 2010-2015 Exprodo Software
22
Exprodo Database User Documentation
All the remaining property types don't support any notion of an
ordering that could be used to specify a less than relation etc.
So for these, the relations available are.
All the above relations are used when the Condition Type is
Value, Updated Value or Meta-Property. For a Condition
Type of Change, the relations are different. In this case, a
comparison between new and an old value are being done. The
numeric options available are semantically identical to their
original values, but to make it clear what is meant by less than
in this situation, the wording changes to this.
All the remaining property types, including those that used the
set of Mapped Integers 188 like user roles above, do not support
any notion of comparing the new and the old value except for
indicating whether there was a change.
© 2010-2015 Exprodo Software
Exprodo DB User Guide
23
The Value
A value is not required when the Condition Type is Change. That's because the Change
relation compares the new and the old values of the property, and so does not require a userspecified value to compare against.
When a value is required, a drop-down menu is shown. Any property that is not a date or
date-time, it shows this:
This gives a choice between a value that is null (a special value meaning there is no value)
and Specified value. If Specified value is chosen then a further item will appear so that the
value can be chosen. The item shown for the value entry will be appropriate to the type of the
property indicated by the Property Path.
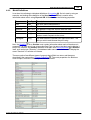
Date Properties And Accuracy
When dealing with dates there are some other options that are available. Whenever a
property is asked for which stores a date two condition lines will appear, one for the start date
and one for the finish date, the relation can then be set (see table earlier in the chapter for the
full list available) :
Then set how accurate the date checking needs to be. There are four options against which
the comparison can be made and then a level of accuracy to be used.
© 2010-2015 Exprodo Software
24
Exprodo Database User Documentation
Date Accuracy Description
now
The time specified but with a level of accuracy.
now plus
Within now plus a certain amount of time with a level of accuracy.
now minus
Within now minus a certain amount of time with a level of accuracy.
specified date The specified date exactly. (No level of accuracy may be set.
The now option means that the value of the property to be compared against is to be the date
and time that the comparison is done. The now plus and now minus options indicate that the
date to be calculated is relative to the time the comparison is done. When selecting either of
these options, a further item is displayed to input how much time to add or subtract from the
time of the comparison to reach the date-time that the property is being compared against. If
the specified date option is selected, then a date-time entry is displayed to input the exact
point in time to compare the property against.
The Accuracy is only shown for date or date-time properties, and it specifies how accurately
the comparison is to be.
Then, when the Condition is checked, and Exprodo DB compares two dates, it first rounds
both dates down to the year, month, day, hour, minute or second. After rounding both dates, it
then compares the dates using the specified relation.
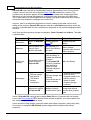
Combination Option
Once all the conditions have been created, choose how logically the conditions will work
together (the combination option). Click on the drop down button in the top left corner of the
condition box.
Combination Option Description (For the combination to be TRUE)
All
All the individual conditions must be true. (Logical AND)
Any
At least one of the individual conditions must be true.
(Logical OR)
Not All
As long as not all the individual conditions are true, this
includes none of the conditions being true. (Logical NAND)
None
As long as none of the individual conditions are true. (Logical
NOR)
This creates the following search condition:
Resources where (location.name starts with h) and (type.name equals Room) and
(requireCancellationReason equals True)
At this point use OK to save the condition and Cancel to start again.
© 2010-2015 Exprodo Software
Exprodo DB User Guide
25
Nested Conditions
Nested conditions allow as many levels of conditions as the user requires. Each set of
nested conditions also has its own combination option allowing the user to create as complex
an overall condition as possible.
Each nested set of conditions is evaluated separately, and the overall result of the nested
condition is then used as an individual condition result as part of the level above's condition
calculation.
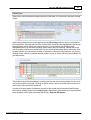
In order to use advanced conditions tick the Show Advanced box. Once ticked the Create
Advanced Condition icon appears at the top of the condition list and on each of the current
conditions.
Below the conditions have been expanded using a nested condition. The nested condition has
two parts, name and collectUsage and it will be True if both sub conditions are True.
This creates the following search condition:
Resources where (location.name starts with h) or ((name starts with d) and (collectUsage
equals true)) or (type.name equals Room) or (requireCancellationReason equals true)
In order to test the condition the following steps will be used
1. Check the nested condition, if both conditions are True then the nested condition is
True otherwise False (All conditions apply)
2. Check the top level condition, if any of the three top level conditions are True or the
nested condition is True then the whole condition is True (Any condition applies)
© 2010-2015 Exprodo Software
26
Exprodo Database User Documentation
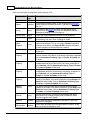
Referenced
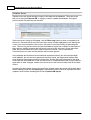
Ticking Show advanced allows the use of Referenced as a Condition Type. Using
Referenced it is possible to search for BiskitDefs 250 that are referenced by other BiskitDefs.
Using the Relation Statement and the Value this can be further refined to find those that are
referenced a number of times. e.g. more than once, less than three times etc.
When using Referenced the application looks for all those BiskitDefs that have a property
which points to the BiskitDef that is the object of the search. In this case the search BiskitDef
is Exprodo User the application will give a drop down that lists all the BiskitDefs that have a
property that points to an Exprodo User BiskitDef. Expanding a BiskitDef will list the
properties that are available. For instance Report has an owner property and Report
Schedule has a users property.
As an example to find all those users that have created Reports, set Exprodo User as the
BiskitDef to be searched for and Report.owner (owner is a pointer to an Exprodo User) as
the property defined in the Property Path, returned will be a list of Exprodo Users that
currently have Reports in the Report Manager. If the Relation Statement and Value are
set to greater than 1 times, then only those users with two or more reports will be returned.
See Also:
Example Automatic Emails 126
The examples in Permissions
97
© 2010-2015 Exprodo Software
Exprodo DB User Guide
2.6
27
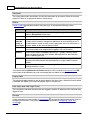
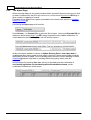
Searching For Information
There are various ways to search for information in Exprodo DB, and several ways to
display the information found. This section describes the generic search options that apply to
any type of data.
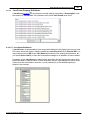
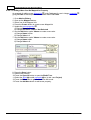
2.6.1
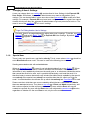
Search
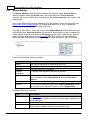
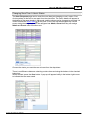
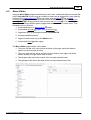
The Search page allows searches for any type of data within Exprodo DB. By default, it
appears under the Search menu, with a sub menu item also labelled Search. However, the
menu may have been configured so that the Search page is not visible or in a different place.
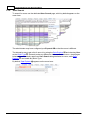
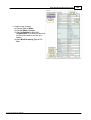
When you enter the Search page the following will be seen:
Choose which Biskit Type 250 to search for. Clicking on Please Select will provide a drop
down menu with the complete list of types available to search.
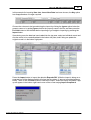
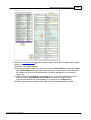
Once a Biskit Type is selected additional options will appear.
There are four report types: List 251 , Summary 252 , Single Item 252 and Group 251 . The user
can also add conditions 250 to the search (not Single Item), change the columns that are
going to be viewed in the returned search (not Summary or Single Item), or reset the search
conditions to the default (not Single Item).
This icon will toggle whether the File and Report Type options are available.
The Go button will run the current search set up.
Autorun if selected will automatically run new search set ups as they change, so changing
Columns, Conditions, Report Type and even what is being searched for, will get the
search to be re-run as each setting is changed. If searches are being done on large amounts
of data or the user needs to make multiple changes between search runs it is more efficient
if Autorun is not selected. If at any time having made changes and Autorun is selected but a
new search has not run then press the Go button.
© 2010-2015 Exprodo Software
28
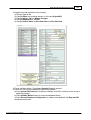
2.6.1.1
Exprodo Database User Documentation
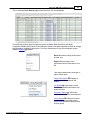
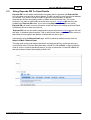
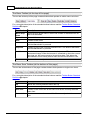
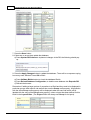
Single Item Report
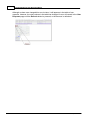
Shows the result of the search as a single record.
Either use the drop down to get a full list of possible options to be scrolled through or type in
the input box to get a shortened list of possible matching objects.
If the user has the correct permissions 251 they may edit the individual records or make
changes to multiple records. All of this will be covered in the chapter on Editing Search
Information 36
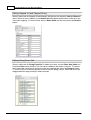
2.6.1.2
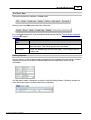
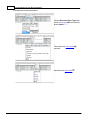
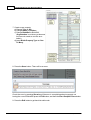
List Report
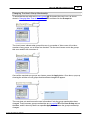
Shows the result of the search as a list of records
Specify which columns are viewed by clicking on the Columns... button and get a drop down
list of tick box's for all available properties 252 , those who have their boxes ticked will be
shown.
© 2010-2015 Exprodo Software
Exprodo DB User Guide
© 2010-2015 Exprodo Software
29
30
Exprodo Database User Documentation
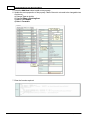
If an individual record is clicked an expanded view of that record will appear below the list.
If the user has the correct permissions 251 you may edit the individual records or make
changes to multiple records. All of this will be covered in the chapter on Editing Search
Information 36 .
© 2010-2015 Exprodo Software
Exprodo DB User Guide
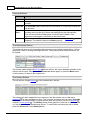
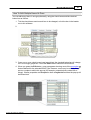
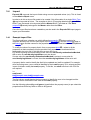
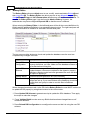
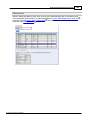
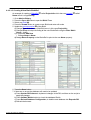
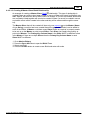
2.6.1.3
31
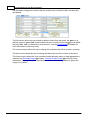
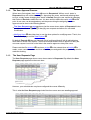
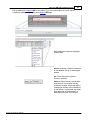
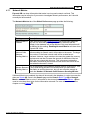
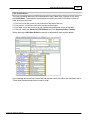
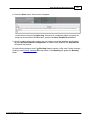
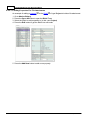
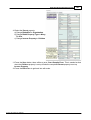
Summary Report
Shows the report as a table, where the user can define the properties 252 that are used for the
rows and the columns of the table, and how the content of each cell will be calculated.
When the Summary Report 252 view appears the user will be asked to select the properties
that will be used for the rows and for the columns.
Once the properties have been selected, then select how the content is to be displayed.
The default content display is count, this will display the content as a simple count of how
many records match the row/column combination, with totals for each row and column.
© 2010-2015 Exprodo Software
32
Exprodo Database User Documentation
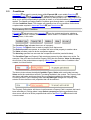
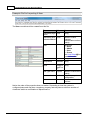
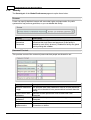
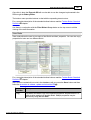
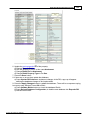
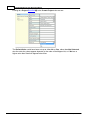
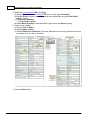
Complex Content Types
All the other content types require a numerical or date property as an additional parameter
(the exception is Count Distinct which will work with any type) . The value of this parameter
will be used to determine the value stored in each cell.
Content Type
Description
Count Distinct
Sum
How many different values to the property are there for
this cell.
The total of this property for this cell (numerical only)
Minimum
The smallest value for this property for this cell
Maximum
The largest value of this property for this cell
Average
The average value of this property for this cell
Standard Deviation
The standard deviation of the values of this property for
this cell.
Choose a property to find the minimum of, and the value
shown in this column will be the value of the current
property when the property being compared with is at a
minimum.
Choose a property to find the maximum of, and the value
shown in this column will be the value of the current
property when the property being compared with is at a
maximum.
Value At Minimum Of
Value At Maximum Of
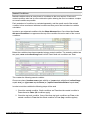
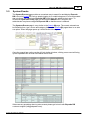
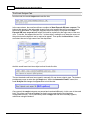
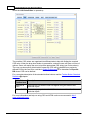
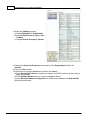
Below is an example of a table showing the total booking duration in minutes for each project
251
for each resource
© 2010-2015 Exprodo Software
Exprodo DB User Guide
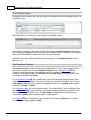
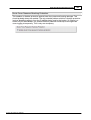
33
Use the Rounded option to round numbers to integers
Use the Scaled option to scale the results by the user requested factor (i.e if the scaling
factor is 10 divides all results by 10).
Viewing Records
Records associated with each cell can be viewed by clicking on the number in the cell. This
will give a List Report 251 of the records for that cell beneath the table.
As with the List Report
record below the list.
28
clicking on an individual record will give an expanded view of that
If the user has the correct permissions 251 they may edit the individual records or make
changes to multiple records. All of this will be covered in the chapter on Editing Search
Information 36
© 2010-2015 Exprodo Software
34
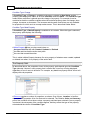
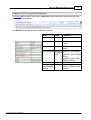
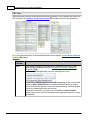
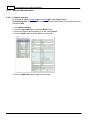
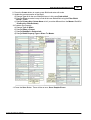
2.6.1.4
Exprodo Database User Documentation
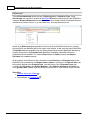
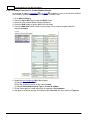
Group Report
Shows the report as a table with one column showing a Count of Biskit Type. The table can
then be extended to show other columns for properties 252 available within the Biskit Type 250
chosen.
To choose more columns either use the Columns... button on the toolbar or the green + (to
add one column), red - (to delete the current column), green tick (to add multiple columns,
tick all columns that are required and then click OK, or use the green + icon on the menu bar
to select all the columns or the red - icon to deselect all the options).
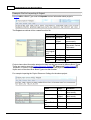
If the Columns... button is clicked a pop up appears, in which the columns can be chosen
using the same three buttons as described above. At the same time the user can decide
what aggregation to use, No aggregation or Count Distinct, as well as whether to Ignore
null values.
© 2010-2015 Exprodo Software
Exprodo DB User Guide
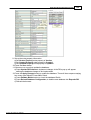
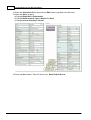
35
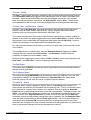
Once the columns have been chosen the table will redisplay using the appropriate number of
rows to display the records, grouping records by the columns chosen giving a count in the
first column.
Once the columns are displayed, move the cursor over the name of a column and a pop up
will appear with Change in it. Click on Change in order to change
1. The column header
2. The column content
The column content can be changed to
1. Another property.
2. A complex content type, see Complex Content Type
section for more details on the types available.
32
in the Summary Report
31
3. Whether null values are ignored.
4. Whether the result should be scaled see Complex Content Type
Report 31 section for more details on scaling.
32
in the Summary
Clicking on a cell will produce a List Report 251 of the records associated with that cell below
the table.
As with the List Report
record below the list.
28
clicking on an individual record will give an expanded view of that
If the user has the correct permissions 251 they may edit the individual records or make
changes to multiple records. All of this will be covered in the chapter on Editing Search
Information 36
© 2010-2015 Exprodo Software
36
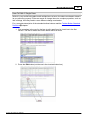
2.6.1.5
Exprodo Database User Documentation
Editing Search Information
Once the search information is in either a List Report 251 view or as an individual record the
information can be edited if the user has the permissions 251 to do so. The administrator will
have set up the permissions for your Exprodo DB.
For a complete description of the standard toolbar buttons read the Toolbar Button Standard
Definition 15 chapter.
For a more complete explanation on how to edit records in the list view read the How to Edit
Multiple Items At Once 47 section of the Data Explorer 46 chapter.
© 2010-2015 Exprodo Software
Exprodo DB User Guide
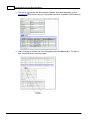
37
For a more complete explanation on how to edit records in the record view read the How to
Edit A Single Item 49 section of the Data Explorer 46 chapter.
Once in edit mode the changes can be made.
© 2010-2015 Exprodo Software
38
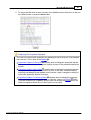
2.6.1.6
Exprodo Database User Documentation
Saving And Reusing Searches
Once a search has been created that is useful the user may wish to save it for later use. This
can be done using the drop down button from the File option on the toolbar and choosing
Save As. This will save the search as a report accessible from the Search->Reports 40
page. Using the File option the user can also load saved searches to run them, edit the
properties 252 of any saved searches and export search information to a file called
report.csv.
When a search has been created use the File->Save As to save the search. Give it a Name,
decide whether the search is accessible to all users (System Wide) and whether anyone can
edit the search (Publicly Modifiable). Then save the search.
When a search is saved it can be reloaded using File->Load. If a search is loaded then the
properties can be edited using the File->Properties menu option. When edited they can be
saved. In this case Save and Apply do the same thing, that is save the changed information
and leave edit mode.
© 2010-2015 Exprodo Software
Exprodo DB User Guide
39
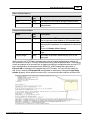
Exporting Search Information
A user can export any data they have found through a search to a .csv, a tab separated file or
native Excel file (either pre 2007 xls or post 2007 xlsx) which can then be loaded into such
applications as Excel.
Using File->Export the current search data will be exported to a file.
There are three options:
1. How the file will be formatted, choose between Comma Separated Values, Excel
xls, Excel xlsx and Tab Separated Values.
2. What headings will be used, these can be Show labels or Show property names.
Labels are those names that have been assigned by the administrator to a Biskit Type
250
, the property name is the name of the property in the database.
3. Whether enumerated types have their names shown, Show value labels where
defined or the value as stored in the database, Show underlying data value.
When the format for the export is chosen press Export, then choose whether to open the
exported information directly into another application, or whether to save the file. If the file is
saved it will be called report.csv and found in the users Downloads folder.
© 2010-2015 Exprodo Software
40
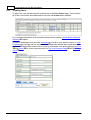
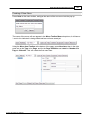
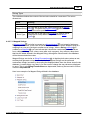
2.6.2
Exprodo Database User Documentation
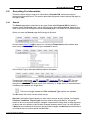
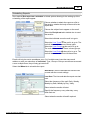
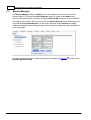
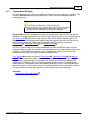
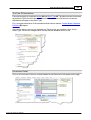
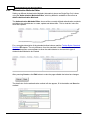
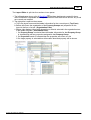
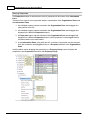
Report Manager
The Report Manager page allows the management of reports within Exprodo DB. By
default, it appears under the Search menu, with a sub menu item labelled Reports.
However, the menu may have been configured so that the Reports page is not visible by the
administrator.
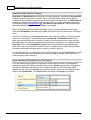
Once useful searches have been created they can be saved for future use as reports (see
Saving and Reusing Searches 38 ). The reports page allows you to view, manage and
schedule your reports as well as creating new ones.
The page is split into two. On the left is a list of the System Reports (those that anyone can
see) and the users Personal Reports. On the right is the area where to edit, schedule and
create reports, when the user enters the Reports page this area is initially empty. Select a
report in the left hand pane to see the properties 252 of that report in the right hand pane.
Where the page splits can be moved to change the space available for each of the sides.
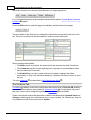
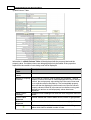
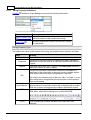
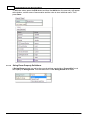
A report has a number of basic properties:
Property
Description
Name
Search For
Enabled
Publicly
Modifiable
System Wide
The name of the report as assigned by the user.
The biskit type 250 that will be searched for.
If the report will run if scheduled.
If a system wide report then anyone can modify it.
Report Type
Owner
Can everyone see the report or is it a personal one. If this is true the
report will appear under System Reports rather than Personal
Reports.
Will the report display as List 251 , Summary 252 or Group 251 report
The user who created the report and if Publicly Modifiable is false,
the only person who can edit a report if it is also System Wide
and tabs to see other properties:
Tab
Conditions
Columns
Schedule
Description
The conditions 250 (if any) associated with the report. (see the Setting
Search Conditions chapter for more information about conditions and
how to edit them)
The columns that will be displayed in the report
Whether the report is scheduled to run and, when it will run, who the
report will be e-mailed to and the format of that e-mail.
© 2010-2015 Exprodo Software
Exprodo DB User Guide
41
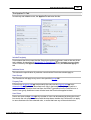
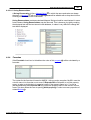
The Menu Bars
The menu bar has two variations. In View mode:
after you press the Edit button and enter edit mode:
For a complete description of the standard toolbar buttons read the Toolbar Button Standard
Definition 15 chapter.
Report Menu
Bar
Description
Open Report
Opens the Search page in a state ready to run your report. Click Go
to run the report. This will be greyed out in edit mode
Opens the Search page and runs the report. This will be greyed out
in edit mode
Run report
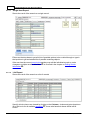
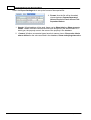
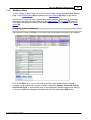
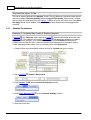
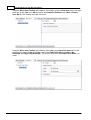
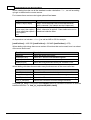
Editing Reports
Once a report is in edit mode the basic properties can be changed in the top section, all have
drop down menus for the options available other than the report name which can be
overwritten.
Use the tabs to add or change the conditions (see the Setting Search Conditions chapter for
more information about conditions and how to edit them).
© 2010-2015 Exprodo Software
42
Exprodo Database User Documentation
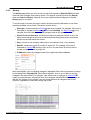
Use the tabs to change the columns that are viewed, what is viewed in them and how they
are labelled.
The first column allows the user to add or delete columns from the report, the green + (to
add one column), green tick (to add multiple columns, tick all columns required to be added
then click OK), red - (to delete the current column). (see the Group Report 34 chapter for
more information on how they work)
The second column allows the user to change the properties that will be viewed in a column.
The third column allows the user to change the label at the top of the column in the report.
The fourth column allows the user to decide whether absolute values or data aggregation is
required. See Summary Report 31 chapter, Complex Content Types 32 section for more
information. If aggregation of the data has been chosen, then decide whether to ignore null
(empty or 0) values.
© 2010-2015 Exprodo Software
Exprodo DB User Guide
43
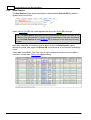
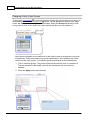
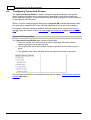
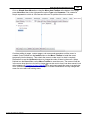
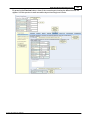
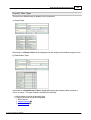
Scheduling Reports
If box marked Run report on a schedule is ticked, options allowing for the setting up of the
scheduling of the report appear.
Choose whether to attach the report as a file to
the email or whether the body of the email is the
report data.
Choose the subject line to appear on the email.
Select the Recipients tab to decide who to send
the email to.
Select the individual users the mail is to go to.
Select the User Types 253 the mail is to go to. The
mail will be sent to all users of these types.
Select the User Groups 252 the mail is to go to.
The mail will be sent to all users in these groups.
Select the User Roles 253 the mail is to go to. The
mail will be sent to all users with these roles.
Emails will only be sent to an address once. So if multiple users have the same email
address or with your selections of Individual, Type, Group or Role you would have accessed
a user multiple times, they will only get one email.
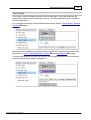
Select the When tab to schedule the report.
Next Send: The time and date the mail will next
be sent with the current settings.
Last Sent: The time and date the report was last
sent.
Select the frequency of the mail: Daily, Weekly,
Monthly by Date, Monthly by Day, Yearly
Select when the emails will start
Specify the frequency: every other day, every
third week etc.
Select when the emails will end if required.
© 2010-2015 Exprodo Software
44
Exprodo Database User Documentation
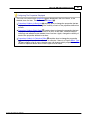
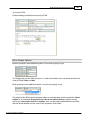
Select the Export Settings tab to set up the format of the exported file.
1. Format: How the file will be formatted,
choose between Comma Separated
Values, Excel xls, Excel xlsx and Tab
Separated Values.
1. Header: What headings will be used, these can be Show labels or Show property
names. Labels are those names that have been assigned by the administrator to a
biskit type, the property name is the name of the property in the database.
2. Content: Whether enumerated types have their names shown, Show value labels
where defined or the value as stored in the database, Show underlying data value.
© 2010-2015 Exprodo Software
Exprodo DB User Guide
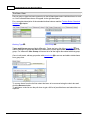
2.6.3
45
History
The History page allows the user to look into the audit log kept by Exprodo DB that shows
what has been changed, when and by whom. This page is normally found on the Search
menu as Search-->History. However, the menu may have been configured so that the
History page is not visible.
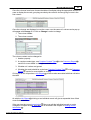
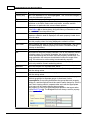
To use the page, first enter the search criteria, and then press the Go button to see what
matching changes can be found. The search criteria can be:
Data type, choose what type of Biskit 250 has been changed. For example, if the user is
interested in changes to bookings 250 , then select Booking. If a Biskit Type 250 is not
selected, then the search will include changes made to any type of Biskit.
Search from and Search to, to restrict the search to particular periods of time. It is
highly recommended to put limits on the time period using these options so that the
amount of returned results are limited.
User, choose to see changes made only by one particular user, or by anybody.
Data ID, choose the unique ID number to search for. For example, if the user is
interested in a project 251 , and they know its ID is 42, then enter 42 here to restrict
results to changes made to project 42.
IP Address, search by changes made from a particular internet address.
After pressing Go, a list of matching changes is displayed. Each one will represent a change
to something within Exprodo DB. When the list appears, click on one of them to see all
changes to the same Biskit. For example, if the search was for changes to resources 252
made on a particular day, returned will be a list of changes that affected all the resources on
that day. By clicking on one of them, the user would then see all changes made to that
resource, regardless of when that change was made.
© 2010-2015 Exprodo Software
46
2.6.4
Exprodo Database User Documentation
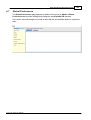
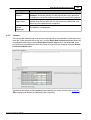
Data Explorer
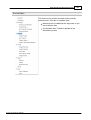
The Data Explorer page allows examination of the data within Exprodo DB. By default, it
appears on the menu here:
Select a Biskit Type 250 , and a table appears that shows all Biskits 250 of that type.
Note: The Data Explorer page does not yet handle well the situation when there is lots
of Biskits of the selected type. It is highly recommended that the user does not attempt
to use the Data Explorer to view Bookings 250 , for example, since there may be many
of them.
Apart from being able to choose the type of data to look at, the Data Explorer page is
identical to several other pages in Exprodo DB, such as the list of users shown in Modifying
Users.
Select User as the Biskit Type, then a list of users will appear and the user will be able to
examine or modify them (permissions 97 permitting).
© 2010-2015 Exprodo Software
Exprodo DB User Guide
47
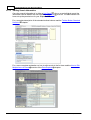
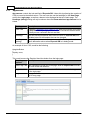
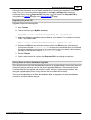
How To Edit Multiple Items At Once
You can edit many items in one go quite easily, using the check boxes and the checked
button bar as follows:
1. Tick the check boxes next to each item to be changed, or tick the box in the header
row to tick all boxes.
2.
3. Once one or more check boxes have been ticked, the checked button bar will change
so it is no longer greyed out. Press the Edit button to edit all the ticked items.
4. When you press the Edit button, a pop-up appears showing most of the properties 252
that are defined for the selected Biskit Type. However, some may be missing if they
are too complex to edit in this pop-up (for example, properties that contain lists of
things). If these properties are Grouped or have a Layout defined then the pop up will
be hierarchical.
© 2010-2015 Exprodo Software
48
Exprodo Database User Documentation
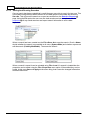
5. Tick the check boxes of one or more properties shown in the pop-up. Once done, the
Apply button changes so it is no longer greyed out, and an editor appears in the Value
column:
6. Choose a value for each property whose check box you tick. When finished, press
the Apply button. Every ticked item will then be modified, with only the ticked
properties being changed. Whatever values selected for each property will be
applied to all the ticked items. Properties that are not ticked are not affected by the
change.
© 2010-2015 Exprodo Software
Exprodo DB User Guide
49
How To Edit A Single Item
While it is very useful being able to edit multiple items at once, the above mechanism doesn't
let you edit every property. If the user wants to change the more complex properties, such as
lists of things, then they need to use a different change mechanism.
For a complete description of the standard toolbar buttons read the Toolbar Button Standard
Definition 15 chapter.
1. Click anywhere in the row for the item to edit, apart from its check box in the first
column. The item's details are shown below the list of items.
2. Press the Edit button (not the one in the checked button bar)
© 2010-2015 Exprodo Software
50
Exprodo Database User Documentation
3. The item is now shown with the properties editable. Note that, depending on how
permissions 251 have been set up, it is possible that some properties will still show as
read-only.
4. Once changing properties has been completed, press the Save button. The item is
then saved and shown read-only again.
© 2010-2015 Exprodo Software
Exprodo DB User Guide
51
5. To cancel the edit while an item is shown in an editable format, either click on the row
for a different item or press the View button.
Configuring The Properties Displayed
The user can control which properties are displayed in the list of items, in the detailed
view of a item. This is done in the Bakery 173 .
Properties Visible In A Biskit List 183 explains how to change the properties that are
displayed in a list of items. Change the visibility of each of the properties defined on
an item.
Properties Visible In Biskit Detail 183 explains how to change the properties that are
displayed when seeing a detailed view of an item. In this case, it affects both the
read-only and editable mode detailed view of an item. Again, change the visibility of
each of the properties defined on an item.
Properties Visible In A Collection Editor 183 explains how to change the properties
that are displayed in collection editors. For example, if there is a Project 251 Biskit
Type that contains a list of Users, then the user can change which properties are
shown to represent those users in the Project's list of users.
© 2010-2015 Exprodo Software
52
2.7
Exprodo Database User Documentation
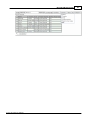
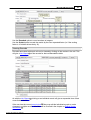
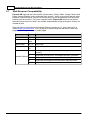
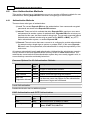
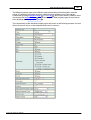
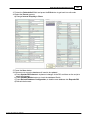
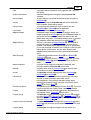
Web Browser Compatability
Exprodo DB supports the most popular web browsers: Firefox, Safari, Google Chrome and
Opera. Internet Explorer is also supported from version 7, but is much slower than the other
browsers. Internet Explorer version 6 will mostly work, but will be extremely slow and some
behaviour will be incorrect. The users experience with Exprodo DB will be much better if
Internet Explorer versions 6 and 7 are avoided, and preferably if Internet Explorer version 8 is
avoided as well.
If the user has no choice but to use Internet Explorer versions 6 or 7, then it will help if to
install Google ChromeFrame. This is a plug-in for Internet Explorer that allows some web
pages to use Google Chrome to render pages.
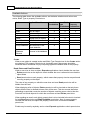
Name
Version Comments
Google Chrome All
Supported
Firefox
3.0 and Supported
later
Apple Safari
4, 5, 6
Supported
Opera
9, 10,
11
Supported
6
Not supported. Very slow and doesn't always behave
properly.
7
Supported, but very slow. Use another browser if possible.
8
Supported, but slower than any of the other major browsers.
9
Supported, but slightly slower than other major browsers.
10
Supported
Internet Explorer
© 2010-2015 Exprodo Software
Part
III
54
3
Exprodo Database User Documentation
Exprodo DB Administration Guide
The Exprodo DB Administration Guide covers the day-to-day administration that is
required for an Exprodo DB installation. This guide should be read in conjunction with the
Exprodo DB User Guide 10 .
3.1
User Administration
When somebody first registers with Exprodo DB (as described by Getting A User Account
10
), a new user is created with a status of Requested. While a user has this status, they
are unable to log in. An administrator must then approve the user by changing their status to
Approved. This and other user-related administration is described in this section.
3.1.1
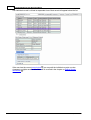
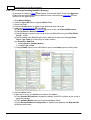
User Properties
This chapter describes the properties of a user and what they are for, but not how to change
them. See Modifying Users 67 for a description of how to change the properties 252 on a user.
The licence for Exprodo DB counts the users with status Normal (whose accounts have not
expired) and Password must be reset at next login.
Identity
Every user has a combination of authentication method and login name which must be
unique. The login name may contain letters, numbers, hyphen, underscore or full stop. A login
name may be changed as long as the new name adheres to these constraints.
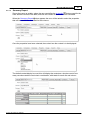
Roles
There can be up to 32 roles 253 defined in the system, including the predefined and special
Root and Admin roles. A user with the Root role always has permission to do anything in the
system. A user with the Admin role is allowed to perform administrative tasks. However,
Exprodo DB can be configured so that the Admin role is not required for administrative
tasks. The remaining 30 possible roles can be configured as required, and they are normally
associated with setting up Permissions as required for your facility. See User Roles 190 in the
Bakery 173 section of the Exprodo DB Configuration Guide for how add new roles.
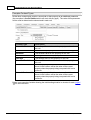
Users with the Root role have the following special properties:
Permissions are not checked. Permission is always granted.
They are allowed to log in, even while the licence has expired. This allows you to
recover such situations once you have a new licence.
They can change the status 253 of a user to make them active (for example, by
changing the status from Blocked to Normal), even if it means there will be more
active users than the licence allows. However, this may not be a good thing to do since
only Root would then be able to use the system.
Normally, a user can only allocate other users with roles that they already have.
However, if a user has the Root role, they can add any role to another user.
© 2010-2015 Exprodo Software
Exprodo DB Administration Guide
55
Users with the Admin role have the following special properties:
By default, Permissions are created that allow a user with the Admin role to create,
update and delete almost all Biskit Types 250 . They can also update the database
schema when using the Bakery 173 . However, these Permissions are changeable and
may be added, removed or modified for any user by a user with Admin privileges.
When the Exprodo DB licence has fewer than 30 days remaining, users with the
Admin role will receive a warning each time they log in. Regular users only receive a
warning in the 7 days prior to expiration. Note that 30 days' grace period is allowed, so
that there is always time after expiration before the licence must be renewed.
When a user with the Admin role logs in for the very first time, they are assigned the
menu that has been configured for Admin users in Global Preferences -> Menus ->
Default Admin Menu 150 . A user that has neither the Root nor the Admin role will be
assigned the menu specified in Menus -> Default User Menu 150 when they first log in.
The final difference that users with the Root or Admin role may notice is that each Biskit
Type can be configured in the Bakery 173 to be visible to users with the Root role, users with
the Admin role, everybody or nobody. For example this provides a way to reduce the number
of bisikit types that users may search for, for example.
Names And Email
A user's name is split into three parts: their given name (usually their first name), the family
name (usually their last name) and their other name (for any middle names). Exprodo DB
uses these names for display and in reports, but not for anything else. For example, it is not a
requirement that a user's name is unique.
A user's email address is important because Exprodo DB sends emails for various reasons
(Automatic Emails 116 and Manual Emails 71 ).
Type
Exprodo DB may be configured so that users are asked for a type 253 when they first
register. The type is a means of segregating users into non-overlapping sets, which may be
used by the facility for assigning Permissions 251 . The possible values for a user type are
configured in Configuring Types And Groups 94 .
© 2010-2015 Exprodo Software
56
Exprodo Database User Documentation
Password
The users password is stored here, but will only be shown as a number of dots for security
reasons. If there is no password the box will be empty.
Status
A user's status 253 indicates whether they can log in. It can take the following values:
Status
Description
Requested This is the status given to a user when they first register. A user whose
status is Requested cannot log in.
Normal
This is the normal status for a user who can log in.
Password
must be
reset at
next login
A user whose status is Password must be reset at next login can log in,
but they will be forced to change their password as soon as they do so. If
an administrator needs to reset a user's password, then it's useful also to
set their status to this value at the same time.
Blocked
A user whose status is Blocked cannot log in. Typically, use this status for
a user that needs to be stopped from logging in for some reason.
Denied
A user whose status is Denied cannot log in. Typically, use this status
when not approving a new user request, although there is also have the
option of deleting the user.
Expired
A user whose status is Expired cannot log in. Either their expiry date has
passed or the administrator has decided they no longer need to use the
system.
Lurker
A user whose status is Lurker cannot login but will receive automatic and
booking reminder e-mails.
The reason that both Blocked and Denied statuses exist is so that an Automatic Email 116
can be sent to the affected user with a message that is suitable for the situation.
Expiry Date
This allows the administrator to set an expiry date for the users login. When this field is edited
a calendar will appear, just select the day the login is to expire on.
Last Login and Last Login From
This records the last date and time the user logged in and the IP address of the machine they
logged in from.
Groups
A user may belong to any number of user groups 252 , and group membership can be used for
assigning Permissions. The groups that exist are configured in Configuring Types And
Groups 94 .
© 2010-2015 Exprodo Software
Exprodo DB Administration Guide
3.1.2
57
The User Approval Process
When users first register, their status 253 is set to Requested. While a user's status is
Requested, they will not be able to log in. Approving new users, and thereby allowing them
to log in, simply means changing their status to Normal. Deny the user request by changing
their status to Denied or delete the user. It is also useful to define the users roles 253 at this
point. A new user can be assigned any role the person doing the assigning has. User
approval can be done in the following places:
The User Requests 57 page 57 shows just the users whose status is Requested. It also
provides short-cuts to approving or denying user requests and allows for user detail
modification.
Modifying Users 67 describes how to use the other options for modifying users. That is, the
User Search page and the Data Explorer 46 .
By default, Exprodo DB has an Automatic Email configured that will tell all administrators
when there is a new user request. The email received contains links to approve or deny the
new user request. Just click on the links in the email to approve or deny new users.
Please note that if a resource 252 requires a project 251 to be entered when a booking 250 is
made, a user cannot book that resource unless they are assigned to the project being used to
make the booking.
3.1.3
The User Requests Page
The User Requests page shows users whose status is Requested. By default, the User
Requests page appears on the menu here:
However, your administrator may have configured the menus differently.
This is what the User Requests page looks like when some users are awaiting approval:
© 2010-2015 Exprodo Software
58
Exprodo Database User Documentation
Approving Or Denying Users
As described in The User Approval Process 57 , approving or denying new users means
changing their status 253 . The top part of the User Requests page provides a quick way to do
just this. Tick the check box next to each user whose status to be changed.
Note that as soon as there are any users checked, then the checked button bar changes so
that it is no longer greyed out.
Now press any of these buttons to Approve, Deny, Block or Delete the ticked users. Press
Force password reset to allow the users to log in, but force them to change their password.
Alternatively, tick the check box in the table's header and every check box will be ticked (or
unticked, as appropriate) as a short-cut to ticking all users.
© 2010-2015 Exprodo Software
Exprodo DB Administration Guide
59
Changing More Than A User's Status
The User Requests page can be used for more than just changing a user's status. First,
click anywhere in the user's row apart from the check box. The user's details will appear at
the bottom of the page already in edit mode, and the values can be changed as required. It is
useful to define the users roles 253 at this point. A new user can be assigned any role the
person doing the assigning has. If the assignee has Admin, Guest then they can assign
Admin and Guest roles to another user.
Choose the status you want the user to have from the drop-down.
There is no difference between selecting a status here and using the buttons in the checked
button bar.
When finished, press the Save button. A pop-up will appear briefly in the bottom right corner
to indicate the user was saved.
© 2010-2015 Exprodo Software
60
Exprodo Database User Documentation
Although we have now changed this user's status, it still appears in the table of user
requests. However, the status shown in the table has changed. A user will remain in the User
Requests page until the Refresh button is pressed, or the browser is refreshed.
© 2010-2015 Exprodo Software
Exprodo DB Administration Guide
61
Changing The User's Group Membership
To associate the user with some users groups 252 , first select the user's row, as shown
above in Changing More Than A User's Status 59 , and then click the Groups tab.
The check boxes indicate what groups this user is a member of. New users will not be a
member of any groups, so no boxes are checked. Tick the check boxes next to the groups
this user needs to be a member of.
Once all the required user groups are chosen, press the Apply button. Once done, a pop-up
showing the number of user groups that have been changed will appear.
The user does not need to save the user information if only the group memberships have
changed. That's because group memberships are a property 252 of the User Group and not
the User, and it's also why there's a separate Apply button to save the group membership
changes.
© 2010-2015 Exprodo Software
62
3.1.4
Exprodo Database User Documentation
User Search
To search for users use the dedicated User Search page, which by default appears on the
menu here:
The administrator may have configured your Exprodo DB so that the menu is different.
The alternative way to get a list of users is by using the Data Explorer 46 and choosing User
as the Biskit Type 250 . It doesn't make any difference which method is chosen - these pages
behave almost identically apart from User Search being dedicated to users, while Data
Explorer 46 can handle any Biskit Type.
By default, Data Explorer
46
appears on the menu here:
© 2010-2015 Exprodo Software
Exprodo DB Administration Guide
63
This is what the User Search page looks like when it is first displayed:
The following section goes through the options available after the search has been
completed, enabling the search to be changed, saved or the data exported, as well as change
the information viewed by the search. For more information on any of the features shown
read the Search 27 chapter.
Save As: Allows saving of the report
for later use.
Export: Allows export of the
information found in the search to a
file.
This button determines what type of
report will be seen:
Single Item Report 252 Displays a
single record that matches the
search.
List Report 251 : Lists each record
found that matches the search one
under the other.
Summary Report 252 : Allows the
information found to be summarised.
Group Report 251 : Allows the report
to be shown by groupings with a
count of the number of records that
fit each group.
© 2010-2015 Exprodo Software
64
Exprodo Database User Documentation
To change the search parameters
Choose Selected User Type then
select a user type 253 from the drop
down options.
Then select the user status 253
required.
And select the user roles 253 .
© 2010-2015 Exprodo Software
Exprodo DB Administration Guide
65
Set up additional conditions 250 for the search. For more information on how to set up
conditions read the information in the Search 27 page.
And change the columns displayed
in the output.
Reset: Resets the search conditions
to the defaults set up on starting the
search.
Go: Runs the search with the
current conditions
Autorun: If this button is ticked then
searches will run as soon as any
conditions change. If the user will be
changing a number of the conditions
of the search, or searches will return
large amounts of information it is
more efficient if this is not ticked.
© 2010-2015 Exprodo Software
66
3.1.5
Exprodo Database User Documentation
Creating Users
To add a new user that has not been requested go to the User Search page. There will be a
list of the current users and underneath a menu bar with Create button enabled.
For a complete description of the standard toolbar buttons read the Toolbar Button Standard
Definition 15 chapter.
In order to understand more about the properties 252 used for a user read the section on User
Properties 54 . The login name to be used will be added under identity after choosing the
appropriate authentication method. Also in order to understand more about setting up projects
251
and groups 252 for a user read the section on The User Requests Page 57 and Modifying
Users 67 .
© 2010-2015 Exprodo Software
Exprodo DB Administration Guide
3.1.6
67
Modifying Users
To see, change or delete users, go to a list of users. Either use the dedicated User Search
page, or use Data Explorer 46 as explained in the User Search 62 chapter to get the list.
Once the list of users has been returned they can be modified. Depending on which page
was used to get the list of users either go to the Data Explorer 46 or Search 27 pages for
more details on editing and saving. Described below is how to specifically change a user
groups 252 .
Changing A User's Password
Once the list of users is displayed, click on the user whose password needs to be changed.
Click on the Edit button, once in edit mode any of the users details may be changed. If
changing a users password it may be an idea to change the Status to Password must be
reset at next login, in order that the user must change their password again when they log
in. Once the details are changed click Save (this will have replaced the Edit button).
© 2010-2015 Exprodo Software
68
Exprodo Database User Documentation
Changing A User's User Groups
To see which user groups 252 a user is a member of select the user from the list of users, as
described by How To Edit A Single User 49 above. The tab panel at the bottom of the page
shows the user's projects and group memberships. Select the Groups tab and a list of all
user groups is seen, with a check box next to each group the user is a member of.
Note: the user's details do not need to be in edit mode in order to change the user group
membership. That's because the user group membership is not a property of the user
itself, but of the user groups. To modify the group membership for the selected user:
1. Tick or untick the groups. The groups ticked are the ones the user is a member of.
Tick the check box in the header row if all the check boxes are to be ticked or
unticked.
2. Press the Apply button when finished.
© 2010-2015 Exprodo Software
Exprodo DB Administration Guide
69
Configuring The Properties Displayed
The user can control which properties 252 are displayed in the list of items, in the
detailed view of a item. This is done in the Bakery 173 .
Properties Visible In A Biskit List 183 explains how to change the properties that are
displayed in a list of items. Change the visibility of each of the properties defined on
an item.
Properties Visible In Biskit Detail 183 explains how to change the properties that are
displayed when seeing a detailed view of an item. In this case, it affects both the
read-only and editable mode detailed view of an item. Again, change the visibility of
each of the properties defined on an item.
Properties Visible In A Collection Editor 183 explains how to change the properties
that are displayed in collection editors. For example, if there is a Project Biskit Type
250
that contains a list of users, then the user can change which properties are
shown to represent those users in the Project's list of users.
© 2010-2015 Exprodo Software
70
3.1.7
Exprodo Database User Documentation
Changing A User's Settings
A user can change their own settings 253 , as described in User Settings in the Exprodo DB
User Guide. Sometimes, however, the administrator may want to edit another user's
settings. This can be desirable if some users do not have permission 251 to modify all of their
settings. For example, Exprodo DB may have been configured so that a regular user cannot
choose which menu they use, whereas an administrator may have permission to do so. The
menu is one of the properties 252 of a user's settings.
Page For Editing Another User's Settings
Currently, there is no page dedicated to editing other user's settings. To do this, use Data
Explorer 46 and set the Biskit Type 250 to Exprodo DB User Settings. By default, Data
Explorer 46 appears on the menu here:
3.1.8
Special User
There is only one special user, and that is nobody. This is a user whose status 253 should be
set to Blocked and never used. This user is used in the following circumstance:
Sending automated emails with embedded data:
When an Automatic Email 116 is sent, it can include data taken from some Biskits 250 . When
this happens, to make sure that it is safe to include such information, make sure that the
information is only readable by whomever the email goes to, or whomever initiated the action
that caused the email to be sent, as it is possible that anybody could read the email. It is
therefore better to ensure that emails only include information that is readable by the special
user nobody. If the special user nobody can read the data, then it's safe to put it into an
email. Your administrator should have set up which data nobody has Permission 97 to read.
Please note that, while there are users created by default that are called Root and Admin,
these are not special users. They have a user role 253 of Root and Admin respectively, and
their roles are special, but the users are not. As many users with the Root role may be
created as required. Any user with the Root role is not subjected to permissions 251 checks,
regardless of whether it is the user Root or not; only the roles matter.
© 2010-2015 Exprodo Software
Exprodo DB Administration Guide
3.2
71
Using Exprodo DB To Send Emails
Exprodo DB can be used to send emails to anybody that is registered with Exprodo DB,
since all users must provide an email address. Emails can also be sent to any email address
as required. This can be used as a means of general communication so that the
administrator doesn't necessarily need to maintain email distribution lists. This works
because if you want to send emails to people who use your resources 252 , then they are
probably also Exprodo DB users. If you are running Exprodo DB on your own server,
Exprodo DB can make a secure connection to the mail server for sending email see Global
Preferences Email on how to set this up..
Exprodo DB can also be used to send email to people who have a booking 250 over the next
few days, or whatever period required. This is useful when there's a problem with a resource
that needs to be brought to the attention of those that are due to use it.
Send emails using the Manual Email page, which is placed by default onto the menu as
Admin-->EMail-->Manual Email.
The page sets up the email subject and email message and priority, as though using any
normal email client. There are then three tabs, named To, CC and BCC, to specify who the
email is sent to, copied to and blindly sent to. As long as someone is in the CC or BCC list
then there doesn't need to be anything in the To list.
© 2010-2015 Exprodo Software
72
Exprodo Database User Documentation
Each of the To, CC and BCC tabs have the same content, with tabs as follows:
Tab Name Description
Email
This adds any
Addresses number of specific
email addresses.
This means emails
can be sent to people
who are not known
by Exprodo DB.
Users
User
Statuses
This chooses
individual users to
send the email to.
Use the drop down to
select the users
required. Use the tick
box to choose which
users you wish to
remove and then
click the Remove
button.
This chooses the
statuses 253 of users
that are allowed to
received the email.
Note that the
recipients will be
those specified by
any of the other tabs
that are not also
prohibited by this
User Statuses tab.
User Types If Exprodo DB is
configured so that
users are classified
by their user type 253 ,
then select one or
more user types so
that all users with
those users types
should receive an
email.
User
Select any number of
Groups
user groups 252 to
send email to. Use
the drop down to
select the user
groups required. Use
the tick box to
choose which user
groups to remove
and then click the
© 2010-2015 Exprodo Software
Exprodo DB Administration Guide
73
Tab Name Description
Remove button.
User Roles Add any user to the
recipient list that has
the selected roles 253 .
When the email and its recipients are ready, then use the buttons in the button bar at the
bottom:
Button
Description
Send
This sends the email
Show
Recipients
Exprodo DB calculates who the email would be sent to and shows a
list of those users without actually sending the email. Use this to verify
that the email will target the expected users. If an email address appears
more than once in any of the tabs then only one email is sent with To
overriding CC overriding BCC to decide which address line is used.
After using the Manual Email page, press the Reset button to reset the
page back to its original content, ready to compose a new email.
Reset
© 2010-2015 Exprodo Software
74
3.3
Exprodo Database User Documentation
Report Manager
The Report Manager allows an Admin user to see reports for all users as well as the
system reports.To access the Report Manager page it is found on the Admin menu.
However, the administrator may have configured Exprodo DB so that the menu is different.
The page is split into two. On the left is a list of the System Reports (those that anyone can
see) and all the Personal Reports. On the right is the area where Reports can edited,
created and deleted. Where the page splits can be moved to change the space available for
each of the sides.
In order to understand how to create and edit reports read the the Reports
Exprodo DB User Guide.
40
section of the
© 2010-2015 Exprodo Software
Exprodo DB Administration Guide
3.4
75
Import
Exprodo DB supports the import of data using comma-separated values (csv). This is found
on the Admin->Import menu.
In order to do this an import file needs to be created. Only information for a single Biskit Type
250
can be imported at a time. The exception to this is, if importing data belonging to a Slave
Biskit Type, that needs to be imported with the Master Biskit Type data as if the Slave
properties 252 actually belonged to the Master rather than the Slave.
Once the import files have been created they can be used in the Exprodo DB import page to
import your information.
3.4.1
Example Import Files
The file should have a header row which defines the properties 252 that are going to be
imported, and then one row for each object of the Biskit Type 250 . Use the Search 27 page or
the Bakery 173 to find the names for the properties. All the fields need to be comma separated.
To modify the value of a property that is from a component biskit 250 , values to all the
properties on that component must be provided. Any properties not mentioned will be
attempted to be set to null. If this fails then an error will occur.
Eg, When importing users and setting a new value for userIdentity.authenticationMethod,
then a value for userIdentity.loginName must also be set.
If a new value for userIdentity.authenticationMethod is set and a new value for
userIdentity.loginName is not set, then the userIdentity.loginName will be set to null.
A property that is used to identify the biskit to be updated can itself be updated. For example,
when importing users, users could be identified by their email property (if it's unique) and the
import could also modify that email property. To do this, two email columns in the CSV file
are required.
i.e.
email,email
[email protected],[email protected]
The first column would then be the key property to identify the user to be changed and the
second column would be the new value of the email property.
Use the following options Key: and Ignore: (typed before the property name) to pre select the
properties that will be key fields or fields to be ignored.
© 2010-2015 Exprodo Software
76
Exprodo Database User Documentation
Example File For Importing A User
The User record that will be created from this file:
Name
Value
userIdentity.login Timb
Name
userIdentity.auth Local
enticationMethod
Comments
String
Needs to match
available
authentication method
exactly.
roles
4
Set by bits
1 = Root
2 = Admin
4 = User
8 = Guest
See User Roles 190 for
more information.
givenName
Tim
String
familyName
Bilderbec String
k
email
blah@co String
naptic.co
m
userType.name Physics Needs to match name
exactly
password
timbil
Depends on system
configuration
status
Normal
Requested, Normal,
Blocked
Notice the order of the properties does not matter. Depending on how the system is
configured password may be a compulsory property and may have a minimum number of
characters and/or a combination of alphanumerics.
© 2010-2015 Exprodo Software
Exprodo DB Administration Guide
77
Example File For Importing A Resource
A resource 252 is a Biskit Type used in Calpendo to store information about resources that
can be booked in a facility.
The Resource record that will be created from this file:
Name
name
Value
Ion Pool
Comments
String
location.name
Harvard
Needs to match name
exactly
type.name
Room
Needs to match name
exactly
projectRequired PROJEC PROJECT_REQUIRED
T_REQUI or
RED
PROJECT_NOT_REQUI
RED or
PROJECT_WITH_RES
OURCE_ENTRY
collectUsage
true
bookingBiskitDe Booking
f.representedBi
skitType
© 2010-2015 Exprodo Software
true or false
The Biskit Type to be
used for bookings of this
resource
78
Exprodo Database User Documentation
Example File For Importing A Project
A project 251 is a Biskit Type used in Calpendo to store information about projects.
The Project record that will be created from this file:
Name
Value
projectCode SunSpots
type.name Physics
Project
status
Approved
owner.userId
entity.loginN
ame
name
start
finish
curie
Comments
String
Needs to match
name exactly
Approved,
Requested, Denied,
Terminated
Login name
Sun Spots String
25 May 2013 Date
25 Dec 2014 Date
Projects have other information attached to them but they are stored in different Biskit Types.
These are used to store the Project Resource Settings 251 , Users and Project Groups 251
properties. In order to import this information, first import the project information and then
import each of the other three Biskit Types one after another.
For example importing the Project Resource Settings for the above project:
Name
project.name
Value
Comments
SunSpots Needs to match
name exactly
resource.name Physics Needs to match
Project
name exactly
numberOfSessi 10
Integer
ons
minutesPerSess 60
Integer
ion
costPerHour
400
Double
© 2010-2015 Exprodo Software
Exprodo DB Administration Guide
79
Example File For Importing A Time Template
A Time Template 252 is a Biskit Type used in Calpendo to store information about when
bookings 250 for resources can take place and how they can be automatically approved.
The Template record that will be created from this file:
Name
Value
Comments
date
Range.start
15 May
2013
10:30
Date and Time
dateRange.finis 15 May
h
2013
15:00
Date and Time
templateGroup Free for All string
Enabled
true
true or false
Abdicated
false
true or false
To import repeat Time Templates see below for additional information about importing repeat
bookings.
© 2010-2015 Exprodo Software
80
Exprodo Database User Documentation
Example File For Importing Two Bookings
A booking is a Calpendo object that has a status 250 , start and finish date and a few other
properties.
The Booking record that will be created from the first import line in this file is:
Name
Value
Comments
booker.userIde admin
ntity.loginName
Needs to match
login name exactly
owner.userIden admin
tity.loginName
Needs to match
login name exactly
status
Approved,
Requested,
Cancelled,
Denied
Approved
dateRange.star 18 May
Date and Time
t
2013 08:00
dateRange.finis 18 May
Date and Time
h
2013 08:30
resource.name dry lab
Needs to match
name exactly
project.Project inventions Needs to match
Code
project code exactly
© 2010-2015 Exprodo Software
Exprodo DB Administration Guide
81
When importing repeat 252 bookings the repeat sub Biskit Type for the repeat booking needs
to be defined as well as all the properties defined for that Biskit Type and all the properties of
the parent Biskit Type Repeat. Any property not defined will have its value set to null.
Biskit Type
Property
Type
Example Value
Repeat
repeat.biskitType
(must always be
present)
Biskit
repeat.start
repeat.finish
Date
Date
repeat.repeatEvery
int
AnnualRepeat
DailyRepeat
MonthlyRepeatByDate
MonthlyRepeatByDay
WeeklyRepeat
12 January 2015 13:00
12 January 2999 14:00
2999 for never ending
repeats
1
repeat.repeatType
(must match
repeat.biskitType)
JavaEnum Annually
Daily
Monthly by date
Monthly by day
Weekly
Int
1-31
int
0-11 with 0 = January
Annual Repeat
repeat.dayOfMonth
repeat.monthOfYear
Daily Repeat
None
Monthly Repeat By Date repeat.dayOfMonth
Monthly Repeat By Day repeat.dayOfWeek
repeat.weekOfMonth
Weekly Repeat
repeat.sunday
repeat.monday
repeat.tuesday
repeat.wednesday
repeat.thursday
repeat.friday
repeat.saturday
© 2010-2015 Exprodo Software
int
int
int
Boolean
Boolean
Boolean
Boolean
Boolean
Boolean
Boolean
1-31
1-7 with 1 = Sunday
1-5
True or False
True or False
True or False
True or False
True or False
True or False
True or False
82
3.4.2
Exprodo Database User Documentation
The Import Page
When importing data you can specify whether data is imported if there are any errors,or that
no data is imported from the file if any errors occur, errors include Permissions 251 failing to
allow creation or updating of records.
Examples of how different error types are handled can be found in the section on Handling
Import File Errors 85 .
On entering the Import page it will look like:
Press Browse... (or Choose File) to select the file to import. At this point Exprodo DB will
attempt to decide which Biskit Type 250 is being imported from the header information. If it
cannot determine the Biskit Type, the user will need to select it.
Once the Import page knows which Biskit Type it is importing it will look like this:
At this point decide whether to choose to Update Existing Data or Insert New data. If
updating data then import needs to know which columns to use as the key fields to find the
appropriate records to update. Click on the Key option below the column headings of those
properties 252 that are keys fields or put Key: before the property name in the file.
In this example for importing User data, the key is specified to be the combination of
userIdentity.loginName and userIdentity.authenticationMethod.name, as the
combination of these two will be unique.
© 2010-2015 Exprodo Software
Exprodo DB Administration Guide
83
In this example for importing User data, Insert New Data. has been chosen, the Key option
has disappeared as no longer required.
Choose the columns to be ignored during the import by clicking the Ignore option below the
property name or by putting Ignore: before the property name in the file, and then press the
Preview button to see the data before importing or go straight to importing by pressing the
Import button.
If previewing once the data has been loaded into the top pane, select an individual record and
see the record to be created/updated in the bottom left pane, and if doing an update the
original record is in the bottom right pane.
Press the Import button to import the data into Exprodo DB. While the import is being run a
progress bar will be displayed which will show the time taken, % amount completed and any
errors. There is also a Cancel button to cancel the import. When the import completes a pop
up will appear in the bottom right hand corner of the screen saying Import Completed.
© 2010-2015 Exprodo Software
84
Exprodo Database User Documentation
Importing Options
Click on the options button to see all the options available for viewing and importing the data
file
Option
Description
Character encoding
While importing Exprodo DB guesses at the character
encoding used for the file being imported, and allows
the administrator the chance to choose the one to use,
allowing non-ASCII files to be imported.
Select the lines to import
Use the Filter... button to set up conditions 250 to
define which rows will be imported.
How to handle errors
Choose Import any that do not fail which will import
all records that do not have errors, or Import all or
nothing, which will only import the records if they
would all succeed.
How to handle long lines
Whether lines should be wrapped making the box
deeper, Wrap long lines, or whether to make the table
wider to deal with long lines. Do not wrap long lines;
make the table wider.
Row Hiding
Whether to hide those rows that are being ignored for
import, Hide ignored rows, or to hide all rows without
an error, Hide error-free rows. Press the Preview
button to see the results of any changes to this setting.
Column Hiding
Whether to hide those columns that are being ignored
for import, Hide ignored columns, or to hide all
columns without an error, Hide error-free columns.
Press the Preview button to see the results of any
changes to this setting.
© 2010-2015 Exprodo Software
Exprodo DB Administration Guide
85
Importing File Attachments
If any of the properties to be imported include the Attachment BiskitDef 250 , then the user is
supplied with an additional button to select the list of attachments to be imported. This needs
to be done before the Preview or Import buttons are pressed.
Once the attachment pop up is present, use the Browse... (or Choose File) button to find all
the attachments required for the import. Once selected click OK and move on to Preview
and Import the data.
Handling Import File Errors
During the import process there are three main types of errors.
1. Incorrect property names or labels in the header of the import file. (Header errors)
2. Incorrect data in a record, stopping Import from resolving property values. (Data
Errors)
3. Failure to import due to internal checking. (Violation errors)
a. Incorrect data in a record, causing Permissions to fail to allow creation of
records(e.g. password too short).
b. Permissions failing to allow creation or updating of records.
© 2010-2015 Exprodo Software
86
Exprodo Database User Documentation
Header Errors
Header errors are found when the import file is first loaded using the Send button. Once
Import has decided on the Biskit Type being imported or the user has selected the correct
Biskit Type, the header information is loaded. If any of the headers cannot be resolved to
property names or property labels (in a case insensitive manner if possible) then those
headers are marked in red. A pop up will inform the user how many column headings have
not been recognised. Import then updates those columns from Normal to Ignore, so the user
can proceed with the import without those columns.
These errors can be fixed in the Import page. Just click on any red header and you will get a
drop down box with a complete lists of this Biskit Types properties. Select the correct one,
and the error will be removed. Once done the column will be moved from Ignore to
automatically.
© 2010-2015 Exprodo Software
Exprodo DB Administration Guide
87
Data Errors
Data errors are found either during the preview of the data, of if a preview is not done, during
import.
If there are problems a pop up will appear use the Show Log button to show a complete list
of the problems. Records with an error will have their record number highlighted in red as will
those property values which are causing an error. If a record has only warnings it will
highlighted in blue, as will those property values which are just warnings. Moving the cursor
over a property with an error/warning will result in a tool tip describing the error/warning. Also
for each column you can see the number of problems. If there are any problems in a column
clicking on the number of problem text will produce a pop up which will show the problems for
just that column.
The problem log will list theproblems, showing the line and column the problem occurs on as
well as the problem message. Clicking on the an errors column will scroll the file to the error,
and it will be coloured blue to stand out.
In order to fix these types of problems go back to the original import document and fix them
there before loading it back into the Import page. Remember once the file to be imported has
been updated, save it before reloading the file into Exprodo DB Import.
© 2010-2015 Exprodo Software
88
Exprodo Database User Documentation
Violation Errors
Violation errors are found during the import of the data into the database. These are errors
that occur when the Exprodo DB is trying to create or update the database. During this
process all the Permissions are checked.
If there are errors a pop up will appear, use the Show Log button to show a complete list of
the errors. Records with an error will have their record number highlighted in red. Moving the
cursor over a record number with an error will result in a tool tip coming up describing the
error. The error log just shows the records that failed to import and a reason for that failure. If
there are two violation reasons that will cause a record to fail, only one is found, and when
fixed, the second reason will cause a failure next time around. This is because the
Permissions are run until one fails and the rest are then ignored.
In the example above the third record has both a password that is too short and an illegal
email address, but only the short password has been found, the illegal email address has
been found for the second record but not the third. So after fixing the password for the third
record and the email address for the second record, if an attempt was made to import the file
again with no other changes, another error would occur this time an invalid email for the third
record.
In order to fix these types of errors go back to the original import document and fix them there
before loading it back into the Import page. Remember once the file to be imported has been
updated, save it before reloading the file into Exprodo DB Import.
© 2010-2015 Exprodo Software
Exprodo DB Administration Guide
3.5
89
System Events
The System Events page provides a convenient way to search for and display Exprodo
DB's record of events 252 such as people logging in or emails being sent. It is recommended
that only those who administer Exprodo DB should have this added to their menu. To
access the Systems Events page it is found on the Admin menu. However, the
administrator may have configured Exprodo DB so that the menu is different.
The Systems Events page is very similar to the Search 27 page. The events returned can
be filtered by time, type, source and category.Unlike other Search 27 pages there is no auto
run option. When the page opens up it looks like the following:
Once the search has run the results will look similar to below, clicking on an event will bring
up the expanded view for that event below the list view.
If there are any questions about system events please get in touch with Exprodo DB
customer support ([email protected]).
© 2010-2015 Exprodo Software
Part
IV
92
4
Exprodo Database User Documentation
Exprodo DB Configuration Guide
Exprodo DB was designed from the very beginning to be flexible, so that it could meet the
requirements of many different types of facilities. It's targeted at people who have shared data
that needs to be viewed and updated through a web interface.
The Exprodo DB Configuration Guide describes how to change Exprodo DB so that it
works the way you want it to. This does not normally need to be read by non-administrators,
nor by anybody who only needs to do the day-to-day administration. This guide should be
read in conjunction with the Exprodo DB User Guide 10
© 2010-2015 Exprodo Software
Exprodo DB Configuration Guide
4.1
93
Types and Groups
For various reasons, it is useful to be able to split users into sets of one sort or another. This
is done in Exprodo DB using types and groups. These are two independent means of
segregating users.
The Difference Between Types and Groups
The key thing to understand is that a user has precisely
one type, but may belong to any number of groups.
Exprodo DB should be configured with types and groups that make sense for the current
installation. A default installation comes with no types and no groups. If your installation does
use User Types 253 , then when a user registers, they will be asked what their type is. An
administrator can override that and change it when they approve the user, but the user will
always have a single type. When users have types, then the type can be used for
Permissions 97 , Automatic Emails 116 and Manual Emails 71 .
Use User Types if there is some logical separation of users that fits the notion of a user
having precisely one type. For example, it may be that there are multiple departments in your
company, with everybody belonging to only one department. If that were the case, then
perhaps have as many User Types as there are departments.
User Groups 252 can also be used for Permissions 97 , Automatic Emails 116 and Manual
Emails 71 , the same as for types. However, there is greater flexibility due to the way a user
can belong to multiple groups (or no groups). So, while a user's type may indicate their
department (or whatever), groups could be created that reflect any sort of grouping that
makes sense in your situation. Given this apparent flexibility in groups, one might ask what
the point of types is. The answer is that it is sometimes useful to have a taxonomy in which
you know every user has a type, whereas a user may belong to no groups at all.
See also:
Configuring Types And Groups
© 2010-2015 Exprodo Software
94
.
94
4.2
Exprodo Database User Documentation
Configuring Types And Groups
The Types And Groups Editor is used to configure the types and groups in the system.
Before reading more about how to configure them, please take a look at which describes
what a type and a group is, and how an item can have exactly one type but may be a member
of many groups (including zero).
When it comes to configuring types and groups in Exprodo DB, consider first whether there
is a good way to categorise the users such that they each fall into precisely one category.
For example, distinguish between students, staff and external users using that for the user
type 253 . Types are used to control Permissions 97 , Automatic Emails 116 and Manual Emails
71
.
Types And Groups Editor
The Types and Groups Editor page consists of three parts:
1. The menu tool bar: this is the tool bar at the top of the page, and all the buttons
operate on all types and groups at a time.
2. The left pane: this allows the selection of a type or group or an item within a type or
group
3. The right pane: this shows the detail of the currently selected type or group item
For a complete description of the standard toolbar buttons read the Toolbar Button Standard
Definition 15 chapter.
© 2010-2015 Exprodo Software
Exprodo DB Configuration Guide
95
The List View
By clicking on one of the types or groups in the left hand pane, in the right hand pane will
appear a list of all the entries for that type or group. This will include two menus, one above
and one below the list.
For a complete description of the standard toolbar buttons read the Toolbar Button Standard
Definition 15 chapter.
Many items can be edited in one go quite easily in the list view, using the check boxes read
the section on How To Edit Multiple Items At Once 47 in the Data Explorer 46 chapter.
To edit an individual item from this list click on it and it will appear below the list and the edit
functions allowed will no longer be greyed out.
© 2010-2015 Exprodo Software
96
Exprodo Database User Documentation
The Item View
Once a group or type has been opened up in the left hand pane select individual items to work
on. Once selected these items will appear in the right hand pane.
For a complete description of the standard toolbar buttons read the Toolbar Button Standard
Definition 15 chapter.
Booking Type 250
User Group 252
Types and Groups appear slightly differently, Types are just a list of the properties 252 that
can be changed. A group has that list but also a list of all the appropriate items that are in its
group. For instance a User Group will have a list of all the logins associated with that group.
Once in edit mode, edit any properties with permission 251 to access and add or delete items
from group lists.
To remove items from the list first select the items to be removed using the check box and
click the Remove button.
To add items to the list use the pull down to get a full list of possible items and select the one
required.
© 2010-2015 Exprodo Software
Exprodo DB Configuration Guide
4.3
97
Permissions
Permissions 251 are designed to be very flexible, so that you have fine-grained control over
who can perform what action on what data. This can be done by creating multiple
Permissions objects. Exprodo DB looks at all the Permissions that apply to the action the
user is trying to perform and uses them to work out if Permission should be granted or
denied.
4.3.1
How Permissions Work
Some systems have a large master list of actions, and then for each role, there would be a
tick against each of the actions that users with that role can do.
The problem with that kind of approach is that it is best employed when the system has a
predefined set of actions that need to be controlled. However, Exprodo DB is designed to
allow for precise control over the detail of what people are allowed to do. This means that it is
much more flexible for a variety of situations. That flexibility also leads to a degree of
complexity, but this section of the manual will try to make this topic as simple as possible.
Permissions 251 are not implemented with an all-encompassing list of actions. The method
that is used is to define a small set of simple actions 251 , and then create customised and
highly targeted individual Permissions to control what can be done. The overall picture is then
obtained by aggregating those individual Permissions.
That aggregation is possible due to a mechanism that allows layering of Permissions, where
some Permissions can override others. The crucial element in allowing this is the concept
that Exprodo DB supports both authorising Permissions that permit something to be done,
and non-authorising Permissions that deny the right to do something.
© 2010-2015 Exprodo Software
98
Exprodo Database User Documentation
Breaking An Activity Into Its Parts
Let's start by looking at an example, viewing the content of a booking 250 .
This example is taken from Calpendo, an Exprodo application. The same principles apply to
all Exprodo applications. To help with following this example, it is useful to know that
Calpendo is a booking system with Booking Rules that specify who can make what
bookings. Each booking may be associated with a project 251 , and each project has a number
of users. Each booking has a resource 252 , which is the equipment, instrument, room or
person etc. that is being booked.
This breaks down into the following items:
1. Action
Start by looking at the underlying action. Everything is broken down into an action of
some sort, and the most common actions are create, read, update and delete. In the
example, it is view, or read.
2. Biskit Type 250
Next, look at the type of the data the action will affect. In the example in order to control
viewing of the content of a booking, the Biskit Type is booking.
3. Property 252
When trying to read or update something, as in the example, then the action has an
impact on individual properties. That means the user may have permission to read
some of the properties on the booking, but not all of them.
So for some Permissions, it is necessary to define the property controlled by the
Permission. For example, to grant or deny the ability to view a particular property on a
booking, create a Permission that affects just that one property.
Permissions that apply to individual properties are only relevant to reading and
updating things. For example, when deleting something, the whole thing is deleted and
not just individual properties. So it makes no sense to specify a property on a
Permission that controls who can delete data.
Layering Permissions
When defining Permissions, specify the action to be controlled and optionally the Biskit Type
and property. Permissions that specify only the action are known as action Permissions.
Permissions that specify the action and a Biskit Type are known as Biskit Type Permissions,
and Permissions that specify action, Biskit Type and property are known
as property Permissions.
In a typical system, everybody can read most things. So it is usually easier to start by giving
read Permission to everybody to read everything. This can be done with an action Permission
for the read action. Then, layered on top of that, create a non-authorising Permission that
takes away permission for the things that are not allowed to be read.
© 2010-2015 Exprodo Software
Exprodo DB Configuration Guide
99
The layering works by using action Permissions only if there isn't a relevant Biskit Type or
property Permission. Similarly, Biskit Type Permissions are used if there isn't a relevant
property Permission.
There is also a numerical priority that can be specified for each Permission, and that provides
another way to layer Permissions because the highest priority Permissions within each of the
three layers, action, Biskit Type and property, are considered first.
If a relevant Permission can not be found, then permission to perform the action is denied.
Precedence Of Permissions
When sorting through the Permissions to decide which one to apply, Exprodo DB will only
consider those that match the action, Biskit Type, properties, conditions 250 and that also
target the user concerned. Also, note that those Permissions that do not specify a Biskit Type
will also be considered.
Once that filtering has taken place, Exprodo DB will use property Permissions first,
then Biskit Type Permissions, and finally action Permissions. Within each of those three,
Permissions are further sorted by priority, and the Permission with the highest numerical
value for its priority will be used. If there are multiple Permissions with the same priority, then
it is undefined which one will be used. The reason this is required will become apparent after
going through the way in which the conditions under which each Permission may be used
can be specified.
Precedence of permission types.
When a BiskitDef has another BiskitDef as its parent it will have access to the Permissions
created for the parent.
When checking Permissions all the child Permissions will be filtered and acted on. If there is
not a relevant Permission then the parents Permissions will be filtered and acted on, for each
type of Permission in order of precedence. For the action Update this will be done first using
property Permissions, and then BiskitDef Permissions and finally the action Update
Permissions. This means all property Permissions on the parent will be checked before any
BiskitDef Permissions on the child will be checked.
© 2010-2015 Exprodo Software
100
Exprodo Database User Documentation
Conditions
The conditions assigned to a Permission provide a means of very precise control over the
situations in which a Permission will apply. For example, there may be different Permissions
that apply depending on:
the resource a booking is made for
the status 250 of a booking (for example, a booking may be editable while it is a request,
but not once it has been approved)
or a particular Permission is to apply when:
approving a booking
cancelling a booking
All of these things are specified by the conditions. Here are some examples. Suppose there
are two Permissions, both of which apply to updating bookings, and both of which are Biskit
Type Permissions (which means they specify the action and Biskit Type but not a property).
Permission A has the condition:
status equals Requested
and Permission B has the condition:
resource equals Wet Lab
In this case, assuming both Permissions apply to the current user, then Permission A will
apply whenever the user tries to update a requested booking 252 and Permission B will apply
whenever the user tries to update a booking for the Wet Lab resource.
What happens when trying to update a requested booking for the Wet Lab. In that case, both
Permissions could apply. This is where the Permission priority comes in. If one Permission
has a higher priority than the other, then the highest priority Permission will be used. If they
have the same priority, then either one could be used.
Authorising And Non-authorising Permissions
When thinking about giving permission for something, one normally thinks in positive terms.
That is, authorising permission for something. However, the layering used in Exprodo DB
requires that there is also the notion of non-authorising permissions as well as authorising
ones. That means that a Permission can be written that will grant the right to do something at
one layer, and then have another Permission at another layer that will explicitly deny the right
to do something.
For example, there may be an authorising action Permission that allows everybody to read
everything, and then a non-authorising property Permission to deny the ability to read the
booking price for some people.
© 2010-2015 Exprodo Software
Exprodo DB Configuration Guide
101
Targeting Users
For each Permission, choose which users it will affect.
However, it's sometimes easier to say who a Permission shouldn't affect, or to say that it's
everybody meeting some criteria, apart from those that meet some other criteria.
So Exprodo applications allows the specification of the users a Permission applies to 250 as
well as those it does not apply to 250 . The affected users will be everybody the Permission
applies to that are not amongst those it does not apply to.
Within each of the applies to and does not apply to sections, identify users by employing one
or more of the following methods:
Name individual users or user groups 252 .
Specify users by the roles 253 they have.
Specify a property on the object being controlled that will identify a user or user group.
This last item, specifying a property that identifies a user or user group, needs more
explanation. For example, a Calpendo booking has an owner 251 that is the user that owns the
booking, a booker 250 that is the user that created the booking and a project. Each project
also has an owner and users.
Consequently, when writing a Permission that affects a booking, users can be targeted by
using any of the properties owner, booker, project.owner and project.users.
Showing the targeted and untargeted users, defined by the "Applies To" and "Does Not Apply To"
users.
© 2010-2015 Exprodo Software
102
Exprodo Database User Documentation
Available Actions
The following table shows the available actions, and indicates whether each action uses
action, Biskit Type or property Permissions :
Action
Applies When You...
Create
Read
Update
Delete
Exists
Email Readable
Run Report
Dump Database
Create a new object
View an object
Update an object
Delete an object
Display a list of objects
Include data in an email
Run a report
Take a backup of the
whole database
Add or remove tables or
columns in the database
Update
Database
Schema
Uses Action Uses Biskit Uses
Permissions Type
Property
Permissions Permissions
X
X
X
X
X
X
X
X
X
X
X
X
X
X
X
X
X
X
X
X
Create
When a new object is created, action and Biskit Type Permissions for the Create action
are checked. The property Permission is checked to see if the property should be
rendered read or read/write only by comparing against the default value of the property.
Read, Exists and Email Readable
When a user tries to view an object, Exprodo applications check whether the user has:
Exists permission on the object to check whether the user is allowed to know that the
object exists
Read permission on each property, which means that property checks are performed
on every property on the object.
The value of any property on which the user does not have Read permission will be
hidden from the user.
When displaying a list of objects, Exists permission will be checked so that only those
objects that the user is allowed to know exist will be seen. This also means that when
generating a report that counts the number of objects matching some criteria, then the
count will not include objects for which the user does not have Exists permission.
When sending an email, each object property that is to be included in the text is checked
for both Read permission and Email Readable permission. Also, for every property
inserted into the email, the object the property comes from is checked for Exists
permission.
Emails may be read by anybody, and so when Exprodo applications check permissions
© 2010-2015 Exprodo Software
Exprodo DB Configuration Guide
103
for what can be included in an email, it checks whether the special user nobody 251 has
the relevant permission as well as the user that performed the action that caused an
email to
be sent. Therefore it is necessary to create a Permission that gives Email Readable
permissions to user nobody for any information that is required to go into an email. See
Special Users 70 for more details on user nobody.
Update
When a user tries to update an object, Exprodo applications will check for Update
permission on the object and also on each property. If permission is denied for any
property, then Update permission for the whole object is denied. This is different from
viewing an object, where being denied permission to read one property does not stop the
user from seeing the other properties.
When editing an object, if Exprodo applications can determine that Permissions prevent
the user from changing a property, then that property will be rendered in an unmodifiable
form. This will prevent the user from making changes that would only be rejected later.
Delete
When deleting an object, Delete action and Biskit Type Permissions are checked.
Run Report
Run Report action Permissions are checked whenever a report is run. This allows the
administrator to prevent some types of report being run (for example, to stop some people
from running summary or group reports), or the Biskit Type being reported on (for
example, to restrict reports about system usage or other things).
To control which reports somebody can run, create a Run Report action Permission for
the Biskit Type Report. Then place conditions on which reports can be run.
Run Report Permissions for any Biskit Type other than Report will be ignored.
Dump Database
Dump Database action Permissions are checked when trying to using the Database
Backup page to generate a copy of all the data in the database.
Update Database Schema
Checked when using the Bakery 250 to modify the database schema for newly added
dynamic properties.
© 2010-2015 Exprodo Software
104
4.3.2
Exprodo Database User Documentation
The Permissions Editor
The Permissions Editor shows all the Permissions 251 and allows the user to create, update
and delete them. By default, it appears on the menu here:
This is what the Permissions Editor looks like first opened:
© 2010-2015 Exprodo Software
Exprodo DB Configuration Guide
105
The Tree Of Permissions
Permissions apply to a particular action 251 and Biskit Type 250 . The above screen shot shows
all the Biskit Types for which there are Permissions. Note that a Permission can also be
defined that will apply to any Biskit Type.
For a complete description of the standard toolbar buttons read the Toolbar Button Standard
Definition 15 chapter.
Once all the items in the tree are viewable, the Permissions are viewable in their Action,
Biskit Type, Permission categorisation with any that are disabled shown in red.
Permission Detail
Click on a Permission in the tree, and the details for that Permission will appear on the right:
© 2010-2015 Exprodo Software
106
Exprodo Database User Documentation
Now that a Permission is selected, the button bar is no longer greyed out:
For a complete description of the standard toolbar buttons read the Toolbar Button Standard
Definition 15 chapter.
Press the Edit button to make the page to be editable, and the button bar changes:
The main details of the Permission contain all the information represented in the tree on the
left. These two screen shots show the details in read-only and in edit mode:
When changing these details:
The Name can be as required, but should not be the same as any other Permission.
The Comments can also contain anything and is only there to record whatever notes
there are about the Permission.
The Enabled flag is a way to create a Permission without making it take effect
immediately, or to turn one off without deleting it. A disabled Permission shows in red in
the tree.
The other properties 252 are described in How Permissions Work
97
.
The Conditions Tab
Conditions 250 underpin much of the configuration that can be done in Exprodo DB, and they
are used in several places (most notably in Automatic Emails 116 ). Consequently, they have
their own section of this configuration guide. See Conditions 17 for the details.
Please note that the section that describes conditions indicates that the Updated Value and
Change condition types are considered an error in some contexts. For Permissions, they are
only usable when the Permission action is Update.
© 2010-2015 Exprodo Software
Exprodo DB Configuration Guide
107
The Applies To Tab
In read-only and editable mode, the Applies To tab looks like this:
Include Everybody
If set to true, then this means that the Permission applies to all users, and so the rest of the
tab is hidden. As described in Introduction To Permissions 97 , the targeted users are those
users covered by the Applies To tab that are not also covered by the Does Not Apply To
tab.
Individual Users
This allows the specification of particular users that the Permission should apply to.
User Groups
The Permission will apply to.any user in the specified groups 252 .
Property Path
A Permission property path 252 works exactly the same as the property path 121 in an
Automatic Email 116 , and it is described more fully in that section. The property path is a
property or list of properties that lead from the Biskit Type defined on the Permission to a
user or user group, and those users will also have the Permission applied to them.
User Roles
Users can have multiple roles 253 . Any number of roles can be selected by ticking the check
box next to the role, and then choose with the drop-down whether the Permission is to apply
to users that have all of the selected roles, or users that have any of the selected roles.
© 2010-2015 Exprodo Software
108
Exprodo Database User Documentation
The Does Not Apply To Tab
This tab is almost identical to the Applies To tab. The only difference is that the check box at
the start is labelled Exclude Nobody instead of Include Everybody. When ticked, it means
that no users are taken away from the Applies To 250 list of users, and so the rest of the Does
Not Apply To tab will be hidden. When unticked, the users that should not be targeted are
selected.
4.3.3
Example Permissions
Example 1: Anybody May Create A Booking Request
A booking 250 is a Calpendo object that has a status 250 , start and finish date and a few other
properties 252 . This example will create a Permission 251 that authorises anybody to create a
booking when the booking to be created has its status set to Requested. Note that by
creating a Permission like this, it doesn't influence what happens when somebody tries to
create a booking whose status is set to something other than Requested.
1. Create a Permission that applies when a booking is Created and give it a name
2. Add a condition 250 : Status is Requested
3. Under Applies To 250 , ensure Include Everybody is ticked
4. Under Does Not Apply To 250 , ensure Exclude Nobody is ticked
5. Save the Permission.
© 2010-2015 Exprodo Software
Exprodo DB Configuration Guide
109
Example 2: Anybody Can Modify A Booking Request They Created If The
Booking Is Still A Request
This example shows the difference between using a Old Value condition and an New Value
condition. We need a Permission that will allow somebody to modify a booking if they created
it and the status was set to Requested before they tried to change it, and its value would still
be Requested after the change.
1. Create a Permission that applies when a booking is Updated and give it a name:
2. Add a condition: Status is Requested. Note that for an update, to put a condition on the
value after the update, then use a New Value type of Condition.
3. Add a condition: Status was Requested. Here, we use a Old Value type of Condition to
put a condition on the value that the status had before the update.
4. We now need to limit the Permission to applying to whomever created the booking. This is
easy because each booking stores a record of who booked it in the booker 250 property. To
do this, go to the Applies To tab, untick Include Everybody and then add a property path
to booker.
5. Save the Permission.
© 2010-2015 Exprodo Software
110
Exprodo Database User Documentation
Example 3: Admins May Create Or Update Anything
This example shows how to use User Roles to decide who gets permission to do something,
as well as showing how to create a Permission that applies to every Biskit Type 250 . Use a
Permission like this when the Admin Role needs to bestow the ability to create or update
whatever they like. The Permission can still be revoked in some circumstances by using a
Permission of a higher level elsewhere that overrides the Permission we're creating here.
To achieve the ability to let the administrator create or update anything, we need to create two
separate Permissions, one for the Create and one for the Update.
1. Create a Permission that applies when Anything is Created and give it a suitable name.
Leave all the other options at their default values:
2. Under Applies To, untick Include Everybody, select Use Roles and tick the check box
next to Admin
3. Save the Permission.
4. Repeat step 1, but this time set the Action 251 to Update and set the Permission's name
accordingly.
5. Repeat of steps 2 and 3 above for this Update Permission.
© 2010-2015 Exprodo Software
Exprodo DB Configuration Guide
111
Example 4: Only Allow Specified Users To See The Price Being Charged For
Use Of A Resource
In Calpendo, a resource 252 represents a real-world item that can be booked. The price to be
charged for its use is project 251 specific, and stored in the Cost Per Session property of a
Project Resource Setting 251 . This example is therefore designed to stop anybody apart from
one particular administrator being able to view this price.This serves to demonstrate how to
protect individual properties and how to apply Permissions to individuals. This is known as a
Property Level Permission 98 .
There are two ways we can set up Permissions to achieve the result we want, depending on
what we'd like to achieve. We can create a Permission for each methodology:
Authorise the user Admin to read the the Cost Per Session, but say nothing about
whether other users can read it.
Deny everyone other than the user Admin from being able to read the Cost Per
Session, but say nothing about whether Admin can read it.
When a Permission says nothing about whether a user is granted or denied permission, then
you rely on other Permissions to specify what you want. This is the way that multiple
Permissions are superimpose to get the result required. To show how this works, we'll go
through each of the options above in turn.
1. Create a Permission that applies when a Project Resource Setting is Read and set the
Data Property to Cost Per Session
2. On the Applies To tab, untick Include Everybody and under Individual Users, select
one or more users. In this example, a user called Admin has been added.
© 2010-2015 Exprodo Software
112
Exprodo Database User Documentation
3. Save the Permission as it is, and with the default values of Authorisation being Grant
Permission, it means that the targeted users (in this case, the user Admin) will be
granted permission when trying to view the Cost Per Session. This Permission says
nothing about whether other users can read Cost Per Session.
If you now wanted to change the Permission so that it says nothing about whether Admin can
read Cost Per Session, but that it denied permission for all other users, follow the following
steps:
4. Press the Edit button (unless you didn't actually save it and so it's still shown in an
editable form).
5. On the AppliesTo tab, tick Include Everybody.
6. On the Doesn't Apply To tab, untick Exclude Nobody and add Admin to the list of
individual users.
7. In the main Permission details, change Authorisation to Deny Permission.
What we've now done is to target everybody apart from Admin. We've made the Permission
negative, so that the targeted users will be denied permission to read Cost Per Session.
© 2010-2015 Exprodo Software
Exprodo DB Configuration Guide
113
Example 5: Approval Of A Booking Requires An Admin
In this example, we are going to create a Permission that allows anybody with the Admin Role
to change a booking's status 250 to Approved. We will also add a condition to make sure
we're matching the situation where an administrator modifies the status themselves, rather
than where the status is modified indirectly as a result of moving the booking to a period in
which a Time Template 252 (another Calpendo concept - the details of which are not
important here) has approved the booking.
1. Create a Permission that applies when a booking is Updated, give it a name, and make it
Grant Permission.
2. Add a condition: Old value Status was not Approved
3. Add a condition: New value Status is Approved
4. Add a condition: New value templateApproved is false. The templateApproved
property is set automatically when a booking is approved by a Time Template and so we
can use it to detect how the status was changed.
5. Under Applies To, untick Include Everybody, select Use Roles and then add Admin.
6. Save the Permission.
© 2010-2015 Exprodo Software
114
Exprodo Database User Documentation
Example 6: No One Can Email Password Details
In this example, we are going to create a Permission that stops everybody from putting the
value of the password property of the User Biskit Type into an email. To do this we will be
using the special user nobody 251
1. Create a Permission that applies when a User is Read, give it a name, select the property
Password, make it negative (Authorisation is Deny Permission).
2. Under Applies To, untick Include Everybody, select Individual Users and then nobody.
3. Save the Permission.
Use this mechanism on any information you do not want sent by e-mail.
© 2010-2015 Exprodo Software
Exprodo DB Configuration Guide
115
Example 7: Hiding Resources And Booking Properties
Sometimes the administrator may want to create resources that only some people may
access, or define properties on a booking that some people shouldn’t be allowed to see. This
is achieved by setting up permissions that control who can access what.
To hide some bookings from some people:
Deny them READ permission on the bookings they should not be able to see.
If you want to hide a booking property from some people, then:
Create a property-level Booking permission that denies them READ rights on that
property
Create a separate permission for each property you need to hide
If you want to hide a resource from someone, here is the list of Permissions that need to be
set up:
Deny them EXISTS permission on the resource
Deny them READ permission on bookings for that resource
Deny them READ permission on templates for that resource.
To set up the first permission.
Action
Data Type
Condition
Exists
Resource
Value of self equals Specified value (name of resource)
Self is property of type Biskit that points to the Biskit owning the property. By using the self
property rather than the name property the primary key of the Biskit is stored in the Condition
and not the name, therefore if the name changes the Permission will still work.
© 2010-2015 Exprodo Software
116
4.4
Exprodo Database User Documentation
Automatic Emails
Exprodo DB can send emails automatically, in response to any data being created, updated
or deleted. An Automatic Email is a specification for the conditions that should generate
emails, to whom they should be sent, and what the content of those emails should be. So
every time any data is created, updated or deleted, Exprodo DB checks to see if there is an
Automatic Email that matches the data that was created, updated or deleted. The Automatic
Email doesn't just specify fixed content that should be sent in the email, but rather, it specifies
a template so that properties 252 from the changed data can be included.
When creating an Automatic Email, these are the elements set:
A Name, to can distinguish it from other Automatic Emails.
The Biskit Type 250 of the data that must change for the Automatic Email to trigger.
The type of change the data must undergo. That is, Create, Update or Delete.
Optionally, specify conditions 250 that are tested against the changed data.
Specify the recipients of the email. Do so by specifying:
1. Individual Users
a. For occasions when the Biskit Type being changed is a User, User Type 253 or
User Group 252 , then that user (or set of users) may be required to receive an
email. For example, if an administrator changes a user's status to Blocked, then
set up an Automatic Email that sends the blocked user an email telling them
they've been blocked.
b. The user that caused the original data change should receive the email. For
example, when a user creates a project 251 , send them an email to confirm its
creation.
2. Individual user types
3. Individual user groups
4. The roles 253 that a user should have, for example to send the email to all users
with the Admin role.
5. A path to a custom property storing users, user types, user groups or email
addresses. This gives the ability to send emails to users outside the Exprodo DB.
Specify the subject of the email. This can contain properties from the changed data.
Specify the content of the email. This can contain properties from the changed data.
There is a flag to be set on the Automatic Email to choose whether it is enabled or not. This
allows the creation of Automatic Emails that are not always in use, and therefore can be
turned on or off as required.
See Also:
Conditions 17 - these are central to the way Exprodo DB works and Automatic Emails in
particular.
© 2010-2015 Exprodo Software
Exprodo DB Configuration Guide
4.4.1
117
The Automatic Email Editor
The Automatic Email Editor shows all the Automatic Emails and allows creating, updating
and deleting them. By default, it appears on the menu here:
The Tree Of Automatic Emails
Automatic Emails are triggered when data of a particular Biskit Type 250 is created, updated
or deleted. Each Automatic Email defines which Biskit Type triggers it and which action
(created, updated or deleted) triggers it. This means all the Automatic Emails can be
categorised by Biskit Type and action. The above screen shot shows all the Biskit Types for
which there are Automatic Emails. Note that an Automatic Email can be defined that will
trigger for any Biskit Type.
For a complete description of the standard toolbar buttons read the Toolbar Button Standard
Definition 15 chapter.
Once all the items in the tree are viewable, the emails in
their Biskit Type, Action, Automatic Email
categorisation will be seen, with any that are disabled
shown in red. The tree shown here shows fourteen
Automatic Emails, four of which are disabled and so are
shown in red.
The first one shown under User, called New user
request to admin, is an Automatic Email that is
triggered when a user is created.
This doesn't mean that an email will actually be sent, because the Automatic Email may
have conditions 250 that need to be checked. In this case, it has a condition that checks
© 2010-2015 Exprodo Software
118
Exprodo Database User Documentation
whether the user's status 253 is Requested, although you can't tell that without clicking on
the Automatic Email to see its details.
© 2010-2015 Exprodo Software
Exprodo DB Configuration Guide
119
Automatic Email Details
Click on an Automatic Email in the tree, and see its details appear on the right:
For a complete description of the standard toolbar buttons read the Toolbar Button Standard
Definition 15 chapter.
Press the Edit button to make the page editable, and the button bar changes:
The main details of the Automatic Email contain all the information represented in the tree on
the left. These two screen shots show the details in read-only and in edit mode:
When changing these details:
The Name can be anything you like, but must be unique amongst Automatic Emails.
The Enabled flag is a way to create an Automatic Email without making it take effect
immediately, or to turn one off without deleting it. These show in red in the tree.
The Event Type is where it is specified whether the Automatic Email is triggered by a
Create, Update or Delete.
The Data Type value indicates which Biskit Type triggers the email. Choose the Any data
type option to make the Automatic Email trigger for every Biskit Type. However, this does
quite severely limit what Conditions 17 you can use and what "magic text" can be inserted
into the email (described below).
© 2010-2015 Exprodo Software
120
Exprodo Database User Documentation
The Conditions Tab
Conditions underpin much of the configuration that can be done in Exprodo DB, and they are
used in several places (most notably in Automatic Emails and Permissions) 97 .
Consequently, they have their own section of this configuration guide. See Conditions 17 for
the details.
Please note that the section that describes conditions indicates that the Updated Value
condition type is considered an error in some contexts. When the Automatic Email is
triggered by a Create or Delete action, that is an example of Updated Value being
inappropriate.
The Recipients Tab
In read-only and editable mode, the Recipients tab looks like this:
Send To Subject Of Action
This option is only applicable when the data whose change triggered the Automatic Email is
itself a User, User Group 252 or User Type 253 . When setting this option to true, and triggered
by a change to a User, then the changed user will receive an email. This means that when a
User is modified (for example to change their status 253 ), they can receive an Automatic
Email. Similarly, if a User Group or User Type changes, then send an email to everybody in
that User Group or with that User Type.
Send To User Performing Action
An Automatic Email is triggered when some data is changed. Normally (but not always), that
© 2010-2015 Exprodo Software
Exprodo DB Configuration Guide
121
change is triggered by something a particular user did. If that user is required to receive the
email, then select true for Send To User Performing Action.
Individual Users
This lets you specify particular users that should receive the email.
User Types
If you specify one or more User Types, then any user with one of those User Types will
receive the email.
User Groups
Any user in the specified groups will receive the email.
User Roles
Users can have multiple roles 253 . Select any number of roles by ticking the check box next to
the role, and then choose with the drop-down whether the email is to go to users that have all
of the selected roles, or users that have any of the selected roles.
Property Path
As an abstract concept, the property path 252 may at first appear confusing. It is used when
the data that is changed contains a reference to a User, User Group or User Type, or else
contains a reference 252 to something that contains a reference to a User, User Group or
User Type. For example, a System Event 252 is a record of various things that happen. Every
time a user logs in, a System Event is created. System Event has a property 252 called user
that records who caused the event. If you were to create an Automatic Email that was
triggered by a System Event, then direct the email to the user that caused that event by
choosing a property path of user.
Custom properties can also be used which hold email addresses, this allows Exprodo DB to
send emails to users outside Exprodo DB, by choosing such a property the Automatic
Email would extract the email address.
Once the Biskit Type is selected that the Automatic Email is triggered by, then clicking in the
Property Path selector will show a drop-down panel with all the possible paths that lead to a
User, User Group, UserType or Email property.
© 2010-2015 Exprodo Software
122
Exprodo Database User Documentation
The Email Subject Tab
In write mode, the email Subject tab looks like this:
In the case shown, the email would have a subject of New Exprodo DB user request. The
buttons that appear in the tab enable dynamic text to be inserted that will be replaced when
the email is generated. For example, suppose the email subject is required to be New
Exprodo DB user request for X where X should be replaced by the login name of the new
user. To do this, first append the text "for " to the subject, making sure to leave the cursor at
the point where the dynamic text is required to appear. Then press the New Value... button
and select the user's login name from the drop-down:
And this would insert text into subject so that it looks like this:
The text inserted could have been typed in manually if it was known what to type. The buttons
provide easy ways to enter the right magic text. When the Automatic Email is saved, the
email Subject tab changes its appearance to look like this:
Once saved, the magic text parts are parsed and rendered differently, in this case in blue and
bold. This gives some visual feedback so that it can be seen that the text has been
recognised correctly. This is particularly useful if magic text has been manually typed in,
rather than using the buttons.
© 2010-2015 Exprodo Software
Exprodo DB Configuration Guide
123
The User... Button
The User... button inserts text that is replaced by the user that performed the action that led
to the Automatic Email being triggered. If an administrator were to create a new User, then
the User... button would insert details about the administrator and not the newly created
User. If somebody registers themselves with Exprodo DB, then the User... button would
insert details about the new user, since they instigated the event that generated the email.
The New Value... And Old Value... Buttons
If a Biskit Type of Any data type has been selected for this Automatic Email, then these
buttons cannot be used. When a specific Biskit Type is selected, then these buttons
generate a pop-up with properties that belong to that Biskit Type.
This means that they allow the insertion of text from the object that was created, updated or
deleted. In the case of an update triggering the email, then the New Value... button is linked to
the properties on the object after the change has taken place and the Old Value... button is
linked to the properties on the object before the change took place.
For date properties extract just the date or just the time to give more control over the content
of the subject.
The example above is a special case: since the Automatic Email is triggered by a User
changing, then this means that the New Value... and Old Value... buttons show the
properties of a User, just like the User... button.
When the action triggering the email is either Create or Delete, then the text inserted by the
New Value... and Old Value... buttons will generate identical results.
The Date Button
This inserts the text [DATE] and when the email is generated, this inserts the date and time
that the email is generated.
The IP Address Button
This inserts the text [IP ADDRESS] and generates the network IP address of the user that
generated the change. For changes initiated by the Exprodo DB server, rather than a
particular person, this will show the server's loopback network address.
The AuditLog... Button
Whenever data is created, updated or deleted, there is an AuditLog entry created. This
button allows the extraction of information from the audit log entry. This is not normally useful,
but is required for a special case. When a user registers, there is normally an Automatic
Email that lets an administrator know that a user has just registered. That email contains two
URLs - one that will automatically approve the user, and one that will automatically deny the
user. For this to work, Exprodo DB needs to make sure that when the relevant URLs are
accessed, nobody else has already changed the user's properties. So, the Automatic Email
uses the audit log information to add the AuditLog's identifier. This is a unique identifier for
the audit log entry. Exprodo DB can then examine the audit log and check to see if there
have been any changes to the user since the time the email was generated; only if there have
been no subsequent changes will the user be approved or denied.
© 2010-2015 Exprodo Software
124
Exprodo Database User Documentation
The URL Button
This inserts a URL to your Exprodo DB. Sometimes, it is required to provide a link in an
email to a particular page. This can be done by putting the relevant page information after the
main URL. For example, if a Project 251 has been changed, then set up a link like this:
[URL]/#ba&type=Project&action=view&id=[NEW.id]
In this case, [URL] is replaced by the main URL, then #ba&type=Project&action=view
links to a page that is told to display Projects and not other Biskit types. Finally, the
&id=[NEW.id] specifies the identifier of the particular Project that was changed.
The easy way to work out how any URL like this should be formatted is to first go to the
relevant page and see what URL Exprodo DB uses, then replicate that within the Automatic
Email, replacing parts as appropriate with dynamic text.
It should be noted that it's not normally useful to insert a URL into an email's subject.
However, the same URL... button is also used for the content of an email (as discussed in
the next section).
© 2010-2015 Exprodo Software
Exprodo DB Configuration Guide
125
The Email Body Tab
The body of the email works just like the subject does. The only differences are that there are
extra buttons, for additional magic text, and the editor allows multi-line text instead of singleline text. In write mode, it looks like this:
The extra two buttons, DIFF and ALL generate a large amount of data. When triggered by an
update, DIFF inserts text that is converted to something that shows what changed. ALL
generates output that shows every piece of data from the changed Biskit 250 , both before and
after the change. This can be particularly noisy. The information it shows is normally
everything that can be reached from the New Value... and Old Value.. buttons. The
exception to this is that if the Automatic Email is triggered by any Biskit Type, then the New
Value... and Old Value.. buttons cannot display appropriate properties because it doesn't
know what Biskit Type will trigger the email. You also cannot type in something like
[NEW.name] and hope that it will work, because it will not. In those cases, [ALL] is the only
way to get at the details. The format this generates is not particularly user-friendly, and so if
you use this, you should be careful about who receives such emails.
In order for any data to be included in an email it needs to have Read and Email Readable
Permissions 251 set for the special user nobody 251 . By default there are no Email Readable
Permissions set up, so no data can be sent by email. In order to allow data to be sent by
email go to Permissions 97 and create an Email Readeable Permission for the user nobody.
Dealing With Sensitive Data In Emails
If there is data that any user shouldn't be able to put into an email because of confidentiality
or sensitivity but the user still needs to be able to access the information in Exprodo DB then
set up specific Permissions for data. There is a special user called nobody which is used for
this purpose. In the Permissions page, for a property or Biskit, create a Permission with
Action set to Read, E-Mail, Readable or Exists, Positive to False and Applies To 250 to
nobody, so that the property or Biskit can still be accessed and read by the user within
Exprodo DB but cannot be added to an email. Read the Permissions 97 section for more
details on setting Permissions.
© 2010-2015 Exprodo Software
126
4.4.2
Exprodo Database User Documentation
Example Automatic Emails
Example 1: Send Email To An Administrator When A Project Request Created
This first example shows how to send an email to an administrator when somebody creates
a Project 251 whose status 252 is Requested. A Project is a Calpendo object, the details of
which do not matter here, except to know that it has a status property 252 .
1. First, go to the Automatic Emails page and press the Create button to create a new
Automatic Email.
2. Give it a name, like Project request to admin
3. Specify the Biskit Type 250 as Project
4. Specify an action type of Create
5. Add a condition 250 : Status is Requested
6. Add the recipients you require
7. Enter the email's subject
8. Specify the text of the email. This can reference properties of the project created and
the user who created it.
© 2010-2015 Exprodo Software
Exprodo DB Configuration Guide
127
Example 2: Send Email To A New User After They Register
This example shows how to create an Automatic Email that will be sent to a new user
immediately after they register with Exprodo DB. We need to make sure it gets sent when a
new User is created, and that the email gets sent to the new user.
1. Create an Automatic Email that is triggered when a User is Created.
2. Add a condition: Status is Requested
3. On the Recipients tab, set Send To User Performing Action to true.
4. On the Email Subject tab, enter the text you want to be the subject of the email.
5. On the Email Body tab, enter the text you want to be the main content of the email.
© 2010-2015 Exprodo Software
128
Exprodo Database User Documentation
Example 3: Send Email To A User When New User Request Denied
This example shows how to send an email to user who has just registered (so the status is
set to Requested) but had their request denied (so the status has changed to Denied).
1. Create an Automatic Email that is triggered when a User is Updated.
2. Add a condition: Old Value is Requested
3. Add a condition: New Value is Denied
4. Set Send To Subject Of Action to true;
5. Enter the email's Subject
6. Enter the email's main content
© 2010-2015 Exprodo Software
Exprodo DB Configuration Guide
4.5
129
Menu Editor
Using the Menu Editor page the administrator can create, modify and delete the menus that
exist in Exprodo DB. Once menus are created, a menu can be assigned to a user either by
relying on the global preferences 251 for new users (see the Menus 150 tab of Global
Preferences) 150 or by manually selecting the menu for particular users (see Changing A
User's Settings 70 ), allowing menus to be set up by the users role 253 or on a user by user
basis. There are many different types of pages that can be added to a users menu. They
include but are not limited to:
1. Customised search or data explorer 250 pages
2. Customised calendar 250 pages using bookmarks 250
3. Pages that open up web pages external to Exprodo DB
4. Running predefined reports
5. Pages normally found only on the Admin menu
6. Customised Biskit 250 editor pages
The Menu Editor page consists of four parts:
1. The menu tool bar: this is the tool bar at the top of the page, and all the buttons
operate on whole menus at a time.
2. The menu item tool bar: this is the tool bar at the bottom of the page, and all the
buttons operate on single items within a menu.
3. The left pane: this shows the content of the currently selected menu.
4. The right pane: this shows the detail of the currently selected menu item
© 2010-2015 Exprodo Software
130
Exprodo Database User Documentation
The Menu Toolbar (at the top of the page)
The tool bar at the top of the page contains buttons that operate on whole menus at a time.
For a complete description of the standard toolbar buttons read the Toolbar Button Standard
Definition 15 chapter.
Tool Bar Item Description
Menu dropdown
Shows a list of all the menus. Select one of them to load that menu so
that it can be edited.
Open all
Opens all the menu items in the current selected menu
New
Creates a new menu
Delete
Deletes the currently selected menu. Note that this doesn't take effect
until the Save button is pressed.
Duplicate
Creates a copy of the currently selected menu. This doesn't take effect
until the Save button is pressed.
Install
Installs the currently selected menu into the browser. This is not a
permanent change. When the browser is refreshed or when the current
user logs out, the menu reverts to its previous state. This allows the
administrator to see exactly what a menu would look like when in use.
Rename
Renames the currently selected menu.
The Menu Item Toolbar (at the bottom of the page)
The tool bar at the bottom of the page contains buttons that operate on single menu items.
For a complete description of the standard toolbar buttons read the Toolbar Button Standard
Definition 15 chapter.
Tool Bar Item Description
Up
Moves the currently selected menu item up
Down
Moves the currently selected menu item down
New item
Creates a new menu item at the same level as the currently selected
menu item.
New sub-item Creates a new menu item as a child of the currently selected menu
item.
© 2010-2015 Exprodo Software
Exprodo DB Configuration Guide
131
The Left Pane
This shows a tree with the contents of the currently
selected menu. If an item is selected, then:
that menu item is loaded into the right pane so you
can modify the item
use the Menu Item Toolbar to operate on the
selected menu item
© 2010-2015 Exprodo Software
132
Exprodo Database User Documentation
The Right Pane
This shows the details of the currently selected menu item. The first property 252 shown is the
menu item's type. There are five types, as described in this table:
Type
Description
Page
This type of menu item is one that shows a page. When menu item is set to
Page, the following properties need to be set:
Menu
Property
Description
Label
This is the text that should be displayed on the menu.
Page
This is a drop-down that allowing selection from all the
different types of pages that Exprodo DB supports.
Parameters
Some pages support additional parameters. If a page is
selected that supports additional parameters, then the
parameters value will be filled with a template that shows the
sort of content expected.
This type of menu item is one that contains only sub-menu items. When this
type is selected, also select the label that should be displayed for the submenu.
Separator Creates a horizontal line in the menu that separates the items before and
after it. Once selected, also fill in the label. The label is not shown on the
menu itself, but is used to display the item in the menu editor's left pane.
Window
This represents a menu item that, when selected, will open another browser
window. Set the following properties:
Property
Description
Label
This is the text that should be displayed on the menu.
URL
This is the address of the web page that should be loaded into
the newly created browser window.
© 2010-2015 Exprodo Software
Exprodo DB Configuration Guide
Type
Description
Custom
Page
This type of menu item is one that shows a custom built page. After
choosing Custom Page, then set the following properties:
133
Property
Description
Label
This is the text that should be displayed on the menu.
Token
What the configurer wishes to appear in the browsers top
address bar when this menu item is selected for example in
the case of the Menu Editor: #menuEditor
Custom
Page Type
The type of custom page to create, there are seven possible
types.
1. Biskit 250 Tree Editor
2. Bookmark Page
3. Customised Search Page
4. Data Explorer Page
5. Frame Page
6. Run Predefined Report
7. Search Results Page
Additional
Information
This depends on the custom page type chosen
More information on the different types of Custom Pages.
Page
Description
Additional Information
Biskit Tree
Editor
A page which which will display
A list of the Biskit Types to be
and edit a user-defined selection
displayed on the page. Once created
of Biskit Types 250 . For example, if the order can be adjusted.
new Biskit Types have been
created such as Doctor and
Nurse and both a Doctor and a
Nurse are associated with
bookings 250 , then create a menu
item that takes the user to a page
where they can create the
Doctors and Nurses.
Biskit Tree
Viewer
Page
Provides a way to display a
number of HTML pages with a
navigation panel for users to
choose which page to view.
1) The Biskit Type to be displayed
2) The property with the information
to be viewed.
Bookmark
Page
A Calendar page with the
specified bookmark set up
The bookmark to be used.
Customised A search page customised to your 1) The Biskit Type to be searched for
© 2010-2015 Exprodo Software
134
Exprodo Database User Documentation
Page
Description
Additional Information
Search
Page
specific requirements
2) The report type to be used
3) A descriptor to define additional
search buttons available on the
search page. See below for a
definition of the descriptors allowed.
4) Any Conditions to be used in the
search
Data
Explorer
Page
A customised Data Explorer page 1) The Biskit Type to be displayed
2) The ID of the particular record to
be displayed. 0 or empty means
display all
3) Whether a user viewing the
custom page may change the Biskit
Type being displayed.
Frame
Page
Opens any URL as a frame inside The URL to be displayed.
Exprodo DB. This will display
For example:
url=http://www.exprodo.com
with the menu at the top of the
page and then the content of the
URL specified below.
Run
Predefined
Report
Runs a report either system or
personal.
The report to be run
The following page type may be useful when customising menus:
Page
Description
Layout
Editor 251
Opens up an editor which allows the user to define
how to layout properties in a Biskit so that they can
be read and managed easily. This is useful if your
type has a large number of properties to be
displayed.
Find by
URL
Opens up a page based on a URL
Parameters
Example
searchtype=
© 2010-2015 Exprodo Software
Exprodo DB Configuration Guide
135
Biskit Tree Viewer
Create a custom biskit and give it a Name property and a Content property. The Content
property should be of type String, and of subtype HTML.
Create a number of instances of the new Biskit Type, giving each a name and adding content
in rich text associated with the name. This can include links and images.
Use the Menu Editor to add a custom page of type Biskit Tree Viewer, and specify the type
of biskit and which property contains the HTML content to display.
Users then see the names of the biskits appear in a navigation pane on the left with the
associated content on the right.
Descriptors for Custom Search Pages
The definition of the format of a descriptor:
line := {group}[;{group}]*
{group} := [{initialFlags}[:[css-class][:label]]]{item}[,{item}]*
{initialFlags} := (H|V|G|F|E|C)[S|L][A][T|O]
{item} := {propPath}[:{itemFlags}][*][!]
{itemFlags} := (S|L)
{propPath} = a path, this may be the name of a property e.g. "status", or a path to the
property e.g. "project.status"
Where:
css-class is the CSS class to be applied to the top level
the initial flags are:
o flags to indicate the overall behaviour of the search:
H = horizontal button bar
V = vertical panel
F = Form-like container that displays each item with a heading in the line above the
search item.
G = Growing form - displays like a form but can be hidden or shown by ticking a
checkbox.
© 2010-2015 Exprodo Software
136
Exprodo Database User Documentation
E = Expanding, a container showing a checkbox for each item, where clicking the
checkbox will open up the search item
C = Captions around each of the items in the container
F = Form, labels above each widget
o flags to indicate the default size of items. Note that these can be overridden by size
flags placed on each item:
S = Small - widgets in this container should be small size by default
L = Large - widgets in this container should be full size by default
o Sorting flags:
No flag means items are presented in the order specified and (when using the A
flag, their natural order)
T = sort all items in this container by their text label
O = sort all items in this container by their bakery-assigned order
o Miscellaneous flags:
A = automatically add items for all known properties not added elsewhere
item flags define the size:
o S = small - minimal widgets in a row
o L = large - widgets taking full size the whole time
Examples:
status:*;service.provider:*;service.location:*;{EAT}
{CL:myCSSclass:My Label}status:*,service.provider:*;{F}service.location:*
© 2010-2015 Exprodo Software
Exprodo DB Configuration Guide
137
Creating A New Menu
Press New on the menu toolbar, and type the name of the new menu into the pop up.
The name of the menu will now appear in the Menu Toolbar Menu drop down, it will have a
* next to it to indicate it is being edited and has not been saved yet.
Using the Menu Item Toolbar at the bottom of the page, press New Item, then in the right
pane set up the Type to be Page, and for the Page Definition set Label to Calendar and
Page to Calendar. This will create the first menu item.
© 2010-2015 Exprodo Software
138
Exprodo Database User Documentation
Using the Menu Item Toolbar at the bottom of the page, press on New Item, then in the right
pane set up the Type to be Menu, and for the Submenu Definition set Label to Simple
User Menu. This creates a simple sub menu.
Using the Menu Item Toolbar at the bottom of the page, press New Sub Item, then in the
right pane set up the Type to be Page, and for the Page Definition set Label to My
Bookings and Page to My Bookings. This will put an item on the Simple User Menu sub
menu.
© 2010-2015 Exprodo Software
Exprodo DB Configuration Guide
139
Click on Simple User Menu then using the Menu Item Toolbar at the bottom of the page,
press New Item, then in the right pane set up the Type to be Separator. This creates a
simple separator to which is a line across the menu to split the menu into sections.
Continue adding in pages, custom pages, sub menus and separators until the menu is
created. Once finished use the Install button on the Menu Toolbar to install the menu
temporarily into the browser. Then check the menu to make sure it is what is required.
Remember to use the Up Down buttons to change the order of items in the menu. When
finished use the Save button on the Menu Toolbar to save the menu. The menu will still be
in the menu drop down box, but will no longer have a star next to it as it has been saved. Look
at the chapter on Changing a Users Settings 70 to see how to apply this menu to a particular
user. Remember putting this menu as an option in Global Preferences will only change that
menu for new users not existing users.
© 2010-2015 Exprodo Software
140
4.6
Exprodo Database User Documentation
User Authentication Methods
THis section outlines how an Administrator can set up a number of different methods for user
authentication, allowing Exprodo DB to be used in a single sign on environment.
4.6.1
Authentication Methods
There are three main types of authentication:
1) Local: The current Exprodo DB does the authentication. User names and encrypted
passwords are stored in the Exprodo DB database.
2) Internal: These are built-in methods that allow Exprodo DB to send your user name
and password to another system for authentication. Exprodo DB does not store your
password in this case, but does handle it during login. The currently supported internal
authentication methods include using an email server (SMTP or IMAP), any HTTP
basic authentication system, or another Exprodo DB.
3) External: The web server that users connect to is configured to provide authentication,
for example using a single-sign-on system or perhaps LDAP. In this case, Exprodo
DB never sees users passwords, and authentication is solely the responsibility of the
web server.
All systems automatically have Local authentication initialised but the administrator may also
set up a number of non-local authentications and may switch off Local authentication. The
administrator cannot switch off the authentication system they are currently logged in with, to
ensure that they cannot be accidentally locked out.
Common Options For All Authentication Methods
Name
Data
Type
Description
Type
String
The type of authentication method.
Name
String
The name assigned to this method. Must be unique.
Login Allowed
Boolean Whether users can login using this method.
Whether new users can register using this method. If
New User
Boolean True then new users may register for this authentication
Registration Allowed
method even if logins are not allowed.
Local Authentication
Local authentication has no additional options.
IMAP Authentication and SMTP Authentication
Name
Data
Type
Description
Host
Security
String
The mail server's IP address or name.
JavaEnum Choose the type of security to be used:
None, STARTTLS, SSL/TLS
© 2010-2015 Exprodo Software
Exprodo DB Configuration Guide
141
Basic Authentication
Name
Data
Type
Description
URL
String
The address of the website doing the authentication.
Realm
String
The name of the system, that is doing the
authentication.
External Authentication
Name
Data
Type
Login Name Header String
Description
The name of the HTTP header that will contain the
user's login name (this defaults to X-Forwarded-User)
Display Type
JavaEnum How to display the frame that will contain the
authentication handshake. If not hidden then choose its
size.
Choice of: Hidden, Inline, Popup
Display Width
String
The width of the frame within the pop up or on the login
page.
Display Height
String
The height of the frame within the pop up or on the
login page.
While you can use HTTP basic authentication using an internal authentication method, it's
also possible to set up HTTP basic authentication using external authentication. The following
shows an example of an excerpt from an Apache virtual host configuration that sets up HTTP
basic authentication and also passes the REMOTE_USER setting that it generates to
Exprodo DB by setting the X-Forwarded-User HTTP header. You can use any header for
this, but you need to tell Exprodo DB which header to examine by setting the Login Name
Header property. When Apache rewrites URLs, you protect /private under the rewritten URL
© 2010-2015 Exprodo Software
142
4.6.2
Exprodo Database User Documentation
Authentication Methods Editor
Setting up different Authentication Methods (alternatively known as Single Sign On) is done
using the Authentication Methods Editor, which by default is available on the menu as
Admin->Authentication Methods.
The Authentication Methods Editor shows all the currently defined authentication methods
and allows the administrator to create, update and delete them. This is what the looks like
when first opened.
For a complete description of the standard toolbar buttons read the Toolbar Button Standard
Definition 15 chapter. The only difference from the standard is that when the Create button is
clicked a drop down menu appears to allow the administrator to choose which type of
Authentication Method to be created.
After pressing Create or the Edit button to make the page editable the button bar changes:
The detail view for the authentication method will also appear, fill in the details and Save the
method.
© 2010-2015 Exprodo Software
Exprodo DB Configuration Guide
4.7
143
Global Preferences
The Global Preferences page appears by default on the menu as Admin-->Global
Preferences and provides settings that change the way Exprodo DB operates.
Once all the required changes are made on each tab the use the Save button to implement
them.
.
© 2010-2015 Exprodo Software
144
4.7.1
Exprodo Database User Documentation
Appearance
Appearance controls the look and feel of Exprodo DB. It does this by allowing the creation of
CSS to overwrite the default values. The user can also set the headings for the Host Page
and for the Login page, as well as a banner to be displayed at the top of each page. The
Headings (debug) setting will only be shown when the Show advanced appearance box is
ticked.
Setting
Description
User CSS
To specify Cascading Style Sheets (CSS) that you would like to be used
by Exprodo DB. Anything specified here will override the default values,
so that you can customise the look and feel.
Headings
This sets several properties that control the look of Exprodo DB, see
the table below for the headers that can be changed.
Headings
(debug)
To specify the same sort of content as used for Headings above, but
allows alternative values when Exprodo DB is in debug mode.
An example of User CSS, would be the following
#registerButton
{
display: none;
}
This would remove the Register New User button from the login page.
Heading
Description
options
Host Page Title This changes the HTML title of the page used for Exprodo DB so that it
will show in the web browser.
Login Header
This lets the user provide alternative HTML for the header that appears
on the login page.
Page Banner
If a page banner is required, this is the HTML that will be shown at the
top of every page.
© 2010-2015 Exprodo Software
Exprodo DB Configuration Guide
4.7.2
145
Date And Time
The Date And Time tab of the Global Preferences page specifies formats to use for dates
and times within Exprodo DB. These are used in a number of places:
1. In Automatic Emails sent out by the server that contain and dates or times
2. When a new user is registered, the date and time formats of their user settings is
copied from the global preference 251
© 2010-2015 Exprodo Software
146
4.7.3
Exprodo Database User Documentation
Email
The Email tab of the Global Preferences page specifies the following:
Setting
Description
Email Sending Set this to true to allow Exprodo DB to send emails, and false to disable
Enabled
all outgoing emails.
SMTP Host
This is the hostname of the SMTP server to be used for sending
outgoing email.
SMTP From
This is the name, and possibly email address, that outgoing emails
should appear to come from. For example, for a Exprodo DB running at
example.com, choose a value like:
"Example Exprodo DB" <Exprodo
[email protected]>
SMTP Reply
To
Connection
Security
The reply to address on any email that is sent out. Set so that if users do
reply to an email it goes to someone rather than getting an error
message.
Choose the security level that should be used for the connection
between your SMTP email server and the Exprodo DB server.
Authentication Select whether to use authentication for the connection between your
SMTP email server and the Exprodo DB server, and if so, select the
user name and password that should be used by Exprodo DB to
connect.
Emailed Base This is the URL that should be used to get to Exprodo DB and is used
URL
by Automatic Emails 116 that reference a URL 124 . It is useful when
sending an email that includes a direct link to a page within Exprodo
DB, and the main part of the URL needs to be injected automatically.
Limited
Recipients
Email BCC
During testing anything related to email, restrict the email addresses that
are allowed to receive email from Exprodo DB. Provide a commaseparated list of email addresses to restrict outgoing email to go only to
those addresses. If this field is left empty, then email will be allowed to
go to anybody.
This is a comma-separated list of email addresses that should receive a
copy of all outgoing emails from Exprodo DB. This is useful for
checking that Exprodo DB is sending the expected emails, particular
while Exprodo DB is being configured.
© 2010-2015 Exprodo Software
Exprodo DB Configuration Guide
147
Setting
Description
Email
Signature
This is a signature that is included at the end of every outgoing email. If
left empty, then a default signature will be added.
© 2010-2015 Exprodo Software
148
4.7.4
Exprodo Database User Documentation
General
The General tab of the Global Preferences page provides the following:
Setting
Description
Icon
This provides the name of an image file that should be used to
display on the Bookings Calendar 250 and (using the default settings
for the appearance headings 144 ) on the login page.
Exprodo DB has some Biskit Types 250 that support repeats such
as Events 250 , Bookings 250 and Time Templates 252 . As the time for
each instance of the repeat 252 passes, a new Booking or Event etc.
is created to represent the instance of the repeat that happened. This
is done so that, when a repeat Booking (or Event etc) is changed,
you do not change the record of what happened in the past.
This setting sets up how often Exprodo DB looks for repeats that
have just happened and need a new historical entry creating.
This limits the frequency with which database dumps can be created.
This is here because database dumps take some time and can
degrade system performance, so they don't want to be allowed to be
run too often.
This is the name of a directory that is used to store temporary files
that are created for downloading.
If Biskit definitions 250 are changed using the Bakery 173 , then it is
possible that the system may be left in an inconsistent state.
This setting disables the boot-time checks that are done to make
sure the Biskit definitions are consistent. If there is a problem and
boot-time checks are enabled, then Exprodo DB will not boot
properly. If there is a problem and boot-time checks are disabled,
then the user may be able to correct the problem in the Bakery 173 ,
but the issue may cause something to work incorrectly in the
meantime.
This indicates whether Exprodo DB should operate in a read-only
mode.
Choose whether to enable protection that stops users from using
reserved database words for table, column and property names
when using the Bakery 173 . This is particularly important if exporting
the Exprodo DB database to a different type of database.
Past Repeatable
Minutes Between
Flushes
Minimum Time
Between
Database Dumps
In Minutes
Temporary
Directory
Run DataDefinition
Validation At Boot
Read-Only Mode
Check Reserved
Words
© 2010-2015 Exprodo Software
Exprodo DB Configuration Guide
Setting
Description
Submit Crash
Reports
Choose whether to allow crash reports to be emailed to Exprodo
Software. Automatic delivery of crash reports are a very useful tool
for helping to find and fix problems and are only used for this purpose.
Choose which page is displayed by default when this program is first
started. Enter the text after the '#' in the browser's address bar, and
before any non-alphanumeric characters
choose the maximum size of a file to be uploaded as an attachment.
The default is 10 Megabytes.
Default Initial
Page Token
Maximum File
Upload
Megabytes
4.7.5
149
Licence
This tab lets the administrator enter a licence key as well as see what the current licence key
limits are. When provided with a new key, click the Enter New Licence Key button and copy
and paste the new licence into the Enter New Licence Key text box, and press OK. Once
you have been returned back to this view make sure you save the changes using the Global
Preferences Save button.
The table at the bottom of the Licence area will specify how many of each of the properties
252
are being used and the limit defined by the current key.
© 2010-2015 Exprodo Software
150
4.7.6
Exprodo Database User Documentation
Menus
When a new user logs in to Exprodo DB for the first time, they are assigned a menu. This
can overridden by specifying a menu, as described in Changing A User's Settings 70 .
However, if settings 252 for a new user have not been set up, then the menu they are assigned
depends on their user roles 253 , and this is controlled by the Menus tab of the Global
Preferences page:
Setting
Description
Default User
Menu
This is the menu to be assigned to users that have neither the Admin
nor the Root role.
Default Admin This is the menu to be assigned to users that have the Admin role but
Menu
not the Root role.
Default Root
Menu
This is the menu to be assigned to users that have the Root role.
© 2010-2015 Exprodo Software
Exprodo DB Configuration Guide
4.7.7
151
Network Metrics
Exprodo DB can keep information that tracks how long each network call took. This
information can be turned on if you want to investigate network performance, but it should
normally be left turned off.
The Network Metrics tab of the Global Preferences page provides the following:
Setting
Description
Network Metrics
Enabled
If this is set to true, then network metrics 251 will be kept, otherwise
they will not. Note that by setting this to false, statistics that are
already in the database will not be affected. Only new information will
be affected by this setting. Enabling Network Metrics will slow down
Exprodo DB a little.
Number Of
Network Calls
Between
Sending Metrics
Indicates how many network calls each web browser much make
before sending its network metric information to the server. The larger
this number is, the fewer network calls will be created as an
overhead. However, larger numbers increase the greater the memory
requirements and also increase the amount of data that will be lost
when the user closes their browser. This is because outstanding
information collected by the browser but not sent to the server is not
sent when the browser it closed.
This is the period of time between sending metrics to the server. This
Minutes Between is only used during periods of low activity when you have some
Sending Metrics information to send to the server, but you are not active enough to
reach the Number Of Network Calls Between Sending Metrics.
If Network Metrics are enabled, the data will be stored in the database. In order to access the
data use Search 27 . Once in the Search page set the Search Biskit Type 250 to Network
Metric, as there could be a lot of information to be returned make sure Conditions... 17 are
used to set at least time limits for the information returned. For more information read the
chapter on using Search 27 .
© 2010-2015 Exprodo Software
152
4.7.8
Exprodo Database User Documentation
Security
The Security tab of the Global Preferences page sets up the items below:
Browser
A user can specify that their browser will remember logins and passwords. On public
systems this may not be a good idea, so you can disable this facility.
Setting
Description
Browser Allowed To
Remember
Passwords
Exprodo DB is configured so that it allows the user's browser to
remember their login name and password (if this facility is
enabled by each user's browser). Disable this facility at a global
level by setting this to false.
Password Content
This provides control of the content of passwords that people are allowed to use.
Setting
Description
Minimum Password
Length
This specifies how many characters must be in each password.
A user will not be able to set a password that is shorter than this
setting.
Specifies whether passwords must include lower case
characters.
Specifies whether passwords must include upper case
characters.
Specifies whether passwords must include numbers.
Specifies whether passwords must include characters that are
not numbers or letters.
Require lower case
characters
Require upper case
characters
Require numbers
Require nonalphanumerics
© 2010-2015 Exprodo Software
Exprodo DB Configuration Guide
153
Brute Force Password Hacking Protection
This enables or disables protection against brute force password hacking attempts. This
should probably always be enabled. The only potential problem with this is that the protection
involves disabling logging in from the IP address being used by the hacker. So if there is a
hacker on your own network, it's possible that this protection could stop some legitimate
users logging in temporarily. This is only ever temporary.
© 2010-2015 Exprodo Software
154
4.7.9
Exprodo Database User Documentation
System Usage Statistics
Exprodo DB can keep statistics 252 that track how much each user has been using it.
Statistics are kept by collating user activity into periods of time, so that Exprodo DB can
record how much activity there was in each block of time. For each user that has been active
in a given block of time, a statistic is stored in the database.
The System Usage Statistics tab of the Global Preferences page lets you provide the
following:
Setting
Description
Usage Statistics Enabled If this is set to true, then usage statistics will be kept,
otherwise they will not. Note that by setting this to false,
statistics that are already in the database will not be affected.
Only new statistics will be affected by this setting. Enabling
Usage Statistics will slow down Exprodo DB a little.
Usage Statistics Minutes This specifies how often Exprodo DB should flush statistics
Between Flushes
out to the database. For performance reasons, this should
not be made too small.
Usage Statistics Minutes This indicates how long each block of time is, during which
Per Statistic
statistics are put together. The larger this value is, then the
less space will be taken in the database, and the lower the
time resolution of the statistics.
If System Usage Statistics is enabled, the data will be stored in the database. In order to
access the data use Search 27 . Once in the Search page set the search Biskit Type 250 to
System Usage. As there could be a lot of information to be returned make sure you use
Conditions... 17 to set at least time limits for the information returned. For more information
read the chapter on using Search 27 .
© 2010-2015 Exprodo Software
Exprodo DB Configuration Guide
155
4.7.10 Users
The Users tab of the Global Preferences page sets up the following:
Setting
New User Request
Requires User Type
Description
If this is set to true, then whenever a new user registers with
Exprodo DB, they must specify their user type 253 . See
Configuring Types And Groups 94 for more information about
types.
User Session Timeout This indicates how long a user's session will remain valid
In Minutes
without any activity. Once this time has passed without them
using Exprodo DB, then they will have to log in again. This
should not be zero or negative. If a user is timed out, any
request they make at the point of the time out will be
automatically resubmitted when they log back in.
This specifies how many characters must be in each user
Minimum Login Name name. A user will not be able to register with a login name that
Length
is shorter than this setting.
Request Filtering By
If this is set to true, then the user requests page will only show
User Type
user requests from users with the same user type as the
currently logged in user. Otherwise, all user requests will be
shown.
New User Default Roles When a new user is created specify the roles 253 they can have
by default. See User Roles 54 for more information.
© 2010-2015 Exprodo Software
156
4.8
Exprodo Database User Documentation
Layout Editor
The Layout Editor allows the user to define how the properties 252 of a Biskit 250 will be
displayed. This is required because Biskits could have a large number of properties,
numbering in the hundreds, and in order for users to find those properties to update them, it is
necessary to organise them.
The Layout Editor allows the user to organise the properties of a Biskit into multiple
Property Groups, Property Groups may themselves contain child Property Groups.
Property Groups at the same level may be organised in one of four ways, Vertical Tabs,
Vertical Tabs (Sorted by Name), Horizontal Tabs and Captions. Property Groups may
have a heading and may also be hidden.
The properties contained within a Property Group may also be organised in one of four
ways, Simple Table, Multi Column Table, Radio Button Table and Custom HTML.
For each table, row, column or cell the standard CSS can be changed allowing the user to
set such things as font, background colour, border size, type and colour and many other
attributes.
Finally for any Property Group, Notes can be set up to be created and then displayed in a
Notes Waterfall.
© 2010-2015 Exprodo Software
Exprodo DB Configuration Guide
157
The Layout Editor is split into four sections in two panes.
1. The left hand pane shows a list of BiskitDefs 250 that have had layouts created for them,
when a BiskitDef is expanded all the layouts defined for that Biskit will be shown. Any in red
are currently not enabled.
2. The right pane is split into three areas:
a. Top is the layout menu and the header information for the current layout. (Top Pane)
b. Bottom left shows the organisation of the Property Groups and properties for this
layout in the form of a tree. (Organisation Pane)
c. Bottom right displays information depending on what is selected in the organisation tree
in the bottom left pane. (Information Pane)
i. If a Property Group is selected then the header information for that Property Group
is viewed along with any properties assigned to that Property Group.
ii. If a Properties branch is selected then the properties are shown in a list
iii. If a single property is selected then information about that property will be shown.
© 2010-2015 Exprodo Software
158
Exprodo Database User Documentation
Left Pane
The Left Pane shows the Layout Tree (see image above). Showing for each BiskitDef the
layouts that are available. It also has a tool bar which allows the user to open and close all the
branches to the tree.
For a complete description of the standard toolbar buttons read the Toolbar Button Standard
Definition 15 chapter.
Top Pane With Layout Toolbar
The Top Pane shows the header information for a layout. To create a new layout press the
Create button and then choose the BiskitDef the layout is for.
Property
Description
Displayed
Type
The BiskitDef the layout is for.
Enabled
Whether this layout is currently to be used. Disabled layouts are shown
in the layout tree in the left pane in red.
Unassigned
Properties
Display
Location
Specifies how all unassigned properties will be displayed. Either Show in
Main Table where the properties are shown in a table above the tabs
section or Shown in Property Group where the properties are shown
as the first tab in the tabs section with a name for the tab assigned by the
user.
The Top Pane also has the Layout toolbar which enables the user to edit, create and delete
layouts as well as being able to preview the layout already defined.
For a complete description of the standard toolbar buttons read the Toolbar Button Standard
Definition 15 chapter.
Layout
Description
Toolbar Item
Preview
This will display a preview of the current layout as defined. When in edit
mode this preview will be up to date and you do not need to save first.
The preview will display initially in read-write mode, but the user can
change the mode using a toggle at the top of the view to see what the
display would look like in read-only mode. Some information is only
displayed in read-only mode. The information in the properties in the
preview is constructed in a random manner to give the user an idea of
what the layout would look like with data and is not read from the
database.
© 2010-2015 Exprodo Software
Exprodo DB Configuration Guide
159
By pressing the Preview button a view of the current layout showing the different areas will
appear. Use this preview to walk around the layout checking how it works.
© 2010-2015 Exprodo Software
160
Exprodo Database User Documentation
Organisation Pane
This pane shows how the properties of a Biskit have been
organised into Property Groups and child Property
Groups as a tree structure.
The layout is defined at the top of the pane, the layout will
have a Properties and Unassigned Properties branch.
Property Groups are then created When a Property
Group is created it will automatically have a Properties
branch which will initially be empty.
Property Groups can be reordered by dragging and
dropping the group elsewhere within its parent.
To move a Property Group from its current parent to
another parent they can be dragged and dropped or by
using cut and paste. Cut the Property Group, select the
new parent, paste the Property Group. Then reorder as
above
The user in edit mode can move properties from one
Properties branch to another by dragging and dropping.
All the properties in a Properties branch can be moved
by dragging the branch to a different Properties branch.
Also properties can be dragged from a property list in the
Information Pane and dropped into a Properties branch
in the Organisation Pane.
Properties can be reordered within a Property Group by
dragging and dropping the properties.
The search box can be used to find a property. Once the
user starts typing a name into the search box, a list of
possible properties will appear, as the user continues
typing the possible list will reduce, until only one remains.
The Properties branch containing that property will be
expanded in the tree and the property will be highlighted.
If what has been typed does not match any possible
property the search box will be outlined in red and the
search text will also go red.
© 2010-2015 Exprodo Software
Exprodo DB Configuration Guide
161
Information Pane
The Information Pane will have information about the item that is currently selected in the
Organisation Pane. There are three types of items that can be selected
1. A Property Group.
2. A Properties branch
3. A property
If a Property Group is selected then information about that
group is displayed. Any properties associated with the
Property Group are listed under the Property Table tab
showing their Name and Label.
The Notes tab allows the user to define whether this
Property Group contains a Notes field and/or a .
The Copy button allows the user put a copy of this
Property Group into the buffer for later pasting.
Informati Description
on
Name
Name of the Property Group
Hidden
Whether the Property Group should be hidden
from view.
Property How the child Property Groups of this
Grouping Property Group should be grouped/displayed.
Method
Vertical Tabs, Vertical Tabs (Sorted by
Name), Horizontal Tabs and Captions. To
see examples of these layout types look at the
Preview 159 image above.
Heading Any heading to be displayed with this Property
Group.
Property How Properties belonging to this Property
Table
Group will be displayed. Simple Table, Multi
Type
Column Table, Radio Button Table and
Custom HTML.
If a Properties branch to the tree is selected then the
properties grouped here will be displayed as a list, showing
their Name and Type.
If an individual property is selected then the properties
Label will be viewed. This is so the user can see what will
be written for this property in the layout.
© 2010-2015 Exprodo Software
162
Exprodo Database User Documentation
If the property selected is of type Biskit then there will also
be an option of how to display the Biskit information. Either
as a Show Simple, (as a single element in a table) or
Show in Property Group with a name assigned by the
user (treating the Biskit as the first Property Group. If the
Biskit has a layout defined it will be used, otherwise all the
properties will be displayed as a simple table.)
If a property is selected from the unassigned properties
branch the information from the Bakery 173 about the
property is displayed for information. This information can
NOT be edited here even if the layout is in edit mode. To
edit the details of a property the user will need to go to the
Bakery 173 .
© 2010-2015 Exprodo Software
Exprodo DB Configuration Guide
163
Information Pane Edit Mode
On entering edit mode what is viewed in the Information Pane will vary depending on what is
selected in the Organisation Pane.
If a Property Group is selected then the header information for the Property Group will be
shown in an editable form. See the table 161 in the previous section for a description of the
information displayed.
There will also be an edit toolbar.
Property Group Description
Toolbar Item
Add New
Adds a new Property Group at the same level as the currently
selected Property Group.
Add New Child
Adds a new Property Group as a child of the currently selected
Property Group.
Cut
Cuts the currently selected Property Group, removing it from its
current place in the tree and puts it in the edit buffer overwriting any
current contents.
Copy
Takes a copy of the currently selected Property Group and puts it in
the edit buffer overwriting any current contents.
Paste
Pastes the current buffer contents as a child of the currently selected
Property Group. When pasting a Property Group care needs to be
taken if the Property Group has any properties associated with it.
Properties can only appear once in a layout and the editor will remove
properties that clash with the pasted properties.
Delete
Deletes the selected Property Group. Any properties associated with
that Property Group will be moved to the Unassigned Properties
branch.
Show Cell CSS This will display in each cell of the properties a little icon allowing the
Editors
user to start up a CSS editor for that cell. For more on the CSS editor
read the section on CSS Editors 156 .
© 2010-2015 Exprodo Software
164
Exprodo Database User Documentation
Moving Properties
If a Properties branch is selected then a list of properties will be shown in the Information
Pane.
There are four ways to move properties within a combination of the Organisation Pane and
the Information Pane
1. An individual property can be selected in the Organisation Pane and dragged to a
new position in the list.
2. An individual property can be selected in the Organisation Pane and dragged and
dropped into a different Properties branch.
3. A Properties branch can be selected in the Organisation Pane and dragged and
dropped into a different Properties branch, all the properties in the dragged branch
will then transfer to the new branch.
4. In the Information Pane using shift and ctrl, a number of properties can be selected
from the viewed list and dragged across to a Properties branch in the Organisation
Pane.
In all the above cases dropping the properties on a Property Group name will place the
properties in the Properties branch for that Property Group.
© 2010-2015 Exprodo Software
Exprodo DB Configuration Guide
165
Property Table Types
There are four different ways to display a list of properties.
1) Simple Table
Information in a Simple Table will be displayed with the property label and the property value.
2) Radio Button Table
Information in a Radio Button Table is displayed showing the property labels and then a
choice of values. This type of table is limited to the following
a. All properties must be of the same type.
b. They must be one of the following types:
i. Biskit valued.
ii. Mapped Integer 251 .
iii. Mapped String 251 .
© 2010-2015 Exprodo Software
166
Exprodo Database User Documentation
3) Multi-Column Table
Information in a Multi-Column Table will be displayed with the property label and the
property value. If multiple columns are being displayed only the labels of the properties
required for the number of rows being used will be displayed.
Multi-Column
Table
Description
Show Custom Row Allows the user to edit the row labels.
Labels
Number of Property The number of columns used to display the properties. The first
Columns
property in the list will have its value displayed at the top of the first
column, the next property value at the top of the next column and
so on until the columns are filled up. The next available property
value will then be displayed in the second row of the first column,
property values will then fill in the second row before moving onto
the next row and so on until all property values have been
displayed
Show Column
Displays column headings into which the user may place their own
Headings
labels.
Column Label
Defines whether the column labels are left, centre or right justified.
Alignment
Row Label
Defines whether the row labels are left, centre or right justified.
Alignment
Adds a new empty cell after the current cell. Useful for filling out
tables which have a variable number of rows.
© 2010-2015 Exprodo Software
Exprodo DB Configuration Guide
167
4) Custom HTML
Enable building of a table structure using HTML.
Other Display Options
Boolean properties have additional options, click on the property to get
The display type can be either a list box or a check box and the user can define the text to be
used for True, False and Null.
Biskit properties have additional options, click on the property to get
The details of the Biskit can be displayed either as a simple table of all the properties (Show
Simple) or in a separate Property Group (Show in Property Group) using the current
layout type, Horizontal, Vertical or Caption. Also if a layout has been defined for the Biskit
then the layout definition will be used for the properties of the Biskit.
© 2010-2015 Exprodo Software
168
Exprodo Database User Documentation
Notes
The user can add areas to the layout which enable the storing of notes. In order to do this a
BiskitDef needs to be created to hold the note information. This BiskitDef must have at least
two properties. Optionally the user can also define a property to hold the Category of note to
be stored.
Property Type
Description
String
This property will hold the Note information. If the
StringPropertyType is HTML then the note will support Rich
Text Format.
Biskit
This property will define the parent BiskitDef that the Note is for.
This property must be an Automated Property Type, set to
Create and Update, the Biskit Def must be set to the parent
Biskit Type and the Biskit Property Type must be set to To One.
Biskit
This property will define the Category BiskitDef that the Note is
associated with. If used the Category is stored with the note and is
used to determine which Waterfall the note will be displayed in.
Other properties may be added to the BiskitDef such as automated properties to hold the
created and updated time, the creator, the updater and the version number as required.
There may be more than one Note BiskitDef if required. A single Note BiskitDef can be used
to hold notes created in multiple places in the layout, or the user may define a different Note
BiskitDef for each place notes are going to be added, or a combination of both
methodologies.
Once an approprite BiskitDef has been created the Notes tab will change from
to
use the drop down to
enable Notes.
Once enabled the user will see the following in the Notes tab.
Note Biskit Type: This needs to be set to the Biskit
Type that will hold the note information.
Owner Property: This needs to be set to the property
that points to the owning Biskit Type. This is the Biskit
Type that the notes can be attached to in the Layout
Editor.
Note Property: This needs to be set to the property that
will hold the note information.
© 2010-2015 Exprodo Software
Exprodo DB Configuration Guide
169
Add Note Button Label: This defines the string to be put
on the button that will add the note to the database.
Add Note Heading: This defines the string that will be
used as a heading to the add note area.
This information is used to determine how the add note
area is defined. Below you can see an example of an add
note area.
So far the area to write and add notes has been defined. Next the user needs to define an
area to display all the notes that have been written to the DB, this is called a Notes Waterfall.
Once the Waterfall is enabled the user can define what
heading will appear above the Waterfall in the layout.
Finally notes can be stored under a number of Category's. In order to set up the Category's
a hierarchical BiskitDef 224 needs to be defined, this is where a parent can have many
children of the same type of BiskitDef and a child will have only one parent. The minmum
properties would be:
Property Type
Description
String
This property will hold the Category name.
Set
This property will point to the children's BiskitDef as a Set. These
will be of the same Biskit Type as the parent.
This property will point to the parents BiskitDef. This will be of the
same Biskit Type as the child.
Biskit
© 2010-2015 Exprodo Software
170
Exprodo Database User Documentation
Once the Category is enabled the use will need to set
the Category property. This is the property on the Note
BiskitDef that points to the Category BiskitDef.
Then the user will need to define which of the Category's
the current Notes section will save Notes as. Any
Waterfall enabled in this Notes section, will only display
Notes of this Category. If no Category is enabled then
the Waterfall section will display all Notes no matter
what their Category. An Add Note can define a
Category to create a Note under in one place in the
Layout and a Notes Waterfall can be enabled with that
Category defined somewhere else in the Layout if
required.
Permissions 251 may be assigned to Category's to stop/
allow viewing/editing of notes. A Permission assigned to
a Category in a hierarchy will be inherited by all its
children.
© 2010-2015 Exprodo Software
Exprodo DB Configuration Guide
171
CSS Rule Editors
The user can define their own CSS information for each Table, Row, Column or Cell using
the CSS Editors. These editors are displayed as small icons with CSS written on them. In
order to bring up the icons:
1. For a row, move the cursor to just to the left of the start of the row.
2. For a column, move the cursor to be just above the column.
3. For a table, move the cursor to be just outside the top left hand corner of the table.
4. For a cell, check the Show Cell CSS Editors box in the Property Group Toolbar.
When selecting a CSS Rule Editor the area to be affected will have a green border.
In the example above the first column has had the text colour set to Blue, the font-family set to
Times New Roman and the font-size set to small.
© 2010-2015 Exprodo Software
172
Exprodo Database User Documentation
When the CSS Rule Editor is opened up:
The possible CSS values are organised into different tabs to help with finding the required
CSS value. When the drop down button is pressed for a value the user will have a choice of
options. Some will require the user to input the appropriate CSS string (see Colour above).
The user can also specify inherit which means the CSS will be inherited from previously
defined CSS by the user, this could be in Global Preferences 144 or elsewhere in Exprodo
DB where CSS can be defined.
For a complete description of the standard toolbar buttons read the Toolbar Button Standard
Definition 15 chapter.
CSS Editor
Description
Toolbar Item
Remove All
CSS
Removes all CSS that the user has applied using the editor to this
particular object.
Show All CSS Shows in a pop up window the CSS that has been defined for this
particular object.
For more information and help on using CSS and HTML a site we recommend is http://
www.w3schools.com/
© 2010-2015 Exprodo Software
Exprodo DB Configuration Guide
4.9
173
Bakery
Exprodo DB is built on Exprodo, a web-based system that is designed to be able to display
and edit the contents of a database. To be able to do this, Exprodo allows the building of
definitions of the data in the database. In other words, while Exprodo DB has a built-in set of
data types that it handles,the user can add extra data types and modify the predefined data
types by adding new properties and change the way existing properties are displayed.
As well as being able to create definitions of the data in a database so that the user can see
and edit the database contents, Exprodo provides additional facilities to help with interaction
with that data:
Automatic Emails 116 to be sent in response to data being changed
Customisable Menus 129
A Permissions
97
system based on very adaptable Conditions
17
Dynamic reporting tools.
Each of these facilities makes heavy use of the fact that the data types themselves are
defined in the database. It lends itself to providing a very flexible system. Therefore, the very
heart of the system is the means by which one can view and modify the definitions of the data
types, and that is precisely what the Bakery 250 does.
The data types themselves are called Biskit Types 250 , and the definition of the content of a
Biskit Type is known as a BiskitDef 250 . Each BiskitDef defines certain information, such as
its name, the labels used to display that name, the database table that contains the Biskit
Type, and how to display the name of its Biskits 250 (individual occurrences of the Biskit Type.
i.e. User is a Bisket Type, Joe Bloggs would have a Biskit in the database defining his
information as a specific occurrence of the User Bisket Type, with the properties 252 of that
Biskit filled in with his specific information.). It also stores a list of property definitions, with
each property definition defining its Biskit Type, how it's stored in the database, how to
display the label for the property, the tool tip text to be displayed when the mouse hovers over
each property value and a number of other aspects of the property.
When saving Biskit Types and properties, Exprodo DB does check that reserved words
have not been used for column names, table names, Biskit Types and property names.
There are currently over eight hundred words such as Select, Into, From, Start, Full which are
reserved. The system administrator can switch this checking off in Global Preferences,
General 148 section, but this is not advisable.
The Bakery allows these things to be customised, as well as adding the users own
BiskitDefs so that Exprodo DB can be used to interact with the users own data.
4.9.1
Property Storage Mechanisms
A database has many tables, with each table having many columns. When a new Biskit 250 is
created, a new row is added to the Biskit's table, containing its properties 252 . When a new
property is added to a Biskit in Exprodo DB, one would normally also add a new column to
the appropriate database table. However, modifying tables like this is not something that all
users would be comfortable doing.
© 2010-2015 Exprodo Software
174
Exprodo Database User Documentation
Exprodo DB helps with this by creating table columns automatically, but it will not remove
unused columns, and it will not change the Biskit Type 250 contained in a column. This
provides some protection against accidental destruction of data while changing the Biskit
definitions, but also means that getting the configuration right does have some difficulties.
This is particularly true if there needs to be a change of the type of data stored by a property,
which has to be handled by creating a new column for it.
However, there is an alternative that does not involve creating a new table column when
adding a new property. Exprodo DB supports what are called Indirect properties which are
stored in a separate table in such a way that new properties do not require changing the table
structure.
In all, there are three property storage mechanisms: Static, Dynamic and Indirect. This table
compares them:
Comparison
Static Properties
Dynamic Properties Indirect Properties
Description
Built-in to Exprodo
DB
Created using the
Bakery 250
Created using the
Bakery
Structure
Each property in a
column in the
Biskit's main table
Each property in a
column in the Biskit's
main table
One row added to the
Biskit's indirect
properties table for each
indirect property.
Adding new
property
Advantages
Disadvantages
Not possible without
a new version of
Exprodo DB
Efficient storage
and retrieval
The fastest
access
mechanism
Add in the Bakery
Ask the Bakery to
update the database
schema
Tell Exprodo DB
Add in the Bakery
server to reload the
data definitions
when you have
finished making all
changes
Efficient storage and
retrieval
Not quite as fast as
static properties
Does not require table
structure to be
changed to add a new
indirect property
Harder to make
mistakes and get
confused
Cannot be changed Need to be aware of
Much less efficient
without new version database columns
storage and retrieval
of Exprodo DB
and their Biskit Types than the other property
types
Users of Exprodo DB cannot create or delete Static Biskits or properties but can change
some of the meta properties 251 of both the Biskit and the properties, such as the labels, tool
tips, whether required and default values.
Users should be using dynamic properties rather than indirect properties, unless they really
do not wish to change the DB Schema, and are happy with the speed of the indirect
properties.
© 2010-2015 Exprodo Software
Exprodo DB Configuration Guide
4.9.2
175
Biskit Definitions
It can be a bit confusing to talk about definitions of properties 252 . So let's start by using an
example, and looking at the definition of the Session Biskit 250 that is used to store
information about who is using Exprodo DB. A Session has the following properties:
Name
Data Type Description
user
Biskit
The user whose session this is
started
Date Time
The date/time when this session started
lastUsed
Date Time
The date/time when this session was last used
IPAddress
String
The IP address of the user's computer
sessionID
String
An ID used to represent the session when the user's web
browser sends requests to the server
userAgent
String
The web browser's reported user agent information. This
tells you which web browser they are using.
Now, the BiskitDef 250 for a Session must contain information about each of the above six
properties. For each one, it has to know the Data Type, its name, the label used to display it
and so on. However, the Session BiskitDef must also store meta-properties 251 of Session
itself, such as its type ("Session"), its database table name and the text used to display the
name "Session" in a number of contexts.
There are quite a few different types of property that a Biskit can store, and these are
described in the next section, Property Definitions 180 . The meta-properties of a Biskit are
much simpler, and here is what they look like in the editor:
© 2010-2015 Exprodo Software
176
Exprodo Database User Documentation
Here is a description of what each meta property is for:
Name
Data
Type
Description
Type
String
Parent
BiskitDef
Group
String
Primary Key
Version
Integer
This is the internal string that represents the Biskit's type.
Some Biskit's extend others (in the programming subclass
sense) and this indicates the Biskit Type that is the parent of
this one.
Only used by the Bakery 250 itself, use any group name
required on a BiskitDef. Then filter the BiskitDefs that are
displayed by setting a filter Biskit group.
This is the unique database identifier for the BiskitDef.
Used internally to manage changes to the BiskitDef.
Increased by one every time a change is made.
The name of a property on the Biskit that can be used to
represent that Biskit. This is not used if Format is specified.
Important to do this or the Exprodo DB chooses the name
for each instance of the Biskit that is created.
The name of the property that should be used to sort Biskits
of this type.
The name of the property that should be used to hold the
version number of the Biskit. Only those properties of type Int
with an Automated Property Type of Create & Update will
be used.
The name of the property that should be used to hold the
created date and time of the Biskit. Only those properties of
type Datetime with an Automated Property Type of Create
or Create & Update will be used.
Name
Property
Integer
String
Sort Property String
Version
Property
String
Created
Property
String
Updated
Property
String
The name of the property that should be used to hold the last
modified date and time of the Biskit. Only those properties of
type Datetime with an Automated Property Type of
Update or Create & Update will be used.
Creator
Property
String
The name of the property that should be used to hold the
creator of the Biskit. Only those properties of type Biskit with
Biskit Def set to User, with an Automated Property Type
of Create or Create & Update will be used.
Updator
Property
String
The name of the property that should be used to hold the
updator of the Biskit. Only those properties of type Biskit with
Biskit Def set to User, with an Automated Property Type
of Update or Create & Update will be used.
Format
String
Abstract
Boolean
Enumerable
Boolean
Lets the user specify a format for representing the Biskit
when there isn't a single property that contains the name.
See below 178 for more details.
True if there can be no instances of this Biskit Type, only
instances of subtypes.
True if there are likely to be a large number of Biskits of this
type, too many for display in a list.
© 2010-2015 Exprodo Software
Exprodo DB Configuration Guide
Hierarchy
Property
String
(property
name)
177
Some Biskits represent a hierarchy. For example, there
might be a Location Biskit, where the Location "Oxford" is a
child of the Location "England", which is a child of "United
Kingdom" which is a child of "Europe".
A hierarchy is a Biskit that has a property containing a Biskit
of the same type, representing the parent in the hierarchy,
and also a property containing a set of its children. So,
Europe has children "United Kingdom", "France", "Germany"
and so on.
When a user selects a Biskit from a hierarchy, they are
presented with a "tree" widget making it easier for them to
choose the right item. For this to work, Exprodo DB needs
to know which property contains the children. This must be a
OneToMany Biskit property.
Label Lower
String
Label Upper
String
Labels Lower String
Labels Upper String
Null Value
Label (Read
Only)
Null Value
Label (Read
Write)
Tooltip
Visibility
Storage
Mechanism
String
String
String
Nobody,
Root,
Indicates who can see that this Biskit Type exists.
Admins,
Users or
Everybody
Static or Indicates whether this BiskitDef is defined statically, in the
Dynamic source code for Exprodo DB, or dynamically in the Bakery.
Shareable
Table
Boolean
Allows
Deletion
While
Referenced
Boolean
Table Name
© 2010-2015 Exprodo Software
Text used to display the Biskit Type, when the context calls
for a lower case label.
Text used to display the Biskit Type, when the context calls
for an upper case label.
Text used to display the Biskit Type, when the context calls
for a plural lower case label.
Text used to display the Biskit Type, when the context calls
for a plural upper case label.
The label to show for Biskits of the type represented by this
BiskitDef when that Biskit is null, and we're displaying in a
read only context.
The label to show for Biskits of the type represented by this
BiskitDef when that Biskit is null, and we're displaying in a
read write context.
Text to display as a tool tip describing this type of Biskit.
String
Shareable with sub-types if you want dynamic sub-types to
be able to share this BiskitDefs database table.
Allows Deletion if you want Biskits of this type to be
deletable even while something references them.
The name of the database table for storing instances of this
BiskitDef. The table name for a static BiskitDef cannot be
modified, since it is defined in the source code for Exprodo
DB. Also, not all static Biskit Types will have a table
associated with them, for example if they are abstract or if
they are only ever used as components of another BiskitDef.
178
Exprodo Database User Documentation
ID Column
Name
String
The name of the column which provides the primary key into
the table. In a Master-Slave combination these must be
different in the Master and each Slave.
Biskit Format
Set the Name property meta-property of a Biskit to specify the name of the property that
should be used to represent the Biskit. when something more complex than just the label is
required. For example, a user has a login name, a given name and a family name, but any
one alone can not be used to display the person's name. Instead, a combination of them is
required.
Biskit Format Definition
The syntax of the format is rather convoluted, and there will soon be an editor that
will let you configure it without having to understand the syntax.
Dynamic Biskits
Use the Bakery to create new Biskit definitions. These will be dynamic Biskits. The user can
use Exprodo DB to handle create, read, update and delete values in any table with the
following restrictions:
There must be an integer-valued primary key
The new dynamic Biskit must contain only dynamic properties. This means that, if an
extra property is added to the dynamic Biskit, the database table must contain a
column for it. If the column doesn't already exist, then Exprodo DB can create the
column for the user, or the user can create it.
Dynamic Biskits can be used in exactly the same way as static Biskits.
Creating Biskits
Biskits can have links to each other via properties, also some meta-property values of a
Biskit depend on having appropriate properties, which means that creating Biskits and their
properties is not a linear event. i.e. the user cannot start at the beginning and hope to move
step by step to the end saving completed Biskits as they go. Sometimes the user will need to
create a Biskit with its properties, save it with errors, create a second Biskit, save it with
errors, go back to the first Biskit, set up new information now available in the first Biskit
because the second Biskit has been created, re save the first Biskit, go back to the second
Biskit, update that with information from the first Biskit and save. This means when creating
your own Biskit's make sure there is a plan on how they are going to connect together.
© 2010-2015 Exprodo Software
Exprodo DB Configuration Guide
179
Inheritance
Biskits can inherit from other Biskits, inheriting all their properties To do this set the Parent
meta-property to be the Biskit the new Biskit is inheriting from.
When a Biskit inherits from another Biskit it needs to be specified whether both Biskits will
share the same table or whether the new Biskit will have a table of its own for its own
properties (those it does not share with the parent). This is done by setting the Share Super
Type Table meta-property. A Biskit can only share the table of the Biskit it inherits from, if
that Biskit has the Shareable Table meta-property set to allow it.
This may seem very similar to copying a Biskit, but there are certain major differences:
When editing the child Biskit the parents properties are not seen.
After adding a property to the parent the child automatically has access to the new
property.
When changing any meta-properties of properties in the parent the child Biskit will
automatically inherit the changes. (e.g. Default Value).
A property in the child cannot be created using the same name as a property in the
parent.
If the child Biskit has a sibling (same parent Biskit) and they all share the same table,
do not create properties of the same name in both child and sibling. (Currently there are
no checks for this but it will cause problems in the database).
Automatic emails applied to a super-type will automatically apply to any sub-type.
Permissions 251 applied to a super-type will automatically apply to any sub-type but may
be overridden in the sub-type.
© 2010-2015 Exprodo Software
180
4.9.3
Exprodo Database User Documentation
Property Definitions
A PropertyDef is the definition of a property 252 on a Biskit 250 . In the example of a Session,
described in Biskit Definitions 175 , we saw that a Session has 6 properties. Therefore, the
BiskitDef 250 describing a Session contains 6 PropertyDefs.
A PropertyDef itself has properties. For example, it needs to record the name and type of
the Biskit property it represents. There are quite a few different property types:
Type
Description
Biskit
Properties of type Biskit contain a reference See Biskit Property
252
to another Biskit.
Definitions 185 .
Boolean
Contains a true/false value
See Boolean Property
Definitions 186
Date
Contains a date without a time element
None
DateRange
Contains a range of date/time values
None
Datetime
Contains a date and time
None
Double
A floating point number
See Double Property
Definitions 187
Int
The property contains a 32-bit signed
integer. This may be interpreted via a dropSee Integer Property
down selector if the PropertyDef indicates
Definitions 188 .
this is a Mapped Integer 188 , and may allow
you to set multiple values if it is a Bit Set 190 .
JavaEnum
The property contains a value that is from See Java Enum Property
an enumeration defined in the source code. Definitions 191 . Must specify
This is represented by a drop-down list.
the Java Enum Definition 191 .
Long
The property contains a 64-bit signed
integer. Javascript does not directly support
64 bit values, and so long properties may
None
cause performance problems because
Exprodo DB has to emulate the behaviour
of a 64 bit integer in the browser.
Set
The property contains a set of items. The
See Set Property Definitions
PropertyDef also needs to define the type 192
.
of the data contained in the set.
String
A text property value. The value may be
constrained, by specifying a Mapped String
See String Property
195
, in which case the value would be edited
Definitions 194 .
using a drop-down list. Otherwise, it will be
a free text entry.
StringEnum
A property that contains a string
constrained by a String Enumeration 197 .
Note that these properties are deprecated
and may be removed in a future version of
Exprodo DB.
Used when the actual type isn't known in
UserDefined advance. Normally used only for indirect
properties.
Type-Specific Content
See String Enum Property
Definitions 196 . Must specify
the String Enumeration 197
None
© 2010-2015 Exprodo Software
Exprodo DB Configuration Guide
181
The different property types have different requirements about what information must be
stored. For example, an integer property needs to specify whether it is to have values
constrained by being a Mapped Integer 188 or a Bit Set 190 , and in both cases in needs to know
which particular Mapped Integer 188 should be used. But other property types do not need to
know anything about Mapped Integers 251 .
The requirements of the individual property types are shown in the following sections, the rest
of this section will focus on the properties they have in common.
© 2010-2015 Exprodo Software
182
Exprodo Database User Documentation
Name
Description
Primary Key
This is the database ID for the PropertyDef. This cannot be changed, it
is only for information purposes.
The type of the property, integer, long, date etc
The name of the property. This must be unique amongst all the property
definitions on its Biskit, and contain only letters, numbers and the
underscore. In particular, this cannot contain spaces.
A description of the content of this property. This is only used for display
in the Bakery 250 so that anybody using the Bakery will be able to see
this text. It's not used anywhere else.
This is the text used to display the property name. This is used
whenever a Biskit's detail is displayed, with each property's label show
before its value.
This is a tool tip that should be displayed whenever the mouse hovers
over this property when it is being displayed or edited in a Biskit.
Used to change the order in which properties are displayed. This cannot
be modified directly. Instead, property sort order is modified by dragand-drop in the Bakery.
Used internally.
The minimum value the property can take. This is only used for numeric
and string values. For numeric properties, the minimum should be a
number representing the minimum value the property should have. For
string properties, the minimum should be the minimum length of the
string. If a minimum is set the string is automatically required.
Similar to Min, this specifies the maximum value the property can take
and is only used for numeric and string values.
These are defined in a separate table, below.
The number of rows used to display the value. Particularly useful for
multi-line string values.
The number of columns used to display the value. Particularly useful for
multi-line string values.
This can be any text required. In some contexts, Biskits are displayed
with their properties in separate groups. In that case, it's the
PropertyDef's Group string that defines the group that each property
belongs to, and the text that should be used to name that group. If this is
used, when viewing a Biskit, separate tabs each with the appropriate
group name will be used to display the properties.
This property is used if no layout has been defined in the layout editor
for this Biskit Type 250 . The Project Biskit will always use this property
for its layout.
Type
Name
Description
Label
Tooltip
Sort Order
Live
Min
Max
Attributes
Rows
Columns
Group
© 2010-2015 Exprodo Software
Exprodo DB Configuration Guide
183
Storage
Mechanism
Formulaic
Indicates whether the property is static, dynamic or indirect. See
Property Storage Mechanisms 173 for more information.
Dynamic only. Allows a formula to be entered to calculate the value of
this property. See the section on Formulae 197 for more details on the
formatting.
Column Name Only required for dynamic properties, this is the name of the database
column used to hold the property.
Unique
Only required for dynamic properties, this indicates whether the value
stored in this property should be unique. If it is, then when Exprodo DB
is asked to generate SQL code to update the database schema, it will
add the necessary commands to tell the database that the column
contains unique values. This will make it illegal for the same non-null
value to be present twice.
Automated
This specifies whether the property is automatically assigned a value,
Property Type and when. The potential values are: None, Create, Update or Create
& Update. If a property has a value other than None then the property
will not be viewable when a Biskit is being edited.
Default Value The value the user will see on creation. If this value is outside the Min
and Max values above then the user will have to update before saving.
The attributes on a PropertyDef are all boolean values as follows:
Name
Description
Visible
Indicates whether the property should ever be displayed. If you make a
property invisible, it will always be hidden.
Editable
Specifies whether this property can ever be modified. Some static
properties are special and cannot be changed, but you may sometimes
have dynamic properties that are calculated from some other source and
inserted into the database. You can mark such properties as not being
editable to protect them from accidental change.
Persistent
Indicates whether the property is stored in the database. Dynamic and
indirect properties should always be persistent.
Null Allowed Specifies whether null is an allowed value for the property. See below 184
for a discussion about Null Allowed and Required.
Required
Specifies whether it is mandatory to provide a value for the property. See
below 184 for a discussion about Required and Null Allowed.
Visible In
Biskit Detail
Visible in
Biskit List
Visible in
Collection
Editor
Specifies whether this property should be visible when the full detail of a
Biskit is displayed.
Specifies whether this property should be visible when a list of Biskits is
displayed.
Specifies whether this property should be visible when displaying a
collection of Biskits of this type. Normally, when editing a collection of
Biskits, the number of properties displayed would be kept very small.
© 2010-2015 Exprodo Software
184
Exprodo Database User Documentation
Required Fields And Null Allowed
Required and Null Allowed sound like they are exact opposites, and therefore Exprodo DB
shouldn't support both of them. However, there is a subtle difference that means that it is
sometimes useful to define a property that is both required and allows null. The Null Allowed
attribute is checked when building an editor for a property. So, when displaying a drop-down
for a Mapped Integer, Mapped String 251 , Java Enum or String Enum, a value representing
null will be added if the Null Allowed attribute is set to true.
When a new Biskit is being created, the default value of a property displayed with a dropdown with Null Allowed set to true will be null, since that is the first value shown in the dropdown.
However, if a property is set to Required, then a value must be provided; it cannot be saved
without a non-null value. For properties that have Required and Null Allowed both set to
true, this means that the user is forced to choose one of the values from the drop-down as
the default value of null cannot be left as the current value. A drop-down for a property that is
Required but for which Null Allowed is false would be built without a value representing
null, and so the user would not be forced to choose. Instead, the first value in the drop-down
would be automatically selected unless a choice is made by the user.
For string properties, an empty string is a non-null value and so will satisfy Required. In order
to make sure the user can not do this set a minimum length for strings where you want to
make sure they enter something.
Large Numbers Of Properties And Tab Layout
If you are adding a large number of properties to a Biskit and wish them to be displayed in
particular groups under specific tab names then use the Group meta-property. All properties
with the same Group meta-property will be displayed under the same tab which will be
labelled with the value of the Group meta-property unless a layout has been defined for this
Biskit in the Layout Editor. (The Project Biskit will always use Group for its layout)
© 2010-2015 Exprodo Software
Exprodo DB Configuration Guide
4.9.3.1
185
Biskit Property Definitions
A property 252 of type Biskit 250 must specify the following information:
Name
Meaning
BiskitDef
Specifies the type of Biskit this property will contain.
Component
Indicates whether the Biskit value is stored as a reference 252 to a
Biskit stored somewhere else, or if its properties are stored directly as
a component of its owning Biskit. Only used for static properties.
Biskit Property To One, Many To One, Master to Slave or Slave To Master
Type
explained below 185 .
Inverse
Property
Must be provided when this is a Many To One property, Master to
Slave or Slave to Master, in which case this is the name of the
property on the parent that points to the child BiskitDef 250 .
Reference
Whether this objects of this Biskit type can be deleted if referenced by
Deletion Option other Biskits in the DB. Cascade, No Action, Set null
Biskit Property Type
Value
Meaning
The value of this property will reference a Biskit, but that Biskit will not
know anything about us referencing them.
The value of this property will reference a Biskit in a child-parent
relationship. We are the child, and this property references the parent.
The parent will also have a Set or List property that contains its child
Many To One Biskits using a One To Many property.
With this value of Biskit Property Type, we must also specify the
Inverse Property that is the name of the parent's property that
contains the children.
Master to Slave When a Biskit is required which has a large number of properties, ie.
in excess of a thousand in SQL, the DB cannot cope with this.
In order to do this create Slave Biskit's, that is Biskits that are created,
Slave To
deleted and referenced with their Master. The Master Biskit would
Master
need a property of type Biskit which would point to each Slave and be
a Master to Slave type, the Slave would need a property of type
Biskit which would point to the Master and be a Slave to Master type.
A Master can have many Slaves in order to reference as many
properties as needed. The only caveat is that the Primary Key
Column Name for any Slave Biskit must be different from the
Masters (defaults to id, therefore needs to be changed), and different
from any other Slave of that Master. The Inverse Property also
needs to be set up in both BiskitDefs.
See Creating a Master-Slave Biskit Relationship 229 example.
To One
© 2010-2015 Exprodo Software
186
4.9.3.2
Exprodo Database User Documentation
Boolean Property Definitions
A boolean property, as well as the normal settings required by a PropertyDef, may also
specify the text to be displayed instead of True and False.
By un-ticking the Default option the user can then specify which text is to be used to display
the value instead of True/False.
When used in a formula the values are T or F.
© 2010-2015 Exprodo Software
Exprodo DB Configuration Guide
4.9.3.3
187
Double Property Definitions
A double property, as well as the normal settings required by a PropertyDef, may also
specify its Units. Doubles are numbers with a decimal point.
There are four types of units Length, Temperature, Time, Weight. Users can also add their
own units into Exprodo DB, Each type of unit has a number of options, and these are:
© 2010-2015 Exprodo Software
188
4.9.3.4
Exprodo Database User Documentation
Int Property Definitions
An integer (a whole number, no decimal information) property, as well as the normal settings
required by a PropertyDef, must also specify its Integer Type. This indicates whether the
content of the integer value should be constrained. The values allowed are:
Value
Meaning
Unconstrained The value can be anything.
The value will be one of the values specified by a
Mapped
Mapped Integer 188 . The particular Mapped Integer
Integer
251
that constrains the value must be specified.
The value will be a Bit Set 190 containing values
specified by a Mapped Integer 188 . The particular
Bit Set
Mapped Integer that constrains the value must be
specified.
Time of Day Stored in the database as the number of seconds
Time of Day since midnight. The only difference is the
(with seconds) formatting on output, with or without seconds.
4.9.3.4.1 Mapped Integers
A Mapped Integer 251 is a mapping between a text display value and an integer value. It
provides a way for a user to edit an integer property by seeing a drop-down list of text values,
hiding the numerical values from them. This provides a means of generating drop-down
boxes for entering values where there is a fixed set of valid values that can be entered, while
storing an integer in the database.
Here is an example of a Mapped Integer defined in the database:
© 2010-2015 Exprodo Software
Exprodo DB Configuration Guide
189
To add new values press the Edit button and then the Add button, the new entry will appear
at the bottom, set the text string to be viewed and the number to store it as. Then press
Save.
There can be as many Mapped Integers as needed in the database. Once the Mapped
Integer is created, to use it, create an integer property on a BiskitDef 250 and set its Integer
Type to be Mapped Integer and chose the Mapped Integer you have created.
The database stores the values as integers. The definition of the Mapped Integer in the
Bakery 250 just maps those numbers to a string for display. At a later date new items can be
added to the mapping (new strings and new integers), the mapping can be changed by
changing the text associated with a particular integer, then everything in the database that
has that integer value will be displayed with the new string.
If there is a mapping where 1 displays as "A", and 2 displays as "B", and then this mapping is
changed so that 2 displays as B and 3 displays as A, and there is no mapping for 1, then
there won't be a way to display a text value for 1, and there won't be a way to search for it.
© 2010-2015 Exprodo Software
190
Exprodo Database User Documentation
4.9.3.4.1.1 Bit Sets
A Bit Set 250 is a BiskitDef 250 integer property that uses a special sort of Mapped Integer 251 .
To be used as a Bit Set, a Mapped Integer must map integer values that are between 0 and
31. It doesn't need to map all 32 possible values, but the values mapped must be within that
range.
A Bit Set works by using binary values. Each Bit Set has a particular value, and when a
number of bits have been set the value of the integer is the total of each of the individual bits
values added up.
Bit
0 1 2 3 4 5 6 7
8
9
10 11 12
13
14
15
......
Valu 1 2 4 8 16 32 64 128 256 512 102 2048 4096 8192 1638 3276 ......
e
4
4
8
Therefore if bits 1, 5 and 7 are set, the value is 162. (2+32+128)
Bit Sets allow the user to combine up to 32 options in any combination required. In Exprodo
DB we have one default bit set and that is for User Roles 190 .
There can be as many Bit Sets as needed in the database. Once the Bit Set is created as a
Mapped Integer, to use it, create an integer property 252 on a BiskitDef and set its Integer
Type to be Bit Set and chose the Mapped Integer that has been created.
4.9.3.4.1.2 User Roles
There is a special Mapped Integer 251 definition called Role 253 . This is used by the Roles bit
set property of a User. Since it is used as a Bit Set, it may only have values of 0 to 31. Value
zero is special in this Mapped Integer. Any user whose roles property 252 has bit 0 set is a
Root user and Permissions 97 do not apply to such a user.
So using the Bit Set 190 bit table a user that has both Admin and User roles would have a
value of 6, the 1 and 2 bits set. A Guest user would have the value 8, just the 3 bit set.
The user may add additional values to this Mapped Integer, and may rename any of them
(including Root)
© 2010-2015 Exprodo Software
Exprodo DB Configuration Guide
4.9.3.5
191
Java Enum Property Definitions
A Java Enum property 252 , as well as the normal settings required by a PropertyDef, must
also specify its Java Enum. This indicates which of the Java Enums to be used.
4.9.3.5.1 Java Enum Definitions
A Java Enum is a representation of an enumeration defined in the original Java source code.
End users should not create, change or delete any Java Enum defined in Exprodo DB. You
may create properties 252 of type Java Enum and use any of the existing enumerations, but
you should do so carefully in case the enumeration changes or is deleted in a future release.
Properties of type Java Enum are edited with a drop-down list box showing the values from
the enumeration. In special cases, such a drop-down list box might display only some of the
values from the enumeration. However, it is not possible for a user-defined property to
behave in this manner.
© 2010-2015 Exprodo Software
192
4.9.3.6
Exprodo Database User Documentation
Set Property Definitions
A property 252 of type Set must specify the Property Type 252 of the elements within the Set. If
the elements are not Biskits 250 , then there are no further settings required. If the elements
are Biskits, then the following must be specified:
Name
Meaning
Sub-type
The type of data stored by the property represented by this
definition. For types other than Biskit the only additional meta
property 251 will be Sorted.
Sorted
Indicates whether the contents of the Set are sorted or not.
BiskitDef
Component
Specifies the type of Biskit the set will contain.
Indicates whether the Biskit value is stored as a reference 252 to
a Biskit stored somewhere else, or if its properties are stored
directly as a component of its owning Biskit. Normally only used
for static properties.
Biskit Property One to Many, Many to Many Persisted, Many To Many
Type 193
Unpersisted, To Many, explained below 193 .
Inverse
Property
This is the property on the Set Biskit which will point back to the
parent Biskit
© 2010-2015 Exprodo Software
Exprodo DB Configuration Guide
193
Biskit Property Type
Value
Meaning
One To Many Indicates the set contains "child" Biskits that will all reference
this Biskit as the "parent" in a Many To One Biskit property.
With this value of Biskit Property Type, we must also specify
the Inverse Property Name that is the name of the child's
property that reference the parent.
Many To Many This Set represents the persisted half of a Many To Many
Persisted
property. See Many To Many Properties 192 .
Many To Many This Set represents the unpersisted half of a Many To Many
Unpersisted
property. See Many To Many Properties 192 .
To Many
This Set is a collection of Biskits, but the Biskits we contain do
not reference us in any way.
Currently Many to Many (in all its forms) is not implemented for dynamic Set properties.
Many To Many Properties
Suppose a user can be associated with any number of projects 251 , and a project can have
any number of users associated with it. This means there will be a collection of projects
stored in a property on each user, and also a collection of users stored in a property on each
project. Both sides of this relationship are known as Many To Many properties.
If a project is a member of a user's projects, then that same user would be a member of that
same project's users and vice versa. This means it is not necessary to save both sides of
this relationship to the database because of this symmetry. However, there are some
occasions when it is necessary to know which side is persisted, and so one half is known as
a Many To Many Persisted, and the other half is known as Many To Many Unpersisted.
© 2010-2015 Exprodo Software
194
4.9.3.7
Exprodo Database User Documentation
String Property Definitions
Property 252 definitions of type String must specify the following information:
Name
Meaning
String Property Type Defines the nature of the content of the string.
194
Indicates whether the content of the text value should
be constrained.
String Type 195
String Property Type
This defines the nature of the content of the string, with possible values shown in this table:
Value
Meaning
Single Line
Password
Multiline
One line of text.
A single line content that should be hidden when typed. Intended for
passwords, but can be used for any text that should not be seen as it
is typed.
A text area with multiple lines. Typically, the PropertyDef would also
specify the number of rows to display.
A single line of text that is expected to contain the web address of
some page. When rendered in a read-only format, it displays with an
HTML anchor element so that it will operate as a hyperlink.
URL
Email Address
HTML
Colour
The content can contain a prefix of the form "http://" or "https://" or any
other valid protocol recognised by all web browsers, but the protocol
prefix is not required.
A single line of text that is expected to contain an email address.
When rendered in a read-only context, this is displayed with a "mailto:"
HTML link so that it will automatically create an email when clicked.
A text area that contains HTML. When edited, this property will use an
HTML editor, with tools for helping you to create valid HTML.
Three hexadecimal numbers that define the RGB colour to be
displayed.
© 2010-2015 Exprodo Software
Exprodo DB Configuration Guide
195
String Type
This indicates whether the content of the text value should be constrained. The values
allowed are:
Value
Meaning
Unconstrained The text value can be anything.
The value will be one of the values specified by a Mapped
Mapped String String 195 . The particular Mapped String 251 that constrains
the value must be specified.
The value will be the type of a BiskitDef 250 , and so will be
Biskit Type configured as a drop-down listing all the known Biskit
Types. 250
4.9.3.7.1 Mapped Strings
A Mapped String 251 is similar in concept to a Mapped Integer 251 , but instead of storing an
integer in the database, a text value is stored instead. This means that a Mapped String is a
mapping from one set of strings to another set of strings. When a String property 252 is
created on a BiskitDef 250 , you can indicate that it should be constrained to contain values
from a Mapped String. Then, when a user edits such a property, they will see a drop-down
that lists the labels defined in the Mapped String, although the value stored in the database
will be the associated text value.
Mapped Strings are similar to String Enumerations 197 , in that they both store values as text,
and they both generate a drop-down selection list. Mapped Strings are the preferred
mechanism though, because by decoupling the displayed labels from the values stored in the
database, it makes things very easy it you ever want to change the way values are displayed
to users. This is why String Enumerations are deprecated, and may be removed in a future
version of Exprodo DB.
Here is an example of a Mapped String defined in the database:
© 2010-2015 Exprodo Software
196
Exprodo Database User Documentation
To add new values press the Edit button and then the Add button, the new entry will appear
at the bottom, set the name of enumeration and the value to store with that name. Then
press Save.
4.9.3.8
String Enum Property Definitions
A String Enum property, as well as the normal settings required by a PropertyDef, must
also specify its String Enum. This indicates which of the String Enums to be used.
© 2010-2015 Exprodo Software
Exprodo DB Configuration Guide
197
4.9.3.8.1 String Enumerations
A String Enumeration is like a Mapped String 195 in which the name and value are always
the same. A property 252 with a type of StringEnum will be editable with a drop-down list box
showing all the values in the enumeration.
String Enumerations are deprecated and Mapped Strings should be used instead. In some
future release, String Enumerations may be removed. This is because, by tightly coupling
the displayed text with the text stored in the database, it makes it very difficult to change the
text that is displayed.
4.9.4
Formulae
If the Formulaic check box is ticked then the value of this property 252 will be calculated by a
formulae.
The syntax for the formulae is based on MySQL, with one major exception, MySQL uses the
column name in its formulae, most users of Exprodo DB would prefer to use the property
name. In order to do this there is a special syntax, if the property name is in [ ], such as
[durationInMinutes] then Exprodo DB will convert the property name to the correct column
name.This also allows the user to specify [biskit.property] in order to access properties of
related Biskits 250 .
© 2010-2015 Exprodo Software
198
Exprodo Database User Documentation
When creating formulae use all the standard number calculations * / + - , as well as setting
up logic to determine the correct answer.
For instance there are two main logical options if and case:
Logic
Description
if (expr1, expr2, expr3)
If expr1 is true then expr2 will be returned otherwise
expr3 is returned. (You cannot use the if statement)
case
If expr1 is true do option1, otherwise if expr2 is true do
when expr1 then option1 option2, otherwise do option3. Case statements can be
when expr2 then option2 nested one inside the other.
else option3
end
An expression can include < > != = () as well as AND or OR for example:
[costPerHour] > 1000 OR ([costPerHour] < 500 AND [costPerHour] > 275)
When dealing with strings there are a number of functions that can be used, here is a subset
of the more useful ones:
Function
Description
length(str)
concat(str1,str2)
replace(str1,str2,str3)
substr(str,pos)
Return the length of the string
Return str 1 and str2 concatenated together
In str1, find where str2 occurs, and replace it with str3
Return the string that starts at the pos character of str.
When dealing with dates there are also many functions some of the more useful are:
Function
Description
datediff(date1, date2)
Returns the difference in whole days between two dates.
unix_timestamp(date)
Returns the number of seconds since midnight 1/1/70.
timediff(date1, date2)
time_to_sec(time)
Returns the difference between two times as a time string,
Returns the conversion of a time string to seconds,
Using time_to_sec() in conjunction with timediff() allows a calculation of the time in seconds
between two times. i.e. time_to_sec(timediff(date1,date2))
© 2010-2015 Exprodo Software
Exprodo DB Configuration Guide
199
Here is an example of a formulae using a nested case and datediff().
In this example the value of a cost property of a booking 250 is determined depending on the
status of a booking.
If the booking is denied, or cancelled with more than seven days to go then do not charge. If
the booking goes ahead then charge the rate found in the property costPerHour in the
Project Resource Settings 251 for that project 251 multiplying by the duration in minutes of the
booking divided by 60 to give hours. If the booking was cancelled less than two days ago
charge 50% otherwise charge 20%.
case
when [status] = 'Denied' then 0
when [status] = 'Approved' or [status] = 'Requested' then
[projectResourceSettings.costPerHour] * [durationInMinutes] / 60
else
case
when datediff(start_date, [cancelled]) >= 7 then 0
when datediff(start_date, [cancelled]) >= 2 then
0.2*[projectResourceSettings.costPerHour] * [durationInMinutes] / 60
else 0.5*[projectResourceSettings.costPerHour] * [durationInMinutes] / 60
end
end
Known Formulae Problems
There are a number of issues with using formulae in Biskits. As the formulae has to be
converted from what is written in Exprodo DB to MySql there are currently some functions
that will not work.
1. Any function that requires a string constant as a parameter. These constants do not
currently convert from Exprodo DB to MySQL cleanly.
For example: timestampdiff(unit,datetime_expr1,datetime_expr2) where unit is one of
FRAC_SECOND (microseconds), SECOND, MINUTE, HOUR, DAY, WEEK, MONTH,
QUARTER, or YEAR. Unit does not convert properly.
2. The if statement does not work so use the if() function instead.
3. Use 'T' and 'F' for the value of Boolean properties.
© 2010-2015 Exprodo Software
200
4.9.5
Exprodo Database User Documentation
Bakery Editior
The Bakery Editor allows an Admin user to see, modify, create and delete Biskits 250 and
their properties 252 . The Bakery Editor also allows access to any Mapped Integers 251 or
Strings 251 , any String and Java Enumeration definitions as well as the unit definitions. To
access the Bakery Editor page it can be found at Admin->Bakery. However, the
administrator may have configured Exprodo DB so that the menu is different.
When entering the Bakery Editor, in the left hand pane will be all the current definitions for
Biskits and the additional definitions in an expanding tree structure. The right hand pane will
hold the information for whatever is selected in the left hand pane.
The top menu provides buttons to check and update the database once the user has
completed any changes in the DB.
Top Menu Item Description
Reload DB
Configuration
Tells the server to reconfigure according to the current dynamic
property definitions you have. Make sure the database schema is
up-to-date before running this.
Update DB
Asks the server to generate a SQL script that can be used to
Schema
create whatever columns are required for the dynamic property
definitions. After the script has been generated, the user will have
the option of applying it.
Validate Biskits Checks that Biskit definitions are self consistent
Filter Biskit Group Display only those Biskits in a particular group. By default no
groups are set up, if your own Biskets are created they should be
put into their own group in order to use this filter to find them
quickly.
When changes have been made to the DB via the Bakery Editor the user MUST make sure
to update the DB properly by using these buttons in the correct order:
1. Press Update DB Schema to generate a script to update the SQL database. Then apply
the script to make the changes
2. .Press Validate Biskit to make sure any Biskits that have been changed have a self
consistent definition.
3. Press Reload DB Configuration to reconfigure the server so that it is using the new DB
schema.
© 2010-2015 Exprodo Software
Exprodo DB Configuration Guide
201
Once this is done the Exprodo DB will now be able to use the changes implemented in the
DB through the Bakery Editor.
The bottom menu provides buttons to deal with the expanding tree structure.
For a complete description of the standard toolbar buttons read the Toolbar Button Standard
Definition 15 chapter.
Use these in conjunction with the Filter Bisket Group button on the top menu to aid the
viewing of the tree information.
View Mode
View mode allows the user to see each of the Biskits and their properties. You can also copy
properties for later use in a different Biskit.
For a complete description of the standard toolbar buttons read the Toolbar Button Standard
Definition 15 chapter.
Items that are created will not exist in the database until you press the Save button and then
follow the procedure to validate, update and reload the DB 200 .
Properties Description
Tool Bar
Copy
© 2010-2015 Exprodo Software
This button will take a copy of the selected properties and place them in a
buffer to allow pasting into another Biskit. Multiple properties may be
selected by using ctrl and shift.
202
Exprodo Database User Documentation
Edit Mode
Edit mode allows the user to edit a Biskit and all its properties. Once changes are saved, the
DB will need to be validated, updated and reloaded 200 , in order for them to be permanent.
For a complete description of the standard toolbar buttons read the Toolbar Button Standard
Definition 15 chapter.
Edit Mode Description
Tool Bar
Save
Saves all the changes to the Biskit and its properties. In order to make
these changes permanent follow the procedure to validate, update and
reload the DB 200 .
When saving a changed Biskit, an error message may occur:
Look at the log (Show Log button) and then depending on the errors decide
whether to Save Despite Errors. Sometimes Biskits need to be saved
with errors due to the need to set up links between Biskits, and both Biskits
need to be created before that can be done.
With some errors there is not the choice of whether to Save Despite
Errors, these errors must be fixed before saving because they can corrupt
the database.
© 2010-2015 Exprodo Software
Exprodo DB Configuration Guide
203
Properties Description
Tool Bar
Add New
Cut
Adds a new property to the property list. The property is automatically
selected and available for its meta properties 251 to be modified.
Multiple properties may be selected by using ctrl and shift
Copy
Multiple properties may be selected by using ctrl and shift.
Paste
Delete
Pastes the properties held in the buffer into the current property list.
Multiple properties may be selected by using ctrl and shift.
Properties are placed in the list of properties for a
Biskit as defined by their Sort Order meta-property.
That Sort Order meta-property cannot be edited
directly but changed by using the [drag] area, and
dragging and dropping selected properties within the
property list.
In the example three properties have been selected
using the shift key and are being dragged up the list
to be placed higher up.
© 2010-2015 Exprodo Software
204
Exprodo Database User Documentation
Editing Mapped Int and Mapped String
When in edit mode for Mapped Int and Mapped String there are buttons to Add and Remove
items. When an item is added, a new Name Value pair appear at the bottom of the list to put
in the new mapping. To remove items select a Name Value pair first then press the Remove
button.
Editing String Enum Def
When in edit mode for String Enum Def to add a new value, use the Enter New Value box
and press Enter when finished. The new value is added to the bottom of the list. To remove
items select the check box for the items to be removed and then press the Remove button.
To move an item to a different position in the list use the [drag] column. Select the item to be
dragged and then drag and drop it where required.
© 2010-2015 Exprodo Software
Exprodo DB Configuration Guide
205
Editing Units
When in edit mode there is a list view, once a unit is selected there will be a single record
view underneath the list view. For more information on How to Edit Multiple Items At Once
in the list view and How to Edit A Single Item 49 in the record view, read the appropriate
sections of the Data Explorer 46 chapter
© 2010-2015 Exprodo Software
47
206
4.9.5.1
Exprodo Database User Documentation
Bakery Editor Examples
4.9.5.1.1 Adding Properties
An example of adding a property 252 to the Biskit 250 of type Project called
ProfessorSignOff, of type boolean which is required to always have a value and starts with
the value False.
1. Go to Admin->Bakery,
2. Press the Open All button to open the Biskit Tree
3. Select the Biskit to add properties to (in this case Project)
4. Press the Edit button to get the Biskit into edit mode
5. Press the Add New button to add a new property.
© 2010-2015 Exprodo Software
Exprodo DB Configuration Guide
207
6. Update the meta properties 251 of the property. Most of them will not need to be changed
but as a minimum
a) Decide on the Type required.
b) Give the property a name, this needs to be unique, Exprodo DB will update the Label
and Column Name meta properties at the same time. Usually these can be left alone,
but Label may need to be modified as this is what is displayed for this property in
reports etc.
c) When a Biskit of type Project is created by a user, is the user required to give this
property a value. (Null Allowed, Min and Max also have an impact on data
requirements and may be used instead of or in conjunction with Required.)
d) Will the property have a default value when a Biskit of type Project is created.
© 2010-2015 Exprodo Software
208
Exprodo Database User Documentation
7. Press the Save button.
8. If there are no errors then update the database:
a) Press Update DB Schema to implement changes in the DB, the following should pop
up:
9. Press the Apply Changes button to update the database. There will be a response saying
how many rows affected. Press OK to finish.
a) Press Validate Biskits button to check the database Biskits.
b) Press Reload Database Configuration, to load the new database into Exprodo DB
c) Refresh the browser
Remember if adding a large number of properties to a Biskit and they need to be displayed in
particular groups under specific tab names then use the Group meta-property. All properties
with the same Group meta-property will be displayed under the same tab which will be
labelled with the value of the Group meta-property, unless a layout has been defined for this
Biskit in the Layout Editor. (The Project Biskit will always use Group for its layout).
© 2010-2015 Exprodo Software
Exprodo DB Configuration Guide
209
4.9.5.1.2 Adding Formulaic Properties
An example of adding a formulaic property 252 to the Biskit 250 of type Booking, which will be
called BookingCost and will calculate the cost of the booking 250 depending on the duration
of the booking and whether it was cancelled or not.
If a booking was Denied, or Cancelled more than 7 days before it was due, then no cost. If it
was Cancelled more than 2 but less than 7 days ago, then 20% of cost, if it was Cancelled
with less than 2 days to go then 50% of the cost otherwise full cost.
The formula used will be:
case
when [status] = 'DENIED' then 0
when [status] = 'APPROVED' or [status] = 'REQUESTED' then
[projectResourceSettings.costPerHour] * [durationInMinutes]/60
else
case
when datediff([dateRange.start], [cancelled]) >= 7 then 0
when datediff([dateRange.start], [cancelled]) >= 2 then
0.2*[projectResourceSettings.costPerHour] * [durationInMinutes]/60
else 0.5*[projectResourceSettings.costPerHour] * [durationInMinutes]/60
end
end
[status] will refer to a property called status found on the Booking Biskit.
[projectResourceSettings.costPerHour] will refer to a property called costPerHour that is
found on the Biskit that is referenced 252 by the projectResourceSettings property of the
Booking Biskit. In this case the type of Biskit referenced is Project Resource Settings.
[durationInMinutes] will refer to a property called durationInMinutes found on the Booking
Biskit.
[dateRange.start] will refer to a property called dateRange found on the Booking Biskit.
dateRange is of type DateRange, this type has some sub types, one of which is start. start
holds the date and time of the start of the date range.
[cancelled] will refer to a property called cancelled found on the Booking Biskit.
datediff is a MySQL function that returns the difference between two dates as a whole
number of days. For more accurate time differences use a combination of timediff() and
time_to_sec() ( i.e. time_to_sec(timediff(date1,date2)) returns the number of seconds
between the two dates ).
We will be using the costPerHour property that can be set up for each resource 252 a project
251
can use. This way individual projects can be set up to pay different amounts for each
resource.
1. Go to Admin->Bakery,
2. Press the Open All button to open the Biskit Tree
3. Select the Biskit to add properties to (in this case Booking)
4. Press the Edit button to get the Bislkit into edit mode
© 2010-2015 Exprodo Software
210
Exprodo Database User Documentation
5. Press the Add New button to add a new property.
6. Update the meta properties of the property. Most of them do not need to be changed but as
a minimum
a) Change Type to double.
b) Change Name to BookingCost.
c) Make it not Editable.
d) Make it Formulaic.
7. Enter the formula required.
© 2010-2015 Exprodo Software
Exprodo DB Configuration Guide
211
8. Press the Save button. An error box will appear:
Check the error by pressing Show Log. If the error is complaining about a property not
being live yet then press the OK button, and then the Save Despite Errors button.
9. As this is adding a formulaic property we only need to reload the database configuration.
a) Press Reload Database Configuration, to load the new database into Exprodo DB
b) Refresh the browser
Go and check bookings to see if the Booking Cost is present. In this case if when viewing a
booking in the Booking Calendar 250 at the bottom of the Booking will appear the Booking
Cost.
© 2010-2015 Exprodo Software
212
Exprodo Database User Documentation
4.9.5.1.3 Adding Properties For File Attachments
An example of adding a property 252 to the Biskit 250 of type Project to hold an file attachment.
1. Go to Admin->Bakery,
2. Press the Open All button to open the Biskit Tree
3. Select the Biskit to add properties to (in this case Project)
4. Press the Edit button to get the Biskit into edit mode
5. Press the Add New button to add a new property.
© 2010-2015 Exprodo Software
Exprodo DB Configuration Guide
213
6. Update the meta properties 251 of the property.
a) Change Type to Biskit.
b) Give the property a name, in this case Attachment.
c) Change Biskit Def to Attachment
d) Change Biskit Property Type to To One.
7. Press the Save button.
8. If there are no errors then update the database:
a) Press Update DB Schema to implement changes in the DB, a pop up will appear
defining the database changes to be implemented.
9. Press the Apply Changes button to update the database. There will be a response saying
how many rows affected. Press OK to finish.
a) Press Validate Biskits button to check the database Biskits.
b) Press Reload Database Configuration, to load the new database into Exprodo DB
c) Refresh the browser
© 2010-2015 Exprodo Software
214
Exprodo Database User Documentation
4.9.5.1.4 Adding Properties For Created/Updated/Vesion
An example of adding a properties 252 to a Biskit 250 created by a user to record when a Biskit
was created, updated and store which version is currently in use.
1. Go to Admin->Bakery,
2. Press the Open All button to open the Biskit Tree
3. Select the user created Biskit to add properties to
4. Press the Edit button to get the Biskit into edit mode
5. Press the Add New button to add a new property. First create a property called for
example Created.
6. Update the meta properties 251 of the property.
a) Change Type to DateTime.
b) Give the property a name, in this case Created.
c) Change Automated Property Type to Create & Update.
7. Do the same again to create a property for example called Updated.
8. And again to create a property for example called Version, this time make it of Type Int.
© 2010-2015 Exprodo Software
Exprodo DB Configuration Guide
215
9. Set up the meta-property information
a) Set Version Property meta-property to Version.
b) Set Created Property meta-property to Created
c) Set Updated Property meta-property to Updated
10.Press the Save button.
11.If there are no errors then update the database:
a) Press Update DB Schema to implement changes in the DB,a pop up will appear
defining the database changes to be implemented.
12.Press the Apply Changes button to update the database. There will be a response saying
how many rows affected. Press OK to finish.
a) Press Validate Biskits button to check the database Biskits.
b) Press Reload Database Configuration, to load the new database into Exprodo DB
c) Refresh the browser
© 2010-2015 Exprodo Software
216
Exprodo Database User Documentation
4.9.5.1.5 Adding A New Yes-No Mapped Int Property
An example of adding a new Mapped Int 251 to the Database for use in integer properties 252 ,
giving Yes-No as the drop down values rather than True-False.
1. Go to Admin->Bakery,
2. Open up the Mapped Int tree
3. Select one of the Mapped Int's
4. Press the Create button to create a new Mapped Int
5. Update the meta properties 251 .
a) Change Name to Yes No
b) Change Null Value Label to Not Selected
6. Use the Add button under Values to create a new value
a) Change Name to Yes
b) Change Value to 1
7. Use the Add button under Values to create a new value
a) Change Name to No
b) Change Value to 0
8. Press the Save button
9. Refresh the browser
10.Press the Open All button to open the Biskit Tree
11.Select the Biskit 250 to add properties 252 to (in this case Project)
12.Press the Edit button to get the Biskit into edit mode
13.Press the Add New button to add a new property.
© 2010-2015 Exprodo Software
Exprodo DB Configuration Guide
217
14.Update the meta properties of the property
a) Change Type to Int.
b) Change Name to something relevant (in this case SignedOff)
c) Change Integer Type to Mapped Integer
d) Change Mapped Int to Yes No.
e) Change Default Value to Specified Value and Not Selected
15.Press the Save button. Press Save Despite Errors if required.
16.If there are no errors the database needs to be updated:
a) Press Update DB Schema to implement changes in the DB, and then run the script to
apply the changes
b) Press Validate Biskits button to check the database Biskits
c) Press Reload Database Configuration, to load the new database into Exprodo DB
d) Refresh the browser
© 2010-2015 Exprodo Software
218
Exprodo Database User Documentation
Looking at a Project BiskitDef 250 in the Create Project view we see:
The Default Value could have been set up as either No or Yes, rather than Not Selected,
also the order the values appear depends on the order of the Mapped Int, so if No has a
higher value than Yes it will appear below Yes.
© 2010-2015 Exprodo Software
Exprodo DB Configuration Guide
219
4.9.5.1.6 Creating A New Basic BiskitDef
An example of creating a BisketDef 250 called ProjectInfo which has one property 252 called
Name which is of type String.
1. Go to Admin->Bakery.
2. Press the Open All button to open the Biskit Tree.
3. Select any Biskit 250 .
4. Press the Create button to create a new Biskit and enter edit mode.
5. Update the meta-properties 251 of the Biskit.
a) Change Type to be the new BiskitDef name, in this case ProjectInfo
b) Change Group to help with finding all the new BisketDefs using the Filter Biskit
Group... button
c) In Properties Add New
i. Change Name to Name
d)Change Name Property on the BisketDef to point to the new Name property
6. Press the Save button.
7. If there are no errors the database will need to be updated:
a) Press Update DB Schema to implement changes in the DB, and then run the script to
apply the changes
b) Press Validate Biskits button to check the database Biskits.
c) Press Reload Database Configuration, to load the new database into Exprodo DB
d) Refresh the browser
© 2010-2015 Exprodo Software
220
Exprodo Database User Documentation
4.9.5.1.7 Creating A Set Of BiskitDef (Attachments)
An example of creating a Set of BiskitDef 250 , for this example we will create a Set of
Attachments, to store a number of documents.
1. Go to Admin->Bakery.
2. Press the Open All button to open the Biskit Tree.
3. Select any Biskit 250 .
4. Press the Create button to create a new Biskit and enter edit mode. First we need to
create the BiskitDef to hold the attachments.
5. Update the meta-properties 251 of the Biskit.
a) Change Type to be the new BiskitDef name, in this case ProjectAttachment.
b) Change Group to help find all the new BisketDefs using the Filter Biskit Group...
button
c) In Properties Add New
i. Change Name to FileName
ii. Change Type to Biskit
iii. Change Biskit Def to Attachment
© 2010-2015 Exprodo Software
Exprodo DB Configuration Guide
221
6. Create a new property.
a) Change Type to Biskit.
b) Change Name to Project
c) Change Biskit Def to Project
d) Change Biskit Property Type to Many
To One.
7. Press the Save button. There will be an error:
Check the error by pressing Show Log. If the error is complaining about a no
inversePropertyName being set press the OK button, and then the Save Despite Errors
button.
© 2010-2015 Exprodo Software
222
Exprodo Database User Documentation
8. Select the Project BiskitDef, press the Edit button to get back into edit mode.
9. In Properties Add New.
a) Change Type to Set.
b) Change Name to attachments
c) Change Biskit Def to Project
Attachment
d) Change Biskit Property Type to One
To Many
e) Change Inverse Property to Project
10.Press the Save button, and this should save without an error.
© 2010-2015 Exprodo Software
Exprodo DB Configuration Guide
223
11.Select the Project Attachment BiskitDef, press the Edit button to get back into edit
mode.
12.Select the Project property.
a) Change Inverse Property to
Attachments.
13.Press the Save button.
14.If there are no errors the database will need to be updated:
a) Press Update DB Schema to implement changes in the DB, and then run the script to
apply the changes
b) Press Validate Biskits button to check the database Biskits.
c) Press Reload Database Configuration, to load the new database into Exprodo DB
d) Refresh the browser
© 2010-2015 Exprodo Software
224
Exprodo Database User Documentation
4.9.5.1.8 Creating A Hierarchy Of BiskitDef
An example of creating a hierarchy of BiskitDef 250 similar to Location. Where a parent can
have many children of the same type of BiskitDef and a child will have only one parent. We
will create one called Organisation.
1. Go to Admin->Bakery.
2. Press the Open All button to open the Biskit Tree.
3. Select any Biskit 250 .
4. Press the Create button to create a new Biskit and enter edit mode.
5. Update the meta-properties 251 of the Biskit.
a) Change Type to be the new BiskitDef name, in this case Organisation.
b) Change Group to help find all the new BisketDefs using the Filter Biskit Group...
button
c) In Properties Add New
i. Change Name to Name
d)Change Name Property on the BisketDef to point to the new Name property 252
© 2010-2015 Exprodo Software
Exprodo DB Configuration Guide
6. Create a new property.
a) Change Type to Biskit.
b) Change Name to Parent
c) Change BiskitDef to BiskitDef
(Organisation is not know yet because
we have not saved so use this as a
holder)
d) Leave Biskit Property Type as To
One.
© 2010-2015 Exprodo Software
225
226
Exprodo Database User Documentation
7. Create a new property
a) Change Type to Set.
b) Change Name to Children
c) Change BiskitDef to BiskitDef
(Organisation is not know yet because
we have not saved so use this as a
holder)
d) Leave Biskit Property Type as One
To Many
8. Press the Save button. There will be an error:
Check the error by pressing Show Log. If the error is complaining about a property not
having the correct BisketDef press the OK button, and then the Save Despite Errors button.
9. Press the Edit button to get back into edit mode.
© 2010-2015 Exprodo Software
Exprodo DB Configuration Guide
227
10.Select the Parent property
a) Change BisketDef to Organisation.
b) Change Biskit Property Type to Many
To One
c) Change Inverse Property to Children
11.Press the Save button, there will be an error, Save Despite Error. This is needed so that
when the Children property is set up it finds the completed Parent property to set up
Inverse Property
12.Press the Edit button to get back into edit mode.
© 2010-2015 Exprodo Software
228
Exprodo Database User Documentation
13.Select the Children property.
a) Change BisketDef to Organisation.
b) Change Biskit Property Type to One
To Many
c) Change Inverse Property to Parent
14.Change the Hierarchy Property meta-property of the Organisation Biskit to be
children.
15.Press the Save button.
16.If there are no errors the database will need to be updated:
a) Press Update DB Schema to implement changes in the DB, and then run the script to
apply the changes
b) Press Validate Biskits button to check the database Biskits.
c) Press Reload Database Configuration, to load the new database into Exprodo DB
d) Refresh the browser
© 2010-2015 Exprodo Software
Exprodo DB Configuration Guide
229
4.9.5.1.9 Creating A Master-Slave Biskit Relationship
An example of creating a Master-Slave Biskit 250 relationship. This type of relationship is
needed if there are going to be a large number of pieces of data to be stored in effectively one
table. MySQL has a limit of about 1000 columns to a table, so if more are needed, Biskits that
are completely linked together will need to be created. Where if a record is created in one an
equivalent record will be created in the other and they will be referenced through the same
key.
The Master-Slave that will be created will have only one property 252 on the Master (Name
of type String), once this has been created then all the properties needed, can be added to
each of the Biskits. A Master could have many Slave Biskits as required, a property needs
to be set up on the Master to point to each Slave. Each Slave just needs one property to
point to the Master. The Primary Key Column Name in the Slave MUST be different to that
in the Master. If there are multiple Slaves then the Primary Key Column Name in each
Slave MUST be different.
1. Go to Admin->Bakery.
2. Press the Open All button to open the Biskit Tree.
3. Select any Biskit.
4. Press the Create button to create a new Biskit and enter edit mode.
© 2010-2015 Exprodo Software
230
Exprodo Database User Documentation
5. Update the meta-properties 251 of the Biskit.
a) Change Type to be the new BiskitDef 250 name, in this case PatientInfo.
b) Change Group to make it easy to find all the new BisketDefs using the Filter Biskit
Group... button
c) In Properties Add New
i. Change Name to Name
d)Change Name Property on the BisketDef to point to the new Name property
6. Create a new property.
a) Change Type to Biskit.
b) Change Name to Slave.
c) Change Biskit Def to Biskit Def (The other BisketDef is not know yet because we have
not created it so use this as a holder).
7. Press the Save button.
© 2010-2015 Exprodo Software
Exprodo DB Configuration Guide
231
8. Press the Create button to create a new Biskit and enter edit mode.
9. Update the meta-properties of the Biskit.
a) Change Type to be the new BiskitDef name, in this case PatientInfo2
b) Change Group to make it easy to find all the new BisketDefs using the Filter Biskit
Group... button
c) Change Primary Key Column Name to id1 (must be different from the Master BiskitDef
Primary Key Column Name)
10.Create a new property.
a) Change Type to Biskit.
b) Change Name to Parent
c) Change BiskitDef to Patient Info
d) Change Biskit Property Type to Slave To Master
11.Press the Save Button. There will be an error, Save Despite Errors.
© 2010-2015 Exprodo Software
232
Exprodo Database User Documentation
12.Select the PatientInfo Biskit and press the Edit button to get back into edit mode.
13.Select the Slave property.
a) Change Bisket Def to PatientInfo2.
b) Change Biskit Property Type to Master To Slave
c) Change Inverse Property to Parent
14.Press the Save button. There will be an error, Save Despite Errors.
© 2010-2015 Exprodo Software
Exprodo DB Configuration Guide
233
15. Select the PatientInfo2 Biskit and press the Edit button to get back into edit mode.
16.Select the Parent property.
a) Change Inverse Property to Slave
17.Press the Save button.
18.If there are no errors the database will need to be updated:
a) Press Update DB Schema to implement changes in the DB, and then run the script to
apply the changes
b) Press Validate Biskits button to check the database Biskits
c) Press Reload Database Configuration, to load the new database into Exprodo DB
d) Refresh the browser
© 2010-2015 Exprodo Software
234
Exprodo Database User Documentation
4.9.5.1.10 Creating An Inheriting BiskitDef (Booking)
An example of creating a Biskit 250 that inherits from another Biskit. In this case Resource.
Please note that when editing the new Biskit the user cannot see the properties 252 that it
inherits from the parent Biskit.
1. Go to Admin->Bakery.
2. Press the Open All button to open the Biskit Tree.
3. Select any Biskit.
4. Press the Create button to create a new Biskit and enter edit mode.
5. Update the meta-properties 251 of the Biskit.
a) Change Type to be the new BiskitDef 250 name, in this case ExtendedResource.
b) Change Parent to Resource
c) Change Group to make it easy to find all the new BisketDefs using the Filter Biskit
Group... button
d) Decide whether new BiskitDef will share a table with its parent by changing Share
Super Type Table (it is best if they do share a table).
e) In Properties Add New
i. Change Name to LastBreakdown
ii. Change Type to Date
f) Change Name property on the BiskitDef to point to the Name property of the parent
6. Press the Save button.
7. If there are no errors the database will need to be updated:
a) Press Update DB Schema to implement changes in the DB, and then run the script to
apply the changes
b) Press Validate Biskits button to check the database Biskits
c) Press Reload Database Configuration, to load the new database into Exprodo DB
d) Refresh the browser
© 2010-2015 Exprodo Software
Exprodo DB Configuration Guide
4.10
235
Backing Up The Database
To take a backup of the database, use the Database Dump page, which is by default on the
menu as Admin-->Database Dump.
Before asking for the backup, there are the following options:
Option
Description
Include structure
If ticked, the backup will contain SQL statements that will
create the database tables.
Include data
If ticked, the backup will contain SQL statements containing
the data from the database.
Add drop if exists
If ticked, the before each database table is created, a
statement is added to drop that table if it already exists.
Compress
If ticked, the backup will be compressed before being
downloaded.
Include all tables
This drop down allows the choice of one of the following
options:
Option
Description
Include all Tables
Dumps all tables
Include all tables except
history and statistics
Dumps all tables except
history and statistics
Select Tables
Provides a simple choice of
tables to be dumped.
Use Custom per-table
settings
See below for complete
description
When all the settings are as required, just press the Dump database button to initiate the
backup. When the backup is complete, the browser should download the backup file.
Exprodo DB limits how often a database backup may be taken, by setting Minimum time
between database backups on the General tab of the Global Preferences.
© 2010-2015 Exprodo Software
236
Exprodo Database User Documentation
Use Custom Per-Table Settings
If the Use Custom per-table settings option is chosen, then Exprodo DB will get a list of all
the tables in the database and allow the way each table is backed up to be customised.
For each table, there are the following options:
Option
Description
Use global settings
Include structure
If ticked, then the other options for this table will be ignored.
Allows the global setting of Include structure for this table
to be overridden.
Allows the global setting of Add drop if exists for this table.
Add drop if exists
Include data
Select by column
Min Column Value
Max Column Value
Used to override the global setting of Include data for this
table to be overridden.
If partial data is to be downloaded, then the user can
nominate a column of the table and specify minimum and/or
maximum values of that column that should be included in
the download.
If the user wants to download partial data and specifies
Select by column, then the Min column value is the
minimum value of the selected column that should be
included in the download.
If the user wants to download partial data and specifies
Select by column, then the Max column value is the
maximum value of the selected column that should be
included in the download.
© 2010-2015 Exprodo Software
Exprodo DB Configuration Guide
© 2010-2015 Exprodo Software
237
Part
V
240
5
Exprodo Database User Documentation
Exprodo DB Installation Guide
If your Exprodo DB is to be hosted on exprodo.com, then you will not need to read these
instructions as it will be installed for you. You only need to read this installation guide if you are
going to install Exprodo DB on your own server.
Hardware and Software Requirements
Operating system
Windows
MacOS
Linux
Server Software
Java 7 minimum (when we add support for HTTP/2, this will require Java 8)
MySQL 5.1 minimum (or MariaDB equivalent)
Tomcat 7 minimum
Apache HTTP Server (tested on 2.2 and 2.4, although any version should work)
Server Hardware
RAM 4GB minimum, 8GB recommended
Hard Disk 10GB minimum, but requirements depend on usage, particularly if you
configure the system to store file uploads.
Recent & fast CPU recommended
Both 32 bit and 64 bit supported
You can use a virtualised server if required
Client Software
Chrome - any version, but recent versions preferred
FireFox - any version, but recent versions preferred
Safari - any version, but recent versions preferred
IE 9 or later (IE8 mostly works but is extremely slow)
Expected Future Changes
We expect the following changes to occur to our requirements:
Tomcat: Some time during 2015 or 2016, we expect to drop the requirement for the
use of Tomcat. We expect to replace Tomcat with Jetty, which we will bundle with our
software.
Java:
Java 6 and Java 7 are both no longer receiving public updates from Oracle.
Further, when we add support for HTTP/2 (which will coincide with dropping the
requirement for Tomcat), HTTP/2 will only work with Java 8, and so we may require the
use of Java 8 at that time.
© 2010-2015 Exprodo Software
Exprodo DB Installation Guide
241
Requirements
You should have received a file archive that contains the following files:
db-x.y.z.sql
DB/
INSTALL/apache/ssl-www.calpendo.com
INSTALL/apache/www.calpendo.com
INSTALL/apache_with_mod_jk/ssl-www.calpendo.com
INSTALL/apache_with_mod_jk/mod_jk.conf
INSTALL/apache_with_mod_jk/singleTomcatInstance/ssl-www.calpendo.com
INSTALL/apache_with_mod_jk/singleTomcatInstance/workers.properties
INSTALL/apache_with_mod_jk/singleTomcatInstance/www.calpendo.com
INSTALL/apache_with_mod_jk/workers.properties
INSTALL/apache_with_mod_jk/www.calpendo.com
INSTALL/hibernate.cfg.xml
INSTALL/README.txt
INSTALL/tomcat6/conf/server.xml
INSTALL/tomcat6/conf/tomcat-users.xml
The DB directory contains the program itself, and db-x.y.z.sql contains a blank MySQL
database. The other files are examples for configuring Apache Tomcat 7 and Apache web
server, described further below.
Installation Overview
You will need:
A database server, eg MySQL, though many other database servers will work ok
A servlet engine, eg Tomcat 7, Jetty etc
Java JDK 7 (or possibly just a JRE, depending on the version of your servlet engine)
An Apache HTTP server may be required, or else you can serve directly from the
servlet engine. The config files are use Apache HTTP server as a front end to Tomcat.
A database. If using MySQL, then you can load the db-x.y.z.sql provided. For any
other database, Exprodo DB can be made to generate the necessary tables itself
(instructions for this are not here)
Once those things are in place, you need to:
Copy the DB directory into the servlet engine's webapps directory
Change a configuration file so it knows how to connect to the database
Configure the servlet engine and Apache
Start the servlet engine and Apache
Connect to the server from a browser to make sure it is accepting connections.
© 2010-2015 Exprodo Software
242
Exprodo Database User Documentation
Install MySQL
Any version that supports InnoDB tables should do, but the database dump that's included in
this distribution comes from MySQL 5.5.x. MySQL documentation should be consulted if
loading this into any other version.
Create The Database And A Mysql User
Open a connection to MySQL with:
mysql -u root -p
and then at the mysql prompt:
mysql>
mysql>
->
mysql>
create database db;
grant all privileges on db.* to exprodo@localhost
identified by 'somepassword';
exit;
You may choose a different name for the database and/or user if you wish. Later on, you will
configure Exprodo DB so it can locate the database and log in - you will just put the
connection information into a URL (in file hibernate.cfg.xml).
Load The Sample Database
You should have a file called db-x.y.z.sql that you can load:
mysql -u db --password=somepassword db < db-x.y.z.sql
Install A Java JDK
Follow the installation instructions for the JDK for your platform. This needs to be at least
JDK 7. Note that the JDK is required, not just the JRE (this is a requirement for Apache
Tomcat, the servlet server, rather than Exprodo DB itself).
© 2010-2015 Exprodo Software
Exprodo DB Installation Guide
243
Install A Java Servlet Server
This should be Apache Tomcat, or Jetty or some other server that supports the Servlet 2.5
specification. Exprodo DB has only been tested with Tomcat 7, and so this is the preferred
server. A future Exprodo DB release is likely to use Jetty instead (and also include a much
easier installation and upgrade mechanism). The rest of this section assumes you are using
Tomcat version 7.
You should read and follow the standard documentation for Tomcat to install it. Once
installed, you will need to edit two files in Tomcat's conf directory, server.xml and tomcatusers.xml. You should find samples of each of these with the Exprodo DB distribution. The
important parts of these are:
tomcat-users.xml
This needs to contain a <user...> line so that somebody can
connect to Tomcat's web management pages. The user name and
password can be anything and will only ever be used by a human. You
may want more than one entry here, depending on who will do the
administration.
server.xml
The sample provided defines a <Connector ...> entry on port 8080
that allows users to connect directly to Tomcat. A standard Tomcat
server.xml would contain this entry, although I've added the
necessary config so that it supports compression. If all access is to
be made through Apache, then this connector on port 8080 could
potentially be turned off. Leave it on for now so you can test the
installation before we bring Apache into the equation.
I've also added a <Connector...> on port 8009 with protocol
AJP/1.3. This is the means by which Apache talks to Tomcat.
Once done, check that you can connect to Tomcat and access its management pages. Go
to the web page:
http://servername:8080/
where servername is the name of the server you installed Tomcat on. There should be a link
on there to the management pages so you can ask Tomcat to start Exprodo DB (after
Exprodo DB is installed).
© 2010-2015 Exprodo Software
244
Exprodo Database User Documentation
Install Exprodo DB
Exprodo DB is delivered as a directory in war file format. However, there's a file inside the
directory (WEB-INF/classes/hibernate.cfg.xml) that you will need to modify to tell
Exprodo DB how to connect to the database.
The root directory in the archive is called DB. You should put this directory into Tomcat's
webapps directory. Then edit the file
webapps/DB/WEB-INF/classes/hibernate.cfg.xml
The entries you need to configure are:
<property name="hibernate.connection.username">
exprodo
</property>
<property name="hibernate.connection.password">
somepassword
</property>
<property name="hibernate.connection.url">
jdbc:mysql://localhost/db
</property>
<property name="hibernate.connection.driver_class">
org.mariadb.jdbc.Driver
</property>
<property name="hibernate.dialect">
com.springsolutions.exprodo.core.server.persistence.ExprodoMySQL5Inno
DBDialect
</property>
You need to change the username, password and url to match the user and database name
you created earlier.
You should now ask Tomcat to start Exprodo DB (in case it isn't done automatically). Go to
the web management page, linked from:
http://servername:8080/
and see if Exprodo DB has started, and if not, ask for it to be started.
Once this is done, then you should test to see whether Exprodo DB is working with Tomcat.
Open a web browser at this url:
http://servername:8080/DB/com.springsolutions.exprodo.basic.Basic/
program.html
All being well, you will see a Exprodo DB login screen. If you don't, then you'll need to check
to see what errors are on screen or in the Tomcat logs.
If you do see the login screen, then try to log in with username root and a blank password.
© 2010-2015 Exprodo Software
Exprodo DB Installation Guide
245
Install Apache HTTP Server
Follow the Apache documentation as appropriate for your operating system in order to install
the Apache HTTP server. Once installed, you should make sure your Apache configuration
loads modules mod_proxy, mod_proxy_http, mod_rewrite, mod_deflate and mod_ssl.
The location of your modules may vary from that shown below, so you may need to alter this
sample configuration:
LoadModule
LoadModule
LoadModule
LoadModule
LoadModule
proxy_module /usr/lib/apache2/modules/mod_proxy.so
proxy_http_module /usr/lib/apache2/modules/mod_proxy_http.so
rewrite_module /usr/lib/apache2/modules/mod_rewrite.so
deflate_module /usr/lib/apache2/modules/mod_deflate.so
ssl_module /usr/lib/apache2/modules/mod_ssl.so
For mod_deflate, you will need to add config like this:
<IfModule mod_deflate.c>
AddOutputFilterByType DEFLATE text/html text/plain text/xml text/css
text/javascript
</IfModule>
This allows Apache to gzip the files it serves. This has a marked impact on the size of
Exprodo DB javascript files in particular.
You will now need to configure the Exprodo DB aspects of Apache. You will have your own
requirements here, but here is the configuration you will need to provide access to Exprodo
DB from a URL of "https://yourServer/DB".
RewriteEngine On
RewriteRule ^/DB/Service(.*) /DB/com.springsolutions.exprodo.basic.Basic/Service$1
RewriteRule ^/DB/program.html(.*) /DB/com.springsolutions.exprodo.basic.Basic/progr
RewriteRule ^/DB/$ /DB/com.springsolutions.exprodo.basic.Basic/program.html [PT,L]
RewriteRule ^/DB/(.*) /DB/com.springsolutions.exprodo.basic.Basic/$1 [PT,L]
ProxyRequests Off
<Proxy *>
Order allow,deny
Allow from all
</Proxy>
ProxyPass /DB http://localhost:8080/DB
ProxyPassReverse /DB http://localhost:8080/DB
The above configuration should be placed inside a VirtualHost declaration. If you want to
provide both SSL and non-SSL access to Exprodo DB, then you should place the above
configuration in both the SSL and non-SSL VirtualHost areas. At this point, accessing
Exprodo DB from "https://yourServer/DB" should work, possibly unless you are using an
operating system that uses SELinux, as described below.
Note that previous versions of this installation guide differed in two ways from the above:
Previously, it was suggested that you should use mod_jk to connect Apache HTTP
server with your servlet container (such as Apache Tomcat). This is no longer
recommended. In particular, mod_jk isn't available for recent versions of Red Hat
Linux and CentOS. That is why the above recommended Apache configuration uses
mod_proxy_http.
© 2010-2015 Exprodo Software
246
Exprodo Database User Documentation
It used to be a requirement that http access was required, at least from localhost,
even when you only wanted https access to be remotely accessible. This requirement
no longer exists so you only need to configure the SSL VirtualHost with the above
directives if you only want to provide SSL access.
SELinux Settings
If you are running a version of Linux that uses SELinux, then you may find that your Apache
HTTP server is prevented from opening further http connections, thereby stopping the above
from working. You can check whether you will need to do this by running this command:
getsebool httpd_can_network_connect
If this returns zero or off, then you will need to change this setting by running this command:
setsebool -P httpd_can_network_connect 1
You can read about the httpd_can_network_connect setting on the httpd_selinux man
page. If your httpd_can_network_connect setting is zero or off, then the result will be an
error in your Apache logs similar to this:
(13)Permission denied: proxy: HTTP: attempt to connect to 127.0.0.1:8080 (localhost
Rebooting
Finally, you will need to arrange for MySQL, Tomcat and Apache to be started each time
your operating system boots. You should follow the standard method for your platform. For
Windows, this means they should all have been installed as services.
Advanced Apache Configuration
Sometimes, you may have an external-facing Apache HTTP server through which all of your
traffic flows (eg on a firewall) and then internally you may have another Apache HTTP server
that has the mod_jk module installed. In this situation, with two Apache HTTP servers and
one Tomcat server, there is some extra configuration to do. Without any extra configuration,
Tomcat will always be given the IP address of the firewall Apache HTTP server as the
source of each request instead of that of the user's computer. The problem with such a
situation is that the login attempts that Exprodo DB will record will all show the firewall as the
source of every attempt. For defence against any attack, it would be better to change this.
You can set up forwarding of HTTP requests from the firewall to the inner Apache HTTP
server in two ways: by configuring a reverse proxy with the ProxyPass directive, or with
mod_rewrite and the [P] directive.
If you use ProxyPass, then you can make a configuration change on the firewall Apache
HTTP server by adding the directive
ProxyPreserveHost On
to the appropriate part of the firewall's Apache HTTP server configuration.
This situation is described here:
http://tomcat.apache.org/connectors-doc/generic_howto/proxy.html
You may be able to achieve the desired effect with SetEnv or SetEnvIf directives instead of
the above (but I have not tested this).
© 2010-2015 Exprodo Software
Exprodo DB Installation Guide
247
Once you have done this, you can check whether this is working as expected in one of two
ways. First, you can look at entries that appear in the login_attempts table whenever
somebody tries to login to Exprodo DB. Secondly, you can check from Exprodo DB by
using either the Search 27 page or the Data Explorer 46 page.
Upgrading Exprodo DB
Upgrades follow the following path:
1. Stop Tomcat
2. Take a backup of your MySQL database:
mysqldump -u root --password=somepassword db > db.saved.sql
3. Apply any database upgrade script provided for your release. For a release of version
"a.b.c", this would mean:
mysql -u root --password=somepassword db < update-a.b.c.sql
4. Replace the DB directory with the contents of the new DB directory. Note that you
must ensure that the hibernate.cfg.xml file that you customised when you followed
the above installation instructions is not overwritten by the new release. New releases
normally do not include a copy of hibernate.cfg.xml file.
5. Restart Tomcat
6. Open a web browser to confirm that Exprodo DB is accepting connections
Rolling Back a Failure Database Upgrade
If you should want to roll back the database because an upgrade failed in some way, then you
should not load you back-up over the top of the upgraded database. That's because there
could be tables for the upgrade that remain in place, and so it might cause problems with
doing the upgrade again (since it may assume the new tables do not exist).
The recommended way to roll back the database after an upgrade is to drop the database,
recreate it, and then load the backup.
© 2010-2015 Exprodo Software
Part
VI
250
6
Exprodo Database User Documentation
Glossary
Term
Definition
Action
Applies To
See Permission Action 251 .
Defines the list of users that are will affected. This list is
overruled by the Does Not Apply To 250 list. ie. If a user is in
both lists then the Does Not Apply To 250 is used.
A Calpendo booking 250 whose status is approved.
A user that has been approved for access to the system.
An editor which allows the user to create, delete and update
BiskitDefs 250 and their properties 252 . The Bakery also
allows editing of Mapped Strings 251 , Mapped Integers 251
and Units 252 .
A Biskit is an object stored in the database that has a
custom type. It will have whatever properties 252 are
specified by its BiskitDef 250 .
Defines the properties 252 associated with a particular type
of Biskit 250 and how those properties 252 should be stored in
the database.
Each Biskit 250 has a type. Biskits 250 with the same type,
have the same property 252 definitions. See BiskitDef 250 .
A Bit Set is a type of integer property 252 that results in a
drop-down that can take multiple values.
A Calpendo concept defining which user has made a
particular booking 250 .
A Calpendo concept of a reservation of a resource 252 at a
particular time.
A Calpendo page which provides a graphical view of
bookings 250 by day, week or month.
A Calpendo concept, setting up restrictions relating to
which bookings 250 can be made.
A Calpendo concept that shows the condition of the
booking 250 .
A user-defined Booking 250 taxonomy.
A Calpendo concept defining a collection of resources 252
to be displayed in the Bookings Calendar 250 .
Allows the user to specify under what circumstances an
action such as generating an email, granting or refusing
permission 251 etc. will occur. Conditions work logically
together using information from the database to reach a
True/False result.
A page that shows Biskits. 250
See Biskit Type 250 .
Defines the list of users that an operation (Rule 250 ,
Permission 251 etc) will not affect. This list overrules the
Applies To 250 list. ie. If a user is in both lists then the Does
Not Apply To is used.
An Exprodo SDM concept which defines a when a task 252
needs to occur.
Approved Booking
Approved User
Bakery
Biskit
BiskitDef
Biskit Type
Bit Set
Booker
Booking
Bookings Calendar
Booking Rule
Booking Status
Booking Type
Bookmark
Condition
Data Explorer
Data Type
Does Not Apply To
Event
© 2010-2015 Exprodo Software
Glossary
FAQ
Global Preferences
Group Report
History
Layout Editor
List Report
Mapped Integer
Mapped String
Meta-Property
Network Metrics
Nobody
Owner
Permission
Permission Action
Project
Project Group
Project Resource Settings
Project Status
© 2010-2015 Exprodo Software
251
Frequently Asked Questions, this page lists the FAQ's for
the facility.
Specifies settings that change the way Exprodo DB
operates.
A report that lets you break down data by any number of
properties 252 .
The audit log kept by Exprodo DB that shows what has
been changed, when and by whom.
The Layout Editor allows the user to define how the
properties 252 of a Biskit 250 will be displayed.
A report that shows a list of Biskits 250 .
A Mapped Integer relates text labels to integer values. An
integer property on a Biskit 250 may use a Mapped Integer so
that a user would see a drop-down with each of the text
labels when they edit it. The related integer value is stored in
the database rather than the text. See also Bit Set 250 .
Similar in concept to a Mapped Integer 251 , but instead of
storing an integer in the database, a text value is stored
instead. This means that a Mapped String is an association
of one set of strings to another set of strings so that you see
a drop-down of text values, but the value stored in the
database does not have to be the same as the displayed
value.
1) Attributes that define how a Biskit 250 or a Biskit's 250
properties 252 work.
2) A type of property used in Conditions 250 when you want
to specify a relation 252 about who performs an action or
when.
A record of how long communications between web
browsers and the Exprodo DB server take.
A special user used for Permissions 251 to control what
information may be written into emails.
A Calpendo concept defining who owns a booking 250 ,
bookmark 250 or project 251 .
How the administrator determines which user may have
access to what information and under which
circumstances. Permissions may have many layers
allowing fine grained control over who can perform what
action 250 on which Biskit 250 .
An operation that can be performed on a Biskit 250 . The most
common actions are Create, Read, Update and Delete.
A Calpendo concept, a project allows an administrator to
link together users, resources 252 and costs.
A Calpendo concept grouping similar projects 251 together
for use in Rules 250 , Permissions 251 , Time Templates 252 or
Automatic Emails. A project 251 may belong to many groups.
See also Project Type 252 .
A Calpendo concept creating a list of resources 252 that a
project 251 may use with project specific information for that
resource.
A Calpendo concept showing the current status of a
252
Exprodo Database User Documentation
Project Type
Property
Property Path
References
Relation
Repeat
Requested Booking
Resource
Settings
Single Item Report
Summary Report
System Event
System Usage Statistics
Task
Time Template
Units
User Approval Process
User Group
project. This can be Requested, Approved, Denied,
Unbookable or Terminated.
A Calpendo concept grouping similar projects 251 together.
A project has only one type. See also Project Group 251 .
An individual piece of data attached to a Biskit 250 . A property
will have a name, a type and a label as well as other meta
properties 251 defining how it is organised.
When adding a property 252 to a report, or placing a
condition 250 on a property 252 , you can choose a property 252
of a property 252 . This is known as a property path. For
example, if you want a Permission 251 to prevent creating
reports that are scheduled to run daily, you would need a
condition 250 on the the report schedule's repeat type. This is
found in the property path
reportSchedule.repeat.repeatType.
Biskit 250 properties 252 may have various types, such as
integer and string. One such type is Biskit 250 , which means
that a Biskit 250 may reference another Biskit 250 . The
References for a Biskit 250 is the list of all such referencing
Biskits 250 .
Provides a means of comparing the value of a property 252
to another value e.g. equals, less than etc.
Something that occurs at regular time intervals.
A Calpendo concept of A booking 250 that has been created
but not yet approved 250 .
A Calpendo concept, defining a room, person, instrument,
or anything else that that must be booked before it can be
used.
See User Settings 253 .
Shows a report of a single item of the appropriate Biskit
Type 250 .
A report like a spreadsheet pivot table that can automatically
count or sum data.
Various things that happen within Exprodo DB are
recorded as a System Event. For example, a system event
is recorded each time an email is sent or an error is
detected.
These are statistics that may optionally be kept to track how
much each user has been using Exprodo DB.
An Exprodo SDM concept of an individual action that needs
to be performed. See also Event. 250
A Calpendo concept allowing an administrator to assign an
acceptability rating to bookings 250 depending on when they
are booked, who makes the booking and the project 251 the
booking is for.
A method of displaying different measurement types such
as feet and metres.
The process by which new users become approved.
A way of grouping similar users together. A user may belong
to many groups. See also User Type 253 .
© 2010-2015 Exprodo Software
Glossary
User Project Association
User Roles
User Settings
User Status
User Type
© 2010-2015 Exprodo Software
253
A Calpendo concept which contains a list of projects 251 the
user is associated with.
Users may be assigned roles, and then Permissions 251 can
be configured to use those Rules. For example, by default,
users with the Admin role 253 can modify more things than
users without the Admin role.
Specifies settings that change the way Exprodo DB
operates for this user. These will override the Global
Preferences 251 .
The current status of the users account. This may be one of
Requested, Normal, Password must be reset at next login,
Blocked or Denied.
A way of grouping similar users together. A user has one
type. See also User Group 252 .
Index
Index
-AAdmin Role
Introduction To
54
Appearance
Global Preferences For
144
Approving
New User Requests
57
Attachment, File
Creating A Set Of Bisket Def 220
Example Adding Properties For
212
Authentication Methods
140
Basic
141
Editor
142
External
141
IMAP
140
Local
140
SMTP
140
Automatic Email
116
Conditions
120
Dealing With Sensitive Data
125
Details
119
Editor
117
Examples
126
Property Path
121
Recipients
120
Subject Tab
122
Tree
117
URL
124
-BBacking Up The Database
235
Use Custom Per-Table Settings
236
Bakery
173
Biskit Definitions
175
Biskit Format
178
Biskit Inheritance
179
Biskit Property Definitions
185
Bit Sets
190
Boolean Property Definitions
186
Check Reserved Words Preference
148
© 2010-2015 Exprodo Software
255
Double Property Definitions
187
Edit Mode
202
Editor
200
Editor Example
206
Example Adding A New Yes-No Mapped Int
Property
216
Example Adding Created/Updated/Version
Properties
214
Example Adding File Attachment Properties
212
Example Adding Formulaic Properties
209
Example Adding Properties
206
Example Booking Cost Formulae
209
Example Creating A Hierarchy Of Bisket Def
224
Example Creating A Master Slave Biskit
Relationship
229
Example Creating A New Basic Bisket Def 219
Example Creating A Set Of Bisket Def 220
Example Creating An Inheriting Biskit Def
(Booking)
234
Formulae
197
Formulaic Properties
197
Integer Property Definitions
188
Integer Type
188
Java Enum
191
Java Enum Definitions
191
Java Enum Property Definitions
191
Mapped Integers
188
Mapped Strings
195
Master Slave
185
Property Definitions
180
Property Layout Editor
156
Property Storage Mechanisms
173
Run Data Definition Validation At Boot
148
Set And List Property Definitions
192
String Enum
196
String Enum Property Definitions
196
String Enumerations
197
String Property Definitions
194
Updating The DB
200
User Roles
190
View Mode
201
Banner, Global Preferences For
144
Biskit
Biskit Property Definitions
185
Biskit Property Type
185, 193
Collection Editor, Properties Visible In
51, 183
Definitions
175
256
Exprodo Database User Documentation
Biskit
Detail, Properties Visible In
51, 183
Dynamic Biskits
178
Format
178
Inheritance
179
Integer Property Definitions
188
Integer Type
188
Java Enum
191
Java Enum Property Definitions
191
List, Properties Visible In
51, 183
Many To Many Properties
193
Master Slave
185
Properties Visible In Biskit Detail
51, 183
Properties Visible In Collection Of 51, 183
Properties Visible In List Of 51, 183
Run Data Definition Validation At Boot
148
Set And List Property Definitions
192
String Enum
196
String Enum Property Definitions
196
String Property Definitions
194
String Property Type
194
String Type
195
Biskit Property Type
185, 193
Bit Sets
190
Booking Sub Type
Example Creating An Inheriting Biskit Def 234
Bookings
Example Creating An Inheriting Biskit Def 234
Repeat Flushing, Time Between
148
Boolean
Boolean Property Definitions
186
-CConditions
Advanced
17
Anatomy Of A Condition
17
Automatic Email
120
Combination Options
24
Context
18
Date Properties And Accuracy
Nested Conditions
25
Panel
18
Pattern Matching Text
21
Property Path
20
Referenced By Property Path
Relation
21
Text Pattern Matching
21
23
26
Type
19
Value
23
Configuring
Groups
94
Types
94
Creating Users
66
CSS, Preference Setting For
144
-DData Explorer
46
Editing Multiple Items
47
How To Edit A Single Item
49
Database
Backing Up
235
Mapping Your Own Tables
178
Database Dumps
Minimum Time Between
148
Date And Time Format
Global Preferences For
145
Double
Double Property Definitions
187
Dynamic
Biskits
178
-EEditor
Authentication Methods
142
Automatic Email
117
Bakery
200
Import
82
Mapped Int
204
Mapped String
204
Menu
129
Permissions
104
Property Layout
156
Reports
40
String Enum Def 204
Types And Groups
94
Units
205
Email
Apparent Sender
146
Authentication
146
Automatic Email
116
Connection Security
146
Copy All Outgoing Emails
146
© 2010-2015 Exprodo Software
Index
Email
Global Preferences For
146
Limiting Who Can Be Sent Emails
146
Reply To
146
Sending Enabled, Global Preference For
146
Signature On Outgoing Email
147
SMTP Server
146
URLs Refering To Exprodo DB, Global Preference
For
146
Using Exprodo DB To Send
71
Example Automatic Email
Dealing With Sensitive Data
125
Send Email To A User Whenever Thier New User
Request Is Denied
128
Send Email To An Adminitrator When A Project
Request Created
126
Example Bakery
Adding A New Yes-No Mapped Int Property
216
Adding Created/Updated/Version Properties
214
Adding File Attachment Properties
212
Adding Formulaic Properties
209
Adding Properties
206
Booking Cost Formulae
209
Creating A Hierarchy Of Bisket Def 224
Creating A Master Slave Biskit Relationship
229
Creating A New Basic Bisket Def 219
Creating A Set Of Bisket Def 220
Creating An Inheriting Biskit Def (Booking)
234
Example Permission
Admins May Create Or Update Anything
110
Anbody Can Modify A Booking Request They
Created If The Booking Is Still A Request
109
Anybody May Create A Booking Request
108
Approval Of A Booking Requires An Admin
113
Hiding Resources And Booking Properties
115
No One Can Email Password Details
114
Only Allow Specified Users To See The Price
Being Charged For A Resource
111
Explorer, Data
46
Exprodo
173
Exprodo Database Configuration Guide
92
Exprodo Database User Guide
10
-FFile, Attachment
© 2010-2015 Exprodo Software
257
Creating A Set Of Bisket Def 220
Example Adding Properties For
212
Formulae
Known Problems
199
-GGeneral
Global Preferences For
148
Getting Started
8
Global Preferences
143
Appearance
144
Check Reserved Words
148
Copy All Outgoing Emails
146
CSS
144
Database Dumps, Minimum Time Between
148
Date And Time Format
145
Default Initial Page
149
Email
146
Email Authentication
146
Email Connection Security
146
Email Signature
147
Email SMTP Server
146
Email, Apparent Sender
146
Email, Limiting Who Emails Can Be Sent To
146
Email, Reply To
146
Email, Sending Enabled
146
Email, URLs Refering To Exprodo DB
146
General
148
Hacking Protection
153
Host Page Title
144
Icon
148
Licence
149
Login Header
144
Login Name Length, Minimum
155
Menu
150
Menu, Default Admin
150
Menu, Default Root
150
Menu, Default User
150
Network Metrics
151
Network Metrics, Enabled, Preference For
151
Network Metrics, Minutes Between Sending
151
Network Metrics, Network Calls Between Sending
151
New User Default Roles
155
Page Banner
144
258
Exprodo Database User Documentation
Global Preferences
143
Page Banner In Debug Mode
144
Password Content Requirements
152
Passwords, Allowing Browser To Remember
152
Read-only Mode
148
Repeat Flushing, Time Between
148
Request Filtering By User Type
155
Run Data Definition Validation At Boot
148
Security
152
Submit Crash Reports
149
System Usage
154
Temporary Directory
148
Usage Statistics Enabled
154
Usage Statistics, Time Between Flushes
154
Usage Statistics, Time Per Statistic
154
User Session Timeout
155
User Type, Requirement For
155
Users
155
Glossary
250
Group Report
34
Groups
User Groups
93
-HHistory
History Button
16
History Page
45
188
-JJava
Enum Definition
191
Enumerations
191
Java Enum
Property
191
-LLayout Editor
CSS Rule Editors
171
Edit Mode
163
Information Pane
161
Moving Properties
164
Notes
168
Organisation Pane
160
Preview
159
Property Group Header Information
Property Table Types
165
Licence
Global Preferences For
149
List Report
28
Login Name
Minimum Length
155
161
-M-
-IImport
75
Attachments
85
Data Errors
87
Example Bookings File
80
Example Files
75
Example Project File
78
Example Resource File
77
Example Time Template File
Example User File
76
File Attachments
85
Handling Errors
85
Header Errors
86
Import Editor
82
Options
84
The Import Page
82
Violation Errors
88
Integer Type
Property
79
Mapped Integers
188
Mapped Strings
195
Menu
Default Admin Menu
150
Default Root Menu
150
Default User Menu
150
Global Preferences For
150
Menu Editor
129
Menu Editor
129
Biskit Tree Viewer
135
Creating a New Menu
137
Custom Search Descriptors
135
Custom Search Pages
135
© 2010-2015 Exprodo Software
Index
-NNetwork Metrics
Enabled, Preference For
151
Global Preferences For
151
Minutes Between Sending, Preference For
151
Network Calls Between Sending, Preference For
151
-PPage Banner, Global Preferences For
144
Password
Allowing Browser To Remember
152
Change
13
Requirements, Preference Setting For
152
Permissions
Actions
102
Applies To
107
Breaking An Activity Into Its Parts
98
Conditions
100, 106
Details
105
Does Not Apply To
108
Examples
108
How Permissions Work
97
Layering
98
Overview
97
Permissions Editor
104
Positive and Negative
100
Precedence Of 99
Targeting Users
101
Tree
105
Preferences
Global
143
Property
Biskit Property Definitions
185
BiskitPropertyType
185, 193
Boolean Property Definitions
186
Double Property Definitions
187
Integer Property Definitions
188
Integer Type
188
Java Enum
191
Java Enum Property Definitions
191
Layout Editor
156
Null Allowed
184
Project
184
Property Definitions
180
© 2010-2015 Exprodo Software
259
Required Fields
184
Set And List Property Definitions
192
String Enum
196
String Enum Property Definitions
196
String Property Definitions
194
String Property Type
194
String Type
195
Tab Layout
184
Visibility When Biskit Detail Viewed
51, 183
Visibility When Biskit List Viewed
51, 183
-RRead-only Mode
Global Preference For
148
References
16
Repeat
Time Between Repeat Flushing
148
Reports
Manager
74
Report Editor
40
Scheduling
43
Request
User
57
Roles
Admin
54
Description Of 54
Root
54
User Role, Editing Role Definition
190
Root Role
Introduction To
54
-SSearch
Comples Content Types
32
Editing Search Information
36
Exporting Information
39
General Search
27
Group Report
34
List Report
28
Saving And Reusing
38
Summary Report
31
Searching
27
Security
Brutce Force Password Hacking, Preference
Setting For
153
Global Preferences For
152
260
Exprodo Database User Documentation
Time Between Flushes, Preference For
154
Security
Time Per Statistic, Preference For
154
Password Requirements, Preference Setting For
152
User
Password, Allowing Browser To Remember,
Administration
54
Preference Setting For
152
Approving New Users
57
Single Sign On
140
Approving Or Denying
58
Statistics
Changing Group Membership
61
Network Metrics, Enabled, Preference For
151
Changing More Than The Status
59
Network Metrics, Minutes Between Sending,
Creating An Account
10
Preference For
151
Creating Users
66
Network Metrics, Network Calls Between Sending,
Global Preferences For
155
Preference For
151
Modifying Users
67
Usage Statistics Enabled, Preference For
154
New User Default Roles
155
Usage Statistics Time Between Flushes,
Password Reset
67
Preference For
154
Properties Of A User
54
Usage Statistics, Time Per Statistic, Preference
Requests Page
57
For
154
Requirement For User Type
155
String Enum
Reset Password
67
Property
196
Roles
190
String Enumerations
197
Search
62
String Property Type
194
Session Timeout
155
String Type
195
Settings
14, 70
Summary Report
31
Special
70
Comples Content Types
32
User Group Membership, Changing
68
System Events
89
User Group
System Usage
User Membership, Changing
68
Global Preferences For
154
User Requests Page
Request Filtering By User Type
155
User Settings
Date & Time
14
Text
Editing For Another User
70
Pattern Matching in Conditions
21
Editing Your Own Settings
14
Toolbar Button
Email
14
Standard Definitions
15
Menu
14
Types
User Type
User Types
93
Requirement For
155
Types and Groups
Configuring
94
Description
93
Editor
94
Visibility
-T-
-V-
Of Properties In A Biskit Collection Editor
183
Of Properties In A Biskit List
51, 183
Of Properties In Biskit Detail
51, 183
-UURL
Refering To Exprodo DB In Emails
Within Automatic Email
124
Usage Statistics
Enabled, Preference For
154
146
51,
-WWeb Browser Compatability
52
© 2010-2015 Exprodo Software
Exprodo Database is produced by Exprodo Software
www.exprodo.com
Email: [email protected]
UK Telephone: 01235 813458
International Telephone: +44 1235 813458