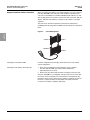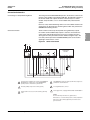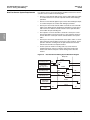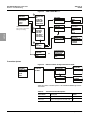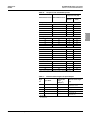
1
XUSLB/XUSLDM
Safety Light Curtain
English
Instruction Bulletin
30072-451-85
HAZARD CATEGORIES AND SPECIAL
SYMBOLS
Read these instructions carefully and look at the equipment to become
familiar with the device before trying to install, operate, or maintain it. The
following special messages may appear throughout this bulletin or on the
equipment to warn of potential hazards or to call attention to information that
clarifies or simplifies a procedure.
The addition of this symbol to a “Danger” or “Warning” safety label on the
product indicates that an electrical hazard exists which will result in personal
injury or death if the instructions are not followed.
This is the safety alert symbol. It is used to alert you to potential personal
injury hazards. Obey all safety messages that follow this symbol to avoid
possible injury or death.
English
DANGER
DANGER indicates an imminently hazardous situation which, if not
avoided, will result in death or serious injury.
WARNING
WARNING indicates a potentially hazardous situation which, if not
avoided, can result in death, serious injury, or equipment damage.
CAUTION
CAUTION indicates a potentially hazardous situation which, if not
avoided, can result in minor or moderate injury, or equipment damage.
CAUTION
CAUTION, used without the safety alert symbol, indicates a potentially
hazardous situation which, if not avoided, can result in equipment
damage.
NOTE: Provides additional information to clarify or simplify a procedure.
Please Note
Electrical equipment should be installed, operated, serviced, and
maintained only by qualified personnel. No responsibility is assumed by
Schneider Electric for any consequences arising out of the use of this
material.
30072-451-85
02/2008
XUSLB/XUSLDM Safety Light Curtain
Contents
SECTION 1:
SAFETY REQUIREMENTS
Precautions ................................................................................................. 9
Meeting Full Compliance ............................................................................ 9
Product Support ........................................................................................ 10
SECTION 2:
PRODUCT DESCRIPTION
XUSLB/XUSLDM Features ....................................................................... 11
System Components ................................................................................. 12
XUSLB/XUSLDM Default settings ............................................................ 13
XUSLB Optimum Light Curtain ............................................................ 13
XUSLDM Universal Light Curtain ........................................................ 13
Catalog Numbers ...................................................................................... 14
System Type ............................................................................................. 15
Operating States ....................................................................................... 15
Machine Run ....................................................................................... 15
Machine Stop ...................................................................................... 15
Interlock ............................................................................................... 15
Alarm ................................................................................................... 15
Operating Modes ...................................................................................... 16
Automatic Start .................................................................................... 16
Start Interlock ...................................................................................... 16
Start/Restart Interlock .......................................................................... 16
XUSLDM Cascaded Function ................................................................... 17
Features and Requirements ................................................................ 17
Segment Reduction Restart Procedure ............................................... 18
Clearing the Fault with the PDM .................................................... 18
Clearing the Fault with the Start Input Line ................................... 18
SECTION 3:
DETECTION OPTIONS
Exact Channel Select (Fixed) Blanking (XUSLDM ONLY) ...................... 20
Exact Channel Select (Fixed) Blanking Using a PDM (XUSLDM only) .... 22
Floating Blanking (XUSLDM ONLY) ........................................................ 23
Activating Floating Blanking (XUSLDM ONLY) ................................... 24
Using Exact Channel Select (Fixed) Blanking with Floating Blanking ...... 25
The Effect of Exact Channel Select (Fixed) Blanking and
Floating Blanking on Minimum Object Resolution (XUSLDM Only) .... 26
Monitored Blanking (XUSLDM Only) ........................................................ 27
Selecting Monitored Blanking (XUSLDM Only) ................................... 27
Operation with Monitored Blanking ..................................................... 28
Reduced Resolution Blanking (XUSLDM Only) ........................................ 29
Selecting Reduced Resolution ............................................................ 29
Operation ............................................................................................. 29
Additional Guarding When Using Exact Channel Select (Fixed)
Blanking, Monitored Blanking, or Floating Blanking .................................. 30
© 2008 Schneider Electric All Rights Reserved
5–EN
English
Hazard Categories and Special Symbols ................................................... 4
XUSLB/XUSLDM Safety Light Curtain
Contents
30072-451-85
02/2008
PREINSTALLATION
CONSIDERATIONS
Safe Mounting Distance ............................................................................31
European Safe Mounting Distance Formula .............................................32
General Formula ..................................................................................32
Applying the Formula ...........................................................................32
Normal (Perpendicular) Approach .......................................................34
Minimum Object Sensitivity is 40 mm or Less ............................... 34
Parallel Approach ................................................................................34
Angled Approach .................................................................................35
Calculation Example: Normal (Perpendicular) Approach ....................35
Factors Affecting the Safe Distance Formula ......................................35
US Safe Distance Formula ..................................................................36
US Safe Distance Formula ANSI B11.1......................................... 36
US Safe Distance Formula OSHA CFR 1910.217 (c)(3)(iii)(e) ...... 38
Additional Mounting Considerations ..........................................................39
Reflective Surface Interference ...........................................................39
Additional Guarding .............................................................................41
Multiple Systems .................................................................................42
Scan Coding ........................................................................................43
Other Infrared Transmitters .................................................................43
SECTION 5:
INSTALLATION, WIRING, AND
STARTUP
Parts List ...................................................................................................45
Mounting the Light Curtain ........................................................................46
Wiring the Light Curtain .............................................................................47
Electrical Connections .........................................................................48
System Diagrams ................................................................................49
Connection Schematics .......................................................................51
Connecting to a Safety Monitoring Device..................................... 51
General Connection ....................................................................... 51
Connecting Via XPSAFL (Including
Extension Cables XSZ-BCT, XSZ-BCR)........................................ 52
Start Up .....................................................................................................53
Checking the LEDs and Aligning the Transmitter and Receiver ..........53
Aligning the Transmitter and Receiver........................................... 54
Alignment ....................................................................................... 55
SECTION 6:
MUTING (XUSLDM ONLY)
Applications Examples ..............................................................................59
Application Information ........................................................................59
Selection and Orientation of Muting Sensors ......................................59
Muting Options ....................................................................................59
Two-Sensor Muting System ......................................................................60
Two Switch Muting System............................................................ 61
Two-Sensor System Requirements .....................................................61
Three-Sensor Muting System ...................................................................62
Three-Sensor System Requirements ..................................................63
Four-Sensor Muting System .....................................................................64
Four-Sensor System Requirements ....................................................66
Dual Four-Sensor Muting System .............................................................67
Dual Four-Sensor System Requirements ............................................68
Bypass Allowed Feature ...........................................................................70
Bypass Allowed Example ....................................................................71
English
SECTION 4:
6–EN
© 2008 Schneider Electric All Rights Reserved
XUSLB/XUSLDM Safety Light Curtain
Contents
SECTION 7:
TROUBLESHOOTING
Diagnostic and Test Features ................................................................... 73
Individual Beam Indicators .................................................................. 73
Synchronization ................................................................................... 73
External Device Monitoring (EDM) or Machine Primary Control
Element (MPCE) Monitoring ................................................................ 73
XUSLB without a PDM .................................................................. 73
XUSLDM and XUSLB with a PDM ................................................ 73
Optional Machine Test Signal (XUSLB Only) ...................................... 74
Start/Restart Selection Options ........................................................... 74
Receiver .................................................................................................... 75
Receiver Head Diagnostic Information ................................................ 75
Receiver Endcap Indicator Lights ........................................................ 75
Receiver Troubleshooting ................................................................... 75
Transmitter ................................................................................................ 76
Troubleshooting the Transmitter ......................................................... 76
Programming and Diagnostics Module (PDM) .......................................... 76
PDM Navigation Buttons ..................................................................... 77
Status Screen Description .................................................................. 77
PDM Status Screen ....................................................................... 78
Main Menu Functions .......................................................................... 78
VIEW CONFIG Menu .......................................................................... 79
Menu Structures ............................................................................ 80
Transmitter Options ............................................................................. 82
The Password ..................................................................................... 83
Changing the Password ................................................................ 83
Forgotten Password ...................................................................... 83
PDM Diagnostic Codes ....................................................................... 84
Safety Outputs .................................................................................... 86
Auxiliary Output .................................................................................. 86
PNP Follow ................................................................................... 86
NPN Follow ................................................................................... 86
PNP, ALARM ................................................................................ 86
NPN, ALARM ................................................................................ 86
SECTION 8:
TECHNICAL
CHARACTERISTICS
Specifications ............................................................................................ 87
Dimensions ............................................................................................... 92
XPSLCM1 Specifications .......................................................................... 97
Replacement Parts and Accessories ........................................................ 98
Replacement Transmitters and Receivers .......................................... 98
Cables and Accessories .................................................................... 105
Shock Mount Kit ...................................................................................... 107
Mirrors ..................................................................................................... 109
SECTION 9:
APPENDIX
Glossary .................................................................................................. 111
Checkout Procedure ............................................................................... 112
Test Procedure ....................................................................................... 113
© 2008 Schneider Electric All Rights Reserved
7–EN
English
30072-451-85
02/2008
XUSLB/XUSLDM Safety Light Curtain
Contents
30072-451-85
02/2008
English
8–EN
© 2008 Schneider Electric All Rights Reserved
30072-451-85
02/2008
XUSLB/XUSLDM Safety Light Curtain
Section 1—Safety Requirements
SECTION 1— SAFETY REQUIREMENTS
PRECAUTIONS
WARNING
IMPROPER SETUP OR INSTALLATION
• Read, understand, and follow Meeting Full Compliance below before
installing the XUSLB/XUSLDM light curtain.
Failure to follow these instructions can result in death or serious
injury.
MEETING FULL COMPLIANCE
Whether a machine and XUSLB/XUSLDM light curtain system complies
with safety regulations depends on the proper application, installation,
maintenance, and operation of the XUSLB/XUSLDM system. These are the
responsibilities of the purchaser, installer, and employer.
The employer is responsible for selecting and training the personnel
necessary to properly install, operate, and maintain the machine and its
safeguarding systems. The XUSLB/XUSLDM system should only be
installed, checked, and maintained by a qualified person. A qualified
person is defined as “a person or persons who, by possession of a
recognized degree or certificate of professional training, or who, by
extensive knowledge, training and experience, has successfully
demonstrated the ability to solve problems relating to the subject matter and
work” (ANSI B30.2-1983).
To use an XUSLB/XUSLDM system, the following requirements must be
met:
© 2008 Schneider Electric All Rights Reserved
•
The guarded machine must be able to stop anywhere in its cycle. Do
not use a safety light curtain on a press with a full-revolution clutch.
•
•
The guarded machine must not present a hazard from flying parts.
•
Heavy smoke, particulate matter, and corrosives may degrade the
efficiency of a safety light curtain. Do not use XUSLB/XUSLDM light
curtains in this type of environment.
•
All applicable governmental and local rules, codes, and regulations must
be satisfied. This is the user’s and employer’s responsibility.
•
All safety-related machine control elements must be designed so that an
alarm in the control logic or failure of the control circuit does not lead to
an XUSLB/XUSLDM system failure.
•
Additional guarding may be required to prevent access to dangerous
areas not protected by the XUSLB/XUSLDM system. See Additional
Guarding When Using Exact Channel Select (Fixed) Blanking,
Monitored Blanking, or Floating Blanking on page 30.
•
Perform the test procedure beginning on page 113 at installation and
after maintenance, adjustment, repair, or modification of the machine
controls, tooling, dies or machine, or to the XUSLB/XUSLDM system.
•
Perform only the test and repair procedures outlined in this manual.
The guarded machine must have a consistent stopping time and
adequate control mechanisms.
9–EN
English
• This equipment must only be installed and serviced by qualified
personnel.
XUSLB/XUSLDM Safety Light Curtain
Section 1—Safety Requirements
30072-451-85
02/2008
•
Follow all procedures in this manual for proper operation of the
XUSLB/XUSLDM system.
•
All safety-related machine control circuit elements, including pneumatic,
electric, or hydraulic controls must be control-reliable. Control reliable is
defined as: “The device, system, or interface shall be designed,
constructed, and installed such that a single component failure within the
device, interface, or system shall not prevent normal stopping action
from taking place, but shall prevent a successive machine cycle...”
(ANSI B11.191).
•
Electro-sensitive protective equipment (ESPE) must not be used as a
lock-out device to meet Occupational Safety and Health Administration2
(OSHA) lock out/tag out requirements.
English
The enforcement of these requirements is beyond the control of Schneider
Electric. The employer has the sole responsibility to follow the preceding
requirements and any other procedures, conditions, and requirements
specific to the machinery.
PRODUCT SUPPORT
10–EN
For information about products and services in your country, visit
www.Telemecanique.com.
1
American National Standards Institute
2
OSHA is administered by the U.S. Department of Labor.
© 2008 Schneider Electric All Rights Reserved
30072-451-85
02/2008
XUSLB/XUSLDM Safety Light Curtain
Section 2—Product Description
SECTION 2— PRODUCT DESCRIPTION
The XUSLB/XUSLDM system is for use where personnel protection is
required. Typical applications include finger and hand detection around
hazardous equipment such as:
•
•
•
•
•
•
•
•
•
•
Robotic work cells
Transfer lines
Assembly lines
Turret punch presses
Palletizers
English
XUSLB/XUSLDM FEATURES
Filter presses
Welding stations
Roll handling equipment
Coilers and uncoilers
Automated equipment
Table 1 displays the standard features of the XUSLB and XUSLDM light
curtains. An “X” in the table indicates that the feature is present in the
corresponding light curtain model.
Table 1:
XUSLB/XUSLDM Light Curtain Features
Feature
XUSLB
XUSLDM
Scan code for cross-talk mitigation
X1
X1
EDM/MPCE (External Device Monitoring/Machine
Primary Control Element) monitoring
X2
X2
PDM (Programming/Diagnostic Module) port
X
X
Adjustable mounting brackets and T-slots
X
X
Non-shielded main cables
X
X
2-box design
X
X
Two PNP safety outputs
X
X
Operating mode
X1
X1
Machine Test Signal (MTS)
X1
X1
Flex bus, multi-segmented head configurations
Auxiliary output (PNP or NPN)
X
X
(PNP/Follow Only)
X1
Muting through XPSLCM1 wiring module
X1
Floating blanking
X1
Exact Channel Select (Fixed) blanking
X1
Monitored blanking
X1
X1
Reduced resolution
Range selection
X1
X1
Start input type
X1
Response time adjustment
X1
1
Configurable via the use of the Programming and Diagnostic Module (PDM).
2
Configurable via the PDM or wiring connection.
NOTE: The XUSLDM light curtain configurations are universal and can be
changed using an external unit called the Programming and Diagnostic
Module (PDM). The XUSLB light curtains are basic units and fewer features
can be changed using the PDM.
© 2008 Schneider Electric All Rights Reserved
11–EN
XUSLB/XUSLDM Safety Light Curtain
Section 2—Product Description
SYSTEM COMPONENTS
Table 2:
Item No.
A
30072-451-85
02/2008
Refer to Figure 1 for the location of the components listed in Table 2.
System Components Identification
Description
Item No.
Description
Receiver
G
Transmitter
B
Individual beam indicator (one for each beam)—Red
H
Detection zone
C
Blanking active—Amber
I
Programming port for the PDM
D
Interlock or Alarm indicator—Yellow
J
Status indicator—Yellow
E
Machine Run/Stop indicator—Green/Red
K
Side mounting T-Slot
F
Receiver connections M-12 (male)
L
Transmitter connections M-12 (male)
English
1
+24 Vdc
1
2
0 Vdc
2
+24 Vdc
3
Ground
3
MTS
4
OSSD2
4
MTS Return
5
Start or EDM
5
Ground
6
EDM
7
Auxiliary Output
8
OSSD1
Figure 1:
0 Vdc
XUSLB/XUSLDM System Components
H
Detection
Zone
Transmitter
A
G
Receiver
K
C
D
B
E
Alternate
T-Slot
Mounting
Receiver LED
Indicators
I
4
6
5
4
8
7
1
Transmitter
LED Indicator
3
2
3
5
1
2
J
L
F
12–EN
© 2008 Schneider Electric All Rights Reserved
30072-451-85
02/2008
XUSLB/XUSLDM DEFAULT SETTINGS
XUSLB/XUSLDM Safety Light Curtain
Section 2—Product Description
The XUSLB/XUSLDM default settings are separated into two categories:
default settings for the XUSLB Optimum light curtain, and default settings
for the XUSLDM Universal light curtain.
The XUSLB Optimum light curtain is the basic light curtain model. The
XUSLB does not ship from the factory with a PDM; however, a PDM may be
ordered separately. This light curtain does not support any muting functions.
The XUSLDM Universal light curtain is the advanced light curtain model and
it is fully functional.
Some of the light curtain default settings include settings for electrical
components. For wiring color, location, and connection, refer to the general
connection diagram shown in Figure 24 on page 51.
XUSLB Optimum Light Curtain
XUSLDM Universal Light Curtain
•
•
Automatic start
•
•
Detection distance: 7 m finger detection and 8 m hand detection
•
•
Auxiliary follow output type: PNP
•
•
•
•
•
•
•
•
•
•
•
Automatic start
EDM (External Device Monitoring) is enabled if the yellow (Start) wire is
connected to + 24 V 3.
MTS: Enabled. Connect the blue wire to the black wire with or without a
test button for correct functionality.
Scan code: A4
EDM enabled if the yellow wire (Start) is connected to + 24 V. 3
Detection distance: 7 m finger detection and 20 m hand detection
MTS: Disabled
Auxiliary follow output type: PNP 5
Scan code: A 4
Exact Channel Select (Fixed) blanking and Monitored blanking: Disabled
Floating blanking: Disabled
Reduced resolution: Disabled
Response time: Normal
Muting: Disabled
NOTE: All functions of XUSLDM Universal light curtain can be set up with
the PDM.
© 2008 Schneider Electric All Rights Reserved
3
In Manual Start mode, the yellow wire (Start) must be connected to 0 V, and the start button
must be the normally closed (NC) type. In this case, the EDM function can only be activated by
the PDM.
4
The scan code selection is only possible with the PDM.
5
NPN, Follow, and Alarm modes are available through the PDM.
13–EN
English
For a list of standard features, refer to XUSLB/XUSLDM Features beginning
on page 11.
XUSLB/XUSLDM Safety Light Curtain
Section 2—Product Description
CATALOG NUMBERS
30072-451-85
02/2008
Refer to the following tables for a key to interpreting XUSLB/XUSLDM
Safety Light Curtain catalog numbers. The tables list all possible values for
each field of the catalog number.
1
XU
SL
B
Q
6
A
0280
T
➀
➁
➂
➃
➄
➅
➆
➇
➀ Operation
XU
Photoelectric
➁ Light Curtain Type
SL
Safety
English
➂ System Type
B
Optimum model
DM
Universal model
DS
Segmented universal model
➃ Operating Range
Q
Optimum or Universal model
0.3–7.0 m (0.98–22.96 ft) 1
R
Optimum model
0.3–20.0 m (0.98–65.62 ft) 2
Y
Universal model
0.3–20.0 m (0.98–65.62 ft) 2
1
The units are configurable to a shorter range of 0.3–3.0 m (0.98–9.84 ft)) using a
PDM.
2
The units are configurable to longer ranges of 0.3–20 m (0.98–65.62 ft) or to a
shorter range of 0.3–8 m (0.98–26.25 ft) using a PDM.
➄ Detection
6
14 mm (0.55 in.) finger detection
5
30 mm (1.18 in.) hand detection
➅ Non-Safety Auxiliary Output
A
Static output (PNP or NPN dependent on version)
➆ Protected Height
mm (in.)
mm (in.)
0280 (11.02) Version Q
0760 (29.92) Version R & Y
mm (in.)
1520 (59.84) Version R & Y
0320 (14.17) Version Q, R, & Y
0880 (34.65) Version Q, R, & Y
1560 (61.41) Version R & Y
0360 (14.17) Version Q, R, & Y
0920 (36.22) Version Q, R, & Y
1640 (64.56) Version R & Y
0440 (17.32) Version Q, R, & Y
1040 (40.94) Version Q, R, & Y
1720 (67.71) Version R & Y
0520 (20.47) Version Q, R, & Y
1120 (44.09) Version Q
1800 (70.86) Version R & Y
0600 (23.62) Version Q, R, & Y
1200 (47.24) Version Q, R, & Y
1920 (75.59) Version R & Y
0680 (26.77) Version R & Y
1360 (53.54) Version Q, R, & Y
2120 (83.46) Version R & Y
0720 (28.35) Version R
1400 (55) Version R & Y
NOTE: Inches are given in this table for reference.
The catalog number field expresses protection height in millimeters only.
➇ Device Type
14–EN
T
Transmitter
R
Receiver
© 2008 Schneider Electric All Rights Reserved
XUSLB/XUSLDM Safety Light Curtain
Section 2—Product Description
The XUSLB/XUSLDM system is a microprocessor-controlled, infrared
transmitted-beam safety device. The system consists of a receiver
assembly and a transmitter assembly. The transmitter and receiver
assemblies are not physically interconnected.
OPERATING STATES
The following terms are used to describe the operating states of the
XUSLB/XUSLDM light curtains:
Machine Run
Machine Run is the normal operating state. In the Machine Run state, the
two receiver safety outputs are in the On state, the green Machine Run
indicator is lit, and the auxiliary output is in a state consistent with its
configuration (see Table 16 on page 54). The protected machine is allowed
to operate.
Machine Stop
Machine Stop state occurs when a beam is interrupted. In the Machine
Stop state, the two receiver safety outputs are in the Off state, the red
Machine Stop indicator is lit, and the auxiliary output is in a state consistent
with its configuration. The protected machine is not allowed to operate.
☛
SYSTEM TYPE
Interlock
Interlock state occurs when the system is in Start Interlock mode (see
page 16) and the beam is interrupted. In the Interlock state, the two receiver
safety outputs are in the Off state, the red Machine Stop and yellow
interlock indicators are lit, and the auxiliary output is in a state consistent
with its configuration. When the system is in the Interlock state, the
protected machine is not allowed to operate until the detection zone is clear
of obstructions, and the start button is pressed and released.
Alarm
Alarm state occurs when the system is in Start/Restart Interlock mode (see
page 16) and the beam is interrupted. In the Alarm state, the two receiver
safety outputs are in the Off state, the red Machine Stop indicator is lit, and
the yellow interlock indicator is flashing. The auxiliary output is in a state
consistent with its configuration. When the system is in the Alarm state, the
protected machine is not allowed to operate. The primary difference
between Alarm and Interlock states is that the XUSLB/XUSLDM system will
remain in the Alarm state until the fault is corrected, regardless of power
cycling or pressing and releasing the start button.
© 2008 Schneider Electric All Rights Reserved
15–EN
English
30072-451-85
02/2008
XUSLB/XUSLDM Safety Light Curtain
Section 2—Product Description
30072-451-85
02/2008
English
OPERATING MODES
The operating mode determines the start-up and operating behavior of the
XUSLB/XUSLDM system. The operating mode descriptions in this section
draw on the operating state definitions in “Operating States” on page 15.
Automatic Start
In Automatic Start mode, the system enters the Machine Run state on
startup without operator intervention, as long as the detection zone is not
blocked. When the XUSLB/XUSLDM system is powered up in Automatic
Start mode, its safety and auxiliary outputs are Off; if the detection zone is
not obstructed, it enters the Machine Run state (see page 15). In this state,
when the XUSLB/XUSLDM system senses an object entering the detection
zone, it changes from Machine Run to Machine Stop (see page 15) state,
and remains in the Machine Stop state until the obstruction is removed.
Once the detection zone is clear, the XUSLB/XUSLDM system
automatically changes from Machine Stop to Machine Run.
Start Interlock
When the XUSLDM system is powered up in Start Interlock mode, its
safety outputs are Off; if no faults are detected, it enters the Interlock state
(see page 15). To enter the Machine Run state from the Interlock state, the
detection zone must be clear, and then the operator must press and release
the Start button. Once in the Machine Run state, if the XUSLDM system
senses an object entering the detection zone, it changes from Machine Run
to Machine Stop state. Once the detection zone is clear, the XUSLDM
system automatically changes from Machine Stop to Machine Run state.
Start/Restart Interlock
When the XUSLB/XUSLDM system is powered up in Start/Restart
Interlock mode, its safety outputs are Off; if no faults are detected, it enters
the Interlock state. To enter the Machine Run state, the detection zone must
be clear, and the operator must press and release the Start button. Once in
the Machine Run state, if the XUSLB/XUSLDM system senses an object
entering the detection zone, it changes from Machine Run to Machine Stop
state. After the obstruction is removed from the detection zone, the
XUSLB/XUSLDM system changes to the Interlock state. To enter the
Machine Run state, the operator must press and release the start button. If
any obstruction is present in the detection zone when the Start button is
pressed and released, the XUSLB/XUSLDM system remains in the Machine
Stop state.
16–EN
© 2008 Schneider Electric All Rights Reserved
XUSLB/XUSLDM Safety Light Curtain
Section 2—Product Description
XUSLDM CASCADED FUNCTION
The XUSLDM safety light curtain can become the master in a cascaded
system. A cascaded XUSLDM with XUSLDS light curtain system allows
multiple transmitters and receivers to be daisy-chained, which gives the
XUSLD the flexibility to guard multiple areas of a machine.
Features and Requirements
•
Offered in protective heights ranging from 280 mm to 1360 mm for
14 mm resolutions, and from 360 mm to 2120 mm for 30 mm resolution.
•
The maximum size of the system is based on the number of beams. A
single master segment cannot exceed 180 beams, and the total of the
combined segments cannot exceed 256 beams.
•
A single XUSLDM light curtain can be converted to a master cascaded
system.
•
XUSLDS segments with different resolutions can be mixed within an
XUSLDM system.
•
•
A single slave segment cannot exceed 128 beams.
•
The maximum cable length between any two segments is 10 m.
© 2008 Schneider Electric All Rights Reserved
Up to four segments can be daisy-chained as long as the total number of
beams does not exceed 256.
17–EN
English
30072-451-85
02/2008
XUSLB/XUSLDM Safety Light Curtain
Section 2—Product Description
Segment Reduction Restart Procedure
30072-451-85
02/2008
When you reduce the number of cascaded segments, you cause a flex bus
fault. The XUSLDM master will enter a fault condition, indicated by error
code “95” on the PDM and on the IBIs (Individual Beam Indicators) as well.
After cycling power to the system to clear the flex fault, fault code “100” will
display. This fault code indicates a reduction in the number of cascaded
segments.
The fault can be cleared and operation restored on the reduced size
XUSLDM master by using either the PDM or the start input line as described
below.
Figure 2:
Cascaded Segments
English
XUSLDS•••R
XUSLDS•••T
XUSLDM•••R
XUSLDM•••T
Clearing the Fault with the PDM
Load the configuration from the light curtain and save the new reduced
system configuration.
Clearing the Fault with the Start Input Line
1. Press the user-supplied start switch while the power is applied.
The three indicator LEDs (red, yellow, amber) will flash for
approximately three seconds.
2. Release the start switch while the LEDs are flashing to clear the fault.
Since the XUSLDM has a configurable start input, take care to ensure that
the correct contact configuration is used and that it is wired properly. The
transmitter will not enter a fault state if the number of segments is reduced.
However, to operate normally, the transmitter must always match the
receiver in the number of segments and beams.
18–EN
© 2008 Schneider Electric All Rights Reserved
30072-451-85
02/2008
XUSLB/XUSLDM Safety Light Curtain
Section 3—Detection Options
SECTION 3— DETECTION OPTIONS
Exact Channel Select (Fixed) Blanking used with Floating Blanking is
reserved for specific applications. All situations that can occur in the
XUSLDM system detection zone must be carefully considered. Read this
section carefully.
WARNING
• Exact Channel Select (Fixed) Blanking and/or Floating Blanking
create unprotected passages in the detection zone and make the
XUSLDM safety light curtain less sensitive to objects in the
detection zone.
• To prevent unauthorized modification of the detection zone, install
the system controller in an enclosure with supervisor-controlled
access.
• If the object to be ignored by the Channel Selected beams does not
completely prevent access to the hazardous area, then either use a
hard guard or other means to block access or increase the
minimum safe distance as required by the proper formula.
• Any beams which are not in alignment at the time of Channel Select
programming may be inadvertently deselected. Use the Test
Procedure beginning on page 113 to verify the correct alignment.
• After programming or activating Exact Channel Select (Fixed)
Blanking or Floating Blanking, use the test object supplied with the
light curtain to perform the Test Procedure beginning on page 113.
Performing the test procedure will help eliminate areas where the
system may not sense an intrusion into the detection zone.
Failure to follow these instructions can result in death or serious
injury.
© 2008 Schneider Electric All Rights Reserved
19–EN
English
LACK OF SENSITIVITY
XUSLB/XUSLDM Safety Light Curtain
Section 3—Detection Options
EXACT CHANNEL SELECT (FIXED)
BLANKING (XUSLDM ONLY)
30072-451-85
02/2008
Exact Channel Select (Fixed) Blanking disables selected, fixed areas of the
detection zone by masking off specific, fixed beam locations. Exact Channel
Select (Fixed) Blanking is helpful when stationary objects such as tooling
and fixtures permanently obstruct a portion of the detection zone.
Exact Channel Select (Fixed) Blanking requires that any portion of the
detection zone which is blocked remain blocked. If the obstruction is
removed, the XUSLDM system will enter the Machine Stop state.
A fixed blanking pattern may consist of more than one fixed blanked area.
Individual fixed blanked areas must be separated by at least one beam that
is always clear. A fixed blanking area may not crossover between flexible
segment boundaries.
English
Each fixed blanked area has a tolerance of +/-1 beam to allow for slight
position variance. Only the two beams on the edges of the blanked area are
allowed to vary. Because of this position tolerance, the optical resolution is
reduced on the border area of fixed blanking patterns. This reduction
comprises two beams. See Table 3. This tolerance also allows the number
of blocked beams to vary +/- 1. For example, a fixed blanked area of 8
blanked beams is allowed to increase to 9 beams or decrease to 7 beams
with the light curtain remaining in the Machine Run state. There is an
exception when there are two beams separating fixed blanked areas. For
this case only, no positional tolerance is allowed on the beam closest to the
entry endcap. If it is blocked, the light curtain will enter Machine Stop state.
If there is only one beam separating fixed blanked areas, there is no
positional tolerance on that beam and it must always be clear. With three or
more beams separating fixed blanked areas, the normal +/– 1 beam
tolerance is applied. See Table 3 for a diagram of operation with Exact
Channel Select (Fixed) Blanking active.
20–EN
© 2008 Schneider Electric All Rights Reserved
30072-451-85
02/2008
Table 3:
XUSLB/XUSLDM Safety Light Curtain
Section 3—Detection Options
Diagram of Exact Channel Select (Fixed) Blanking Operation
English
Exact Channel Select Exact Channel Select Exact Channel Select Exact Channel Select Exact Channel Select
No Exact
(Fixed) Blanking
(Fixed) Blanking
(Fixed) Blanking
(Fixed) Blanking
(Fixed) Blanking
Channel Select
Enabled
Enabled
Enabled
Enabled
Enabled
(Fixed) Blanking
Machine Stop
Machine Run
Machine Run
Table 4:
Symbol
Machine Run
Machine Stop
Machine Stop
Icon Key for Table 3
Description
Clear optical channel
Blocked optical channel
Optical channel is selected by Exact Channel Select (Fixed) blanking
Blocked optical channel is selected by Exact Channel Select (Fixed)
blanking
The minimum number of beams in a fixed blanking area is one. If only one
beam is blocked, that beam must remain blocked; however, the number of
blocked beams can be increased to two.
The fixed blanking pattern must not prevent the light curtain from
synchronizing. This means that the size of the blanked object cannot
exceed certain limits. On an XUSLDM system with 12 or fewer beams, six
consecutive beams must always remain clear (not blanked). On an
XUSLDM system with more than 128 beams, ten consecutive beams must
always remain clear (not blanked). Refer to Table 17 on page 55.
Exact Channel Select (Fixed) blanking is allowed during all modes of
operation (Automatic Start, Start Interlock, and Start/Restart Interlock).
© 2008 Schneider Electric All Rights Reserved
21–EN
XUSLB/XUSLDM Safety Light Curtain
Section 3—Detection Options
EXACT CHANNEL SELECT (FIXED)
BLANKING USING A PDM
(XUSLDM ONLY)
30072-451-85
02/2008
To activate Exact Channel Select (Fixed) Blanking:
1. Place an obstruction in the detection zone. This causes the receiver to
go into Machine Stop state.
2. Connect the PDM to the receiver.
3. Log in with the supervisor access level.
Refer to the information contained in Programming and Diagnostics Module
(PDM) beginning on page 76. This section contains information regarding
PDM navigation buttons, screen descriptions, menu functions and
structures, diagnostics, and so forth.
With the PDM connected and login complete:
1. Load the light curtain’s configuration to the PDM.
English
2. Navigate to the Edit Configuration menu.
3. Exact Channel Select (Fixed) Blanking On. The system enters a
configuration state.
4. Save the configuration to the light curtain.
5. Navigate to the Fixed Blanking Programming menu.
6. Select the Program option. Wait until the LEDs start flashing.
7. Select Finish. The light curtain will automatically restart.
See Table 5 for the effective resolution when Exact Channel Select (Fixed)
Blanking is active.
Table 5:
Effective Resolution with Exact Channel Select (Fixed)
Blanking
Standard Resolution
Effective Resolution at Ends of Exact Channel
Select (Fixed) Blanked Area
14 mm
34 mm
30 mm
60 mm
NOTE: The tolerance does not reduce the resolution of the entire light
curtain, only the ends of the Exact Channel Select (Fixed) Blanked Areas.
22–EN
© 2008 Schneider Electric All Rights Reserved
30072-451-85
02/2008
XUSLB/XUSLDM Safety Light Curtain
Section 3—Detection Options
FLOATING BLANKING (XUSLDM ONLY)
With floating blanking, up to two channels can be blanked at any location in
the detection zone without the XUSLDM system going to the Machine Stop
state. The blanked beams are not fixed at a single location but float through
the detection zone.
For two-beam floating blanking, the two obstructed beams do not have to be
adjacent. See Table 6 for possible system responses during operation with
Floating Blanking active.
System Response to Floating Blanking
Number of
Beams
Selected
0
1
1
1
1
2
2
2
2
2
2
2
Floating
Blanking
Status
Inactive
Active
Active
Active
Active
Active
Active
Active
Active
Active
Active
Active
Beam
Blocked
1
0
1
2
2
0
1
2
2
3
3
3
Safety
Output
Status
stop
run
run
stop
stop
run
run
run
run
stop
stop
stop
Beam 1
Beam 2
Beam 3
Beam 4
Beam 5...
Table 7:
Icon Key for Table 6
Symbol
Description
Beam is not blocked.
Beam is blocked.
See Table 8 for the effective resolution when floating blanking is active.
Table 8:
Effective Resolution with Floating Blanking Active
Floating Banking Effects on Minimum Object Resolution
Minimum Object Resolution with
No Floating Blanking
Minimum Object Resolution with
1 Beam Floating
Minimum Object Resolution with
2 Beam Floating
14 mm
24 mm
34 mm
30 mm
50 mm
70 mm
© 2008 Schneider Electric All Rights Reserved
23–EN
English
Table 6:
XUSLB/XUSLDM Safety Light Curtain
Section 3—Detection Options
Activating Floating Blanking
(XUSLDM ONLY)
30072-451-85
02/2008
Floating Blanking (either one- or two-beam) is activated by using the PDM.
Only an authorized user can activate the Floating Blanking function on the
XUSLDM light curtain.
To activate Floating Blanking:
1. Place an obstruction in the detection zone. This causes the receiver to
go into Machine Stop state.
2. Connect the PDM to the receiver.
3. Log in with the supervisor access level.
English
Refer to the information contained in Programming and Diagnostics Module
(PDM) beginning on page 76. This section contains information regarding
PDM navigation buttons, screen descriptions, menu functions and
structures, diagnostics, and so forth.
With the PDM connected and login complete:
1. Load the light curtain’s configuration to the PDM.
2. Navigate to the Edit Configuration menu.
3. Select Floating Blanking On. The system enters a configuration state.
4. Choose one- or two-beams.
5. Save the configuration to the light curtain.
6. The light curtain will automatically restart.
This will cause the PDM to request that the receiver perform a reset. The
receiver then enters the Power-On Self Test state. If no faults are detected,
the receiver then enters the Interlock or Machine Run state depending upon
the selected operating mode. Upon successful completion of the self test,
the receiver Blanking Active LED will turn on.
24–EN
© 2008 Schneider Electric All Rights Reserved
30072-451-85
02/2008
XUSLB/XUSLDM Safety Light Curtain
Section 3—Detection Options
USING EXACT CHANNEL SELECT
(FIXED) BLANKING WITH FLOATING
BLANKING
WARNING
LACK OF SENSITIVITY
• Read this section carefully.
• Use of Exact Channel Select (Fixed) Blanking with Floating
Blanking is reserved for specific applications.
• Improper use of Exact Channel Select (Fixed) Blanking and/or
Floating Blanking will make the XUSLDM system less sensitive to
objects in the detection zone.
• With Exact Channel Select (Fixed) Blanking or Floating Blanking,
the XUSLDM system may be less sensitive to objects in the
detection zone, necessitating an increase in the safe mounting
distance. See Section 4 beginning on page 31.
Failure to follow these instructions can result in death or serious
injury.
When both Exact Channel Select (Fixed) Blanking and Floating Blanking
are selected, the floating channels are allowed to occur anywhere within the
detection zone, with the exception of the area selected by Exact Channel
Select (Fixed) Blanking.
See Table 9 for possible blanking function combinations which can be used
at the same time, and the effect on resolution during light curtain operation.
As an example, Exact Channel Select (Fixed) Blanking can be used in
combination with Floating Blanking; however, the resolution will be reduced.
Table 9:
Possible Blanking Function Combinations
Function
Exact Channel Select
(Fixed) Blanking
Floating Blanking
Monitored Floating
Blanking
Reduced Resolution
Exact Channel Select
(Fixed) Blanking
N/A
Yes
No
No
Floating Blanking
Yes
N/A
Yes
No
Monitored Floating
Blanking
No
Yes
N/A
No
Reduced Resolution
No
No
No
N/A
© 2008 Schneider Electric All Rights Reserved
25–EN
English
• Use of Exact Channel Select (Fixed) Blanking may require a hard
barrier guard.
XUSLB/XUSLDM Safety Light Curtain
Section 3—Detection Options
The Effect of Exact Channel Select
(Fixed) Blanking and Floating Blanking
on Minimum Object Resolution
(XUSLDM Only)
30072-451-85
02/2008
When Exact Channel Select (Fixed) Blanking and/or Floating Blanking is
active, the safe mounting distance is affected. See Section 4 beginning on
page 31 for information regarding safe mounting distance. Exact Channel
Select (Fixed) Blanking and Floating Blanking desensitize the light curtain
and increase the size of the minimum object detected. The increase is equal
to the channel spacing distance for each channel that is disabled.
If the size of the object detected by the XUSLDM system increases, the
minimum safe distance must increase. See European Safe Mounting
Distance Formula on page 32, US Safe Distance Formula ANSI B11.1 on
page 36, or US Safe Distance Formula OSHA CFR 1910.217 (c)(3)(iii)(e) on
page 38 for information regarding minimum safe distance. Use the minimum
object sensitivity given in Tables 10 and 11 to compute the safe mounting
distance.
English
Table 10:
Sample S and Dpf Factors for Finger Detection System
Total Number of Beams
Minimum
Disabled by Exact
Object Resolution
Channel Select (Fixed)
(S)
and/or Floating Blanking
Depth Penetration Factor, Dpf
for use with ANSI Formula (See
page 36)
(Dpf = 3.4 (S–0.276) in.)
None
14 mm (0.55 in.)
0.93 in. (24 mm)
1 Beam
24 mm (0.94 in.)
2.26 in. (57 mm)
2 Beams
34 mm (1.34 in.)
3.62 in. (92 mm)
3 Beams
44 mm (1.73 in.)
4.94 in. (125 mm)
4 Beams
54 mm (2.13 in.)
6.3 in. (160 mm)
5 Beams
64 mm (2.52 in.)
7.6 in. (193 mm)
> 5 Beams
>64 mm (2.52 in.)
36 in. (900 mm)
Table 11:
Sample S and Dpf Factors for Hand Detection System
Total Number of Beams
Minimum
Disabled by Exact
Object Resolution
Channel Select (Fixed)
(S)
and/or Floating Blanking
Depth Penetration Factor, Dpf
for use with ANSI Formula (See
page 36)
(Dpf = 3.4 (S–0.276) in.)
None
30 mm (1.18 in.)
3.1 in. (78 mm)
1 Beam
50 mm (1.97 in.)
5.76 in. (146 mm)
> 1 Beam
>64 mm (2.52 in.)
36 in. (900 mm)
Minimum object sensitivity (MOS) is the largest allowable size of an
interruption in the sensing field. An XUSLDM system with 14 mm (0.55 in.)
minimum object resolution and one channel disabled has a minimum object
sensitivity of:
14 mm + 10 mm = 24 mm (0.94 in.)
An XUSLDM system with 14 mm (0.55 in.) minimum object resolution and
two channels disabled has a minimum object sensitivity of:
14 mm + 10 mm + 10 mm = 34 mm (1.33 in.)
An XUSLDM system with 30 mm (1.18 in.) minimum object resolution and
one channel disabled has a minimum object sensitivity of:
30 mm + 20 mm = 50 mm (1.96 in.)
An XUSLDM system with 30 mm (1.18 in.) minimum object resolution and
two channels disabled has a minimum object sensitivity of:
30 mm + 20 mm + 20 mm = 70 mm (2.75 in.)
26–EN
© 2008 Schneider Electric All Rights Reserved
30072-451-85
02/2008
MONITORED BLANKING
(XUSLDM ONLY)
XUSLB/XUSLDM Safety Light Curtain
Section 3—Detection Options
This feature allows a pre-determined object to move within the detection
zone while the light curtain remains in the Run state. Monitored blanking is
similar to Exact Channel Select (Fixed) blanking; it requires an object with a
certain size to block a predetermined number of optical beams within the
detection zone. It differs from Exact Channel Select (Fixed) blanking as it
allows the object to move within the detection zone. Each system segment
will allow only one monitored blanking area within its detection zone.
The blanking pattern must not prevent the light curtain from synchronizing.
This means the size of the blanked object can not exceed certain limits. On
a system with fewer than 12 beams, six consecutive beams must always
remain clear (not blanked). On a system with more than 12 beams, ten
consecutive beams must always remain clear (not blanked).
Blanking is allowed during all modes of operation (Automatic Start, Start
Interlock, and Start/Restart Interlock).
Selecting Monitored Blanking
(XUSLDM Only)
To select Monitored Blanking:
1. Place an obstruction in the detection zone. This causes the receiver to
go into Machine Stop state.
2. Connect the PDM to the receiver.
3. Log in with the supervisor access level.
Refer to the information contained in Programming and Diagnostics Module
(PDM) beginning on page 76. This section contains information regarding
PDM navigation buttons, screen descriptions, menu functions and
structures, diagnostics, and so forth.
With the PDM connected and login complete:
1. Load the light curtain’s configuration to the PDM.
2. Navigate to the Edit Configuration menu.
3. Select Monitored Blanking Enable. This will record the state of each one
of the optical beams that form the protected area.
4. With the obstruction placed at one limit of the desired monitored area,
select Program Begin.
5. Without removing the obstruction from the detection zone, move the
obstruction to the other limit of the desired monitored area, and select
Program End.
6. Select Finish.
7. Save the configuration to the light curtain. The light curtain will
automatically restart.
After you perform these steps, the PDM requests that the system perform a
restart. If no faults are detected and the state of the optical beams matches
the recorded monitored blanking pattern, the receiver enters the Interlock or
Machine Run state depending upon the selected operating mode. The
receiver Blanking Active LED will illuminate.
On subsequent power cycles, the receiver will operate in accordance with
its configured starting and operation modes. A new floating object size is
recorded only when the receiver is in Machine Stop state and the monitored
blanking option is activated. If the monitored blanking option is disabled, the
stored protected zone pattern is cleared from the system.
© 2008 Schneider Electric All Rights Reserved
27–EN
English
The minimum number of beams in a monitored blanking area is one. If only
one beam is blocked, the number of blocked beams can be increased to
two. A monitored blanking area larger than one beam has a size tolerance
of +/- 1 beam. The size tolerance only applies to the beams on the edges of
the floating area.
XUSLB/XUSLDM Safety Light Curtain
Section 3—Detection Options
Operation with Monitored Blanking
30072-451-85
02/2008
The monitored blanking optical channel pattern is stored in memory and
remains unchanged when power is cycled on the receiver. On power-up the
receiver recalls the recorded monitored blanking pattern. If the protected
zone blocked and unblocked beams do not match the selected monitored
blanking pattern, the receiver transitions to the Machine Stop state. The
stored pattern is cleared from memory whenever the monitored blanking
feature is disabled. As factory-shipped, the receiver is configured with the
monitored blanking feature disabled with no pre-recorded protected zone
obstructions.
English
28–EN
© 2008 Schneider Electric All Rights Reserved
30072-451-85
02/2008
XUSLB/XUSLDM Safety Light Curtain
Section 3—Detection Options
REDUCED RESOLUTION BLANKING
(XUSLDM ONLY)
Reduced resolution blanking changes the sensing resolution of the light
curtain. Reduced resolution blanking is selectable in one- or two-beam
increments, allowing the light curtain to ignore the obstruction of one or two
beams. There can be any number of ignored beams anywhere in the
protection field, but no more than two adjacent blanked beams.
Selecting Reduced Resolution
To select reduced resolution:
1. Connect the PDM to the receiver.
Refer to the information contained in Programming and Diagnostics Module
(PDM) beginning on page 76. This section contains information regarding
PDM navigation buttons, screen descriptions, menu functions and
structures, diagnostics, and so forth.
With the PDM connected and login complete:
1. Load the light curtain’s configuration to the PDM.
2. Navigate to the Edit Configuration menu.
3. Select Reduced Resolution Enable.
4. Enter the beam resolution of the unit.
5. Select the resolution reduction.
6. Save the configuration to the light curtain.The light curtain will
automatically restart.
After you perform these steps, the PDM requests the XUSLDM receiver to
perform a restart. If no faults are detected, any objects within the detection
zone of less than the selected beam resolution will not be detected and the
machine will enter an Interlock or Machine Run state depending upon the
selected status mode. The XUSLDM receiver Blanking Active LED
illuminates to indicate reduced resolution blanking.
Operation
When light curtains are being used for control purposes (such as stroke
operation), an optical resolution greater than 30 mm is not allowed. When
reduced resolution blanking is enabled, objects under a certain maximum
size may enter into the light curtain detection zone and the light curtain will
remain in the Machine Run state.
The light curtain offers reduced resolution blanking on systems with
14 mm and 30 mm minimum object resolution. The allowed beam reduction,
the resulting effective resolution, and the maximum size of movable objects
within the detection zone are shown in Table 12.
When reduced resolution blanking is enabled, fixed blanking, monitored
blanking, and floating blanking are not allowed. The PDM is required to
select and enable reduced resolution blanking.
Table 12:
Optical Resolution
Reduced
Resolution
© 2008 Schneider Electric All Rights Reserved
14mm
Effective
Resolution
30 mm
Maximum
Undetected
Effective
Resolution
Maximum
Undetected
1 beam
24 mm
6 mm
47 mm
13 mm
2 beams
34 mm
16 mm
67 mm
33 mm
3 beams
44 mm
26 mm
87 mm
53 mm
29–EN
English
2. Log in with the supervisor access level.
XUSLB/XUSLDM Safety Light Curtain
Section 3—Detection Options
ADDITIONAL GUARDING WHEN USING
EXACT CHANNEL SELECT (FIXED)
BLANKING, MONITORED BLANKING, OR
FLOATING BLANKING
30072-451-85
02/2008
Exact Channel Select (Fixed) Blanking, Monitored Blanking, and Floating
Blanking create holes in the detection zone. These holes are required for
certain applications. If an obstruction does not completely fill these holes
one of two actions are required:
1. The safe mounting distance must be increased to account for the larger
opening in the curtain, or
2. The area not filled by an obstruction must be guarded, typically by some
method of hard guarding.
Hard guarding refers to mechanical barriers such as sheet or expanded
metal. See Figure 3 for an example.
Figure 3:
Obstruction
Light Curtain
30–EN
Channel Select Area
Detection Zone
English
Adding Hard Guarding to Light Curtain When Using Exact
Channel Select (Fixed) Blanking or Floating Blanking
Light Curtain
© 2008 Schneider Electric All Rights Reserved
30072-451-85
02/2008
XUSLB/XUSLDM Safety Light Curtain
Section 4—Preinstallation Considerations
SECTION 4— PREINSTALLATION CONSIDERATIONS
SAFE MOUNTING DISTANCE
NOTE: All quotations and statements from Occupational Safety and Health
Administration (OSHA) and American National Standards Institute (ANSI)
apply to the USA only.
WARNING
• Install the XUSLB/XUSLDM system at the safe mounting distance
calculated using the appropriate formula.
• Ensure that the XUSLB/XUSLDM system is mounted far enough
away from the operations hazard to fully accommodate the stopping
time.
Failure to follow these instructions can result in death or serious
injury.
The XUSLB/XUSLDM system must be mounted far enough from the
machine’s danger zone so the machine will stop before a hand or other
body part reaches the hazardous area. This distance is called the minimum
safe mounting distance (see Figure 4). It is a number calculated from a
formula. Before installing the XUSLB/XUSLDM light curtain, you must
determine the safe mounting distance.
Regardless of the calculated distance, never mount an XUSLB/XUSLDM
system closer to a point of operation hazard than specified. This is required
by Table 0-10 in OSHA 1910.217.
Safe Mounting Distance
Light Curtain
Figure 4:
S (Ds)
© 2008 Schneider Electric All Rights Reserved
31–EN
English
IMPROPER SETUP
XUSLB/XUSLDM Safety Light Curtain
Section 4—Preinstallation Considerations
30072-451-85
02/2008
EUROPEAN SAFE MOUNTING
DISTANCE FORMULA
The minimum safe mounting distance discussed in this section is based on
European standard EN 999. This standard applies to light curtains used in
industrial environments.
General Formula
The minimum safe mounting distance is a value, S, calculated from the
following formula:
S = (K x T) + C
Where:
S = the minimum safe distance in millimeters between the danger zone and
the detection point, line, plane, or zone.
English
K = the theoretical speed of approach of the body, or parts of the body, in
millimeters per seconds.
T = the overall system stopping performance in seconds. T = t1 + t2, where:
t1 = the maximum response time of the light curtain in seconds. This is
the time it takes for the output signal switching devices to change to the
Off state after the light curtain actuates. This value is listed on the light
curtain nameplate.
t2 = the maximum response time of the machine in seconds. This is the
time it takes for the machine to stop or remove the risk after it receives
the output signal from the light curtain.
C = an additional distance in millimeters based on the light curtain’s
minimum object sensitivity (MOS)6.
Applying the Formula
32–EN
The values of variables K and C used in the general formula vary depending
on how the light curtain is mounted. Three light curtain mounting schemes
are discussed in this section. Refer to the section that is appropriate for your
application, and use the safe distance formula given in that section.
•
Normal (perpendicular) approach: the operator’s direction of approach is
perpendicular to the detection zone (see Figure 5).
•
Parallel approach: the operator’s direction of approach is parallel to the
detection zone (see Figure 6).
•
Angled approach: the operator’s direction of approach is at an angle to
the detection zone (see Figure 7).
6
Minimum object sensitivity (MOS) is the diameter in millimeters of the minimum sized object that
will cause the light curtain to actuate. Minimum object sensitivity is called “detection capability”
on the light curtain nameplate.
© 2008 Schneider Electric All Rights Reserved
30072-451-85
02/2008
XUSLB/XUSLDM Safety Light Curtain
Section 4—Preinstallation Considerations
Figure 5:
Normal (Perpendicular) Approach to the Detection Zone
2
3
S: Minimum safe distance
1
1: Danger zone
1
2: Detection zone
3: Direction of approach
2
4: Fixed guard
5: Beginning of the detection zone
4
English
S
3
S
4
1
S
2
3
4
Figure 6:
Parallel Approach to the Detection Zone
1
2
H
4
5
3
S
Figure 7:
Angled Approach to the Detection Zone
2
1
2
5
1
°
> 30
4
<3
0°
S
S
5
4
© 2008 Schneider Electric All Rights Reserved
3
3
33–EN
XUSLB/XUSLDM Safety Light Curtain
Section 4—Preinstallation Considerations
30072-451-85
02/2008
Normal (Perpendicular) Approach
Minimum Object Sensitivity is
40 mm or Less
If the operator’s approach is perpendicular to the detection zone (see Figure
5) and the minimum object sensitivity (MOS) of the system is 40 mm or less,
use the following formula to calculate the safe mounting distance:
S= (K x T) + C
S = (2000 mm/s x T) + 8(d – 14 mm)
K = 2000 mm/s
C = 8(d – 14 mm), but not less than 0. Where:
English
d = the minimum object sensitivity of the light curtain in millimeters.
Using this formula with values for T and d that are appropriate for the light
curtain, calculate the minimum safe distance S.
•
If the calculated value of S is greater than or equal to 100 mm (3.94 in.)
and less than or equal to 500 mm (19.68 in.), use the calculated value
for the minimum safe distance.
•
If the calculated value of S is less than 100 mm, use 100 mm as the safe
distance.
•
If the calculated value of S is greater than 500 mm (19.68 in.),
recalculate S as follows with an alternate value for K:
S = (1600 mm/s x T) + 8(d – 14 mm)
Parallel Approach
If the operator’s direction of approach is parallel to the detection zone (see
Figure 6), calculate the minimum safe distance, S, with the following
formula:
S = (1600 mm/s x T) + (1200 mm – 0.4H)
K = 1600 mm/s
C = 1200 mm – 0.4H, but not less than 850 mm. Where:
H = the height of the detection zone above the reference plane (for
example, the floor) in millimeters.
The maximum allowable value for H is 1000 mm (39.37 in.). If the value
of H exceeds 300 mm (11.81 in.), additional protective devices must be
used.
Figure 8:
Height of the Detection Zone
2
1
S: Minimum safe distance
1: Danger zone
2: Detection zone
4
3: Direction of approach
5
H
S
34–EN
4: Fixed guard
5: Beginning of the detection zone
3
© 2008 Schneider Electric All Rights Reserved
30072-451-85
02/2008
Calculation Example: Normal
(Perpendicular) Approach
When the operator’s direction of approach is at an angle to the detection
zone (see Figure 7), the minimum safe distance formula depends on the
size of the angle.
•
If the angle is greater than 30°, use the formulas in “Normal
(Perpendicular) Approach” on page 34.
•
If the angle is less than or equal to 30°, use the formula in “Parallel
Approach” on page 34.
In this example, the machine has a stopping time of 60 ms (t2). It is fitted
with a light curtain having a minimum object sensitivity of 30 mm (d) and a
response time of 30 ms (t1). The light curtain is mounted in such a way that
the operator’s direction of approach is perpendicular to the detection zone
(see Figure 5).
Using the formula for normal (perpendicular) approach with a minimum
object sensitivity less than 40 mm, calculate the minimum safe mounting
distance, S:
S = (2000 mm/s x T) + 8(d – 14 mm)
Where:
T = overall response time (t1 + t2) = (60 + 30) ms = 90 ms, or 0.09 s
d = 30 mm
So:
S = (2000 mm/s x 0.09 s) + 8(30 – 14) mm
S = 180 mm + 128 mm
S = 308 mm
Factors Affecting the Safe Distance
Formula
When light curtains are used for machine initiation, their minimum object
sensitivity must be 30 mm or less according to the EN 999 standard. (This
requirement may vary with other standards.) In machine initiation
applications:
•
Use the formula given in “Minimum Object Sensitivity is 40 mm or Less”
on page 34 to calculate the safe mounting distance, except
•
If the calculated value of S is less than 150 mm, use 150 mm as the safe
mounting distance.
WARNING
IMPROPER SETUP
If the calculated distance S is such that an operator can stand between
the barrier and the danger zone, additional protection is required, such as
a physical guard or barrier comprising several parts. Consult all applicable
standards.
Failure to follow this instruction can result in death or serious injury.
© 2008 Schneider Electric All Rights Reserved
35–EN
English
Angled Approach
XUSLB/XUSLDM Safety Light Curtain
Section 4—Preinstallation Considerations
XUSLB/XUSLDM Safety Light Curtain
Section 4—Preinstallation Considerations
US Safe Distance Formula
30072-451-85
02/2008
Two different formulas are used to calculate the minimum safe distance for
light curtains that are mounted vertically. One formula, as outlined in OSHA
1910.217, applies to the guarding of mechanical power presses, but should
serve as a guide for other machine applications. The American National
Standards Institute (ANSI) standard uses a newer formula which takes into
consideration more factors when calculating the minimum safe distance.
The basic formulas for calculating minimum safe mounting distances for
light curtains mounted vertically are in this section. These formulas apply to
all light curtains. ANSI B11.1 is listed below, OSHA 29 CFR 1910.217 is on
page 38.
US Safe Distance Formula ANSI B11.1
The ANSI B11.1 formula is shown on the next line, followed by a description
of each variable.
English
Ds = K x (Ts + Tc + Tr + Tbm) + Dpf
DS:
The minimum safe distance between the light curtain sensing area
and the nearest point of potential operation hazard.
K:
A hand-speed constant of 63 inches per second. This is the
minimum value accepted by ANSI standards. ANSI recognizes that
this constant may not be optimal, and that the user should consider
all factors before deciding on the value of K for use in the formula.
Ts:
The stopping time of the machine, as measured from the final control
device. Ts is measured at the maximum velocity.
Tc:
The time it takes the control circuit to activate the braking system.
NOTE: Ts and Tc are usually measured together by a stop time
measurement device.
Tr:
The response time of the XUSLB/LDM light curtain in milliseconds.
See Table 28 on page 87.
Tbm: The additional time that the brake monitor allows to compensate for
wear and variations in the stopping time. (Brake monitors stop the
machine when the stop time of the machinery exceeds a preset limit.)
NOTE: If a brake monitor is not installed on the machine, a factor
must be added to the measured stop time to include brake wear.
Generally, brake monitors allow approximately 20% to 25%
additional stop time. To determine the actual value, contact the
machine manufacturer.
WARNING
IMPROPER SET UP
When using an XPS Preventa module (XPS AFL) with the
XUSLB/XUSLDM control, add 20 ms to the response time.
Failure to follow this instruction can result in death or serious
injury.
36–EN
© 2008 Schneider Electric All Rights Reserved
30072-451-85
02/2008
XUSLB/XUSLDM Safety Light Curtain
Section 4—Preinstallation Considerations
Dpf:
(Depth Penetration Factor) The maximum travel toward the hazard
within the detection zone that may occur before a stop is signaled.
Depth penetration factors vary depending on the light curtain model
and the application.
Dpf is 0.9 m (36 in.) for an application that allows only a person’s arm
to reach through the detection zone—typically a model with three or
more beams. See Figure 9.
Dpf is 1.2 m (48 in.) for an application that allows a person to bend
over the detection zone and reach through it towards the hazard—
typically a two-beam model. See Figure 9.
Depth Penetration Factor Calculation
Dpf = 0.9 m (36 in.)
English
Figure 9:
Dpf = 1.2 m (48 in.)
1.2 m (48 in.) min.
0.9 m (36 in.) min.
0.2 m (7.9 in.)
The penetration depth factor is determined by using the Penetration
Depth Factor Chart from ANSI B11.1 (see Figure 10). Alternately,
the following ANSI formula can be used:
Dpf = 3.4 (S - 0.276), where
S = minimum object sensitivity.
Figure 10:
Penetration Depth Factor
Minimum Object Sensitivity (S) in Inches
2.5
2.0
1.5
1.0
0.5
0.0
0.0
1.0
2.0
3.0
4.0
5.0
6.0
7.0
8.0
Penetration Factor Dpf in Inches — Dpf = 3.4(S - 0.276)
© 2008 Schneider Electric All Rights Reserved
37–EN
XUSLB/XUSLDM Safety Light Curtain
Section 4—Preinstallation Considerations
US Safe Distance Formula OSHA CFR 1910.217
(c)(3)(iii)(e)
30072-451-85
02/2008
The OSHA formula is shown on the next line, followed by a description of
each variable.
Ds = 63 in. per second x Ts
Where:
DS: Minimum safe mounting distance (inches)
63 in. per second = hand speed constant
TS:
Stop time of the machine (press), as measured from the final control
element. It is measured to determine worst case time and maximum
velocity of the press, usually at 90° of press rotation on the
downstroke.
English
In addition to the formula above, we recommend that OSHA 1910.217
Table O-10 be followed. Table 13 shows the maximum width of
openings allowed for a guard based on the distance from the light
curtain to the point of operation hazard. The maximum width of the
opening shown in Table 13 corresponds to the minimum object
sensitivity of the light curtain.
Table 13:
OSHA 1910.217 Table O-10
Distance of Opening from Point of
Operation Hazard (inches)
Maximum Width of Opening (inches)
0.5–1.5
0.25
1.5–2.5
0.375
2.5–3.5
0.5
3.5–5.5
0.625
5.5–6.5
0.75
6.5–7.5
0.875
7.5–12.5
1.25
12.5–15.5
1.5
15.5–17.5
1.875
17.5–31.5
2.125
NOTE: If the guarded machine is not equipped with a stop time performance
monitor, a percentage increase factor should be applied to the stop time of
the machine to allow for braking system wear. Contact your machine
manufacturer for information.
Dpf: (Depth Penetration Factor) provides a factor to cover the possibility
that fingers or hands will penetrate through the sensing field before
detection occurs. This value is determined using the Penetration
Depth Factor Chart from ANSI B11.1 (see Figure 10 on page 37).
Alternately, the following ANSI formula can be used:
Dpf = 3.4 (S - 0.276), where:
S = minimum object sensitivity
38–EN
© 2008 Schneider Electric All Rights Reserved
30072-451-85
02/2008
XUSLB/XUSLDM Safety Light Curtain
Section 4—Preinstallation Considerations
ADDITIONAL MOUNTING
CONSIDERATIONS
DANGER
HAZARD OF ELECTRIC SHOCK, EXPLOSION, OR ARC FLASH
Whenever an end cap is removed:
• Disconnect power before removing the end cap.
• Replace the end cap before reapplying power.
Failure to follow these instructions will result in death or serious
injury.
English
WARNING
IMPROPER SETUP
• Read the information in this section completely before starting the
installation procedures beginning on page 46.
• An XUSLB/XUSLDM system should only be installed, checked, and
maintained by a qualified person as defined in Meeting Full Compliance
on page 9.
• The user must be familiar with the installation requirements, safe
mounting distance, system controls, and features before using the
XUSLB/XUSLDM system.
Failure to follow these instructions can result in death or serious
injury.
Reflective Surface Interference
A reflective surface—such as a machine part, mechanical guard, or
workpiece—near the detection zone can deflect the optical beam and
prevent an obstruction in the protected zone from being detected. In
Figure 11, for example, the obstruction is not detected because of the
reflection. The reflective object is inside the beam angle.
Figure 11:
Example of Reflective Surface Interference
Approach Direction
Center beam
Effective
Obstruction Beam
Width
Transmitter
Reflective Surface
eam ion
t
ed B
lect Interrup
f
e
R nts
e
v
Pre
Receiver
Perimeter of Danger Area
© 2008 Schneider Electric All Rights Reserved
39–EN
XUSLB/XUSLDM Safety Light Curtain
Section 4—Preinstallation Considerations
30072-451-85
02/2008
To prevent reflective surface interference, maintain a minimum distance (d)
between the reflective object and the center line of the XUSLB/XUSLDM
detection zone. Refer to Figure 12. In this example, the reflective object is
outside of the beam angle, so the obstruction is clearly detected.
Figure 12:
Minimum Distance Between Reflective Surface and
Detection Zone Prevents Interference
Operating Range
Approach Direction
English
Center beam
Obstruction
Transmitter
Receiver
d
Min. Distance
for Reflective Surface
Reflective Surface
Perimeter of Danger Area
Refer to Figure 13 for the minimum distances that must be maintained
between the reflective object and the center line of the detection zone as a
function of the light curtain’s operating range. Use the test procedure
beginning on page 113 to test for reflective surface interference.
Figure 13:
Minimum Distance from a Reflective Surface as a
Function of Operating Range
1.3m
Minimum Distance
1.1m
900
700
d (mm)
500
300
100
0 0.3m
2m
4m
6m
8m
10m
12m
14m
16m
18m
20m
Range (m)
40–EN
© 2008 Schneider Electric All Rights Reserved
30072-451-85
02/2008
Additional Guarding
XUSLB/XUSLDM Safety Light Curtain
Section 4—Preinstallation Considerations
Areas of the hazard zone that are not guarded by the XUSLB/XUSLDM
system must be protected by another suitable means, such as a fixed
barrier guard, an interlocked guard, or a safety mat. See Figure 14.
Figure 14:
Additional Guarding
English
LIGHT CURTAIN
S (Ds)
Hazard
Zone
Mechanical
Barrier
Supplemental
Guarding
Example
Safety Mat
© 2008 Schneider Electric All Rights Reserved
41–EN
XUSLB/XUSLDM Safety Light Curtain
Section 4—Preinstallation Considerations
When two or more light curtain systems are mounted in close proximity and
in alignment with each other, mount the transmitters and receivers back-toback, or stack them to prevent one light curtain from interfering with another.
See Figure 15.
3
Recommended
The light curtains are stacked, with the transmitters
facing in opposite directions.
NOTE: Separate the light curtain system, not the
flex unit extension.
42–EN
Receiver
Transmitter
Machine 2
Transmitter
Machine 1
Receiver
The receivers are mounted
back-to-back.
Receiver
Recommended
Machine 2
Receiver
2
Machine 1
Transmitter
English
This arrangement is subject
to interference between the
two light curtains.
Transmitter
Not Recommended
Receiver
1
Transmitter
Multiple Light Curtain Installation Configurations
Receiver
Figure 15:
Transmitter
Multiple Systems
30072-451-85
02/2008
Machine 1
© 2008 Schneider Electric All Rights Reserved
30072-451-85
02/2008
Scan Coding
XUSLB/XUSLDM Safety Light Curtain
Section 4—Preinstallation Considerations
The XUSLB or XUSLDM scan coding feature allows you to mount light
curtain systems in close proximity and in alignment with each other without
interference. The receiver and transmitter can be set to one of two scan
codes—A or B (see Start Up on page 53). The distinctive coding allows the
system to operate without interference while in view of another system with
different scan coding. See Figure 16. A PDM is required to change the scan
codes.
Scan Coding
English
Figure 16:
Other Infrared Transmitters
When using the XUSLB/XUSLDM light curtain in an environment containing
other infrared transmitters, follow the recommendations in Figure 17
(according to IEC 61496-2).
Figure 17:
Use with Other Infrared Transmitters
20 m
XUS-L• B/DM
XUS-L•B/DM
Maintain the distance d between the
optical axes of the XUSLB/XUSLDM
barrier and the optical axes of other
infrared transmitters. Refer to Table 14
for values of R and d.
Interfering Transmitter
d
R
Table 14:
Distances Illustrated in Figure 17
R
m (in.)
d
mm (in.)
0.5 (19.68)
270 (10.63)
0.75 (29.52)
260 (10.24)
1.50 (59.05)
260 (10.24)
3.0 (118.11)
250 (9.84)
5.0 (196.85)
440 (17.32)
7.0 (275.59)
620 (24.40)
8.0 (314.96)
700 (27.56)
10 (393.70)
840 (33.07)
15 (590.55)
1250 (49.21)
NOTE: The XUSLB/XUSLDM light curtains are not sensitive to flashing
lights, rotating flashing lights, welding sparks, or flashes.
© 2008 Schneider Electric All Rights Reserved
43–EN
XUSLB/XUSLDM Safety Light Curtain
Section 4—Preinstallation Considerations
30072-451-85
02/2008
English
44–EN
© 2008 Schneider Electric All Rights Reserved
30072-451-85
02/2008
XUSLB/XUSLDM Safety Light Curtain
Section 5—Installation, Wiring, and Startup
SECTION 5— INSTALLATION, WIRING, AND STARTUP
PARTS LIST
English
A
SVT
CDV03
0100-483
4
B
E
30VDC
TVS
4384-0010
C
F
D
H
I
G
J
K
A. Instruction bulletin CD ROM
B. Arc suppressors (2)
C. Receiver connection cable XSZBCR (ordered separately)
D. XUSLB/DM receiver
E. XUSLDS transmitter
F. Mounting bracket hardware (4 sets)
G. XUSLB/DM transmitter
H. XUSLDS receiver
I.
Mounting brackets (4)
J. Testing object
K. Transmitter connection cable XSZBCT (ordered separately)
© 2008 Schneider Electric All Rights Reserved
45–EN
XUSLB/XUSLDM Safety Light Curtain
Section 5—Installation, Wiring, and Startup
MOUNTING THE LIGHT CURTAIN
30072-451-85
02/2008
NOTE: Before mounting the light curtain, read “Safe Mounting Distance” on
page 31.
To mount the light curtain (refer to Figure 18 for lettered callouts):
1. If you are installing the light curtain in a high-vibration environment,
install a shock-mount kit (see Figure 19) on the mounting area before
mounting the light curtain. Refer to Shock Mount Kit on page 107 to
select the kit that is appropriate for your application.
2. Using the mounting hardware (F) provided, install the mounting brackets
(A) on both ends of the receiver (B) and transmitter (C). Tighten the
hardware to 6 lb-in (0.68 N•m).
English
3. Connect the cables to the receiver and the transmitter. The receiver
cable end (D) has a red 8-pin connector, and the transmitter cable end
(E) has a black 5-pin connector.
4. Observing the safe mounting distance, mount the receiver and the
transmitter on the machine in the same plane and at equal height. Refer
to page 55 for alignment considerations. Refer to Preinstallation
Considerations beginning on page 31 for mounting considerations.
5. Wire the light curtain as illustrated on page 49 (wiring with final switching
devices) or page 50 (wiring with an XPS safety relay module). Refer to
Wiring the Light Curtain beginning on page 47 for complete wiring
information.
Figure 18:
Mounting the Light Curtain
A
B
D
C
E
F
Figure 19:
46–EN
Shock-Mount Kit Detail
© 2008 Schneider Electric All Rights Reserved
30072-451-85
02/2008
XUSLB/XUSLDM Safety Light Curtain
Section 5—Installation, Wiring, and Startup
WIRING THE LIGHT CURTAIN
WARNING
IMPROPER CONNECTION
• The XUSLB/XUSLDM light curtain is designed for use only on a 24 Vdc
negative ground (functional ground) electrical system.
• The XUSLB/XUSLDM light curtain safety outputs are designed for a 24
Vdc system.
Failure to follow these instructions can result in death or serious
injury.
WARNING
IMPROPER CONNECTION
• The XUSLB/XUSLDM light curtain must be connected using both safety
outputs.
• Never use only a single safety output to control a machine.
Failure to follow these instructions can result in death or serious
injury.
CAUTION
IMPROPER GROUNDING
Never connect the earth ground of the power supply to 0 Vdc.
Failure to follow this instruction can result in equipment damage.
The XUSLB/XUSLDM system operates directly from a 24 Vdc ±20% power
supply. The power supply must meet the requirements of IEC 60204-1 and
IEC 61496-1. Telemecanique part number ABL8RPS24030 is
recommended. Never connect the earth ground to 0 Vdc.
© 2008 Schneider Electric All Rights Reserved
47–EN
English
• Never connect the XUSLB/XUSLDM light curtain to a positive ground
(protective earth) system.
XUSLB/XUSLDM Safety Light Curtain
Section 5—Installation, Wiring, and Startup
Electrical Connections
30072-451-85
02/2008
Figure 20:
Receiver Connections (M12, 8-Pin)
NOTE: As viewed from the M12
connection on the endcap of the receiver.
5
6
4
7
3
2
1
8
Pin–Wire Color Description
English
1–Brown
+24 Vdc
2–Blue
0 Vdc
3–Green
Ground
4–White
OSSD 2
5–Yellow
Start
6–Red
EDM/MPCE
7–Pink
Auxiliary output
8–Black
OSSD 1
NOTE: OSSD = Output safety switching device
Figure 21:
Transmitter Connections (M12, 5-Pin)
5
4
3
1
2
NOTE: As viewed from the M12 connection
on the endcap of the transmitter.
Pin–Wire Color Description
1-Blue
0 Vdc
2-Brown
24 Vdc
3-White
MTS
4-Black
MTS return
5-Green
Ground
NOTE: MTS = Machine test signal.
48–EN
© 2008 Schneider Electric All Rights Reserved
30072-451-85
02/2008
XUSLB/XUSLDM Safety Light Curtain
Section 5—Installation, Wiring, and Startup
System Diagrams
Figure 22:
For connection schematics, refer to page 51.
XUSLB/DM/DS Wiring with Final Switching Devices
HV
LVLV C C HV
Telemecanique
Telemecanique
Receiver
Power
Supply
(ABL8•)
1L1
1L1
3L2
3L2
English
Note: XUSLDS: connected
to XUSLDM or XUSLDS only
OSSD11
5L3
5L3
A1A1
1313 NONO 2121NCNC
LC1
DO9
LC1
DO9
4384-0010
4384-0010
30VDC
1414 NONO2222 NCNC
2T1
2T1
4T2
4T2
Green
Green
Blue-Blue
Brown++
Brown
Red
Red
Black
Black
White
White
Yellow
Yellow
Pink
Pink
SQUARE
SQUARE
D D
TVS
30VDC
TVS
Telemecanique
Telemecanique
FSD12
A2A2
6T3
6T3
Transmitter
OSSD21
1L1
1L1
3L2
3L2
5L3
5L3
A1A1
1313 NONO 2121NCNC
LC1
DO9
LC1
DO9
FSD22
1414 NONO2222 NCNC
2T1
2T1
4T2
4T2
Note:
XUSLB or
XUSLDM
TVS
4384-0010
30VDC
TVS
30VDC
SQUARE
SQUARE
D D
4384-0010
Telemecanique
Telemecanique
Green
Green
Blue-Blue
Brown++
Brown
White
White
A2A2
6T3
6T3
Black
Black
Start
START
START
3
OPTION
OPTION
N.C.
OPTION
OPTION
CC
BB
OPTION
OPTION
AA
Telemecanique
Telemecanique
Telemecanique
Telemecanique
PLC
PLC
PLC
PLC
PWR
RUN
PWR
ERR
RUN
STAT
ERR
STAT
013
2
012
012345
012345
IN IN
PWR
RUN
PWR
ERR
RUN
STAT
ERR
STAT
012345
012345
013
2
012
IN IN
3
OUT
OUT
3
OUT
OUT
Non-Safety
Auxiliary
Output
(PNP or
NPN)
N.C.
Machine Test Signal
© 2008 Schneider Electric All Rights Reserved
1
OSSD: Output safety switching device.
2
FSD: Final switching device.
3
In the default state (Automatic Start active and EDM/MPCE inactive) the red and yellow wires
are wired to system 0 V. The dotted lines represent use of a start button and EDM/MPCE
active.
49–EN
XUSLB/XUSLDM Safety Light Curtain
Section 5—Installation, Wiring, and Startup
30072-451-85
02/2008
For the configuration illustrated in Figure 23, the device must be in Automatic Start mode.
Figure 23:
LV
C
XUSLB or XUSLDM Wiring with XPS Safety Relay Module
HV
Segment
Receiver
Segment
Transmitter
Telemecanique
Note: XUSLDS: connected
to XUSLDM or XUSLDS only
Power
Supply
English
Green
Blue Brown +
Red
Black
White
Yellow
Pink
13 23 24 33
A1 S33 S34 S39
Telemecanique
PREVENTA
TYPE
XPS-AFL
A1/A2
Fuse
Master
Receiver
K1
K2
Master
Transmitter
13 23 33
K1
K2
14 24 34
XPS
Module
A2
14
Note:
XUSLB or
XUSLDM
S11 S12 S12
S11 S22
34
OSSD11
Green
Blue Brown +
White
OSSD21
Start
Black
START
N.O.
OPTION
OPTION
C
B
OPTION
A
Telemecanique
Telemecanique
PLC
PLC
IN
012345
PWR
RUN
ERR
STAT
IN
PWR
RUN
ERR
STAT
012345
012
012
3
OUT
3
OUT
Non-Safety
Auxiliary
Output
(PNP or
NPN)
N.C.
Machine Test Signal
50–EN
1
OSSD: Output safety switching device.
2
In the default state (Automatic Start active and EDM/MPCE inactive) the red and yellow wires
are wired to system 0 V. The dotted lines represent use of a start button depending on the
version of XUSLB or XUSLDM.
© 2008 Schneider Electric All Rights Reserved
30072-451-85
02/2008
XUSLB/XUSLDM Safety Light Curtain
Section 5—Installation, Wiring, and Startup
Connection Schematics
Connecting to a Safety Monitoring Device
The wiring from the XUSLB/XUSLDM system to the machine control circuit
must be control reliable as described in ANSI B11.19-1990 and on page 9 of
this manual. Solid state outputs should be connected only to a control
reliable, safety-rated PLC, or to a control reliable safety-rated machine
system.
General Connection
The K1 and K2 control relays must provide force guided relay outputs
for machine control. OSSD safety outputs 1 and 2 are connected to the
control relays and provide the power necessary to energize the relays.
See Figure 24 for the preferred connection method using the relays. The
non-safety alarm output of the XUSLB/XUSLDM system can be used to
signal light curtain status to a PLC.
Figure 24:
N
General Connection
L
F1
L
XUSLB/XUSLD Receiver
XUSLB/XUSLD
Transmitter
Power
Supply
1
OSSD2
To PLC
Black
White
5
2
K1
Blue
GND 0V 24V MTS MTS Ret
White
Black
Pink
Yellow
Red
Brown
Blue
Green
Start AUX OSSD1
GND 0V 24V EDM/
MPCE
Green
6
GND 0V 24V
Brown
GND N
Test
K2
K1
K2
Start
4
3
1
For testing prior to installation, the user may select EDM/MPCE
Off (default factory setting). In this case the EDM/MPCE line
(red wire) must be connected to the system 0 V line.
4
4
The EDM/MPCE coils must be suppressed with the arc suppressors
provided in the documentation kit.
2
Non-safety auxiliary output connect to PLC (optional).
5
If not using MTS function, short out.
If Remote Start is not used, connect the start line (yellow wire)
to 0 V.
6
Power supply 24 Vdc, complying with IEC 61496-1 and IEC 60204-1
3
NOTES:
The K1 and K2 relays must have force guided contacts.
When used close to a motor driven by a drive controller, verify that all
frames (motor, drive controller, light barriers) are tied to the same
ground connection.
© 2008 Schneider Electric All Rights Reserved
51–EN
English
However, safety related monitoring devices are now available. Note that all
safety inputs are directed to the monitoring device which also performs the
EDM/MPCE monitoring function.
XUSLB/XUSLDM Safety Light Curtain
Section 5—Installation, Wiring, and Startup
30072-451-85
02/2008
Connecting Via XPSAFL (Including Extension
Cables XSZ-BCT, XSZ-BCR)
Figure 25:
Control Cabinet
L
K3
L
N
Connecting with an XPSAFL Module
Start
K4
F3
F4
F1
S33
A1
13 23
S34 S39
33
Control Circuit
K1
L
GND N
T
Power
Supply
K3
LOGIC
XPSAFL
K2
K4
4
14 24
K3
To PLC
Signalling
N
OSSD1
MTS
Black
GND 0V 24V
White
OSSD2
XUSLB/XUSLD Receiver
Auxiliary output connection to PLC (optional).
Brown
Black
Pink
Yellow
Start AUX
Green
MPCE
Test
White
0V 24V EDM/
3
1
Red
Brown
Blue
Green
1
GND
34
K4
Blue
English
S11 S12 S11 S22
A2
GND 0V 24V
MTS Ret
XUSLB/XUSLD Transmitter
3
The light curtain must be configured with Automatic Start and EDM/MPCE
inactive.
4
Power supply 24 Vdc complying with IEC 61496-1 and IEC 60204-1.
NOTE:
The K3 and K4 relays must have force guided contacts.
52–EN
© 2008 Schneider Electric All Rights Reserved
30072-451-85
02/2008
XUSLB/XUSLDM Safety Light Curtain
Section 5—Installation, Wiring, and Startup
START UP
Before starting the XUSLB/XUSLDM Safety Light Curtain, perform the
following steps:
1. Verify that the wiring, power supply voltage, and polarity of connections
are correct.
2. Apply power to the system.
3. Check the LEDs as described in Checking the LEDs and Aligning the
Transmitter and Receiver below.
Checking the LEDs and Aligning the
Transmitter and Receiver
Figure 26:
English
4. Adjust the alignment of the transmitter and the receiver using the beam
indicators. See Checking the LEDs and Aligning the Transmitter and
Receiver below and Troubleshooting on page 73.
LEDs and Beam Indicators
Beam
Indicators
XUSLDS
Table 15:
LEDs
Transmitter
LED
Receiver LEDs
Amber: FB or
1
ECS/B
Yellow: Interlock
OK
Yellow: Status
XUSLD/XUSLDM
Receiver LEDs
Transmitter LED
When
illuminated, the
When
light curtain is
When
illuminated, the
waiting for the
illuminated, the
transmitter is
start button to be
light curtain is
emitting a beam.
pushed; the
operating in a
When blinking,
guarded machine
reduced resolution
the system is in an
is not operating.
mode.
alarm condition.
When blinking,
the system is in an
alarm condition.
1
© 2008 Schneider Electric All Rights Reserved
Red: Stop
Green: Run
☛
When
illuminated, the
light curtain is
blocked and the
guarded machine
is not operating.
When
illuminated, the
guarded machine
is operating.
ECS/B: Exact Channel Select (Fixed) Blanking
FB: Floating blanking
53–EN
XUSLB/XUSLDM Safety Light Curtain
Section 5—Installation, Wiring, and Startup
30072-451-85
02/2008
Aligning the Transmitter and Receiver
The beam indicators and the optical synchronization beam indicators on the
transmitter and receiver must be properly aligned before operation.
Beam Indicators
When the transmitter and the receiver are not aligned, every other
individual beam indicator will be illuminated. When the transmitter and the
receiver are aligned, none of the beam indicators will be illuminated. When
any beam is blocked or out of alignment, the beam indicator of the blocked
channel will be illuminated.
Table 16 lists normal system states at power up and the associated LED
indications. If you do not achieve the LED designations listed in Table 16,
refer to the Troubleshooting section beginning on page 73.
English
Table 16:
LED Indications at Power Up
These LED Patterns:
With These Detection Options:
Indicate These
System States:
Transmitter LED Receiver LEDs Exact Channel
Select (Fixed)
Illuminated
Illuminated
Blanking Active
Floating
Blanking Active
Monitored
Blanking Active
Yellow
Red
No
No
No
Transmitter and receiver are not in alignment.
Yellow
Green
No
No
No
Transmitter and receiver are in alignment.
Yellow
Amber and Green
Yes
No
No
Transmitter and receiver are in alignment with the
programmed obstruction.
Yellow
Amber and Green
No
Yes
No
Transmitter and receiver are in alignment.
Yellow
Amber and Green
Yes
Yes
No
Transmitter and receiver are in alignment with the
programmed obstruction.
Yellow
Amber and Red
Yes
No
No
Transmitter and receiver are in alignment with the
programmed obstruction removed.
Yellow
Amber and Red
Yes
Yes
No
Transmitter and receiver are in alignment with the
programmed obstruction removed.
Yellow
Amber and Green
Yes
No
Yes
Transmitter and receiver are in alignment with the
programmed obstruction.
Yellow
Amber and Red
Yes
No
Yes
Transmitter and receiver are in alignment with the
programmed obstruction removed.
Yellow
Amber and Green
No
No
Yes
Transmitter and receiver are in alignment with the
programmed obstruction.
Yellow
Amber and Red
No
No
Yes
Transmitter and receiver are in alignment with the
programmed obstruction removed.
54–EN
© 2008 Schneider Electric All Rights Reserved
30072-451-85
02/2008
XUSLB/XUSLDM Safety Light Curtain
Section 5—Installation, Wiring, and Startup
Optical Synchronization
Synchronization between the XUSLB/XUSLDM system transmitter and
receiver is optical, which means, the system does not use one specific
beam.
When programming for fixed or monitored blanking, the size of the fixed or
monitored blanking fields must comply with the number of consecutive clear
beams within the first segment. Refer to Table 17. In addition, there must be
at least one clear beam on each flex segment.
Table 17 displays the synchronization beam requirements for each light
curtain beam count.
Table 17:
Alignment
Synchronization Requirements
Light Curtain Beam Count
Synchronization Beam Requirement
12 – 16
6 consecutive clear beams
17 – 32
7 consecutive clear beams
33 – 64
8 consecutive clear beams
65 – 128
9 consecutive clear beams
129 – 256
10 consecutive clear beams
Receiver Red LED Is Always Illuminated.
If the Yellow LED on the transmitter is illuminated:
1. Realign the transmitter and receiver:
— Alignment of the transmitter and receiver is easiest when the system
is in Automatic Start operating mode with Fixed Blanking inactive.
— The transmitter and receiver must be in the same plane and at equal
height.
— The transmitter and receiver are aligned when the blocked beam
indicators on the receiver are off.
— Ensure that the alignment position is stable. Verify that a small
deviation of the receiver or transmitter around the alignment position
does not cause the blocked beam indicators to illuminate.
2. Verify the synchronization of the light curtain system.
If the Yellow LED on the transmitter is not illuminated:
1. Ensure that cable connections are secure.
2. Ensure that the power supply is 24 Vdc ±20%.
3. Verify that the machine test signal (MTS) wiring is tied to the MTS return.
If the Yellow LED on the transmitter is blinking, the light curtain is in an
alarm condition.
© 2008 Schneider Electric All Rights Reserved
55–EN
English
The system requires a predetermined number of consecutive clear beams
within the first master segment to establish synchronization. If this
requirement is not satisfied, the system will enter a Machine Stop state and
every other individual beam indicators will illuminate. When the beams are
clear, the system will re-synchronize and enter a state consistent with its
operating mode. Once synchronization is established, it can be maintained
as long as the required number of consecutive clear beams can be satisfied
anywhere in the system (including flex systems).
XUSLB/XUSLDM Safety Light Curtain
Section 5—Installation, Wiring, and Startup
30072-451-85
02/2008
English
56–EN
© 2008 Schneider Electric All Rights Reserved
30072-451-85
02/2008
XUSLB/XUSLDM Safety Light Curtain
Section 6—Muting (XUSLDM Only)
SECTION 6— MUTING (XUSLDM ONLY)
The mute mode is active only when the correct sequence of mute sensor
input signals is achieved. The object of the correct muting sensor selection
and orientation is to always recognize the presence of the work piece
material as the intended means to start or stop the muting sequence. Any
entry into the detection zone by any animate or inanimate object will result in
a stop signal being sent to the guarded machine.
When the XUSLDM system is in the Mute state, an indicator lamp for each
safety channel illuminates. These lamps must be visible to all personnel in
the immediate area.
The XUSLDM light curtains provide a muting function through the use of an
XPSLCM1 wiring module. The XPSLCM1 wiring module serves as a
termination point for the muting sensors and muting lamp, and connects to
the end connector of an XUSLDM receiver. See Figure 27.
WARNING
UNEXPECTED OUTPUT OPERATION
Sensor position and sequence activation determine the muting function.
Verify that muting is functioning before commissioning the light curtain.
Failure to follow these instructions can result in death or serious
injury.
Figure 27:
Muting Function using XPSLCM1 wiring module
Muting Sensors
SR-1
SX-2
SR-2
SX-3
SR-3
SX-4
SR-4
+24 Vdc
Lamp
Z1
Z2
S11 S12
B1
B2
X1
X2
XPSLCM1
SX-1
XUSLDM
Transmitter
© 2008 Schneider Electric All Rights Reserved
A1
A2
31
32
13
14
23
24
Machine
Control
Cabinet
XUSLDM
Receiver
57–EN
English
Muting bypasses the protective function on safety related control systems,
such as the XUSLDM system, during a predetermined, non-hazardous
portion of the machine’s operation.
XUSLB/XUSLDM Safety Light Curtain
Section 6—Muting (XUSLDM Only)
30072-451-85
02/2008
Use of the muting function requires special precautions by the safety system
machine controller, installer, operator, and employer. The following
information is only a partial list of requirements for muting applications and
is not intended to be a complete guide to muting standards. The employer
must contact the local safety authority for specific requirements regarding
the machine, machine controller, and safety-related control system.
Schneider Electric provides the following information for reference only, and
makes no claim regarding its accuracy, completeness, or effectiveness for a
specific application.
English
•
Mute the light curtain only during the non-hazardous portion of the
machine cycle.
•
If the machine tool has reversing capability that could cause a muting
hazard, provide a control scheme that includes an automatic method of
preventing muting in the reverse direction.
•
Provide one or more visual indicator(s) that illuminate when the light
curtain is in a muted condition.
•
Ensure that the light curtain cannot enter a mute condition when a fault
is present.
•
Ensure that the mute indicator(s) are visible from any normal machine
operator position and from the position from which any muting
adjustments are normally carried out.
•
Provide at least two, independent muting signal sources with the
XPSLCM1 wiring module. A single, simple cam-operated limit switch is
inadequate as a muting signal source since its failure can remain
undetected.
•
Ensure that the guarded machine is able to stop anywhere in its cycle.
Do not use an XUSLDM/DS as a cascaded system on a press with a
full-revolution clutch.
•
Ensure that additional guarding is used to limit access to any danger
zone not covered by the safety device system. See Additional Guarding
When Using Exact Channel Select (Fixed) Blanking, Monitored
Blanking, or Floating Blanking on page 30
The enforcement of these requirements is beyond the control of Schneider
Electric. The employer has the sole responsibility to follow the preceding
requirements and any other procedures, conditions, and requirements
specific to his machinery.
58–EN
© 2008 Schneider Electric All Rights Reserved
30072-451-85
02/2008
XUSLB/XUSLDM Safety Light Curtain
Section 6—Muting (XUSLDM Only)
APPLICATIONS EXAMPLES
Application Information
This section contains several examples of how the XPSLCM1 wiring module
may be used with various sensor arrangements to start and end the muting
sequence.
Selection and Orientation of
Muting Sensors
Select and orient the muting sensors so that they recognize the presence of
the work piece as the condition for starting or stopping the muting
sequence. The presence of any person in the detection zone of the muting
sensors must never initiate a muting sequence.
The proper selection, installation, and orientation of the muting sensors are
the sole responsibility of the employer and installer. The following
recommendations must be observed, especially in applications involving
conveyors.
Muting Options
•
Ensure that the muting sensors detect the material, and not the
transportation means, such as a pallet, cart, or other transport device.
•
Ensure that a person on the transport device cannot initiate muting and
enter the danger zone.
•
Do not allow interruption in the sensing of the material while the material
passes the muting sensors. The detection of the material should be
continuous over its length.
•
If using photoelectric sensors, do not allow reflective material to interrupt
or cause optical paths among different sensors. Do not allow sensors in
adjacent areas to interfere with each other or provide false indication.
•
Position the sensors such that before a new load of material is detected
by the first sensor, the prior material has passed the last sensor, and all
muting sensors are deactivated for a period of time.
•
Consider the overall speed and cycle of the material as it moves through
the process. Allow time for evaluating the muting sensors’ output before
the material reaches the safeguarding device.
•
Detect and prevent people from entering the hazardous area of the
machine. The safeguarding device must be able to send a stop signal to
the machine before a person enters the danger zone. Other
safeguarding methods, such as physical barriers or fences, may be
necessary.
When the XUSLDM is used with an XPSLCM1 it offers a full selection of
muting configurations that are activated with the PDM. The following list
includes available muting functions:
•
•
•
•
•
•
•
© 2008 Schneider Electric All Rights Reserved
Two-sensor muting
Three-sensor muting
Four-sensor muting: (bi-directional or uni-directional selectable)
Dual four-sensor muting: (bi-directional or uni-directional selectable)
Adjustable sensor input filtering: (50 to 500 ms)
Mute Bypass allowed
Mute Timeout limit: 2 minutes or no-timeout selectable
59–EN
English
Although photoelectric sensors are used in the example, other types of
sensors, such as limit switches, inductive proximity sensors, and ultrasonic
sensors may be used as sensor inputs to the XPSLCM1 wiring module.
XUSLB/XUSLDM Safety Light Curtain
Section 6—Muting (XUSLDM Only)
30072-451-85
02/2008
TWO-SENSOR MUTING SYSTEM
WARNING
IMPROPER SETUP OR INSTALLATION
Position the muting sensors in such a way that personnel cannot activate
the sensors in a sequence which will permit them to pass through the light
curtain protection field undetected.
Failure to follow these instructions can result in death or serious
injury.
Figure 28 illustrates a conveyor belt muting system using a two-sensor
configuration. The two-sensor configuration is bi-directional.
English
Figure 28:
Sensor 1
Two-Sensor System Diagram
Light
Curtain
Object
Sensor 2
Sensor 1
Conveyor
Light
Curtain
Light
Curtain
Sensor 2
Light
Curtain
Sensor 1
Light
Curtain
Sensor 2
Table 18:
Bi-Directional
Light
Curtain
Conditions Required to Transition to Muting State –
Two Sensor System
State Mute Enable Sensor 1 Sensor 2 Sensor 3 Sensor 4
1
60–EN
Off
X1
X1
X1
System
Status
X1
Protected
2
2
On
Off
Off
XX
XX2
Protected
3
On
Off
On
XX2
XX2
Protected
4
On
On
Off
XX2
XX2
Protected
5
On
On
On
XX2
XX2
Muted
1
The system status is not dependent on the state of this sensor.
2
Under normal conditions, these sensor inputs should not be connected. When
muting has been enabled through the PDM, if at anytime these sensor inputs
become active, the muting system will transition to the Lockout (Fault) state.
© 2008 Schneider Electric All Rights Reserved
30072-451-85
02/2008
Two Switch Muting System
XUSLB/XUSLDM Safety Light Curtain
Section 6—Muting (XUSLDM Only)
The two switch muting system is a special muting application. Figure 29
illustrates muting on a mechanical press using two switches to sense when
to enter the Muting state. Bottom dead center (BDC) is the point at which
the tool is closest to the die. Top dead center (TDC) is the point at which the
tool is furthest from the die.
Figure 29:
Muting a Mechanical Press
Switch 2
2
Switch 1
2
1
1
2
1
1
2
2
2
1
4
3
1
6
5
Closing Stroke
English
TDC
Opening Stroke
Opening Stroke
Closing Stroke
BDC
Protected
Two-Sensor System Requirements
Muting
Started
Muting in
Progress
Muting
Maintained
Muting
Interrupted
Protected
In a two-sensor system, the following conditions must be met for the system
to enter the Muting state:
•
Sensor 1 must be a dark-on type sensor with a PNP-type output, or a
switch that closes its contact to provide +24 Vdc when muting is
permitted.
•
Sensor 2 must be a light-on type sensor with a PNP-type output, or a
switch that opens its contact when muting is permitted.
•
In a two-sensor system, each sensor must transition to the On state
within 3 seconds of each other for the Muting state to occur.
Figure 30:
Two Sensor Muting System Waveform Diagram
Muting State
ON State
Sensor-1 Input
(Dark -On type sensor)
OFF
OFF
< 3 sec.
Sensor-2 Input
(Light -On type sensor)
OFF
ON State
OFF
ON State
XUSLDM Safety
Outputs (OSSD)
OFF
ON State
Mute Lamp
Output
© 2008 Schneider Electric All Rights Reserved
OFF
OFF
61–EN
XUSLB/XUSLDM Safety Light Curtain
Section 6—Muting (XUSLDM Only)
30072-451-85
02/2008
THREE-SENSOR MUTING SYSTEM
WARNING
IMPROPER SETUP OR INSTALLATION
Position the muting sensors in such a way that personnel cannot activate
the sensors in a sequence which will permit them to pass through the light
curtain protection field undetected.
Failure to follow these instructions can result in death or serious
injury.
English
The three-sensor muting system is an uni-directional system. In a threesensor system, the following conditions must be met for the system to enter
the muting state:
•
Sensor 3 is used as a direction detector, and must transition to the On
state prior to the activation of sensor pair 2 and 1.
•
•
Sensor pair 2 and 1 must activate within 3 seconds of each other.
Sensor 3 must turn Off before Sensor 2 or 1.
Figure 31 illustrates a muting system used in a three-sensor conveyor belt
configuration.
Figure 31:
Three-Sensor System Design
Sensor 1
Light
Curtain
Conveyor
Object
Sensor 3
Sensor 2
Sensor 1
Light
Curtain
Light
Curtain
Object
Sensor 3
Sensor 2
Sensor 1
Light
Curtain
Light
Curtain
Object
Sensor 3
62–EN
Sensor 2
Light
Curtain
© 2008 Schneider Electric All Rights Reserved
30072-451-85
02/2008
XUSLB/XUSLDM Safety Light Curtain
Section 6—Muting (XUSLDM Only)
Conditions Required to Transition to Muting State –
Three-Sensor System
State Mute Enable Sensor 1 Sensor 2 Sensor 3 Sensor 4
1
Off
X1
X1
X1
X1
2
On
Off
Off
Off
XX2
Protected
3
On
Off
Off
On
XX2
Protected
4
On
On
On
On
XX2
Muted3
Off
2
Muted3
5
Three-Sensor System Requirements
System
Status
On
On
On
XX
Protected
1
The system status is not dependent on the state of this sensor.
2
Under normal conditions, these sensor inputs should not be connected. When
muting has been enabled through the PDM, if at anytime these sensor inputs
become active, the muting system will transition to the Lockout (fault) state.
3
Muting will occur if sensor 3 is on in proper sequence as detailed in this section.
English
Table 19:
In a three-sensor system, the following conditions must be met for the
system to enter the muting state:
•
Sensors 1 and 3 must be a dark-on type sensors with a PNP-type
output, or a switch that closes its contact to provide +24 Vdc when
muting is permitted.
•
Sensor 2 must be a light-on type sensor with a PNP-type output, or a
switch that opens its contact when muting is permitted.
•
•
Sensor 3 must activate at least 0.05 seconds before sensors 1 and 2.
•
Sensor 3 must remain active until both sensors 1 and 2 activate.
Activation of both sensor 1 and 2 must be within 3 seconds of each
other.
Figure 32:
Three-Sensor Muting System Waveform Diagram
Muting State
ON State
Sensor-3 Input
(Dark -On type sensor)
OFF
ON State
Sensor-1 Input
(Dark -On type sens or)
OFF
OFF
< 3 sec.
Sensor-2 Input
(Light -On type sensor)
XUSLDM Safety
Outputs (OSSD)
OFF
ON State
OFF
ON State
OFF
ON State
Mute Lamp
Output
© 2008 Schneider Electric All Rights Reserved
OFF
OFF
63–EN
XUSLB/XUSLDM Safety Light Curtain
Section 6—Muting (XUSLDM Only)
30072-451-85
02/2008
FOUR-SENSOR MUTING SYSTEM
WARNING
IMPROPER SETUP OR INSTALLATION
Position the muting sensors in such a way that personnel cannot activate
the sensors in a sequence which will permit them to pass through the light
curtain protection field undetected.
Failure to follow these instructions can result in death or serious
injury.
English
The four-sensor muting systems is a bi-directional system. In a four-sensor
system, sensor pair 1 and 2, or sensor pair 3 and 4 must transition to the On
state and activate within 3 seconds of each other before the system can
enter the muting state. Since the conveyor is bidirectional, either sensor 1 or
4 can activate first within the sequence.
Figure 33 illustrates a muting system used in a four-sensor conveyor belt
configuration.
64–EN
© 2008 Schneider Electric All Rights Reserved
30072-451-85
02/2008
XUSLB/XUSLDM Safety Light Curtain
Section 6—Muting (XUSLDM Only)
Figure 33:
Four-Sensor System Diagram
Light
Curtain
Bi-Directional
Conveyor
Object
Light
Curtain
Sensor 1 Sensor 2
Sensor 3 Sensor 4
Light
Curtain
Bi-Directional
English
Conveyor
Object
Light
Curtain
Sensor 1 Sensor 2
Sensor 3 Sensor 4
Light
Curtain
Bi-Directional
Conveyor
Object
Light
Curtain
Sensor 1 Sensor 2
Sensor 3 Sensor 4
Light
Curtain
Bi-Directional
Object
Conveyor
Light
Curtain
Sensor 1 Sensor 2
Sensor 3 Sensor 4
Light
Curtain
Bi-Directional
Object
Light
Curtain
Sensor 1 Sensor 2
Table 20:
Conditions Required to Transition to Muting State –
Four-Sensor System
State
Mute Enable
Sensor 1
Sensor 2
Sensor 3
Sensor 4
System
Status
1
Off
X1
X1
X1
X1
Protected
2
On
Off
Off
Off
Off
Protected
3
On
On
Off
Off
Off
Protected
4
On
On
On
Off
Off
Muted
5
On
On
On
On
Off
Muted
6
On
On
On
On
On
Muted
7
On
Off
On
On
On
Muted
8
On
Off
Off
On
On
Muted
9
On
Off
Off
Off
On
Protected
1
© 2008 Schneider Electric All Rights Reserved
Sensor 3 Sensor 4
The system status is not dependent on the state of this sensor.
65–EN
XUSLB/XUSLDM Safety Light Curtain
Section 6—Muting (XUSLDM Only)
Four-Sensor System Requirements
30072-451-85
02/2008
In a four-sensor system, the following conditions must be met for the system
to enter or remain in the muting state:
English
•
Sensors 1 and 3 must be dark-on type sensors with a PNP-type output,
or a switch that closes its contact to provide +24 Vdc when muting is
permitted.
•
Sensors 2 and 4 must be light-on type sensors with a PNP-type output,
or a switch that opens its contact when muting is permitted.
•
Sensor pair 1 and 2 must activate within 3 seconds of each other.
Sensor pair 3 and 4 must also activate within 3 seconds of each other.
•
The sequence of sensor activation is as follows: sensor 1 must activate
before sensor 2, followed by sensor 3, and finally, sensor 4; or, the
sequence may be in reverse direction—sensor 4 activates before sensor
3, followed by sensor 2, and finally, sensor 1. The time lapse between
sensor activation must be at least 0.05 seconds.
•
To stay in muting state, sensor pair 1 and 2 must remain active until
sensor pair 3 and 4 activate. In reverse direction, sensor pair 3 and 4
must remain active until sensor pair 1 and 2 activate.
Figure 34:
Four-Sensor Muting System Waveform Diagram
Muting State
ON State
Sensor-1 Input
(Dark -On type sensor)
Sensor-2 Input
(Light -On type sensor)
OFF
OFF
< 3 sec.
OFF
OFF
ON State
ON state
Sensor-3 Input
(Dark -On type sensor)
OFF
Sensor-4 Input
(Light -On type sensor)
XUSLDM Safety
Outputs (OSSD)
OFF
< 3 sec.
OFF
OFF
ON State
OFF
ON State
Mute Lamp
Output
66–EN
OFF
OFF
© 2008 Schneider Electric All Rights Reserved
30072-451-85
02/2008
XUSLB/XUSLDM Safety Light Curtain
Section 6—Muting (XUSLDM Only)
DUAL FOUR-SENSOR MUTING SYSTEM
WARNING
IMPROPER SETUP OR INSTALLATION
Position the muting sensors in such a way that personnel cannot activate
the sensors in a sequence which will permit them to pass through the light
curtain protection field undetected.
The dual four-sensor muting systems is a bi-directional system.The dual
four-sensor system does not require the same time sequence between
sensor activation in each pair as the four-sensor (see page 64).
Figure 35 illustrates a dual four-sensor system.
Figure 35:
Dual four-Sensor System Diagram
Light
Curtain
Sensor 1
Sensor 3
Object
Bi-Directional
Sensor 2
Light
Curtain
Sensor 4
Sensor 1
Light
Curtain
Sensor 3
Object
Bi-Directional
Sensor 2
Light
Curtain
Sensor 4
Sensor 1
Light
Curtain
Sensor 3
Object
Light
Curtain
Sensor 2
Table 21:
Bi-Directional
Sensor 4
Conditions Required to Transition to Muting State –
Dual 4-Sensor System
State Mute Enable Sensor 1 Sensor 2 Sensor 3 Sensor 4
1
Off
X1
X1
X1
X1
Protected
2
On
Off
Off
Off
Off
Protected
3
On
On
Off
Off
Off
Protected
4
On
Off
On
Off
Off
Protected
5
On
On
On
Off
Off
Muted
6
On
On
On
Off
On
Muted
7
On
On
On
On
On
Muted
8
On
Off
On
On
On
Muted
9
On
Off
Off
On
On
Muted
10
On
Off
Off
Off
On
Protected
11
On
Off
Off
On
Off
Protected
1
© 2008 Schneider Electric All Rights Reserved
System
Status
The system status is not dependent on the state of this sensor.
67–EN
English
Failure to follow these instructions can result in death or serious
injury.
XUSLB/XUSLDM Safety Light Curtain
Section 6—Muting (XUSLDM Only)
Dual Four-Sensor System Requirements
30072-451-85
02/2008
In a dual four-sensor system, the following conditions must be met for the
system to enter or remain in the muting state:
Sensors 1 and 3 must be dark-on type sensors with a PNP-type output,
or a switch that closes its contact to provide +24 Vdc when muting is
permitted.
•
Sensors 2 and 4 must be light-on type sensors with a PNP-type output,
or a switch that opens its contact when muting is permitted.
•
Sensor pair 1 and 2 must activate within 3 seconds of each other with
either sensor within the pair activating first. Activation of sensor pair 3
and 4 must occur within 3 seconds of the first sensor pair with either
sensor within the pair activating first.
•
The sequence of sensor activation is as follows: sensor pair 1 and 2
must activate before sensor pair 3 and 4; or, the sequence may be in
reverse direction—sensor pair 3 and 4 activates before sensor pair 1
and 2.
•
Sensor pair 1 and 2 may activate before sensor pair 3 and 4, or sensor
pair 3 and 4 may activate before sensor pair 1 and 2; however, for the
system to remain in a muting state, the pair that activates first must
remain active until the second pair activates.
•
For the system to remain in a muting state, any sensor that has
transitioned from an active to an inactive state must remain in the
inactive state until the next pair of active muting sensors become
inactive.
English
•
Figure 36:
Dual Four-Sensor Muting System Waveform Diagram
Muting State
ON State
Sensor-1 Input
(Dark -On type sensor)
Sensor-2 Input
(Light -On type sensor)
OFF
OFF
< 3 sec.
OFF
OFF
ON State
Sensor-3 Input
(Dark -On type sensor)
OFF
Sensor-4 Input
(Light -On type sensor)
OFF
ON State
OFF
< 3 sec.
ON State
OFF
ON State
XUSLDM Safety
Outputs (OSSD)
OFF
ON State
Mute Lamp
Output
68–EN
OFF
OFF
© 2008 Schneider Electric All Rights Reserved
30072-451-85
02/2008
XUSLB/XUSLDM Safety Light Curtain
Section 6—Muting (XUSLDM Only)
Figure 37:
N
Dual Four-Sensor Muting System
L
F1
GND
N
L
Power Supply
Receiver XUSLDM
GND 0V 24V
GND 0V 24V MPCE/EDM Start
Transmitter XUSLDM
(1)
K2
GND
OSSD2
Output
(2)
K1
(3)
NC
OSSD1
Start
0V 24V MTS MTS Ref
Test
K2
(4)
K1
(4)
GND Shield -RS485 +RS485 Return +VDC
XPS LCM1
Muting Lamp
Lamp S4-In
S3-In
BN
BU
OG
BK A
BN
BK A
A
A
OG
OG
Sensor 1
PNP
Dark On
Sensor 2
PNP
Light On
Sensor 3
PNP
Dark On
Sensor 4
PNP
Light On
© 2008 Schneider Electric All Rights Reserved
BU
BN
BU
BK
BN
BU
BK
OG
S2-In S1-In
69–EN
English
AUX
XUSLB/XUSLDM Safety Light Curtain
Section 6—Muting (XUSLDM Only)
BYPASS ALLOWED FEATURE
30072-451-85
02/2008
The Bypass Allowed feature provides a means for supervisory personnel to
momentarily override the machine stop signal of the XUSLDM/XPSLCM1
system. This feature is for use when the processing sequence does not
allow an automatic transition to the muting state, and the
XUSLDM/XPSLCM1 safety outputs are in the Off state.
The XUSLDM/XPSLCM1 system will enter the Bypass Allowed state when
the light curtain safety outputs (OSSD) are in the Off state and a minimum of
one mute sensor is active.
The XUSLDM/XPSLCM1 signals that it is in the Bypass Allowed state by
flashing the mute lamp at a 1 second interval.
English
To allow the XUSLDM/XPSLCM1 to transition to the muting state, the
supervisory personnel must press and release the start button. When
entering the muting state from the Bypass Allowed feature, the following will
occur:
•
•
The mute lamp will illuminate and stay illuminated.
If the light curtain is clear of obstructions before all of the mute sensors
have cleared, the system will leave the muting state and enter the
Machine Run state.
NOTE: All mute sensors must be clear of obstruction for the
XUSLDM/XPSLCM1 system to automatically enter the muting state
during the next process cycle.
70–EN
•
If all mute sensors are clear of obstructions before the light curtain has
cleared, the XUSLDM/XPSLCM1 system will leave the muting state and
enter the Machine Stop state.
•
When the muting state is entered from the Bypass Allowed state, the
maximum time for the XUSLDM/XPSLCM1 to be continuously in the
Muting state is 10 minutes.
•
If the 10 minute time limit is exceeded, the XUSLDM/XPSLCM1 system
will automatically change from the muting state to the Bypass Allowed
state. There is no limit on the number of times the XUSLDM /XPSLCM1
system can enter the Bypass Allowed state and, with the press and
release of the Start button, transition into the muting state.
© 2008 Schneider Electric All Rights Reserved
30072-451-85
02/2008
XUSLB/XUSLDM Safety Light Curtain
Section 6—Muting (XUSLDM Only)
Bypass Allowed Example
Bypass Allowed Example
Muting Sensor Condition
Light Curtain
Condition
XPSLCM1 Response to Condition
Blocked
Cleared
Powers-up, enters Interlock state, senses
that sensor 3 is active.
Blocked
Cleared
Enters Machine Run state, safety outputs
(OSSD) switch to On state and conveyor
motors start
Conveyor System Condition
Sensor 1
Sensor 2
Sensor 3
System power is restored
Clear
Clear
Supervisor verifies that the system is safe
to start, the XUSLDM/XPSLCM1 system
Start button is pressed and released.
Clear
Clear
Conveyor motors are running
Becomes blocked Becomes blocked Becomes clear Becomes blocked
Enters Machine Stop (Bypass Allowed) state
since muting sensor 3 was not inactive at
power-up, safety outputs (OSSD) switch to
Off state.
Conveyor motors stop
Blocked
Blocked
Clear
Blocked
XUSLDM/XPSLCM1 system indicates
Bypass Allowed by a blinking mute lamp.
Supervisor verifies that the system is safe
to bypass, the XUSLDM/XPSLCM1
system Start button is pressed and
released.
Blocked
Blocked
Clear
Blocked
Enters Muting state, safety outputs (OSSD)
switch to On state, mute lamp is illuminated
Conveyor motors are running
Blocked
Blocked
Clear
Becomes clear
Enters Machine Run state, mute lamp
illuminates.
Conveyor motors are running
Becomes clear
Becomes clear
Clear
Cleared
Stays in Machine Run state and is ready to
automatically enter Muting when next object
passes through the sensors
© 2008 Schneider Electric All Rights Reserved
71–EN
English
Table 22:
In this example, a conveyor, operated with an XUSLDM/XPSLCM1 system,
has one light curtain and three mute sensors connected. The
XUSLDM/XPSLCM1 system is set to Start Interlock mode and Bypass
Allowed is enable.
XUSLB/XUSLDM Safety Light Curtain
Section 6—Muting (XUSLDM Only)
30072-451-85
02/2008
English
72–EN
© 2008 Schneider Electric All Rights Reserved
30072-451-85
02/2008
XUSLB/XUSLDM Safety Light Curtain
Section 7—Troubleshooting
SECTION 7— TROUBLESHOOTING
Individual Beam Indicators
The XUSLB/XUSLDM system has a visible, red individual beam indicator
(IBI) next to each infrared beam on the receiver. This indicator illuminates
when the associated infrared beam fails to meet the conditions necessary
for the XUSLB/XUSLDM system to remain in the Machine Run state. The
IBIs are not safety critical components. A beam indicator failure will not
cause an alarm condition, and the XUSLB/XUSLDM system will continue to
operate. See Figure 1 on page 12 for component location.
Synchronization
Synchronization between the XUSLB/XUSLDM system transmitter and
receiver is optical.
To establish synchronization the system needs to have a predetermined
number of consecutive clear beams within the first master segment. If this
requirement is not satisfied, the system will enter a Machine Stop state and
every other individual beam indicator will illuminate. When the beams are
clear, the system will re-synchronize and enter a state consistent with its
operating mode.
Once the synchronization is established, it can be maintained as long as the
required number of consecutive clear beams can be satisfied anywhere in
the system (including flex systems). See “Optical Synchronization” on
page 55.
External Device Monitoring (EDM) or
Machine Primary Control Element
(MPCE) Monitoring
EDM/MPCE monitoring is an important safety function. It monitors the
XUSLB/XUSLDM system’s interface to the guarded machine to confirm that
the machine’s primary control elements (switching devices, such as
contactors) are responding correctly to the XUSLB/XUSLDM light curtains,
and to detect any inconsistency between the two machine EDMs/MPCEs
which prevents a stop signal from reaching the machine primary control
elements.
XUSLB without a PDM
On the XUSLB (without a PDM), the EDM function is controlled through the
External EDM Select feature using the start line connections to disable or
enable the function as follows:
•
If the start line is connected to 0 Vdc at start-up, the EDM function is
disabled. The EDM line must be connected to 0 V.
•
If the start line is connected to +24 V at start-up, the EDM function is
enabled. The EDM line must be connected in series through the NC
contacts on the final switching device.
When using the start line to configure the EDM function, the manual start
input is not accessible.
XUSLDM and XUSLB with a PDM
On the XUSLDM and XUSLB (with PDM), the EDM function can be
activated and deactivated using the PDM.
Connections for MPCE monitoring are made at the receiver (see Figure 22
on page 49). On power-up, the XUSLB/XUSLDM system looks for the
MPCE to be in the closed condition—an Off state where the contacts are
closed. When this is found, the system enters a state consistent with the
selected operating mode (see “Operating Modes” on page 16).
When the XUSLB/XUSLDM system enables its safety outputs (enters the
Machine Run state), it monitors the MPCE contacts for a closed-to-open
© 2008 Schneider Electric All Rights Reserved
73–EN
English
DIAGNOSTIC AND TEST FEATURES
XUSLB/XUSLDM Safety Light Curtain
Section 7—Troubleshooting
30072-451-85
02/2008
transition. This transition must occur within 300 ms or the XUSLB/XUSLDM
system considers the MPCE to be in a faulted state causing the system to
enter an Alarm state. Likewise, if the EDM or MPCE connectors are
incorrectly wired, the XUSLB/XUSLDM system will enter an Alarm state.
Optional Machine Test Signal (XUSLB
Only)
Some applications require the machine guarding system be tested by the
machine controller during a non-hazardous portion of the machine cycle to
verify that the guarding system is functioning properly. See Additional
Guarding When Using Exact Channel Select (Fixed) Blanking, Monitored
Blanking, or Floating Blanking on page 30.
English
To provide a Machine Test Signal (MTS), place a normally closed switch
across the MTS and MTS Return lines of the transmitter. When the
transmitter recognizes a closed-to-open transition on this switch, a beam
blocked state is simulated and the receiver enters the Machine Stop state.
The beam blocked state is simulated as long as the switch is held open. The
external MTS contact must be closed during power-up. When the
transmitter is configured with MTS disabled, the MTS input can be left with
no connection (wire to 0 Vdc is not needed).
Start/Restart Selection Options
The XUSLDM offers four Start Restart input type selections, including:
•
•
•
•
NO1–Normally Open (Pulled Low to 0 Vdc)
NO2–Normally Open (Pulled High to +24 Vdc)
NC1–Normally Closed (Pulled Low to 0 Vdc)
NC2–Normally Closed (Pulled High to +24 Vdc).
The default setting is NC1 (Pulled Low). All four configurations reset on the
trailing edge when the restart switch is pressed and released.
Refer to Figure 38 for a illustrated description of each start input.
Figure 38:
Start/Reset Input Type Selections
XUSLDM-N01
Start
+24 Vdc
N.O.
0 Vdc
0 Vdc
Reset
N01 Normally Open Option (Pulled Low to 0 Vdc)
XUSLDM-N02
Start
+24 Vdc
+24 Vdc
N.O.
Reset
0 Vdc
N02 Normally Open Option (Pulled High to +24 Vdc)
XUSLDM-NC1
Start
+24 Vdc
N.C.
0 Vdc
Reset
0 Vdc
NC1 Normally Closed (Pulled Low to 0 Vdc)
XUSLDM-NC2
Start
+24 Vdc
N.C.
+24 Vdc
0 Vdc
Reset
NC2 Normally Closed (Pulled High to +24 Vdc)
74–EN
© 2008 Schneider Electric All Rights Reserved
30072-451-85
02/2008
XUSLB/XUSLDM Safety Light Curtain
Section 7—Troubleshooting
RECEIVER
The receiver master (1st segment) head uses the IBI’s (individual beam
indicators) to indicate diagnostic codes. The IBI’s only indicate diagnostic
codes, when in the Fault state. In this state the yellow Interlock LED flashes
and the first 10 IBI’s are used to display the fault code, see Figure 39.
Figure 39:
Example of IBI LEDs used to Show Fault Code
Next Group of 4
LEDs are ON
4th LED is OFF
First 3 LEDs
are ON
Front view of
receiver head
showing the
first 8 IBI LEDs
English
Receiver Head Diagnostic Information
IBI LEDs are
turned On to
indicate Fault
Code 34, which
means OSSDA
is shorted to
Ground
Interlock LED
Flashing
On RX End Cap
Receiver Endcap Indicator Lights
Receiver Troubleshooting
The Receiver endcap indicator lights include:
• Green—The guarded machine is operating.
•
Red—The light curtain is blocked and the guarded machine is not
operating.
•
Yellow Interlock—The light curtain is waiting for the start button to be
pushed. The guarded machine is not operating. If the LED is blinking,
the light curtain is in a alarm condition.
•
Amber FB or CS—The light curtain is operating in a reduced resolution
mode. This applies to all blanking functions.
If the yellow Interlock LED is blinking:
1. Check the configuration for EDM/MPCE Monitoring. If EDM/MPCE
Monitoring is inactive, the input (pink wire) must be connected to 0 Vdc.
If EDM/MPCE is active, the input must be connected to the normally
closed contacts of the control relays of the guarded machine or the
monitor terminal of the XPSLCM1 Mute Module, if used.
2. Verify that the power supply is within specified limits.
3. Verify that the light curtain is properly connected to the control relays of
the guarded machine.
4. Verify that the control relays are within the operating limits of the safety
outputs.
NOTE: The pull-in voltage requirement of the relays must be satisfied. The
XUSLB/XUSLDM provides V=Vsupply–2 V on each solid-state safety
output.
5. Verify that the cable lengths from the light curtain to the control relays
are within specified limits.
6. Call your local Schneider Electric representative.
© 2008 Schneider Electric All Rights Reserved
75–EN
XUSLB/XUSLDM Safety Light Curtain
Section 7—Troubleshooting
30072-451-85
02/2008
TRANSMITTER
Troubleshooting the Transmitter
If the yellow LED is off:
1. Verify that the cable is connected.
2. Verify that the power supply is within limits (+24 V ± 20%).
3. Call your local Schneider Electric representative.
If the yellow LED is blinking:
1. Verify that the power supply is within limits (+24 V ± 20%).
2. Call your local Schneider Electric representative.
English
PROGRAMMING AND DIAGNOSTICS
MODULE (PDM)
The PDM can be used to access and program the operating parameters of
the XUSLB/XUSLDM Safety Light Curtain. In addition to light curtain
configuration, the PDM also serves as a diagnostics device, allowing the
user to retrieve fault information.
The Programming and Diagnostic module:
•
Displays programming and diagnostics information on a multi-line LCD
display.
•
Supports a variety of languages including English, Spanish, German,
French, and Italian.
•
Housing is rated IP65 allowing permanent mounting near the light
curtain.
The light curtain does not require the PDM to operate. The factory default
settings allow for basic guarding operation.
76–EN
© 2008 Schneider Electric All Rights Reserved
30072-451-85
02/2008
PDM Navigation Buttons
XUSLB/XUSLDM Safety Light Curtain
Section 7—Troubleshooting
The PDM has five buttons that allow navigation through the set-up menus. A
description of these buttons is provided in Figure 40
Figure 40:
PDM Navigation Buttons.
Programming Diagnostic Module
Scroll forward and backward to review the
previous and next menu, or to move within the
same screen.
ENTER
XUS-LPDM
When pressed, the selected function will
be accessed.
Telemecanique
Status Screen Description
Table 23 contains the field names that appear on the PDM status screen
followed by a description of the type of information which will appear in the
field.
Table 23:
Status Screen Description
Field Name
Description
State
Run-time state
Beams
Total number of beams
Segs/Code
Total number of segments/Scan Code 1
Mute
Mute Status displays only if Mute Enable is On.
Sensors
Mute sensors are numbered 1 – 4 from left to right indicating B (Blocked) or
C (Clear). Displays only if Mute Enable is On.
Fault
Fault information only displays if there is a fault.
1
Alternates from number of segments to active scan code.
Table 24 is a sample of the information appearing on the status screen.
Refer to Figure 41 for an illustration of the menu structure.
Table 24:
Sample Status Screen
STATUS RXA 1.42
STATE: FAULT
BEAMS: 48 SEGS: 2
MUTE: OK
SENSORS: BBCC
FAULT: 42 EDM
LOGIN
PDM 1.17
© 2008 Schneider Electric All Rights Reserved
77–EN
English
Scroll up and down to review the selection
of the current menu.
ENTER
XUSLB/XUSLDM Safety Light Curtain
Section 7—Troubleshooting
30072-451-85
02/2008
PDM Status Screen
The Boot Up screen allows any user, regardless of access level, to change
the language of the text that displays on the screens. Once the preferred
language is selected, the PDM will start up using that language.
NOTE: The language can be changed at any time using the Language
Select screen.
Figure 41 is a representation of the menu structure within the PDM.
Figure 41:
BOOT UP
PDM Status Screen
LOGIN/STATUS
SCHNEIDER
ELECTRIC
English
SAFETY
LIGHT CURTAINS
LOGIN
OPERATOR
CONFIG USER
SERVICE USER
STATUS
STATUS
STATE: STOP
BEAMS: 16 SEGS: 1
MUTE:
SENSORS:
FAULT:
LOGIN
Main Menu Functions
LOGIN/PASSWORD
1ST LEVEL/MAIN MENU
MAIN
LOAD CONFIG
VIEW CONFIG
LOGIN
CONFIG USER
PASSWORD: ????
LOGIN
SERVICE USER
PASSWORD: ????
LOGOUT
MAIN
LOAD CONFIG
VIEW/EDIT CONFIG
SAVE CONFIG
PROG FIXED BLANK
SYSTEM
LOGOUT
Refer to Figure 41, 1st LEVEL/MAIN MENU, for a representation of where
the following menu selections fit into the PDM menu structure.
•
Load Config—Load a configuration from 1 of the 3 sources:
— Light curtain
— Factory default
— Custom configuration (saved by user)
•
View/Edit Config—View configuration parameters. A user with
supervisory access can also edit the configuration parameters. See The
Password on page 83.
•
Save Config—Save a new configuration to 1 of 2 destinations:
— Light curtain
— Custom configuration
78–EN
•
Prog Fixed Blank—Program the fixed blanking pattern using the
sequence: Program and Finish.
•
•
System—Access the maintenance functions.
Logout—Exit the menu functions and return to the status screen.
© 2008 Schneider Electric All Rights Reserved
30072-451-85
02/2008
Table 25 includes receiver PDM selectable options found in the VIEW
CONFIG menu. Refer to Figure 42 on page 80 for location of the VIEW
CONFIG menu within the menu structure
Table 25:
VIEW CONFIG Menu Options
Option Name
Description
Default
Operating Mode
Select from Automatic, Start Interlock, or
Start/Restart Interlock modes.
Automatic
EDM (MPCE monitoring) 1
Select from On, Off. or By Wire.
Default is by wire
Select from code A or B
A
Select from Normal or Slow.
Normal
RX Scan Code
1
Response Time
Exact Channel Select
Select from Off, Fixed Blanking (Exact
(Fixed) Blanking/Monitored
Channel Select), or Monitored Blanking.
Blanking
Select from Off, 1-channel blanking, or
2-channel blanking.
Off
Reduced Resolution
Select from On or Off, and 1, 2, or 3 beam
reduction.
Off
MUTE ENABLE–On or Off
Off
MUTE MODE–2-sensor, 3-sensor, 4-sensor,
dual 4-sensor, 4-sensor fwd, or
2-sensor
2X-sensor fwd
MUTE TIMEOUT–2 min. or no time-out
2 min.
MUTE BYPASS–On or Off
Off
Range 1
Select operating range from Short or Long
Short
Start Input
Select from:
NC 0 V
NC 24 V
NO 0 V
NO 24 V
NC 0 V
Aux. Output
Select from:
FOLLOW OSSD PNP
FOLLOW OSSD NPN
ALARM PNP
ALARM NPN
Default is Follow
OSSD PNP
1
© 2008 Schneider Electric All Rights Reserved
Off
Floating Blanking
Mute Options
English
VIEW CONFIG Menu
XUSLB/XUSLDM Safety Light Curtain
Section 7—Troubleshooting
XUSLB only has access to EDM, Operating Mode, RX Scan Code, and Range.
79–EN
XUSLB/XUSLDM Safety Light Curtain
Section 7—Troubleshooting
Menu Structures
30072-451-85
02/2008
Figures 42 through 44 illustrate the menu structure of the three screens
available from VIEW CONFIG. In the figures, the three screens are
numbered to help you correlate them with corresponding figures supplying
more detail. See Figures 43 and 44 on pages 81 and 82,
Figure 42:
VIEW CONFIG Menu ➀
1
VIEW CONFIG
OPERATING MODE
EDM
RX SCAN CODE
RESPONSE TIME
FIXED BLANK
FLOATING BLANK
MAIN
LOAD CONFIG
VIEW/EDIT CONFIG
SAVE CONFIG
PROG FIXED BLANK
SYSTEM
LOGOUT
English
NOTE: You must load the
light curtain configuration
before proceeding.
2
VIEW CONFIG
REDUCED RES
MUTE ENABLE
MUTE MODE
MUTE TIMEOUT
MUTE BYPASS
MUTE RESPONSE
VIEW CONFIG
OPERATING MODE
AUTO START
EDIT CONFIG
OPERATING MODE
AUTOMATIC START
START LOCK
RESTART LOCK
VIEW CONFIG
EDM:
OFF
EDIT CONFIG
EDM
OFF
ON
VIEW CONFIG
RX SCAN CODE:
A
EDIT CONFIG
RX SCAN CODE
A
B
VIEW CONFIG
RESPONSE TIME
NORMAL
EDIT CONFIG
RESPONSE TIME
NORMAL
SLOW
VIEW CONFIG
FIXED BLANK
OFF
EDIT CONFIG
FIXED BLANK
OFF
ON
VIEW CONFIG
FLOATING BLANK
OFF
EDIT CONFIG
FLOATING BLANK
OFF
1 CHANNEL
2 CHANNEL
3
VIEW CONFIG
RANGE
START INPUT
AUX OUTPUT
80–EN
© 2008 Schneider Electric All Rights Reserved
30072-451-85
02/2008
XUSLB/XUSLDM Safety Light Curtain
Section 7—Troubleshooting
Figure 43:
VIEW CONFIG Menu ➁
1
NOTE: You must load the
light curtain configuration
before proceeding.
2
VIEW CONFIG
REDUCED RES
MUTE ENABLE
MUTE MODE
MUTE TIMEOUT
MUTE BYPASS
MUTE RESPONSE
VIEW CONFIG
REDUCED RES
OFF
VIEW CONFIG
MUTE ENABLE
OFF
VIEW CONFIG
MUTE MODE
OFF
3
VIEW CONFIG
RANGE
START INPUT
AUX OUTPUT
VIEW CONFIG
MUTE TIMEOUT
2 MINUTES
EDIT CONFIG
REDUCED RES
OFF
1 BEAM
2 BEAM
3 BEAM
EDIT CONFIG
MUTE ENABLE
OFF
ON
EDIT CONFIG
MUTE MODE
2 SENSOR
3 SENSOR
4 SENSOR
2X SENSOR
4 SENSOR FWD
2X SENSOR FWD
EDIT CONFIG
MUTE TIMEOUT
2 MINUTES
NO TIMEOUT
VIEW CONFIG
MUTE BYPASS
OFF
EDIT CONFIG
MUTE BYPASS
OFF
ON
VIEW CONFIG
MUTE RESPONSE
50MS
EDIT CONFIG
MUTE RESPONSE
50MS
TO CHANGE
© 2008 Schneider Electric All Rights Reserved
81–EN
English
VIEW CONFIG
OPERATING MODE
EDM
RX SCAN CODE
RESPONSE TIME
FIX/MON BLANK
FLOATING BLANK
MAIN
LOAD CONFIG
VIEW/EDIT CONFIG
SAVE CONFIG
PROG BLANKING
SYSTEM
LOGOUT
XUSLB/XUSLDM Safety Light Curtain
Section 7—Troubleshooting
30072-451-85
02/2008
Figure 44:
MAIN
LOAD CONFIG
VIEW/EDIT CONFIG
SAVE CONFIG
PROG BLANKING
SYSTEM
LOGOUT
NOTE: You must load the
light curtain configuration
before proceeding.
1
VIEW CONFIG Menu ➂
VIEW CONFIG
OPERATING MODE
EDM
RX SCAN CODE
RESPONSE TIME
FIX/MON BLANK
FLOATING BLANK
2
English
3
VIEW CONFIG
REDUCED RES
MUTE ENABLE
MUTE MODE
MUTE TIMEOUT
MUTE BYPASS
MUTE RESPONSE
VIEW CONFIG
RANGE
SHORT
EDIT CONFIG
RANGE
SHORT
LONG
VIEW CONFIG
START INPUT
NC 0V
EDIT CONFIG
START INPUT
NC 0V
NC 24V
NO 0V
NO 24V
VIEW CONFIG
AUX OUTPUT
FOLLOW OSSD PNP
EDIT CONFIG
AUX OUTPUT
FOLLOW OSSD PNP
FOLLOW OSSD NPN
ALARM PNP
ALARM NPN
VIEW CONFIG
RANGE
START INPUT
AUX OUTPUT
PROGRAM BLANKING
FIXED BLANK
PROGRAM
FINISH
OR
PROGRAM BLANKING
MONITORED BLANK
PROGRAM BEGIN
PROGRAM END
FINISH
Transmitter Options
Figure 45:
MAIN
LOAD CONFIG
VIEW/EDIT CONFIG
SAVE CONFIG
VIEW CONFIG
TX SCAN CODE
MTS ENABLE
PDM Transmitter Configuration/View and Edit
VIEW CONFIG
TX SCAN CODE
A
EDIT CONFIG
TX SCAN CODE
A
B
VIEW CONFIG
MTS ENABLE
OFF
EDIT CONFIG
MTS ENABLE
OFF
ON
SYSTEM
LOGOUT
Table 26 includes selectable options of the XUSLB/XUSLDM Light Curtain
Transmitter.
Table 26:
82–EN
Transmitter Selectable Options
Option Name
Description
Default
TX Scan Code
Select from code A or B
A
MTS Enable
Machine Test signal. Select from On or Off
Off
© 2008 Schneider Electric All Rights Reserved
30072-451-85
02/2008
The Password
XUSLB/XUSLDM Safety Light Curtain
Section 7—Troubleshooting
Due to the safety nature of the XUSLB/XUSLDM, it is required that all users
with privileges to change the configuration log in with a password. The
password grants the user the right to view and modify the configuration. The
configuration includes all the parameters that have been defined to guard
an application. The password is coded into the PDM and not the
XUSLB/XUSLDM. The PDM is shipped with a default password of “0000.”
•
Operator Access—The operator can access the XUSLB/XUSLDM in a
monitoring mode. Because the operator cannot make any changes to
the light curtain parameters in this mode, it does not require a password.
•
Supervisory (Config User) Access—Supervisors and maintenance
personnel may access the XUSLB/XUSLDM and perform a variety of
functions. They may stop the light curtain, download, modify an existing
configuration, or create a new one.
NOTE: Service User Access is reserved for Schneider Electric service
personnel ONLY.
Changing the Password
The default password can be changed, allowing maintenance personnel to
restrict the access of unauthorized persons. To change the password, the
user must log-in at the supervisor (Config User) access level, using the
default password (0000).
To change the password:
1. Navigate to “System - Change Password”.
2. At the “ENTER NEW:????” prompt, set the password to a 4-digit
decimal number, and press ENTER. Use the ^ and v buttons to change
the selected digit as desired, use the > button to access the next digit.
3. At the “RE ENTER NEW:????” prompt, enter the new password again
and press ENTER to confirm and save the new password.
Forgotten Password
If a password is forgotten, the default password can be activated as follows:
From the STATUS screen, press ^ 7 consecutive times and the password
will be reset to the default.
© 2008 Schneider Electric All Rights Reserved
83–EN
English
There are two user access levels:
XUSLB/XUSLDM Safety Light Curtain
Section 7—Troubleshooting
PDM Diagnostic Codes
30072-451-85
02/2008
Table 27:
Standard Diagnostic Codes
Code Group
Normal Operation
English
Safety Output
(OSSD) Faults
EDM Faults
Description
88/V#
During power-up all the segments light and the software
version displays.
—
Run state
-0
Stop state
-1
Interlock state, waiting for Start input
-2
Floating blanking enabled
-3
Exact Channel Select (Fixed) blanking enabled
-4
Floating blanking and Exact Channel Select (Fixed)
blanking enabled
-5
Muting light curtain
31
OSSD1 & OSSD2 are shorted together.
32
OSSD1 is shorted to power.
33
OSSD2 is shorted to power.
34
OSSD1 is shorted to ground.
35
OSSD2 is shorted to ground.
41
EDM signal was in wrong state before entering Machine
Run state.
42
EDM signal was in wrong state after entering Machine Run
state.
43
EDM signal was in wrong state during power-up of the
XUSLB/DM light curtain.
44
Check the start input wire or EDM function selection.
Controller Fault
50
A fault internal to the XUSLB/DM light curtain has been
detected.
Setup Error
60
A receiver in view of multiple transmitters is set to the same
scan code.
70
General muting fault. Check the wiring of unused mute
sensors.
71
Mute sensors are activated in the wrong sequence. Check
the mounting of the mute sensors for correct sequence.
72
Mute sensor activation time limit (300 ms) is exceeded.
Sensor pairs must activate within 300 ms of each other.
Adjust sensor mounting distance or process speed.
73
System is muted for longer than the maximum time
allowed. Check the mute sensors for blockage or
misalignment.
74
Mute lamp is burned out or is not connected. Check the
status of the mute lamp.
Muting Faults
84–EN
Code
Number
© 2008 Schneider Electric All Rights Reserved
30072-451-85
02/2008
XUSLB/XUSLDM Safety Light Curtain
Section 7—Troubleshooting
Standard Diagnostic Codes (continued)
Code Group
Cascaded
System Faults
© 2008 Schneider Electric All Rights Reserved
Code
Number
Description
80
Configuration error. Call your local Schneider Electric
representative for troubleshooting assistance.
81
Second segment or mute module error. Check all cable
connections. Call your local Schneider Electric
representative for troubleshooting assistance.
82
Third segment or mute module error. Check all cable
connections. Call your local Schneider Electric
representative for troubleshooting assistance.
83
Fourth segment or mute module error. Check all cable
connections. Call your local Schneider Electric
representative for troubleshooting assistance.
84
Mute module error Check all cable connections to the mute
module. Call your local Schneider Electric representative
for troubleshooting assistance.
85
Configuration error. Call your local Schneider Electric
representative for troubleshooting assistance.
86
Second segment or mute module firmware is not
compatible with the first segment. Replace with a
compatible component, or return the system to Schneider
Electric for an upgrade.
87
Third segment or mute module firmware is not compatible
with the first segment. Replace with a compatible
component, or return the system to Schneider Electric for
an upgrade.
88
Fourth segment or mute module firmware is not compatible
with the first segment. Replace with a compatible
component, or return the system to Schneider Electric for
an upgrade.
89
Mute module firmware is not compatible with the first
segment. Replace with a compatible component, or return
system to Schneider Electric for an upgrade.
90
Incorrect segment type in position two, three, or four.
Confirm that all the segments are of the same type—either
all transmitters or all receivers.
91
Segment 2 type does not match segment 1 type. Confirm
that segment 2 is the same type (transmitter or receiver) as
segment 1.
92
Segment 3 type does not match segment 1 type. Confirm
that segment 3 is the same type (transmitter or receiver) as
segment 1.
93
Segment 4 type does not match segment 1 type. Confirm
that segment 4 is the same type (transmitter or receiver) as
segment 1.
95
Error during operation. Check the connections. Call your
local Schneider Electric representative for troubleshooting
assistance.
96
Error in segment 2 during operation. Check the
connections to segment 2. Replace segment 2 with a
known good segment.
97
Error in segment 3 during operation. Check the
connections to segment 3. Replace segment 3 with a
known good segment.
98
Error in segment 4 during operation. Check the
connections to segment 4. Replace segment 4 with a
known good segment.
100
Number of segments in the system has been reduced.
Segment count is less than the original configuration. Add
the required segment(s), or program the system for the
current configuration.
85–EN
English
Table 27:
XUSLB/XUSLDM Safety Light Curtain
Section 7—Troubleshooting
30072-451-85
02/2008
Safety Outputs
WARNING
IMPROPER SETUP OR INSTALLATION
This product is designed for use on a 24 Vdc, negative ground (protective
earth) electrical system only.
Never connect the XUSLB/XUSLDM system to a positive ground
(protective earth) system. With a positive ground (protective earth) wiring
scheme, certain simultaneous shorts of both safety outputs may not be
detected and the guarded machine may not stop.
English
Failure to follow these instructions can result in death or serious
injury.
The XUSLB/XUSLDM system receiver supplies two independent PNP-type,
safety outputs to provide run/stop signals to the guarded machine. In the
Machine run state, the safety outputs are electrically conducting and source
625mA of current at 24 Vdc. In the Machine Stop state, the outputs are not
electrically conducting.
Auxiliary Output
This is not a safety output. The XUSLB/XUSLDM supplies one auxiliary
output. The configuration of this output at time of order is PNP Follow. On
XUSLDM systems, it can be switched to other configurations using the
Programming and Diagnostics Module.
PNP Follow
In the On state, this PNP output sources up to 100 mA at 24 Vdc. In this
configuration, the auxiliary output is on when the safety outputs are on.
NPN Follow
In the On state, this NPN output sinks up to 100 mA. In this configuration the
auxiliary output will be on when the safety outputs are on.
PNP, ALARM
In the On state, this PNP output sources up to 100 mA at 24 Vdc. In this
configuration, the auxiliary output is on only when the XUSLDM system is in
the Alarm state.
NPN, ALARM
In the On state, this NPN output sinks up to 100 mA. In this configuration,
the auxiliary output is on only when the XUSLDM system is in the Alarm
state.
86–EN
© 2008 Schneider Electric All Rights Reserved
30072-451-85
02/2008
XUSLB/XUSLDM Safety Light Curtain
Section 8—Technical Characteristics
SECTION 8— TECHNICAL CHARACTERISTICS
SPECIFICATIONS
Table 28:
Specifications are subject to change without notice.
Light Curtain Specifications
XUSLB/DMQ6 ••• (14 mm)
XUSLBR5••• (30 mm)
XUSLDMY5••• (30 mm)
Conformity/Approvals
IEC/EN 61496-1, -2 and IEC 61508-1,-2 for TYPE 4 ESPE. ANSI/RIA R15.06, ANSI B11:19-1990, OSHA 1910.217(C),
OSHA 1910.212.
The ANSI and OSHA standards apply only to the USA.
Other approvals
UL, CSA, CE / TUV, EU directives: 2002/95/EC (ROHS),2002/96/EC (WEEE), Machinery 98/37/EEC, Work equipment
89/655/EEC and EMC 89/336/EEC
English
Conforming to standards
Environment
Ambient Air temperature
C
F
For operation: -10° to + 55 °C, for storage: -25 to +75 °C
For operation: 14 to +131 °F, for storage: -13 to +167 °F
Relative humidity
%
95% maximum, non-condensing
Degree of protection
IP65
Resistance to shock and vibration
According to IEC 61496-1, Shock: 10 g, impulse 16 ms,
Vibration: 10 to 55 Hz, amplitude: 0.35 +/- 0.05 mm (0.0014 +/-0.00020 in.)
Materials
Housing: aluminum with electrostatically applied polyester powder-paint (Red color: RAL3000);
End caps: polycarbonate 20% fiberglass;
Optical Characteristics
14 mm (0.55 in.) no floating blanking
24 mm (0.94 in.) 1-beam floating
blanking
34 mm (1.34 in.) 2-beam floating
blanking
Etc. (See Table 9 on page 25.)
30 mm (1.18 in.) no floating blanking
50 mm (1.97 in.) 1-beam floating blanking
70 mm (2.75 in.) 2-beam floating blanking
Nominal Range
m
(ft)
0.3 to 7 m (0.3 to 3 m with PDM)
(1 to 22.9 ft) (1 to 8.96 ft with PDM)
0.3 to 8 m
(1 to 26.25 ft)
Protection heights
mm
(in.)
280 to 1360 mm
(11 to 53.5 in.)
320 to 2120 mm
(12.6 to 83.5 in.)
Minimum object resolution (MOS)
XUSLDM Only
mm
(Use of Exact Channel Select
(in.)
(Fixed) will increase this value.)
Effective aperture angle
Etc. (See Table 10 on page 26.)
0.3 to 20 m (0.3 to 8 m with PDM)
(1 to 65.62 ft) (1 to 26.25 ft with PDM)
+2.5° maximum, transmitter and receiver at operating range > 3 m (9.84 ft) according to IEC 61496-2
Light source
GaAIAs Light Emitting Diode, 880 nm
Resistance to light
Per IEC/EN 61496-2
Electrical Characteristics
Response time
ms
<23 ms (protected heights: 280, 320,
360, 440, 520, 600)
<32 ms (protected heights: 720, 760,
880, 920, 960, 1040, 1120, 1200)
<41 ms (protected heights: 1360)
Power supply
V
24 V a +/-20% 2 A. The power supply must meet the requirements of IEC 61496-1 and IEC 60204-1.
Max. current consumption
(no load)
mA
Receiver: 450 mA; Transmitter: 285 mA
Resistance to interference
Level 3 according to IEC 61496-1
Input power supply
A
Transmitter: 285 mA; Receiver: 1.8 A (with maximum load). The power supply must meet the requirements of
IEC 60204-1 and IEC 61496-1.
<23 ms (protected heights: 320, 360, 440, 520, 600, 680, 760, 880, 920, 1040,
1200, 1360, 1400)
<32 ms (protected heights: 1520, 1560, 1640, 1720, 1800, 1920, 2120)
Safety outputs (OSSD)
2 solid state PNP outputs, 625 mA @ 24 V (short circuit protection).1, 2
Auxiliary (non-safety) outputs
100 mA @ 24 Va.1
Max. current Input consumption
EDM/MPCE monitor 50 mA @ 24 V, Start/restart: 10 mA
Signals
Transmitter: 1 LED (power); Receiver: 4 LEDs (stop, run, interlock, blanking/floating blanking, and IBI (individual beam
indicators))
Connections
Transmitter: 5 pin male M12 connector
Receiver: 8 pin male M12 connector
Cable lengths
Unshielded extension cables are available separately in lengths of 5 (16.4 ft),10 (32.8 ft),15 (49.2 ft), and 30 meters
(98.4 ft).
Maximum cable length of 60 meters (196.8 ft) is dependent on load current and power supply.
© 2008 Schneider Electric All Rights Reserved
87–EN
XUSLB/XUSLDM Safety Light Curtain
Section 8—Technical Characteristics
Table 28:
30072-451-85
02/2008
Light Curtain Specifications (continued)
XUSLB/DMQ6 ••• (14 mm)
Cable gauge
0.32 mm2 (22 AWG)
Cable resistance
0.1686 per ft
0.05531 per m
XUSLBR5••• (30 mm)
XUSLDMY5••• (30 mm)
1
The total current required by two solid-state outputs and the non-safety auxiliary output should not exceed 1.35 A.
2
24 V a is nominal. Drop out voltage is 1 V.
Table 29:
Ranges of XUSLB/D Systems
English
Schneider Electric
Reference
Operating Range
(m)
Detection Zone
(mm)
Response Time
(ms)
No. of Beams
Minimum Object Sensitivity
Use to Determine Response
(mm)
Time from Table 30
XUSLBQ6A0280
7
280
23
28
14
XUSLBQ6A0320
7
320
23
32
14
XUSLBQ6A0360
7
360
23
36
14
XUSLBQ6A0440
7
440
23
44
14
XUSLBQ6A0520
7
520
23
52
14
XUSLBQ6A0600
7
600
23
60
14
XUSLBQ6A0720
7
720
32
72
14
XUSLBQ6A0760
7
760
32
76
14
XUSLBQ6A0880
7
880
32
88
14
XUSLBQ6A0920
7
920
32
92
14
XUSLBQ6A0960
7
960
32
96
14
XUSLBQ6A1040
7
1040
32
104
14
XUSLBQ6A1120
7
1120
32
112
14
XUSLBQ6A1200
7
1200
32
120
14
XUSLBQ6A1360
7
1360
41
136
14
XUSLBR5A0320
20
320
14
16
30
XUSLBR5A0360
20
360
23
18
30
XUSLBR5A0440
20
440
23
22
30
XUSLBR5A0520
20
520
23
26
30
XUSLBR5A0600
20
600
23
30
30
XUSLBR5A0680
20
680
23
34
30
XUSLBR5A0760
20
760
23
38
30
XUSLBR5A0880
20
880
23
44
30
XUSLBR5A0920
20
920
23
46
30
XUSLBR5A1040
20
1040
23
52
30
XUSLBR5A1200
20
1200
23
60
30
XUSLBR5A1360
20
1360
23
68
30
XUSLBR5A1400
20
1400
23
70
30
XUSLBR5A1520
20
1520
32
76
30
XUSLBR5A1560
20
1560
32
78
30
XUSLBR5A1640
20
1640
32
82
30
XUSLBR5A1720
20
1720
32
86
30
XUSLBR5A1800
20
1800
32
90
30
XUSLBR5A1920
20
1920
32
96
30
XUSLBR5A2120
20
2120
32
106
30
XUSLDMQ6A0280
7
280
23—99
28
14
XUSLDMQ6A0320
7
320
23—99
32
14
XUSLDMQ6A0360
7
360
23—99
36
14
88–EN
© 2008 Schneider Electric All Rights Reserved
30072-451-85
02/2008
Table 29:
XUSLB/XUSLDM Safety Light Curtain
Section 8—Technical Characteristics
Ranges of XUSLB/D Systems (continued)
Operating Range
(m)
Detection Zone
(mm)
Response Time
(ms)
No. of Beams
Minimum Object Sensitivity
Use to Determine Response
(mm)
Time from Table 30
XUSLDMQ6A0440
7
440
23—99
44
14
XUSLDMQ6A0520
7
520
23—99
52
14
XUSLDMQ6A0600
7
600
23—99
60
14
XUSLDMQ6A0720
7
720
32—99
72
14
XUSLDMQ6A0760
7
760
32—99
76
14
XUSLDMQ6A0880
7
880
32—99
88
14
XUSLDMQ6A0920
7
920
32—99
92
14
XUSLDMQ6A0960
7
960
32—99
96
14
XUSLDMQ6A1040
7
1040
32—99
104
14
XUSLDMQ6A1120
7
1120
32—99
112
14
XUSLDMQ6A1200
7
1200
32—99
120
14
XUSLDMQ6A1360
7
1360
41—99
136
14
XUSLDMY5A0320
20
320
14—99
16
30
XUSLDMY5A0360
20
360
23—99
18
30
XUSLDMY5A0440
20
440
23—99
22
30
XUSLDMY5A0520
20
520
23—99
26
30
XUSLDMY5A0600
20
600
23—99
30
30
XUSLDMY5A0680
20
680
23—99
34
30
XUSLDMY5A0760
20
760
23—99
38
30
XUSLDMY5A0880
20
880
23—99
44
30
XUSLDMY5A0920
20
920
23—99
46
30
XUSLDMY5A1040
20
1040
23—99
52
30
XUSLDMY5A1200
20
1200
23—99
60
30
XUSLDMY5A1360
20
1360
23—99
68
30
XUSLDMY5A1400
20
1400
23—99
70
30
XUSLDMY5A1520
20
1520
32—99
76
30
XUSLDMY5A1560
20
1560
32—99
78
30
XUSLDMY5A1640
20
1640
32—99
82
30
XUSLDMY5A1720
20
1720
32—99
86
30
XUSLDMY5A1800
20
1800
32—99
90
30
XUSLDMY5A1920
20
1920
32—99
96
30
XUSLDMY5A2120
20
2120
32—99
106
30
XUSLDSQ6A0280
7
280
23—99
28
14
XUSLDSQ6A0320
7
320
23—99
32
14
XUSLDSQ6A0360
7
360
23—99
36
14
XUSLDSQ6A0440
7
440
23—99
44
14
XUSLDSQ6A0520
7
520
23—99
52
14
XUSLDSQ6A0600
7
600
23—99
60
14
XUSLDSQ6A0720
7
720
32—99
72
14
XUSLDSQ6A0760
7
760
32—99
76
14
XUSLDSQ6A0880
7
880
32—99
88
14
XUSLDSQ6A0920
7
920
32—99
92
14
XUSLDSQ6A0960
7
960
32—99
96
14
XUSLDSQ6A1040
7
1040
32—99
104
14
XUSLDSQ6A1120
7
1120
32—99
112
14
XUSLDSQ6A1200
7
1200
32—99
120
14
© 2008 Schneider Electric All Rights Reserved
English
Schneider Electric
Reference
89–EN
XUSLB/XUSLDM Safety Light Curtain
Section 8—Technical Characteristics
Table 29:
30072-451-85
02/2008
Ranges of XUSLB/D Systems (continued)
English
Schneider Electric
Reference
Operating Range
(m)
Detection Zone
(mm)
Response Time
(ms)
No. of Beams
Minimum Object Sensitivity
Use to Determine Response
(mm)
Time from Table 30
XUSLDSR5A0320
20
320
14—99
16
30
XUSLDSR5A0360
20
360
23—99
18
30
XUSLDSR5A0440
20
440
23—99
22
30
XUSLDSR5A0520
20
520
23—99
26
30
XUSLDSR5A0600
20
600
23—99
30
30
XUSLDSR5A0680
20
680
23—99
34
30
XUSLDSR5A0760
20
760
23—99
38
30
XUSLDSR5A0880
20
880
23—99
44
30
XUSLDSR5A0920
20
920
23—99
46
30
XUSLDSR5A1040
20
1040
23—99
52
30
XUSLDSR5A1200
20
1200
23—99
60
30
XUSLDSR5A1360
20
1360
23—99
68
30
XUSLDSR5A1400
20
1400
23—99
70
30
XUSLDSR5A1520
20
1520
32—99
76
30
XUSLDSR5A1560
20
1560
32—99
78
30
XUSLDSR5A1640
20
1640
32—99
82
30
XUSLDSR5A1720
20
1720
32—99
86
30
XUSLDSR5A1800
20
1800
32—99
90
30
XUSLDSR5A1920
20
1920
32—99
96
30
XUSLDSR5A2120
20
2120
32—99
106
30
90–EN
© 2008 Schneider Electric All Rights Reserved
30072-451-85
02/2008
XUSLB/XUSLDM Safety Light Curtain
Section 8—Technical Characteristics
Table 30:
Response Time of XUSLB/D Systems
Response Time (mS)
Minimum Beam Count Maximum Beam Count
Normal
Slow 1
0
16
14
23
17
71
23
38
72
126
32
53
127
180
41
68
181
235
50
83
236
256
59
99
English
One-Segment System (XUSLB or XUSLDM)
Two-Segment System (XUSLDM + 1 XUSLDS)
0
65
23
38
66
120
32
53
121
174
41
68
175
229
50
83
230
256
59
99
Three-Segment System (XUSLDM + 2 XUSLDS)
0
59
23
38
60
114
32
53
115
168
41
68
169
223
50
83
224
256
59
99
Four-Segment System (XUSLDM + 3 XUSLDS)
1
53
23
38
108
32
53
109
162
41
68
163
217
50
83
218
256
59
99
Slow response time is programmed by PDM for the XUSLDM system only.
Table 31:
Maximum Cable Lengths for Inputs/Outputs
RX or
TX1
Signal Name
Minimum Wire
Gauge
AWG (mm2)
Maximum Cable Length
ft (m)
RX
OSSD A and B Outputs
22 (0.32)
300 mA load: 147 (45)
625 mA load: 72 (22)
RX
Auxiliary Output
22 (0.32)
164 (50)
RX
Start Input
22 (0.32)
164 (50)
RX
EDM/MPCE Monitor Input
22 (0.32)
164 (50)
18 (0.70)
1.8 A load:42 (13)
1 A load:75 (23)
RX/TX
1
© 2008 Schneider Electric All Rights Reserved
0
54
24 Vdc Input Power
RX: Receiver
TX: Transmitter
91–EN
XUSLB/XUSLDM Safety Light Curtain
Section 8—Technical Characteristics
30072-451-85
02/2008
DIMENSIONS
Figure 46:
XUSLB Dimensions
1.19
30.1
2.33
59.4
Bracket
Rotation
90.0°
2.19
55.6
1.50
38.1
2.08
52.8
1.97
50.0
1.93
49.1
1.09
38.1
English
2.01
51.0
TOP
VIEWS
1.47
37.2
2.31
58.8
1.50
38.0
1.55
39.4
1.97
50.0
“D”
Inverted
Mounting
“B”
“A”
Detection
Zone
“C”
Center
Slot
Mounting
“E”
Alt.
T-Slot
Mtg.
1.82
46.4
2.74
69.6
3.04
77.3
2.28
58.0
Front
View
Left Side
View
1.47
37.2
Right Side
View
BTM
View
Back
View
Mounting
Brackets
Inverted
1.93
49.1
Quick Disconnect
Cable
PDM
PDM Port
Cover/Cap
M8 Plug
2.67
67.8
PDM Cable
2.20
56.0
2.42
61.5
92–EN
© 2008 Schneider Electric All Rights Reserved
30072-451-85
02/2008
Table 32:
XUSLB/XUSLDM Safety Light Curtain
Section 8—Technical Characteristics
XUSLB Dimensions (mm/in.) (Refer to Figure 46 for lettered items.)
280mm
320mm
360mm
440mm
520mm
600mm
720mm
760mm
A
284.4/11.2
324.8/12.8
364.5/14.3
443.9/17.5
523.4/20.6
604.1/23.8
724.0/28.5
763.0/30.0
B
420.4/16.5
460.8/18.1
500.5/19.7
579.9/22.8
659.4/26.0
740.1/29.1
860.0/33.9
899.0/35.4
C
381.7/15.0
422.1/16.6
461.8/18.2
541.2/21.3
620.7/24.4
701.4/27.6
821.3/32.3
860.3/33.9
D
307.3/12.1
347.7/13.7
387.4/15.3
466.8/18.4
546.3/21.5
627.0/24.7
746.9/29.4
785.9/30.9
E
371.3/14.6
411.7/16.2
451.4/17.8
530.8/20.9
610.3/24.0
691.0/27.2
810.9/31.9
849.9/33.5
Weight (g)
1788
1965
2150
2504
2865
3219
3757
3934
Weight (g) Packaged 2598
2775
2960
3314
3675
4234
4772
4949
880mm
920mm
960mm
1040mm
1120mm
1200mm
1360mm
A
882.8/34.8
922.5/36.3
963.6/37.9
1042.9/41.1
1122.3/44.2
1203.8/47.4
1362.0/53.6
B
1018.8/40.1
1058.6/41.7
1099.6/43.3
1178.9/46.4
1258.3/49.5
1339.8/52.7
1498.0/59.0
C
980.1/38.6
1019.8/40.2
1060.9/41.8
1140.2/44.9
1219.6/48.0
1301.1/51.2
1459.3/57.5
D
905.7/35.7
945.4/37.2
986.5/38.8
1065.8/42.0
1145.2/45.1
1226.7/48.3
1384.9/54.5
E
969.7/38.2
1009.4/39.7
1050.5/41.4
1129.8/44.5
1209.2/47.6
1290.7/50.8
1448.9/57.0
Weight (g)
4472
4649
4825
5187
5540
5902
6617
Weight (g) Packaged 6652
6829
7005
7367
7720
8082
8797
320mm
360mm
440mm
520mm
600mm
680mm
760mm
A
324.8/12.8
364.5/14.3
443.9/17.5
523.4/20.6
604.1/23.8
683,6/26,9
763.0/30.0
B
460.8/18.1
500.5/19.7
580,0/22.8
659.4/26.0
740.1/29.1
819,7/32,3
899.1/35.4
C
422.1/16.6
461.8/18.2
541.3/21.3
620,8/24,4
701,5/27,6
781,0/30,8
860.4/33.9
D
347.7/13.7
387.4/15.3
466.8/18.4
546,3/21,5
627.0/24.7
706,5/27,8
785.9/30.9
E
411.7/16.2
451.4/17.8
530.8/20.9
610,3/24,0
691.0/27.2
770,5/30,3
849.9/33.5
Weight (g)
1965
2150
3314
2865
3219
3580
3934
Weight (g) Packaged 2775
2960
2504
3675
4234
4595
4949
880mm
920mm
1040mm
1200mm
1360mm
1400mm
1520mm
A
882.8/34.8
922.5/36.3
1042.9/41.1
1203.8/47.4
1362.0/53.6
1401.7/55.2
1521.5/59.9
B
1018.8/40.1
1058.6/41.7
1178.9/46.4
1339.8/52.7
1498.0/59.0
1537.7/60.5
1657.5/65.3
C
980.1/38.6
1019.8/40.2
1140.2/44.9
1301.1/51.2
1459.3/57.5
1499.0/59.0
1618.8/63.7
30 mm D
905.7/35.7
945.4/37.2
1065.8/42.0
1226.7/48.3
1384.9/54.5
1424.6/56.1
1544.4/60.8
E
969.7/38.2
1009.4/39.7
1129.8/44.5
1290.7/50.8
1448.9/57.0
1488.6/58.6
1608.4/63.3
Weight (g)
4472
4649
5187
5902
6617
6794
7332
Weight (g) Packaged 6652
6829
7367
8082
8797
8974
9512
1560mm
1640mm
1720mm
1800mm
1920mm
2120mm
A
1563.3/61.5
1641.3/64.6
1720.8/67.7
1802.9/71.0
1922.8/75.7
2120.0/83.5
B
1699.3/66.9
1777.3/70.0
1856.8/73.1
1938.9/76.3
2058.8/81.1
2256.0/88.8
C
1660.6/65.4
1738.6/68.4
1818.1/71.6
1900.2/74.8
2020.1/79.5
2217.3/87.3
D
1586.2/62.4
1664.2/65.5
1743.7/68.6
1825.8/71.9
1945.7/76.6
2142.9/84.4
E
1650.2/65.0
1728.2/68.0
1807.7/71.2
1889.8/74.4
2009.7/79.1
2206.9/86.9
Weight (g)
7509
7870
8224
8585
9116
10016
10050
10404
10765
11296
12196
Weight (g) Packaged 9689
© 2008 Schneider Electric All Rights Reserved
English
14 mm
93–EN
XUSLB/XUSLDM Safety Light Curtain
Section 8—Technical Characteristics
Figure 47:
30072-451-85
02/2008
XUSLD Dimensions
1.19
30.1
2.33
59.3
Bracket
Rotation XPS-LCM Module
2.19
55.6
90.0°
1.97
50.0
1.50
38.1
2.08
52.8
TOP
VIEWS
1.58
40.1
1.09
27.8
Multiple
Flex
Segments
.27
6.8
1.93
49.1
2.01
51.0
Flex - Out
Connector Cap
M12 Plug
2.31
58.8
English
.91
23.2
1.50
38.0
1.55
39.4
1.97
50.0
“A”
Detection
Zone
“C”
Center
Slot
Mounting
“B”
“E2”
Mid Segments
“E1”
Last
Segment
1.09
27.8
2.01
51.0
.73
18.5
2.31
58.8
Flex Cable
4.33
110.0
1.55
39.4
1.47
37.2
Typ.
1.09
27.8
2.01
51.0
2.31
58.8
1.55
39.4
“D”
First
Segment
“C”
Center
Slot
Mounting
“A”
Detection
Zone
Alt.
T-Slot
Mtg.
“B”
1.82
46.4
2.74
69.6
2.28
58.0
3.04
77.3
Front
View
Left Side
View
Quick Disconnect
Cable
BTM
View
1.47
397.2
Right Side
View
1.93
49.1
Mounting
Brackets
Inverted
Back
View
2.67
67.8
PDM Port
Cover/Cap
M8 Plug
PDM Cable
PDM
2.20
56.0
2.42
61.5
94–EN
© 2008 Schneider Electric All Rights Reserved
30072-451-85
02/2008
XUSLD Dimensions (mm / in.) (Refer to Figure 47 for lettered items.)
280mm
320mm
360mm
440mm
520mm
600mm
720mm
760mm
A
284.4/11.2
324.8/12.8
364.5/14.3
443.9/17.5
523.4/20.6
604.1/23.8
724.0/28.5
763.0/30.0
B1
420.4/16.6
460.8/18.1
500.5/19.7
579.9/22.8
659.4/26.0
740.1/29.1
860.0/33.9
899.0/35.4
B2
401.9/15.8
442.3/17.4
482.0/19.0
561.4/22.1
640.9/25.2
721.6/28.4
841.5/33.1
880.5/34.7
C1
381.7/15.0
422.1/16.6
461.8/18.2
541.2/21.3
620.7/24.4
701.4/27.6
821.3/32.3
860.3/33.9
C2
363.1/14.3
403.5/15.9
443.2/17.4
522.6/20.6
602.1/23.7
682.8/26.9
802.7/31.6
841.7/33.1
D
440.0/17.3
480.4/18.9
520.1/20.5
599.5/23.6
679.0/26.7
759.7/29.9
879.6/34.6
918.6/36.2
E1
367.7/14.5
408.1/16.1
447.8/17.6
527.2/20.8
606.7/23.9
687.4/27.1
807.3/31.8
846.3/33.3
E2
421.4/16.6
461.8/18.2
501.5/19.7
580.9/22.9
660.4/26.0
741.1/29.2
861.0/33.9
900.0/35.4
Weight (g)
1788
1965
2150
2504
2865
3219
3757
3934
14mm Weight (g) Packaged 2598
2775
2960
3314
3675
4234
4772
4949
880mm
920mm
960mm
1040mm
1120mm
1200mm
1360mm
A
882.8/34.8
922.5.8/36.3
963.6/37.9
1042.9/41.1
1122.3/44.2
1203.8/47.4
1362.0/53.6
B1
1018.8/40.1
1058.5/41.7
1099.6/43.3
1178.9/46.4
1258.3/49.5
1339.8/52.7
1498.0/59.0
B2
1000.3/39.4
1040.0/40.9
1081.1/42.6
1160.4/45.7
1239.8/48.8
1321.3/52.0
1479.5/58.2
C1
980.1/38.6
1019.8/40.2
1060.9/41.8
1140.2/44.9
1219.6/48.0
1301.1/51.2
1459.3/57.5
C2
961.5/37.9
1001.2/39.4
1042.3/41.0
1121.6/44.2
1201.0/47.3
1282.5/50.5
1440.7/56.7
D
1038.4/40.9
1078.1/42.5
1119.2/44.1
1198.5/47.2
1277.9/50.3
1359.4/53.5
1517.6/59.8
E1
966.1/38.0
1005.8/39.6
1046.9/41.2
1126.2/44.3
1205.6/47.5
1287.1/50.7
1445.3/56.9
E2
1019.8/40.2
1059.5/41.7
1100.6/43.3
1179.9/46.5
1259.3/49.6
1340.8/52.8
1499.0/59.0
Weight (g)
4472
4649
4825
5187
5540
5902
6617
Weight (g) Packaged 6652
6829
7005
7367
7720
8082
8797
320mm
360mm
440mm
520mm
600mm
680mm
760mm
A
324.8/12.8
364.5/14.3
443.9/17.5
523.4/20.6
604.1/23.8
683.6/26.9
763.0/30.0
B1
460.8/18.1
500.5/19.7
579.9/22.8
659.4/26.0
740.1/29.1
819.6/32.3
899.0/35.4
B2
442.3/17.4
482.0/19.0
561.4/22.1
640.9/25.2
721.6/28.4
801.1/31.5
880.5/34.7
C1
422.1/16.6
461.8/18.2
541.2/21.3
620.7/24.4
701.4/27.6
780.9/30.7
860.3/33.9
C2
403.5/15.9
443.2/17.4
522.6/20.6
602.1/23.7
682.8/26.9
762.3/30.0
841.7/33.1
D
480.4/18.9
520.1/20.5
599.5/23.6
679.0/26.7
759.7/29.9
839.2/33.0
918.6/36.2
E1
408.1/16.1
447.8/17.6
527.2/20.8
606.7/23.9
687.4/27.1
766.9/30.2
846.3/33.3
30mm E2
461.8/18.2
501.5/19.7
580.9/22.9
660.4/26.0
741.1/29.2
820.6/32.3
900.0/35.4
1965
2150
2504
2865
3219
3580
3934
Weight (g) Packaged 2775
2960
3314
3675
4234
4595
4949
Weight (g)
© 2008 Schneider Electric All Rights Reserved
95–EN
English
Table 33:
XUSLB/XUSLDM Safety Light Curtain
Section 8—Technical Characteristics
XUSLB/XUSLDM Safety Light Curtain
Section 8—Technical Characteristics
Table 33:
XUSLD Dimensions (mm / in.) (Refer to Figure 47 for lettered items.) (continued)
880mm
920mm
1040mm
1200mm
1360mm
1400mm
1520mm
English
A
882.8/34.8
922.5.8/36.3
1042.9/41.1
1203.8/47.4
1362.0/53.6
1401.7/55.2
1521.5/59.9
B1
1018.8/40.1
1058.5/41.7
1178.9/46.4
1339.8/52.7
1498.0/59.0
1537.7/60.5
1657.5/65.3
B2
1000.3/39.4
1040.0/40.9
1160.4/45.7
1321.3/52.0
1479.5/58.2
1519.2/59.8
1639.0/64.5
C1
980.1/38.6
1019.8/40.2
1140.2/44.9
1301.1/51.2
1459.3/57.5
1499.0/59.0
1618.8/63.7
C2
961.5/37.9
1001.2/39.4
1121.6/44.2
1282.5/50.5
1440.7/56.7
1480.4/58.3
1600.2/63.0
D
1038.4/40.9
1078.1/42.5
1198.5/47.2
1359.4/53.5
1517.6/59.8
1557.3/61.3
1677.1/66.0
E1
966.1/38.0
1005.8/39.6
1126.2/44.3
1287.1/50.7
1445.3/56.9
1485.0/58.5
1604.8/63.2
E2
1019.8/40.2
1059.5/41.7
1179.9/46.5
1340.8/52.8
1499.0/59.0
1538.7/60.6
1658.5/65.3
Weight (g)
4472
4649
4825
5902
6617
6793
7332
Weight (g) Packaged 6652
6829
7005
8082
8797
8973
9512
1560mm
1640mm
1720mm
1800mm
1920mm
2120mm
A
1563.3/61.5
1641.3/64.6
1720.8/67.6
1802.9/71.0
1922.8/75.7
2120.0/83.5
30mm B1
1699.3/66.9
1777.3/70.0
1856.8/73.1
1938.9/76.3
2058.8/81.1
2256.0/88.8
B2
1680.8/66.2
1758.8/69.2
1838.3/72.4
1920.4/75.6
2040.3/80.3
2237.5/88.1
C1
1660.6/65.4
1738.6/68.4
1818.1/71.6
1900.2/74.8
2020.1/79.5
2217.3/87.3
C2
1642.0/64.6
1720.0/67.7
1799.5/70.8
1881.6/74.1
2001.5/78.8
2198.7/86.6
D
1718.9/67.7
1796.9/70.7
1876.4/73.9
1958.5/77.1
2078.4/81.8
2275.6/88.6
E1
1646.6/64.8
1724.6/67.9
1804.1/71.0
1886.2/74.3
2006.1/79.0
2203.3/86.7
E2
1700.3/66.9
1778.3/70.0
1857.8/73.1
1939.9/76.4
2059.8/81.1
2257.0/88.9
Weight (g)
7509
7870
8224
8585
9116
10016
10050
10404
10765
11296
12196
Weight (g) Packaged 9689
96–EN
30072-451-85
02/2008
© 2008 Schneider Electric All Rights Reserved
30072-451-85
02/2008
XPSLCM1 SPECIFICATIONS
XUSLB/XUSLDM Safety Light Curtain
Section 8—Technical Characteristics
Table 34:
XPSLCM1 Environmental Specifications
Input Power
24 Vdc± 20 %, 30 mA max.
Temperature
0° C to 55° C
Humidity
Less than 95% non-condensing
Storage Temperature -25° C to 75° C
In accordance with IEC 68-2-29, 1 Dg, 15 ms pulse, 1000/axis
Enclosure
IP20
Mute Sensor
PNP 24 Vdc (11 mA consumption)
Mute Lamp Output
10 – 100 MA (NPN), 30 Vdc max. 1
Safety Category
Type 4 per IEC 61496-1
1
The external lamp must provide a current load between 10 mA and 100 mA for the lamp
monitoring circuit to sense proper operation of the mute lamp.
White
Orange
Blue
Figure 48:
Brown
In accordance with IEC 68-2-6, 0.35 mm displacement, 10 to 55 Hz
Shock
XPSLCM1 Dimensions in mm (in.)
22.5 ( 0.89 )
113.3 ( 4.38 )
102.9 ( 4.05 )
Lamp
Shield PE
+VDC 0VDC +RS -RS
RET
Telemecanique
Preventa
Lamp
Shield PE
+VDC 0VDC +RS -RS
RET
XPS-LCM1
99.1 ( 3.90 )
Status
Telemecanique
Preventa
XPS-LCM1
Status
S3 S1 S2 S4
114.3 ( 4.50 )
S3 S1 S2 S4
© 2008 Schneider Electric All Rights Reserved
97–EN
English
Vibration
XUSLB/XUSLDM Safety Light Curtain
Section 8—Technical Characteristics
30072-451-85
02/2008
REPLACEMENT PARTS AND
ACCESSORIES
Replacement Transmitters and Receivers
English
98–EN
Table 35:
Transmitter, XUSLB, Basic Stand-alone
Transmitter
Description
XUSLBQ6A0280T
Transmitter, 7 m range, finger detection, 0280 mm protected height
XUSLBQ6A0320T
Transmitter, 7 m range, finger detection, 0320 mm protected height
XUSLBQ6A0360T
Transmitter, 7 m range, finger detection, 0360 mm protected height
XUSLBQ6A0440T
Transmitter, 7 m range, finger detection, 0440 mm protected height
XUSLBQ6A0520T
Transmitter, 7 m range, finger detection, 0520 mm protected height
XUSLBQ6A0600T
Transmitter, 7 m range, finger detection, 0600 mm protected height
XUSLBQ6A0720T
Transmitter, 7 m range, finger detection, 0720 mm protected height
XUSLBQ6A0760T
Transmitter, 7 m range, finger detection, 0760 mm protected height
XUSLBQ6A0880T
Transmitter, 7 m range, finger detection, 0880 mm protected height
XUSLBQ6A0920T
Transmitter, 7 m range, finger detection, 0920 mm protected height
XUSLBQ6A0960T
Transmitter, 7 m range, finger detection, 0960 mm protected height
XUSLBQ6A1040T
Transmitter, 7 m range, finger detection, 1040 mm protected height
XUSLBQ6A1120T
Transmitter, 7 m range, finger detection, 1120 mm protected height
XUSLBQ6A1200T
Transmitter, 7 m range, finger detection, 1200 mm protected height
XUSLBQ6A1360T
Transmitter, 7 m range, finger detection, 1360 mm protected height
XUSLBR5A0320T
Transmitter, 20 m range, hand detection, 0320 mm protected height
XUSLBR5A0360T
Transmitter, 20 m range, hand detection, 0360 mm protected height
XUSLBR5A0440T
Transmitter, 20 m range, hand detection, 0440 mm protected height
XUSLBR5A0520T
Transmitter, 20 m range, hand detection, 0520 mm protected height
XUSLBR5A0600T
Transmitter, 20 m range, hand detection, 0600 mm protected height
XUSLBR5A0680T
Transmitter, 20 m range, hand detection, 0680 mm protected height
XUSLBR5A0760T
Transmitter, 20 m range, hand detection, 0760 mm protected height
XUSLBR5A0880T
Transmitter, 20 m range, hand detection, 0880 mm protected height
XUSLBR5A0920T
Transmitter, 20 m range, hand detection, 0920 mm protected height
XUSLBR5A1040T
Transmitter, 20 m range, hand detection, 1040 mm protected height
XUSLBR5A1200T
Transmitter, 20 m range, hand detection, 1200 mm protected height
XUSLBR5A1360T
Transmitter, 20 m range, hand detection, 1360 mm protected height
XUSLBR5A1400T
Transmitter, 20 m range, hand detection, 1400 mm protected height
XUSLBR5A1520T
Transmitter, 20 m range, hand detection, 1520 mm protected height
XUSLBR5A1560T
Transmitter, 20 m range, hand detection, 1560 mm protected height
XUSLBR5A1640T
Transmitter, 20 m range, hand detection, 1640 mm protected height
XUSLBR5A1720T
Transmitter, 20 m range, hand detection, 1720 mm protected height
XUSLBR5A1800T
Transmitter, 20 m range, hand detection, 1800 mm protected height
XUSLBR5A1920T
Transmitter, 20 m range, hand detection, 1920 mm protected height
XUSLBR5A2120T
Transmitter, 20 m range, hand detection, 2120 mm protected height
© 2008 Schneider Electric All Rights Reserved
30072-451-85
02/2008
XUSLB/XUSLDM Safety Light Curtain
Section 8—Technical Characteristics
© 2008 Schneider Electric All Rights Reserved
Transmitter, XUSLDM, Universal, Master
Transmitter
Description
XUSLDMQ6A0280T
Transmitter, Master, 7 m range, finger detection, 0280 mm protected
height
XUSLDMQ6A0320T
Transmitter, Master, 7 m range, finger detection, 0320 mm protected
height
XUSLDMQ6A0360T
Transmitter, Master, 7 m range, finger detection, 0360 mm protected
height
XUSLDMQ6A0440T
Transmitter, Master, 7 m range, finger detection, 0440 mm protected
height
XUSLDMQ6A0520T
Transmitter, Master, 7 m range, finger detection, 0520 mm protected
height
XUSLDMQ6A0600T
Transmitter, Master, 7 m range, finger detection, 0600 mm protected
height
XUSLDMQ6A0720T
Transmitter, Master, 7 m range, finger detection, 0720 mm protected
height
XUSLDMQ6A0760T
Transmitter, Master, 7 m range, finger detection, 0760 mm protected
height
XUSLDMQ6A0880T
Transmitter, Master, 7 m range, finger detection, 0880 mm protected
height
XUSLDMQ6A0920T
Transmitter, Master, 7 m range, finger detection, 0920 mm protected
height
XUSLDMQ6A0960T
Transmitter, Master, 7 m range, finger detection, 0960 mm protected
height
XUSLDMQ6A1040T
Transmitter, Master, 7 m range, finger detection, 1040 mm protected
height
XUSLDMQ6A1120T
Transmitter, Master, 7 m range, finger detection, 1120 mm protected
height
XUSLDMQ6A1200T
Transmitter, Master, 7 m range, finger detection, 1200 mm protected
height
XUSLDMQ6A1360T
Transmitter, Master, 7 m range, finger detection, 1360 mm protected
height
XUSLDMY5A0320T
Transmitter, Master, 20 m range, hand detection, 0320 mm protected
height
XUSLDMY5A0360T
Transmitter, Master, 20 m range, hand detection, 0360 mm protected
height
XUSLDMY5A0440T
Transmitter, Master, 20 m range, hand detection, 0440 mm protected
height
XUSLDMY5A0520T
Transmitter, Master, 20 m range, hand detection, 0520 mm protected
height
XUSLDMY5A0600T
Transmitter, Master, 20 m range, hand detection, 0600 mm protected
height
XUSLDMY5A0680T
Transmitter, Master, 20 m range, hand detection, 0680 mm protected
height
XUSLDMY5A0760T
Transmitter, Master, 20 m range, hand detection, 0760 mm protected
height
XUSLDMY5A0880T
Transmitter, Master, 20 m range, hand detection, 0880 mm protected
height
XUSLDMY5A0920T
Transmitter, Master, 20 m range, hand detection, 0920 mm protected
height
XUSLDMY5A1040T
Transmitter, Master, 20 m range, hand detection, 1040 mm protected
height
XUSLDMY5A1200T
Transmitter, Master, 20 m range, hand detection, 1200 mm protected
height
XUSLDMY5A1360T
Transmitter, Master, 20 m range, hand detection, 1360 mm protected
height
XUSLDMY5A1400T
Transmitter, Master, 20 m range, hand detection, 1400 mm protected
height
XUSLDMY5A1520T
Transmitter, Master, 20 m range, hand detection, 1520 mm protected
height
XUSLDMY5A1560T
Transmitter, Master, 20 m range, hand detection, 1560 mm protected
height
99–EN
English
Table 36:
XUSLB/XUSLDM Safety Light Curtain
Section 8—Technical Characteristics
30072-451-85
02/2008
Table 36:
Transmitter
Description
XUSLDMY5A1640T
Transmitter, Master, 20 m range, hand detection, 1640 mm protected
height
XUSLDMY5A1720T
Transmitter, Master, 20 m range, hand detection, 1720 mm protected
height
XUSLDMY5A1800T
Transmitter, Master, 20 m range, hand detection, 1800 mm protected
height
XUSLDMY5A1920T
Transmitter, Master, 20 m range, hand detection, 1920 mm protected
height
XUSLDMY5A2120T
Transmitter, Master, 20 m range, hand detection, 2120 mm protected
height
English
Table 37:
100–EN
Transmitter, XUSLDM, Universal, Master (continued)
Transmitter, XUSLDS, Universal, Slave
Transmitter
Description
XUSLDSQ6A0280T
Transmitter, Slave, 7 m range, finger detection, 0280 mm protected
height
XUSLDSQ6A0320T
Transmitter, Slave, 7 m range, finger detection, 0320 mm protected
height
XUSLDSQ6A0360T
Transmitter, Slave, 7 m range, finger detection, 0360 mm protected
height
XUSLDSQ6A0440T
Transmitter, Slave, 7 m range, finger detection, 0440 mm protected
height
XUSLDSQ6A0520T
Transmitter, Slave, 7 m range, finger detection, 0520 mm protected
height
XUSLDSQ6A0600T
Transmitter, Slave, 7 m range, finger detection, 0600 mm protected
height
XUSLDSQ6A0720T
Transmitter, Slave, 7 m range, finger detection, 0720 mm protected
height
XUSLDSQ6A0760T
Transmitter, Slave, 7 m range, finger detection, 0760 mm protected
height
XUSLDSQ6A0880T
Transmitter, Slave, 7 m range, finger detection, 0880 mm protected
height
XUSLDSQ6A0920T
Transmitter, Slave, 7 m range, finger detection, 0920 mm protected
height
XUSLDSQ6A0960T
Transmitter, Slave, 7 m range, finger detection, 0960 mm protected
height
XUSLDSQ6A1040T
Transmitter, Slave, 7 m range, finger detection, 1040 mm protected
height
XUSLDSQ6A1120T
Transmitter, Slave, 7 m range, finger detection, 1120 mm protected
height
XUSLDSQ6A1200T
Transmitter, Slave, 7 m range, finger detection, 1200 mm protected
height
XUSLDSY5A0320T
Transmitter, Slave, 20 m range, hand detection, 0320 mm protected
height
XUSLDSY5A0360T
Transmitter, Slave, 20 m range, hand detection, 0360 mm protected
height
XUSLDSY5A0440T
Transmitter, Slave, 20 m range, hand detection, 0440 mm protected
height
XUSLDSY5A0520T
Transmitter, Slave, 20 m range, hand detection, 0520 mm protected
height
XUSLDSY5A0600T
Transmitter, Slave, 20 m range, hand detection, 0600 mm protected
height
XUSLDSY5A0680T
Transmitter, Slave, 20 m range, hand detection, 0680 mm protected
height
XUSLDSY5A0760T
Transmitter, Slave, 20 m range, hand detection, 0760 mm protected
height
XUSLDSY5A0880T
Transmitter, Slave, 20 m range, hand detection, 0880 mm protected
height
© 2008 Schneider Electric All Rights Reserved
30072-451-85
02/2008
XUSLB/XUSLDM Safety Light Curtain
Section 8—Technical Characteristics
Transmitter
Description
XUSLDSY5A0920T
Transmitter, Slave, 20 m range, hand detection, 0920 mm protected
height
XUSLDSY5A1040T
Transmitter, Slave, 20 m range, hand detection, 1040 mm protected
height
XUSLDSY5A1200T
Transmitter, Slave, 20 m range, hand detection, 1200 mm protected
height
XUSLDSY5A1360T
Transmitter, Slave, 20 m range, hand detection, 1360 mm protected
height
XUSLDSY5A1400T
Transmitter, Slave, 20 m range, hand detection, 1400 mm protected
height
XUSLDSY5A1520T
Transmitter, Slave, 20 m range, hand detection, 1520 mm protected
height
XUSLDSY5A1560T
Transmitter, Slave, 20 m range, hand detection, 1560 mm protected
height
XUSLDSY5A1640T
Transmitter, Slave, 20 m range, hand detection, 1640 mm protected
height
XUSLDSY5A1720T
Transmitter, Slave, 20 m range, hand detection, 1720 mm protected
height
XUSLDSY5A1800T
Transmitter, Slave, 20 m range, hand detection, 1800 mm protected
height
XUSLDSY5A1920T
Transmitter, Slave, 20 m range, hand detection, 1920 mm protected
height
XUSLDSY5A2120T
Transmitter, Slave, 20 m range, hand detection, 2120 mm protected
height
Table 38:
© 2008 Schneider Electric All Rights Reserved
Transmitter, XUSLDS, Universal, Slave (continued)
Receiver, XUSLB, Optimum Stand-alone
Receiver
Description
XUSLBQ6A0280R
Receiver, Basic, 7 m range, finger detection, 0280 mm protected height
XUSLBQ6A0320R
Receiver, Basic, 7 m range, finger detection, 0320 mm protected height
XUSLBQ6A0360R
Receiver, Basic, 7 m range, finger detection, 0360 mm protected height
XUSLBQ6A0440R
Receiver, Basic, 7 m range, finger detection, 0440 mm protected height
XUSLBQ6A0520R
Receiver, Basic, 7 m range, finger detection, 0520 mm protected height
XUSLBQ6A0600R
Receiver, Basic, 7 m range, finger detection, 0600 mm protected height
XUSLBQ6A0720R
Receiver, Basic, 7 m range, finger detection, 0720 mm protected height
XUSLBQ6A0760R
Receiver, Basic, 7 m range, finger detection, 0760 mm protected height
XUSLBQ6A0880R
Receiver, Basic, 7 m range, finger detection, 0880 mm protected height
XUSLBQ6A0920R
Receiver, Basic, 7 m range, finger detection, 0920 mm protected height
XUSLBQ6A0960R
Receiver, Basic, 7 m range, finger detection, 0960 mm protected height
XUSLBQ6A1040R
Receiver, Basic, 7 m range, finger detection, 1040 mm protected height
XUSLBQ6A1120R
Receiver, Basic, 7 m range, finger detection, 1120 mm protected height
XUSLBQ6A1200R
Receiver, Basic, 7 m range, finger detection, 1200 mm protected height
XUSLBQ6A1360R
Receiver, Basic, 7 m range, finger detection, 1360 mm protected height
XUSLBR5A0320R
Receiver, Basic, 20 m range, hand detection, 0320 mm protected height
XUSLBR5A0360R
Receiver, Basic, 20 m range, hand detection, 0360 mm protected height
XUSLBR5A0440R
Receiver, Basic, 20 m range, hand detection, 0440 mm protected height
XUSLBR5A0520R
Receiver, Basic, 20 m range, hand detection, 0520 mm protected height
XUSLBR5A0600R
Receiver, Basic, 20 m range, hand detection, 0600 mm protected height
XUSLBR5A0680R
Receiver, Basic, 20 m range, hand detection, 0680 mm protected height
XUSLBR5A0760R
Receiver, Basic, 20 m range, hand detection, 0760 mm protected height
XUSLBR5A0880R
Receiver, Basic, 20 m range, hand detection, 0880 mm protected height
XUSLBR5A0920R
Receiver, Basic, 20 m range, hand detection, 0920 mm protected height
XUSLBR5A1040R
Receiver, Basic, 20 m range, hand detection, 1040 mm protected height
101–EN
English
Table 37:
XUSLB/XUSLDM Safety Light Curtain
Section 8—Technical Characteristics
30072-451-85
02/2008
Table 38:
English
Receiver
Description
XUSLBR5A1200R
Receiver, Basic, 20 m range, hand detection, 1200 mm protected height
XUSLBR5A1360R
Receiver, Basic, 20 m range, hand detection, 1360 mm protected height
XUSLBR5A1400R
Receiver, Basic, 20 m range, hand detection, 1400 mm protected height
XUSLBR5A1520R
Receiver, Basic, 20 m range, hand detection, 1520 mm protected height
XUSLBR5A1560R
Receiver, Basic, 20 m range, hand detection, 1560 mm protected height
XUSLBR5A1640R
Receiver, Basic, 20 m range, hand detection, 1640 mm protected height
XUSLBR5A1720R
Receiver, Basic, 20 m range, hand detection, 1720 mm protected height
XUSLBR5A1800R
Receiver, Basic, 20 m range, hand detection, 1800 mm protected height
XUSLBR5A1920R
Receiver, Basic, 20 m range, hand detection, 1920 mm protected height
XUSLBR5A2120R
Receiver, Basic, 20 m range, hand detection, 2120 mm protected height
Table 39:
102–EN
Receiver, XUSLB, Optimum Stand-alone (continued)
Receiver, XUSLDM, Universal, Master
Receiver
Description
XUSLDMQ6A0280R
Receiver, Advanced Master, 7 m range, finger detection, 0280 mm
protected height
XUSLDMQ6A0320R
Receiver, Advanced Master, 7 m range, finger detection, 0320 mm
protected height
XUSLDMQ6A0360R
Receiver, Advanced Master, 7 m range, finger detection, 0360 mm
protected height
XUSLDMQ6A0440R
Receiver, Advanced Master, 7 m range, finger detection, 0440 mm
protected height
XUSLDMQ6A0520R
Receiver, Advanced Master, 7 m range, finger detection, 0520 mm
protected height
XUSLDMQ6A0600R
Receiver, Advanced Master, 7 m range, finger detection, 0600 mm
protected height
XUSLDMQ6A0720R
Receiver, Advanced Master, 7 m range, finger detection, 0720 mm
protected height
XUSLDMQ6A0760R
Receiver, Advanced Master, 7 m range, finger detection, 0760 mm
protected height
XUSLDMQ6A0880R
Receiver, Advanced Master, 7 m range, finger detection, 0880 mm
protected height
XUSLDMQ6A0920R
Receiver, Advanced Master, 7 m range, finger detection, 0920 mm
protected height
XUSLDMQ6A0960R
Receiver, Advanced Master, 7 m range, finger detection, 0960 mm
protected height
XUSLDMQ6A1040R
Receiver, Advanced Master, 7 m range, finger detection, 1040 mm
protected height
XUSLDMQ6A1120R
Receiver, Advanced Master, 7 m range, finger detection, 1120 mm
protected height
XUSLDMQ6A1200R
Receiver, Advanced Master, 7 m range, finger detection, 1200 mm
protected height
XUSLDMQ6A1360R
Receiver, Advanced Master, 7 m range, finger detection, 1360 mm
protected height
XUSLDMY5A0320R
Receiver, Advanced Master, 20 m range, hand detection, 0320 mm
protected height
XUSLDMY5A0360R
Receiver, Advanced Master, 20 m range, hand detection, 0360 mm
protected height
XUSLDMY5A0440R
Receiver, Advanced Master, 20 m range, hand detection, 0440 mm
protected height
XUSLDMY5A0520R
Receiver, Advanced Master, 20 m range, hand detection, 0520 mm
protected height
XUSLDMY5A0600R
Receiver, Advanced Master, 20 m range, hand detection, 0600 mm
protected height
XUSLDMY5A0680R
Receiver, Advanced Master, 20 m range, hand detection, 0680 mm
protected height
© 2008 Schneider Electric All Rights Reserved
30072-451-85
02/2008
XUSLB/XUSLDM Safety Light Curtain
Section 8—Technical Characteristics
Receiver
Description
XUSLDMY5A0760R
Receiver, Advanced Master, 20 m range, hand detection, 0760 mm
protected height
XUSLDMY5A0880R
Receiver, Advanced Master, 20 m range, hand detection, 0880 mm
protected height
XUSLDMY5A0920R
Receiver, Advanced Master, 20 m range, hand detection, 0920 mm
protected height
XUSLDMY5A1040R
Receiver, Advanced Master, 20 m range, hand detection, 1040 mm
protected height
XUSLDMY5A1200R
Receiver, Advanced Master, 20 m range, hand detection, 1200 mm
protected height
XUSLDMY5A1360R
Receiver, Advanced Master, 20 m range, hand detection, 1360 mm
protected height
XUSLDMY5A1400R
Receiver, Advanced Master, 20 m range, hand detection, 1400 mm
protected height
XUSLDMY5A1520R
Receiver, Advanced Master, 20 m range, hand detection, 1520 mm
protected height
XUSLDMY5A1560R
Receiver, Advanced Master, 20 m range, hand detection, 1560 mm
protected height
XUSLDMY5A1640R
Receiver, Advanced Master, 20 m range, hand detection, 1640 mm
protected height
XUSLDMY5A1720R
Receiver, Advanced Master, 20 m range, hand detection, 1720 mm
protected height
XUSLDMY5A1800R
Receiver, Advanced Master, 20 m range, hand detection, 1800 mm
protected height
XUSLDMY5A1920R
Receiver, Advanced Master, 20 m range, hand detection, 1920 mm
protected height
XUSLDMY5A2120R
Receiver, Advanced Master, 20 m range, hand detection, 2120 mm
protected height
Table 40:
© 2008 Schneider Electric All Rights Reserved
Receiver, XUSLDM, Universal, Master (continued)
Receiver, XUSLDS, Universal, Slave
Receiver
Description
XUSLDSQ6A0280R
Receiver, Slave, 7 m range, finger detection, 0280 mm protected height
XUSLDSQ6A0320R
Receiver, Slave, 7 m range, finger detection, 0320 mm protected height
XUSLDSQ6A0360R
Receiver, Slave, 7 m range, finger detection, 0360 mm protected height
XUSLDSQ6A0440R
Receiver, Slave, 7 m range, finger detection, 0440 mm protected height
XUSLDSQ6A0520R
Receiver, Slave, 7 m range, finger detection, 0520 mm protected height
XUSLDSQ6A0600R
Receiver, Slave, 7 m range, finger detection, 0600 mm protected height
XUSLDSQ6A0720R
Receiver, Slave, 7 m range, finger detection, 0720 mm protected height
XUSLDSQ6A0760R
Receiver, Slave, 7 m range, finger detection, 0760 mm protected height
XUSLDSQ6A0880R
Receiver, Slave, 7 m range, finger detection, 0880 mm protected height
XUSLDSQ6A0920R
Receiver, Slave, 7 m range, finger detection, 0920 mm protected height
XUSLDSQ6A0960R
Receiver, Slave, 7 m range, finger detection, 0960 mm protected height
XUSLDSQ6A1040R
Receiver, Slave, 7 m range, finger detection, 1040 mm protected height
XUSLDSQ6A1120R
Receiver, Slave, 7 m range, finger detection, 1120 mm protected height
XUSLDSQ6A1200R
Receiver, Slave, 7 m range, finger detection, 1200 mm protected height
XUSLDSY5A0320R
Receiver, Slave, 20 m range, hand detection, 0320 mm protected height
XUSLDSY5A0360R
Receiver, Slave, 20 m range, hand detection, 0360 mm protected height
XUSLDSY5A0440R
Receiver, Slave, 20 m range, hand detection, 0440 mm protected height
XUSLDSY5A0520R
Receiver, Slave, 20 m range, hand detection, 0520 mm protected height
XUSLDSY5A0600R
Receiver, Slave, 20 m range, hand detection, 0600 mm protected height
XUSLDSY5A0680R
Receiver, Slave, 20 m range, hand detection, 0680 mm protected height
XUSLDSY5A0760R
Receiver, Slave, 20 m range, hand detection, 0760 mm protected height
XUSLDSY5A0880R
Receiver, Slave, 20 m range, hand detection, 0880 mm protected height
103–EN
English
Table 39:
XUSLB/XUSLDM Safety Light Curtain
Section 8—Technical Characteristics
30072-451-85
02/2008
Table 40:
English
104–EN
Receiver, XUSLDS, Universal, Slave
Receiver
Description
XUSLDSY5A0920R
Receiver, Slave, 20 m range, hand detection, 0920 mm protected height
XUSLDSY5A1040R
Receiver, Slave, 20 m range, hand detection, 1040 mm protected height
XUSLDSY5A1200R
Receiver, Slave, 20 m range, hand detection, 1200 mm protected height
XUSLDSY5A1360R
Receiver, Slave, 20 m range, hand detection, 1360 mm protected height
XUSLDSY5A1400R
Receiver, Slave, 20 m range, hand detection, 1400 mm protected height
XUSLDSY5A1520R
Receiver, Slave, 20 m range, hand detection, 1520 mm protected height
XUSLDSY5A1560R
Receiver, Slave, 20 m range, hand detection, 1560 mm protected height
XUSLDSY5A1640R
Receiver, Slave, 20 m range, hand detection, 1640 mm protected height
XUSLDSY5A1720R
Receiver, Slave, 20 m range, hand detection, 1720 mm protected height
XUSLDSY5A1800R
Receiver, Slave, 20 m range, hand detection, 1800 mm protected height
XUSLDSY5A1920R
Receiver, Slave, 20 m range, hand detection, 1920 mm protected height
XUSLDSY5A2120R
Receiver, Slave, 20 m range, hand detection, 2120 mm protected height
© 2008 Schneider Electric All Rights Reserved
30072-451-85
02/2008
© 2008 Schneider Electric All Rights Reserved
Table 41:
Cables and Accessories
Catalog Number
Description
XSZBCT05
Cable, Main Receiver, 5 meters
XSZBCT10
Cable, Main Receiver, 10 meters
XSZBCT15
Cable, Main Receiver, 15 meters
XSZBCT30
Cable, Main Receiver, 30 meters
XSZBCR05
Cable, Main Transmitter, 5 meters
XSZBCR10
Cable, Main Transmitter, 10 meters
XSZBCR15
Cable, Main Transmitter, 15 meters
XSZBCR30
Cable, Main Transmitter, 30 meters
XSZDCT003
Cable, Flex Extension, TX, 0.3 meters
XSZDCT005
Cable, Flex Extension, TX, 0.5 meters
XSZDCT010
Cable, Flex Extension, TX, 1 meters
XSZDCT020
Cable, Flex Extension, TX, 2 meters
XSZDCT030
Cable, Flex Extension, TX, 3 meters
XSZDCT050
Cable, Flex Extension, TX, 5 meters
XSZDCT100
Cable, Flex Extension, TX, 10 meters
XSZDCR003
Cable, Flex Extension, RX, 0.3 meters
XSZDCR005
Cable, Flex Extension, RX, 0.5 meters
XSZDCR010
Cable, Flex Extension, RX, 1 meters
XSZDCR020
Cable, Flex Extension, RX, 2 meters
XSZDCR030
Cable, Flex Extension, RX, 3 meters
XSZDCR050
Cable, Flex Extension, RX, 5 meters
XSZDCR100
Cable, Flex Extension, RX, 10 meters
XSZDCRM10
Cable, XPSLCM1 connect, 10 meters
XSZDCRM15
Cable, XPSLCM1 connect, 15 meters
XSZDCRM30
Cable, XPSLCM1 connect, 30 meters
XUSLZ450
CD ROM Manual
XUSLPDM
Handheld Programing Device
XPSLCM1
Wiring Module
XUSLZ610
KIT, XUSLPDM Connector Cover (qty. 10)
XUSLZPDM
XUSLPDM Holder
XUSLZ228
Kit, XUSLB/D One Head Mounting
XUSLZ330
Kit, XUSLB/D T Slot-Mount Hardware, 2 heads
English
Cables and Accessories
XUSLB/XUSLDM Safety Light Curtain
Section 8—Technical Characteristics
XUSLZ600
Kit, Flex Out Connector Cover (qty. 10)
XUSLAT1
Laser Alignment Tool
XUSLZD70280
IP67 Mounting Kit, XUSLB/D, (qty. 2), 0280 mm protected height
XUSLZD70320
IP67 Mounting Kit, XUSLB/D, (qty. 2), 0320 mm protected height
XUSLZD70360
IP67 Mounting Kit, XUSLB/D, (qty. 2), 0360 mm protected height
XUSLZD70440
IP67 Mounting Kit, XUSLB/D, (qty. 2), 0440 mm protected height
XUSLZD70520
IP67 Mounting Kit, XUSLB/D, (qty. 2), 0520 mm protected height
XUSLZD70600
IP67 Mounting Kit, XUSLB/D, (qty. 2), 0600 mm protected height
XUSLZD70680
IP67 Mounting Kit, XUSLB/D, (qty. 2), 0680 mm protected height
XUSLZD70720
IP67 Mounting Kit, XUSLB/D, (qty. 2), 0720 mm protected height
XUSLZD70760
IP67 Mounting Kit, XUSLB/D, (qty. 2), 0760 mm protected height
XUSLZD70880
IP67 Mounting Kit, XUSLB/D, (qty. 2), 0880 mm protected height
XUSLZD70920
IP67 Mounting Kit, XUSLB/D, (qty. 2), 0920 mm protected height
XUSLZD70960
IP67 Mounting Kit, XUSLB/D, (qty. 2), 0960 mm protected height
XUSLZD71040
IP67 Mounting Kit, XUSLB/D, (qty. 2), 1040 mm protected height
105–EN
XUSLB/XUSLDM Safety Light Curtain
Section 8—Technical Characteristics
30072-451-85
02/2008
Table 41:
Cables and Accessories (continued)
English
Catalog Number
Description
XUSLZD71120
IP67 Mounting Kit, XUSLB/D, (qty. 2), 1120 mm protected height
XUSLZD71200
IP67 Mounting Kit, XUSLB/D, (qty. 2), 1200 mm protected height
XUSLZD71360
IP67 Mounting Kit, XUSLB/D, (qty. 2), 1360 mm protected height
XUSLZD71400
IP67 Mounting Kit, XUSLB/D, (qty. 2), 1400 mm protected height
XUSLZD71520
IP67 Mounting Kit, XUSLB/D, (qty. 2), 1520 mm protected height
XUSLZD71560
IP67 Mounting Kit, XUSLB/D, (qty. 2), 1560 mm protected height
XUSLZD71640
IP67 Mounting Kit, XUSLB/D, (qty. 2), 1640 mm protected height
XUSLZD71720
IP67 Mounting Kit, XUSLB/D, (qty. 2), 1720 mm protected height
XUSLZD71800
IP67 Mounting Kit, XUSLB/D, (qty. 2), 1800 mm protected height
XUSLZD71920
IP67 Mounting Kit, XUSLB/D, (qty. 2), 1920 mm protected height
XUSLZD72120
IP67 Mounting Kit, XUSLB/D, (qty. 2), 2120 mm protected height
Figure 49:
PDM Module with Holder
Front View
Side View
62.00 (2.44)
Back View
30.51 (1.20)
Programming Diagnostic Module
PDM Holder
64.60 (2.54)
140.00 (5.51)
ENTER
50.00 (1.97)
91.00 (3.58)
R2.10 (R0.08)
(x3)
Telemecanique
MS48-PDM
ASSY, MS4800, PDM
42.42 (1.67)
2.50 (0.10)
29.00 (1.14)
22.50 (0.89)
20.00 (0.79)
Maximum screwhead diameter is ø8.00 mm.
Screw types compliant with DIN 7981 are suitable
(for example: ø4.2 mm diameter Phillips screws)
NS48PDM-HDR
PDM holder
Cable assembly, PDM
40.00 (1.57)
22.71 (0.89)
1000 (39.4)
(Typical)
106–EN
Dimensions : mm (in.)
© 2008 Schneider Electric All Rights Reserved
30072-451-85
02/2008
SHOCK MOUNT KIT
XUSLB/XUSLDM Safety Light Curtain
Section 8—Technical Characteristics
This kit is used to isolate mirrors from sources of vibration. It can also be
used to shock-mount the transmitters and receivers. Eight shock mounts
are included.
Table 42:
Shock Mount Kits
Part Number
Description
XSZSMK
XSZSMK and XSZSMK1 shock mounts secured with 10-32 studs
XSZSMK1
XSZSMK2
XSZSMK2 shock mount secured with 1/4-20 studs
Shock Mount Kit
Figure 51:
Shock Mount Kit Dimensions (mm/in)
English
Figure 50:
16.02
0,63
9.65
0,38
9.65
0,38
XSZSMK
Ø 19.05
0,75
10-32-UNF
10-32-UNF
12.70
0,50
9.65
0,38
9.65
0,38
Ø
9.65
0,38
XSZSMK1
10-32 UNF
10-32 UNF
19.05
0,75
12.70
0,50
12.70
0,50
XSZSMK2
Ø 25.40
1,00
1/4-20 UNC
1/4-20 UNC
Table 43:
Recommended Mounting Methods
Compression Mount
Shock
Mount
Kit
Max. Load Torque (K)
lb
lb-in
N•m
Natural
Freq.
(Hz)
Max. Load Torque (K) Natural
Freq.
lb
kg lb-in N•m
(Hz)
XSZSMK
18.0
8.16
222.5
25.16
11.0
3.0
1.36
27.7
3.13
9.5
XSZSMK1
4.8
2.177
96.1
10.86
14.0
2.5
1.13
20.7
2.34
9.0
24.94 949.7 107.39
13.0
23.0 10.43 132.2 14.94
7.5
XSZSMK2 55.0
© 2008 Schneider Electric All Rights Reserved
kg
Shear Mount
107–EN
XUSLB/XUSLDM Safety Light Curtain
Section 8—Technical Characteristics
30072-451-85
02/2008
Table 44:
Weight Classes
Weight Class
Product
1
XUSL•Q, Lengths 280–1040 mm
2
3
4
X
XUSL•Q, Lengths 1120–1200 mm
X
XUSL•Q, Lengths 1360 mm
x
XUSL•R/Y, Lengths 320–680 mm
X
XUSL•R/Y, Lengths 760–1200 mm
X
XUSL•R/Y, Lengths 1360–2120 mm
X
XUSZM, Length 102 mm
X
X
English
XUSZM, Lengths 152–457 mm
X
XUSZM, Lengths 508–711 mm
X
XUSZM, Lengths 762–1016 mm
X
XUSZM, Lengths >1016 mm
Use of shock mount kits is not recommended
XUSZA, Length 102 mm
X
XUSZA, Length 152–1067 mm
X
XUSZA, Length 1219–1626 mm
X
XUSZA, Length 1829 –2134 mm
X
The symbol “•” in these catalog numbers indicates part of the number that
varies between B or DM.
Table 45:
Shock Applications 1
Mounting Method
Weight Class 1
Weight Class 2
XSZSMK
Using two mounts per XSZSMK Using two or four
XSZSMK1 head
XSZSMK1 mounts per head
Shear Mounted
Compression
Mounted
Not Recommended
XSZSMK1
Weight Class 3
XSZSMK
Using four mounts
XSZSMK1 per head
Weight Class 4
XSZSMK
Using four mounts
XSZSMK1 per head
XSZSMK2
Using two or four
mounts per head
XSZSMK
Using two mounts per
XSZSMK
head
Using two mounts per
Using two or four
XSZSMK1
mounts per head
head
XSZSMK2
XSZSMK1
Using two or four
mounts per head
Using two mounts per
head
Using four mounts
per head
1. Shock applications are low frequency, high amplitude applications, such as punch presses,
where strong shock can be present.
Table 46:
Vibration Applications 2
Mounting Method
Weight Class 1
XSZSMK
Shear Mounted
Compression
Mounted
XSZSMK1
XSZSMK1
Using two or four
mounts per head
Weight Class 2
XSZSMK
XSZSMK1
Using two or four
mounts per head
Weight Class 3
Weight Class 4
XSZSMK
Using two or four
mounts per head
XSZSMK
XSZSMK1
Using four mounts
per head
XSZSMK1
Using four mounts
per head
XSZSMK2
Using two mounts per
Using two or four
XSZSMK2
head
mounts per head
XSZSMK2
Using two or four
mounts per head
XSZSMK
Using two mounts per
XSZSMK
head
Using two or four
mounts per head
XSZSMK
Using two mounts per
head
Using four mounts
per head
XSZSMK1
Using four mounts
per head
Using two mounts per
Using two or four
XSZSMK1
head
mounts per head
XSZSMK1
2. Vibration applications are high frequency, low amplitude applications, such as offset printing
machines, where constant vibration can be present.
108–EN
© 2008 Schneider Electric All Rights Reserved
30072-451-85
02/2008
MIRRORS
XUSLB/XUSLDM Safety Light Curtain
Section 8—Technical Characteristics
Mirrors must be firmly mounted and protected against shocks. Observe safe
mounting distances throughout the detection zone, including the distances
to possible reflective surfaces (see “Reflective Surface Interference” on
page 39).
Figure 52:
Mirror Configurations
XUSL•R
XUSL•T
XUSL•T
XUSL•R
English
XUSL•T
XUSL•R
The total nominal range between the transmitter and the receiver will be
reduced according to the number of mirrors.
Table 47:
Recommended Maximum Range for Glass Mirrors: m (ft)
XUSLB/XUSLDM Range
Number of Mirrors
3 (9.84)
7 (21.34)
8 (26.25)
20 (60.96)
1
2.64 (8.66)
6.16 (18.78)
7.04 (23.50)
17.60 (53.64)
2
2.32 (7.61)
5.42 (16.52)
6.2 (20.30)
15.40 (46.94)
3
2.04 (6.69)
4.77 (14.54)
5.45 (17.90)
13.60 (41.45)
4
1.8 (5.91)
4.20 (12.80)
4.8 (15.75)
12 (36.58)
Table 48:
Recommended Maximum Range for
Stainless Steel Mirrors: m (ft)
XUSLB/XUSLDM Range
Number of Mirrors
© 2008 Schneider Electric All Rights Reserved
3 (9.84)
7 (21.34)
8 (26.25)
20 (60.96
1
2.46 (8.07)
5.74 (17.50)
6.60 (21.50)
16.40 (49.99)
2
2,02 (6.63)
4.71 (14.35)
5.4 (17.60)
13.40 (40.84)
3
1.65 (5.41)
3.86 (11.76)
4.90 (14.50)
11 (33.53)
4
1.36 (4.46)
3.16 (9.65)
3.6 (11.90)
9 (23.43)
109–EN
XUSLB/XUSLDM Safety Light Curtain
Section 8—Technical Characteristics
30072-451-85
02/2008
Figure 53:
Mirror Dimensions (See Table 49 for Dimensions A and B)
43 Dia.
1.69
NOTE: Clamp assemblies are included in the
mirror kit.
145
5.72
102
4.0
52
2.05
7 Dia.
0.270
(8 plcs)
32
1.25
24
0.94
A
B
English
Dimensions: mm
in.
13
0.50
1.34
0.05
Table 49:
Dimensions A and B
Part Number
110–EN
A
mm (in.)
B
mm (in.)
182 (7.18)
Glass
Stainless Steel
XUSZM0102
XUSZA0102
140 (5.5)
XUSZM0152
XUSZA0152
191 (7.5)
233 (9.18)
XUSZM0305
XUSZA0305
343 (13.5)
386 (15.18)
XUSZM0457
XUSZA0457
495 (19.5)
538 (21.18)
XUSZM0508
XUSZA0508
546 (21.5)
589 (23.18)
XUSZM0610
XUSZA0610
648 (25.5)
690 (27.18)
XUSZM0711
XUSZA0711
749 (29.5)
792 (31.18)
XUSZM0762
XUSZA0762
800 (31.5)
843 (33.18)
XUSZM0813
XUSZA0813
851 (33.5)
894 (35.18)
XUSZM0914
XUSZA0914
953 (37.5)
995 (39.18)
XUSZM1016
XUSZA1016
1054 (41.5)
1097 (43.18)
XUSZM1067
XUSZA1067
1105 (43.5)
1148 (45.18)
XUSZM1219
XUSZA1219
1257 (49.5)
1300 (51.18)
XUSZM1321
XUSZA1321
1359 (53.5)
1402 (55.18)
XUSZM1372
XUSZA1372
1410 (55.5)
1452 (57.18)
XUSZM1422
XUSZA1422
1461 (57.5)
1503 (59.18)
XUSZM1524
XUSZA1524
1562 (61.5)
1605 (63.18)
XUSZM1626
XUSZA1626
1664 (65.5)
1706 (67.18)
XUSZM1830
XUSZA1830
1867 (73.5)
1910 (75.18)
XUSZM2134
XUSZA2134
2172 (85.5)
2214 (87.18)
© 2008 Schneider Electric All Rights Reserved
30072-451-85
02/2008
XUSLB/XUSLDM Safety Light Curtain
Section 9—Appendix
SECTION 9— APPENDIX
GLOSSARY
ANSI: American National Standards Institute. Administrator and coordinator
of the US private sector standardization system.
Channel: One transmitter/receiver pair of beams.
Detection Zone: The zone within which a specified test piece will be
detected by the XUSLB/XUSLDM system.
External Device Monitoring/Machine Primary Control Element
Monitoring (EDM/MPCE): A means by which the light curtain monitors the
state of external control devices.
Final Switching Device (FSD): The output of the safety light curtain that
interrupts the machine primary control element (EDM/MPCE) as a response
to the output safety switching device (OSSD) transitioning to the Off state.
Minimum Object Sensitivity (MOS): The diameter in millimeters of the
minimum-sized object that will actuate the light curtain. Minimum object
sensitivity is called “detection capability” on the light curtain nameplate.
Off State: The state in which the output circuit is interrupted (open) and
does not permit current to flow.
On State: The state in which the output circuit is complete (closed) and
permits the flow of current.
OSHA: Occupational Safety and Health Administration. A U.S. government
agency.
Output Safety Switching Device (OSSD): The component of the safety
light curtain connected to the machine control system which, when the light
curtain detection zone is interrupted, responds by going to the Off state.
Also known as a safety output.
Test Object: An opaque cylindrical object used to verify the detection
capability of the XUSLB/XUSLDM system.
© 2008 Schneider Electric All Rights Reserved
111–EN
English
Exact Channel Select (Fixed) Blanking: A system with blocked beams in
an exact stored pattern.
XUSLB/XUSLDM Safety Light Curtain
Section 9—Appendix
CHECKOUT PROCEDURE
30072-451-85
02/2008
Qualified personnel must perform the Checkout Procedure in Table 50
during the initial installation and at least once every three months thereafter
or more frequently depending on machine usage and company guidelines.
Make a copy of the checkout procedure form, use the copy as the checkout
log, and store it with the machine records. Use caution when working
around hazardous voltages which may be present during this procedure.
Machine Identification:________________________________________
Date:______________
Table 50:
English
Item
Checkout Procedure
Condition
Comments
1. Verify that the guarded machine is compatible with the type of
❏ Pass
machine that may be used with the XUSLB/XUSLDM system. See
❏ Fail
Precautions on page 9 for further information.
2. Verify that the mounting distance of the XUSLB/XUSLDM
system is equal to or greater than the minimum safe distance from ❏ Pass
the danger zone. See Mounting the Light Curtain on page 46 for ❏ Fail
more information.
3. Determine that all access to the danger zone not protected by an
XUSLB/XUSLDM system is guarded by other means, such as
❏ Pass
gates, fencing, wire, or other approved methods. Verify that all
❏ Fail
additional guarding devices are installed and operating properly.
4. Ensure that the operator is not able to stand between the
XUSLB/XUSLDM system detection zone and the machine danger ❏ Pass
zone. Verify that the light curtain can only be reset from a position ❏ Fail
outside and within view of the hazardous machine area.
5. Inspect the electrical connections between the guarded
machine’s control system and the XUSLB/XUSLDM system. Verify
❏ Pass
that they are properly connected to the machine such that a stop
❏ Fail
signal from the XUSLB/XUSLDM system results in an immediate
halt of the machine's cycle.
6. If the EDM/MPCE monitoring feature is not used, proceed to
Step 7. To test the EDM/MPCE feature, verify that the feature has
been enabled. Turn the machine power on. Cycle the machine.
❏ Pass
Place a temporary jumper wire between the EDM/MPCE
❏ Fail
connections. The XUSLB/XUSLDM system should enter an Alarm
state. Remove the temporary jumper. Press and release the start
button.
7. Record the test results in the machine log. Then perform the Test ❏ Results
Procedure beginning on page 113.
recorded
Comments____________________________________________________________________________________________
_____________________________________________________________________________________________________
_____________________________________________________________________________________________________
________________________________________________________________________________________________
Technician Signature:___________________________________________
112–EN
© 2008 Schneider Electric All Rights Reserved
30072-451-85
02/2008
TEST PROCEDURE
XUSLB/XUSLDM Safety Light Curtain
Section 9—Appendix
Qualified personnel must perform the test procedure in Table 51 during
initial XUSLB/XUSLDM system installation, according to the employer’s
regular inspection program, and after any maintenance, adjustment, or
modification of the XUSLB/XUSLDM system or the guarded machine.
English
Testing confirms that the light curtain, safety system, and the machine
control system work together to properly stop the machine. Failure to test
properly could result in serious injury to personnel. To test the
XUSLB/XUSLDM system, use the proper-size test object.
© 2008 Schneider Electric All Rights Reserved
113–EN
XUSLB/XUSLDM Safety Light Curtain
Section 9—Appendix
Table 51:
30072-451-85
02/2008
Test Procedure
Item
Condition
1. Disable the machine to be guarded. Apply power to the
XUSLB/XUSLDM system.
❏ Pass
❏ Fail
Comments
2. Visually inspect the machine to ensure that access to the danger
zone is only through the XUSLB/XUSLDM detecting zone. If not,
❏ Pass
additional guarding, including mechanical barriers, may be
❏ Fail
required. Verify that all additional guarding devices and barriers are
installed and operating properly.
English
3. Verify that the mounting distance of the XUSLB/XUSLDM
system is equal to or greater than the calculated minimum safe
distance from the danger zone. See Mounting the Light Curtain on ❏ Pass
page 46 for further information. Ensure that the operator is not able ❏ Fail
to stand between the XUSLB/XUSLDM detection zone and the
danger zone.
4. Check for signs of external damage to the XUSLB/XUSLDM
system, the machine, and the electrical cables and wiring. If
❏ Pass
damage is found, lock the machine off and report the damage to the ❏ Fail
supervisor.
5. Interrupt the XUSLB/XUSLDM system detection zone with the
proper-size test object. Move the test object inside the perimeter
(along the top, sides, and bottom) of the detection zone and up and
down through the center. At least one individual beam indicator
❏ Pass
must be lit while the test object is anywhere in the detection zone.
❏ Fail
If in automatic start mode, verify that the red Machine Stop LED is
lit. If in start/restart interlock mode, verify that the red Machine Stop
and yellow interlock LEDs are lit. Press and release the Start button
before proceeding to step 6.
6. Start the machine. While the machine is in motion, interrupt the
detection zone with the test object. The machine should stop
immediately. Never insert the test object into the dangerous parts ❏ Pass
of the machine. With the machine at rest, interrupt the detection
❏ Fail
zone with the test object. Verify that the machine will not start with
the test object in the detection zone.
7. Verify that the braking system is working properly. If the machine
❏ Pass
does not stop fast enough, adjust the braking system or increase
❏ Fail
the distance from the detection zone to the danger zone.
8. If the safety devices or the machine fail any of these tests, do not
run the machine. Immediately tag or lock out the machine to
prevent its use, and notify the supervisor.
Comments____________________________________________________________________________________________
_____________________________________________________________________________________________________
_____________________________________________________________________________________________________
________________________________________________________________________________________________
114–EN
© 2008 Schneider Electric All Rights Reserved
English
XUSLB/XUSLD Safety Light Curtain
Instruction Bulletin
W916196600111A01
English
Schneider Electric
Electrical equipment should be installed, operated, serviced, and maintained only by qualified
personnel. No responsibility is assumed by Schneider Electric for any consequences arising out of
the use of this material.
30072-451-85
© 2008 Schneider Electric All Rights Reserved
02/2008