1
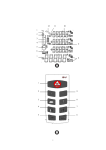
HAND-HELD LASER DISTANCE METER
USER MANUAL V 1.0
1
Safety Regulations
Before using this product, please carefully read and
understand all the terms and operational guidelines in this manual.
Hazardous laser radiation damage, electric shock or personal injury
may occur if operations are not implemented under those safety
regulations in this operation manual.
Do not change the performance of the laser in any way,
otherwise it may cause dangers due to laser exposure. Activate the
laser only when you use the instrument. Don’t stare at the laser
directly. Please keep your instrument safe from use of any
unauthorized persons.
· Don’t shoot at others with the laser intentionally or in dark.
· Don’t shoot the laser beam onto objects with high-reflective
surface.
· Don’t place the laser meter in reach of the child.
Do not repair the equipment without authorization. If the
equipment is damaged, please contact your local dealer.
Electromagnetic radiation may interfere other instruments or
devices (such as medical instruments like pacemakers or hearing aid
.)
·
Do not use the instrument near gas stations and other
inflammable and explosive places.
·
Do not use the instrument near medical equipment.
·
Do not use this instrument on the plane.
Please follow your local laws to dispose the obsolete
instrument.
2
Picture A
1
2
3
4
5
Picture B
1
4
5
2
3
6
7
3
Congratulations on your purchase of PD-23 distance meter.
The safety regulations and
instructions along with the
user manual should be read
carefully before initial operat
-ion.
Overview
Keyboard
See Picture A
1
2
3
4
5
ON / Single measure / Continuous measure
Area / Volume / Pythagorean measure
Plus / Minus / Units
Reference / Illumination
Clear / OFF
Display
See Picture B
1
2
3
4
5
6
7
Laser ON
Reference (front/rear)
Area / volume/ Pythagorean
Battery display
Units with exponents ( 2/3 )
Auxiliary Display (e.g. intermediate values)
Main display
4
Start Up
Inserting / Replacing Batteries
Remove the battery cover, insert the battery correctly. Close the
battery compartment. Replace the battery when this
symbol
constantly blinks in the display.
· Only use alkaline batteries.
· Batteries should be removed in case of danger of corrosion, if
the device will not be used for a long time.
Selecting Units
Press this key until the desired unit is displayed.
Optional units:
length
area
volume
0.000 m
0.000 m²²
0.000 m³ ³
0.00m
0.00 m²
0.00 m³
0.00 ft
0.00 ft²
0.00 ft³
0' 0'' 1/16
0.00 ft²
0.00 ft³
0.0 in
0.00 ft²
0.00 ft³
5
Operation
Switching on/off
Device and laser are switched on to wait to measure.
Holding down this key
for 2 seconds to switch the device
off, The device also switches off automatically after 3 minutes of
inactivity i.e. no key is pressed within that interval.
Clear-Key
Cancel the last action. Within a function (area, volume,
etc.) single measurement can be deleted step by step and
re-measured
Illumination
Press this key for 2 seconds to switch the illumination on
or off.
Reference Setting
Default reference setting is from the rear of the device.
Press this key to switch the reference. The reference
returns automatically to the default setting (rear reference) after
power off.
6
Measuring
Single Measurement
Press this key to activate the laser. Press again to
implement the distance measurement.
Continuous Measurement
Press the key briefly to activate the laser,press and
hold key for about 2 seconds to start continuous measuring .
Press again shortly: continuous measurement is stopped.
During continuous measuring , the latest measured value is
displayed on the main display area, auxiliary display area shows
the last measured value.
Function
Addition / Subtraction
Single distance, area, volume measurement all can be realized by
using addition/subtraction to accumulate or regressive
Press this key to switch to addition or subtraction,
Operational symbol will appear in the front of the main display.
After selecting the algorithm,In the distance measurement mode,
the instrument will automatically operate after the completion of
7
measurement,the result is displayed in the main display area,
measured value will be displayed in the auxiliary display area;In
the area, volume mode, After the completion of area or volume
measurement,press
key to calculation,the result is
displayed in the main display area,latest measured value will be
displayed in the auxiliary display area.
Area
Press this key once,This symbol
key
is displayed. press
to take the first line measurement,press
s
again and take the second line measurement, after this the area of
operation will be automatically, the result is displayed in the
main display area.
Volume
Press this key briefly,This symbol
to
is displayed. Press
take the three lines measurement and then the
volume value will be displayed in the main display area and the
third line measured value is displayed in the auxiliary area.
8
Pythagorean
Pythagorean measurement is used in the condition that the
objective needing to be measured is covered or has no effective
reflecting surface and can’t be measured directly. The accurate
measured result can be got only when the laser beam and
measured goal are at the right angle.
Press this key briefly,this symbol
is displayed in
the screen, according to the on-screen prompts. according to the
on-screen prompts,press
to take Right angle edge -
right angle, or bevel edge - right angle edge operation then the
instrument will automatically realize Pythagorean
operation,
the result is displayed in the main display area.
· When measuring in Pythagorean measurement mode ,
Right-angle edge length must be less than the length of the
hypotenuse , Otherwise the equipment will report mention
information.
· Under the Pythagorean measurement mode, make sure to
start the measurement from the same starting point ; In
Hypotenuse - right angle edge model, it is also necessary to
ensure that right-angle side is perpendicular to the measured
surface.
9
Appendix
Display Notices
In the course of using the instruments,information as below may
be displayed on the screen:
InFo
Cause
Correction
204
Data overflow
Repeat steps
205
252
253
255
256
257
258
Error
measurement
range
transfinite
Temperature
too high
Temperature
too low
Received signal
too weak
Received signal
too strong
Pythagorean
measurement
Violation
Initialization
error
Use the meter in distance
allowed
Let device cool down
Warm device up
Measure target point with
stronger reflectance
Measure target point with
weaker reflectance
Re-measure and ensure the hy
-potenuse is greater than right
angle edge
reboot
Cause
Correction
Hardware error
If the signal still appears after
repeatedly switching on/off the
equipment, please contact your
dealer.
10
Technical Specifications
Range (for extended Distan
-ces, use a target Plate)
Measuring accuracy
Minimum unit displayed
Laser class
Laser type
Automatic power off
Display illumination
Continuous measurement
Addition / subtraction
Battery life,3 V compound
battery
Dimensions and weight
Temperature range:
Storage:
Operation
�
0.05 m to 40 m
typically: ± 3 mm *
1 mm
II
635 nm, < 1 mW
after 180 s
√
√
√
up to 5000
measurements
116*54*35 mm, 155 g
-2 5 to +70
0 to +40
In unfavorable conditions, such as intensive sunshine, very weakly
reflecting target surface or large temperature fluctuations,
measuring accuracy may deteriorate.
Maintenance
Do not immerse the instrument into water. You can use wet soft
cloth to wipe the surface, but do not use corrosive lotion. Clean
optical components like cleaning Eyeglasses and camera lenses
(The laser emission window and receiving lens).
11
Packing list
Name
quantity
unit
1
Main body
1
pc
2
AAA battery
2
pcs
2
Instrument
cap
1
pc
4
Lanyard
1
pc
5
User manual
1
pc
NO.
Testing:
Date:
12
Remarks