1
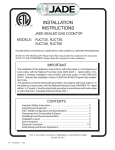
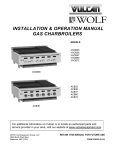
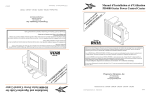
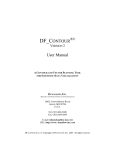
DN
Dry Extractor
Maintenance Manual
___________________________
Spring Air Systems Inc., Oakville, Ontario
Phone (905) 338-2999, Fax (905) 338-0179, [email protected]
2010 Update
DN Dry Extractor Maintenance and Operating
Manual
Table of Contents
Introduction
Spring Air Systems Hood Model Number Designations
Principle of Operation
Variflow Baffles
Baffle Settings
Extractor Insert
Maintenance Schedule
Cleaning the Exterior
Trouble Shooting
Installing the Terminator Baffle
Measuring the Exhaust Airflow
Measuring the Supply Airflow – MI Models Only
Measuring the Supply Airflow – MB Models Only
Measuring the Supply Airflow – MJ Models Only
DN-Startup Report
1
2
2
3
4
4
5
5
5
6
7
8
9
11
12
DN Dry Extractor Maintenance and Operating Manual
ULC/UL Listed Exhaust Hoods without Fire Dampers
INTRODUCTION
Thank you for selecting a SPRING AIR SYSTEMS INC. Commercial kitchen exhaust dry extractor. Your
system consists of a dry extractor, exhaust fan and on/off switch. Others may have supplied the exhaust
fan and on/off operator.
Your SPRING AIR SYSTEMS INC. Dry extractor model was selected to best meet the design
requirements of your commercial kitchen application.
The DN series dry ventilator is a UL/ULC listed “Exhaust Hoods without Fire Dampers”.
Typical SPRING AIR SYSTEMS Dry Ventilator Installation
An ON/OFF selector switch located in the kitchen area or mounted on the exhaust fan starter coil
electrical enclosure normally controls the exhaust fan.
Dry Extractor Maintenance and Operating Manual
1
SPRING AIR SYSTEMS HOOD MODEL NUMBER DESIGNATIONS
There are numerous types and styles of SPRING AIR SYSTEM dry ventilator available. Refer to the
UL/ULC label for the complete model number and exhaust flow requirement for your dry ventilator. The
UL/ULC label is located on the underside of the grease through on the right hand side of the dry
ventilator.
D
D
Dry Grease Extractor
N
No exhaust fire damper
S
B
BS
DB
DI
DF
Shelf type hood
Box type hood
Box shelf type hood
Double box type hood
Single row Island hood
Rev-low hood
MG
MP
MI
MC
MR
MB
MJ
F
Make up air through front grilles
Make up air through perforated panels
Make up air internally
Make up air down discharge through perforated
Make up air through rear wall plenum
DynaFlow Tri-Zone control system
DynaFlow perimeter defense system
Single row canopy finished on all sides, RevLow type
10
4
The length of the ventilator in feet
The width of the ventilator in feet
N
B
MP
10
4
Model Number Designation - Ventilators
PRINCIPLE OF OPERATION
The SPRING AIR SYSTEMS type “D” extractor is a high
efficiency dry extractor. The type “D” extractor removes
grease, dirt and lint through centrifugal force. Remove the
front access door and wipe the interior with a damp cloth to
manually wash the extractor chamber.
The contaminated exhaust air enters the high velocity inlet
slot A and flows through the transition zone to the VORTEX
CHAMBER B. Centrifugal force causes the grease, dirt
and lint particles to deposit on the PRIMARY VARIABLE
FLOW BAFFLE G and VORTEX BAFFLE C. The sloping
VORTEX BAFFLE C drains collected grease to the end of
the ventilator into the grease cup H.
The exhaust air continues into the secondary extraction
chamber, which contains an aDNitional baffle, F. Residual
grease is deposited on the secondary baffle as the exhaust
air gyrates through the secondary chamber.
Type “D” Extractor
Dry Extractor Maintenance and Operating Manual
2
Variflow Baffles
The most important component for the successful operation of a DN hood is the core extractor, which
contains the Variflow baffles. The core extractor profile has been designed to facilitate the smooth flow of
cooking vapors and dilution air from the roof of the hood, down along the front of the core extractor and
into the core extractor slot. The Variflow baffles are located inside the core extractor along the entire
length. The Variflow baffles are adjustable to provide between a 90 CFM/ft to 450 CFM/ft flow rate into
the core extractor slot. The Variflow baffles are adjustable without any special tools by lifting off the core
extractor removable insert and hand adjusting the position of the baffle. Just set the position of the
Variflow baffle to match the appliance located below. See Figure below for isometric view of Variflow
baffles.
Section View of Core Extractor for DN-B Hood
Roof of hood
Exhaust duct collar
Core extractor
Variflow Baffle
Front of hood
Drain connection
Baffle Closed
Baffle Partially Closed
Baffle Opened
Section View of DN Extractor with Detail of Vari-flow Baffle
Dry Extractor Maintenance and Operating Manual
3
BAFFLE SETTINGS
Vari-flow Baffle labeling
Each baffle is factory set base on the type of appliance under the hood.
Extractor Insert
Dry Extractor Maintenance and Operating Manual
4
MAINTENANCE SCHEDULE
DAILY:
1.At the end of the cooking day wipe off the interior and exterior of the dry ventilator canopy and the
underside of the grease trough with damp clothe.
WEEKLY:
1.Remove the grease inserts and wash in a mild detergent and water mixture.
2.Cleaning the Hood Exterior
Cleaning the Hood Exterior
Wipe off the interior of the dry ventilator plenum behind the grease extractor inserts and the interior and
exterior of the grease trough. Remove the grease cup and clean if necessary.
SIX MONTHS
1.Check the exhaust fan belts for alignment, tighten, and wear. Adjust an/or replace.
2.Inspect the fusible link fire damper. Clean and/or replace the fusible link if necessary.
3.For hoods with makeup air only: remove the filter in makeup air plenum and wash in a mild
detergent and water mixture.
CLEANING THE EXTERIOR
Normal soil can be removed with a mild detergent and water mixture applied to a cloth. To remove baked
on grease, apply a cleanser to a damp cloth or sponge and rub on the metal in the direction of the
polishing lines. DO NOT RUB IN A CIRCULAR MOTION.
Burnt deposits, which do not respond, can usually be removed by rubbing the surface with a SCOTCHBRITE scouring pad of STAINLESS scouring pads. DO NOT USE ORDINARY STEEL WOOL.
Heat tint can be removed by a vigorous scouring in the direction of the polish lines using a SCOTCH
BRITE of STAINLESS scouring pad in conjunction with a powdered cleanser.
TROUBLE SHOOTING
Low air
(i)
(ii)
(iii)
(iv)
(iv)
Improper exhaust fan rotation.
Broken or slipping belt.
Exhaust ductwork inspection door open.
Obstruction in the ductwork.
Variflow baffle must be adjusted
No Air
(i)
(ii)
(iii)
(iv)
(v)
(v)
Broken belt.
Exhaust fan overload tripped.
Exhaust fan disconnect open.
Exhaust fan motor fuse blown.
Fire damper closed.
Check if baffle are upside down in extractor.
Dry Extractor Maintenance and Operating Manual
5
INSTALLING THE TERMINATOR BAFFLE
The TBDD Terminator baffle is available in various lengths to suit adverse site
conditions. This will provide additional exhaust air over heavy appliances that are being
effected by the surrounding environment.
Installation:
Remove the TBDD from the packing material. Take off all of the Removable Access Doors “A” from the
hood. You should be able to clearly see all the adjustable baffles “B” and their settings. Ensure that the
adjustable baffle(s) “B” over the heavy appliance is set at 5, or 3 if the baffle is directly beneath the
exhaust duct collar. The TBDD baffles “C” are going to be installed on the adjustable baffles “B” over the
light appliances. To install the TBDD baffle “C” onto the adjustable baffle “B” simply line up the gap on
the TBDD baffle “C” with the lower end of baffle “B”. Tap the TBBD along the length until it is snug on
baffle “B”. If the fit is loose remove the TBBD baffle “C” and gently tap the gap with a hammer in the
middle and at each end. Re-attach to baffle “B”.
Install these baffles on the two adjustable baffles “B” located on the right or left side of the charbroiler
(when looking from the front of the hood).
Dry Extractor Maintenance and Operating Manual
6
MEASURING THE EXHAUST AIRFLOW
The exhaust air is measured along the inlet slot of the ventilator. To ensure accurate results take a
reading every foot along the length of the ventilator is recommended.
VANAXIAL VELOMETER
PITOT TUBE OR ANEMOMETER
Hold the instrument
perpendicular to
the VORTEX
BAFFLE and
parallel to the
throat (inlet slot) of
the ventilator. Take
three readings
across the throat
and average the
results.
Hold the
instrument
perpendicular to
the VORTEX
BAFFLE and
parallel to the
throat (inlet slot) of
the ventilator.
Velometer should
not exceed three
inches in
diameter.
Measuring Exhaust Air
Measuring Exhaust Air
Calculating the Exhaust Air
Calculate the average velocity across the inlet slot and refer to the chart below for the
corresponding CFM/ft (l/s/m).
Ventilator Type
Velocity
B, S, and front & back slot of DB
B, S, and front & back slot of DB
B, S, and front & back slot of DB
B, S, and front & back slot of DB
B, S, and front & back slot of DB
B, S, and front & back slot of DB
B, S, and front & back slot of DB
B, S, and front & back slot of DB
B, S, and front & back slot of DB
B, S, and front & back slot of DB
Exhaust Air Volume
Fpm
m/s
CFM/ft
l/s/m
450
675
900
1125
1350
1575
1800
2000
2250
2450
2.3
3.4
4.6
5.7
6.9
8.0
9.2
10.2
11.5
12.5
100
150
200
250
300
350
400
450
500
550
140
210
275
340
410
480
550
620
690
755
Dry Extractor Maintenance and Operating Manual
7
MEASURING THE SUPPLY AIRFLOW - MI MODELS ONLY
The supply air discharge from a DN-B-MI or DN-DB-MI is measured along the internal discharge
perforated plate inside the filter hood canopy. To ensure accurate results take a reading every
foot along the length of the filter hood.
VANAXIAL VELOMETER
Hold the instrument parallel to and about one (1) inch from the perforated discharge slot.
Measuring Supply Air
Figure 8
PITOT TUBE OR ANEMOMETER
Hold the instrument parallel to and about one (1) inch from the perforated discharge slot. Take
two readings across the slot and average the results.
Measuring Supply Air
Calculate the average velocity along the length of the perforated discharge and refer to chart No.
2 for corresponding CFM/ft (l/s/m). If the supply air is too high adjust the opposed blade dampers
on top of the filter hood at the supply air inlets just above the supply fire dampers. Multiple
dampers can be balanced to provide the velocity profile required across the supply discharge.
Supply Velocity vs. Supply Flow Rate
Supply Discharge Velocity
fpm
m/s
400
2.1
600
3.1
800
4.1
1000
5.1
Supply Flow Rate
CFM/ft
120
180
240
300
Dry Extractor Maintenance and Operating Manual
l/s/m
186
372
372
466
8
MEASURING THE SUPPLY AIRFLOW - MB
Measuring the total supply fan airflow through the Blade:
_____1.
Remove Blade front discharge perforated panel with appropriate tools.
_____2.
Turn Blade’s threaded rod counter-clockwise until the Blade comes to a fully open position,
which is required to determine the total supply volume at each hood.
_____3.
Turn supply fan on.
_____4.
Re-install Blade front discharge perforated plate with appropriate tools.
_____5.
Take velocity reading across the perforated plate as shown in the diagram below. Take two
vertical readings, one at 2” from the bottom of perforation and one at 4”. Repeat these horizontal
readings every 12” along the hood.
_____6.
Total all readings and divide by the number of reading to determine the average velocity.
_____7.
Multiply the average velocity x 72 x length of perforated panel (in inches) to determine the total
CFM per perforated panel. (It is critical to take the velocity readings 1” off the surface of the perforated
panel to use this formula).
_____8.
If the total supply volume was not correct and Spring Air Systems provided the supply fan/unit
then adjust the supply volume at the fan/unit or at field supplied balancing dampers. If the supply
fan/unit was not provided by Spring Air Systems advise the general contractor to adjust the supply air
volume and do not proceed unit the volume has been correct. The total supply volume required can be
found on the Spring Air Systems shop drawings.
Dry Extractor Maintenance and Operating Manual
9
Measuring supply airflow through the Custom Comfort Dial:
_____1.
Remove Blade front discharge perforated panel with appropriate tools.
_____2.
Turn Blade’s threaded rod clockwise until the blade is 1.5 inches off the vertical front surface of
the hood. See diagram below.
_____3.
Set the velometer parallel to the bottom discharge with the face open perpendicular to the
perforated screen where the air discharges and take a reading every 12” apart for the full length of the
hood. See diagram below.
_____4.
Total all velocity readings and divide by the number of reading to determine the average
velocity.
_____5.
Refer to Custom Comfort Dial Velocity Chart below. Based on the hood length and the
temperature rating indicated on the UL/ULC plate determine the Custom Comfort Dial Velocity.
_____6.
If the measured average velocity is too high, turn the Blade threaded rod counter-clockwise 5
times. Re-measure average velocity. Repeat until the measured velocity at Comfort Comfort Dial is
correct.
_____7. If the measured average velocity is too low, turn the Blade threaded rod clockwise 5 times. Remeasure average velocity. Repeat until the measured velocity of Comfort Comfort Dial is correct.
FN or FB Hood Custom Comfort Dial Velocity Chart
APPLIANCES
CCD VELOCITY (fpm)
0
9 - 14
6-9
4-6
Up to 4
Set point
500
500
550
550
SIDE
FLOW
Set point
450
450
450
450
0
9 - 14
6-9
4-6
Up to 4
450
450
450
450
400
400
450
450
TEMP.
Heavy - Charbroiler
Heavy - Charbroiler
Heavy - Charbroiler
Heavy - Charbroiler
600 F
0
600 F
0
600 F
0
600 F
Medium
Medium
Medium
Medium
400 F
0
400 F
0
400 F
0
400 F
– Griddle, fryer
– Griddle, fryer
– Griddle, fryer
– Griddle, fryer
Hood
Length
(ft)
FRONT
Dry Extractor Maintenance and Operating Manual
10
MEASURING THE SUPPLY AIRFLOW - MJ
The supply air is measured along the bottom inside discharge opening of the make up air plenum. To ensure
accurate results take a reading every one foot along the length of the ventilator.
Measure supply air flow through comfort dial:
_____1.
Ensure the MJ blowers are powered when the exhaust fan is activated.
_____2.
Locate the rheostat on the back of the MJ Blower which is on top of the MJ plenum.
_____3.
Turn the rheostat 120 degree clock-wise to activate the MJ blower.
_____4.
Set the velometer parallel to the bottom discharge with the face open perpendicular to the
perforated screen where the air discharges and take a reading every 12” apart for the full length of the
hood. The first reading should be one inch from the end and continue every twelve inches to the
opposite end of the ventilator.
_____5.
Total all velocity readings and divide by the number of readings to determine the average
velocity.
_____6.
Refer to Comfort Comfort Dial Velocity Chart below. Based on the hood length and the hood
temperature rating indicated on the UL/ULC plate determine the Comfort Comfort Dial velocity on the
chart.
_____7.
If the measured average velocity is not correct adjust the rheostat as follows: Rotate clockwise
for lower or counterclockwise for higher velocity. Retake the velocity reading to confirm the
recommended set point.
FN or FB Hood
Custom Comfort Dial Velocity Chart
APPLIANCES
CCD VELOCITY (fpm)
0
9 - 14
6-9
4-6
Up to 4
Set point
500
500
550
550
SIDE
FLOW
Set point
450
450
450
450
0
9 - 14
6-9
4-6
Up to 4
450
450
450
450
400
400
450
450
TEMP.
Heavy - Charbroiler
Heavy - Charbroiler
Heavy - Charbroiler
Heavy - Charbroiler
600 F
0
600 F
0
600 F
0
600 F
Medium
Medium
Medium
Medium
400 F
0
400 F
0
400 F
0
400 F
– Griddle, fryer
– Griddle, fryer
– Griddle, fryer
– Griddle, fryer
Hood
Length
(ft)
FRONT
Dry Extractor Maintenance and Operating Manual
11
DN- STARTUP
REPORT
General Information
Job Name
Date
Customer
Location
Spring Air Service
Exhaust Fan Model No.
Manufacturer
Up blast Discharge
Exhaust Fan HP
Exhaust Air Design (CFM)
Supply Air Design (CFM)
Ventilator mounting Height
from finished floor to front of hood
Make Up Air Systems
yes
Good
no
Fair
Poor
None
Hood Item
Model
Width
Baffle Size *
Baffle No.
Baffle Setting
Left to Right
1
2
3
4
5
6
Total Exhaust Measured CFM
Design Exhaust CFM
Length
No. of Baffles
Design CFM
Velocity Reading
(fpm)
Calculated Exhaust Volume
per Baffle (CFM) **
Length
No. of Baffles
Design CFM
Velocity Reading
(fpm)
Calculated Exhaust Volume
per Baffle (CFM) **
Hood Item
Model
Width
Baffle Size *
Baffle No.
Baffle Setting
Left to Right
1
2
3
4
5
6
Total Exhaust Measured CFM
Design Exhaust CFM
Dry Extractor Maintenance and Operating Manual
12
Hood Item
Model
Width
Baffle Size *
Baffle No.
Baffle Setting
Left to Right
1
2
3
4
5
6
Total Exhaust Measured CFM
Design Exhaust CFM
Length
No. of Baffles
Design CFM
Velocity Reading
(fpm)
Calculated Exhaust Volume
per Baffle (CFM) **
Length
No. of Baffles
Design CFM
Velocity Reading
(fpm)
Calculated Exhaust Volume
per Baffle (CFM) **
Length
No. of Baffles
Design CFM
Velocity Reading
(fpm)
Calculated Exhaust Volume
per Baffle (CFM) **
Hood Item
Model
Width
Baffle Size *
Baffle No.
Baffle Setting
Left to Right
1
2
3
4
5
6
Total Exhaust Measured CFM
Design Exhaust CFM
Hood Item
Model
Width
Baffle Size *
Baffle No.
Baffle Setting
Left to Right
1
2
3
4
5
6
Total Exhaust Measured CFM
Design Exhaust CFM
Dry Extractor Maintenance and Operating Manual
13
Other Fine Products From
• RevLow Hoods
• DynaFlow Hoods
• TruFlow Energy Management Systems
• UL/ULC Listed Pollution Control Systems
• Dry Extractor Hoods
• Catridge Hoods
• Filter Hoods
• Water Wash Ventilators
• Surface Fire Suppression
• Commercial Kitchen Exhaust Fans
• Commercial Kitchen Supply Units
• Utility Distribution Systems
Phone: 866-874-4505, FAX: 905-338-0179
[email protected]
www.springairsystems.com