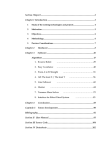
1
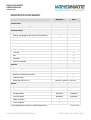
WINGMATE DATA MANAGER
USER MANUAL
HARDWARE ................................................................
................................................................................................
...............................................................................
............................................... 2
Installation ................................................................
................................................................................................
...............................................................................
............................................... 2
Operation ................................................................
................................................................................................
................................................................................
................................................ 2
DATA VIEWER................................
VIEWER................................................................
................................................................................................
............................................................................
............................................ 3
Installing the Viewer ................................................................
...............................................................................................
............................................................... 3
Transferring data to the PC ................................................................
..................................................................................
.................................................. 3
Using the Viewer ................................................................
................................................................................................
....................................................................
.................................... 3
File .................................................................................................................................. 3
Reports ......................................................................................................................... 3
Google Earth export.................................................................................................... 3
Sensor traces ............................................................................................................... 4
Zoom, Auto range .................................................................................................... 4
Pan .......................................................................................................................... 4
Export graphs .......................................................................................................... 4
Print graphs ............................................................................................................. 5
Help ............................................................................................................................... 5
SPECIFICATION SHEET ................................................................
............................................................................................
............................................................ 6
Throughout this manual, features only available on WINGMATE Data Manager Plus
are indicated with this symbol.
WWW.WINGMATEAVIONICS.COM
TELEPHONE: +61 3 8740 3127
DATA MANAGER
USER MANUAL
VERSION #02
#02
HARDWARE
INSTALLATION
− Put the Data Manager on a flat horizontal surface and secure the unit rigid. You can use
straps to fix it in place.
− For best results, place the Data Manager behind the CFG (Centre of Gravity) of the
plane.
− Plug the power lead into the cigarette lighter socket.
∗ If the airplane does not have a power point, it is a quick and easy job for the
maintenance engineer to install one.
OPERATION
− Turn the unit on by pressing the power button – the button will light up green. After
approximately 10 seconds the red LED will start flashing, indicating that the unit has
started recording. In normal logging mode, the red LED will keep flashing on/off.
− Press the power button again to stop logging.
− To take the SD card out to view the data on your PC, always first turn the unit off and
wait until the red light is off.
− A continuous red light indicates that the data manager is unable to log data onto the SD
card. This can happen when the card is full, locked or faulty.
∗ Always use the SD card provided with the logger. The card will record approximately
600 hours of flying. If the card is full please contact WINGMATE for a replacement.
WWW.WINGMATEAVIONICS.COM
TELEPHONE: +61 3 8740 3127
DATA MANAGER
USER MANUAL
VERSION #02
#02
DATA
DA TA VIEWER
INSTALLING THE VIEWER
− Copy the installation file from the provided DVD to your computer (e.g. on your desktop).
− Double-click the installation file and the software will install automatically.
− Double-click the WINGMATE icon to open the Viewer.
TRANSFERRING DATA TO THE PC
It is good practice to copy the files you want to analyse with the viewer from the SD card to
the PC. Although not necessary, the software will run files from the PC quicker.
− Using Windows Explorer navigate to the SD card (often E:). You will find the file in the
directory of the month it was recorded with a timestamp of the day and a number
indicating the files recorded that day.
∗ For example: the third file recorded on 15 August 2011 will be stored on the SD card
as Aug11/11-8-15_LOG_03.lfw
− Copy the file to C:/WINGMATE/Data
∗ You can rename the file if required, but keep the same extension (.lfw)
USING THE VIEWER
FILE
− On the File menu, click Open
− Click on the file you would like to view and then click Open
∗ The file is fully loaded when the grey bar listing the current file appears under the
menu bar. If you open a large file, this may take some time.
REPORTS
− On the Report menu, click Generate Report to view the maximum and minimum of all
sensors and the calculated analysis values of the take off and landing performance.
∗ The take off report shows the values of the first take off during this logging file and the
landing report shows the values of the last landing during this logging file.
Performances of intermediate take offs and landings, for example of a touch and go,
will not be shown directly.
−
On the Report menu, click Generate EFIS Report to view the values as calculated
from the EFIS data.
GOOGLE EARTH EXPORT
Note: You will need Google Earth installed on your computer. You can download the latest
version for free from http://www.google.com/earth/index.html.
WWW.WINGMATEAVIONICS.COM
TELEPHONE: +61 3 8740 3127
DATA MANAGER
USER MANUAL
VERSION #02
#02
− On the Google Earth menu, click Export to GE
∗ A message appears that shows the name of the created KML file.
∗ Google Earth will open automatically ready to select the KML file.
− In Google Earth, click File and then Open.
− Navigate to C:/WINGMATE/KML to open the just created file. This will show you the
trace overlayed on Google Earth together with a summary of the reports.
SENSOR TRACES
− On the Graphs menu, click Internal Sensors to view the traces of all the Data
Manager’s internal sensors.
−
On the Graphs menu, click EFIS Data to view the traces of all EFIS sensors.
− In the graph windows, select or clear the checkboxes on the left to customise which
graphs are shown.
! Tip: When working with large files, zooming and panning is faster when fewer traces are
selected.
Zoom, Auto range
− In the graph windows, when you right-click the sensor traces, a shortcut menu appears
where you can choose:
∗ Zoom in - to zoom in both axes, the range axis (time) or the domain axis
∗ Zoom out - to zoom out both axes, the range axis (time) or the domain axis
∗ Auto range - to reset to auto range both axes, the range axis (time) or the domain axis
− To zoom in you can also click the left top corner of the area of interest and drag the
pointer to the right bottom corner
− To zoom out you can also click a point at the right bottom of an area and drag the
pointer to the left top. Regardless of the exact area you select, this will zoom out to auto
range.
Pan
Press the CTRL key, while dragging the graph to the left or the right to pan any zoomed in
graph.
Export graphs
− In the graph screens, when you right-click the sensor traces, a shortcut menu appears
where you can choose:
∗ Copy - to copy the graphs to paste into another program (e.g. an MSWord file or an
email)
∗ Save as - to save the graphs as a png file
WWW.WINGMATEAVIONICS.COM
TELEPHONE: +61 3 8740 3127
DATA MANAGER
USER MANUAL
VERSION #02
#02
Print graphs
− In the graph screens, when you right-click the sensor traces, a shortcut menu appears
where you can choose:
∗ Print - to print to any printer installed on your system
! Tip: For guidance on the interpretation of the sensor traces, go to the website at
WWW.WINGMATEAVIONICS.COM and have a look at the Data Analysis section.
There will also be regular entries in the blog to discuss specific traces or combination
of traces.
HELP
− On the Help menu, click Help file for tips and shortcuts for the Viewer
− On the Help menu, click About to find the software version of the Viewer.
WWW.WINGMATEAVIONICS.COM
TELEPHONE: +61 3 8740 3127
DATA MANAGER
USER MANUAL
VERSION #02
#02
SPECIFICATION SHEET
Standard
Plus
Connections
Connects to Dynon EFIS
-
Recorded Data
Lateral, Longitudinal and Vertical accelerations
Yaw, Pitch and Roll
Speed
Heading
Altitude
Angle of Attack
-
∗
Turnrate
-
∗
VSI
-
∗
Airspeed
-
∗
Pressure Altitude
-
∗
General
Power supply
9 to 34 volt
Temperature
-40 to +85 °C
Serial bus (connects to EFIS)
-
2 GB SD card
Dimensions W x H x D
103 mm x 53 mm x 120 mm
Viewer
Export to Google Earth
Min and max of all sensors
Landing report
Standard
Extended
Take off report
Standard
Extended
Zoom functions
Trace selection
∗ Providing relevant sensor is connected to EFIS
WWW.WINGMATEAVIONICS.COM
Version #01.2
TELEPHONE: +61 3 8740 3127