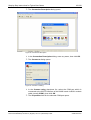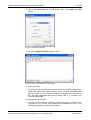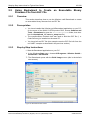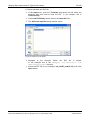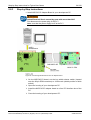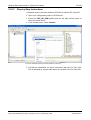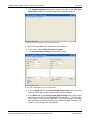
1
Getting Started NXHX 51-ETM Hilscher Gesellschaft für Systemautomation mbH www.hilscher.com DOC130701GS02EN | Revision 2 | English | 2013-10 | Released | Public Table of Contents 2/109 Table of Contents 1 INTRODUCTION.........................................................................................................4 1.1 About this Document ..................................................................................................4 1.1.1 1.1.2 1.1.3 1.2 Legal Notes.................................................................................................................5 1.2.1 1.2.2 1.2.3 1.2.4 1.2.5 1.2.6 2 Description of the Contents ..................................................................................4 List of Revisions ...................................................................................................4 Conventions in this Manual ..................................................................................4 Copyright ..............................................................................................................5 Important Notes ....................................................................................................5 Exclusion of Liability .............................................................................................6 Warranty ...............................................................................................................6 Export Regulations ...............................................................................................7 Registered Trademarks........................................................................................7 DESCRIPTIONS OF THE USE CASES ......................................................................8 2.1 Overview.....................................................................................................................8 2.2 Using Standard Loadable Firmware ...........................................................................8 2.2.1 2.2.2 2.2.3 2.3 What Is Standard Loadable Firmware ?...............................................................8 Loadable Firmware and Second Stage Bootloader .............................................9 Downloading SSBL and LFW to Serial Flash of NXHX 51-ETM Board ...............9 Using LOM Firmware................................................................................................10 2.3.1 2.3.2 2.3.3 What Is LOM Firmware ? ...................................................................................10 Using the Application Examples on the Product DVD........................................12 Downloading (Flashing) LOM Firmware to NXHX 51-ETM Board .....................15 3 DEVICE DRAWING AND POSITIONS OF THE NXHX 51-ETM ...............................16 4 CONNECTING POWER SUPPLY.............................................................................18 5 STEP-BY-STEP INSTRUCTIONS FOR TYPICAL USE CASES...............................19 5.1 Installing Code Sourcery Compiler on Your Development PC..................................19 5.1.1 5.1.2 5.1.3 5.2 Using Waf to Build ELF Files from All Application Examples ...................................20 5.2.1 5.2.2 5.2.3 5.3 Overview.............................................................................................................20 Prerequisites.......................................................................................................20 Step-by-Step Instructions ...................................................................................20 Using Waf to Build an ELF File from an rcX Application Example............................22 5.3.1 5.3.2 5.3.3 5.4 Overview.............................................................................................................19 Prerequisites.......................................................................................................19 Step-by-Step Instructions ...................................................................................19 Overview.............................................................................................................22 Prerequisites.......................................................................................................22 Step-by-Step Instructions ...................................................................................22 Using HiTOP to Build, Download and Debug an ELF File Made from an rcX Application Example .................................................................................................28 NXHX 51-ETM | Getting Started DOC130701GS02EN | Revision 2 | English | 2013-10 | Released | Public © Hilscher 2013 Table of Contents 5.4.1 5.4.2 5.4.3 5.5 Overview.............................................................................................................75 Prerequisites.......................................................................................................75 Step-by-Step Instructions ...................................................................................76 Testing I/O Communication ......................................................................................96 5.10.1 5.10.2 5.10.3 6 Overview.............................................................................................................63 Prerequisites.......................................................................................................63 Step-by-Step Instructions ...................................................................................64 Configuring NXHX 51-ETM With SYCON.net...........................................................75 5.9.1 5.9.2 5.9.3 5.10 Overview.............................................................................................................56 Prerequisites.......................................................................................................56 Step-by-Step Instructions ...................................................................................57 Downloading NXF Firmware via PCI and Host Interface ..........................................63 5.8.1 5.8.2 5.8.3 5.9 Overview.............................................................................................................46 Prerequisites.......................................................................................................46 Step-by-Step Instructions ...................................................................................47 Downloading NXF Firmware to Serial Flash of the NXHX 51-ETM via USB ............56 5.7.1 5.7.2 5.7.3 5.8 Overview.............................................................................................................42 Prerequisites.......................................................................................................42 Step-by-Step Instructions ...................................................................................42 Downloading Executable Binary Image to Serial Flash of the NXHX 51-ETM via USB ..........................................................................................................................46 5.6.1 5.6.2 5.6.3 5.7 Overview.............................................................................................................28 Prerequisites.......................................................................................................28 Step-by-Step Instructions ...................................................................................28 Using Bootwizard to Create an Executable Binary Firmware File from ELF File......42 5.5.1 5.5.2 5.5.3 5.6 3/109 Overview.............................................................................................................96 Prerequisites.......................................................................................................96 Step-by-Step Instructions ...................................................................................97 APPENDIX ..............................................................................................................105 6.1 List of Figures .........................................................................................................105 6.2 List of Tables ..........................................................................................................108 6.3 Contacts..................................................................................................................109 NXHX 51-ETM | Getting Started DOC130701GS02EN | Revision 2 | English | 2013-10 | Released | Public © Hilscher 2013 Introduction 1 4/109 Introduction 1.1 1.1.1 About this Document Description of the Contents This Getting Started Guide describes typical use cases for the Hilscher NXHX 51-ETM Development Board. 1.1.2 List of Revisions Index Date Chapter Revisions 1 2013-08-30 All Created 2 2013-10-23 5.9 Section Configuring NXHX 51-ETM With SYCON.net added 5.10 Section Testing I/O Communication added Table 1: List of Revisions 1.1.3 Conventions in this Manual Notes, operation instructions and results of operation steps are marked as follows: Notes Important: <important note> Note: <note> <note, where to find further information> Operation Instructions 1. <instruction> 2. <instruction> or <instruction> Results <result> NXHX 51-ETM | Getting Started DOC130701GS02EN | Revision 2 | English | 2013-10 | Released | Public © Hilscher 2013 Introduction 1.2 1.2.1 5/109 Legal Notes Copyright © Hilscher 2013, Hilscher Gesellschaft für Systemautomation mbH All rights reserved. The images, photographs and texts in the accompanying material (user manual, accompanying texts, documentation, etc.) are protected by German and international copyright law as well as international trade and protection provisions. You are not authorized to duplicate these in whole or in part using technical or mechanical methods (printing, photocopying or other methods), to manipulate or transfer using electronic systems without prior written consent. You are not permitted to make changes to copyright notices, markings, trademarks or ownership declarations. The included diagrams do not take the patent situation into account. The company names and product descriptions included in this document may be trademarks or brands of the respective owners and may be trademarked or patented. Any form of further use requires the explicit consent of the respective rights owner. 1.2.2 Important Notes The user manual, accompanying texts and the documentation were created for the use of the products by qualified experts, however, errors cannot be ruled out. For this reason, no guarantee can be made and neither juristic responsibility for erroneous information nor any liability can be assumed. Descriptions, accompanying texts and documentation included in the user manual do not present a guarantee nor any information about proper use as stipulated in the contract or a warranted feature. It cannot be ruled out that the user manual, the accompanying texts and the documentation do not correspond exactly to the described features, standards or other data of the delivered product. No warranty or guarantee regarding the correctness or accuracy of the information is assumed. We reserve the right to change our products and their specification as well as related user manuals, accompanying texts and documentation at all times and without advance notice, without obligation to report the change. Changes will be included in future manuals and do not constitute any obligations. There is no entitlement to revisions of delivered documents. The manual delivered with the product applies. Hilscher Gesellschaft für Systemautomation mbH is not liable under any circumstances for direct, indirect, incidental or follow-on damage or loss of earnings resulting from the use of the information contained in this publication. NXHX 51-ETM | Getting Started DOC130701GS02EN | Revision 2 | English | 2013-10 | Released | Public © Hilscher 2013 Introduction 1.2.3 6/109 Exclusion of Liability The software was produced and tested with utmost care by Hilscher Gesellschaft für Systemautomation mbH and is made available as is. No warranty can be assumed for the performance and flawlessness of the software for all usage conditions and cases and for the results produced when utilized by the user. Liability for any damages that may result from the use of the hardware or software or related documents, is limited to cases of intent or grossly negligent violation of significant contractual obligations. Indemnity claims for the violation of significant contractual obligations are limited to damages that are foreseeable and typical for this type of contract. It is strictly prohibited to use the software in the following areas: for military purposes or in weapon systems; for the design, construction, maintenance or operation of nuclear facilities; in air traffic control systems, air traffic or air traffic communication systems; in life support systems; in systems in which failures in the software could lead to personal injury or injuries leading to death. We inform you that the software was not developed for use in dangerous environments requiring fail-proof control mechanisms. Use of the software in such an environment occurs at your own risk. No liability is assumed for damages or losses due to unauthorized use. 1.2.4 Warranty Although the hardware and software was developed with utmost care and tested intensively, Hilscher Gesellschaft für Systemautomation mbH does not guarantee its suitability for any purpose not confirmed in writing. It cannot be guaranteed that the hardware and software will meet your requirements, that the use of the software operates without interruption and that the software is free of errors. No guarantee is made regarding infringements, violations of patents, rights of ownership or the freedom from interference by third parties. No additional guarantees or assurances are made regarding marketability, freedom of defect of title, integration or usability for certain purposes unless they are required in accordance with the law and cannot be limited. Warranty claims are limited to the right to claim rectification. NXHX 51-ETM | Getting Started DOC130701GS02EN | Revision 2 | English | 2013-10 | Released | Public © Hilscher 2013 Introduction 1.2.5 7/109 Export Regulations The delivered product (including the technical data) is subject to export or import laws as well as the associated regulations of different counters, in particular those of Germany and the USA. The software may not be exported to countries where this is prohibited by the United States Export Administration Act and its additional provisions. You are obligated to comply with the regulations at your personal responsibility. We wish to inform you that you may require permission from state authorities to export, re-export or import the product. 1.2.6 Registered Trademarks HiTOP is a trademark of Hitex Development Tools GmbH. Sourcery G++ is a trademark of CodeSourcery, Inc. Windows ® XP, Windows ® 7 and Windows trademarks of Microsoft Corporation. NXHX 51-ETM | Getting Started DOC130701GS02EN | Revision 2 | English | 2013-10 | Released | Public ® 8 are registered © Hilscher 2013 Descriptions of the Use Cases 2 8/109 Descriptions of the Use Cases 2.1 Overview The NXHX 51-ETM Development Board can be operated with ready-made Standard Loadable Firmware (LFW) or with customer-engineered firmware based on Linkable Object Modules (LOM). LFW files for immediate usage can be obtained from Hilscher. The product DVD of the NXHX 51-ETM board contains a loadable PROFINET IO Device firmware file with limited IO data exchange (2 Bytes) for testing and evaluation purposes. In case you want to create and use your own firmware based on LOM, the DVD provides precompiled rcX and protocol libraries, build tools and source code of application examples which can be integrated into your LOM firmware. The product DVD also provides tools for downloading files to the serial flash memory of the NXHX board. 2.2 2.2.1 Using Standard Loadable Firmware What Is Standard Loadable Firmware ? Standard Loadable Firmware (LFW) is a binary code with an executable image containing a certain protocol stack and the rcX operating system for the netX controller. All LFW files are in the NXF format, and can thus be recognized by their .nxf file extension. LFW is “ready-to-use”: after downloading the firmware and a configuration file to the board, the device is immediately ready for fieldbus communication. It is thus the easiest way to operate the NXHX 51-ETM for testing and development purposes. Once downloaded and stored in the non-volatile flash memory of the NXHX board, the firmware is available on each netX boot process. In case you want to use or test a different network protocol, you can easily switch the protocol by just downloading a new LFW file containing the desired protocol stack (you might also need to change the fieldbus adapter/connector hardware on the board). LFW can be purchased from Hilscher. Using LFW is ideal for users who want to utilize the Dual Port Memory (DPM) of the netX in a double-chip architecture, in which the netX on the NXHX board is accessed and controlled by an application running in the processor of a customer-engineered host system or Windows PC. By using LFW, the developer can concentrate on testing network communication with the netX 51 controller on the NXHX 51-ETM and on programming and debugging his host application. For more detailed information about LFW, please refer to the Application Note Loadable Firmware – How To Use Loadable Firmware, DOC090903ANxxEN, which is stored in the Documentation\2. Application Notes\2. How To Use Loadable Firmware directory of the NXHX 51-ETM product DVD. NXHX 51-ETM | Getting Started DOC130701GS02EN | Revision 2 | English | 2013-10 | Released | Public © Hilscher 2013 Descriptions of the Use Cases 2.2.2 9/109 Loadable Firmware and Second Stage Bootloader Standard Loadable Firmware can not be booted directly by the ROM code (ROM Loader) residing in the netX controller. LFW needs to be started by a software module called Second Stage Bootloader (SSBL). Therefore, operating your NXHX 51-ETM with LFW requires the SSBL file on the board. The SSBL must be downloaded and running on the NXHX board before you can download or boot any LFW file. The appropriate SSBL for your board is the NETX51-BSL.bin file. This file is stored in the Tools\2nd Stage Bootloader directory of the product DVD. The SSBL can be downloaded and stored “non-volatile” in the serial flash of the NXHX 51-ETM board. After download to flash, the SSBL will be started by the ROM loader after every power-on reset of the board (given that flash boot mode is configured). The SSBL then in turn starts the firmware. 2.2.3 Downloading SSBL and LFW to Serial Flash of NXHX 51-ETM Board There are several ways to download (“flash”) the Second Stage Bootloader and the Loadable Firmware to the serial flash memory of the NXHX 51ETM board from a Windows PC. For flashing the SSBL file, Hilscher recommends to use the netX Bootwizard tool and serial interface (USB or COM Port). Instructions for this method are provided in the Downloading Executable Binary Image to Serial Flash of the NXHX 51-ETM via USB section on page 46 of this Getting Started Guide. An installation program for the Bootwizard can be found on the product DVD in the Tools\Bootwizard directory. Like the SSBL, the LFW can also be flashed to the board from a Windows PC via serial interface (USB or COM Port). Hilscher recommends to use the netHOST Device Test Application for this. Instructions for this method are provided in the Downloading NXF Firmware to Serial Flash of the NXHX 51-ETM via USB section on page 56. The netHOST Device Test Application can be found on the product DVD in the Tools\netX Transport directory. If you are using a Windows PC as host device for the NXHX board, you can also download the firmware from the PC via PCI and host interface (i. e. parallel Dual-Port Memory). You need an adapter and a cable for this, which can be purchased from Hilscher. This method is described in the Downloading NXF Firmware via PCI and Host Interface section on page 63. If you are using a customer-engineered host system not based on Windows, you can, of course, also implement a customized download function for firmware files via host interface in your own host application. You can use the cifX Toolkit, which is provided on the product DVD in the Driver and Toolkit\Driver Toolkit (NXDRVTKIT)\cifXToolkit directory, to develop a driver enabling communication between your host system and the Dual-Port Memory of the netX 51 (parallel or serial DPM). For more detailed information about the cifX Toolkit, please refer to the Toolkit Manual cifX/netX Toolkit – DPM, DOC090203TKxxEN, which is stored in the Driver and Toolkit\Driver Toolkit (NXDRVTKIT)\Documentation directory of the product DVD. NXHX 51-ETM | Getting Started DOC130701GS02EN | Revision 2 | English | 2013-10 | Released | Public © Hilscher 2013 Descriptions of the Use Cases 2.3 2.3.1 10/109 Using LOM Firmware What Is LOM Firmware ? As an alternative to using Standard Loadable Firmware, you can also create your own customized firmware based on Linkable Object Modules (LOM). When using LOM, you can choose whether you want to create an executable binary firmware file (which can be directly started by the ROM Loader residing in the netX controller) or if you want to create firmware in NXF format. You can use the Waf framework as meta build system or HiTOP as integrated development environment (IDE) for creating an ELF, which then can be downloaded to the NXHX board for debugging. Both build systems/environments use Mentor Code Sourcery GNU (GCC) as tool for compiling C source code. After debugging, you can use the Waf framework to build LOM firmware in NXF format or as executable binary file, which can be stored in the serial flash memory of the NXHX board. You can also use the netX Bootwizard to turn an ELF into an executable binary file. Like Loadable Firmware, LOM firmware basically consists of the rcX (the operating system of the netX controller) and the stack of the chosen protocol, but unlike LFW, LOM can be augmented by a customer application. The DVD provides ready-to-use C source code and headers of application examples, together with ready-to-use Waf build scripts (wscript files) and project files for HiTOP (HTP files). Precompiled libraries of the rcX and of various protocol stacks are also provided on the product DVD. The Waf build scripts and the HiTOP project files organize and control the tool chain which compiles the source code of the application examples and links and assembles the resulting object files together with the rcX and stack libraries into the ELF. Of course, you can also write your own application code or adapt/customize the provided code, and then use Waf or HiTOP for compiling and creating objects, and link them together with the provided libraries into an ELF. The produced ELF can then be downloaded to the netX 51 controller for testing and debugging. The ELF runs only “volatile” in the netX, i. e. it can not be stored in the serial flash of the NXHX board in order to be automatically available for booting after each power-on reset. Therefore, after successful testing and debugging, you need to create an executable binary firmware file or a firmware file in NXF format, which can be downloaded and stored “non-volatile” in the serial flash memory of the NXHX board. The Waf framework is capable of building LOM firmware in NXF format or as executable binary file from the debugged source code and the libraries. Waf uses the Hilscher netX Bootwizard, respectively the bootblocker.bat as tools for this. As an alternative, you can also build an ELF first, e. g. with HiTOP, and then open it in the netX Bootwizard and turn it into an executable binary file. The Bootwizard can also be used to download bootable images and other files to the flash memory of the NXHX board. For more detailed information about the Bootwizard, please refer to the Operating Instruction Manual netX Bootwizard, DOC070502OIxxEN, which is stored in the Documentation\4. Tool Manuals\Bootwizard directory of the NXHX 51-ETM product DVD. NXHX 51-ETM | Getting Started DOC130701GS02EN | Revision 2 | English | 2013-10 | Released | Public © Hilscher 2013 Descriptions of the Use Cases 2.3.1.1 11/109 LOM Firmware in NXF Format Like standard Loadable Firmware (which is also in NXF format), LOM firmware in NXF format can not be booted directly by the ROM Loader residing in the netX controller. Firmware in NXF format is started by a software module called Second Stage Bootloader (SSBL). Therefore, operating your NXHX 51-ETM with LOM firmware in NXF format requires the SSBL on the board. The SSBL must be downloaded and running on the NXHX board before you can download or boot your firmware file. For more detailed information about the Second Stage Bootloader, please refer to the Function Description Second Stage Boot Loader, DOC070301FDxxEN, which is stored in the Driver and Toolkit\Driver Toolkit (NXDRV-TKIT)\Documentation directory of the product DVD. Using LOM firmware in NXF format together with the SSBL has some advantages over using firmware in ordinary executable binary format, because the SSBL provides functions which otherwise would have to be performed by the firmware itself, such as: creating a file system in the serial flash memory, validating firmware against hardware data stored in the security memory, setting up SDRAM, relocating firmware, setting up host interface (HIF) parameters. Because the SSBL carries all relevant hardware parameters in its Tag List, it is possible to keep the firmware as independent from the hardware as possible. Hilscher therefore recommends building LOM firmware for the NXHX 51-ETM board in NXF format. If hardware parameters need to be changed, you can do so by editing the tag list of the SSBL. A tool called Tag List Editor for editing tag lists is provided on the product DVD in the Tools\Tag List Editor directory. For more detailed information about the Tag List Editor, please refer to the Operating Instruction Manual Tag List Editor – Viewing and Editing Tags, DOC110306OIxxEN, which is stored in the Documentation\4. Tool Manuals\Tag List Editor directory of the product DVD. Using firmware in NXF format also makes firmware update faster and easier, because a new firmware file can be downloaded to the serial flash memory of the NXHX board via host interface. The necessary file system in the serial flash and the host interface are both set up by the SSBL. In contrast to this, when using firmware in executable binary format, there is no SSBL performing these tasks, and thus the binary firmware would need to be updated via serial interface, making the whole procedure more time consuming. NXHX 51-ETM | Getting Started DOC130701GS02EN | Revision 2 | English | 2013-10 | Released | Public © Hilscher 2013 Descriptions of the Use Cases 2.3.1.2 12/109 LOM Firmware in Executable Binary Format If you decide to create your LOM firmware as ordinary executable binary file, and not in NXF format, the functions (if needed) which otherwise would be performed by the Second Stage Bootloader now must be performed by the executable firmware itself. The executable binary LOM firmware also needs a Boot Header, so that it can be booted by the ROM Loader of the netX controller. The Boot Header is created and added to the executable binary by the netX Bootwizard application. 2.3.2 2.3.2.1 Using the Application Examples on the Product DVD Overview The product DVD of the NXHX 51-ETM provides different types of application examples for the NXHX 51-ETM evaluation board. After using the HiTOP IDE or the Waf build framework to build ELF files out of these examples, you can debug the produced ELF. After debugging, you can use the netX Bootwizard to turn an ELF into an executable binary file, which can be stored in the serial flash memory of the NXHX board. An example of firmware in NXF format, which can be produced with Waf, is provided in the Examples and API\LOM\2. LOM Build LFW directory. The wscript contained in that directory produces a PROFINET IO Device firmware in NXF format with limited IO data exchange (2 Bytes). The Examples and API folder contains the following sub-directories: HAL: Contains source code for Hardware Abstractions Layer programs with direct access to the netX hardware resources. You can use HiTOP or Waf to build ELF files out of theses examples. LFW: The 1. LFW netX Toolkit\Firmware\PROFINET directory contains a Loadable Firmware file for PROFINET IO Device with limited IO data exchange (2 Bytes) The 1. LFW netX Toolkit\cifXTKitHWFunctions directory contains an example of a host application based on the cifX Toolkit for the provided LFW file. LOM: The 1. LOM FB RTE folder contains source code and protocol stack libraries for building software examples with communication protocol support. You can use HiTOP or Waf to build ELF files out of these examples. The 2. LOM Build LFW folder contains code, library and a customized wscript file for building a PROFINET IO Device firmware in NXF format with Waf. This LOM firmware is also limited to 2 Bytes IO data exchange. nonOS: Contains embedded software programs without OS (rcX), typically specialized for the particular netX hardware. You can use HiTOP or Waf to build ELF files out of theses examples. rcX: Contains rcX based software examples with driver- and kernelfunctionality for peripheral and interface support. You can use HiTOP or Waf to build ELF files out of theses examples. NXHX 51-ETM | Getting Started DOC130701GS02EN | Revision 2 | English | 2013-10 | Released | Public © Hilscher 2013 Descriptions of the Use Cases 2.3.2.2 13/109 Limited Libraries for the Protocol Stacks Note that the libraries for the protocol stacks provided on the DVD are intended for testing and development purposes only. They are therefore limited in their functions. The limitations are: CANopen Slave library 3.5.1.0: Node ID: 32 One PDO per direction Maximum 2 Byte for each PDO CCLink Slave library 2.9.2.0: Slave Station Address: 32 Station type: only Remote IO CCLink Version: V1.1 Fix 2 Byte In- and Output DeviceNet Slave library: 2.3.21.0 Fix 2 Byte In- and Output EtherCAT Slave library: 4.2.9.0 2 Byte Input and Output PDO EtherNet/IP Adapter library: 2.7.7.3 IP Address: freely selectable Fixed instance number of input assembly: 0x100 Fixed instance number of output assembly: 0x101 Process Data size: 2 Byte Input/Output Open Modbus/TCP Messaging Device library: 2.5.8.1 IP Address: freely selectable Max Register counter: 2 Max Coils counter: 32 Process Data size: 2 Byte Input/Output PROFIBUS DP Slave library: 2.6.6.0 Network Station Address: 32 2 Byte Input and Output Modules NXHX 51-ETM | Getting Started DOC130701GS02EN | Revision 2 | English | 2013-10 | Released | Public © Hilscher 2013 Descriptions of the Use Cases 14/109 PROFINET IO IRT Device library: 3.5.13.1 IP Address: freely selectable 2 Byte Input and Output Modules sercos Slave library: 3.1.18.0 IP Address: freely selectable Number of slaves: 1 2.3.2.3 Using HiTOP to Build an Application Example If you use HiTOP, you can directly download and debug the produced ELF file via the Onboard USB HiTOP Debugger of the NXHX 51-ETM board. Step-by-step instructions for this are given in section Using HiTOP to Build, Download and Debug an ELF File Made from an rcX Application Example on page 28. 2.3.2.4 Using Waf to Build the Application Examples If you use Waf, you can build all application examples provided on the product DVD at once, simply by executing the Build.bat batch file located in the Examples and API directory from a Command Prompt. You only have to specify whether you want to build the ELF files (respectively the libraries) for debugging or release purposes by entering a “debug” or “release” option. All produced output will be stored in the Examples and API\build directory in the debug or release folder according to the option you have specified. Detailed instructions for this are provided in the Using Waf to Build ELF Files from All Application Examples section on page 20. If you want to build only one or certain examples, you can do so by specifying a target in the Command Prompt or in the Build.bat batch file. Detailed instructions for this are provided in the Using Waf to Build an ELF File from an rcX Application Example section on page 22. After building an ELF for debugging, you need a hardware debugger to download and debug the ELF. This can be the Onboard USB HiTOP Debugger or any other debugger like e. g. the Lauterbach LA-7690 PowerTrace-ETH 512M via the ETM interface or a JTAG debugger via JTAGETM adapter and ETM interface. NXHX 51-ETM | Getting Started DOC130701GS02EN | Revision 2 | English | 2013-10 | Released | Public © Hilscher 2013 Descriptions of the Use Cases 2.3.3 2.3.3.1 15/109 Downloading (Flashing) LOM Firmware to NXHX 51-ETM Board Downloading LOM Firmware in Executable Binary Format LOM Firmware in executable binary format can be downloaded and stored in the serial flash memory of the NXHX 51-ETM board by the netX Bootwizard tool via serial interface (USB or COM Port). The procedure of downloading the executable firmware is the same as for downloading a Second Stage Bootloader file, because both files are in essence executable binary images. Thus, if you want to download the executable binary after having created it from ELF, you can follow the instructions provided in the Downloading Executable Binary Image to Serial Flash of the NXHX 51ETM via USB section on page 46; simply select the executable binary firmware instead of the SSBL file for download. 2.3.3.2 Downloading LOM Firmware in NXF Format LOM Firmware in NXF Format can be downloaded and stored in the serial flash memory of NXHX 51-ETM board in the same way as the Standard Loadable Firmware, i. e. via serial interface (USB or COM Port) and by using the netHOST Device Test Application (see Downloading NXF Firmware to Serial Flash of the NXHX 51-ETM via USB section on page 56). As an alternative, firmware in NXF format can also be downloaded via Host Interface by using the cifX Driver Setup Utility and the NXPCA-PCI Adapter Board. This is described in the Downloading NXF Firmware via PCI and Host Interface section on page 63. Note that the Second Stage Bootloader (SSBL) must be downloaded and running on the NXHX board before you can download or boot any firmware in NXF format. The SSBL can be downloaded by the netX Bootwizard tool (see Downloading Executable Binary Image to Serial Flash of the NXHX 51-ETM via USB section on page 46). NXHX 51-ETM | Getting Started DOC130701GS02EN | Revision 2 | English | 2013-10 | Released | Public © Hilscher 2013 Device Drawing and Positions of the NXHX 51-ETM 3 16/109 Device Drawing and Positions of the NXHX 51-ETM Figure 1: NXHX51-ETM Printed Circuit Board No. in figure Name Description X5 Fieldbus interface CH0 X6 Fieldbus interface CH1 V30 Communication status LED 0 (green / red) V31 Communication status LED 1 (green / red) S1 Boot strap options X9 ETM-Interface netX 51 X7 UART0 interface SW30 4 pol. DIL switch as general input V15 LED yellow, MMIO27 as general output V14 LED yellow, MMIO26 as general output V13 LED yellow, MMIO25 as general output V12 LED yellow, MMIO24 as general output X4 microSD Card connector X8 USB connector type B, HiTOP X100 24 V power connector for board X50 2 x RJ45 connector - Matrix label V1 System status LED (yellow / green) T1 Power on reset X2 Mini-B USB connector X3 Host interface NXHX 51-ETM | Getting Started DOC130701GS02EN | Revision 2 | English | 2013-10 | Released | Public © Hilscher 2013 Device Drawing and Positions of the NXHX 51-ETM No. in figure Name Description S2 Host interface mode X10 Host interface configuration jumper 17/109 Table 2: List of Positions on Printed Circuit Board NXHX 51-ETM | Getting Started DOC130701GS02EN | Revision 2 | English | 2013-10 | Released | Public © Hilscher 2013 Connecting Power Supply 4 18/109 Connecting Power Supply The NXHX 51-ETM Development Board is powered by an external DC supply voltage of 24 V (±6V). Use the Hilscher NXAC Power adapter (part number 7930.000). Device Destruction! Use only the permissible supply voltage of 24V DC (±6V) to operate the NXHX 51-ETM. Operating the NXHX 51-ETM with a supply voltage above the specified range leads to device destruction. Plug the barrel connector of the NXAC-POWER power supply into the power supply chassis socket on the NXHX board connector as shown in the picture below. Figure 2: Connect Power Supply NXHX 51-ETM | Getting Started DOC130701GS02EN | Revision 2 | English | 2013-10 | Released | Public © Hilscher 2013 Step-by-Step Instructions for Typical Use Cases 5 19/109 Step-by-Step Instructions for Typical Use Cases 5.1 5.1.1 Installing Code Sourcery Compiler on Your Development PC Overview This section describes how to install the Mentor Code Sourcery G++ Lite for ARM EABI compiler on your development PC. Code Sourcery is used by the Waf build framework and the HiTOP IDE as tool for compiling the C source code provided on the product DVD. 5.1.2 Prerequisites NXHX 51-ETM Product DVD. You have access to the internet (for downloading Code Sourcery). 5.1.3 Step-by-Step Instructions Open Software\Mentor - Codesourcery directory on the product DVD. Double-click arm-none-eabi.exe.lnk to start downloading the Code Sourcery installation program from the internet. The web browser opens and asks for permission to download the Code Sourcery installation program. After download, double-click the downloaded arm-2011.03-42-armnone-eabi.exe file to start the installation program on your PC. Follow the instruction of the installation program. Accept all suggested default settings. NXHX 51-ETM | Getting Started DOC130701GS02EN | Revision 2 | English | 2013-10 | Released | Public © Hilscher 2013 Step-by-Step Instructions for Typical Use Cases 5.2 5.2.1 20/109 Using Waf to Build ELF Files from All Application Examples Overview This section describes how to use Waf to build the HAL, LOM, nonOS and rcX application examples provided in the Examples and API folder of the product DVD at once. 5.2.2 Prerequisites You have installed Code Sourcery G++ Lite for ARM EABI on your development PC (see Installing Code Sourcery Compiler on Your Development PC section on page 19). You have copied the Examples and API folder from the product DVD to a local path on your development PC. 5.2.3 Step-by-Step Instructions 1. Open the command prompt on your development PC. In the Windows Start menu, choose All Programs > Accessories > Command Prompt. The Command Prompt opens: Figure 3: Command Prompt in Windows XP 2. Change to the directory where the Examples and API folder is stored. If you have stored the Examples and API folder e. g. in the directory E:\NXHX_51_ETM on your PC, change to the E drive (if necessary) and enter the following string: cd “E:\NXHX_51_ETM\Examples and API“ NXHX 51-ETM | Getting Started DOC130701GS02EN | Revision 2 | English | 2013-10 | Released | Public © Hilscher 2013 Step-by-Step Instructions for Typical Use Cases 21/109 The prompt shows the specified path: Figure 4: Change Directory in Command Prompt 3. Execute Build.bat batch file to start the building process. Enter Build.bat followed by the option debug or release. Figure 5: Execute Build.bat Note: If you later want to debug the produced ELF files with a debugger of your choice, use the debug option. If you don’t want to debug them, use the release option. Waf starts to build all application examples provided in the Examples and API folder (with the exception of the already built firmware file and the host application stored in the LFW folder). It creates a build directory and stores the ELF files and all produced output in the debug or release folder in the build directory according to the option you have specified. NXHX 51-ETM | Getting Started DOC130701GS02EN | Revision 2 | English | 2013-10 | Released | Public © Hilscher 2013 Step-by-Step Instructions for Typical Use Cases 5.3 5.3.1 22/109 Using Waf to Build an ELF File from an rcX Application Example Overview If you don’t want to build all application examples at once (as described in the preceding section), you can use the Waf build option “--target=” to specify a certain single example that you want to build. This section describes how to use Waf to produce a single ELF file from the rcX Tasks application example provided in the Examples and API\rcX\1. rcX Tasks directory on the product DVD. You can start the build process from a command prompt or from a customized Build.bat batch file; both methods are described in this section. If you want to produce ELF files from different examples and for different purposes at different times (i. e. debugging or release), you can create separate customized Build.bat batch files for each target and purpose. Note, that you have to specify the exact name of the application example that you want to build. How to find out the exact name of an application example is described in step 1 of these step-by-step instructions. 5.3.2 Prerequisites You have installed Code Sourcery G++ Lite for ARM EABI on your development PC (see Installing Code Sourcery Compiler on Your Development PC section on page 19). You have copied the Examples and API folder from the product DVD to a local path on your development PC. 5.3.3 Step-by-Step Instructions 1. Find out the name of the application example which you want to build. Open the folder of the application example. In this case, it is the Examples and API\rcX\1. rcX Tasks folder. In the 1. rcX Tasks folder, open the wscript file with an editor, e. g. Notepad. NXHX 51-ETM | Getting Started DOC130701GS02EN | Revision 2 | English | 2013-10 | Released | Public © Hilscher 2013 Step-by-Step Instructions for Typical Use Cases 23/109 The application name is stated behind APPNAME. Figure 6: Opened wscript File Note or write down the application name on a sheet of paper. Close the wscript file. Using Command Prompt: 2. Open the command prompt on your development PC. In the Windows Start menu, choose All Programs > Accessories > Command Prompt. The Command Prompt opens: Figure 7: Command Prompt in Windows XP 3. Change to the directory where the Examples and API folder is stored. If you have stored the Examples and API folder e. g. in the directory E:\NXHX_51_ETM on your PC, change to the E drive (if necessary) and enter the following string: cd “E:\NXHX_51_ETM\Examples and API” NXHX 51-ETM | Getting Started DOC130701GS02EN | Revision 2 | English | 2013-10 | Released | Public © Hilscher 2013 Step-by-Step Instructions for Typical Use Cases 24/109 The prompt shows the specified path: Figure 8: Change Directory in Command Prompt 4. Specify build options and execute waf.bat batch file. To build an ELF for debugging from the rcX_Tasks example, type in the following string behind the prompt, then press Enter key on your keyboard: BuildEnvironment\Waf\waf.bat configure build --target=rcX_Tasks --conditions=debug Figure 9: Execute waf.bat with Target and Build Options Note: If you want to build a different application (not the rcX_Tasks application), look up the APPNAME in the wscript file belonging to the corresponding application example and enter it behind the target option: --target=[APPNAME]. Note that the parameters are case sensitive. If you want to use the ELF for debugging, don’t forget to add the debug option: --conditions=debug. If you don’t use the --conditions=debug option, the ELF will be built for release by default. Waf starts to build the application example specified by the target option (i. e. the rcX_Tasks example). It creates a build\debug or build\release directory and stores the produced ELF in the corresponding application example folder (i. e. in the Examples and API\build\debug\rcX\1. rcX Tasks directory). NXHX 51-ETM | Getting Started DOC130701GS02EN | Revision 2 | English | 2013-10 | Released | Public © Hilscher 2013 Step-by-Step Instructions for Typical Use Cases 25/109 Using Customized Build.bat file: 2. Duplicate the Build.bat MS-DOS batch file. In the Windows Explorer, open the Examples and API folder on your development PC. Copy the Build.bat file and rename the copy according to its intended function. If, e. g., you want to use the batch file to build an ELF from the rcX Tasks application example for the purpose of debugging, you could name it Build_rcx_Task_debug.bat. 3. Edit batch file. Select your copy of the Build.bat file in the Windows Explorer and choose Edit from the context menu. The Build.bat file opens in Notepad. Delete obsolete code lines. The obsolete lines are highlighted in blue in the figure below: Figure 10: Delete Obsolete Commands in Build.bat File Note: These code lines are obsolete, because in this method, the Build.bat will be started by double-click, not by using the Command Prompt. NXHX 51-ETM | Getting Started DOC130701GS02EN | Revision 2 | English | 2013-10 | Released | Public © Hilscher 2013 Step-by-Step Instructions for Typical Use Cases 26/109 After deleting the obsolete lines, the file should now look like this: Figure 11: Build.bat File After Deleting Obsolete Commands Specify the build options at the position indicated in the figure below. In our example, use the following string: cmd/C waf.bat build --target=rcX_Tasks install --conditions=debug Figure 12: Edited Build.bat File Note: The parameters are case sensitive, therefore mind the upper-case “X” in “rcX_Tasks”. If you want to build a different application (not the rcX_Tasks application example), look up the APPNAME in the wscript file belonging to the application example and enter the name behind the target option: --target=[APPNAME]. Don’t forget to enter the --conditions=debug option if you want to use the ELF for debugging. If you want to use the ELF not for debugging but for release, enter --conditions=release option instead. NXHX 51-ETM | Getting Started DOC130701GS02EN | Revision 2 | English | 2013-10 | Released | Public © Hilscher 2013 Step-by-Step Instructions for Typical Use Cases 27/109 Save and close the Build.bat file after editing. 4. Execute batch file. Double-click your edited copy of the Build.bat file. Waf starts to build the application example (i. e. the rcX_Tasks example) according to the options specified in the batch file. It creates a build\debug or build\release directory and stores the produced ELF in the corresponding application example folder (in our example, this will be in the Examples and API\build\debug\rcX\1. rcX Tasks directory). NXHX 51-ETM | Getting Started DOC130701GS02EN | Revision 2 | English | 2013-10 | Released | Public © Hilscher 2013 Step-by-Step Instructions for Typical Use Cases 5.4 5.4.1 28/109 Using HiTOP to Build, Download and Debug an ELF File Made from an rcX Application Example Overview This section describes how to use HiTOP to build, download and debug an ELF file containing the c source code of the rcX UART example provided in the Examples and API\rcX\7. rcX UART folder on the NXHX 51ETM product DVD. This section should give you a basic understanding of how to use the NXHX board together with HiTOP and the example code provided on the product DVD. Detailed instructions about the HiTOP debugger are not provided here, please refer to the HiTOP online help for information about debugging with HiTOP. 5.4.2 Prerequisites You have installed Code Sourcery G++ Lite for ARM EABI on your development PC (see Installing Code Sourcery Compiler on Your Development PC section on page 19). The NXHX board is connected to a voltage supply. The serial flash memory of the NXHX 51-ETM board should be empty. (If you have already downloaded any file to the serial flash, we recommend using the Bootwizard application to erase it before you download and debug the ELF. Instructions for this are provided in the netX Bootwizard manual.) You have a USB cable with a Type B connector ready. You have a NXHX-RS232 adapter (Hilscher part number 7923.010) and a NULL modem cable ready (for testing the UART function of the downloaded ELF containing the rcX example). You have access to the NXHX 51-ETM product DVD. You have copied the Examples and API folder from the product DVD to a local path on your development PC. 5.4.3 Step-by-Step Instructions 1. Create an Environment Variable for Code Sourcery in Windows. If you are using Windows XP: In the Start menu, choose Control Panel entry. The Control Panel window opens. In the Control Panel, double-click on System entry. The System Properties sheet opens. In the System Properties sheet, select Advanced tab. NXHX 51-ETM | Getting Started DOC130701GS02EN | Revision 2 | English | 2013-10 | Released | Public © Hilscher 2013 Step-by-Step Instructions for Typical Use Cases 29/109 Figure 13: System Properties in Windows XP In the Advanced tab, click Environment Variables button. The Environment Variables sheet opens: Figure 14: Environment Variables in Windows XP In the System variables area, click New button. NXHX 51-ETM | Getting Started DOC130701GS02EN | Revision 2 | English | 2013-10 | Released | Public © Hilscher 2013 Step-by-Step Instructions for Typical Use Cases 30/109 The New System Variable dialog window opens: Figure 15: New System Variable in Windows XP In the Variable name field, enter PATH_CODE_SOURCERY string. In the Variable value field, enter the path to the Code Sourcery installation on your local PC, e. g. C:\Program Files\CodeSourcery\Sourcery G++ Lite. Close all opened sheets with OK. If you are using Windows 7 or 8: In the Start menu, choose Control Panel entry. The Control Panel window opens. In the Control Panel, click on System and Security entry. The System and Security sheet opens: Figure 16: System and Security Sheet in Windows 7 In the System and Security sheet, click System entry. NXHX 51-ETM | Getting Started DOC130701GS02EN | Revision 2 | English | 2013-10 | Released | Public © Hilscher 2013 Step-by-Step Instructions for Typical Use Cases 31/109 The System sheet opens: Figure 17: System Sheet in Windows 7 In the System sheet, click Advanced system settings entry. The Advanced tab of the System Properties sheet opens: Figure 18: Advanced System Properties in Windows 7 NXHX 51-ETM | Getting Started DOC130701GS02EN | Revision 2 | English | 2013-10 | Released | Public © Hilscher 2013 Step-by-Step Instructions for Typical Use Cases 32/109 In the Advanced tab of the System Properties sheet, click Environment Variables button. The Environment Variables sheet opens: Figure 19: Environment Variables in Windows 7 In the System variables area, click New button. The New System Variable dialog window opens: Figure 20: New System Variable in Windows 7 In the Variable name field, enter PATH_CODE_SOURCERY string. In the Variable value field, enter the path to the Code Sourcery installation on your local PC, e. g. C:\Program Files(x86)\CodeSourcery\Sourcery G++ Lite. Close all opened windows with OK. NXHX 51-ETM | Getting Started DOC130701GS02EN | Revision 2 | English | 2013-10 | Released | Public © Hilscher 2013 Step-by-Step Instructions for Typical Use Cases 33/109 2. Install HiTOP Debugger on your development PC. Open Software\Hitex directory on the product DVD. Double-click program. Hitop-NetX_5-40-xxxx.exe to start the installation The HiTOP for netSTICK installation program starts. Follow the instruction of the installation program. Accept all suggested default settings. 3. Connect the Onboard USB HiTOP debugger to the Development PC. Connect the NXHX board to a voltage supply (for details, see Connecting Power Supply chapter on page 18). Plug an USB connector (type B) into the socket of the Onboard USB in Device HiTOP debugger on the NXHX board (see position Drawing and Positions of the NXHX 51-ETM section on page 16) and connect the USB cable to your PC. Note: The USB drivers needed for connecting the HiTOP debugger with the NXHX board have automatically been installed on your PC by the HiTOP installation program. However, under Windows XP, the installation process of the USB drivers needs to be completed in the Found New Hardware Wizard, which opens when you connect the NXHX board for the first time to your PC. For finishing the installation of the USB drivers in the wizard, follow the instructions given below. The Found New Hardware Wizard opens three times: for the Hitex USB Serial JTAG driver, for the Hilscher USB Serial COM Port driver and for the Hilscher USB Serial Port. Under Windows 7 and 8, the Installing device driver software message appears in the Windows task bar when you connect the NXHX board to the PC via USB cable for the first time. Windows then automatically copies the driver files to the appropriate Windows directories, you do not need to take any action in this. If you are using Windows XP: In the start screen of the Found New Hardware Wizard, answer the question Can Windows connect to Windows Update…? by selecting the No, not this time option. Click Next button. In the next screen, answer the question What do you want the wizard to do? by selecting Install the software automatically option. Click Next. Windows then copies the driver files to the Windows directories. In the Completing the Found New Hardware Wizard screen, click Finish button. NXHX 51-ETM | Getting Started DOC130701GS02EN | Revision 2 | English | 2013-10 | Released | Public © Hilscher 2013 Step-by-Step Instructions for Typical Use Cases 34/109 4. Establish UART connection. Connect the NXHX-RS232 adapter to the UART0 interface of the NXHX in Device Drawing and Positions of the NXHX board (see position 51-ETM chapter on page 16). Connect a NULL modem cable to the D-sub male plug on the NXHXRS232 adapter. Connect the other end of the cable to the COM port of your development PC. 5. Adjust tool settings in HiTOP. In the Windows Start menu, choose All Programs > HiTOP54netSTICK > HiTOP Debugger. HiTOP5 opens and displays the Using projects in HiTOP dialog window: Figure 21: HiTOP Start Click Open an existing project button. NXHX 51-ETM | Getting Started DOC130701GS02EN | Revision 2 | English | 2013-10 | Released | Public © Hilscher 2013 Step-by-Step Instructions for Typical Use Cases 35/109 The Open dialog window opens: Figure 22: Select Project File Dialog Navigate to the Examples and API\rcX\7. rcX UART folder. Select the rcX_UART_netX51.htp file, then click Open button. The Select compiler dialog window opens: Figure 23: Select Compiler Dialog Select the GNU C Compiler for ARM, then click OK button. The Download Applications dialog window opens: Figure 24: Select Compiler Dialog Click Cancel button (you don’t want to download the application yet, you first need to adjust the tool settings and build the application). NXHX 51-ETM | Getting Started DOC130701GS02EN | Revision 2 | English | 2013-10 | Released | Public © Hilscher 2013 Step-by-Step Instructions for Typical Use Cases 36/109 The project is loaded and displayed in HiTOP: Figure 25: Project in HiTOP In the menu, choose Project > Settings… The Project settings dialog window opens: Figure 26: Project Settings NXHX 51-ETM | Getting Started DOC130701GS02EN | Revision 2 | English | 2013-10 | Released | Public © Hilscher 2013 Step-by-Step Instructions for Typical Use Cases 37/109 Click Tool Settings… button. The Tool Settings dialog opens. Enter the parameters as shown below: Figure 27: Tool Settings Click OK button. You have adjusted the Tool Settings in HiTOP. Exit HiTOP. 6. Build and download netX UART example. Restart HiTOP. HiTOP opens and displays the Using projects in HiTOP dialog window. Choose Open an existing project option. The Open dialog window opens. Navigate to Examples and API\rcX\7. rcX UART folder and open the rcX_UART_netX51.htp file. The project is opened and the Download Applications dialog appears. In the Download Applications dialog, click Cancel button (you don’t want to download the application yet, you first need to build the application). NXHX 51-ETM | Getting Started DOC130701GS02EN | Revision 2 | English | 2013-10 | Released | Public © Hilscher 2013 Step-by-Step Instructions for Typical Use Cases 38/109 The project is displayed in HiTOP: Figure 28: Project in HiTOP In the icon bar of HiTOP, click Build button ( keyboard. ) or press F7 on your Answer the question Would you like to rebuild the affected files ? with Yes. The project/ELF file is being compiled and the Download Applications dialog appears again. This time, choose OK in the Download Applications dialog. The project/ELF file is automatically downloaded to the NXHX board after the build process is finished. NXHX 51-ETM | Getting Started DOC130701GS02EN | Revision 2 | English | 2013-10 | Released | Public © Hilscher 2013 Step-by-Step Instructions for Typical Use Cases 39/109 7. Run netX UART example. In the icon bar of HiTOP, click Go button ( ) to start the rcX UART example on the NXHX board (or press F5 on your keyboard). Figure 29: Project in HiTOP (2) The running project is indicated by the corner of the HiTOP screen. sign in the lower right 8. Test netX UART example with Windows HyperTerminal program. Note: Windows HyperTerminal program is included in Windows XP, but not in Windows 7 and 8. If you are using Win 7 or 8, use an equivalent terminal program instead. In the Windows Start menu, choose Accessories > Communications > HyperTerminal. If the Default Telnet Program? dialog opens and asks you to make HyperTerminal your default Telnet program, click No. If the Location Information dialog opens, click Cancel. Note: The Location Information parameters demanded by Windows are not relevant for this example. Confirm cancelling; respectively click Cancel each times Windows ask for these parameters. NXHX 51-ETM | Getting Started DOC130701GS02EN | Revision 2 | English | 2013-10 | Released | Public © Hilscher 2013 Step-by-Step Instructions for Typical Use Cases 40/109 The Connection Description dialog opens: Figure 30: Connection Description In the Connection Description dialog, enter any name, then click OK. The Connect to dialog opens: Figure 31: Connect To Dialog In the Connect using drop-down list, select the COM port which is connected to the UART0 interface of the NXHX board via NULL modem cable (usually COM1), then click OK. The Properties sheet for the selected COM port opens. NXHX 51-ETM | Getting Started DOC130701GS02EN | Revision 2 | English | 2013-10 | Released | Public © Hilscher 2013 Step-by-Step Instructions for Typical Use Cases 41/109 Select the parameters as shown below, then click Apply and OK button. Figure 32: COM Port Properties At last the HyperTerminal program opens: Figure 33: rcX UART Example in HyperTerminal Enter any letter. According to the programmed function of the rcX UART example, any small letter sent to the netX processor will be returned as capital letter and vice versa, e.g. the entered character string gT will be returned as Gt. (All other characters that are not letters, like e. g. numbers, are returned unchanged.) 9. Debug/alter rcX example Use the HiTOP functions to debug, respectively alter the source code according to your needs, then rebuild and download the ELF to the NXHX board again (as described in step 6). NXHX 51-ETM | Getting Started DOC130701GS02EN | Revision 2 | English | 2013-10 | Released | Public © Hilscher 2013 Step-by-Step Instructions for Typical Use Cases 5.5 5.5.1 42/109 Using Bootwizard to Create an Executable Binary Firmware File from ELF File Overview This section describes how to use the Hilscher netX Bootwizard to create an executable binary firmware from an ELF file. 5.5.2 Prerequisites You have installed the Hilscher netX Bootwizard application on your PC. (In the menu of the NXHX 51-ETM product DVD, choose Software and Tools > Bootwizard to open the Tools\Bootwizard folder, then double-click bootwizard_1.3.xxxxx.x_setup.exe file.) The compiler/linker toolchain that was used to build the ELF file (i. e. Code Sourcery) is installed on the same PC. You have built an ELF file (this example uses the ELF file built from the rcX UART example as described in the previous section). 5.5.3 Step-by-Step Instructions 1. Start the Bootwizard application on your PC. In the Windows Start menu, choose All Programs > Hilscher GmbH > Bootwizard > Bootwizard. The Bootwizard opens with the Build image screen (this is the default start screen): Figure 34: Bootwizard Start Screen NXHX 51-ETM | Getting Started DOC130701GS02EN | Revision 2 | English | 2013-10 | Released | Public © Hilscher 2013 Step-by-Step Instructions for Typical Use Cases 43/109 2. Select toolchain and ELF file. In the Input area, open the Toolchain drop-down list and select the toolchain that was used to build the ELF, in our example, this is Codesourcery. Click Load ELF/binary button next to the Input file field. The Select an input file dialog window opens: Figure 35: Select ELF File Dialog Navigate to the directory where the ELF file is stored. In our example this is the Examples and API\rcX\7. rcX UART\Output\netX51 directory. Select the ELF file (in our example: rcX_UART_netX51.elf), then click Open button. NXHX 51-ETM | Getting Started DOC130701GS02EN | Revision 2 | English | 2013-10 | Released | Public © Hilscher 2013 Step-by-Step Instructions for Typical Use Cases 44/109 The Bootwizard loads the ELF file. Figure 36: ELF File Loaded 3. Set parameters. In the Chip type area, select 51/52. In the Bootblock parameters area, open the first drop-down list next to Source device and select Serial flash on SPI bus entry. Open the right drop-down list and select Generic SPI Flash netX51/52, 10MHz entry. Note: Because Quad SPI Flash is used on the NXHX 51-ETM board, the setting you choose in the right drop-down list of the Source device parameter is actually of no consequence. However, any one of these entries must be selected, otherwise the Generate boot image button will not be enabled. In the first drop-down list next to Dest. device, make sure that SDRAM is selected. Open the right drop-down list and select SDRam MT48LC2M32B2-7IT entry. 4. Specify output file. In the Output area, click Save as button. The Select the output file dialog window opens. In the File name field, specify file name of the executable binary file which you want to create (the *.bin Boot Image), e. g. “example.bin”. Specify the output directory, then click Save button. NXHX 51-ETM | Getting Started DOC130701GS02EN | Revision 2 | English | 2013-10 | Released | Public © Hilscher 2013 Step-by-Step Instructions for Typical Use Cases 45/109 The GUI should now look like this: Figure 37: Generate Boot Image Screen 5. Generate firmware file. In the Output area, click Generate boot image button. The executable binary firmware file is generated and stored in the specified output folder. Note: The executable binary can then be downloaded and stored in the flash memory of the NXHX 51-ETM board by the Bootwizard via serial interface. Because both files are in essence executable binary images, the procedure of downloading the executable firmware is the same as for downloading a Second Stage Bootloader file. Thus, if you want to download the executable binary after having created it from ELF, you can follow the instructions provided in the Downloading Executable Binary Image to Serial Flash of the NXHX 51-ETM via USB section on page 46; simply select the executable binary firmware instead of the SSBL file for download. NXHX 51-ETM | Getting Started DOC130701GS02EN | Revision 2 | English | 2013-10 | Released | Public © Hilscher 2013 Step-by-Step Instructions for Typical Use Cases 5.6 5.6.1 46/109 Downloading Executable Binary Image to Serial Flash of the NXHX 51-ETM via USB Overview This section describes how to download an executable binary image from your development PC to the flash memory of your netX device via USB. For this, you need the Hilscher netX Bootwizard application as download tool installed on your PC and an USB cable with a Mini-B connector. The executable binary image file can be the Second Stage Bootloader (SSBL) or customer-engineered LOM firmware. This section is relevant to users of Standard Loadable Firmware (LFW) and users of LOM firmware alike, because users who want to operate the board with LFW or LOM firmware in NXF format need to flash the SSBL beforehand, users who want to operate the board with LOM firmware not in NXF format also need a way to flash their executable binary firmware image. For more detailed information about the Bootwizard, please refer to the Operating Instruction Manual netX Bootwizard, DOC070502OIxxEN, which is stored in the Documentation\4. Tool Manuals\Bootwizard directory of the product DVD. Note: To ensure successful download, the serial flash memory of the NXHX 51-ETM board needs to be empty. The NXHX 51-ETM is delivered with an empty serial flash memory. If you have already downloaded any file to the serial flash, use the Bootwizard application to erase it before you proceed to download the binary image. Instructions for this are provided in the netX Bootwizard manual. 5.6.2 Prerequisites You have installed the Hilscher netX Bootwizard application on your PC. (In the menu of the NXHX 51-ETM product DVD, choose Software and Tools > BootWizard to open the Tools\Bootwizard folder, then double-click bootwizard_1.3.xxxxx.x_setup.exe file.) The NXHX board is connected to a voltage supply. You have a USB cable with a Mini-B connector ready. You have access to the image which you want to download. In case of the SSBL, this is the NETX51-BSL.bin file stored on the NXHX 51-ETM product DVD in the Tools\2nd Stage Bootloader directory. NXHX 51-ETM | Getting Started DOC130701GS02EN | Revision 2 | English | 2013-10 | Released | Public © Hilscher 2013 Step-by-Step Instructions for Typical Use Cases 5.6.3 47/109 Step-by-Step Instructions 1. Start the Bootwizard application on your PC. In the Windows Start menu, choose All Programs > Hilscher GmbH > Bootwizard > Bootwizard. The Bootwizard opens: Figure 38: Bootwizard Start Screen 2. Choose flashing task. In the Select Task area, click Write to flash button. NXHX 51-ETM | Getting Started DOC130701GS02EN | Revision 2 | English | 2013-10 | Released | Public © Hilscher 2013 Step-by-Step Instructions for Typical Use Cases 48/109 The Bootwizard shows the fields and controls for the chosen Write to flash task: Figure 39: Bootwizard Write to Flash Screen 3. Select the image to be downloaded. In the Input area, click File to flash button. The Select an input file dialog window opens: Figure 40: Select Input File Dialog NXHX 51-ETM | Getting Started DOC130701GS02EN | Revision 2 | English | 2013-10 | Released | Public © Hilscher 2013 Step-by-Step Instructions for Typical Use Cases 49/109 Navigate to the directory where the image is stored. In case of the SSBL, this is the Tools\2nd Stage Bootloader directory on the product DVD. Select the image file (in case of the SSBL, this is the NETX51-BSL.bin file), then click Open button. The Bootwizard opens file. The following message appears: Figure 41: Bootwizard Message Click OK. 4. Select Chip type. In the Chip type area, select 51/52. The GUI should now look like this: Figure 42: Selected File in Write to Flash Screen NXHX 51-ETM | Getting Started DOC130701GS02EN | Revision 2 | English | 2013-10 | Released | Public © Hilscher 2013 Step-by-Step Instructions for Typical Use Cases 50/109 5. Put the NXHX 51-ETM into serial boot mode. in Device Use the S1 switch on the NXHX board (see position Drawing and Positions of the NXHX 51-ETM chapter on page 16) to set the boot strap options to SERIAL boot mode. Use the following settings: S1 SW Setting 1 on 2 off 3 off 4 off 5 off 6 on Table 3: Settings for Serial Boot Mode at Switch S1 Push the Reset button (T1) on the NXHX board (see position in Device Drawing and Positions of the NXHX 51-ETM chapter on page 16). The SYS LED on the NXHX board (see position in Device Drawing and Positions of the NXHX 51-ETM chapter on page 16) which up to this point has been blinking yellow (on/off) now alternates between brighter and darker yellow, indicating serial boot mode. 6. Establish an USB connection. Plug an USB cable into the Mini-B USB socket on the NXHX board (see in Device Drawing and Positions of the NXHX 51-ETM secposition tion on page 16) and connect the USB cable to your PC. Note: The USB drivers needed for connecting the Bootwizard to the NXHX board have automatically been installed on your PC by the Bootwizard setup program. However, under Windows XP, the installation process of the USB drivers needs to be completed in the Found New Hardware Wizard, which opens when you connect the NXHX board for the first time to your PC. For finishing the installation of the USB drivers in the wizard, follow the instructions given below. The Found New Hardware Wizard opens twice: for the netX51 Bootmonitor (CDC) driver and for the netX51 USB Bootmonitor (ROM) driver. Under Windows 7 and 8, the Installing device driver software message appears in the Windows task bar when you connect the NXHX board to the PC via USB cable for the first time. Windows then automatically copies the driver files to the appropriate Windows directories, you do not need to take any action in this. If you are using Windows XP: 7. Finish installation of USB drivers in the Found New Hardware Wizard. In the start screen of the Found New Hardware Wizard, answer the question Can Windows connect to Windows Update…? by selecting the No, not this time option. Click Next button. NXHX 51-ETM | Getting Started DOC130701GS02EN | Revision 2 | English | 2013-10 | Released | Public © Hilscher 2013 Step-by-Step Instructions for Typical Use Cases 51/109 In the next screen, answer the question What do you want the wizard to do? by selecting Install the software automatically option. Click Next. Windows then copies the driver files to the Windows directories. In the Completing the Found New Hardware Wizard screen, click Finish button. 8. Check USB connection in Device Manager (Windows XP). In the Start menu, choose Control Panel entry. The Control Panel window opens. In the Control Panel, double-click on System entry. The System Properties sheet opens. In the System Properties sheet, select Hardware tab. In the Hardware tab, click Device Manager button. The Device Manager window opens. Check the entries under Ports (COM & LPT) for the netX51 Bootmonitor. Figure 43: Check USB Connection to netX 51 Bootmonitor in Windows XP The number of the COM port of your PC currently connected to the NXHX board is indicated in brackets. In this example, COM22 is connected to the netX51 Bootmonitor (i. e. the ROM Loader running in the netX 51 controller on the NXHX board). Note or write down the number of the COM port (you will need the COM number in the next step), then close the Device Manager. NXHX 51-ETM | Getting Started DOC130701GS02EN | Revision 2 | English | 2013-10 | Released | Public © Hilscher 2013 Step-by-Step Instructions for Typical Use Cases 52/109 If you are using Windows 7 or 8: 8. Check USB connection (Windows 7 and 8): In the Start menu, choose Control Panel entry. The Control Panel window opens. In the Control Panel window, choose Hardware and Sound entry. The Hardware and Sound window opens. In the Hardware and Sound window, below Devices and Printers, click Device Manager entry. The Device Manager window opens. Check the entries under Ports (COM & LPT) for the netX51 Bootmonitor. Figure 44: Check USB Connection to netX 51 in Windows 7 The number of the COM port of your PC currently connected to the NXHX board is indicated in brackets. In this example, COM26 is connected to the netX51 Bootmonitor (i. e. the ROM Loader running in the netX 51 controller on the NXHX board). Note or write down the number of the COM port (you will need the COM number in the next step), then close the Device Manager. NXHX 51-ETM | Getting Started DOC130701GS02EN | Revision 2 | English | 2013-10 | Released | Public © Hilscher 2013 Step-by-Step Instructions for Typical Use Cases 53/109 9. Download image file. In the Bootwizard, click Flash button. Figure 45: Write to Flash Screen The plugin selector opens: Figure 46: Plugin Selector for netX 51 Rom Loader Select the COM port connected to the netX51 Bootmonitor (the COM number which you have found out in the Device Manager in the previous step). Click OK button (or double-click the relevant COM port entry). NXHX 51-ETM | Getting Started DOC130701GS02EN | Revision 2 | English | 2013-10 | Released | Public © Hilscher 2013 Step-by-Step Instructions for Typical Use Cases 54/109 The Bootwizard now sends the data file and the flasher program to the NXHX board and runs the flasher. While downloading, a progress bar is shown: Figure 47: Progress Window Finally, a success or error message is shown: Figure 48: Flashing Successful Message The SYS LED on the NXHX board (see position in Device Drawing and Positions of the NXHX 51-ETM chapter on page 16) shows steady yellow. 10. Change boot mode and reset the NXHX board. Disconnect the USB cable from the NXHX board. in Device Use the S1 switch on the NXHX board (see position Drawing and Positions of the NXHX 51-ETM chapter on page 16) to set the boot strap options to FLASH boot mode. Use the following settings: S1 SW Setting 1 off 2 off 3 off 4 off 5 off 6 on Table 4: Set Flash Boot Mode at Switch S1 NXHX 51-ETM | Getting Started DOC130701GS02EN | Revision 2 | English | 2013-10 | Released | Public © Hilscher 2013 Step-by-Step Instructions for Typical Use Cases 55/109 Push the Reset button (T1) on the NXHX board (see position in Device Drawing and Positions of the NXHX 51-ETM chapter on page 16). The executable binary image is loaded from flash memory and then runs in the internal RAM of the netX 51. In case of the Second Stage Bootloader, the SSBL running in the internal RAM is now searching for NXF firmware to boot. This is indicated by the SYS LED (see position in Device Drawing and Positions of the NXHX 51-ETM chapter on page 16) alternating between yellow and green. NXHX 51-ETM | Getting Started DOC130701GS02EN | Revision 2 | English | 2013-10 | Released | Public © Hilscher 2013 Step-by-Step Instructions for Typical Use Cases 5.7 5.7.1 56/109 Downloading NXF Firmware to Serial Flash of the NXHX 51-ETM via USB Overview This section describes how to download a LFW or a LOM file in NXF format from your development PC to the flash memory of your netX device via USB. Note that the Second Stage Bootloader must have been downloaded to the NXHX board before you can download or boot any firmware in NXF format. Unlike the SSBL file, firmware in NXF format can not be downloaded to flash memory by using the netX Bootwizard application, because the Bootwizard can not cope with the file system set up by the SSBL already running on the NXHX board. Therefore, you need another Hilscher application to download the firmware file, the netHOST Device Test Application. The netHOST Device Test Application is stored on the product DVD in the Tools\netX Transport directory and can be run directly from DVD, it does not need to be installed on your PC. A ready-made LFW PROFINET IO Device NXF firmware for testing and evaluation purposes (limited IO data exchange of 2 Bytes) is stored on the product DVD in the Examples and API\LFW\1. LFW netX Toolkit\Firmware\PROFINET directory. As an alternative, you can also download the LOM PROFINET IO Device firmware in NXF format, which has also limited IO data exchange of 2 Bytes. Note that you first have to build it by using Waf with the release option. The code and libraries for this example are provided in the Examples and API\LOM\2. LOM Build LFW directory. After the build process, the firmware with the file name LOM_PNS.nxf will be stored in the Examples and API\build\release\LOM\2. LOM Build LFW directory. 5.7.2 Prerequisites You have downloaded the Second Stage Bootloader to the NXHX board. The NXHX board is connected to a voltage supply. You have a USB cable with a Mini-B connector ready. You have installed the Hilscher USB device drivers on your PC. (On the NXHX 51-ETM product DVD, open the Driver and Toolkit\USB Driver directory, then double-click setup.exe file. Follow the instructions of the installation wizard) You have inserted the NXHX 51-ETM product DVD into the DVD drive of your development PC (in order to be able to access the netHOST Device Test Application). You have access to the firmware file which you want to download. NXHX 51-ETM | Getting Started DOC130701GS02EN | Revision 2 | English | 2013-10 | Released | Public © Hilscher 2013 Step-by-Step Instructions for Typical Use Cases 5.7.3 57/109 Step-by-Step Instructions 1. Run the Second Stage Bootloader on the NXHX board. Use the S1 switch on the NXHX board (see position in Device Drawing and Positions of the NXHX 51-ETM chapter on page 16) to set the boot strap options to FLASH boot mode. Use the following settings: S1 SW Setting 1 off 2 off 3 off 4 off 5 off 6 on Table 5: Set Flash Boot Mode at Switch S1 Push the Reset button (T1) on the development board (see position in Device Drawing and Positions of the NXHX 51-ETM chapter on page 16). The Second Stage Bootloader is loaded and then runs in the internal RAM of the netX 51, searching for firmware to boot. This is indicated by in Device Drawing and Positions of the the SYS LED (see position NXHX 51-ETM chapter on page 16) alternating between yellow and green. 2. Establish USB connection. Plug an USB cable into the Mini-B USB socket on the NXHX board (see in Device Drawing and Positions of the NXHX 51-ETM secposition tion on page 16) and connect the USB cable to your PC. Note: The Second Stage Bootloader, which you have downloaded in the previous section and which is now running on the NXHX board, sends a new USB identification that differs from the identification which had been sent by the ROM Loader running on the NXHX board when you first connected it via USB in order to download the Second Stage Bootloader. Therefore, it is necessary to briefly disconnect the USB cable after you have downloaded the SSBL, before you proceed to download the firmware, so that Windows can recognize the new USB ID. If the Found New Hardware Wizard opens under Windows XP, answer the question Can Windows connect to Windows Update…? by selecting the No, not this time option. In the next screen, answer the question What do you want the wizard to do? by selecting Install the software automatically option. NXHX 51-ETM | Getting Started DOC130701GS02EN | Revision 2 | English | 2013-10 | Released | Public © Hilscher 2013 Step-by-Step Instructions for Typical Use Cases 58/109 3. Check USB connection in Device Manager under Windows XP: In the Start menu, choose Control Panel entry The Control Panel window opens. In the Control Panel, double-click on System entry. The System Properties sheet opens. In the System Properties sheet, select Hardware tab. In the Hardware tab, click Device Manager button. The Device Manager window opens. Check the entries under Ports (COM & LPT) for the netX 51. Figure 49: Check USB Connection to netX 51 in Windows XP The number of the COM port of your PC currently connected to the NXHX board is indicated in brackets. In this example, COM23 is connected to the netX 51 (i. e. the Second Stage Bootloader running in the netX 51 controller on the NXHX board). 3. Check USB connection in Device Manager under Windows 7 or 8: In the Start menu, choose Control Panel entry. The Control Panel window opens. In the Control Panel window, choose Hardware and Sound entry. The Hardware and Sound window opens. In the Hardware and Sound window, below Devices and Printers, click Device Manager entry. The Device Manager window opens. Check the entries under Ports (COM & LPT) for the netX 51. Figure 50: Check USB Connection to netX 51 in Windows 7 The number of the COM port of your PC currently connected to the NXHX board is indicated in brackets. In this example, COM23 is connected to the netX 51 (i. e. the Second Stage Bootloader running in the netX 51 controller on the NXHX board). NXHX 51-ETM | Getting Started DOC130701GS02EN | Revision 2 | English | 2013-10 | Released | Public © Hilscher 2013 Step-by-Step Instructions for Typical Use Cases 59/109 4. Open the netHOST Device Test Application on your PC. Insert the NXHX 51-ETM product DVD into your local DVD drive. Use the Windows Explorer to open the directory Tools\netX Transport on the DVD. Double-click netHOST.exe. The netHOST Device Test Application opens: Figure 51: netHOST Device Test Application Start Screen 5. Open connection to NXHX board. In the menu, choose Device > Open and wait for a few seconds. After a while, the Channel Selection dialog box opens: Figure 52: Channel Selection Dialog In the left part of the dialog box, select the COM port to which the NXHX board is connected via USB, then click Open button. NXHX 51-ETM | Getting Started DOC130701GS02EN | Revision 2 | English | 2013-10 | Released | Public © Hilscher 2013 Step-by-Step Instructions for Typical Use Cases 60/109 The Channel Selection dialog box closes, and back in the netHOST Device Test Application window, the header displays the selected channel: Figure 53: netHOST Device Test Application After Channel Selection 6. Select firmware file. In the menu, choose Device > Download. The Download window opens: Figure 54: Download Window NXHX 51-ETM | Getting Started DOC130701GS02EN | Revision 2 | English | 2013-10 | Released | Public © Hilscher 2013 Step-by-Step Instructions for Typical Use Cases 61/109 In the Download Mode drop-down list, choose Firmware Download. Click button next to the Filename field. The Windows file selection dialog opens: Figure 55: File Selection In the Windows file selection dialog, select the firmware file which you want to download, then click Open button. The Windows file selection dialog closes, and back in the Download window, the selected Firmware file is displayed in the Filename field. 7. Download firmware file. Click Download button to start the file download. While the firmware file is being downloaded to the NXHX board, a progress bar is displayed: Figure 56: Firmware Download in Progress NXHX 51-ETM | Getting Started DOC130701GS02EN | Revision 2 | English | 2013-10 | Released | Public © Hilscher 2013 Step-by-Step Instructions for Typical Use Cases 62/109 Note: A completed download is indicated only by the full progress bar; there will be no extra message box popping up in order to inform you about the completion of the download. 8. Reset NXHX board to start the firmware. Disconnect the USB cable from the NXHX board. in Push the Reset button (T1) on the NXHX board (see position Device Drawing and Positions of the NXHX 51-ETM chapter on page 16). The firmware is loaded by the Second Stage Bootloader. Running in firmware is indicated by a steady green SYS LED (see position Device Drawing and Positions of the NXHX 51-ETM chapter on page 16) In the menu of the netHOST Device Test Application, choose Device > Close, then choose File > Quit to exit the application. NXHX 51-ETM | Getting Started DOC130701GS02EN | Revision 2 | English | 2013-10 | Released | Public © Hilscher 2013 Step-by-Step Instructions for Typical Use Cases 5.8 5.8.1 63/109 Downloading NXF Firmware via PCI and Host Interface Overview This section describes how to download a LFW or a LOM firmware in NXF format via the PCI interface of your development PC to the flash memory of your NXHX 51-ETM board via Host Interface by using the cifX Driver Setup Utility and the NXPCA-PCI Adapter Board. For further information about the NXPCA-PCI board, please refer to the User Manual NXPCA-PCI. A ready-made LFW PROFINET IO Device NXF firmware for testing and evaluation purposes (limited IO data exchange of 2 Bytes) is stored on the product DVD in the Examples and API\LFW\1. LFW netX Toolkit\Firmware\PROFINET directory. As an alternative, you can also download the LOM PROFINET IO Device firmware in NXF format, which has also limited IO data exchange of 2 Bytes. Note that you first have to build it by using Waf with the release option. The code and libraries for this example are provided in the Examples and API\LOM\2. LOM Build LFW directory. After the build process, the firmware with the file name LOM_PNS.nxf will be stored in the Examples and API\build\release\LOM\2. LOM Build LFW directory. 5.8.2 Prerequisites Hilscher NXPCA-PCI Adapter Board (part number 7902.100). Hilscher CAB-NXPCA-PCI cable (part number 4400.000) You have installed the cifX Device Driver on your PC (on the NXHX 51-ETM product DVD, open the Driver and Toolkit\Device Driver (NXDRV-WIN)\Installation directory, then double-click cifX Device Driver Setup.exe file. Follow the instructions of the installation wizard). You have downloaded the Second Stage Bootloader to the NXHX board (see section Downloading Executable Binary Image to Serial Flash of the NXHX 51-ETM via USB on page 46). The NXHX board is connected to a voltage supply. You have access to the NXF firmware file which you want to download. NXHX 51-ETM | Getting Started DOC130701GS02EN | Revision 2 | English | 2013-10 | Released | Public © Hilscher 2013 Step-by-Step Instructions for Typical Use Cases 5.8.3 64/109 Step-by-Step Instructions 1. Install NXPCA-PCI Adapter Board in your development PC. Lethal Electrical Shock caused by parts with more than 50V! First disconnect the power plug of the PC ! Make sure that the power supply is off at the PC ! Figure 57: Connecting NXHX Board to PC via Adapter Board On the NXPCA-PCI board, set the bus width selector switch (located near the 68-pin DPM connector) to 16 Bit mode (middle position of slide switch). Open the housing of your development PC. Install the NXPCA-PCI adapter board at a free PCI interface slot of the PC. Close the housing of your development PC. NXHX 51-ETM | Getting Started DOC130701GS02EN | Revision 2 | English | 2013-10 | Released | Public © Hilscher 2013 Step-by-Step Instructions for Typical Use Cases 65/109 2. Connect NXHX 51-ETM board to NXPCA-PCI adapter board. Connect one end of the CAB-NXPCA-PCI cable to the 68-pin Dual-port memory connector of the NXPCA-PCI adapter board (accessible through cut-out slots in PC housing). Connect the other end of the CAB-NXPCA-PCI cable to the host in interface connector X3 of the NXHX 51-ETM board (see position Device Drawing and Positions of the NXHX 51-ETM chapter on page 16). Reconnect your development PC to power supply and switch it on. 3. Finish installation of NXPCA-PCI adapter board under Windows. After rebooting the development PC, Windows recognizes the new NXPCAPCI hardware and wants to finish the installation of the appropriate driver. If you are using Windows 7 or 8: Under Windows 7 and 8, the Installing device driver software message appears in the Windows task bar. If you have already installed the cifX Device Driver on your PC (as recommended), Windows automatically copies the driver files to the appropriate Windows directories. You do not need to take any action in this. If you are using Windows XP: Under Windows XP, the Found New Hardware Wizard opens. If you have already installed the cifX Device Driver on your PC (as recommended), do the following: In the start screen of the Found New Hardware Wizard, answer the question Can Windows connect to Windows Update…? by selecting the No, not this time option. Click Next button. In the next screen, answer the question What do you want the wizard to do? by selecting Install the software automatically option. Click Next. Windows then copies the driver files to the Windows directories. In the Completing the Found New Hardware Wizard screen, click Finish button. NXHX 51-ETM | Getting Started DOC130701GS02EN | Revision 2 | English | 2013-10 | Released | Public © Hilscher 2013 Step-by-Step Instructions for Typical Use Cases 66/109 4. Configure NXHX board for DPM host interface mode. in Device Use the S2 switch on the NXHX board (see position Drawing and Positions of the NXHX 51-ETM chapter on page 16) to set the host interface mode to Parallel Dual-Port Memory 16 bit mode. If you are using an NXHX 51-ETM board hardware revision 3, use the following settings: S2 SW Setting 1 off 2 on Table 6: 16 Bit Mode at Switch S2 for Hardware Revision 3 If you are using an NXHX 51-ETM board hardware revision 4, use the following settings: S2 SW Setting 1 off 2 off Table 7: 16 Bit Mode at Switch S2 for Hardware Revision 4 Use the X10 Host Interface Configuration jumper on the NXHX board in Device Drawing and Positions of the NXHX 51-ETM (see position chapter on page 16) to configure the signals for DPM host interface mode. Set the following jumper positions: X10 Description DPM_DIRQ# signal is connected to X3 pin 11 DPM_SIRQ# signal is connected to X3 pin 4 RSTIN# signal is connected to X3 pin 7 Table 8: Set X10 Jumper for Dual-Port Memory NXHX 51-ETM | Getting Started DOC130701GS02EN | Revision 2 | English | 2013-10 | Released | Public © Hilscher 2013 Step-by-Step Instructions for Typical Use Cases 67/109 The X10 host interface configuration jumper on the NXHX board should now look like this: Figure 58: Settings for DPM Use the S1 switch on the NXHX board (see position in Device Drawing and Positions of the NXHX 51-ETM chapter on page 16) to set the boot strap options to FLASH boot mode. Use the following settings: S1 SW Setting 1 off 2 off 3 off 4 off 5 off 6 on Table 9: Set Flash Boot Mode at Switch S1 5. Start the NXHX board. Connect the NXHX board to power supply or push the Reset button in Device Drawing and Positions of (T1) on the board (see position the NXHX 51-ETM chapter on page 16). The Second Stage Bootloader is loaded and then runs in the internal RAM of the netX 51, searching for firmware to boot. This is indicated by in Device Drawing and Positions of the the SYS LED (see position NXHX 51-ETM chapter on page 16) alternating between yellow and green. NXHX 51-ETM | Getting Started DOC130701GS02EN | Revision 2 | English | 2013-10 | Released | Public © Hilscher 2013 Step-by-Step Instructions for Typical Use Cases 68/109 6. Enable/disable the NXPCA-PCI driver before firmware download. Before you can download the firmware file, you have to acquaint the Windows driver on your development PC with the new system channel in the Dual-Port Memory of the NXHX board, which has been established by the Second Stage Bootloader. This can be achieved by enabling/disabling the NXPCA-PCI driver in the Device Manager of the PC: Open the Device Manager on your PC. In Windows XP: Start menu > Control Panel > System > Hardware > Device Manager In Windows 7 and 8: Start menu > Control Panel > Hardware and Sound > Device Manager In the Device Manager, click on the + Symbol in front of the CIFx Communication Interface entry, then right-click NX-PCA-PCI entry to open the context menu. In the context menu, select Disable. Figure 59: Disable NXPCA-PCI in Device Manager (Windows XP) A warning message appears. Acknowledge the warning message with Yes. NXHX 51-ETM | Getting Started DOC130701GS02EN | Revision 2 | English | 2013-10 | Released | Public © Hilscher 2013 Step-by-Step Instructions for Typical Use Cases 69/109 Wait for a few seconds, then open the context menu on the NX-PCAPCI entry again and select Enable. Figure 60: Enable NXPCA-PCI in Device Manager (Windows XP) You can now proceed to download the firmware. 7. Open cifX Driver Setup Utility on your PC. If you are using Windows XP: In the Start menu, choose Control Panel. The Control Panel opens. Here you will see two cifX icons: Figure 61: Control Panel in Windows XP Double-click cifX Setup icon. NXHX 51-ETM | Getting Started DOC130701GS02EN | Revision 2 | English | 2013-10 | Released | Public © Hilscher 2013 Step-by-Step Instructions for Typical Use Cases 70/109 If you are using Windows 7 or 8: In the Start menu, choose Control Panel. The Control Panel opens. In the navigation bar of the Control Panel, click on All Control Panel Items entry. button and select Figure 62: Control Panel in Windows 7 The All Control Panel Items window opens: Figure 63:All Control Panel Items in Windows 7 Double-click cifX Setup icon. Answer the question Do you want to allow the following program to make changes to this computer with Yes. NXHX 51-ETM | Getting Started DOC130701GS02EN | Revision 2 | English | 2013-10 | Released | Public © Hilscher 2013 Step-by-Step Instructions for Typical Use Cases 71/109 The cifX Driver Setup Utility window opens: Figure 64: cifX Driver Setup Utility Start Screen 8. Select communication channel. In the Device List, in the folder Active Devices > cifX0 (), click CH#0 entry. Note: A firmware and a configuration file can be assigned to each of the communication channels CH#0 to CH#5. By default, only channel CH#0 is used for firmware files in the .nxf format. The other channels are used for modular firmware files in the .nxo format. NXHX 51-ETM | Getting Started DOC130701GS02EN | Revision 2 | English | 2013-10 | Released | Public © Hilscher 2013 Step-by-Step Instructions for Typical Use Cases 72/109 The following window is displayed: Figure 65: cifX Driver Setup Utility - Active Devices 9. Select firmware file. In the Assigned Module / Firmware Files area, click Add button. A file selection dialog window opens: Figure 66: cifX Driver Setup Utility – Open File Dialog Navigate to the directory where the NXF firmware is stored. If you want to use the LOM PROFINET IO Device firmware built with Waf, navigate to the Examples and API\build\release\LOM\2. LOM Build LFW directory and select the LOM_PNS.nxf file. If you want to use the ready-made LFW PROFINET IO Device firmware (recommended) navigate to the Examples and API\LFW\1. LFW netX Toolkit\Firmware\PROFINET directory select the X060D000.nxf file. NXHX 51-ETM | Getting Started DOC130701GS02EN | Revision 2 | English | 2013-10 | Released | Public © Hilscher 2013 Step-by-Step Instructions for Typical Use Cases 73/109 Click Open button. The selected Firmware file is displayed in the Assigned Module / Firmware Files field: Figure 67: cifX Driver Setup Utility – Selected Firmware File 10. Download firmware file. Click Apply button to activate the file download (click OK button to download the file and also close the cifX Driver Setup Utility). A dialog box asking you to restart the NXHX board appears: Figure 68: Device Restart Request Answer the request with Yes. The firmware file is downloaded to the NXHX board. Note: The firmware file is also copied to the configuration directory on the development PC, e. g. [disk drive]:\Program Files\cifX Device Driver\1250 100_999\Channel0\. This function is needed for netX devices without Flash memory, which boot from the PC via PCI, like e. g. cifX PC Cards. NXHX 51-ETM | Getting Started DOC130701GS02EN | Revision 2 | English | 2013-10 | Released | Public © Hilscher 2013 Step-by-Step Instructions for Typical Use Cases 74/109 In case another program (e. g. SYCON.net or the cifX Test Application) is accessing the NXHX board at the same time during download, the following warning is displayed: Figure 69: Device Still Accessed Warning In this case, close the other program and repeat steps 9 and 10. On the NXHX board, the running firmware is indicated by a green SYSLED (RDY/RUN). Note: If you also want to download a configuration file, click Add button in the Assigned Configuration Files area to select the configuration file (*.nxd), then click Apply button to activate the download of the configuration file. Enabling/disabling the NXPCA-PCI driver after firmware download If you want to continue accessing the NXHX board from your PC via PCI interface after firmware download (i. e. for downloading a configuration or testing the IO data exchange), you again have to enable/disable the NXPCA-PCI driver in the Device Manager of your PC. This is because the Dual-Port Memory of the NXHX board has been changed by the firmware now running on the device. For details on how to enable/disable the NXPCA-PCI driver, see step 6. NXHX 51-ETM | Getting Started DOC130701GS02EN | Revision 2 | English | 2013-10 | Released | Public © Hilscher 2013 Step-by-Step Instructions for Typical Use Cases 5.9 5.9.1 75/109 Configuring NXHX 51-ETM With SYCON.net Overview This section describes how to configure the NXHX board as PROFINET IO Device with the SYCON.net configuration software and how to download the configuration from the PC to the NXHX board via Host Interface and NXPCA-PCI Adapter Board. After configuration, you can test the I/O communication of the NXHX board. Note: For effective configuration and testing of the NXHX board as PROFINET IO Device, you also need a PROFINET IO Controller. In this example, a Hilscher PC Card CIFX 50 RE is used as IO Controller. 5.9.2 Prerequisites You have downloaded the LFW PROFINET IO Device NXF firmware to the NXHX board (see Downloading NXF Firmware to Serial Flash of the NXHX 51-ETM via USB section on page 56 or Downloading NXF Firmware via PCI and Host Interface section on page 63). The NXHX board is connected to the configuration PC via NXPCA-PCI Adapter Board and CAB-NXPCA-PCI cable. Instructions for this can be found in the Downloading NXF Firmware via PCI and Host Interface section on page 63. You have installed the SYCON.net configuration software version 1.360 or higher on your PC (on the NXHX 51-ETM product DVD, open the Software\SYCON.net directory, then double-click SYCONnet netX setup.exe file. Follow the instructions of the installation wizard). You have installed the cifX Device Driver on your PC (on the NXHX 51-ETM product DVD, open the Driver and Toolkit\Device Driver (NXDRV-WIN)\Installation directory, then double-click cifX Device Driver Setup.exe file. Follow the instructions of the installation wizard). You have installed a PC Card CIFX 50-RE in your configuration PC. For details, please refer to the User Manual PC Cards CIFX 50 50E 70E 100EH, DOC120204UMxxEN. PROFINET IO Controller firmware for the PC Card CIFX 50-RE. The NXHX board is connected to a voltage supply. The NXHX board is connected to the PC Card CIFX 50-RE via Ethernet cable. NXHX 51-ETM | Getting Started DOC130701GS02EN | Revision 2 | English | 2013-10 | Released | Public © Hilscher 2013 Step-by-Step Instructions for Typical Use Cases 5.9.3 76/109 Step-by-Step Instructions 1. Enable Security Memory on the NXHX board. Use the S1 switch on the NXHX board (see position in Device Drawing and Positions of the NXHX 51-ETM chapter on page 16) to enable the security memory and to set the boot strap options to flash boot mode. Use the following settings: S1 SW Setting 1 off 2 off 3 off 4 off 5 off 6 on Table 10: Enable SecMem and Flash Boot Mode at Switch S1 Push the Reset button (T1) on the NXHX board (see position in Device Drawing and Positions of the NXHX 51-ETM chapter on page 16). 2. Start SYCON.net configuration software. In the Windows Start menu, select All Programs > SYCON.net System Configurator > SYCON.net. A login dialog appears: Figure 70: SYCON.net Login Enter your password, then click OK. NXHX 51-ETM | Getting Started DOC130701GS02EN | Revision 2 | English | 2013-10 | Released | Public © Hilscher 2013 Step-by-Step Instructions for Typical Use Cases 77/109 SYCON.net opens with a new empty project: Figure 71: Empty Project in SYCON.net 3. Add PC Card cifX as PROFINET IO Controller (master). In the Fieldbus tab of the Device Catalog (right window), navigate to folder PROFINET IO > Master. Then select CIFX RE/PNM device and drag & drop it onto the bus configuration line in the middle window. Figure 72: Define CIFX 50 as PROFINET IO Controller in SYCON.net NXHX 51-ETM | Getting Started DOC130701GS02EN | Revision 2 | English | 2013-10 | Released | Public © Hilscher 2013 Step-by-Step Instructions for Typical Use Cases 78/109 The PC Card cifX is displayed on the bus line. 4. Add NXHX board as PROFINET IO Device (slave). In the Fieldbus tab of the Device Catalog (right window), navigate to folder PROFINET IO > Gateway / Stand-Alone Slave. Then select NETX 51 RE/PNS item and drag & drop it onto the PROFINET network line next to the PC Card cifX. Figure 73: Define NXHX Board as PROFINET IO Device in SYCON.net You have added the NXHX board as IO Device (slave) in the PROFINET IO network. 5. Assign driver to PC Card cifX (IO Controller). Double-click the CIFX_RE_PNM symbol (i. e. the IO Controller) in the bus configuration line or select the symbol and choose Configuration… entry from the context menu. The Configuration dialog window opens. NXHX 51-ETM | Getting Started DOC130701GS02EN | Revision 2 | English | 2013-10 | Released | Public © Hilscher 2013 Step-by-Step Instructions for Typical Use Cases 79/109 In the Navigation Area, select Settings > Driver. The Driver list opens: Figure 74: Choose Driver for PC Card cifX Check the box in front of the cifX Device Driver entry and click Apply button. In the Navigation Area, select Settings > Driver > Device Assignment. NXHX 51-ETM | Getting Started DOC130701GS02EN | Revision 2 | English | 2013-10 | Released | Public © Hilscher 2013 Step-by-Step Instructions for Typical Use Cases 80/109 The Device Assignment window opens. Check the box in front of the CIFX 50-RE entry and click Apply button. Figure 75: Assign Driver to PC Card cifX You have assigned the driver for the PC Card cifX. 6. Download IO Controller firmware to PC Card cifX. Note: This step has to be performed only if no PROFINET IO Controller firmware has yet been loaded to the PC card cifX. If the PC Card cifX is already equipped with a PROFINET IO Controller firmware, you can skip this step and close the configuration dialog window for the PC Card cifX by clicking the OK button. In the Navigation Area, select Settings > Driver > Firmware Download. NXHX 51-ETM | Getting Started DOC130701GS02EN | Revision 2 | English | 2013-10 | Released | Public © Hilscher 2013 Step-by-Step Instructions for Typical Use Cases 81/109 The Firmware Download window opens: Figure 76: Firmware Download Dialog in SYCON.net Click Browse… button to choose the firmware which you want to load into the PC Card cifX. The Select Firmware File dialog opens: Figure 77: Select Firmware File Dialog in SYCON.net Navigate to the directory where the PROFINET IO Controller firmware is stored. On the Communication Solutions DVD e.g., this is the Firmware\CIFX folder. NXHX 51-ETM | Getting Started DOC130701GS02EN | Revision 2 | English | 2013-10 | Released | Public © Hilscher 2013 Step-by-Step Instructions for Typical Use Cases 82/109 Select cifXpnm.nxf file, then click Open button. Name and version of the selected firmware are displayed in the Firmware Download window. Figure 78: Downloading Firmware to PC Card cifX Check, whether you have selected the right firmware, then click Download button to start the download. Answer the security question with Yes. The firmware is downloaded to the PC Card cifX. Click OK button to close the configuration window. NXHX 51-ETM | Getting Started DOC130701GS02EN | Revision 2 | English | 2013-10 | Released | Public © Hilscher 2013 Step-by-Step Instructions for Typical Use Cases 83/109 7. Assign driver to NXHX board (IO Device). Double-click the NETX_51_ RE_PNS symbol (i. e. the IO Device) in the bus configuration line or select the symbol and choose Configuration… entry from the context menu. The Configuration dialog opens. In the Navigation Area, select Settings > Driver. The Driver list opens: Figure 79: Choose Driver for NXHX Board Check the box in front of the cifX Device Driver entry and click Apply button. NXHX 51-ETM | Getting Started DOC130701GS02EN | Revision 2 | English | 2013-10 | Released | Public © Hilscher 2013 Step-by-Step Instructions for Typical Use Cases 84/109 In the Navigation Area, select Settings > Driver > Device Assignment. The Device Assignment dialog window opens: Figure 80: Configuration Dialog NXHX Board In the Device Assignment dialog window, choose all in the Device selection drop-down list, then click Scan button. NXHX 51-ETM | Getting Started DOC130701GS02EN | Revision 2 | English | 2013-10 | Released | Public © Hilscher 2013 Step-by-Step Instructions for Typical Use Cases 85/109 SYCON.net scans for connected devices. If the NXHX board has been properly connected to the configuration PC, the NXHX board will be found and displayed as NETX EVALUATION BOARD in the list: Figure 81: Assign Driver to NXHX Board Check the box in front of the NETX EVALUATION BOARD entry and click Apply button. You have assigned the driver for the NXHX board. NXHX 51-ETM | Getting Started DOC130701GS02EN | Revision 2 | English | 2013-10 | Released | Public © Hilscher 2013 Step-by-Step Instructions for Typical Use Cases 86/109 8. Configure I/O data of NXHX board. In the Navigation Area, select Configuration > Modules. The Modules dialog window opens: Figure 82: Modules Dialog of NXHX Board Click Add Module button to add a module for input data. Note: The PROFINET IO Device firmware for testing and evaluation purposes is limited to two Bytes IO data exchange. NXHX 51-ETM | Getting Started DOC130701GS02EN | Revision 2 | English | 2013-10 | Released | Public © Hilscher 2013 Step-by-Step Instructions for Typical Use Cases 87/109 Click in the Module field of the newly added module, then select 2 Bytes Input from the drop-down list. Figure 83: Define Input Module of NXHX Board Click Add Module button again to add a module for output data. Click in the Module field of the newly added module, then select 2 Byte Output from the drop-down list. Figure 84: Define Output Module of NXHX Board NXHX 51-ETM | Getting Started DOC130701GS02EN | Revision 2 | English | 2013-10 | Released | Public © Hilscher 2013 Step-by-Step Instructions for Typical Use Cases 88/109 Click OK button to close the configuration dialog. You have configured the I/O data of the NXHX board. 9. Download configuration to NXHX board. Select the NETX_51_RE_PNS symbol and use the right mouse button to open the context menu. In the context menu, select Download. Figure 85: Download Configuration to NXHX Board Answer the configuration download confirmation request with Yes. The configuration is downloaded to the NXHX board. SYCON.net automatically establishes an online connection for both NXHX board (IO Device) and the PC Card cifX (IO Controller). The communication status LED COM 1 on the NXHX board shows in Device Drawing and Positions of the steady red light (see position NXHX 51-ETM chapter on page 16). This is because the configuration of the PC Card cifX (IO Controller) has not been downloaded yet, thus IO Controller and IO Device are not communicating yet. NXHX 51-ETM | Getting Started DOC130701GS02EN | Revision 2 | English | 2013-10 | Released | Public © Hilscher 2013 Step-by-Step Instructions for Typical Use Cases 89/109 10. Configure PC Card cifX (IO Controller). Note: You don’t necessarily need to configure the PC Card cifX (IO Controller), because this example can be used with the configuration parameters preset by SYCON.net. You can, however, customize the configuration of the PC Card cifX (IO Controller), if you want to use a different network setup, e. g. if you are using additional slave devices. Select the CIFX_RE_PNM symbol and use the right mouse button to open the context menu. In the context menu, select Disconnect. Figure 86: Disconnect IO Controller in SYCON.net SYCON.net disconnects the online connection to the PC Card cifX (IO Controller). The PC Card cifX (IO Controller) can now be configured. Double-click the CIFX_RE_PNM symbol (i. e. the IO Controller) in the bus configuration line or select the symbol and choose Configuration… entry from the context menu. The Configuration dialog window opens. NXHX 51-ETM | Getting Started DOC130701GS02EN | Revision 2 | English | 2013-10 | Released | Public © Hilscher 2013 Step-by-Step Instructions for Typical Use Cases 90/109 In the Navigation Area, choose Configuration > Controller Network Settings. The Controller Network Settings dialog window opens: Figure 87: Controller Network Settings Alter the station name and the IP address of the IO Controller, if you need to. NXHX 51-ETM | Getting Started DOC130701GS02EN | Revision 2 | English | 2013-10 | Released | Public © Hilscher 2013 Step-by-Step Instructions for Typical Use Cases 91/109 In the Navigation Area, choose Configuration > Device Table. The Device Table dialog window opens: Figure 88: Device Table Make sure that the Activate field is checked. Alter the station name of the NXHX board (IO Device), if you need to. Note: If you have already downloaded the IO Device configuration to the NXHX board and you alter the preset Name of Station here, you must download the IO Device configuration to the NXHX board again. NXHX 51-ETM | Getting Started DOC130701GS02EN | Revision 2 | English | 2013-10 | Released | Public © Hilscher 2013 Step-by-Step Instructions for Typical Use Cases 92/109 In the Navigation Area, choose Configuration > IP Address Table. The IP Address Table dialog window opens: Figure 89: IP Address Table Alter the IP address of the NXHX board (IO Device), if you need to. NXHX 51-ETM | Getting Started DOC130701GS02EN | Revision 2 | English | 2013-10 | Released | Public © Hilscher 2013 Step-by-Step Instructions for Typical Use Cases 93/109 In the Navigation Area, choose Configuration > Process Data. The Process Data dialog window opens: Figure 90: Process Data Review the mapping of the input and output data. NXHX 51-ETM | Getting Started DOC130701GS02EN | Revision 2 | English | 2013-10 | Released | Public © Hilscher 2013 Step-by-Step Instructions for Typical Use Cases 94/109 In the Navigation Area, choose Configuration > Address Table. The Address Table dialog window opens: Figure 91: Address Table Review the Address Table. The parameters are preset. Note: Keep the preset parameters in the FSU-/Port-Settings, Stations Timing and Controller Settings dialog windows. If you nevertheless alter the Stations Timing parameters after having already downloaded the IO Device configuration to the NXHX board, you must afterwards download the IO Device configuration to the NXHX board again. Click OK button to close the configuration dialog. You have configured the PC Card cifX (IO Controller). NXHX 51-ETM | Getting Started DOC130701GS02EN | Revision 2 | English | 2013-10 | Released | Public © Hilscher 2013 Step-by-Step Instructions for Typical Use Cases 95/109 11. Download configuration to PC Card cifX (IO Controller). Select the CIFX_RE_PNM symbol and use the right mouse button to open the context menu. In the context menu, select Download. Figure 92: Download Configuration to PC Card cifX Answer the configuration download confirmation request with Yes. The configuration is downloaded to the PC Card cifX. The communication status LED COM 1 on the NXHX board blinks red in Device Drawing and Positions of for a few seconds (see position the NXHX 51-ETM chapter on page 16). Once the PC Card cifX has successfully established communication with the NXHX board, the LED COM 1 goes off. NXHX 51-ETM | Getting Started DOC130701GS02EN | Revision 2 | English | 2013-10 | Released | Public © Hilscher 2013 Step-by-Step Instructions for Typical Use Cases 96/109 5.10 Testing I/O Communication 5.10.1 Overview This section describes how to test the I/O data exchange between the NXHX board (PROFINET IO Device) and the PC card cifX (PROFINET IO Controller). In this test setup, the NXHX board is connected to the configuration PC via Host Interface and NXPCA-PCI Adapter Board. The configuration PC serves as host system for the NXHX board, the Hilscher cifX Test Application running on the PC simulates a host application for the NXHX board (i. e. the IO Device) enabling you to exchange I/O data with the IO Controller. The configuration PC is also the host system for the PC Card cifX, which is connected to the PCI interface of the PC. The IO Monitor feature of SYCON.net running on the configuration PC simulates a host application for the PC Card cifX (i. e. the PROFINET IO Controller) enabling you to exchange I/O data with the IO Device. 5.10.2 Prerequisites You have configured the NXHX board and the PC Card cifX (see Configuring NXHX 51-ETM With SYCON.net section on page 75). The NXHX board is connected to the configuration PC via NXPCA-PCI Adapter Board and CAB-NXPCA-PCI cable. Instructions for this can be found in the Downloading NXF Firmware via PCI and Host Interface section on page 63. You have installed the SYCON.net configuration software version 1.360 or higher on your PC. (On the NXHX 51-ETM product DVD, open the Software\SYCON.net directory, then double-click SYCONnet netX setup.exe file. Follow the instructions of the installation wizard.) You have installed the cifX Device Driver on your PC. (On the NXHX 51-ETM product DVD, open the Driver and Toolkit\Device Driver (NXDRV-WIN)\Installation directory, then double-click cifX Device Driver Setup.exe file. Follow the instructions of the installation wizard.) The cifX Device Driver installation contains the cifX Test Application, which can be used for testing I/O data exchange of the NXHX board. You have installed a PC Card CIFX 50-RE in your configuration PC. For details, please refer to the User Manual PC Cards CIFX 50 50E 70E 100EH, DOC120204UMxxEN. The NXHX board is connected to a voltage supply. The NXHX board is connected to the PC Card CIFX 50-RE via Ethernet cable. NXHX 51-ETM | Getting Started DOC130701GS02EN | Revision 2 | English | 2013-10 | Released | Public © Hilscher 2013 Step-by-Step Instructions for Typical Use Cases 5.10.3 97/109 Step-by-Step Instructions 1. Establish online connection between SYCON.net and the PC Card cifX. Open your configuration project in SYCON.net. Select the CIFX_RE_PNM symbol and use the right mouse button to open the context menu. In the context menu, select Connect. Figure 93: Establish Online Connection With PC Card cifX SYCON.net establishes an online connection with the PC Card cifX. This is indicated by a green label above the symbol of the PC Card cifX. NXHX 51-ETM | Getting Started DOC130701GS02EN | Revision 2 | English | 2013-10 | Released | Public © Hilscher 2013 Step-by-Step Instructions for Typical Use Cases 98/109 2. Open Diagnosis for PC Card cifX (IO Controller) in SYCON.net. Select the CIFX_RE_PNM symbol and use the right mouse button to open the context menu. In the context menu, select Diagnosis… Figure 94: Open Diagnosis Dialog for PC Card cifX The General Diagnosis dialog window opens: Figure 95: General Diagnosis for PC Card cifX NXHX 51-ETM | Getting Started DOC130701GS02EN | Revision 2 | English | 2013-10 | Released | Public © Hilscher 2013 Step-by-Step Instructions for Typical Use Cases 99/109 Check, whether the LEDs for Communication, Operate, Run and Bus ON are green. If this is the case, a functioning communication between the PC Card cifX and the NXHX board has been established. 3. Open IO Monitor. In the Navigation Area, choose Tools > IO Monitor. The IO Monitor dialog window opens: Figure 96: IO Monitor for PC Card cifX Leave the IO Monitor dialog window open while changing to the cifX Test Application in the next step. NXHX 51-ETM | Getting Started DOC130701GS02EN | Revision 2 | English | 2013-10 | Released | Public © Hilscher 2013 Step-by-Step Instructions for Typical Use Cases 100/109 4. Open the cifX Test Application on your PC. In the Windows Start menu, choose Control Panel > cifX Test. The cifX Test Application opens: Figure 97: cifX Test Application Start Screen 5. Open connection to NXHX board. In the menu, choose Device > Open and wait for a few seconds. After a while, the Channel Selection dialog box opens: Figure 98: Channel Selection Dialog In the left part of the dialog box, select the channel of the cifX driver to which the NXHX board is connected via Host Interface and NXPCAPCI Adapter Board. The PROFINET IO Controller (i. e. the PC Card cifX) is also connected to the cifX driver, therefore check in the Selection Information area on the right side, whether you have selected the correct channel (i. e. the channel for the PROFINET IO Device. After selecting the channel for the PROFINET IO Device (i. e. the NXHX board), click Open button. NXHX 51-ETM | Getting Started DOC130701GS02EN | Revision 2 | English | 2013-10 | Released | Public © Hilscher 2013 Step-by-Step Instructions for Typical Use Cases 101/109 The Channel Selection dialog box closes, and back in the cifX Test Application window, the header displays the selected channel: Figure 99: cifX Test Application After Channel Selection 6. Send I/O Output data from IO Device to IO Controller. In the menu, choose Data Transfer > I/O Data. The Process Data I/O Image dialog window opens. Figure 100: I/O Data Dialog in cifX Test Application In the Length field of the Process Data Input Image area, enter the value 2. This is the number of Bytes which can be received. In the Data field of the Process Data Output Image area, enter output data that can be sent to the PROFINET IO Controller (i. e. the PC Card cifX). Keep in mind, that the PROFINET IO Device firmware for testing and evaluation purposes is limited to two Bytes IO data exchange. For instance, you can enter the value 01 02. NXHX 51-ETM | Getting Started DOC130701GS02EN | Revision 2 | English | 2013-10 | Released | Public © Hilscher 2013 Step-by-Step Instructions for Typical Use Cases 102/109 Figure 101: Enter Output Data in cifX Test Application After having entered the output data, click Update. The data is sent from the PROFINET IO Device (i. e. the NXHX board) to the IO Controller (i. e. the PC Card cifX) via Ethernet cable. 7. Read I/O data from IO Device in SYCON.net IO Monitor. Change to the IO Monitor window in SYCON.net. Figure 102: Incoming Data in IO Monitor The data which has been sent from the PROFINET IO Device (i. e. the NXHX board) is displayed in the Input data area of the IO Monitor. NXHX 51-ETM | Getting Started DOC130701GS02EN | Revision 2 | English | 2013-10 | Released | Public © Hilscher 2013 Step-by-Step Instructions for Typical Use Cases 103/109 8. Send I/O Output data from IO Controller to IO Device. In the Output data area of the IO Monitor, enter output data that can be sent from the PROFINET IO Controller (i. e. the PC Card cifX) to the PROFINET IO Device (i. e. the NXHX board). For instance, you can enter the value 03 04. Figure 103: Output Data in IO Monitor After having entered the output data, click Update. The data is sent from the PROFINET IO Controller (i. e. the PC Card cifX) to the IO Device (i. e. the NXHX board) via Ethernet cable. NXHX 51-ETM | Getting Started DOC130701GS02EN | Revision 2 | English | 2013-10 | Released | Public © Hilscher 2013 Step-by-Step Instructions for Typical Use Cases 104/109 9. Read I/O data from IO Controller in cifX Test Application. Change to the cifX Test Application. The data which has been sent from the PROFINET IO Controller (i. e. the PC Card cifX) is displayed in the Data field of Process Data Input Image area of the cifX Test Application. Figure 104: Incoming Data in cifX Test Application NXHX 51-ETM | Getting Started DOC130701GS02EN | Revision 2 | English | 2013-10 | Released | Public © Hilscher 2013 Appendix 6 6.1 105/109 Appendix List of Figures Figure 1: NXHX51-ETM Printed Circuit Board Figure 2: Connect Power Supply Figure 3: Command Prompt in Windows XP Figure 4: Change Directory in Command Prompt Figure 5: Execute Build.bat Figure 6: Opened wscript File Figure 7: Command Prompt in Windows XP Figure 8: Change Directory in Command Prompt Figure 9: Execute waf.bat with Target and Build Options Figure 10: Delete Obsolete Commands in Build.bat File Figure 11: Build.bat File After Deleting Obsolete Commands Figure 12: Edited Build.bat File Figure 13: System Properties in Windows XP Figure 14: Environment Variables in Windows XP Figure 15: New System Variable in Windows XP Figure 16: System and Security Sheet in Windows 7 Figure 17: System Sheet in Windows 7 Figure 18: Advanced System Properties in Windows 7 Figure 19: Environment Variables in Windows 7 Figure 20: New System Variable in Windows 7 Figure 21: HiTOP Start Figure 22: Select Project File Dialog Figure 23: Select Compiler Dialog Figure 24: Select Compiler Dialog Figure 25: Project in HiTOP Figure 26: Project Settings Figure 27: Tool Settings Figure 28: Project in HiTOP Figure 29: Project in HiTOP (2) Figure 30: Connection Description Figure 31: Connect To Dialog Figure 32: COM Port Properties Figure 33: rcX UART Example in HyperTerminal Figure 34: Bootwizard Start Screen Figure 35: Select ELF File Dialog Figure 36: ELF File Loaded Figure 37: Generate Boot Image Screen Figure 38: Bootwizard Start Screen Figure 39: Bootwizard Write to Flash Screen Figure 40: Select Input File Dialog Figure 41: Bootwizard Message Figure 42: Selected File in Write to Flash Screen Figure 43: Check USB Connection to netX 51 Bootmonitor in Windows XP Figure 44: Check USB Connection to netX 51 in Windows 7 Figure 45: Write to Flash Screen Figure 46: Plugin Selector for netX 51 Rom Loader Figure 47: Progress Window Figure 48: Flashing Successful Message NXHX 51-ETM | Getting Started DOC130701GS02EN | Revision 2 | English | 2013-10 | Released | Public 16 18 20 21 21 23 23 24 24 25 26 26 29 29 30 30 31 31 32 32 34 35 35 35 36 36 37 38 39 40 40 41 41 42 43 44 45 47 48 48 49 49 51 52 53 53 54 54 © Hilscher 2013 Appendix Figure 49: Check USB Connection to netX 51 in Windows XP Figure 50: Check USB Connection to netX 51 in Windows 7 Figure 51: netHOST Device Test Application Start Screen Figure 52: Channel Selection Dialog Figure 53: netHOST Device Test Application After Channel Selection Figure 54: Download Window Figure 55: File Selection Figure 56: Firmware Download in Progress Figure 57: Connecting NXHX Board to PC via Adapter Board Figure 58: Settings for DPM Figure 59: Disable NXPCA-PCI in Device Manager (Windows XP) Figure 60: Enable NXPCA-PCI in Device Manager (Windows XP) Figure 61: Control Panel in Windows XP Figure 62: Control Panel in Windows 7 Figure 63:All Control Panel Items in Windows 7 Figure 64: cifX Driver Setup Utility Start Screen Figure 65: cifX Driver Setup Utility - Active Devices Figure 66: cifX Driver Setup Utility – Open File Dialog Figure 67: cifX Driver Setup Utility – Selected Firmware File Figure 68: Device Restart Request Figure 69: Device Still Accessed Warning Figure 70: SYCON.net Login Figure 71: Empty Project in SYCON.net Figure 72: Define CIFX 50 as PROFINET IO Controller in SYCON.net Figure 73: Define NXHX Board as PROFINET IO Device in SYCON.net Figure 74: Choose Driver for PC Card cifX Figure 75: Assign Driver to PC Card cifX Figure 76: Firmware Download Dialog in SYCON.net Figure 77: Select Firmware File Dialog in SYCON.net Figure 78: Downloading Firmware to PC Card cifX Figure 79: Choose Driver for NXHX Board Figure 80: Configuration Dialog NXHX Board Figure 81: Assign Driver to NXHX Board Figure 82: Modules Dialog of NXHX Board Figure 83: Define Input Module of NXHX Board Figure 84: Define Output Module of NXHX Board Figure 85: Download Configuration to NXHX Board Figure 86: Disconnect IO Controller in SYCON.net Figure 87: Controller Network Settings Figure 88: Device Table Figure 89: IP Address Table Figure 90: Process Data Figure 91: Address Table Figure 92: Download Configuration to PC Card cifX Figure 93: Establish Online Connection With PC Card cifX Figure 94: Open Diagnosis Dialog for PC Card cifX Figure 95: General Diagnosis for PC Card cifX Figure 96: IO Monitor for PC Card cifX Figure 97: cifX Test Application Start Screen Figure 98: Channel Selection Dialog Figure 99: cifX Test Application After Channel Selection Figure 100: I/O Data Dialog in cifX Test Application Figure 101: Enter Output Data in cifX Test Application NXHX 51-ETM | Getting Started DOC130701GS02EN | Revision 2 | English | 2013-10 | Released | Public 106/109 58 58 59 59 60 60 61 61 64 67 68 69 69 70 70 71 72 72 73 73 74 76 77 77 78 79 80 81 81 82 83 84 85 86 87 87 88 89 90 91 92 93 94 95 97 98 98 99 100 100 101 101 102 © Hilscher 2013 Appendix Figure 102: Incoming Data in IO Monitor Figure 103: Output Data in IO Monitor Figure 104: Incoming Data in cifX Test Application NXHX 51-ETM | Getting Started DOC130701GS02EN | Revision 2 | English | 2013-10 | Released | Public 107/109 102 103 104 © Hilscher 2013 Appendix 6.2 108/109 List of Tables Table 1: List of Revisions Table 2: List of Positions on Printed Circuit Board Table 3: Settings for Serial Boot Mode at Switch S1 Table 4: Set Flash Boot Mode at Switch S1 Table 5: Set Flash Boot Mode at Switch S1 Table 6: 16 Bit Mode at Switch S2 for Hardware Revision 3 Table 7: 16 Bit Mode at Switch S2 for Hardware Revision 4 Table 8: Set X10 Jumper for Dual-Port Memory Table 9: Set Flash Boot Mode at Switch S1 Table 10: Enable SecMem and Flash Boot Mode at Switch S1 NXHX 51-ETM | Getting Started DOC130701GS02EN | Revision 2 | English | 2013-10 | Released | Public 4 17 50 54 57 66 66 66 67 76 © Hilscher 2013 Appendix 6.3 109/109 Contacts Headquarters Germany Hilscher Gesellschaft für Systemautomation mbH Rheinstrasse 15 65795 Hattersheim Phone: +49 (0) 6190 9907-0 Fax: +49 (0) 6190 9907-50 E-Mail: [email protected] Support Phone: +49 (0) 6190 9907-99 E-Mail: [email protected] Subsidiaries China Japan Hilscher Systemautomation (Shanghai) Co. Ltd. 200010 Shanghai Phone: +86 (0) 21-6355-5161 E-Mail: [email protected] Hilscher Japan KK Tokyo, 160-0022 Phone: +81 (0) 3-5362-0521 E-Mail: [email protected] Support Support Phone: +86 (0) 21-6355-5161 E-Mail: [email protected] Phone: +81 (0) 3-5362-0521 E-Mail: [email protected] France Korea Hilscher France S.a.r.l. 69500 Bron Phone: +33 (0) 4 72 37 98 40 E-Mail: [email protected] Hilscher Korea Inc. Suwon, Gyeonggi, 443-734 Phone: +82 (0) 31-695-5515 E-Mail: [email protected] Support Phone: +33 (0) 4 72 37 98 40 E-Mail: [email protected] India Hilscher India Pvt. Ltd. New Delhi - 110 065 Phone: +91 11 43055431 E-Mail: [email protected] Switzerland Hilscher Swiss GmbH 4500 Solothurn Phone: +41 (0) 32 623 6633 E-Mail: [email protected] Support Phone: +49 (0) 6190 9907-99 E-Mail: [email protected] Italy USA Hilscher Italia S.r.l. 20090 Vimodrone (MI) Phone: +39 02 25007068 E-Mail: [email protected] Hilscher North America, Inc. Lisle, IL 60532 Phone: +1 630-505-5301 E-Mail: [email protected] Support Support Phone: +39 02 25007068 E-Mail: [email protected] Phone: +1 630-505-5301 E-Mail: [email protected] NXHX 51-ETM | Getting Started DOC130701GS02EN | Revision 2 | English | 2013-10 | Released | Public © Hilscher 2013