1
X-Configurator
User’s Manual
Manual version 1.13, August 2000
Note
The information in this manual is subject to change without notice.
This manual provides a description of the X-Configurator software. The
instructions included in this manual are compatible with software version 1.2.
While every effort has been made to ensure the accuracy of all information in this
document, Xnet Communications GmbH assumes no liability to any party for any loss or
damage caused by errors or omissions by statements of any kind in this document.
All product names and trademarks are the property of their respective
companies.
Copyright 2000 Xnet Communications GmbH. All rights reserved
2
Contents
Chapter 1 – System overview ......................................................................................... 6
1.1. What is X-Configurator? ....................................................................................... 6
1.2. Components ......................................................................................................... 6
1.3. System operation summary.................................................................................. 7
1.4. Meaning of Task Templates ................................................................................. 7
1.5. Meaning of Jobs ................................................................................................... 8
1.6. Meaning of Targets............................................................................................... 8
1.7. Meaning of Projects.............................................................................................. 8
1.8. Meaning of Setup option....................................................................................... 8
1.9. Meaning of Communication Channels.................................................................. 8
1.10. Meaning of Task Instance .................................................................................. 9
1.11. Meaning of Session ............................................................................................ 9
1.12. Meaning of XACS Log ........................................................................................ 9
1.13. Meaning of NAS ................................................................................................. 9
Chapter 2 – XACS Scheduler ....................................................................................... 10
2.1. How XACS Scheduler works .............................................................................. 10
2.2. Task start conditions........................................................................................... 12
2.3. "On Time" Tasks................................................................................................. 12
2.4. "Repeatable" Tasks ............................................................................................ 12
2.5. "On Call" Tasks .................................................................................................. 12
2.5.1. CLID method................................................................................................ 13
2.5.2. Active method .............................................................................................. 13
2.6. "On Event" Tasks ............................................................................................... 13
Chapter 3 – XACS LUA ................................................................................................ 15
3.1. XACS LUA Extensions ....................................................................................... 15
3.2. XACS functions .................................................................................................. 15
3.3. XACS variables .................................................................................................. 18
Chapter 4 – Configuration scripts development guidelines ........................................... 20
Chapter 5 – Preparing system for working .................................................................... 21
5.1. Installing Remote CAPI for BinTec routers ......................................................... 21
5.2. Configuring ISDN channels for using by X-Configurator..................................... 21
5.3. Configuring Setup option of X-Configurator........................................................ 22
5.4. Creating accounts for the X-Configurator users ................................................. 22
5.5. Create the new project for configuring targets.................................................... 22
5.5.1. Create the New Project................................................................................ 22
5.5.2. Create and add new Target to Project ......................................................... 22
5.5.2. Create new Job............................................................................................ 23
5.5.3. Create new Task Template and assign the Target(s) .................................. 23
5.5.4. Watch the X-Configurator state.................................................................... 23
Chapter 6 – Menu options............................................................................................. 24
6.1. Projects .............................................................................................................. 24
6.1.1. Create New Project...................................................................................... 25
6.1.2. Edit Project .................................................................................................. 25
6.1.3. Add/Update Project Description ................................................................... 26
6.1.4. Remove Project ........................................................................................... 26
6.1.5. Profiles......................................................................................................... 26
6.1.5.1. Create New Profile ................................................................................ 27
6.1.6. Target profiles .............................................................................................. 28
6.1.6.1. Create New Target Profile ..................................................................... 28
3
6.1.6.2. Find Target Profile................................................................................. 30
6.1.6.3. Remove Target Profile .......................................................................... 30
6.1.6.4. Set Parent for Target Profile.................................................................. 30
6.1.6.5. Add Parameter to Target Profile............................................................ 31
6.1.6.6. Update Value of Target Parameter........................................................ 31
6.1.6.7. Remove Parameter from Target Profile................................................. 31
6.1.7. NAS profiles................................................................................................. 31
6.1.7.1. Create New NAS Profile........................................................................ 32
6.1.7.2. Remove NAS Profile ............................................................................. 33
6.1.7.3. Update Parent for NAS Profile............................................................... 34
6.1.7.4. Add Parameter to NAS Profile............................................................... 34
6.1.7.5. Update Value of Parameter................................................................... 34
6.1.7.6. Remove Parameter from NAS Profile.................................................... 34
6.1.8. Jobs ............................................................................................................. 34
6.1.8.1. Create New Job..................................................................................... 35
6.1.8.2. Update Job ............................................................................................ 35
6.1.8.3. Remove Job .......................................................................................... 36
6.1.8.4. Script Info .............................................................................................. 36
6.1.9. Targets......................................................................................................... 36
6.1.9.1. What is NAS .......................................................................................... 37
6.1.9.2. Create New NAS ................................................................................... 38
6.1.9.3. Update NAS .......................................................................................... 39
6.1.9.4. Update Parent NAS Profile.................................................................... 40
6.1.9.5. Add Parameter for NAS......................................................................... 40
6.1.9.6. Update Value of NAS Parameter........................................................... 40
6.1.9.7. Remove Parameter from NAS............................................................... 40
6.1.9.8. Remove NAS......................................................................................... 40
6.1.9.9. Add New Target to NAS ........................................................................ 40
6.1.9.10. Find Target .......................................................................................... 42
6.1.9.11. Edit Target........................................................................................... 42
6.1.9.12. Clone Target........................................................................................ 43
6.1.9.13. Remove Target.................................................................................... 43
6.1.9.14. Set Parent Target Profile ..................................................................... 43
6.1.9.15. Add Parameter for Target.................................................................... 43
6.1.9.16. Update Value of Target Parameter...................................................... 43
6.1.9.17. Remove Target Parameter.................................................................. 44
6.1.10. Target Groups............................................................................................ 44
6.1.10.1. Create New Target Group ................................................................... 45
6.1.10.2. Update Target Group .......................................................................... 45
6.1.10.3. Add Target to Target Group ................................................................ 45
6.1.10.4. Remove Target from Target Group ..................................................... 45
6.1.10.5. Remove Target Group......................................................................... 45
6.1.11. Task Templates ......................................................................................... 46
6.1.11.1. Create New Task Template................................................................. 46
6.1.11.2. Update Task Template ........................................................................ 48
6.1.11.3. Add/Remove Target to/from Task Template........................................ 48
6.1.11.4. Add/Remove Target Group to/from Task Template............................. 49
6.1.11.5. Activate ............................................................................................... 49
6.1.11.6. Deactivate ........................................................................................... 49
6.1.11.7. Run Now.............................................................................................. 49
6.1.11.8. Remove Task Template ...................................................................... 49
4
6.1.11.9. View Task Instances ........................................................................... 49
6.1.12. Task Manager ............................................................................................ 53
6.1.12.1. Activity Matrix ...................................................................................... 54
6.1.12.2. System Activity .................................................................................... 55
6.1.13. XACS Log .................................................................................................. 55
6.2. System Parameters ............................................................................................ 58
6.2.1. Project parameters....................................................................................... 59
6.2.1.1. Add Parameter ...................................................................................... 59
6.2.1.2. Update Parameter ................................................................................. 61
6.2.1.3. Remove Parameter ............................................................................... 61
6.2.2. NAS parameters .......................................................................................... 62
6.2.2.1. Add Parameter ...................................................................................... 62
6.2.2.2. Update Parameter ................................................................................. 64
6.2.2.3. Remove Parameter ............................................................................... 64
6.2.3. Target parameters ....................................................................................... 64
6.2.3.1. Add Parameter ...................................................................................... 64
6.2.3.2. Update Parameter ................................................................................. 66
6.2.3.3. Remove Parameter ............................................................................... 66
6.3. Users .................................................................................................................. 67
6.3.1. New User ..................................................................................................... 67
6.3.2. Update User................................................................................................. 68
6.3.3. Remove User............................................................................................... 68
6.3.4. User Rights .................................................................................................. 68
6.3.5. Change Password........................................................................................ 70
6.3.6. Reset Password........................................................................................... 70
6.4. Setup .................................................................................................................. 71
6.5. ISDN................................................................................................................... 73
6.5.1. ISDN Controllers .......................................................................................... 73
6.5.1.1. Find Controller....................................................................................... 74
6.5.1.2. Controller List ........................................................................................ 75
6.5.1.3. Add Controller ....................................................................................... 75
6.5.1.4. Remove Controller ................................................................................ 75
6.5.1.5. Update Controller .................................................................................. 75
6.5.2. ISDN MSN ................................................................................................... 75
6.5.2.1. Find MSN .............................................................................................. 76
6.5.2.2. MSN List................................................................................................ 76
6.5.2.3. Add MSN............................................................................................... 77
6.5.2.4. Remove MSN ........................................................................................ 77
6.5.2.5. Update MSN.......................................................................................... 77
6.6. Reports............................................................................................................... 77
6.6.1. Log............................................................................................................... 77
6.6.2. Targets......................................................................................................... 78
6.7. Help .................................................................................................................... 78
6.8. Logout ................................................................................................................ 79
Chapter 7 – Appendix ................................................................................................... 81
7.1. XACS event codes ............................................................................................. 81
7.2. Index of XACS LUA functions and XACS LUA variables.................................... 82
Chapter 8 – Troubleshooting......................................................................................... 83
List of Figures ............................................................................................................... 85
5
Chapter 1 – System overview
1.1. What is X-Configurator?
X-Configurator is a service delivery management tool, which supports the BinTec
router family. X-Configurator provides an efficient delivery model of new managed
services for medium and large enterprises. Installing a router or adding new features to
the remote router - like e.g. adding new WAN partners, changing CHAP passwords or
configuring interfaces is fully automated and trouble free. X-Configurator automates and
instantly reduces costs for the following tasks:
-
MASSIVE ROLLOUT AND INSTALLATION SCENARIOS
NEW SERVICE CREATION
SERVICE PROFILING AND DISTRIBUTION
DELIVERY OF UPDATES AND UPGRADES
X-Configurator is an absolutely modern and innovative platform to address the
issues and complexities of installing and managing significant numbers of routers within
a service provider network. X-Configurator enables the service provider to offer and
maintain new services at low rates and high availability.
X-Configurator was developed to meet the following customer and devices
needs:
- fully automated provisioning and maintenance of remote devices
- no on site engineer required to provision the device
- no end user configuration required to enable network access
- the migration to different service-levels should be supported as a seamless
operation
- experts should only be involved during the service definition phase
- investment protection
- the device automatically gets only what is necessary for update - configuration or
image
- a single change updates all devices that subscribe to a particular service
- no pre-configuration of device required - units will be shipped directly from stock
1.2. Components
X-Configurator system consists of the following components:
• XACS Server
- XACS Scheduler
- IPC Service
- Database Trigger
• WEB Server
- Apache WEB Server with PHP
• Oracle 8i Database
• TFTP Server
• Radius Server (optional)
6
• Configuration router
• Firewall
• WEB console and X-Configurator users
XACS Server and TFTP Server are services that must be running under
Windows NT 4.0. Currently WEB Console can be browsed and managed using Internet
Explorer 5.0 but in the future will support Netscape Navigator, too.
1.3. System operation summary
X-Configurator uses task template, target (client) and job. Task template is the
entity which tells "what", "when" and "for whom" should be done. Task template groups
together the following information:
•= List of targets to service
•= List of target groups to service
•= Identifier of the action (job) to perform
•= Start task conditions
Task template (task) stores both target and target groups information. Only one
action can be defined for a task. This might seem to be a strong limitation, but it is not in
fact. Since actions in the system are written as scripts, you can group things to be done
in script including many files in one. Having only one action (job) per task allows
avoiding unnecessary redundancy.
The action to perform in task template is defined by job. The job is a script written
in LUA programming language. X-Configurator embeds LUA, extended with
communications functions: ISDN connection establishment and termination, and data
exchange. Task template has a list of targets associated with it. When a task is started,
the job is performed for all targets associated with task template. The target is defined
by number of parameters, including its name, phone number, IP address, netmask, etc.
All these parameters can be referred to by job.
Having task template defined and activated, scheduler checks if start conditions
have been met. If yes, it creates task instance referred also as session. One session is
created for every target in task template. Session has status field, which keeps track of
session execution state. This field is updated by XACS Scheduler. Session can be
repeated automatically by XACS Scheduler in case of a failure.
Task template can be started in two ways:
- Outbound – central site (X-Configurator) initiate a call
- Inbound – remote device initiate a call
1.4. Meaning of Task Templates
Task templates are defined in Projects option of X-Configurator. Task templates
define static of the system. Task templates groups together the following information:
•= List of targets or/and target groups
•= Job, which has to be run for all those targets
•= Start conditions
7
Dynamic of the system is represented by tasks instances and sessions. Sessions
represent script execution for a single target. When task start conditions are fulfilled,
task template is triggered – e.g. task instance is created.
1.5. Meaning of Jobs
Job is a script written in LUA programming language. X-Configurator embeds
LUA, extended with communications functions: ISDN connection establishment and
termination, and data exchange. Actual job (script) is stored in file. You can use either
plain-text script files, or compile the file to binary – to hide source code.
1.6. Meaning of Targets
The target means remote router. In fact, this can be any device, which provides
X.75 connectivity. X-Configurator stores targets definition in database. Targets may
have many parameters, which are dynamically created by the user in X-Configurator.
1.7. Meaning of Projects
Project is a set of task templates, jobs and targets. It contains all necessary
information about installation and configuration process. The X-Configurator realizes the
control, modifications and user’s identification in each project. In order to access project
data, user has to log in to the system. Every type of user (Administrator, ProjectManager, Operator, Hotline, End-User) is given a set of rights which state his privileges
in entire X-Configurator. The rights for different types of users can be configured in
section Rights of the Users option menu. By choosing different rights for different types
of user you can limit rights of some users to only viewing the appropriate data from the
project, others to modifying data and others to having full access to the entire system.
1.8. Meaning of Setup option
Global parameters required by X-Configurator are defined in Setup option of XConfigurator. See the description for Setup menu option for details.
1.9. Meaning of Communication Channels
X-Configurator is particularly designed to work with great number of targets. It
needs information about available communications resources to schedule sessions. For
example it is not reasonable to start 3000 jobs (scripts) at once (each of them trying to
make ISDN connection) when only two B-channels are available. In ISDN option of XConfigurator you define resources available on the configuration router(s). The
resources are represented in CAPI 2.0 fashion – in terms of controllers and channels.
For example, if you use one configuration router in central site, which is standard S0
controller – with 2 B channels supported, you should create in ISDN menu option one
8
controller with 2 B channels and optionally mark option "Used for listening". That will
allow to answer and to handle the incoming calls by X-Configurator.
1.10. Meaning of Task Instance
Task Instance - single execution of task, for all targets, which are associated with
task template. Task instance consists of sessions – one or more for each target. Task
instance groups together both successful and failed sessions.
1.11. Meaning of Session
Single execution of job’s script for the target (client). Session has its status, i.e.
indication if it has completed successfully. Session status is set in job, by assigning
value to error_code variable. For more information about error_codes see XACS event
codes section.
1.12. Meaning of XACS Log
XACS Log stores system log. The log is mainly used to report system errors, but
can also be used to write debugging and tracing data. What is stored in log depends on
the global debug level parameter defined in Setup option and in the field Debug level
configured for each target. See Setup option to find more information about configuring
the XACS Log. You can view the contents of the log by choosing XACS Log option of
the X-Configurator.
1.13. Meaning of NAS
NAS is an ISDN router or other ISDN device located at central site which allows
serving the targets. Since every target must belong to one NAS (which will serve them),
at least one NAS must be defined for each project. You can define many NASes located
at central site (if you have many central routers) and indicate, which NAS will serve
particular target or targets.
9
Chapter 2 – XACS Scheduler
2.1. How XACS Scheduler works
Scheduler monitors database to look for tasks to activate. When task start
condition is fulfilled, the XACS Scheduler creates sessions for all targets associated
with given task. Initially, session is in "Initial" state. It means, that session is waiting for
communications channel to become available. The XACS Scheduler also creates task
instance. Task instance is the entity which bounds together all sessions originated from
the same task template run. This means sessions to all targets, both successful and
failed. There can be many sessions to one target in the same task instance, as failed
sessions are being retried.
The XACS Scheduler keeps track of communications channels (ISDN channels)
available. The administrator in ISDN option must define the available controllers and
channels. When channel becomes active, it changes session state to "Running" and
executes job associated with session. "Job execution" means running script here. The
XACS Scheduler embeds LUA language script interpreter, extended with
communications functions. The script performs its actions (typically connection
establishment and data exchange), and sets variable "error_code" to indicate if it
completed successfully.
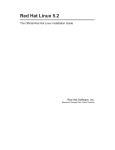
When session is completed, its state is marked as "Completed". If session has
completed with failure (i.e. “error_code” variable was set to value different then "0" by
the script) scheduler retries the sessions. "Retrying session" means creating new
session. Newly created "retry" session has "retry_count" field incremented. It shares the
same instance identifier, as parent session. Retried sessions are not started
immediately. Instead they are created in "Postponed" state. In this state, session is
"frozen" for some time (5 minutes). After this time, session state is set to "Initial" – from
this moment session can be scheduled to run. How many times session is retried,
depend on Number of retries field of session parent task template.
Diagram below shows session lifecycle.
Figure 1 Session lifecycle diagram
10
Every time a session is completed, scheduler scans all sessions belonging to the
same task instance. When all sessions are completed, task instance status is changed.
If all sessions are completed with success, instance status is set to "Completed OK". If
some sessions completed successfully and some failed, instance status is set to
"Partially Failed". If all sessions has failed, instance status is set to "Totally Failed".
When session is running for the time longer then defined in Task duration field of the
task template, scheduler terminates the session.
Table below describes session and task instances states:
Session State
Completed
Initial
Running
Interrupting
Postponed
Description
Session has finished. "error_code" describes session result. Value
of "0" means success. Other values indicate error. "error_code" is
set by script. Values of "error_code" are predefined (see section
XACS event codes)
State for newly created session. In this state, session waits for
communications channel to be available.
Session has been granted communications channel, and is
running script.
Session is being interrupted. Scheduler sets session state to this
value, when it terminates session, which failed to complete within
specified duration. You can also interrupt not completed session.
First state for session, which is created as retry of failed session.
The practice shows that it is good to wait some time before retrying
communication session to faulty target. The session waits in this
state for 5 minutes, and then is put to “Initial” state.
Task instances states and their meaning:
State
Running
Completed OK
Partially Failed
Totally Failed
Description
Task instance is running. This is initial state. Instance stays in this
state as long, as not completed sessions associated with this
instance exist.
All sessions associated with the instance completed successfully
(i.e. their "error_code" is "0").
All sessions associated with the instance completed. Some of then
has been successful and some failed.
All sessions associated with the instance completed with failure.
As session record stores information about its completion result and error text (if
any), this is main source of information for the system user. View tasks instances option
located in Task Templates or Task Manager option are helpful, as it stores "global"
parameters: summary task instance status, and duration.
11
2.2. Task start conditions
Activities to be performed by X-Configurator are defined in terms of task
templates. Task template basically consists of three elements: job to be done, list of
targets (target groups) to service, and its start conditions.
Task template start conditions are constraints, which have to be fulfilled to start
the task.
Start conditions will define "Task type". The following start types will be available:
Start Type
On Time
Repeatable
On Call
On Event
Description
Parameters
Starts the task at specified date and
•= Start time.
time
Starts the task on time conditions.
•= Unix cron-like string
Time conditions are like "start every
Thursday, on 10 PM".
Starts the task, for specified target in
•= Rule
for
matching
case of incoming call.
calling number (e.g.
match last N digits)
•= Number
of
calling
number digits to match
(according to "Rule")
Starts the task when event occurs.
•= Event name
This start type is to be used with
external software.
2.3. "On Time" Tasks
“On Time” tasks are quite simple to explain: task template is triggered, when the
specified time is reached. Task instance is created, and so are the sessions to all
targets associated with the task template. This does not mean that the system tries to
call all targets at the same time. Targets are being called, when communications
channels (e.g. B-channels) become available.
2.4. "Repeatable" Tasks
“Repeatable” tasks can be used when you want some activity to be performed
repeatedly, e.g. every Thursday, on 10 PM. You will specify appropriate time conditions
at creating time of the task template of this type.
2.5. "On Call" Tasks
The idea behind “On Call” task is, that user requests configuration session on its
own – calling central site (NAS). The system supports two incoming calls handling
strategies: CLID method and Active method.
12
2.5.1. CLID method
CLID method is simple: remote device makes ISDN call to the X-Configurator.
The XACS Scheduler rejects the call. As this is an ISDN connection, scheduler "sees"
Calling Party number. Then it searches all defined and active “On Call” tasks and looks
for associated target, whose telephone number matches Calling Party number. If it finds
one, the session is started.
Although CLID method looks nice and simple it has some disadvantages. When
remote device is mobile, its number may change. To support such kind of remote
devices, the X-Configurator provides another incoming calls handling method called
"Active".
2.5.2. Active method
In Active method remote device makes ISDN call to the X-Configurator. The
XACS Scheduler rejects the call. As this is ISDN connection, scheduler "sees" Calling
Party number. To avoid some disadvantages described in CLID method section, in this
method XACS Scheduler makes login session to calling number before it analyzes
tasks. It runs the special script, which retrieves information from remote device, which
can be used as unique identifier. This can be e.g. device MAC address or serial
number. When this special session completes, scheduler searches "On Call" tasks, but
does not look at target's "Branch ISDN login telephone number". Instead if evaluates
LUA language expression, which has been returned by the job script. The expression
should uniquely identify the target.
The script, which is used for “Active” incoming calls handling, is configured in
Setup option of the X-Configurator. The script must set special variable called
"client_selection_rule". For example, if we want to find client based on its MAC address,
the script should retrieve MAC address from remote device.
2.6. "On Event" Tasks
"On Event" task requires some additional explanation. The idea is to let thirdparty software activate the task. Activation method should be flexible. It should allow not
only task, but also target selection.
"Event" is record in "xacs_events" table. The process, which wants to activate the
task, should insert row into this table. "Event_name" field of the table is the name, which
is task template parameter. The XACS Scheduler watches "xacs_events" table. If the
entry is inserted there, it searches all task templates of "On Event" start type to find
matching "event_name".
The task can contain more than one target. Using this method, we can specify
exactly for what target, the task should be activated when the event occurs. E.g. if we
want to activate the targets, whose geographical location contains word "Hamburg", we
will input the following in the Client selection rule field of the task template:
"strfind( location, "Hamburg") ~= nil"
13
If we want to activate the target, which branch is "007", the conditions will be
even simpler:
"branch=="007"
The following operations can be done on task template:
Activate
Deactivate
Makes the task active, i.e. "visible" to scheduler. Task will be
executed when its running conditions are fulfilled.
Makes task template inactive i.e. not scheduled.
Run immediately
This runs the task immediately.
Any task template, no matter what its start type is, can be started on user request
by choosing "Run now" option for the appropriate task template.
Task template includes job. This job specifies identifier to the action to perform.
Storing action script in file has a drawback – scripts must be located on local
drive accessible for the XACS Scheduler service. Keeping scripts in file, it will also be
easier to work with compiled (binary) scripts.
14
Chapter 3 – XACS LUA
3.1. XACS LUA Extensions
X-Configurator uses LUA programming language interpreter as embedded script
language. It is beyond scope of this reference to describe LUA language itself – refer to
LUA documentation for language description. In short terms, LUA is dynamically typed
scripting language with syntax similar to Pascal.
X-Configurator extends LUA to support communications functions.
3.2. XACS functions
com_accept()
Accepts incoming call. com_listen must be issued first.
Returns:
0 - failure
1 - call accepted
com_reject( number )
Reject/ignore incoming call. This can be used, after com_listen completes successfully
to ignore or reject incoming call. In cause of ISDN device, number specifies Reject
value of CONNECT_RESP message. The values can be:
Value 0 should not be used – to accept the call the use should use com_accept
function.
Main purpose of this function is to ignore calls, which are addressed to MSN other than
application’s MSN.
Returns:
0 - failure
1 - call rejected
com_connect( string )
Calls string. Returns when connection is established, or failed.
Returns:
1 - connection established
0 - error
com_disconnect()
Terminates connection.
Returns:
1 - connection terminated
15
0 - error
com_isdn_lastcause()
Returns 3 numbers:
- ISDN reason code
- ISDN result
- ISDN extended info
com_lasterror()
Returns device-specific error code.
For ISDN, error codes are:
0 - OK
1 - DISCONNECT_IND
2 - CAPI_SET_SIGNAL error
3 - DISCONNECTED
4 - Protocol error
5 - Wrong parameters
7 - Timeout
8 - CAPI_REGISTER error
9 - CAPI command error
1 Local disconnection
1 DISCONNECT_B3_IND
1 Wrong state
1 CAPI not installed
2 Call rejected
2 No memory
com_listen()
Listens to incoming call.
Returns number:
1 - incoming call
2 - error
com_accept should be called to accept the call. Incoming call can be rejected with
com_disconnect.
com_readtimeout()
Returns number:
0 - last receive operation completed without timeout
1 - last receive operation completed with timeout
This function shall be called when com_receive or com_receivebuf complete, to check
out if timeout has occurred.
com_receive( delimiterstring, timeout )
16
Receives data until delimiterstring is received, or timeout occurs.
timeout is given in miliseconds.
Returns string of received data and received data length.
E.g. to accept line of text, with 1 second timeout, call:
readdata, length = com_receive( "\n", 1000 )
com_receivebuf( number, timeout )
Receives incoming data, until number of characters is received, or timeout elapses.
timeout is in ms.
Returns string of received data and received data length.
com_receiveline()
Receives incoming data, until newline character ( 0x0A ) is received.
Returns string of received data and received data length.
com_send( string )
Sends string.
Returns number:
1 - successfully sent.
0 - send failed
Binary data can be sent using hex2str function.
com_sendfile( local [, remote] )
Send file using Z-modem. remote parameter is optional. If not specified, remote file
name is the same as local.
Returns number:
1 – file sent
0 – send error
com_receive_file( remote, local )
Starts receiving file using Z-modem protocol.
Returns number:
1 – file received
0 – receive error
hex2str( string )
Converts parameter string to sequence of bytes. Returns LUA string, which can
contains '\0' characters. It can be used to send non-ascii characters, e.g.:
17
com_send( hex2str( "0D0A" ) )
include_file( string )
Runs LUA file specified in parameter string. It does the same as LUA native do_file
function, but searches XACS job script path to find requested file.
system( string )
Runs program specified by string. Actually, this calls C-language system function.
write_dbg( string )
Sends string to X-Configurator debug output. Debug output can be viewed with ctrld.exe
program. Although scripts can also write XACS Log (database) this is preferred way to
do debug printouts. This is because it is much faster, and overloads database.
write_log( EventCode, Severity, Message, DebugLevel )
This function writes to XACS Log. The parameters are:
•= EventCode: valid XACS event code. Event codes are listed in XACS Event
Codes section
•= Severity: event severity. The values are:
- 0: info
- 1: warning
- 2: error
- 3: fatal error
•= Message: optional text to be written to log
•= DebugLevel: message debug level
3.3. XACS variables
Below, XACS LUA predefined variables are listed. The variables defined for
devices other then ISDN are not listed here.
ARGC
This is an integer variable, equal to number of script command line options. This will
always be at least "1", as first argument the script receives is its file name.
ARGV
This is an array storing script command line options. Remember, that in Lua arrays
indexing starts with "1" (not "0", as in C language). First element of this array is script
file name.
This is sample code that lists script command line parameters:
i=1
while ( i <= ARGC ) do
write( "Argument number "..format( "%d", i ).." is:"..ARGV[i].."\n" )
i=i+1;
18
end
com_CIPMask
ISDN CIP Mask.
com_CIPValue
ISDN CIP Value.
com_ISDN_B1
ISDN B1 protocol.
com_ISDN_B2
ISDN B2 protocol.
com_ISDN_B3
ISDN B3 protocol
com_ISDN_Calling_Number
Calling number. You may have to set this variable, when making calls through PABX
systems.
com_ISDN_ctrl_connect
Number of ISDN controller for outgoing calls.
com_ISDN_ctrl_listen
Number of ISDN controller for incoming calls.
com_device
Communications device type. The following types are defined:
- XCOM_ISDN_Device,
- XCOM_TCP_Device,
- XCOM_Modem,
- XCOM_NULL_Modem
The variables listed above, are predefined "global" variables. These variables
can be read and written by LUA job script.
19
Chapter 4 – Configuration scripts development guidelines
The X-Configurator uses embedded LUA language interpreter for configuration
scripts (jobs). The X-Configurator can write any valid LUA script, there are however
some rules that must be followed to write the proper XACS configuration script.
The script is supplied by XACS Scheduler with set of pre-defined variables. These are:
•= Extension variables described in XACS Variables section.
•= Static parameter of target, NAS and project. These are:
- project identifier
- NAS identifier
- target identifier
- target name
- target debug level.
•= All dynamic parameters of target. Some of these parameters are used are used
by the XACS Scheduler. These are:
- use_default_login - This variable tells the scheduler whether to use target’s own
or default user/password for ISDN login. Script should set this flag to “Disable”
(0) when it changes targets login parameters and set it to “Enable” (1) when is
restores login defaults at target device.
•= All dynamic parameters of NAS.
•= auto_login_name and auto_login_password: The script should use these
variables instead of login_name and login_password from target parameters.
These variables are automatically set by the XACS Scheduler to target’s values
of defaults, according to use_default_login flag.
The script should use command line options for customizing. Especially, it should
support write its info when run with "-?" option. To access script command line you can
use ARGC and ARGV variables. You can also use GetParameters function from
“comutils.lua” module shipped with the X-Configurator.
The script should set the variable error_code to its exit code. This is very
important, as it tells the scheduler whether it should retry session. error_code should be
set to one of predefined values for exit code. These values are listed in XACS Event
Codes section. You can use symbolic names of event codes, if you include xacs.lua file.
The scheduler does not make ISDN connections for the script. To establish and
terminate ISDN connection, the script should call com_connect() and
com_disconnect() functions respectively.
20
Chapter 5 – Preparing system for working
5.1. Installing Remote CAPI for BinTec routers
Before you start using the X-Configurator you must install Remote CAPI. For
BinTec routers Remote CAPI can be installed and configured by the software called
BRICKWARE supplied on CD-ROM with the router. Please refer to the documentation
of the product to properly install the Remote CAPI. After installing Remote CAPI you
must change properties for XACS Scheduler service. To do this, select Services from
Control Panel window and then from the services list select XACS Scheduler and press
Startup button. Set up “Log On As” option to “This Account”. Now enter appropriate
account name and password. Now log on as a different user if necessary and restart
XACS Scheduler service. To check if the remote CAPI is properly loaded, enter
command "netstat -a" from command line. This command will return a list of active
connections. The following item indicate that Remote CAPI is properly loaded:
TCP
computer_name:port_number IP_address_of_CAPI_SERVER:CAPI_port_number ESTABLISHED
Where:
computer_name - is the name of the computer where the XACS Scheduler service is installed
port_number - is the port number used for communication
IP_address_of_CAPI_SERVER - IP address of the device where Remote CAPI is served (usually IP
address of the BinTec router located in the central site)
CAPI_port_number - port number for Remote CAPI server
If you can't see such item on the list of active connection please refer to the
documentation of your router.
5.2. Configuring ISDN channels for using by X-Configurator
In this step you will configure controller(s) used for the configuration purposes.
From the main menu option choose ISDN and then Controllers. Click on Add to add
new controller. As Controller identifier input unique number for this controller and in
Number of channels input number of B-channels, which you can use simultaneously.
For example, if your router is connected to the ISDN BRI, you can use 2 B-channels, if
router is connected to ISDN PRI there are 30 B-channels available for you. Mark Used
for listening option to allow the controller to answer incoming calls from the targets. If
this option is "off" then X-Configurator can only dial-out and cannot serve incoming
calls. Once controller is added in ISDN option then choose MSN option. Now you can
add new MSN number for the previously added controller. In MSN to listen for incoming
calls field input MSN number that allows the X-Configurator answer the calls. See
description for ISDN option of the X-Configurator for more information.
21
5.3. Configuring Setup option of X-Configurator
Before you start using the X-Configurator you have to configure some global
data. This is made in Setup option of the X-Configurator. For more information please
refer to the description of this X-Configurator’s option.
5.4. Creating accounts for the X-Configurator users
You will need to create users that will be able to operate in the X-Configurator.
You will find more information about how to create new user and how to assign
appropriate user's rights in the description of Users option of the X-Configurator. You
should configure at least one user (Administrator) with full access to entire XConfigurator.
5.5. Create the new project for configuring targets
5.5.1. Create the New Project
Project is a set of task templates, jobs and targets. It contains all necessary
information about installation and configuration process. The X-Configurator realizes the
control, modifications and user’s identification in each project. In order to access project
data, user has to log in to the system. Every type of user (Administrator, ProjectManager, Operator, Hotline, End-User) is given a set of rights which state his privileges
in entire X-Configurator. The rights for different types of users can be configured in
section Rights of the Users option menu. By choosing different rights for different types
of user you can limit rights of some users to only viewing the appropriate data from the
project, others to modifying data and others to having full access to the entire system.
You can create the new project in Project option of the X-Configurator. In the
New project name field enter the appropriate name for the new created project. Then
click Create project to write changes into the database. Now, in the window displaying
project list you will be able to see the name of the created project. Click on this project
to setup its properties. The following steps can only be executed after selecting this
project (must apply to this project).
Note:
When the currently logged user creates a new project he automatically gains full rights
to this project.
5.5.2. Create and add new Target to Project
Choose Targets option from appropriate Project, and then create the new NAS.
In the New NAS name field enter required name for the NAS and click on the Add new
NAS. The new NAS will be added to the database. Note that for each project must be at
least one NAS defined. Once you have added new NAS, this item appears in the
registered NASes list. In the next step you must add the target (router) to the NAS. Click
22
on the appropriate NAS name and then Add new target. Once you have added the
target, you can set up parameters for this target. See section Add new target and Add
parameter for target for information about configuring the target.
Note:
Each target has to belong to one NAS.
5.5.2. Create new Job
Once you have added target(s) to the Project as it is described above, you can
define what should be done for this target(s). See the description for Jobs option of XConfigurator for more information.
5.5.3. Create new Task Template and assign the Target(s)
Once you have created target and job as described in previous sections, the next
step will define task template containing created job. You will learn how to create and
configure the new task template in Task templates section. Once you assign the job,
you must assign the target(s) for this task template. Additionally you can include the
target groups to the task template. You will learn how to add targets to the task template
in Add targets section and how to add Target Groups in Add target group section.
Finally you have to make this task visible for the XACS Scheduler. Now you have to
activate the task template. For tests purposes you can run the task to start configuring
the target(s). You will find information from task execution in the XACS Log and in View
task instances. Additionally you can use Task Manager option to check the system
activity.
5.5.4. Watch the X-Configurator state
You can view the system state in the following ways:
•= in Task Manager option located in Projects, to see the task activity matrix and the
current system state
•= in XACS Log option located in Projects, to view the log from entire XConfigurator. By choosing this option you can use filters to extract interested
portion of log.
•= in the View task instances you can see the log from sessions and messages from
the XACS Log for the selected task.
23
Chapter 6 – Menu options
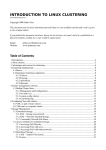
Figure 2 shows the main menu of X-Configurator. On the left there is the menu
with options that can be selected. All these menu options are described in the following
chapter. Note that such view appears only when logged user has “Admin” user right and
therefore has access to the all menu options of X-Configurator.
Figure 2 Main menu of X-Configurator (user logged with “Admin“ user’s rights)
6.1. Projects
Project is a set of task templates, jobs and targets (clients). It contains all
necessary information about installation and configuration process. The X-Configurator
realizes the control, modifications and user’s identification in each project. In order to
access project data, user has to log in to the system. Every type of user (Administrator,
Project-Manager, Operator, Hotline, End-User) is given a set of rights which state his
privileges in entire X-Configurator. The rights for different types of users can be
configured in section Rights of the Users option menu. By choosing different rights for
different types of user you can limit rights of some users to only viewing the appropriate
data from the project, others to modifying data and others to having full access to the
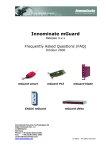
entire system. Figure 3 shows the view that appears when you select Project option of
X-Configurator.
24
Figure 3 The view in "Projects" option of X-Configurator
6.1.1. Create New Project
This option is available in Project option of the X-Configurator. In order to create
new project, first enter the appropriate name in the New project name field and then
click Create project to write the changes to the database.
Note:
Currently logged user automatically gains full to rights to the new created project.
6.1.2. Edit Project
This option is available in Project option of the X-Configurator. Click on the name
of the project you want to edit. A new window will appear in which you will be able to set
up each component of every project. You can edit the following components:
•= Profiles - allows you to manage the profiles used in the project. See also the
description of Profiles option.
•= Jobs - allows you to create, add and remove jobs in the project. See also the
description of Job option.
25
•= Targets - allows you to include target devices into project. See also the
description of Target option.
•= Target Groups - allows you to include and manage the target group in the
project. See also the description of Target Groups option.
•= Task Templates - allows you to set up the task templates for the entire project.
See also the description of Task Templates option.
•= Task Manager - allows you to view the task and system activity. See also the
description of Task Manager option.
•= XACS Log - allows you to set up and view the log for the project. See also the
description of XACS Log option.
Note:
If you cannot edit the selected project it means that you don't have the necessary user’s
rights for the project. To view the project contents user needs at least the right “Read”
for Profiles, Jobs, NAS or the others sub-components of each project.
6.1.3. Add/Update Project Description
This option is available in Project section of the X-Configurator. Click on project
name to view its components. At the top of the page there is a field in which you can
enter the description of the project. Once you entered new data click on Update
description to save the changes.
6.1.4. Remove Project
In order to remove the project choose Project option from the main menu of the
X-Configurator. A new window will appear with name’s list of all defined projects. To
remove any projects simply click on Remove button next to the chosen project name.
Note:
1. In order to remove the project the user must have required user’s rights to execute
this action.
2. If you cannot view the list of projects after choosing Project options from the main
menu, check the user rights for the currently logged user. Such situation might occur
that if the user has “No rights” set in user rights section.
6.1.5. Profiles
Profiles allow you to group parameters that can be configured on the target or the
NAS. Profiles can be inherited from other profiles (from this selected as parent profile).
The LUA job scripts may use parameters grouped in a profile. When you configure the
target you can assign to it any chosen profile.
26
You can create a new profile in a project by selecting desired project from the
Projects option of the X-Configurator and then choosing option Profiles. The new
window will appear with a list of types of profiles, which you can create and associate
with this project (see figure 4). You can create the following types of profiles:
•= Target profiles - choose this option to create and manage parameters that will be
configured on the targets (routers).
•= NAS profiles - this option allows you to create and manage parameters that can
be configured on the NAS (on router at central site, or RADIUS server).
Figure 4 The view in Profiles option of X-Configurator
6.1.5.1. Create New Profile
You can create a new profile in a project by selecting desired project from the
Projects option of the X-Configurator and then choosing option Profiles. A new window
will appear with a list of profiles associated with this project. The list will be empty if you
haven’t configured any profiles before. In the New profile name field enter required
name for the profile and click on the Create new profile button. New profile will be
added to the database.
27
6.1.6. Target profiles
Target profiles allow you to create a set of parameters that will be configured on
each target (router). Target profiles can be organized hierarchically therefore one profile
can inherit all parameters from another profile (i.e. from parent profile). Figure 5 shows
a sample view of Target profiles option.
Figure 5 The sample view in “Target profiles“ option of X-Configurator
6.1.6.1. Create New Target Profile
You can create a new profile in a project by selecting desired project from the
Projects option of the X-Configurator and then choosing option Profiles. Choose Target
profiles and new window will appear with a list of target profiles associated with this
project. The list will be empty if you haven’t configured any target profiles yet. In a New
profile name field enter required name for the target profile and click on the Create new
profile button. New profile will be added to the database.
28
Figure 6 The sample view in “Create new Target Profile“ option
When you create new target profile (see figure 6) you can optionally set up the
following options grouped in "Debug level" section:
•= Trace errors - mark this field if you want to write error messages to the XACS
Log.
•= Trace task - mark this field if you want to write to the log messages from task
execution. If this option is marked, information about the time when task was
started and finished is written to the XACS Log.
•= Trace session states - mark this field if you want to write to the log messages
from the session states. If this option is marked, information about the time when
session was created, started and finished is written to the XACS Log.
•= Trace session scripts - mark this field if you want to trace the execution of the job
script.
•= Trace session scripts ext. - mark this field if you want to trace in details the
execution of the job script.
•= Internal trace - mark this field if you want to have the detailed trace from the
system state. This option produces a large amount of information that is written
to the XACS Log. Default value for this option is set to "off" and should be
changed to "on" only if necessary.
29
To have a good idea of what happened in the system you should turn on debug
for at least first four options.
Note:
1. Each target has to belong to one NAS.
2. Each target has to have parameters that allow to dial-out to this target (ISDN
number), login name and login password. These parameters can be taken from
target profile called "Default login profile" which is predefined and supplied with the
X-Configurator.
3. The currently logged user who wants to remove the profile must have required
user's rights to execute this action.
6.1.6.2. Find Target Profile
If you are going to find any target profile then choose Target profiles from Project
option of the main menu of the X-Configurator. New view will appear with the list of all
defined target profiles names. If you want to find any target profile then in Target name
field input required target profile name and then press Search. If such target profile will
be found then it appears as first on the list of defined profiles. If search fails then
appropriate message will be displayed (Target profile not found).
6.1.6.3. Remove Target Profile
When you choose Target profiles from Project option of the main menu of the XConfigurator a new view will appear with list of all defined target profiles names. If you
want to remove a target profile, click on Remove button next to the selected profile
name. The selected target profile will be deleted from the database.
Note:
1. The currently logged user who wants to remove the profile must have required
user's rights to execute this action.
2. If you cannot view the list of profiles in this option, check the user rights for the
currently logged user. Such situation might occur when the user has “No rights” set
in user rights section.
6.1.6.4. Set Parent for Target Profile
In Parent field you can set parent profile for the currently created target profile.
To do this, just designate the appropriate target profile’s name from the list and choose
Set parent. The target profile doesn't have to have a parent profile. Each target has to
have parameters that allow to dial-out to this target (ISDN number), login name and
login password. These parameters can be taken from target profile called "Default login
profile" which is predefined and supplied with the X-Configurator.
30
6.1.6.5. Add Parameter to Target Profile
To add a new parameter to the current target profile select chosen parameter
from drop-down menu and click Add parameter button. Then enter the value for this
parameter in Value field next to the added parameter. To apply value for this parameter
simply click on Update button, next to the appropriate parameter.
If you do not see any parameters in drop-down menu it means that you have to
create parameters for the targets first. Refer to section Parameters for targets for more
details.
6.1.6.6. Update Value of Target Parameter
To update the value of parameter input its new value in the field and click Update
button to save changes in the database.
6.1.6.7. Remove Parameter from Target Profile
To remove a parameter from the target profile click on Remove button next to the
appropriate parameter name.
6.1.7. NAS profiles
NAS profiles allow you to create a set of parameters that will be configured on
each NAS point (central router), usually located at central site. The NAS profiles can be
organized hierarchically, therefore one profile can inherit all parameters from other
profile (i.e. from parent profile). When you choose a particular NAS profile, a new view
will appear with a list of all targets served by this NAS.
Note:
Each target has to belong to one NAS.
31
Figure 7 The view in “NAS profiles“ option of X-Configurator
6.1.7.1. Create New NAS Profile
You can create a new profile in a project by selecting desired project from the
Projects option of the X-Configurator and then choosing option Profiles. When you
choose NAS profiles, a new window will appear with a list of NAS profiles associated
with this project. The list will be empty if you haven’t configured any NAS profile before.
In the field New profile name enter required name for the NAS profile and click on the
Create new profile button. New profile will be added to the database.
Note:
1. Each target has to belong to one NAS.
2. You have to have appropriate user's rights to be able create new NAS.
32
Figure 8 The sample view with NAS profile property
6.1.7.2. Remove NAS Profile
When you choose NAS profiles from Project option of the main menu of the XConfigurator a new view will appear with a list of all defined NAS profiles names. If you
want to remove selected NAS profile, click on Remove button next to the appropriate
profile name. The selected NAS profile will be deleted from the database.
Note:
1. The currently logged user who wants to remove the profile must have required
user's rights to execute this action.
2. If you cannot view the list of profiles in this option, check the user rights for the
currently logged user. Such situation might occur if the user has “No rights” set in
user rights section.
33
6.1.7.3. Update Parent for NAS Profile
In Parent field you can set the parent profile for the currently created NAS profile.
To do this simply designate the appropriate NAS profile name from the list and choose
Update parent. The NAS profile doesn't have to have a parent profile.
6.1.7.4. Add Parameter to NAS Profile
To add a new parameter to the current NAS profile select appropriate parameter
from drop-down menu and click Add parameter. Then enter the value for this
parameter in Value field next to the added parameter. To apply value for this parameter
simply click on Update button, next to the appropriate parameter.
If you do not see parameters in drop-down menu it means that you have to
create parameters for the NAS first. Please refer to section Parameters for NAS for
more details.
6.1.7.5. Update Value of Parameter
To update the value of particular parameter input its new value in the field and
click Update to save changes in the database.
6.1.7.6. Remove Parameter from NAS Profile
To remove particular parameter from the NAS profile click on Remove, next to
the appropriate parameter name.
6.1.8. Jobs
Jobs contain the set of actions, grouped in the LUA scripts file, that have to be
performed during configuration. For a large rollout process here you can define a main
job. This job contains the common most important parameters that have to be
configured on the remote routers. In the jobs you can define what will be performed:
configuration update, reset and return to the factory settings, firmware update on the
router or creating new WAN partner. Jobs option can be found in the Project section of
the X-Configurator. When you select a project name a new submenu will appear
containing options for job. Figure 9 shows the sample view in this option.
34
Figure 9 The sample view in “Jobs“ option of X-Configurator
6.1.8.1. Create New Job
This option allows you to create the new job. When you choose this option a new
view will appear that allows you define the following information for the job:
•= Name - enter in this field the name of the new created job.
•= Description - you can add description for the new created job (optional).
•= Filename - select here the filename of the job script file that contains a set of
action that should be performed in the job. You don't have to input full path to the
file. The X-Configurator will look for scripts in directories configured in Script path
field of the Setup option.
When you fill in all the fields click on Save to add the job to the database.
6.1.8.2. Update Job
To update contents of any field simply enter new value in the desired field and
click on Update button located next the appropriate job. Changes will be written to the
database.
35
6.1.8.3. Remove Job
To remove the selected job from the project (and from the database), click on
Remove button located next to the selected job.
6.1.8.4. Script Info
The functions contained in LUA script file can have a tag that shortly describes
this function. An example of a tag is shown below:
--###################################
--# Function: Testing()
--# Description: Here is the description
--# Description: section for the function
--# Globals: testaddr
--###################################
function testing()
<INSTRUCTION 1>
<INSTRUCTION 2>
<INSTRUCTION 3>
<INSTRUCTION ...>
end
The information from this tag is displayed when you choose Script info button.
Meaning of each column, which appears in a new window is described below:
•= Function - this column displays the name of the function defined in "--# Function:
" tag.
•= Description - this column displays the description for the function defined in "--##
Description: " tag(s).
•= Parameters - this column displays the global parameters that are optionally used
by this function and are defined in "--# Globals: " tag. If the function doesn’t use
global parameters then you don’t have to write this tag.
If you do not define such tag in LUA script file for the function the window
"Describe of LUA script" will be empty.
Note:
Tags for the functions contained in job script file are not mandatory.
6.1.9. Targets
Target represents configured device (router) and allows you to create a set of
parameters that will be configured on this router (target). The target can inherit a set of
parameters from any target profile selected as parent profile.
Each target is configured with a help of NAS. So, when you select Target option
of the X-Configurator you must create first NAS and then targets that will be served by
this NAS. The view for creating new NAS is shown in figure 10. When you select any
NAS then new view appears with a list of targets served by this NAS (see figure 11).
36
6.1.9.1. What is NAS
NAS allows you to assign the targets to the appropriate central site router (NAS).
For each project must be at least one NAS defined. When you choose the appropriate
NAS the new view appears that lists all targets served by this NAS. In this window you
can add/remove targets.
Figure 10 The view with sample registered NAS in “Targets“ option of X-Configurator
37
Figure 11 The sample list of targets served by NAS called XACS-NAS in option
“Targets“ of X-Configurator
6.1.9.2. Create New NAS
You can create a new NAS in the appropriate project by selecting desired project
from the Projects option of the X-Configurator and then choosing Targets option. The
new window appears with a list of NASes associated with this project. The list is empty
if you haven't configured any NAS yet. In the field New NAS name enter required name
for the NAS and click on the Create new NAS. New NAS will be added to the database.
Note:
1. Each project has to have configured at least one NAS that will serve the targets
(routers).
2. Each target must belong to one NAS.
38
6.1.9.3. Update NAS
You can change any information for the selected NAS associated with the
appropriate project. You can add, change or remove any component is described
below.
•= Update parent NAS profile
•= Add parameter for NAS
•= Update value of NAS parameter
•= Remove NAS parameter
•= Remove NAS
•= Add new target
•= Edit target
•= Clone targets
•= Remove target
•= Set parent target profile
•= Update value of target parameter
•= Remove target parameter
Figure 12 The view on properties for selected NAS
39
6.1.9.4. Update Parent NAS Profile
In Parent field you can set the parent NAS profile for the currently created NAS.
To do this, simply designate the appropriate NAS profile's name from the list and
choose Update. The NAS doesn't have to have a parent profile.
6.1.9.5. Add Parameter for NAS
To add new parameter to the current NAS just select appropriate parameter from
drop-down menu and click Add parameter. After this, enter the value for this parameter
in Value field next to the added parameter. To apply value for this parameter just click
on Update, next to the appropriate parameter.
If you cannot see any parameter in drop-down menu then first, you have to create
parameters for the NAS. See to section System parameters how to create parameters
for NAS.
6.1.9.6. Update Value of NAS Parameter
To update the value of the appropriate parameter in the NAS input its new value
in the field and click Update to save changes in the database.
6.1.9.7. Remove Parameter from NAS
To remove the appropriate parameter from the NAS click on Remove, next to the
appropriate parameter name.
6.1.9.8. Remove NAS
When you choose Targets from the appropriate Project option of the main menu
of the X-Configurator then new view appears with listed all defined in current project
NAS names. If you want to remove the selected NAS then click on Remove next to the
appropriate name. The definition of NAS will be deleted from the database.
Note:
The currently logged user who wants to remove the NAS must have appropriate user's
rights to execute this action.
6.1.9.9. Add New Target to NAS
You can create a new target in a NAS by selecting desired NAS from the Projects
option of the X-Configurator. When you select NAS name a new window will appear
with a list of targets associated with this NAS. The list will be empty if you haven't
configured any target before. In the field New target enter required name for the target
and click on the Add button. New target will be added to the database and to current
NAS. Once you have created new target you can set up the following options (see
figure 13):
•= Debug level – this section allows you to configure required debug level for this
target. Here you will find the following:
- Trace errors - mark this field if you want to write error messages to the XACS
Log.
40
-Trace task - mark this field if you want to write to the log messages from task
execution. If this option is marked, information about the time when task was
started and finished is written to the XACS Log.
- Trace session states - mark this field if you want to write to the log messages
from the session states. If this option is marked, information about the time
when session is created, started and finished is written to the XACS Log.
- Trace session scripts - mark this field if you want to trace the execution of the
job script.
- Trace session scripts ext. - mark this field if you want to trace in details the
execution of the job script.
- Internal trace - mark this field if you want to have the detailed trace from the
system state. This option produces a large amount of information that is
written to the XACS Log. Default value for this option is set to "off" and should
be changed to "on" only if necessary.
You should turn on the first four debug levels. For default settings of the debug
level see also Global debug level field in Setup option.
•= Parent - here you can set up parent profile for this target. Target has to have at
least "profile root" (default) selected. You can find information about how to
create the profile for targets in Target Profiles section.
•= Add parameter - this field allows you to add the parameter for the target.
•= Remove - click on this button to remove the parameter from the target.
•= Update - change data in appropriate field and then click on Update button next to
the changed value.
•= Parameters from profile - this part of window displays the parameters inherited
from the parent profile.
•= Clone target - this button allows you to create clone of the current target. For
more information refer to section Clone target.
•= Index array - if the parameter is an array, you will see here an index in the array
for this parameter.
Note:
1. Each target has to belong to one NAS.
2. The currently logged user who wants to remove the profile must have required
user's rights to execute this action.
41
Figure 13 The sample properties for new created target served by NAS called here
XACS-NAS
6.1.9.10. Find Target
You can find required target name by entering the name in Target name field and
pressing Search button. When selected target name is found it appears on the top of
the target’s list.
6.1.9.11. Edit Target
You can edit target in the appropriate NAS by selecting desired NAS from the
Projects option of the X-Configurator. When you select particular NAS name, a new
window will appear with a list of targets associated with this NAS. The list will be empty
if you haven't configured any target before. Click on target name to see the properties of
this target. Also see Add new target to NAS for more information.
42
6.1.9.12. Clone Target
This option is available in Targets section of selected Project. When you select
NAS a list of associated targets will appear. Select a target to view its properties, then
choose Clone target. New window will appear which allows you to enter Clone name
for the target. Additionally you can assign this clone to selected NAS. When you are
ready simply click on Create clone button. A created clone has the same set of settings
as a source target.
6.1.9.13. Remove Target
When you choose Targets option from Project option of the X-Configurator, new
view will appear with a list of all defined NAS in this project. Select required NAS. A list
of served targets will appear. If you want to remove selected target, click on Remove
button next to the target name. The selected target will be deleted from the database.
Note:
1. The currently logged user who wants to remove the target must have required user's
rights to execute this action.
2. If you cannot view the list of profiles in this option, check the user rights for the
currently logged user. Such situation might occur that if the user has “No rights” set
in user rights section.
6.1.9.14. Set Parent Target Profile
In Parent field you can set parent profile for the currently created target. To do
this simply designate the appropriate targets profile name from the list and choose
Update. The target doesn't have to have a parent profile.
6.1.9.15. Add Parameter for Target
To add a new parameter to the current target select the parameter from dropdown menu and click Add parameter. Then enter the value for this parameter in Value
field next to the added parameter. To apply value for this parameter simply click on
Update button next to the parameter.
If you do not see parameters in drop-down menu it means that you have to
create parameters for the targets first. Refer to section Parameters for targets for more
details.
6.1.9.16. Update Value of Target Parameter
To update the value of particular parameter input its new value in the field and
click Update to save changes in the database.
43
6.1.9.17. Remove Target Parameter
To remove particular parameter from the target profile click on Remove button
next to the appropriate parameter name.
6.1.10. Target Groups
This option appears when you choose particular project name in Project option of
the X-Configurator. This option helps you to group targets into one group (for example
based on their location). One group can contain other target group. This allows you to
create hierarchy of the target groups. The sample view in this option is shown in figure
14.
Figure 14 The sample target groups configured in “Target Groups“ option of
X-Configurator
44
6.1.10.1. Create New Target Group
If you want to create the new target group click on the New target group button.
When you choose this option, a new window will appear, which will allow you to define
the following properties:
•= Group name - in this field enter the name for the new created target group.
•= Description - optionally you can add a description of the new created target
group.
•= Parent group - select from the drop down menu appropriate parent group. This is
not mandatory. If you don't choose any parent group, group Everyone is taken
as a default.
•= Target list - select from this window targets which will belong to this group.
Click Save to add the definition of new target group to the database.
6.1.10.2. Update Target Group
If you want to change any information associated with particular group (i.e. name
or description), enter the information in selected field and click on Update button, next
to the appropriate target group. The information will be changed and written to the
database.
6.1.10.3. Add Target to Target Group
If you want to add a target to selected group, click on the Add/Remove target
button, next to the appropriate target group name. A new view will appear, containing
two windows. In the left window you will see the list of defined targets not included in
this group. If you want to add any target, select it from the list and click on Add. In the
right window there is a list of targets contained in the current group.
6.1.10.4. Remove Target from Target Group
If you want to remove a target from selected group, click on the Add/Remove
target button next to the appropriate target group name. A new view will appear
containing two windows. In the right window you will see the list of targets contained in
the current group. If you want to remove any target, select it from the list and click on
Remove. In the left window you will see the list of defined targets not included in this
group.
6.1.10.5. Remove Target Group
If you want to remove selected target group, simply click on Remove button next
to the appropriate target group name. This will remove the definition of a target group
from the database.
45
6.1.11. Task Templates
Task template groups together the following information:
•= List of targets or/and target groups.
•= Job, which has to be run for all those targets.
•= Start conditions
To be able to make configuration process for the router (target) user must define
task template, which will realize this. You can create Task templates from Project menu
of the X-Configurator by selecting the appropriate project name. In figure 15 is shown
the sample view in Task Templates option.
Figure 15 The view with sample configured tasks in “Task Templates“ option of
X-Configurator
6.1.11.1. Create New Task Template
Choose New task template from Task template. A new window will appear (see
figure 16) with the following fields:
•= Task name - in this field enter required name for a new created task template.
•= Description - in this field input optionally description for new created task
template.
46
•= Job name - from this drop down menu select the appropriate job that will be
executed with the beginning of the task.
•= Job arguments – enter here arguments for the selected job (optional).
•= Client selections rule - this field allows you to enter rules that will apply to the
targets. Rules can be defined in such way that they will be able to exclude
matched targets. The rule is an expression in LUA language that uses variables
defined for targets and NAS. Client selection rule applies to all start types of the
task.
•= Start task type - this field allows you to define how the task should be started.
You may choose from the following types:
a) On Time - task will be started at defined time. Choose this start type and click
Next button. The resulting window will allow you to configure date and time
when task will be started. See also information in sections Task start
conditions and On Time Task for more details.
b) Repeatable - task will be automatically started and repeated in the defined
intervals. Choose this start type and click Next button. The resulting window
will allow you to configure date and time when task will be repeated. See also
information in sections Task start conditions and Repeatable Task for more
details.
c) On Call - task is waiting for incoming connection from target. Choose this start
type and click Next button. The resulting window will allow you to define how
to match digits from incoming call number. You will see the following fields:
- Rule matching - this field defines how the incoming phone number is
analyzed. If "Match all" is selected then all digits from calling number must
match. If "Match first number" is selected then the first digit from the
incoming call number is checked and matched. If "Match last number" is
selected then the last digit from the incoming call number is checked and
matched.
- Matching digits - enter how many digits should be matched. Digits for the
calling number are checked from right to left.
See also information in sections Task start conditions and On Call Task for
more details.
d) On Event - task is started when the appropriate event in the database table
appears. When you choose this start type and click Next a new window will
appear which will allow you to enter the event name. See also information in
sections Task start conditions and On Event Task for more details.
For more information concerning task types please refer to XACS Scheduler
section.
•= Task duration - enter here the approximate time (in seconds) of the task duration
(for example 360). When the time is out, the task is terminated by the XACS
Scheduler.
•= Number of retries - input here required number of retries for this task. If an error
occurs while executing the task (due i.e. communication problems) XACS
Scheduler will retry this task the number of times specified in this field. Input 0
(zero) if you don't want XACS Scheduler to make any retries.
47
When you click Next you will see the new window depending on the selected
task start type. Click on Save to add task template to the database.
Figure 16 The view in “New Task Template“ option of X-Configurator
6.1.11.2. Update Task Template
To update any information in the task template (i.e. name, description, start time),
click on the Update button, next to particular task template. The new view will appear
identical like in Create new task template option. Please refer to the description of this
option.
6.1.11.3. Add/Remove Target to/from Task Template
Each task template has to have at least one target. To associate the target or
targets with the task template click Add/remove target button, next to selected task
template name. A new view will appear containing two windows. In the left window you
will see the list of defined targets not included in this task template. To add any target,
simply select it from the list and click Add. In the right window you will see the list of
targets contained in the current task template. To remove target, select it from the list
and click Remove. When you finish adding/removing targets, click on Back button.
48
6.1.11.4. Add/Remove Target Group to/from Task Template
Each task template has to have at least one target. To associate the target
group(s) with the task template click Add/remove group button, next to particular task
template name. A new view will appear containing two windows. In the left window you
will see the list of defined target groups not included in this task template. To add any
group, simply select it from the list and click Add. In the right window there is a list of
groups contained in a current task template. To remove the group, select it from the list
and click Remove. When you finish adding/removing target groups, click on Back.
6.1.11.5. Activate
The task must be activated to be ready to execute required actions. When you
finish configuring task template, you have to activate the task. You can do this by
clicking on Activate in appropriate task template.
6.1.11.6. Deactivate
The task must be activated to be ready to execute required actions. To stop the
“active” task, click on Deactivate in appropriate task template. You can deactivate the
task template at any time.
6.1.11.7. Run Now
Once the task template is in "active" state, you can start its task instance
manually by clicking on Run now. The session(s) for the target(s) contained in the task
template will be started.
6.1.11.8. Remove Task Template
To remove task template, click on Remove button associated with the task
template you want to remove. The task template will be deleted from the database.
6.1.11.9. View Task Instances
If you want to watch the task instances from particular task template, click on
View task instances. When you choose this option a new window will appear (see
figure 17) with a list of all task instances. By choosing the Sessions option located next
to each task instance you will be shown a new view with list of all sessions for this task
instance (see figure 18). The Details option allows you to view the detailed information
about selected session (see figure 19). The Log option allows you to view the
messages written in XACS Log by the selected task session (see figure 20).
49
Figure 17 The sample view in “View Task Instances” option
50
Figure 18 The sample messages in Task Sessions Log
51
Figure 19 The sample view in “Details“ option located in “Task Sessions“
52
Figure 20 The sample messages from “Log“ option located in “Task Sessions“
6.1.12. Task Manager
This option is available in Project section of the X-Configurator for selected
project. When you choose this option a new view will appear showing you
Target/Activity matrix. This is the best way to view the status of the entire system and
the appropriate target. For example, you can start here desired task for selected target.
The window of the Task Manager consists of two panes. The top pane shows the
“Activity Matrix” for all defined tasks and targets in the system. The bottom pane
displays the current “System Activity”. Figure 21 shows sample view in this option.
53
Figure 21 The sample view in “Task Manager“ option for appropriate project
6.1.12.1. Activity Matrix
This window displays matrix (see figure 21). The first row contains a list of
defined tasks. The first column contains the list of all defined targets. In the intersection
points you can execute actions represented by the following icons:
•= Click on this icon to view the portion of the XACS Log for this task and
target(s).
•= Click on this icon to view the session log for the target(s) included in
the task.
•= Click on this icon to run the task for the specific target.
Additionally, next to each target you will see the graphic status of configuration
state for this target. You will see here the following icons representing different
configuration states of the task instance.
•= This icon indicates that configuration of this target was successfully
executed. All sessions associated with this task instance completed successfully
(i.e. their "error_code" is "0").
•= This icon indicates that an error occurred during configuration process.
All sessions associated with the task instance completed but some of them have
been successful and some failed.
•= This icon indicates that this target(s) is not configured. It means that
54
target was not configured at all or his state was manual set up (target parameter:
configure_state=Not configured).
•= This icon indicates that the task instance is running (configuration
process for any target is in progress). This is initial state. Instance stays in this
state as long, as not completed sessions associated with this task instance exist.
•= This icon indicates that the task instance state is unknown.
You will find more information about session states and task execution in the
XACS Scheduler and Task instances states sections.
6.1.12.2. System Activity
This part of the Task Manager window (see figure 21) represents system activity
and displays messages from the XACS Log. You can set up here the following options:
•= Refresh time - time in second for refreshing the information in this window.
•= History time - time in minutes defining how old messages should be
displayed in the window.
•= Max task - maximum number of rows displayed for each task.
To change the values of the parameter input the correct value and click Update.
Note:
If the currently logged user doesn't have the Admin user's right, Task Manager window
will appear as default. User who doesn't have “Admin” right cannot access all menu
options of the X-Configurator.
6.1.13. XACS Log
The XACS Log option is located in Project section of the X-Configurator. You can
view the log of particular project. Once you have chosen a project, messages from the
log will appear. You can use filters to extract messages that interest you from the XACS
Log. You may choose multiple selection, which will allow you to select, for example
"Info" and "Warning" severity at once and the source "Scheduler" and "Console". In
figure 22 is shown sample view that you will see when you choose XACS Log option.
To extract required messages you may use the following filters operating on the
fields from the database:
•= Severity - this option allows you to filter and display only the messages with
specific value in the severity field:
1) All - display all messages written to XACS Log (don't look at the value in the
severity field of the message).
2) Info - display only the messages which contain in severity field "Info"
(Information).
55
3) Warning - display only the messages that are stored in the XACS Log
database with "Warning" in the severity field.
4) Error - display only the messages that are stored in the XACS Log database
with "Error" in the severity field.
5) Fatal error - display only the messages that are stored in the XACS Log
database with "Fatal error" in the severity field.
•= Event - this option allows you to filter and display only the messages with specific
type of event contained in the event field:
1) Success - filter and display only this kind of events.
2) Script trace - filter and display only this kind of events.
3) Database access error - filter and display only this kind of events.
4) Error reading setup data - filter and display only this kind of events.
5) Error running script file - filter and display only this kind of events.
6) Error initializing script engine - filter and display only this kind of events.
7) Session interrupted - filter and display only this kind of events.
8) Deadline reached - session terminated by scheduler - filter and display only
this kind of events.
9) Error creating task instance - filter and display only this kind of events.
10) Error creating session - filter and display only this kind of events.
11) Error update task instance status - filter and display only this kind of events.
12) Error update session status - filter and display only this kind of events.
13) No client matches event condition - filter and display only this kind of events.
14) Error in event condition expression - filter and display only this kind of events.
15) Miscellaneous error - filter and display only this kind of events.
16) Error parsing cron string - filter and display only this kind of events.
17) Time conditions not specified for repeatable task - filter and display only this
kind of events.
18) Connection establishment started - filter and display only this kind of events.
19) Online - filter and display only this kind of events.
20) Connection failed - filter and display only this kind of events.
21) Login failure - filter and display only this kind of events.
21) Connection terminated - filter and display only this kind of events.
22) Error opening script - filter and display only this kind of events.
23) Error reading client record - filter and display only this kind of events.
24) Internal error - filter and display only this kind of events.
25) Service started - filter and display only this kind of events.
26) Service stopped - filter and display only this kind of events.
27) Not enough memory - filter and display only this kind of events.
56
28) Session deactivated - filter and display only this kind of events.
29) Task instance created - filter and display only this kind of events.
30) Session created - filter and display only this kind of events.
31) Session started - filter and display only this kind of events.
32) Session terminated - filter and display only this kind of events.
33) Task instance terminated - filter and display only this kind of events.
34) Session retried - filter and display only this kind of events.
35) Update target error - filter and display only this kind of events.
36) Events number - filter and display only this kind of events.
•= Source - this filter allows you to display messages from the selected XACS
component:
1) All - display the messages written to XACS Log by all XACS components.
2) Scheduler - display only messages written to XACS Log by the XACS
Scheduler.
3) Console - display only messages that come from the X-Configurator console.
4) Session - display only messages that were written at executing the task
sessions.
5) DBTrigger - display only messages written to XACS Log by the DBTrigger.
When you set up the appropriate filter criterion then click on Run filtering and
the selected messages from XACS Log will be listed on the screen. Not all messages
are displayed at once. Contents of XACS Log will be displayed in small portions on the
page. You will see buttons that help you navigate in pages with XACS Log. For
example, you will see buttons Next and Previous that will be listed appropriate portion
of the XACS Log.
57
Figure 22 The view in “XACS Log“ option of X-Configurator with sample messages from
XACS Log database
6.2. System Parameters
This option allows you to configure the following parameters:
•= Project parameters - mark this option if you want to add, edit or remove a project
parameter.
•= NAS parameters - mark this option if you want to add, edit or remove a NAS
parameter.
•= Target parameters - mark this option if you want to add, edit or remove a target
parameter.
When you select desired option(s) click Apply button. The new view will appear
with defined parameters (see figure 23). If the new window remains empty it means that
either user has no rights to use this option or there are no defined parameters. See
section Rights in Users option to learn how to check user’s rights.
58
Figure 23 The sample view in “System parameters“ option of X-Configurator
6.2.1. Project parameters
This option is available in the System Parameters section of the X-Configurator.
Here you can set up parameters describing project. The LUA script job files of the XConfigurator can use parameters configured here. If there are any configured project
parameters, you will see them on the list of registered parameter types (see figure 23).
6.2.1.1. Add Parameter
Click on Add parameter option to create and configure new parameter that can
be used later in the project. The LUA script can use this parameter. When you choose
this option a new view will appear (see figure 24) with the following fields:
•= Name - enter the description string for the new created parameter.
•= Short name - enter the short name of the parameter that will be configured. This
name is important and is used in the X-Configurator job scripts. The button Copy
from "Name" allows you to copy the name of the parameter from Name field.
•= Data type - this field allows you to set up the type of the parameter. You can
choose between:
59
1) Byte - select this type if the parameter represents the small positive integer
number (0-255).
2) INT16 - select this type the parameter represents 16-bits integer number.
3) INT32 - select this type the parameter represents 32-bits integer number.
4) String - select this type if the parameter represents text (string).
5) IP Address - select this type if the parameter represents IP address. For
example: IP network mask.
6) Password - select this type if the parameter represents password. For security
reasons such parameters should be encrypted and invisible for everyone.
7) Version - select this type if the parameter represents version. For example:
firmware (software) version.
8) Date time - select this type if the parameter represents date and time.
•= Parameter destination - here you can define where this parameter can be used.
You can choose and apply this parameter in:
1) Projects – select this option if this parameter will be used in project.
2) NAS configuration – select this option if this parameter will be used in
configuration of NAS.
3) Target configuration – select this option if this parameter will be used in
configuration of target.
•= Language - here you can choose a language which describes the parameter.
You enter the description in the Quick Info field.
•= Value - when parameter is enumerate type you can associate values of this
parameter with any description name, entered in Value name field. In this way
you can create the pairs containing value name=value.
•= Value name – input here description name for the value of parameter when the
parameter is enumerate type. Add button allows you to add pair value
name=value to the list and Remove button allows you to remove the selected
pair from the list.
•= Is array - mark this option when the parameter is an array of values (i.e. array of
numbers, array of strings).
•= Writable - mark this option when the parameter can be written to database by the
job script.
•= Readonly - mark this option when the parameter should only be read by the XConfigurator.
•= Hidden - mark this option when the parameter has to be invisible for the user
operating in the X-Configurator.
•= Mandatory - mark this option when the parameter have to be configured in every
project.
•= Quick info - you can enter here some usefully information about this parameter.
The Information is displayed in a language selected in Language field.
When you fill in all the fields you can add parameter to the database by clicking
on Apply button. If you want to abort or cancel the operation, click Back.
60
Figure 24 The view in “Add parameter for project“ option
6.2.1.2. Update Parameter
Click on the Update button located next to the selected parameter. New window
will appear with the fields with the same meaning as described in Add parameter option.
When you have changed desired field, click Apply to save changes in the database or
click Back to abort or cancel edition.
6.2.1.3. Remove Parameter
Click on the Remove button located next to the selected parameter name. The
parameter will be deleted from the database.
61
6.2.2. NAS parameters
This option is available in the System Parameters section of the X-Configurator.
Here you can set up parameters that describe the router in central site and optionally
the central radius server. All the devices are called NAS. Parameters configured here
can be used by the LUA script jobs files of the X-Configurator. If there are any
configured NAS parameters, you will see them on the list of registered parameter types
(see figure 23).
6.2.2.1. Add Parameter
Click on Add parameter option to create and configure new parameter that can
be used later in configuration process. This parameter can be used by the LUA job
script. When you choose this option a new view will appear (see figure 25) with the
following fields:
•= Name - enter the description string for the new created NAS parameter.
•= Short name - enter the short name of the parameter that will be configured. This
name is important and is used in the X-Configurator job scripts. The button Copy
from "Name" allows you to copy the name of the parameter from Name field.
•= Data type - this field allows you to set up the type of the parameter. You can
choose between:
1) Byte - select this type if the parameter represents the small positive integer
number (0-255).
2) INT16 - select this type the parameter represents 16-bits integer number.
3) INT32 - select this type the parameter represents 32-bits integer number.
4) String - select this type if the parameter represents text (string).
5) IP Address - select this type if the parameter represents IP address. For
example: IP network mask.
6) Password - select this type if the parameter represents password. For security
reasons such parameters should be encrypted and invisible for everyone.
7) Version - select this type if the parameter represents version. For example:
firmware (software) version.
8) Date time - select this type if the parameter represents date and time.
•= Parameter destination - here you can define where this parameter can be used.
You can choose and apply this parameter in:
1) Projects – select this option if this parameter will be used in project.
2) NAS configuration – select this option if this parameter will be used in
configuration of NAS.
3) Target configuration – select this option if this parameter will be used in
configuration of target.
•= Language - here you can choose a language which describes the parameter.
You enter the description in the Quick Info field.
•= Value - when parameter is enumerate type you can associate values of this
parameter with any description name, entered in Value name field. In this way
you can create the pairs containing value name=value.
62
•= Value name – input here description name for the value of parameter when the
parameter is enumerate type. Add button allows you to add pair value
name=value to the list and Remove button allows you to remove the selected
pair from the list.
•= Is array - mark this option when the parameter is an array of values (i.e. array of
numbers, array of strings).
•= Writable - mark this option when the parameter can be written to database by the
job script.
•= Readonly - mark this option when the parameter should only be read by the XConfigurator.
•= Hidden - mark this option when the parameter has to be invisible for the user
operating in the X-Configurator.
•= Mandatory - mark this option when the parameter have to be configured in every
NAS.
•= Quick info - you can enter here some usefully information about this parameter.
The Information is displayed in a language selected in Language field.
When you fill in all the fields you can add parameter to the database by clicking
Apply button. If you want to abort or cancel the operation, click Back.
Figure 25 The view in “Add parameter for NAS“ option
63
6.2.2.2. Update Parameter
Click on Update button located next to the selected parameter. A new window
will appear with the fields with the same meaning as described in Add parameter for
NAS option. When you have changed the desired field, click Apply to save changes in
the database or click Back to abort or cancel the edition.
6.2.2.3. Remove Parameter
Click on Remove button located next to the selected NAS parameter to delete.
After this the NAS parameter will be deleted from the database.
6.2.3. Target parameters
This option is available in the System Parameters section of the X-Configurator.
Here you can configure parameters that will be configured on the targets (routers).
Parameters configured here can be used by the LUA jobs files of the X-Configurator. If
there are any configured target parameters, you will see them on the list of registered
parameter types (see figure 23).
6.2.3.1. Add Parameter
Click on Add parameter option to create and configure new parameter that can
be used later in configuration process of the target. When you choose this option new
view will appear (see figure 26) with the following fields:
•= Name - enter the description string for the new created target parameter.
•= Short name - enter the short name of the parameter that will be configured. This
name is important and is used in the X-Configurator job scripts. The button Copy
from "Name" allows you to copy the name of the parameter from Name field.
•= Data type - this field allows you to set up the type of the parameter. You can
choose between:
1) Byte - select this type if the parameter represents the small positive integer
number (0-255).
2) INT16 - select this type the parameter represents 16-bits integer number.
3) INT32 - select this type the parameter represents 32-bits integer number.
4) String - select this type if the parameter represents text (string).
5) IP Address - select this type if the parameter represents IP address. For
example: IP network mask.
6) Password - select this type if the parameter represents password. For security
reasons such parameters should be encrypted and invisible for everyone.
64
7) Version - select this type if the parameter represents version. For example:
firmware (software) version.
8) Date time - select this type if the parameter represents date and time.
•= Parameter destination - here you can define where this parameter can be used.
You can choose and apply this parameter in:
1) Projects – select this option if this parameter will be used in project.
2) NAS configuration – select this option if this parameter will be used in
configuration of NAS.
3) Target configuration – select this option if this parameter will be used in
configuration of target.
•= Language - here you can choose a language which describes the parameter.
You enter the description in the Quick Info field.
•= Value - when parameter is enumerate type you can associate values of this
parameter with any description name, entered in Value name field. In this way
you can create the pairs containing value name=value.
•= Value name – input here description name for the value of parameter when the
parameter is enumerate type. Add button allows you to add pair value
name=value to the list and Remove button allows you to remove the selected
pair from the list.
•= Is array - mark this option when the parameter is an array of values (i.e. array of
numbers, array of strings).
•= Writable - mark this option when the parameter can be written to database by the
job script.
•= Readonly - mark this option when the parameter should only be read by the XConfigurator.
•= Hidden - mark this option when the parameter has to be invisible for the user
operating in the X-Configurator.
•= Mandatory - mark this option when the parameter have to be configured on every
target.
•= Quick info - you can enter here some usefully information about this parameter.
The Information is displayed in a language selected in Language field.
When you fill in all the fields you can add parameter to the database by clicking
Apply button. If you want to abort or cancel the operation, click Back.
65
Figure 26 The view in “Add parameter for target“ option
6.2.3.2. Update Parameter
Click on the Update button located next to the selected parameter. A new
window will appear with the fields with the same meaning as described in Add
parameter option. When you have changed the desired field, click Apply to save
changes in the database or Back to abort or cancel the edition.
6.2.3.3. Remove Parameter
Click on the Remove button located next to the selected parameter to delete this
target parameter from the database.
66
6.3. Users
This option is available in the main menu of the X-Configurator. When you
choose this option the new view (see figure 27) displays all defined users. It contains
the following information:
•= Id - displays unique identifier of the user in the database.
•= Login name - Login name for the user, used for logging into X-Configurator.
•= Full name - Full name of the user (i.e. first name and last name of the user).
Figure 27 The sample view in "Users“ option of X-Configurator
6.3.1. New User
Click on New user if you want to create a new user. If you choose this option
new window will appear for you to enter the following information:
•= Login name - Login name for the user. With this string user will be able to log into
X-Configurator and operate.
•= Full name – optionally description of the new created user. This can be his first
name and last name.
•= Password - password that will be used together with login name when logging
into X-Configurator. Password is encrypted using MD5 algorithm.
67
By default every new created user gets a default set of rights. You can grant
rights for any user using option Rights from Users options.
Click Save to save the setting and add new user to the database.
Note:
During login process values for: Login name and Password are case sensitive.
6.3.2. Update User
You can modify parameters of existing users in User window. To modify selected
user, make changes in appropriate fields and click on the Update button next to the
modified field.
6.3.3. Remove User
You can delete existing users listed in User window. To delete particular user
from the list, click on the Remove button next to the selected user. He selected user will
be deleted from the database.
6.3.4. User Rights
This window (see figure 28) allows you to assign or change the rights of the
selected user. Each of user's rights gives the user access to particular option(s) of the
X-Configurator:
•= Projects – grant access to the Projects option.
•= User – grant access to the Users option.
•= Profiles – grant access to the Profiles option.
•= Setup - grant access to the Setup option.
•= Target - grant access to the Targets option.
•= Task - grant access to the Tasks Template option.
•= Job - grant access to the Jobs option.
•= Report - grant access to the Reports option.
•= Log - grant access to the XACS Log option.
•= NAS - grant access to the NAS option.
You can assign the following rights to the user that apply to particular option of
the X-Configurator:
•= None - if this checkbox is marked, user has no rights to access this option of the
X-Configurator.
•= Read - if this checkbox is marked, user has right to read (view) information from
this option of the X-Configurator.
•= Create - if this checkbox is marked, user has right to create new objects (i.e.
project, user, task) in particular option of the X-Configurator (i.e. Projects, Users,
Report).
68
•= Change - if this checkbox is marked, user has right to change properties for this
object (i.e. project, user, task) in particular option of the X-Configurator (i.e.
Projects, Users, Setup).
•= Delete - if this checkbox is marked, user has right to delete object (i.e. project,
user, task) in particular option of the X-Configurator (i.e. Projects, Users, Job).
•= Execute - if this checkbox is marked, user has right to execute object (starting a
task) in the "Task" option of the X-Configurator.
•= Admin - if this checkbox is marked, user has administrative rights for the object
(i.e. project, user, task) in particular option of the X-Configurator (i.e. Projects,
Users, Job).
Click Save to write the user’s settings in the database.
Note:
1. The rights apply to the project selected in the drop-down menu on the right side of
the window. This allows you to view the user's rights for "Profiles" option, for
example in ProjectNo1 and the rights for option "Job" in ProjectNo2 at once. When
you select any project name from drop-down menu, click Refresh rights to make
sure that rights displayed on the screen are correct.
2. By default new created users has default set of rights, so you will need to assign the
additionally rights for them. Additionally you need to have the rights to be able to
create and modify the Users option in the X-Configurator.
69
Figure 28 The sample view with user’s rights for user “xds” in “Rights“ option
6.3.5. Change Password
Click on Change password button if you want to change the password for the
current user logged in the X-Configurator. When you choose this option the new window
will appear. Type in the old password in the Old password field and then the new
password in the New password field. Click on Change button to confirm changes.
The change takes effect once a user logs out from the X-Configurator. You may
use Logout option from the menu of the X-Configurator. You will have to type the new
password when trying to log in the next time.
6.3.6. Reset Password
If you want to reset password for the selected user, click on the Reset pass
button next to the login name. He will use empty password when logging to a system
the next time. You can use Logout option from the menu of the X-Configurator to login
once again with empty password.
70
6.4. Setup
In this option you can configure the X-Configurator parameters as well as
parameters for others components. The view that you will see in this option is shown in
figure 29.
Figure 29 The view in “Setup“ option of X-Configurator
You can find here the following fields:
•= Log size limitation type - This parameter says when the log file should be
truncated. You can choose between:
1) Number of entries - remove oldest log events when number of entries exceeds
value set in Number of log entries field.
2) Older than number of days - remove log entries older than date set in Number
of days to store log field.
3) No automatic log delete - do not remove log events automatically. In this case
you can delete records manually.
•= Number of log entries - (this field is shown if Log size limitation type = Number of
entries). Log size is limited to this number of records.
•= Number of days to store log - (this field is shown if Log size limitation type =
Older than number of days). The number of days that log events are stored.
71
•= Number of entries to delete - (field is shown if Log size limitation type = Number
of entries, or Log size limitation type = Older than number of days). The number
of entries that will be automatically deleted when log exceeds certain number of
events or when events in log are older than number of days specified by user.
•= Sessions record limitation type - This parameter says when the session log
should be truncated. You can choose between:
1) Number store sessions - remove oldest sessions when number of sessions
exceeds the value set in Number of session entries field.
2) Older than number of days - remove sessions older than the value set in
Number of days to store sessions field.
3) No automatic session delete - do not remove sessions automatically. In this
case you can delete records manually.
•= Number of days to store sessions - (this field is shown if: Session record
limitation type = Older than number of days). This parameter describes how
many days particular session should be stored in database.
•= Number of session entries - (this field is shown if: Session record limitation type =
Number store session). Number of sessions to be stored in database.
•= Number of entries to delete - (field is shown if: Session record limitation type =
Older than number of days or Session record limitation type = Number store
session). Number of sessions removed in one truncate.
•= Number of task retries - Default number of retries for a new task. This parameter
says how many times task can be retried when an error has occurred during the
execution. Enter here 0 (zero) if you don’t want to retry.
•= Task duration - Default time of task duration (given in seconds). For example:
360.
•= Task start type - Default task start type. The X-Configurator offers the following
task types:
- On Time
- Repeatable
- On Call
- On Event
For more details see also sections Task start conditions and XACS Scheduler.
•= Session retry timeout - Time is seconds the XACS Scheduler waits before
retrying session to the target. For example: 80.
•= Script Path - Set of directories, in which scheduler searches for LUA scripts to
execute, when job’s filename does not specify full path. Directories names should
be separated with semicolon (';'). E.g.: ".;c:\xacs\script".
•= Global debug level - Global debug level is used by the XACS Scheduler to mask
its debug database output. Debug level for specified session is of this field OR
target's debug level (configured in Targets option). To set debug level, you can
OR the following values:
- Errors 0x0001. Error trace. This is default value.
- Task Trace 0x0002. Task instances creation and status change.
- Session States Trace 0x0004. Session creation and status change.
- Session Script Trace Basic 0x0008. Printouts from scripts.
72
- Session Script Trace Extended: 0x0010. Extended printouts from scripts.
- Internal Trace: 0x0100. Flag for highest level internal debug.
•= Identifier of the job used for incoming call handling - Identifier of the job used for
incoming call handling, when value in Incoming calls handling method field is
“Active”.
•= Incoming calls handling method - Values:
1) CLID: Session is started, when Calling Number matches target’s telephone
number.
2) Active: When there is an incoming call, XACS Scheduler starts job, which is
specified by the field Identifier of the job used for incoming call handling. This
job calls Calling Number and makes ISDN session. It retrieves client’s unique
identifier (e.g. serial number). Then scheduler starts configuration session to
target, which matches unique identifier
For more details see also sections CLID method, Active method and XACS
Scheduler.
Click on Save button if you have changed the value of any parameter and you
want to keep the changes.
6.5. ISDN
This option enables you to configure ISDN communications parameters. This
option contains the following sub-options:
•= Controllers
•= MSN
6.5.1. ISDN Controllers
This option allows you to create, modify or delete communications controllers.
To perform any of those actions simply click on the appropriate button next to the
chosen controller. Figure 30 shows a sample view in ISDN Controllers option.
73
Figure 30 The view in “ISDN Controllers“ option of X-Configurator
6.5.1.1. Find Controller
In "Find controller" window you can quickly find desired controller. You can
search for controllers using the following key properties (fields):
•= Controller identifier - find controller with required identifier.
•= Number of channels - find controller(s) with required number of channels.
•= Used for listening - find controller(s) with this property.
When you input desired searching key, click on the Find button.
Note:
For these three fields function OR is used as a condition in controller searching. For
example:
If you enter ‘3’ in Controller identifier field and you leave the used for listening checkbox
unchecked, as a search result you will get the information about controller number 3 (if
exists) and all controllers that have not marked Used for listening option.
74
6.5.1.2. Controller List
This window shows the list of all defined controllers. If option find have been
used, the list will show all controllers that match search conditions. If no controller was
found in search process or there are no defined controllers, the list will remain empty.
6.5.1.3. Add Controller
You can add new controller in "Controllers List" window. To add a new controller
to the list press Add button. A new "Add controller" window will appear with the
following fields:
•= Controller identifier - input here numerical identifier for the new created controller.
•= Number of channels - input here number of communications channels offered by
this controller (device-router).
•= Used for listening - check this box, if you wish to use this controller in listening
mode (allows receiving the incoming calls). Otherwise the controller will only be
able to make outgoing calls to the targets.
When you fill in all the fields click Add button to add a new controller to the list.
6.5.1.4. Remove Controller
You can remove existing controller in "Controllers List" window. To delete
particular controller from the list, simply click on the Remove button next to the selected
controller.
6.5.1.5. Update Controller
You can modify parameters of existing controller in “Controllers List” window. To
modify a controller, first make desired changes in appropriate fields then click on the
Update button next to the selected controller.
6.5.2. ISDN MSN
This option allows you to assign particular MSN numbers to selected controllers.
When you choose this option the new view appears (see figure 31).
75
Figure 31 Sample view in “ISDN MSN“ option of X-Configurator
6.5.2.1. Find MSN
In "Find MSN" window you can quickly find desired controller. You can search for
controllers using the following key properties (fields):
•= Controller number – search for controller according to his identifier number.
•= MSN to listen to incoming calls - find controller with desired MSN number used
for listening to incoming calls.
When you input desired searching key, click on the Find button to begin search.
6.5.2.2. MSN List
This window displays all defined MSN's and assigned controllers or if you used
Find option, this window shows controller that matches search pattern. If no controller
found this window will be empty. One controller can have more than one MSN number.
76
6.5.2.3. Add MSN
You can add new MSN number in "MSN List" window. To add new MSN number
to the list press Add button in the top right corner of the window. New "Add MSN"
window will appear with the following fields:
•= Controller number - input here controller identifier for which you want to assign
MSN. Controller with this identifier must exists. Refer to section Add Controller
for information about adding new controllers.
•= MSN to listen for incoming calls - enter MSN number that will be associated with
this controller. One controller may have more than one MSN number.
When you fill in all fields, click Add button to add a new MSN.
6.5.2.4. Remove MSN
You can remove existing MSN number listed in "MSN List" window. To delete
MSN number from the list, click on the Remove button next to the selected MSN.
6.5.2.5. Update MSN
You can modify parameters of existing MSN numbers and associated controllers
in “MSN List” window. To modify selected MSN number, first make desired changes in
appropriate fields, then click Update button next to the changed MSN number.
6.6. Reports
This option is located in the main menu of the X-Configurator and allows you to
create the reports from the sessions to the targets (routers). Reports contain particular
messages from the XACS Log (for example for selected target, task).
6.6.1. Log
This option is located in Reports option of the X-Configurator and allows you to
create reports based on the information stored in the XACS Log. When you choose this
option Log Report Wizard appears.
In the first step you will select the columns that will be contained in the report.
Please select here the required columns and press Next. You will go to the next step of
the wizard.
In the second step of Log Report Wizard you select the filter that will extract
messages from XACS Log with required property. The view in this option is similar to
77
the XACS Log option located in Projects option and therefore for more details please
refer to the section that describes this option. After all press Finish button that ends the
wizard procedure. The report will be listed in the new window. You can now print the
report using Print option of your browser. Sample Log Report is shown in figure 32.
Note:
Displaying the report page may take some time when the XACS Log database is large.
Figure 32 The sample Log Report created in “Reports Log“ option of X-Configurator
6.6.2. Targets
This option allows you to create reports for particular target.
6.7. Help
78
This option the X-Configurator enables quick access to the X-Configurator Help.
The X-Configurator Help contains a detailed description of each option of the XConfigurator. Additionally, you can use the search engine that helps you to find
document according to the entered topic.
Search engine is located on the top of the page and allows you to input any string
that should be find. For example if you want to search documents that describe Task
Manager option simply input Task Manager in the search field and press Search button.
The search engine is not case sensitive.
Help Index button located in the left menu allows you quickly jump to the contents of
the X-Configurator Help.
Figure 33 shows a view of X-Configurator Help.
Figure 33 The main view in “Help“ option of X-Configurator Help
6.8. Logout
This option allows you to log out from the X-Configurator. You should use this
option when you finish working with the X-Configurator or you want to login into the X-
79
Configurator as other user (with other user rights). When you choose this option the
new window will appear with prompt to enter User and Password.
Note:
During log in, values in the fields User and Password are case sensitive.
80
Chapter 7 – Appendix
7.1. XACS event codes
The table below lists currently defined XACS error codes. These values are used
in the XACS Log and session log. You can use these names in the LUA scripts. For
example at the end of the script you can return error_code XACS_SUCCESS that
means script has been successfully executed and doesn‘t matter what happened before
this in the job file (maybe connection to target failed).
Predefined name
Value
Description
XACS_SUCCESS
XACS_SCRIPT_TRACE
XACS_DATABASE_ACCESS_ERROR
XACS_CONFIG_READ_ERROR
XACS_RUN_SCRIPT_ERROR
XACS_SCRIPT_INIT_ERROR
XACS_SCRIPT_INTERRUPTED
XACS_SCRIPT_DEADLINE_REACHED
0
1
2
3
4
5
6
7
XACS_CREATE_TASK_ERROR
XACS_CREATE_SESSION_ERROR
XACS_UPDATE_TASK_ERROR
8
9
10
XACS_UPDATE_SESSION_ERROR
XACS_NO_MATCHING_CLIENT_FOUND
11
12
XACS_ERROR_IN_EVENT_EXPRESSION
13
XACS_MISCELEANOUS_ERROR
XACS_CRON_STRING_PARSE_ERROR
XACS_CRON_STRING_EMPTY
14
15
16
XACS_CONNECTING_STARTED
17
XACS_CONNECTION_ESTABLISHED
XACS_CONNECTION_FAILED
XACS_LOGIN_FAILURE
XACS_CONNECTION_TERMINATED
XACS_OPEN_SCRIPT_ERROR
XACS_CLIENT_READ_ERROR
XACS_MODULE_INTERNAL_ERROR
XACS_SERVICE_STARTED
XACS_SERVICE_FINISHED
XACS_NO_MEMORY
18
19
20
21
22
23
24
25
26
27
Success
Script trace
Database access error
Error reading setup data
Error running script file
Error initializing script engine
Session interrupted
Deadline reached - session
terminated by scheduler
Error creating task instance
Error creating session
Error update task instance
status
Error update session status
No client matches event
condition
Error in event condition
expression
Miscellaneous error
Error parsing cron string
Time conditions not specified for
repeatable task
Connection establishment
started
Online
Connection failed
Login failure
Connection terminated
Cannot open script file
Error reading client record
Internal error
Service started
Service stopped
Not enough memory
81
7.2. Index of XACS LUA functions and XACS LUA variables
Index of the XACS LUA functions
com_accept()
com_reject( number )
com_connect( string )
com_disconnect()
com_isdn_lastcause()
com_lasterror()
com_listen()
com_readtimeout()
com_receive( delimiterstring, timeout )
com_receivebuf( number, timeout )
com_receiveline()
com_send( string )
com_sendfile( local [, remote] )
com_receive_file( remote, local )
hex2str( string )
include_file( string )
system( string )
write_dbg( string )
write_log( EventCode, Severity, Message,
DebugLevel )
Index of the XACS LUA variables
ARGC
ARGV
com_CIPMask
com_CIPValue
com_ISDN_B1
com_ISDN_B2
com_ISDN_B3
com_ISDN_Calling_Number
com_ISDN_ctrl_connect
com_ISDN_ctrl_listen
com_device
82
Chapter 8 – Troubleshooting
Problem: It takes a long time for a page to be displayed (i.e. XACS Log) in my browser
and a loaded page is incomplete. Missing information on the page.
Solution: This may happen when default settings for maximum memory used by one
page in PHP3 and timeout parameters are too small in your PHP3.INI file. You should
change the values of the following parameters: max_execution_time, memory_limit.
These parameters should have at least the following settings:
max_execution_time=300 ; set time on 300 seconds
memory_limit=20971520 ; set amount of consumed memory to 20 MB
Problem: You are in Setup option of the X-Configurator and cannot change anything.
Solution: You don't have the rights to modify this option. You can log into X-Configurator
as other user or ask the admin to give you the appropriate rights.
Problem: I can't see all options in the left menu of the X-Configurator. When I log in,
Task Manager window appears.
Solution: You don't have the user right "Admin". Only users with the "admin" have
access to all options of the X-Configurator.
Problem: I can't see information about task and sessions execution in the XACS Log
and sessions log even though the task was started.
Solution: Check if you have setup the appropriate debug level for the target(s) included
in the task template.
Problem: I see the message: "Connection failed. Last error: 0 Result: Call/Answer error.
Code: Timeout CAPI code: 0" in session log for the task.
Solution: Make sure that in ISDN option of the X-Configurator you have configured at
least one controller(s) with identifier 1 and have assigned MSN number for it. For more
information please refer to section Installing Remote CAPI for Bintec routers and
Configuring ISDN channels for using by X-Configurator.
83
Problem: I have installed Remote CAPI, XACS Scheduler is started but configuration
process cannot be started.
Solution: After installing Remote CAPI you must change properties for XACS Scheduler
service. To do this, open Control Panel window and then Services. From the services
list select XACS Scheduler and press Startup button. Set up “Log On As” option to “This
Account”. Now enter appropriate account name and password. Now log on as different
user if necessary and restart XACS Scheduler service. For more information please
refer to section Installing Remote CAPI for Bintec routers.
84
List of Figures
Figure 1
Figure 2
Figure 3
Figure 4
Figure 5
Figure 6
Figure 7
Figure 8
Figure 9
Figure 10
Figure 11
Figure 12
Figure 13
Figure 14
Figure 15
Figure 16
Figure 17
Figure 18
Figure 19
Figure 20
Figure 21
Figure 22
Figure 23
Figure 24
Figure 25
Figure 26
Figure 27
Figure 28
Figure 29
Figure 30
Figure 31
Figure 32
Figure 33
Session lifecycle diagram............................................................................. 10
Main menu of X-Configurator (user logged with “Admin“ user’s rights) ........ 24
The view in "Projects" option of X-Configurator............................................ 25
The view in Profiles option of X-Configurator ............................................... 27
The sample view in “Target profiles“ option of X-Configurator ..................... 28
The sample view in “Create new Target Profile“ option................................ 29
The view in “NAS profiles“ option of X-Configurator..................................... 32
The sample view with NAS profile property.................................................. 33
The sample view in “Jobs“ option of X-Configurator..................................... 35
The view with sample registered NAS in “Targets“ option of X-Configurator 37
The sample list of targets served by NAS called XACS-NAS in option
“Targets“ of X-Configurator .......................................................................... 38
The view on properties for selected NAS ..................................................... 39
The sample properties for new created target served by NAS called here
XACS-NAS................................................................................................... 42
The sample target groups configured in “Target Groups“ option of
X-Configurator.............................................................................................. 44
The view with sample configured tasks in “Task Templates“ option of
X-Configurator.............................................................................................. 46
The view in “New Task Template“ option of X-Configurator......................... 48
The sample view in "View Task Instances" option ....................................... 50
The sample messages in Task Sessions Log .............................................. 51
The sample view in “Details“ option located in “Task Sessions“ .................. 52
The sample messages from “Log“ option located in “Task Sessions“ .......... 53
The sample view in “Task Manager“ option for appropriate project.............. 54
The view in “XACS Log“ option of X-Configurator with sample messages
from XACS Log database ............................................................................ 58
The sample view in “System parameters“ option of X-Configurator ............. 59
The view in “Add parameter for project“ option ............................................ 61
The view in “Add parameter for NAS“ option................................................ 63
The view in “Add parameter for target“ option.............................................. 66
The sample view in "Users“ option of X-Configurator................................... 67
The sample view with user’s rights for user “xds” in “Rights“ option............. 70
The view in “Setup“ option of X-Configurator ............................................... 71
The view in “ISDN Controllers“ option of X-Configurator.............................. 74
Sample view in “ISDN MSN“ option of X-Configurator ................................. 76
The sample Log Report created in “Reports Log“ option of X-Configurator . 78
The main view in “Help“ option of X-Configurator Help ................................ 79
85