1
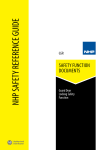
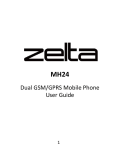
Verykool i129 User Manual © 2014. All rights are reserved. No part of this document may be reproduced without permission. While all efforts have been made to ensure the accuracy of all the contents in this manual, we assume no liability for errors or omissions or statements of any kind in this manual, whether such errors or omissions or statements resulting from negligence, accidents, or any other cause. The contents of this manual are subject to change without notice. Protect our environment! We strive to produce products in compliance with global environmental standards. Please consult your local authorities for proper disposal. Note: User Manual is just to guide the user about the functionality of the phone. This does not seem any certificate of technology. Some functions may vary due to modifications and upgrade of software, or due to print mistake. 1. For your safety Read this simple guideline. Not following them may be dangerous or illegal. Read the complete user manual for further information. Do not switch your phone on when the use of wireless devices is prohibited or when the wireless device may cause interference or danger. Do not use your phone while driving. Follow relevant rules or regulations in hospitals and health care facilities. Switch your phone off near medical devices. Switch your phone off in aircraft. The radio signal from it may cause interference in signals of the aircraft. Switch your phone off near high-precision electronic devices. It may affect the performance of these devices. Do not attempt to disassemble your phone or its accessories. Only qualified personnel may service or repair the phone. Do not place your phone and its accessories in containers with strong electromagnetic field. Do not place magnetic storage media near your phone. Radiation from the phone may erase the information stored on them. Do not put your phone in a high-temperature place or use it in a place with flammable gas such as a petrol pumps. Keep your phone and its accessories away from children. Do not allow children to use your phone without guidance. Observe any laws or regulations on the use of phone. Respect others' privacy and legal rights when using your phone. Improper use will invalidate the warranty! These safety instructions also apply to original accessories. 2. Phone Overview 2.1 Appearance 1 2 3 4 5 6 7 Center key Left soft key Dial/Answer key Earpiece Display Navigation key Right soft key 8 9 10 11 12 13 14 Ending/Power key Keypad Microphone Charge/Headset port Camera Speaker Torch 2.2 Keypad Definition Key Left Soft key/ Right Soft key Navigation Keys OK Key Definitions 1. Execute functions that the left-down/right-down corner indicator shows. 2. In the standby mode, press left soft key to enter main menu , press right soft key to access Contacts. 1. In other modes, it is used as the navigation/direction key except for some special functions. 2. In standby mode, press navigation keys to enter shortcut functions. 1. In standby mode, press the key to enter main menu. 2. In other mode, press the key for confirmation. 1. Mainly used as power on/off. End Key/ Power Key 2. Press to return to standby screen in any interface. 3. End calls or reject incoming calls. Dial Key 1. Press this key to dial or receive an incoming call. 2. In standby mode, press this key to access Dialed calls. Number Keys 1. Use these keys to input numbers or letters. 2. In standby mode, long press the 0 key to turn on torch * Key 1. In standby mode, press left soft key and * key to lock or unlock keypad. # Key 1. In text editing interface, press # key to switch the text input method. 2. Press and hold # key to transfer the profile of General mode and Silent mode. 3. Getting started 3.1 Installing the SIM Cards, T-flash card and battery. 1) Remove the back cover and lift the battery away. 2) Insert the SIM card into the SIM card slot lightly with the corner cutting of the card aligning to the notch of the slot and the gold plate of the card facing downward, till it cannot be pushed further in. 3) To install the T-Flash card, open its latch, place its indented side downward, insert the card into the card slot, and then close the latch. 4) With the metallic contacts of the battery facing the metallic contacts in the battery slot, press the battery down until it locks into place,then fix its back cover. 3.2 Charging the Battery The lithium battery delivered with the mobile phone can be put into use immediately after being unpacked. Battery level indication: Your mobile phone can monitor and display the battery state. Normally the remaining energy of the battery is indicated by the battery level icon at the upper right corner of the display screen. When the battery energy is insufficient, the mobile phone prompts "Battery low". A charging animation appears when the battery is being charged. When the charging is complete, the animation disappears. Using a travel adapter: Install the battery into the mobile phone before charging the battery. Connect the adapter of the travel charger with the charging slot in the mobile phone. Ensure that the adapter is fully inserted. Insert the plug of the travel charger to an appropriate power outlet. During the charging, the battery level grids in the battery icon keep flickering till the battery is fully charged. It is normal when the battery is become hot during the charging period. The battery icon does no longer flicker when the charging process ends. Using the Battery The performance of a battery is subject to multiple factors: radio network configuration, signal strength, ambient temperature, chosen functions or settings, phone fittings, and the voice, data or other application mode you choose to use. To guarantee the optimal performance of your battery, please stick to the following rules: Use only the battery provided by the vendor. Otherwise, damages or even injuries could be caused during the charging. Power off the mobile phone before removing the battery. The charging process lasts a longer time for a new battery or a battery not in use for long. If the battery voltage is too low to enable the mobile phone to be powered on, charge the battery for a longer time. In this case, the battery icon does not flicker until a long time after the battery enters the charge status. During the charging, ensure the battery is placed in a room temperature environment or in an environment close to room temperature. Immediately stop using the battery if the battery produces odor, overheats, cracks, distorts or has other damage, or if the electrolyte leaks. The battery wears out with use. A longer charging time is required as the battery is put into use for a long time. If the total conversation duration decreases but the charging time increases even though the battery is properly charged, purchase a standard battery from the OEM or use a battery approved by our company. Using any poor-quality fittings will cause harm to your mobile phone or even incur danger! 3.3 Powering On/Off the Mobile Phone Hold the End key for a while to power on the mobile phone. A power-on animation appears on the display screen. Input the phone lock code and press the OK key if the mobile phone prompts you to input the phone lock code. The original code is 0000. Input the PIN and press the OK key if the mobile phone prompts you to input the PIN. The PIN is provided by the network operator for new opening SIM card. To power off the mobile phone, hold the End key for a while. 3.3 Linking to the Network After the SIM card and the mobile phone are successfully unlocked, the mobile phone automatically searches for an available network. 3.4 Dialing Calls In the standby interface, press number keys to input the area code and the telephone number, and then press the Dial key to dial a call. To end the call, press the End key. Dialing an international call Hold the * key and input "+". Then input the country code, the area code and the telephone number. Finally, press the Dial key. Dialing a call to a number in the phonebook Enter the phonebook and use the up or down direction keys to find the telephone number you want to call. Press the Dial key. The mobile phone automatically dials the chosen telephone number. Redialing the last number In the standby interface, press the dial key to show the dialed calls. Press the up or down direction keys to select a number you want to dial and then press the Dial key. Answering incoming calls Press the Dial key or the Left soft key to answer an incoming call. Press the End key to end the current conversation. To reject an incoming call, press the End key or the Right soft key. Using options during a conversation Select Options during a conversation to pause, end the ongoing call, originate a new call, browse the phonebook, view information, set the mute, set the DTMF, or perform other operations. For details, refer to the menu guide. 4. Input methods This mobile phone provides multiple input methods, including English input in both upper and lower case, and numeric input method. 1) Press # key to switch between input methods. 2) Press the * key to enter the Select symbol interface and select a symbol you want. 5. Using the Menus 5.1 File Manager The phone supports the T-Flash card. You can use the file manager to conveniently manage various directories and files on the T-Flash card. 5.2 Contacts The mobile phone can store at least 300 phone numbers. 5.3 Call logs Through this function, you can view a list of missed calls, dialed calls and received calls 、rejected calls etc. 5.4 Message Through this function, you can write message, view inbox、outbox etc, If the short message memory is full, a blinking message icon appears on the top of the screen. 5.5 Multimedia Camera Use this function to take picture. DV Use this function to record video files. Image Use this function to preview photos. Video Use this function to play video files. Recorder Use this function to record audio files. FM radio You can use the application as a traditional FM radio with automatic tuning and saved channels. 5.6 Tool Torch Select on or off as per your requirement. Long press 0 key to switch on or off in the standby interface. Internet This function enables you to view the internet. This service is offered as the SIM card service provided by the network operator. STK STK service is the tool kit of SIM card. This phone supports the service function .The specific items are depended on SIM card and network. Service menu will be auto added to the phone menu when supported by network and SIM card. Calendar Once you enter this menu, there is a monthly-view calendar for you to view the date; you can go to any day you want. Alarm You can activate one, or multiple as needed. For each alarm clock, the ringing date and the ringing time can be set. World clock This function allows you to check the standard time in different areas of the world. Bluetooth With Bluetooth, you can make a wireless connection to other compatible devices, such as mobile phones, computers, headsets and car kits. You can use the Bluetooth to send images, video clips, music, sound clips and notes, and transfer files from your compatible pc. Calculator The calculator can add, subtract, multiply and divide. 5.7 Games Snake: The Mobile phone is only one game for the user to play,name Snake. For specific operation, please refer to Help option of the game. 5.8 Settings Call settings Through this function, you can set call divert、call waiting、call barring etc. Phone Settings 1) Date & time: set the date format, time format, and detail time of the location. 2) Language: Select the display language for the mobile phone. 3) Shortcut settings: Customize the shortcut functions of the Up, Down, Left, and Right direction keys. 4) Auto power on/off: Set the time when the mobile phone will be automatically powered on and off. 5) Restore Factory Settings: Use this function to restore factory settings. The preset password is 0000. Display settings You can set wallpaper, Backlight ,Keypad back light time through this function. Security settings 1) PIN:PIN code is the personal identification number for SIM card. Default password set by network operator should be 1234. If activated the power-on PIN code, then you have to input the PIN password each time you switch on the phone. 2) Phone locked:Secured by phone password, the phone will be protected from other unauthorized users. After activated this function, you should input password each time you switch on the phone. The defaulted password is 0000. 3) Privacy: In this menu, you can set password-protected on the need of menu, For the menu open the private protection, need to input a phone password when you entered. 4) Auto keypad lock:After activating this function, the phone will be locked automatically after a particular time, so as to avoid error operations 5) Guardlock: You can activate or deactivate the guardlock function, When the guardlock is activate, once your SIM card is replaced, the phone will automatically send stolen information to the prior SIM card. Input password to enter the menu and set. Profiles The mobile phone has multiple user profiles to suit user’s requirements. Connections You can set Network account, Date connection , Network selection mode etc. 5.9 Audio player Use this function to play audio files. 6. Common fault diagnosis Fault phenomenon possible reasons Cannot turn on The battery is discharged. Charge it with electricity. Wrong SIM Card SIM card smudgy, clean the SIM card. Reinstall the SIM card. SIM card has been damaged, replace the SIM card。 Reception bad Check on the screen of the signal strength indicator, and this is the number of symbols in this for 5 case said the strong signal, 2 case said the weak signal Phone can't dial you may set the hide the machine number, but your network operator does not provide this service; may have a strong interference environment around signal; may you activate the call barring function; may you activate the line 2, but your network operator does not provide this service; Battery can’t charge may have excessive discharge battery, charger needed to connect after a period of time to charge; battery performance have been worse; Unable to connect to the network signal is too weak, or around the radio interference SIM card is installed correctly, whether contact undesirable or SIM card has been damaged? Such as the SIM card is damaged, please you consultation network service operators Photographs too dark brightness set low; environment light around a dark; Photographs too vague Shooting in a state of motion object; Press the shutter moment cell phone has a slight shaking; Dark Photographs have distortion May be the foreground subject distance lens too close 7. FCC Caution 7.1 Labelling requirements. This device complies with part 15 of the FCC Rules. Operation is subject to the following two conditions: (1) This device may not cause harmful interference, and (2) this device must accept any interference received, including interference that may cause undesired operation. 7.2 Information to user. Any Changes or modifications not expressly approved by the party responsible for compliance could void the user's authority to operate the equipment. 7.3 Information to the user. This equipment has been tested and found to comply with the limits for a Class B digital device, pursuant to part 15 of the FCC Rules. These limits are designed to provide reasonable protection against harmful interference in a residential installation. This equipment generates uses and can radiate radio frequency energy and, if not installed and used in accordance with the instructions, may cause harmful interference to radio communications. However, there is no guarantee that interference will not occur in a particular installation. If this equipment does cause harmful interference to radio or television reception, which can be determined by turning the equipment off and on, the user is encouraged to try to correct the interference by one or more of the following measures: ‐Reorient or relocate the receiving antenna. ‐Increase the separation between the equipment and receiver. ‐Connect the equipment into an outlet on a circuit different from that to which the receiver is connected. ‐Consult the dealer or an experienced radio/TV technician for help. Specific Absorption Rate (SAR) information: This GSM Mobile Phone meets the government's requirements for exposure to radio waves. The guidelines are based on standards that were developed by independent scientific organizations through periodic and thorough evaluation of scientific studies. The standards include a substantial safety margin designed to assure the safety of all persons regardless of age or health. FCC RF Exposure Information and Statement The SAR limit of USA (FCC) is 1.6 W/kg averaged over one gram of tissue. Device types: i129 (FCC ID: WA6i129) has also been tested against this SAR limit. The highest SAR value reported under this standard during product certification for use at the ear is 1.12W/kg and when properly worn on the body is 1.13W/kg. This device was tested for typical body‐worn operations with the back of the handset kept 1.5cm from the body. To maintain compliance with FCC RF exposure requirements, use accessories that maintain a 1.5cm separation distance between the user's body and the back of the handset. The use of belt clips, holsters and similar accessories should not contain metallic components in its assembly. The use of accessories that do not satisfy these requirements may not comply with FCC RF exposure requirements, and should be avoided.