1
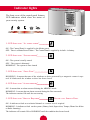
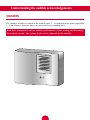
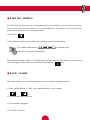
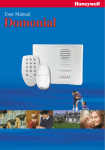
User Manual
Congratulations on the purchase of your DOMONIAL
security system.
This system is designed to operate on an authorised
radio frequency and will in no way endanger the user.
To make the best out of your system we advise you to
read this manual carefully. This manual has been
written for your special attention and integrates
remarks and suggestions of existing users.
Full set
Part set
Annex
Zone 1 :
Zone 2 :
Zone 3 :
Zone 4 :
Zone 5 :
Zone 6 :
Zone 7 :
Zone 8 :
Zone 9 :
Zone 10 :
Zone 11 :
Zone 12 :
Zone 13 :
Zone 14 :
Zone 15 :
Zone 16 :
Zone 17 :
Zone 18 :
Zone 19 :
Zone 20 :
2
INDEX
① Introduction to your security system
4
② Understanding the audible acknowledgements
6
③ How to use your wireless keypad
8
④
How to use your keyfob (if purchased)
12
⑤
Maintenance and recommendations
15
3
Introduction to your security system
The Domonial control panel/communicator unit is the brain of your security system. It
exchanges information with the associated wireless peripherals. The control panel
centralises the data sent by the detectors, records the arming and disarming operations
and communicates with the Alarm Receiving Centre.
CHARACTERISTICS
Radio
● Narrow band frequency modulation
● Identification code specific to each
component (no possible interference
between neighbouring systems)
● Protection against attempted jamming
● Radio monitoring of the system
detectors and sounders
Electrical
● 240V mains with battery backup
● Built-in voltage surge protection
● System supply monitoring
Transmission
● Built-in telephone transmission
● Telephone line loss detection
● Transmission monitoring by periodical tests (as programmed)
Operational
● 3 protected area groups - 20 detection points
● Alert functions, with sounder or silent
● All door and window contacts, closed position
checked upon arming
● Control panel tamper protection against opening
4
Indicator lights
The front cover of the control panel features
LED indicators which show the status of
your security system.
1- LED INDICATOR “AC MAINS POWER”
ON : The Control Panel is supplied by the Mains power
OFF : There is a Mains Power Failure – The Control Panel is supplied by its built – in battery
2- LED INDICATOR “SYSTEM ARMED”
ON : The system is totally armed
OFF : The system is disarmed
BLINKING : The system is Part Armed
3- LED INDICATOR “OPEN ZONE”
BLINKING : It means that one of the windows or doors protected by a magnetic contact is opened. It blinks until the window or door has been closed
4- LED INDICATOR “ALARM MEMORY”
ON : It means that an alarm occurred during the ARMING mode
BLINKING : It means that an alarm occurred during the Part arm mode
The indicator remains ON until the next arming
5- LED INDICATOR “SERVICE REQUIRED”
PLEASE CALL SERVICE DEPT.
ON : It indicates a fault on a technical channel or a remote reset is required
BLINKING : It indicates a fault on the system ( Battery fault, Supervision, Tamper, Phone line failure
or Radio Jamming )
The indicator will remain ON or BLINKING until the condition has been cleared.
5
Understanding the audible acknowledgements
SOUNDERS
The sounder, whether it is built in the control panel 1 or mounted in the house (optional)
2 is an effective deterrent due to its power and very irratating tone.
Both these components emit an audible confirmation of your arming and disarming
the security system. The volume levels can be adjusted by the installer.
6
AUDIBLE CONFIRMATIONS OF THE SYSTEM
7
③
How to use your wireless keypad
The keypad is used to arm and to disarm your security
system by means of an access code chosen at the installation stage.
To use all the functions of the keypad you must have the master code
chosen at the installation stage or have the master key tag.
● ARMING USING THE KEYPAD
✔ Present and hold the TAG on the keypad
symbol until the red
light flashes and audible confirmation tone
is heard.
● DISARMING USING THE KEYPAD
✔ Present the TAG on the keypad
symbol.
A green light on the keypad confirms that the TAG has been accepted.
✔ The audible confirmation tone
is simultaneously emitted by the sounder at this moment remove your key TAG
● ARMING USING YOUR CODE
✔ Press an arming key on the keypad and enter your access code.
✔ A high-pitch beep confirms the entry of each digit,
8
✔ The keypad confirms the code with a flashing red light,
- The audible confirmation
is simultaneously
emitted by the sounder.
Always make sure that when arming the system it is followed by the audible confirmation.
Premises will be armed after you have closed the exit door (full set) or after 30 seconds (part set).
✔ Your system is equipped with a TAG Reader, presenting the TAG in front of
the keypad can take the place of entering your code.
✔ Presenting the TAG for more than 2 seconds will arm your system.
● DISARMING VIA THE CODE KEYPAD
To enable you to get to the keypad without triggering an alarm, your installer has programmed an
entry delay of 30 seconds.
✔ Enter your code or present the TAG for less than 1,5 seconds
✔ A high-pitch beep confirms the entry of each digit,
✔ The keypad confirms the validity of the code by a green light,
- The audible confirmation
is simultaneously
emitted by the signaling equipment.
18
9
To reset the system follow the disarming procedures using either your code or keytag four times
consecutively. Ensure the audible disarm tone sounds after each disarming procedure.
If the two red LEDs
are illuminated on your alarm panel, this indicates a confirmed
alarm has occured and a remote reset is required and the system will not operate. To remotely reset
your system call your Service Department :
● CHANGING OR SETTING ADDITIONAL CODES
To change or set additional user codes firstly enter programming mode
✔ Press key :
+
simultaneously
✔ The red light will flash slowly
✔ Enter the 4 digit master code (user 1)
✔ Select and enter an existing or new single digit user ID (0-9)
(N.B. : User 1 is always the master)
✔ Enter the new 4 digit code for this user
✔ A double beep on the keypad will confirm acceptance of the new code.
✔ You must confirm the new code by re entering the 4 digits numbers.
✔ A double beep on the keypad will confirm acceptance of the new code.
Exit programming mode by pressing
key.
● CHANGING OR SETTING ADDITIONAL KEY TAG
A key TAG can only be programmed to an existing user’s 4 digits code.
To change or set additional key TAG firstly enter programming mode
✔ Press key :
✔ The red light will flash slowly
simultaneously
✔ Enter the 4 digit master code (user 1)
✔ Select and enter an existing digit user ID (0-9)
✔ Present the new key TAG
✔ A double beep on the keypad will confirm acceptance of the new TAG.
Exit programming mode by pressing
key.
WARNING : The system will automatically exit programming mode after 15 seconds if no
keys have been pressed and the red light will be timed off. If this occurs you must start this
process again from the beginning.
● SENDING A PANIC SIGNAL
You can send an instant panic alarm whenever you feel threatened whilst at home:
✔ Press and hold the “SOS” key simultaneously :
✔ The sounder is triggered (as programmed),
✔ The ARC is informed.
The “PANIC” function is operative even when your system is not armed.
You can stop the sounder manually by pressing key
of the keyfob or by entering code, on
the keypad.
Stopping the sounder does not interrupt the transmission to the ARC.
● ENTRY DELAY
The entry delay gives you the time necessary to enter your access code or use your key TAG
on the keypad to disarm your security system.
● WRONG CODE PROTECTION
If your enter 5 successive wrong codes, the keypad is blocked for 5 minutes.
④
How to use your keyfob (Optional)
The keyfob is an optional extra. This can be used to arm or disarm your
security system as well as to trigger an audible or silent alert.
● ARMING
✔ Press key :
✔ The indicator light on the keyfob comes on briefly when you release
the button
- An audible confirmation
is simultaneously emitted by the signaling equipments.
Always make sure that your arming the system is followed by the audible confirmation. N.B.
Arming and disarming can only be operated whilst inside the premises.
If, upon arming, a door or window contact is in the "open" position (e.g. window not properly
shut), a FAULT signal will inform you. Disarm the system, shut the corresponding window
and repeat arming.
● DISARMING AFTER ENTRY
✔ Press key :
✔ The indicator light on the keyfob comes on briefly when you release the button.
- The audible confirmation
is emitted by the
signaling equipment.
N.B. This function can only be used when the entry route delay has been triggered.
12
● PART SET ARMING
Provided that this function has been programmed by the installer, you can choose to protect
only a part of your premises whilst you are in the other part. For instance, you can protect the
ground floor while your are sleeping upstairs.
✔ Press key
✔ The indicator light on the keyfob comes on when you release the button.
- The audible confirmation
is simultaneously
emitted by the signaling equipment.
Part protection becomes effective 30 seconds after you have armed it. Any intruder in the protected
zone will trigger an alarm. Part set is disarmed by pressing the
key.
● PANIC ALARM
These keys enable you to send an instant alarm if you need urgent assistance at home.
✔ Press and hold the two “SOS” keys simultaneously for two seconds.
+
✔ The indicator light comes on.
✔ The sounder is triggered
✔ The ARC is alerted.
13
The “PANIC” function is operative even when your system is not armed. The sounder stops by itself
after 30 second but you can stop it manually by pressing
Stopping the sounder does not interrupt the transmission to the ARC station.
● ASSISTANCE ALERT KEY
This key enables you to call for assistance from one of your keyholders.
✔ Press key :
✔ The indicator light comes on when you release the button.
✔The ARC is alerted.
14
⑤
Maintenance and recommendations
● Check regulary your system (once a month or follow your operator’s
specifications)
● Avoid shocks for all the components and more especially
avoid dropping the remote keyfob.
● Do not immerse.
● To clean the components use a damp rag only (no detergent).
● Keep in a clean, dry place at the ambient temperature.
● Dispose of old batteries in containers for this purpose.
● Avoid exposing yourself to prolonged sounder emission.
● Do not hide motion detectors behind curtains, furniture, etc.
● Do not paint or paper the components
● Do not try to open or move the components.
They are tamper-protected and some of them can
present electric shock hazards.
15
All data and pictures in this document are subject to change without prior notice- Agence TAG 00 33 (0)4 92 07 03 03 - EKZ 0066 00A