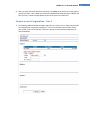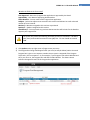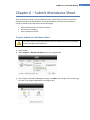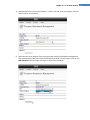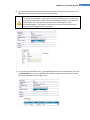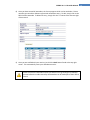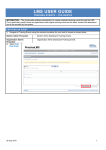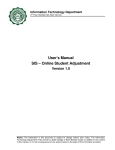
1
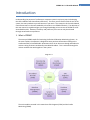
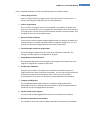
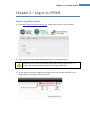
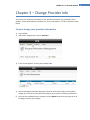
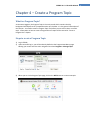
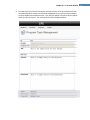
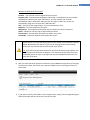
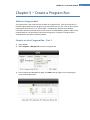
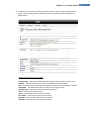
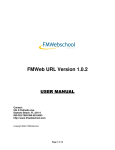
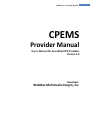
CPEMS Ver. 1.0 Provider Manual 1 CPEMS Provider Manual User’s Manual for Accredited CPE Providers Version 1.0 Developer: WebMax Multimedia Designs, Inc. CPEMS Ver. 1.0 Provider Manual Table of Contents Introduction ......................................................................................... 3 What is CPEMS ........................................................................... 3 Basic knowledge needed by a User ........................................... 4 Basic system requirement .......................................................... 4 Chapter 1: Process Flow Chart ............................................................. 5 Chapter 2: Log in to CPEMS ................................................................. 7 Chapter 3: Change Provider Info .......................................................... 8 Chapter 4: Create a Program Topic ...................................................... 9 Chapter 5: Create a Program Run ...................................................... 12 Chapter 6: Submit Attendance Sheet ................................................. 16 2 CPEMS Ver. 1.0 Provider Manual Introduction Understanding the purpose of a software or computer system is a primary step in developing the skills needed to use that software effectively. The more you are familiar with the use of the system, the more productive you will become in your work. The content in this Provider Manual concentrates more on the tasks needed by a Provider to run CPEMS effectively. The objective of this user manual is to guide and give you enough knowledge on how to use the CPEMS as a CPE Accredited Provider. However, familiarity and proficiency of its use can only be achieved through actual hands‐on experience. 1. What is CPEMS? The acronym CPEMS stands for Continuing Professional Education Monitoring System. As the name implies, the software is designed to store pertinent information relating to the credits earned by a Certified Public Accountant which he or she earns through attendance in various training seminars conducted by Accredited Providers. This is achieved through the various modules that work together in the system. Diagram 0.1 The main modules covered in this manual are CPD Programs (CPM) and the Credits Monitoring (CMM). 3 CPEMS Ver. 1.0 Provider Manual Who should read this manual? There are several user types for the CPEMS who have their respective roles to play. They are listed in the table below. This manual, however, focuses particularly on the role of a CPE Accredited Provider. It will teach you how to create and manage your seminars as well as submit credit records of your attendees. Site Positions MA AD PR MO Manager (Council Members) Admin (Administrator) CPE Provider Monitor 2. Basic Knowledge needed by a User Following are the basic knowledge or skills needed by a user to appreciate the system: •
•
•
Familiarity with Windows Explorer Web Navigation Familiarity with Mozilla Firefox 3.5.x or higher 3. Basic System Requirement For a user to access the system, the following are the minimum hardware requirement: •
•
•
•
•
Windows XP or higher Pentium 4 CPU 500 MB RAM Mozilla Firefox 3.5.x (supported browser) Internet DSL or Broadband Connection 4 CPEMS Ver. 1.0 Provider Manual 5 Chapter 1 – Process Flow Chart How does it work? In order to run the CPEMS effectively, you need to understand the flow process or steps involved in running a Program Seminar. The diagram below illustrates the step‐by‐step process starting with creating a seminar program up to the submission of the credit attendance sheet. Note that the boxes in yellow are Provider roles. Diagram 1.1 CPEMS Ver. 1.0 Provider Manual Here is a detailed explanation of each step (following the circle numbers above): 1. Create a Program Topic What is a Program Topic? A Program Topic is the main record of a seminar topic. It contains the background and objectives of a planned seminar. 2. Create a Program Run Since a seminar or Program Topic can be conducted or repeated by a Provider more than once, we record each run as a Program Run to distinguish one run from the other. The Program Run contains more specific information about the seminar like date, time and place of venue as well as speaker details. 3. Attach pertinent documents These are the scanned or digitized supporting documents of a program needed by the Council members to evaluate and decide whether to approve a program or not. The provider can attach these digitized documents to their Program Run. 4. Council Manager reviews the Program Run A Council Manager reviews online all the pertinent information submitted. The manager can either approve or disapprove the program. 5. Assign Monitors and Credit Values Once approved, Monitors are now assigned to the Program. Each subject area in the Program is assigned their respective credit value. 6. Encode credit attendance During or after a seminar, the Provider may encode the attendance sheet of the Program online for instant verification of attendees. There is also an offline method of submission through the Excel Attendance Form or EAF. The online method is recommended as your entries are verified to a central database of CPA members. 7. Temporary holding table The encoded attendance sheet is placed in a temporary holding table where questionable records (i.e. Missing PRC ID of attendee or name of attendee does not match PRC record) are highlighted for verification. 8. Confirm record or data integrity The system will not allow highlighted records to be committed to the database. 9. Records are committed to the database The attendance sheet and credits earned per attendee is committed to the database. 6 CPEMS Ver. 1.0 Provider Manual Chapter 2 – Log in to CPEMS Steps to log in the system 1) Go to http://www.accountancycpd.com.ph . Home Page is similar to the one below: 2) Log in using the username and password given to you by the Administrator. We advise you to change your password right after you log in the first time. To change your password, read the chapter on “Change Provider Info”. 3) You will know that you have logged in successfully when you see your username or first name indicated at top right corner of the screen. 7 CPEMS Ver. 1.0 Provider Manual Chapter 3 – Change Provider Info You may have to change certain details of your provider information (e.g. telephone, office address, contact email address, password, etc.) every now and then. To do so, follow the steps below: Steps to change your provider information 1) Log in CPEMS 2) At the main navigation bar, click on Providers. 3) In the list that appears, click on your Provider Code. 4) The Provider details should be displayed. Except for the Provider Code, you may edit or change any of the other information pertaining to your account including your password. 5) Once you are satisfied with your changes, click on Update found at the top right corner of the page to commit your changes. 8 CPEMS Ver. 1.0 Provider Manual Chapter 4 – Create a Program Topic What is a Program Topic? As the name suggests, the Program Topic is the main record which contains the title, background and objectives of a proposed seminar of a Provider. It is the general information of the seminar. You need to create a Program Topic first before you can even make a run of this topic. Information on how to create a Program Run of a topic will be covered in “Create a Program Run” chapter. Steps to create a Program Topic 1) Log in CPEMS. 2) Upon successful log in, you will be taken by default to the Program Attendance page. Moving your mouse over the main navigation bar select Programs > Manage Topic. 4) When you are in the Program Topic page, click on the Add button to create a new topic. 9 CPEMS Ver. 1.0 Provider Manual 10 5) The New Topic Entry Form should appear and you will have to fill up the boxes with their corresponding values. Please note that fields highlighted in grey are system generated or are to be supplied by the Administrator. They may not appear in the form but will appear when you view the record. The meaning of each field is explained below. CPEMS Ver. 1.0 Provider Manual What do the fields in the form mean? Provider – Your provider name as registered in the system. Program Code – System generated program code which is a combination of your Provider Accreditation Code plus your topic code counter. So, if for example your Provider Accreditation Code is “0001‐001” and this is your first topic creation, the system will automatically assign this new topic with “0001‐001‐001”. Title – The title of your program topic. This is an alphanumeric field. Objective – The main objective of this topic. Background – The background information why you believe this topic is important Status – Whether or not this topic is approved by the Board. Date Created – The date when this topic was saved in the system. Created By – Username of person who created this record. Please refrain from copy and pasting directly from another source document like MS Word, MS PowerPoint or the like as you may be copying certain text formatting codes that may interfere with the data stored in the system. Tip: If you must copy text from MS Word or any other word processing software, you can first paste the copied text to Notepad. This method strips the Word text of any embedded formats or styles. Copy again the text from Notepad and paste it to the entry box of the form. 6) After you have entered all pertinent information, click on Save at the top corner of the page to commit your data. You will see your new topic added to your list of Program Topics as seen below. 7) If you wish to edit any information in your Program Topic, simply click the assigned Program Code of that topic and be sure to save once you are done. 11 CPEMS Ver. 1.0 Provider Manual Chapter 5 – Create a Program Run What is a Program Run? The Program Run is the actual seminar schedule of a Program Topic. There are times when a Provider might repeat the same Program Topic more than once in a year. Each of the seminars conducted is what we call a “run” of that topic. A Program Run contains more detailed information about the planned seminar such as venue, scheduled dates, speaker, subject areas covered and their corresponding credit values among others. Creation of a Program Run is accomplished in two parts as explained below. Steps to create a Program Run – Part 1 1) Log in CPEMS. 2) Select Programs > Manage Run from main navigation bar. 3) At the Program Run Management page, click Add at the top right corner of the page to create a new Program Run. 12 CPEMS Ver. 1.0 Provider Manual 4) Fill‐up the form with the pertinent Program Run details. Use the sample form below as a guide. Note that the grayed out fields are either system generated or provided by the Administrator. What do the fields in the form mean? Program Topic – Select from the dropdown the Program Topic you wish to make a run. Provider – This automatically inserts the Provider Code (system generated). Title – The default title is taken from the Program Topic but this may be edited if needed Description – The default description is taken from the Program Topic Program Dates – Enter the inclusive dates of the seminars Time – Enter the time of the seminar Venue – Enter where seminar will be conducted No. of Days – Total number of days of the seminar Date Start – Enter the date of the seminar’s first day Date End – Enter the date of the seminar’s last day 13 CPEMS Ver. 1.0 Provider Manual 5) After you have entered all pertinent information, click Save at the top corner of the page to commit your data. Once saved, you will notice that additional fields have been added to the form for entry. Follow the steps below on how to fill‐up the rest of the form. Steps to create a Program Run – Part 2 1) The following additional fields will appear right after you save in Part 1. Note that you need not complete Part 2 right after saving Part 1. You can come back to the record at a later time and fill up the rest of the form. Below is a sample of a form and the explanation of each field follows. 14 CPEMS Ver. 1.0 Provider Manual 15 What do the fields in the form mean? Date Approved – Date when Program Run application is approved by the Board. Approved By – User Name of approving board member. Status Remarks – Current status of this Program Run application. Subjects – Select the subject areas covered in this seminar and indicate its credit value and number of hours covered. Monitor/s – Monitors assigned to this seminar as per Board. Speaker/s – Speakers assigned to this seminar Attachment/s – You may attach any pertinent documents that will be basis for the Board to approve your Program Run. The system only allows the following document formats for attachment: MS Word (doc, docx) and Portable Document Format (pdf) files. File size should not exceed 2MB. 2) Click Update at the top right corner of page to save your entry. 3) The Program Run listing should appear after you save (see sample below). Notice that each Program Run is given a run sequence number whose syntax is composed of the Program Topic code + the run sequence. So, for example, if your Program Title code is 0001‐001 and this is your first run, the Program Run code will be 0001‐001‐001. The Status column indicates the approval status of this Program Run application. CPEMS Ver. 1.0 Provider Manual Chapter 6 – Submit Attendance Sheet After completing a seminar, each Accredited Provider is given fifteen (15) days to submit the attendance sheet to the CPEMS Admin. We recommend that you submit your attendance record via CPEMS as this method has several advantages; •
•
•
Real time PRC Number‐To‐Name verification No need for re‐encoding Easier validation of entries Steps to submit an Attendance Sheet You cannot submit an Attendance Sheet unless the Program Run you are submitting to has been approved by the Board. 1) Log in CPEMS. 2) Select Programs > Manage Attendance from main navigation bar. 3) At the Program Attendance Management page, click Add at the top right corner of the page to create a new Program Attendance of a Program Run. 16 CPEMS Ver. 1.0 Provider Manual 4) The Attendance Entry Form should appear. From the Title bar, select the Program Title you wish to submit an attendance. 5) Upon selection of the Program Title, the Program Run Code and the Subjects Assigned and their corresponding credit value should automatically be filled‐in by the system. Click on the Add Attendees button to begin entering the names of the attendees. 17 CPEMS Ver. 1.0 Provider Manual 6) Start entering the PRC IDs of each attendee one at a time making sure that you click on the Save button each time to store the record of that Attendee. The PRC ID of an attendee is required for successful attendance entry. Please make sure that this information is taken from each attendee of a seminar. Each time you enter a PRC ID, the name details of the participant should appear in their corresponding boxes. If the PRC ID is not found in the system, then the entry will automatically be flagged for later verification. 7) As you save each attendance entry, it gets added to the summary list of attendees. Just click on Add Attendees once more to add the next attendee. Repeat this process until you have entered all attendees of that Program Title. 18 CPEMS Ver. 1.0 Provider Manual 8) Once you have entered all attendees, the list may appear similar to the one below. Please note that you can edit or delete any particular attendance entry. To edit, simply click on the PRC ID of that attendee. To delete an entry, simply click the “x” button to the extreme right of that record. 9) Once you are satisfied with your entries, just click the Back button found at the top right corner. This automatically saves your attendance entries. Please note that the Attendance Sheet you submit has to go through an evaluation process before the credits earned by the Attendees can be made part of their official record. 19