1
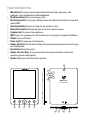
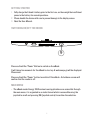
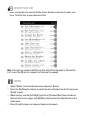
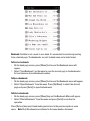
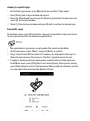
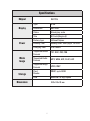
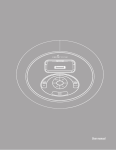
User Manual
21
Precautions
We strongly recommend reading the points below before operating this product:
≥≥ Back up the data periodically to another safe media. Under no circumstances there
is any liability regarding to data damage or loss.
≥≥ Do not place the reader near devices that emit strong magnetic fields. It may cause
data damage or loss.
≥≥ Do not disassemble or remodel the device.
≥≥ Do not let the device drop or shock.
≥≥ Do not use the device under heavy moisture or wet.
≥≥ Do not press the device screen.
≥≥ Do not use the device in a dirty or dusty environment.
≥≥ Do not use chemicals to clean the device screen. Clean the screen with a soft cloth;
be careful not to wipe it with anything abrasive.
≥≥ Do not remove SD card or turn off the device during data writing or reading to
prevent damage to data and to the device.
≥≥ Make sure the SD card is unlocked before writing or deleting data in the SD card.
Introduction
≥≥ Thank you for purchasing Energy Book 1060. You are reading the welcome section
of the Energy Book’s 1060 User’s Manual. This section provides an overview of the
device and its basic features.
Product Summary
≥≥ Energy Book 1060 uses a high-resolution display technology called electronic
paper display.
Electronic ink (E-Ink):
≥≥ It is a screen printing technology without backlit which does not cause eye strain
when reading. Electronic ink displays power consumption is very low, so you can read
thousands of pages with a single charge. In addition, electronic paper is not affected
by sun reflections and has a wider viewing angle than a conventional screen.
3
Front and Rear View
1. Menu button: To access options menu while reading a book: page jump, save
bookmark, open bookmark and delete bookmark.
2. Play/Pause button: Play or pause music files.
3. Directional joystick: Turns pages (left/previous and right/next) to select and confirm
(centre/OK).
4. Zoom in/out button: Zoom in or zoom out the pictures or text.
5. Return/Cancel button: Cancel selection or return to previous menu.
6. Earphone jack: To connect the earphones.
7. USB: Connect to a computer for file transference or charging via computer USB port.
8. SD slot: To insert SD card.
9. Power on/off: To power on / off the device.
10. Volume-/Next Page: To decrease volume during music playback or go to the next page
on reading mode.
11. Reset button: Reset the device.
12. Volume+/Previous Page: To increase volume during music playback or go to the
previous page on reading mode.
13. Speaker: Play music with the built in speaker.
13
12
11
10
ENERGY BooK 1060
E-Ink® Vizplex technology
1
2
3
4
5
6
4
7
8
9
Getting Started
1. Fully charge the E-book’s battery prior to the first use, as there might be insufficient
power in the battery for normal operations.
2. Please handle the device with care to prevent damage to the display screen.
3. Read the User Manual.
Switching On/Off the eBook
9
Press and hold the “Power” Button to switch on the eBook.
It will take a few moments for the eBook to start up. A welcome page will be displayed.
Please wait.
Press and hold the “Power” button to switch off the eBook. A shutdown screen will
confirm that the reader is off.
Main Menu
≥≥ The eBook reader Energy 1060 contents and applications are accessible through
the main menu, it is organized in an index format which is accessible using the
joystick to scroll and pressing OK (joystick centre) to confirm the selection.
5
Recent Files List
≥≥ Items read by the user recently will be shown. Use the arrow keys to select, and
press “Confirm” key to open the desired file.
Note: If the files are saved in the SD card, they will still be displayed in “Recent File
List” even if the SD card is removed, but they can’t be opened.
BookS
1. Select “Books” icon from the main menu and press [Enter].
2. Press the [Up/Down] arrow key to select the desired books from the list and press
[Enter] to open.
3. When reading, use the [Left/Right] joystick or [Previous/Next] keys located on
the back side to turn pages, and [Up/Down] key to select the desired book in the
books menu.
4. Press [Zoom] to zoom in or zoom out books or documents.
6
Bookmark: Suitable to set a mark in an e-book. It’s convenient for continuing reading
from a desired page. The bookmarks are sort by book name and e-book format.
To Create a bookmark:
1. On the book page screen, press [Menu] button and the Bookmark menu will
appear.
2. Select “Save Bookmark” on the menu to save the current page in the bookmarks
list and choose a desired bookmark number.
To Open a bookmark:
1. On the book page screen, press [Menu] button and the Bookmark menu will appear.
2. Select “Open Bookmark” from the menu. Press [Up/Down] to select the desired
page and press [Enter] to open the bookmark.
To Delete a bookmark:
1. On the book page screen, press [Menu] key and the Bookmark Menu will appear.
2. Select “Delete Bookmark” from the menu and press [Enter] to confirm the
operation.
Press [Return] key to exit book reading and return to the previous option or main
menu. Note: Only 8 bookmarks are allowed in the same book or document.
7
Jumping to a specified page:
1. On the book page screen, press [Menu] button and select “Page Jump”.
2. Press [Enter] and an Input window will pop out.
3. Press the [Directional] keys to input the desired page number. To clear one entry
select [x] on the input window.
4. Select [≤] from the input window and press [Enter] to confirm the desired page.
Zoom In/Out a page:
On the book screen, press [Zoom] button, the page is magnified in steps and returns
to the original scale after the maximum magnification.
Music
≥≥ This application let you access and play audio files stored on the eBook.
1. On the main menu, select “Music” and press [Enter] to confirm.
2. Songs stored in both SD card and built in memory are displayed in the song list.
Select the desired music file and press “Confirm” (joystick centre) to start.
3. It supports background music playing when reading books or viewing pictures.
In the Music menu, press [Play] key to start music playing. During music playing,
press [Return] key to return to the main menu. Music playback continues and you
can now select other functions like Books or Photos.
8
Adjust Volume: Press “Volume +/-“ button on the back case to adjust the volume level.
Play/Pause: Press “Play/Pause” button to play or pause the music.
Fast Forward/Backward: Press and hold [Left] arrow key to play backward, press
and hold [Right] arrow key to fast forward. Press [Left] arrow key once to listen the
previous track or press [Right] arrow key once for the next track.
Options: Press [Menu] key to access the music player options such as “Repeat Mode”,
“Play Mode”, “MSEQ” and “EQ Sel”.
Photo
≥≥ Select “Photos” from the main menu and press [Enter]. Scroll with [Up] or [Down]
to the desired image and press “Confirm” button (joystick centre) to view it.
Zoom In/Out: Press [Zoom] button to zoom in or zoom out the image.
File Explorer
≥≥ Select “File Explorer” from the main menu and press [Enter] button to enter. All the
files and folders stored in the device (Flash) and SD card will be listed. Select the
desired option to browse folders or files and press [Enter] to open your selection.
9
Content Update
≥≥ Newly stored files in the SD card or flash memory may not be visible. In order to
view the updated contents, select “Content Update” in the main menu and press
[Enter] button to confirm. A window will pop out showing that the content is being
updated.
System Settings
≥≥ Select “System Settings” and press [Enter] button to adjust the device settings.
10
Time:
Press [Left/Right] to select “Hour/Minute” and press [Up/Down] joystick to change
the time value. Press [Enter] to confirm your settings.
Date:
Press [Left/Right] to select “Year/Month/Day” and press [Up/Down] joystick to
change the date. Press [Enter] to confirm your settings.
Recent File Settings:
1. Select “Keep Reading History” to save the recent used files in Recent files list.
2. Select “Disable” to disable this function.
3. Select “Clear history” to empty and delete all the document/files titles from the
“Recent Files” list.
Screen Refresh Mode:
Full Refresh:
For full screen refreshing.
Partial Refresh:
Only refresh the screen content partially.
Language:
To change the user interface language, select the corresponding desired option and
press [Enter].
AutoShutdown Settings:
Press [Up/Down] button to select desired auto shutdown time: 3mins, 5mins, 10mins,
15mins and 20mins. Select “No automatic shutdown” to disable auto shutdown and
the device will remain power on all the time until it is manually power off by pressing
the [Power] button.
Restore to Default Settings:
To restore all settings back to the factory original settings.
*All preferences, presets and data will be lost.
System Information:
Information about the eBook including software and system version.
11
Users Manual
≥≥ From the Main Menu, select User Manual to access the content of digital User’s Manual.
File Management
Connecting to computer:
Use the supplied USB cable to plug into the device and connect the other end to the
computer free USB port. The computer will detect both the built in flash memory and
SD card.
Managing Files:
You will be able to access built in memory and SD card (if SD card is plugged in) from
“My Computer” when the device is connected to the computer. You can move, copy
or delete the existing files or folders. The device will resume to normal operation
automatically after disconnected from computer.
Troubleshooting:
The device hang or cannot be switched on.
≥≥ Reset the device by pressing the Reset button with a small pin or clip.
≥≥ Battery has been fully depleted. Please charge the device via USB.
Battery capacity seems short:
≥≥ The battery is not used for prolonged period. Please recharge the battery device again
≥≥ The battery is not fully charged. Please charge the device for 4 hours.
It takes long time for the display to appear:
≥≥ This is due to the characteristic of the display panel, especially in low temperature environment,
and not a malfunction.
An ebook file cannot be read:
≥≥ Check if the book has copyright protection. Copyright protected books aren’t compatible.
≥≥ Check if the book format is supported by the device.
The device cannot be operated during USB connection:
≥≥ The device cannot be operated while it is connected to a computer
12
Specifications
RK2705
Chipset
Display
Power
Music
Image
Storage
Type
E-Ink
Resolution
600*800
Colors
4 level grey scale
Size
6.0 inch (diagonal)
Battery type
Lithium Polymer
Reading Time
Reading books: 4000 pages, 20 hours
Charging Time
3 to 4 hours
Supported eBook
Formats
TXT, DOC, PDF, PDB
Supported Audio
Formats
MP3, WMA, APE, FLAC, AAC
Supported Image
Formats
JPEG, BMP
Card
Reader
SDHC, up to 16 GB
USB
MiniUSB 2.0 High Speed
Dimensions
160 x 116 x 10 mm
13
WARRANTY
≥≥ Energy Sistem Soyntec S.A. warrants its products to be free from defects in
materials and workman ship at the time of purchase.
The warranty period is 36 months from the date of purchase.
WARRANTY PROCEDURE
≥≥ Visit the Support section at http://support.energysistem.com and select your
product to view the FAQ (Frequently Asked Questions). The solution to your
problem is very likely to have been already published there. You will also be able to
download user manuals, user guides, drivers and updates.
≥≥ If you cannot find an appropriate solution in the Support section, you may send us
your enquiry or warranty service request by email: [email protected]
≥≥ Alternatively, you may prefer to contact the distributor from which you purchased
the product, presenting the purchase receipt or invoice.
Specifications are subject to change without notice.
© 2009 by Energy Sistem®. All rights reserved.
TRADEMARKS.
All company, brand and product names are trademarks or registered trademarks of
their respective companies.
DECLARATION OF CONFORMITY
Manufacturer Name: Energy Sistem Soyntec S.A.
Address: Pol. Ind. Finestrat, C/.Calpe nº1, 03509, Finestrat Alicante (Spain)
Tel: 902 388 388 Fax: 902 119 034
NIF: A53107488
We declare under our own exclusive responsibility that the product:
Energy Sistem® Electronic Book reader Energy™ 1060
Manufacturing country: China
Is in compliance with the essential directives, norms and standards of the European
Union 89/336/EEC (EMC Directive).
14