1
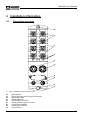
Handbuch
Manual
Manuel
MVK-MI
Art.-No. 55294
Art.-No. 55295
Art.-No. 55296
MVK-MI Series
User’s Manual
Art.No. 55 294 DI8 (DI8)
Art.No. 55 295 DIO8 (DI8)
Art.No. 55 296 DIO8(DIO8)
User’s Manual Art.-No. 55 387
Murrelektronik GmbH
P.O. Box 1165
71567 Oppenweiler
Falkenstraße 3
71570 Oppenweiler
Internet : http://www.murrelektronik.com
Version 1.0
Phone++49(0)7191/47-0
Fax
++49(0)7191/47-130
MVK-MI User’s Manual
1
1.1
2
CONCERNING THIS MANUAL ................................................................................ 1
Chapter overview..............................................................................................................................1
SAFETY INFORMATION .......................................................................................... 3
2.1
Explanation of symbols ...................................................................................................................3
2.1.1
Use of attention signs..................................................................................................................3
2.1.2
Use of danger signs ....................................................................................................................3
2.1.3
Use of numbering in illustrations .................................................................................................3
2.1.4
Use of handling information ........................................................................................................3
2.1.5
Use of foot notes .........................................................................................................................3
2.2
Designated use .................................................................................................................................4
2.3
Qualified personnel ..........................................................................................................................5
3
CONFIGURATION INFORMATION .......................................................................... 6
3.1
System description ..........................................................................................................................6
3.2
System data ......................................................................................................................................8
3.3
Information for the beginner ...........................................................................................................9
3.4
Electrical specifications.................................................................................................................10
3.4.1
System cables ...........................................................................................................................10
3.4.2
Power supply.............................................................................................................................12
3.4.3
Recommended power supply units MCSPower+ ......................................................................12
3.4.4
Conductor cross-sections..........................................................................................................12
3.5
Slave profile ....................................................................................................................................13
3.5.1
Identification code .....................................................................................................................13
3.6
System configuration.....................................................................................................................14
3.6.1
Physical addressing ..................................................................................................................14
3.6.2
Logical addressing ....................................................................................................................15
4
4.1
INSTALLATION INFORMATION............................................................................ 16
Connection overview .....................................................................................................................16
4.2
Connection to MVK-MI ...................................................................................................................17
4.2.1
Grounding cable ........................................................................................................................17
4.2.2
Interbus connection ...................................................................................................................18
4.2.3
Pin assignment: M12 (B-coded) bus connector ........................................................................18
4.2.4
Pin assignment: 7/8" power connector (Mini-Style) ..................................................................18
4.2.5
Power supply connection ..........................................................................................................19
4.2.6
Connection of digital sensors and encoder ...............................................................................20
4.3
Installation.......................................................................................................................................24
4.4
Installation clearance .....................................................................................................................25
MVK-MI User’s Manual
Electromagnetic compatibility (EEC)........................................................................................... 26
4.5
4.5.1
Protection against electrostatic discharge ................................................................................ 26
4.5.2
Grounding ................................................................................................................................. 27
4.5.3
Cable routing ............................................................................................................................ 27
4.5.4
Voltage drops............................................................................................................................ 27
4.5.5
Inductive load interference suppression ................................................................................... 28
4.5.6
Limits and what can still be done.............................................................................................. 28
5
5.1
6
DIAGNOSIS DISPLAYS ......................................................................................... 29
Bus / Device status displays......................................................................................................... 29
INTERBUS WORD STRUCTURE .......................................................................... 30
6.1
MVK-MI DI8(DI8) Art.Nr. 55294...................................................................................................... 30
6.2
MVK-MI DIO8(DIO8) Art.Nr. 55295 ................................................................................................ 31
6.3
MVK-MI DIO8(DIO8) Art.Nr. 55296 ................................................................................................ 32
7
PARAMETERIZATION ........................................................................................... 33
7.1
Parameterization of Pin 2 as an input or diagnosis input ......................................................... 33
7.2
Implicit parameterization as a digital input or digital output .................................................... 33
8
TECHNICAL DATA ................................................................................................ 35
8.1
Mechanical data ............................................................................................................................. 35
8.1.1
DI8(DI8) Art.Nr. 55 294, DIO8(DI8) Art.Nr. 55 295, DIO8(DIO8) Art.Nr. 55 296...................... 35
8.2
9
10
Electrical data................................................................................................................................. 36
ACCESSORIES ...................................................................................................... 37
DESCRIPTION OF TERMS ................................................................................. 38
MVK-MI User’s Manual
Manual supplements / Corrections
Version
V 1.0
Notes:
Chapter
Supplements / Corrections
Created
Date/ Name
11.04.05 M.H./ HE
MVK-MI User’s Manual
1
Concerning this manual
Please take the time to read this User’s Manual prior to setting up and operating MVK-MI components.
The User’s Manual must be kept in a conspicuous place and accessible to all authorized personnel.
The text, illustrations, diagrams and examples used in this manual serve solely for the purpose of
explanation, operation and application of Input/Output modules of the MVK-MI series.
If you should have any further reaching questions regarding the installation and set-up of the equipment
described in this manual, please don’t hesitate to contact us. We would be glad to assist you any time.
Murrelektronik GmbH
P.O. Box 1165
Falkenstraße 3
71567 Oppenweiler
71570 Oppenweiler
Phone:
Fax:
++49(0) 7191/47-0
++49(0) 7191/47-130
Internet : http://www.murrelektronik.com
Murrelektronik reserves the right to make technical changes or modifications to this manual without prior
notice.
1.1
Chapter overview
The “Safety information” section must be read without fail prior to working with the products and the
system. This section contains information required for safe installation and handling.
The “Configuration Information“ section directs itself to system planners. It offers important information
and details relevant to successful configuration.
The “Installation” section provides details regarding installation, in both mechanical and electrical
contexts. This chapter addresses itself in particular to qualified and trained electricians responsible for the
assembly and installation of system components.
The “Setup“ and “Diagnosis“ sections are intended for the setup personnel. They offer important notes
and information with regard to the rapid and uncomplicated setup in a Profibus DP network.
V 1.0
1
MVK-MI User’s Manual
2 Safety information
2.1 Explanation of symbols
2.1.1
Use of attention signs
Notes containing important information are specially marked. These are illustrated as follows:
Attention text...........
2.1.2
Use of danger signs
Danger signs are additionally marked with an enclosing frame.
Caution:
Disregard of safety measures may result in damage to equipment and other serious
consequences.
DANGER:
Non-compliance with the relevant safety measures poses a danger to the health and
life of the user.
2.1.3
Use of numbering in illustrations
Illustrations are numbered with white numbers in black, round fields.
Example:
Text 1......
Text 2......
Text 3......
The explanatory text follows in tabular form under the same number, in direct context to the preceding
illustration.
2.1.4
Use of handling information
Handling information describes the sequence of steps during installation, setup, operation and
maintenance that must be strictly observed.
The numbering (black numerals in a white field) is given in a sequential and ascending order.
Example:
Instruction 1........
Instruction 2........
Instruction 3........
2.1.5
Use of foot notes
Supplementary information is marked with superscripted numerals (example: Text Text
These are explained in the form of footnotes beneath tables or text at the end of the page.
V 1.0
1)
Text Text).
3
MVK-MI User’s Manual
2.2 Designated use
The devices described in this manual serve as decentralized input/output modules intended for
connection to a Intebus network.
The products described in this manual
•
have been developed, manufactured, tested and documented in compliance with currently valid
safety codes. The equipment poses no danger to operating personnel or material if configuration,
assembly, and operation are performed in compliance with the stated handling and safety regulations.
•
fulfill the requirements of:
•
•
•
EMC directives (89/336/EWG, 93/68/EWG and 93/44/EWG)
low voltage directive (73/23/EWG)
and are designed for use in an industrial environment. An industrial environment is one where the
consumers are not directly connected to the public low voltage supply network. Additional measures
must be taken for use in residential areas or in office and business environments.
Warning!
This is class A rated equipment. Operation of this equipment in a residential
environment can cause radio interference, in which case the user can be required
to take necessary corrective measures.
Fault-free and safe function of this equipment is guaranteed only if the conditions for proper transport,
storage, installation and assembly are observed.
The designated operation of the device is guaranteed only with the housing fully installed
Good chemical and oil resistance.
When using aggressive mediums, material resistance based on application must be
checked.
All devices connected to this equipment must fulfill EN 61558-2-4 and EN 61558-2-6 requirements.
Only qualified and suitably trained electrical tradesmen knowledgeable in the safety standards of
automation technology may perform configuration, installation, setup, maintenance and testing of the
equipment.
Current safety and accident prevention laws valid for a specific application must be observed in the
configuration, installation, setup, maintenance and testing of the equipment.
Only cables and accessories are allowed that meet the requirements and regulations for safety,
electromagnetic compatibility and, where applicable, telecommunications transmission equipment and
specifications.
Information concerning the type of authorized cables and accessories can be obtained from your
Murrelektronik distributor or are described in this manual.
4
V 1.0
MVK-MI User’s Manual
2.3 Qualified personnel
Requirements to be met by qualified personnel are based on qualifications profiles described in ZVEI and
VDMA guidelines.
Weiterbildung in der Automatisierungstechnik (Further training in automation technology)
Herausgeber: ZVEI and VDMA (Publisher: ZVEI and VDMA)
Maschinenbau Verlag
P.O. Box 71 08 64
60498 Frankfurt
Only trained electricians familiar with the contents of this manual may be allowed to install and service the
components described here.
These are understood as being persons who,
•
•
based on their trade qualification, experience and knowledge of relevant standards, are able to
assess the project requirements and to recognize possible hazards.
based on extensive experience in comparable areas, possess the same level of knowledge as could
be expected of a trained tradesman.
Only Murrelektronik technical personnel are allowed to undertake intervention in the hardware and
software of our products, unless the procedure is described in this manual.
Warning!
Unqualified intervention in the hardware and software of our equipment or the
disregard of warnings and information provided in this manual can result in injury or
serious damage to man and/or material.
V 1.0
5
MVK-MI User’s Manual
3 Configuration information
3.1 System description
The Interbus is a high-speed, universal sensor/actuator bus system n the form of a data ring.
A serial bus cable connects the master to input/output modules installed in the system. The necessary
wiring can therefore be reduced to a minimum in comparison to conventional parallel wiring.
Each slave constitutes part of a shift register which, when combined, forms a large shift register. Data
transfer takes place in a master-slave-access process.
The ring structure offers the possibility of simultaneous transmission and reception of data (full duplex).
The bus cable between individual participating modules always contains conductors for forward and for
return transmission of data signals.
Master
♦
Slave
Slave
Slave
Slave
Fig. 3-1 Bus topology/Data ring
The application area concentrates mainly on lower level industrial automation for networking of analog
and binary sensors and actuators.
The Interbus is a substitute for traditional wiring between sensors, actuators and the PLC.
System-based mechanisms and software tools effectively support setup, operation, maintenance and
diagnosis.
Every Interbus system requires a control unit, the master. This is available as a PLC specific module or in
the form of a PC card.
The application program on the control system or PC controls the process via the master and the decentralized I/O groups, the slaves.
The master performs cyclical information exchange between the master and the slaves independently.
An identification cycle is started immediately after switch-ON. During this system initialization phase, the
master reads the identification data of all slaves in the sequence of their physical location.
This data serves (among other things) to prepare a periphery map in the master.
Subsequent cycles are purely data cycles and serve solely to exchange process data between the master
and the slaves.
According to standard specifications, an Interbus network supports the operation of maximum 256 slaves
and can reach a max. extension of 13 Km with copper cables and >80 Km using fiber optic cables.
The distance between individual remote bus modules must not exceed 400 m (using copper conductors).
The following transmission distances between two modules are possible when using fiber optic cable
technology:
Polymer fiber
max. 50 m
HCS fiber
max. 300 m
Glass fiber
max. 2500 m
Besides the remote bus, there is also a remote Installation bus.
The remote Installation bus differs from the remote bus as follows:
The power supply (24 V DC) is carried by the system cable. The max current is limited to 4.5A according
to specifications. The sum of all cable segments is maximum is 50m.
6
V 1.0
MVK-MI User’s Manual
MVK-MI modules are suitable for operation in the remote bus.
In te r fa c e m o d u le
B u s m a s te r
R e m o te
50m
In s ta lla tio n r e m o te
R em o
te
bus
1 2 .8
Km
50m
400m
400m
♦
Fig. 3-2: Interbus system topology
The cycle time depends on the degree of expansion. With full system expansion, 4096 I/O points, the
cycle time is: 7.2ms.
V 1.0
7
MVK-MI User’s Manual
3.2
System data
Topology
Transmission media
Active ring – Tree structure with max. 16 levels
- Copper cable (RS-485; Transmission distance 400 m)
- Fiber optic cable (Polymer 50 m, HCS 300 m,
glass fiber 2500 m)
Sum of all cable segments max. 12.8km
Sum of all cable segments max. 50 m
Cable length of remote bus
Cable length of remote
Installation bus
Number of remote bus modules Max. 256 (limited by master firmware)
Number of Interbus modules
Max. 512 (limit due to handling)
Number of I/O points
Max. 4096
Number of data words
Max. 256
Baud rate
Messages
500 kBaud
Cyclic messages from the master to individual slaves (Master call)
with instant reply from slave (slave reply)
0.105 ms
Data cycle time per slave
(without master run time)
DI16/DO16
Error recognition
Master functions
Identification of faulty messages, automatic repeat
- System initialization
- Automatic slave detection
- Non-cyclical parameter transmission
- Bus and slave diagnosis
- Error messages to control
Table 3-1: Interbus system data
8
V 1.0
MVK-MI User’s Manual
3.3 Information for the beginner
The Interbus is a field bus system for industrial application whose advantages include not only ease of
handling in planning and application, but also a good general overview of the total system.
To make the system even easier and safer for beginners to use, we recommend proceeding as outlined
in the checklist below:
Work phase
Planning
Questions
Note
How many I/O’s are required in This determines which types and how many
total?
Interbus modules are required.
Planning
How great is the system power Important for the selection of suitable system
requirement?
power supply units and conductor cross sections.
Planning
How large is the total scope of The sum of all cable lengths may not exceed 12.8
the system?
Km if using copper cables.
Configuration
How are the modules to be To avoid assignment errors, create an assignment
assigned?
scheme and carefully label all modules
accordingly.
Installation
Where will
installed?
Setup
How will the system configuration Automatic system configuration.
be
executed?
The C (Configuration), M (Monitoring), D
(Diagnostic) software is recommended for the
setup.
Have all slaves been detected by When all slaves have been detected, data transfer
the master?
is active and the “BA” and “RC” LED’s on the
slaves will light up green. The
“RD” LED is OFF.
How can a simple I/O function Quick and straightforward, with special, easy to
test be performed?
use configuration software (CMD).
Alternatively via PLC software.
Setup
Setup
V 1.0
the
modules
be Depends on the module enclosure type rating.
Either in a switch cabinet or terminal box. Place
modules of enclosure type IP 67 close to sensors
and actuators for the sake of greater efficiency.
9
MVK-MI User’s Manual
3.4 Electrical specifications
3.4.1
System cables
On the field bus side, system cables can be either of the remote bus or remote installation bus type,
depending on different application requirements.
3.4.1.1 INTERBUS remote bus cable
The Interbus remote bus cable contains 3 stranded conductor pairs with a common screen.
green
yellow
pink
grey
brown
♦
10
- Remote bus cable
- Screen
Fig. 3-3: Remote bus cable
V 1.0
MVK-MI User’s Manual
3.4.1.2 System cable specifications
Characteristic value (20°C)
Conductor cross-section
DC conductor resistance per 100m
Value
Min. 0.2 mm²
Max. 9.6 Ω
Characteristic impedance
120 Ω ± 20 % at f = 0.064 MHz
100 Ω ± 15 Ω at f > 1 MHz
Dielectric strength
- Conductor / conductor
- Conductor / screen
Insulation resistance (following
dielectric strength test)
Max. Transfer impedance
(transfer impedance) at 30 MHz)
Operation capacity at 800 Hz
Min. close-up cross-talk impedance
(NEXT) for 100 m cable
- at 0.772 MHz
- at 1 MHz
- at 2 MHz
- at 4 MHz
- at 8 MHz
- at 10 MHz
- at 16 MHz
- at 20 MHz
Max. wave attenuation
for 100 m cable
- at 0.256 MHz
- at 0.772 MHz
- at 1 MHz
- at 4 MHz
- at 10 MHz
- at 16 MHz
- at 20 MHz
Test method
VDE 0472-501
IEC 189-1 cl. 5-1
1000 Veff , 1 min.
1000 Veff , 1 min.
Min. 150 MΩ for 1 km cable
250 mΩ/m
Max. 60 nF for 1 km cable
IEC 1156-1 cl. 3.3.3
VDE 0472-509 test type C
or IEC 189-1 cl. 5.2
VDE 0472-502 test type B
or IEC 189-1 cl.5.3
IEC 96-1
VDE 0472-504 Test type A
or IEC 189-1 cl. 5.4
VDE 0472-517 or
IEC 1156-1 cl. 3.3.4
61 dB
59 dB
55 dB
50 dB
46 dB
44 dB
41 dB
40 dB
VDE 0472-515 or
IEC 1156-1 cl. 3.3.2
1.5 dB
2.4 dB
2.7 dB
5.2 dB
8.4 dB
11.2 dB
11.9 dB
The following mechanical requirements apply to limited flexible cable routing (occasionally moved) and
permanent routing in a dry, moist environment:
Variable
Temperature range
Color coding of data cables
Color coding of power supply cables
Jacket color
Maximum outer diameter
Minimum jacket inner diameter
Minimal bending radius
Connection method
V 1.0
Value
-20 °C to +70 °C
According to DIN 47100
Red, blue, yellow/green
Green RAL 6017
8 mm
5 mm
80 mm
Suitable for round plug connector IP65
9-pin (Coninvers)
11
MVK-MI User’s Manual
3.4.2
Power supply
Interbus modules require a power supply of typically 24V DC, which must meet normal industrial power
supply requirements.
We recommend the use of separate power supply sources for sensor & bus power
and for the actuator power, in order to assure a higher degree of noise immunity and
insulation. Primary switched-mode or unregulated power supplies should be used for
voltage supply
The rating of the power supply units depends on the number of connected modules and on their power
rating.
ATTENTION:
Always ensure that the system power, measured at the device furthest away from the
system power supply, does not drop below 18V DC.
System behavior is undefined if the sensor & bus power supply drops below 18V.
Primary switched-mode power supply units, as a rule, allow the output voltage to be
raised above the rated voltage in order to compensate for loss in the lines.
Interbus modules with digital inputs allow the direct connection of commercially available sensors.
A separate power supply for the sensors may be necessary, depending on the total power requirements
of the overall system based on the number of slaves or when using sensors with high current
consumption.
3.4.3
Recommended power supply units MCSPower+
Primary switched-mode power supply devices of the MCSPower+ series are especially well suited for
power supply to automation systems. We therefore recommend their use in supplying the MVK-MI.
Phases
Power output
1
1
240 W / 10 A
480 W / 20 A
Phases
Power output
3
3
3
240 W / 10 A
480 W / 20 A
960 W / 40 A
3.4.4
Power input
95...132 VAC
85086
85088
Power input
185...265 VAC
85085
85087
Power input
3 x 340...460 VAC
85095
85097
85099
Conductor cross-sections
The core cross-section is limited to max. 1.5 mm² and is restricted to this size by the 7/8” connector.
12
V 1.0
MVK-MI User’s Manual
3.5 Slave profile
3.5.1
Identification code
The Interbus master marks each slave with an identification code to assure unequivocal, functional
identification. This code is permanently programmed by the manufacturer and cannot be changed. The
conditions for this are listed in the Interbus specifications.
The identification code consists of one data word (16 Bit).
Bit
15
14
13
Management bits
♦
12
11 10 9
Data width
of module
8
7
6
5
4
3
2
1
Device group
ID-Code or Ident. code
0
Fig. 3-4: Bit assignment of identification code
Management bits 13-15 transfer dynamic error messages to the master if a fault occurs.
Bits 8-12 define the data width of the slave.
Data widths from 4 Bits to 32 words are possible.
Example:
A slave with 16 input bits and 8 output bits occupies 1 word in the input area and 1 word in the output
area. The larger value is always decisive in establishing the module-specific data width.
With the aid of bits 0-7, the master can identify the slave function and assign the I/O data to the various
areas of the process map.
Bits 0-7 are also referred to as ID codes.
Modules of the MVK-MI series have the ID code 3 and a data width of 2 words
V 1.0
13
MVK-MI User’s Manual
3.6 System configuration
The master has identified all its slaves during the initialization phase and has received information as to
their data widths.
Based on this information, the master creates a periphery map of all detected slaves in the data ring.
PLC
Interbus slaves
Interbus-Master
Interface module
MVK- MI DI8 (DI8)
2 Words, ID 3
Periphery map „Inputs“
Process input image
(PII)
Input data Module 1
Diagnosis data Module 1
Periphery map “Outputs”
Output data Module 2
Parameter data Module 2
Output data Module 3
Parameter data Module 3
Process output image
(PIO)
Installation remote bus
Output data Module 1
Parameter data Module 1
♦
Remote bus or
Input data module 3
Diagnosis data Module 3
PLC- Program
•
•
•
•
Input data Module 2
Diagnosis data Module 2
Input data
Diagnose
Output data
Parameter
MVK- MI DI08 (DI8)
2 Words, ID 3
•
•
•
•
Input data
Diagnose
Output data
Parameter
MVK- MI DIO8 (DI08)
2 Words, ID 3
•
•
•
•
Input data
Diagnose
Output data
Parameter
Fig.3.6- : Data transfer between PLC, interface module (Master) and Interbus slaves
The Interbus master creates a periphery map of all detected Interbus slaves and addresses them
according to their physical location in the field bus.
The user has the option of assigning the physical periphery map of the Interbus slaves to logical
addresses in the PLC.
3.6.1
Physical addressing
The assignment of the periphery map in the master to the process map of the PLC reflects the physical
arrangement of the modules in the field bus.
Advantage:
No configuration expenditure, the assignment is automatic
Disadvantage:
Hardware changes in the periphery cause structural changes in the
periphery map and thereby also to the process map in the control.
14
V 1.0
MVK-MI User’s Manual
3.6.2
Logical addressing
Logical addressing can be performed manually during the configuration phase (depending on the master
module employed), by using a suitable configuration software (e.g. CMD). The periphery map or parts of
the periphery map is thereby logically assigned to the process map of the control.
Advantage:
Hardware changes in the periphery produce no structural changes in
the control process map. No configuration expenditure, as assignment
is automatic.
Disadvantage:
Increased configuration expenditure.
V 1.0
15
MVK-MI User’s Manual
4 Installation information
4.1
Connection overview
3
7
2
6
1
5
0
4
♦
Fig 4-1: MVK-MI module connection layout
Mounting hole
M12 round connectors for inputs and outputs
Identification label
Display elements
Power supply connection
Outgoing power supply connection
Incoming bus interface
Outgoing bus interface
FE connection
16
V 1.0
MVK-MI User’s Manual
4.2
Connection to MVK-MI
Connect the grounding cable to the FE terminal
Connect incoming Profibus cables to the incoming bus terminal .
Connect any outgoing Profibus cables to the outgoing bus terminal
or attach terminating resistor to the outgoing bus terminal .
4.2.1
Grounding cable
The FE connection is located at the bottom/side of the module housing.
♦
Fig. 4-2: FE connection
ID. labels
FE connection
Connect the grounding cable at the FE connection on the housing in a low impedance
manner.
V 1.0
17
MVK-MI User’s Manual
4.2.2
Interbus connection
4.2.2.1 Cables
Interbus field bus cable connection requires cables conforming to Interbus specifications.
We recommend using our prepared Interbus cables for easy and reliable wiring of the equipment.
The Interbus cables can also be prepared by yourself. We offer the following accessories:
Art . No.
55 771
50 27606
50 27601
Description
Comments
Interbus bus cable
remote bus
(by the meter)
M12 male connector B-coded, straight (screened)
M12 female connector, B-coded, straight (screened)
Art. No.
55 356
Description
Terminating resistor plug
Any sockets that are not in use must be fitted with blind caps as IP 67 protection is
otherwise not guaranteed.
Art. No.
55 468
33 8155
55 390
4.2.3
Description
M12 blind caps, black (4)
Diagnosis blind plugs M12
Blind cap 7/8“ (external thread)
Pin assignment: M12 (B-coded) bus connector
3
5
4
2
2
1
1
BUS IN
♦
5
3
4
BUS OUT
Fig. 4-3: Bus connector pin assignment
pin No.
1
2
3
4
5
Threaded
Signal
DO
/DO
DI
/DI
GND
Screen
Significance
Data line of IBS master
Data line of IBS master inverts
Data line of IBS master
Data line of IBS master inverts
Ground
Screen or FE
Colour
yellow
green
grey
pink
brown
The screen should be evenly distributed around the thread.
4.2.4
18
Pin assignment: 7/8" power connector (Mini-Style)
V 1.0
MVK-MI User’s Manual
POWER IN
POWER OUT
1
1
2
2
5
3
♦
4
5
4
3
Fig. 4-4: Pin assignment:
pin 1
Pin 2
pin 3
Pin 4
pin 5
4.2.5
0V
0V
PE
Sensor & bus power supply
Actuator power supply
Power supply connection
4.2.5.1 5-pin Mini-Style connector (7/8")
♦
Fig. 4-5: Preparing the power supply cable
ATTENTION:
Reverse polarity of the power supply can cause damage to the module.
V 1.0
19
MVK-MI User’s Manual
4.2.5.2 Connecting the power supply to the module
Auxiliary power supply is required for actuators and sensors. The MVK-MI electronics are supplied from
the sensor power supply.
The sensor power supply may not be of the switchable type as this voltage supplies
power to the module electronics!
ATTENTION:
The 7/8“ plug connector is designed for max. 9 A current per pin. This must be taken
into account for downstream power supply.
In order to reduce the power loss upon the incoming cable from the power supply to the MVK-MI module
is recommended a 1,5mm² wire gauge. The recommended wire gauge from the MVK-MI module to the
actuators is 0,75mm².
4.2.6
Connection of digital sensors and encoder
2
1
5
4
♦
3
Fig. 4-6: M12 socket assignment
Pin 1
Pin 2
Pin 3
Pin 4
Pin 5
+ 24 V
Function channel 1x
0V
Function channel 0x
FE
Sensor supply
Parameterizable channel
Reference potential
Parameterizable channel
Ground
Any sockets not in use must be fitted with blind caps, as IP 67 protections is
otherwise not guaranteed.
20
V 1.0
MVK-MI User’s Manual
4.2.6.1 Logical signal display and LED response
Normally open input
Normally closed input
Diagnosis input
Voltage at input
0V
24 V
0V
24 V
0V
24 V
Logical value
0
1
1
0
1
0
LED display1
OFF
Yellow
OFF
Yellow
Red
OFF
Logical value
0
1
Voltage at output
0V
24 V
LED display
OFF
Yellow
Output
4.2.6.2 Sensor power supply
Sensors can be supplied via pin 1 (+24V) and pin 3 (0V) of the M12 sockets. A re-settable PTC per M12
socket protects the sensor supply. The max. current draw for sensor power supply is 200 mA for each
M12 socket. Please note the following derating diagram.
Derating sensor power supply
250
200
150
I / mA
100
50
0
0
10
20
30
40
50
60
T / °C
1
If a channel-related diagnosis is active, the LED assigned to this channel will light up red.
V 1.0
21
MVK-MI User’s Manual
4.2.6.3 Actuators
Each output can be loaded to a maximum of 1.6 A.
Maximum output current per port 3,2A (each 1,6A) <= 40°C room temperature.
Maximum output current per port 2,8A (each 1,6A) <= 55°C room temperature.
Attention:
The sum current may not exceed 9 A due to the maximum current carrying capacity of
the power connector.
When routing the actuator power supply forward, please assure that the sum current
of all modules does not exceed 9 A.
Attention:
Reverse polarity of the actuator power can damage the module!
Attention:
The module may heat, depending on the load!
If an overload or short-circuit occurs at an output, that output will be disabled. This
output will remain disabled even when the error has been corrected. In order to reset
the short-circuit memory, the output must be switched off at the control.
Targeting a fast short circuit shutdown time is recommended to not exceed the following cable lengths:
max 15m incoming cable 1,5mm² and max 1,5m actuator cable 0,75 mm²
max 10m incoming cable 1,5mm² and max 3m actuator cable 0,75 mm²
22
V 1.0
MVK-MI User’s Manual
4.2.6.4 Diagnosis input
Pin 2 of the M12 socket can be parametered as a diagnosis input on all modules. If a 0 volt signal is
present at a diagnosis input, it will be inversely displayed in the process map. At the same time, the
Interbus diagnosis will issue a channel-specific diagnostic message.
4.2.6.4.1 Examples of using the diagnosis function at Pin 2
When Pin 2 is parametered as a diagnosis input, it always responds as an inverted input. This means that
in the case of 0 V -> logic “1“ the assigned LED will light up red. This allows external device errors to be
displayed at the MVK-MI. Several possible examples are presented below.
4.2.6.4.1.1 Connecting sensors and actuators with diagnosis output
For this example, assume that a sensor or actuator with a diagnosis output is being used. This diagnostic
signal can also be evaluated with a conventional I/O system. It can be processed and displayed in the
control.
However, you have no visual error display near the defective sensor which, moreover, is probably also
mounted in a non-visible location. The optical display at the M12 socket of the MVK-MI facilitates exact
on-site location of the error.
M12 Socket
1 (+)
2 Diagnosis
3 (-)
DESINA Sensor
4 (S)
Detection of:
♦
Front surface damage
♦
Defective electronics
♦
Open-Load
4.2.6.4.1.2 Cable breakage monitoring
With the M12 diagnostic adapter, Murrelektronik GmbH offers a simple tool for monitoring the M12 cables
to the sensors or actuators for cable breakage.
M12 Socket
1 (+) M12 Adapter with socket 1 (+)
2 Diagnosis
V 1.0
3 (-)
3 (-)
4 (S)
4 (S)
Sensor
23
MVK-MI User’s Manual
4.3 Installation
Modules of the MVK-MI series can be attached directly to an installation panel or to a machine. The
module features two mounting holes for this purpose.
Before attaching the module, it must be assured that the mounting surface is smooth and flat to prevent
mechanical stress in the module housing.
Two mounting screws 6 mm in diameter and two lock washers DIN 433 T1/T2 are needed for attachment.
The tightening torque is 9 Nm.
63 +/-0,5
225 +/-0,5
208,5 +/-0,5
22,5
20,5
39 +/-0,5
♦
24
Fig. 4-7: Attachment dimensions
V 1.0
MVK-MI User’s Manual
4.4
Installation clearance
For adequate installation and improved heat dissipation we recommend that the
assembly of MVK MI be kept at a minimum distance of 3 mm to keep.
3
3
7
7
2
2
6
6
1
1
5
5
0
0
4
4
3mm
♦
Fig. 4-8: Installation clearance
V 1.0
25
MVK-MI User’s Manual
4.5
Electromagnetic compatibility (EEC)
This device complies with EC directives 89/336/EWG
“Electromagnetic compatibility“
Warning!
This is Class A equipment. Installation in residential areas can result in radio
interference; in such cases, the operator / owner can be required to take appropriate
counter measures.
This can result in damage to the module.
The devices described in this user’s manual already conform to relevant EMC standards. Despite this,
however, it must not be assumed that their electromagnetic compatibility in an installation is guaranteed.
The user is therefore strongly advised to adhere to the following information on EMC-suitable installation.
Only under these conditions and the exclusive use of CE rated components can compliance with EMC
requirements be assumed for the total system.
Responsibility for compliance with EMC regulations rests entirely with the system manufacturer.
4.5.1
Protection against electrostatic discharge
The products described in this manual contain complex semi-conductor components that can be
damaged or destroyed through electrostatic discharge (ESD). Damage does not necessarily lead to an
immediately detectable failure or malfunction. This can also occur with delay or sporadically.
When handling the devices, please observe the generally familiar safety measures for handling ESDsensitive equipment. The following deserves special attention:
Attention:
Connectors must never be pulled or plugged in while the equipment is under power.
Personnel entrusted with the installation must be electrostatically discharged prior to
handling the equipment. This can be accomplished by either touching a grounded
part of the installation or by wearing a correctly grounded ESD wrist strap.
26
V 1.0
MVK-MI User’s Manual
4.5.2
Grounding
A short, low impedance connection between the grounding terminal and ground is needed in order to
draw off interference voltages occurring between the device and ground. The inductivity of conventional
PE cables is a source of high impedance for high frequency interference voltages. For this reason the use
of grounding strips is preferred. If this is not possible use fine-stranded PE cable of large cross-section
and keep the distance to earth as short as possible.
4.5.3
Cable routing
Non-compliance with elementary rules of cable routing is a common cause of EMC problems!
The Interbus data cable must be kept as far away as possible from power cables.
A minimum distance of 10 mm must be observed.
Data cables and power cables should cross each other only at right angles.
It is recommended to lay data and power cables in separate, screened troughs.
Potential interference from other devices or cables must also be taken into consideration in cable
routing. The greatest possible distance must be maintained especially from frequency converters,
motor cables and other devices or cables emitting high frequency interference.
4.5.4
Voltage drops
The electronics power supply is buffered by integrated capacitors so that short-term voltage drops will not
usually affect normal operation. This does not apply to the actuator power supply as their high power
requirements cannot be buffered with integrated capacitors. Even short-term actuator power interruptions
can therefore result in undesired switching operations.
Thanks to the integrated input filters, interruption of the sensor supply voltage < 1 ms does not result in
any change to the input status reported to the Interbus Master. Lengthier sensor supply interruptions,
however, can lead to input signal changes.
V 1.0
27
MVK-MI User’s Manual
4.5.5
Inductive load interference suppression
The outputs of the devices described in this manual feature an integrated surge protection circuit against
the interference voltage that arises when inductive devices are switched.
SM6T36CA
Bipolar suppressor diode
36V, 0.6 kW
Inductive load
(e.g. solenoid valve)
The suppressor diode assures rapid reduction of the energy stored in the inductive load magnetic field.
Unlike varistors, safety circuits with suppressor diodes offer two important advantages:
No aging
Rapid reaction response
The high voltages that occur when switching OFF inductive loads result in potent fields in the cables
which in turn may cause interference in neighboring circuits or devices. For this reason we recommend
using additional load-drain circuits when there is a greater distance between module output and load or
when other factors are involved. This has the effect that the voltage peaks induced by the inductive load
are drained at source.
Murrelektronik GmbH offers an extensive array of interference suppression products
for this purpose.
4.5.6
Limits and what can still be done...
As the EMC within the system is also influenced by the products of other manufacturers, it is conceivable
that there will be system configurations where interference emission and noise immunity requirements
can be met only through additional efforts or not at all.
Line filters are suitable for reducing power related interference.
Various manufacturers offer fiber optic converters. Data transmission through fiber optic cables is less
sensitive to EMC interference. This does not, however, apply to the electronics required for the
conversion. Fiber optics cannot therefore solve all EMC related problems.
Should you have any further questions regarding EMC or require advice on fulfilling
the EMC directives in your installation, please contact our accredited test center.
MURRELEKTRONIK Test Center
Grabenstr. 27
D-71 570 Oppenweiler
Tel.:07191 / 47 – 320
Fax:
07191 / 47 – 323
[email protected]
28
V 1.0
MVK-MI User’s Manual
5
Diagnosis displays
Diagnostic information is an important prerequisite for easy setup and quick troubleshooting.
UL
♦
RC
BA
RD
UA
UA S
Fig. 5-1: MVK-MI module diagnosis displays
Errors can be quickly identified and rectified through clear information regarding the field bus system, the
I/O module and connected peripheral components such as sensors and actuators. This minimizes
downtimes.
All MVK-MI series modules feature separate, clearly arranged displays for bus status, device status and
I/O status. These displays are located on the front of the module-housing.
5.1
Bus / Device status displays
The LED’s on the face of the module are marked for clear information identification and represent a static
status LED display.
LED
UL
RC
BA
RD
US
Color
Green
Green
Yellow
Green
Status
On
On
On
On
On
Description
Power supply for module electronics is connected
The incoming remote bus connection is O.K. ( Remote Bus Check)
Data transmission with the master is active (Bus Active)
Downstream field bus disconnected (Remote Bus Disabled)
Power supply for sensors is connected and over 18V
UAL
Red
Green
On
Power supply for sensors is under 18V
Power supply for left actuators is connected and over 18V
UAR
Red
Green
On
Power supply for actuators is under 18V
Power supply for right actuators is connected and over 18V
Red
♦
Power supply for right actuators is under 18V
Table 5-1 : Bus-/Device – Status display
V 1.0
29
MVK-MI User’s Manual
6
Interbus word structure
When using the following table please keep in mind that the MVK-MI system transmits two words. Each
word contains two bytes arranged in the Big-Endian format (higher value byte first).
When using the CMD software, simply orient yourself on the third column “Byte” in the following table.
This represents the structure as displayed in the process data monitor.
MVK-MI DI8(DI8) Art.Nr. 55294
Word
Bit
8
9
10
11
12
13
14
15
0
1
2
3
4
5
6
7
Bit
8
9
10
11
12
13
14
15
0
1
2
3
4
5
6
7
Word 1
Byte 0
Byte 1
Byte
Byte 2
Word
Byte
Byte 3
Word 0
6.1
Bit
0
1
2
3
4
5
6
7
0
1
2
3
4
5
6
7
Bit
0
1
2
3
4
5
6
7
0
1
2
3
4
5
6
7
ID-Code
Length code
Input address space
Output address space
Parameter channel (PCP)
Register length (Bus)
30
Input
Channel 00 (Socket 0 / Pin 4)
Channel 01 (Socket 1 / Pin 4)
Channel 02 (Socket 2 / Pin 4)
Channel 03 (Socket 3 / Pin 4)
Channel 04 (Socket 4 / Pin 4)
Channel 05 (Socket 5 / Pin 4)
Channel 06 (Socket 6 / Pin 4)
Channel 07 (Socket 7 / Pin 4)
Channel 10 (Socket 0 / Pin 2)
Channel 11 (Socket 1 / Pin 2)
Channel 12 (Socket 2 / Pin 2)
Channel 13 (Socket 3 / Pin 2)
Channel 14 (Socket 4 / Pin 2)
Channel 15 (Socket 5 / Pin 2)
Channel 16 (Socket 6 / Pin 2)
Channel 17 (Socket 7 / Pin 2)
Output
reserved (default=0)
reserved (default=0)
reserved (default=0)
reserved (default=0)
reserved (default=0)
reserved (default=0)
reserved (default=0)
reserved (default=0)
reserved (default=0)
reserved (default=0)
reserved (default=0)
reserved (default=0)
reserved (default=0)
reserved (default=0)
reserved (default=0)
reserved (default=0)
Undervoltage USensor
Undervoltage UActuator,0..3
Undervoltage UActuator,4..7
Sensor supply short circuit
reserved
reserved
reserved
reserved
Periphery error Socket 0
Periphery error Socket 1
Periphery error Socket 2
Periphery error Socket 3
Periphery error Socket 4
Periphery error Socket 5
Periphery error Socket 6
Periphery error Socket 7
reserved (default=0)
reserved (default=0)
reserved (default=0)
reserved (default=0)
reserved (default=0)
reserved (default=0)
reserved (default=0)
reserved (default=0)
Channel 10 Diagnose (0) / Input (1)
Channel 11 Diagnose (0) / Input (1)
Channel 12 Diagnose (0) / Input (1)
Channel 13 Diagnose (0) / Input (1)
Channel 14 Diagnose (0) / Input (1)
Channel 15 Diagnose (0) / Input (1)
Channel 16 Diagnose (0) / Input (1)
Channel 17 Diagnose (0) / Input (1)
03hex (03dec)
02hex (02dec)
4 bytes
4 bytes
0 bytes
4 byte
V 1.0
MVK-MI User’s Manual
MVK-MI DIO8(DIO8) Art.Nr. 55295
Word
Bit
8
9
10
11
12
13
14
15
0
1
2
3
4
5
6
7
Bit
8
9
10
11
12
13
14
15
0
1
2
3
4
5
6
7
Word 1
Byte 0
Byte 1
Byte
Byte 2
Word
Byte
Byte 3
Word 0
6.2
Bit
0
1
2
3
4
5
6
7
0
1
2
3
4
5
6
7
Bit
0
1
2
3
4
5
6
7
0
1
2
3
4
5
6
7
ID-Code
Length code
Input address space
Output address space
Parameter channel (PCP)
Register length (Bus)
Input
Channel 00 (Socket 0 / Pin 4)
Channel 01 (Socket 1 / Pin 4)
Channel 02 (Socket 2 / Pin 4)
Channel 03 (Socket 3 / Pin 4)
Channel 04 (Socket 4 / Pin 4)
Channel 05 (Socket 5 / Pin 4)
Channel 06 (Socket 6 / Pin 4)
Channel 07 (Socket 7 / Pin 4)
Channel 10 (Socket 0 / Pin 2)
Channel 11 (Socket 1 / Pin 2)
Channel 12 (Socket 2 / Pin 2)
Channel 13 (Socket 3 / Pin 2)
Channel 14 (Socket 4 / Pin 2)
Channel 15 (Socket 5 / Pin 2)
Channel 16 (Socket 6 / Pin 2)
Channel 17 (Socket 7 / Pin 2)
Output
Channel 00 (Socket 0 / Pin 4)
Channel 01 (Socket 1 / Pin 4)
Channel 02 (Socket 2 / Pin 4)
Channel 03 (Socket 3 / Pin 4)
Channel 04 (Socket 4 / Pin 4)
Channel 05 (Socket 5 / Pin 4)
Channel 06 (Socket 6 / Pin 4)
Channel 07 (Socket 7 / Pin 4)
reserved (default=0)
reserved (default=0)
reserved (default=0)
reserved (default=0)
reserved (default=0)
reserved (default=0)
reserved (default=0)
reserved (default=0)
Undervoltage USensor
Undervoltage e UActuator,0..3
Undervoltage UActuator,4..7
Sensor supply short circuit
Actuator disable Socket 0..3
Actuator disable Socket 4..7
Actuator warning
reserved
Periphery error Socket 0
Periphery error Socket 1
Periphery error Socket 2
Periphery error Socket 3
Periphery error Socket 4
Periphery error Socket 5
Periphery error Socket 6
Periphery error Socket 7
reserved (default=0)
reserved (default=0)
reserved (default=0)
reserved (default=0)
reserved (default=0)
reserved (default=0)
reserved (default=0)
reserved (default=0)
Channel 10 Diagnose (0) / Input (1)
Channel 11 Diagnose (0) / Input (1)
Channel 12 Diagnose (0) / Input (1)
Channel 13 Diagnose (0) / Input (1)
Channel 14 Diagnose (0) / Input (1)
Channel 15 Diagnose (0) / Input (1)
Channel 16 Diagnose (0) / Input (1)
Channel 17 Diagnose (0) / Input (1)
03hex (03dec)
02hex (02dec)
4 bytes
4 bytes
0 bytes
4 bytes
The output status is not reported back via the input word!
Parameterization between input and output takes place implicitly through description
of the output bit (Word 0). If an output is not set, this means that parameterization as
an input has been made.
V 1.0
31
MVK-MI User’s Manual
MVK-MI DIO8(DIO8) Art.Nr. 55296
Word
Bit
8
9
10
11
12
13
14
15
0
1
2
3
4
5
6
7
Bit
8
9
10
11
12
13
14
15
0
1
2
3
4
5
6
7
Word 1
Byte 0
Byte 1
Byte
Byte 2
Word
Byte
Byte 3
Word 0
6.3
Bit
0
1
2
3
4
5
6
7
0
1
2
3
4
5
6
7
Bit
0
1
2
3
4
5
6
7
0
1
2
3
4
5
6
7
ID-Code
Length code
Input address space
Output address space
Parameter channel (PCP)
Register length (Bus)
Input
Channel 00 (Socket 0 / Pin 4)
Channel 01 (Socket 1 / Pin 4)
Channel 02 (Socket 2 / Pin 4)
Channel 03 (Socket 3 / Pin 4)
Channel 04 (Socket 4 / Pin 4)
Channel 05 (Socket 5 / Pin 4)
Channel 06 (Socket 6 / Pin 4)
Channel 07 (Socket 7 / Pin 4)
Channel 10 (Socket 0 / Pin 2)
Channel 11 (Socket 1 / Pin 2)
Channel 12 (Socket 2 / Pin 2)
Channel 13 (Socket 3 / Pin 2)
Channel 14 (Socket 4 / Pin 2)
Channel 15 (Socket 5 / Pin 2)
Channel 16 (Socket 6 / Pin 2)
Channel 17 (Socket 7 / Pin 2)
Output
Channel 00 (Socket 0 / Pin 4)
Channel 01 (Socket 1 / Pin 4)
Channel 02 (Socket 2 / Pin 4)
Channel 03 (Socket 3 / Pin 4)
Channel 04 (Socket 4 / Pin 4)
Channel 05 (Socket 5 / Pin 4)
Channel 06 (Socket 6 / Pin 4)
Channel 07 (Socket 7 / Pin 4)
Channel 10 (Socket 0 / Pin 2)
Channel 11 (Socket 1 / Pin 2)
Channel 12 (Socket 2 / Pin 2)
Channel 13 (Socket 3 / Pin 2)
Channel 14 (Socket 4 / Pin 2)
Channel 15 (Socket 5 / Pin 2)
Channel 16 (Socket 6 / Pin 2)
Channel 17 (Socket 7 / Pin 2)
Undervoltage USensor
Undervoltage UActuator,0..3
Undervoltage UActuator,4..7
Sensor supply short circuit
Actuator disable Socket 0..3
Actuator disable Socket 4..7
reserved
reserved
Periphery error Socket 0
Periphery error Socket 1
Periphery error Socket 2
Periphery error Socket 3
Periphery error Socket 4
Periphery error Socket 5
Periphery error Socket 6
Periphery error Socket 7
reserved (default=0)
reserved (default=0)
reserved (default=0)
reserved (default=0)
reserved (default=0)
reserved (default=0)
reserved (default=0)
reserved (default=0)
Channel 10 Diagnose (0) or E/A (1)
Channel 11 Diagnose (0) or E/A (1)
Channel 12 Diagnose (0) or E/A (1)
Channel 13 Diagnose (0) or E/A (1)
Channel 14 Diagnose (0) or E/A (1)
Channel 15 Diagnose (0) or E/A (1)
Channel 16 Diagnose (0) or E/A (1)
Channel 17 Diagnose (0) or E/A (1)
03hex (03dec)
02hex (02dec)
4 bytes
4 bytes
0 bytes
4 bytes
The output status is not reported back via the input word!
Parameterization between input and output takes place implicitly through description
of the output bit (Word 0). If an output is not set, this means that parameterization as
an input has been made.
32
V 1.0
MVK-MI User’s Manual
7
Parameterization
Parameterization of the MVK-MI is accomplished via cyclical user data exchange. The parameter data is
transferred together with the output data. The PCP2 channel is not supported. Devices with PCP support
can, however, be operated together with the MVK-MI system on a common Interbus line.
7.1
Parameterization of Pin 2 as an input or diagnosis input
Parameter
Channel 1x Input / Diagnose
Values
0
1
Significance
Diagnosis
Input
Pin 2 parameterized as a diagnosis input
Power at Pin 2
0V
LED 10..17
Red
Interbus data
1
24 V
OFF
0
Interpretation
Desina-Diagnosis /
External error /
cable breakage
No error / OK
LED 10..17
OFF
Yellow
Interbus data
0
1
Interpretation
-
Pin 2 parameterized as an input
Power at Pin 2
0V
24 V
7.2
Implicit parameterization as a digital input or digital output
Every M12 socket has two pins that can be used either for input or output signals. The use of pin 2 and/or
pin 4 of the M12 socket can be determined by describing the outputs.
16 channels (pin 2 / pin 4) are available on eight M12 socket connectors. Each of these channels can be
independently defined to function as either an input or an output. For Pin 2, you can additionally define
whether that channel should function as a digital input or as a diagnosis input.
By setting the corresponding bit at the output, the respective pin will be seen as an output and issue 24V.
The voltage at the output is, at the same time, read in by the module and reported in Interbus word 0.
When the output at the same bit is now set to 0, the actual voltage at the pin is still measured and
reported via Interbus word 0. If a signal coming from a sensor is present at this pin, its status (“0” or “1”) is
reported.
2
Peripherals Communication Protocol
V 1.0
33
MVK-MI User’s Manual
8
Technical data
8.1 Mechanical data
8.1.1
DI8(DI8) Art.Nr. 55 294, DIO8(DI8) Art.Nr. 55 295, DIO8(DIO8) Art.Nr. 55 296
Technical data
Ambient conditions
Operating temperature
Storage temperature
Flammability classification
Chemical and oil resistance
Materials
Housing
Contact mount M12
Contact mount 7/8“
Contact
O-Ring M12
O-Ring 7/8“
Luminous comb + ring
Mechanical data
Insertion force / contact
Withdrawal force / contact
Plugging cycles / contact
Enclosure type EN 60629
Vibration, sine shaped
EN 60068-2-6
Shock, half-sine shaped
Design information
Dimensions (LxWxH)
Mounting clearance
Weight
Torques
Round connector M12
Mounting screws M6
Connection possibilities
Supply cables
Profibus
I/O cables
*
DI8(DI8)
Art.Nr. 55 294
DIO8(DI8)
Art.Nr. 55 295
DIO8(DIO8)
Art.r. 55 296
0°C...55°C
-25°C...75°C
UL 94 V0
Good chemical and oil resistance. When using aggressive mediums, material resistance based on
application must be checked.
Zinc die cast, matt nickel coated
SPS (UL94 V0), black
TPE PA 6.6 (UL94 V2), black
CuZn, nickel and gold plated
Viton, green
NBR, black
PC
≥ 0.4 N
≤ 50
IP 67 (only when plugged and screwed down)
Floating sine 10 to 60 Hz: Amplitude 0.35 mm
Floating sine 60 to 500 Hz: Acceleration 15 g
Shock duration 11 ms
Shock acceleration 50 g
*
*
208.5 ±0.5 mm
ca. 735 g
220 x 63 x 48 mm
0.6 Nm
9 Nm
M12 connectors (B-coded) 5-pin
8 x M12 round connectors (A-coded) 5-pin
Validated with vibration 20g according to EN 60068-2-27 and shock 80g according to MIL STD-800
V 1.0
35
MVK-MI User’s Manual
8.2
Electrical data
Technical data
DI8(DI8)
Art.Nr. 55 294
DIO8(DI8)
Art.Nr. 55 295
16
-
16
8
Max. number of inputs
Max. number of outputs
Operating voltage
Current consumption
Sensor supply
Max. current
Overload/Short circuit
Fuse
max. 200 mA per M12 socket
Multi-fuse (PTC)
<= 100 mA
Automatic re-start
(For each M12 socket)
> 100 mA
Reset required
Trip time 1 s at Ik >= 1 A und 23°C ambient temperature
Yes
No
No
-
1.6 A
9A
Yes (Suppressor diode)
0.75 mm²
0.34 mm²
Max. 1.5 mm²
2 to 5 ms
20 Hz
Conductor cross section
Signal delay
Max. switch frequency at
inductive load
Max. lamp load
Profibus
Supported Baud rates
Protocol
Operating modes
Id. number
Profibus address
3
Max. 10 m
Max. 5 m
IEC 1131-2, Type 2
approx. 1 ms
2 to 5 ms
Yes (suppressor diode)
EN 61000-4-2 ESD
EN 61000-4-3 RF-field
EN 50204 RF-field GSM
EN 61000-4-4 Burst
EN 61000-4-5 Surge
EN 61000-4-6 RF-asymmetric
EN 61000-4-8 Magnetic field 50 Hz
EN 50081-1 Interference strength
Insulation
Rated voltage
Test voltage
Insulation resistance
Volume resistance
1.6 A
9A
10 W
Inputs
Input characteristic curve
Input filter
Signal delay
Overvoltage protection
EMC
EN 50082 / EN 50081
3
16
3
16
24V DC ± 25%
<150 mA
Reverse polarity protection
- Module electronics
- Sensors
- Actuators
Outputs
Rated current
Max. sum current
Overvoltage protection
Cable length
3
DIO8(DIO8)
Art.r. 55 296
Contact ± 4 kV ; Air ± 8 kV
10 V/m
10 V/m
± 2 kV
Asym./sym. ± 0.5 kV DC line input
Asym. ± 1 kV Signal connections
10 V
30 A/m
QP 40 dBµV/m (30-230 MHz)
QP 47 dBµV/m (230-1000 MHz)
DIN VDE 0160
IEC 60664-1
IEC 60512-2
≤ 5 mΩ
9.6 / 19.2 / 45.45 / 93.75 / 187.5 / 500 / 1500 / 3000 / 6000 / 12000 kBaud
Profibus DP according to IEC 61158
Sync-Mode and Freeze-Mode are supported
064A hex
1 – 99 selectable via BCD rotary switch
Depending on parameterization. The sum of inputs and outputs is always 16.
36
V 1.0
MVK-MI User’s Manual
9
Accessories
Art. No.
55 294
55 295
55 296
Description
MVK-MI DI8 (DI8)
MVK-MI DIO8 (DI8)
MVK-MI DIO8 (DIO8)
55 468
33 8155
33 8008
M12 blind plugs, black (set of 4)
M12 diagnosis blind plugs, black (1 x)
M12 diagnosis adapter
55 771
Interbus remote bus cable (per meter)
55 387
MVK-MI Manual (German/English/French)
55387_hdb_e_10.doc
V 1.0
37
MVK-MI User’s Manual
10
Description of terms
Actuator disable
If an output driver is overloaded or has a short-circuit, it is
disabled by an integrated thermal monitor. The software of the
MVK-MI prevents the output driver from being reactivated
automatically after cooling down. Otherwise, the output driver
would be switched on/off alternately in the case of overload or
short circuit. No defined response would be possible. During an
overload or short circuit, therefore, the output driver is switched
permanently off until the user process resets the output. This
deletes the short-circuit memory.
Sensor supply short circuit
The sensor power supply of each M12 socket is individually
protected by means of a 200 mA Multi-fuse. A short circuit or
overload in the sensor supply of one M12 socket therefore does
not affect the sensors or module electronics supplied through
other M12 sockets.
Periphery error
Error message relating to individual M12 sockets; this message
combines the individual errors “actuator disable” and “sensor
supply short circuit”. Pin 2 diagnosis according to DESINA is NOT
included in the periphery error but is separately transferred in the
input data for pin 2.
Pin 2 diagnosis
The diagnosis output of an intelligent sensor or actuator can be
connected to pin 2. An “OK” status is always assigned to status
“1” (24 V), as this is the only way breakage of a diagnostic signal
cable can be recognized as an error. The diagnosis input inverts
the signal and indicates the error condition via a red LED at the
M12 socket.
38
V 1.0