1
Sidekick II Signature Series
Model # SK2-SS
(418 MHz Receiver)
Setup and Operation:
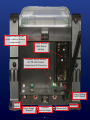
1. Plug the power supply pin jack into the connector located next to the Power ON/OFF switch on the
back of the receiver. (see page 6 for diagram) Plug power supply into a wall electrical outlet.
Battery Back-up Installation Instructions
Your Sidekick II Signature Series Receiver comes with the battery back-up pre-installed at the factory. In the event that you need to re-install the battery pack, follow the instructions below.
The battery compartment door is secured by one screw. To gain access to the battery compartment remove the screw (pg 6). Plug the female connector from the battery pack onto the male
connector pin in the battery compartment. Be sure to line up the pins with the holes in the connector. It will only fit one way. Replace the battery compartment door and secure the screw.
You will notice and On/Off switch on the right hand bottom corner of the battery compartment
door (see pg 6). With the battery back-up installed and the back-up switch turn to the “ON” position, the Sidekick II’s blue light (AC power indicator) will turn to an amber color when the unit
goes into battery back-up mode because of a power failure. Turning the battery back-up power
switch to “OFF” will turn off the battery back-up to the receiver and the clock. It is important
that the battery back-up feature be turned “ON” for proper operation.
The Ni-Cad battery is intended to keep the Sidekick II operational during a short term power
outage for several hours without the strobe or vibrator operating. If both strobe and vibrator are
operating, the battery back-up will operate the system for approximately 10 minutes. The battery
back-up is automatically being charged when the Sidekick II power supply is plugged into a standard electrical wall outlet.
The BATTERY ICON will display itself on the LCD screen once the battery back-up level has
reached 2/3 of its discharge. However, the BATTERY ICON will not be displayed until this condition is reached. When the Amber LED is on but the BATTERY ICON is not displayed on the
screen, this means that the battery is at a full or close to full charge.
2. Turn the Power ON by sliding the ON/OFF SWITCH on the back of the receiver to the ON position.
The front panel display will show the time 11:59AM. A blue light will be visible from the Strobe lens.
The blue light indicates that the unit’s AC power is on. An amber light will appear if the unit is in battery backup mode. (If your unit is equipped with a battery back-up.)
3